
1. Before you begin
In this codelab you learn how to implement Sign in with Google on Android using Credential Manager.
Prerequisites
- Basic understanding of using Kotlin for Android development
- Basic understanding of Jetpack Compose (More info can be found here)
What you'll learn
- How to create a Google Cloud Project
- How to create OAuth clients in the Google Cloud Console
- How to implement Sign in With Google using the Bottom Sheet flow
- How to implement Sign in With Google using the Button flow
What you need
- Android Studio (Download here)
- A computer that meets the Android Studio system requirements
- A computer that meets the Android Emulator system requirements
2. Create an Android Studio project
Duration 3:00 - 5:00
To get started, we need to create a new project in Android Studio:
- Open Android Studio
- Click New Project

- Select Phone and Tablet and Empty Activity

- Click Next
- Now it's time to set up a few pieces of the project:
- Name: this is the name of your project
- Package name: this will be auto populated based on your project name
- Save location: this should default to the folder that Android Studio saves your projects in. You can change this to where ever you'd like.
- Minimum SDK: This is the lowest version of the Android SDK that your app is built to run on. In this CodeLab, we will be using API 36 (Baklava)

- Click Finish
- Android Studio will create the project and download any necessary dependencies for the base application, this can take several minutes. To see this happen, just click the build icon:

- Once that has completed, Android Studio should look similar to this:

3. Set up your Google Cloud project
Create a Google Cloud project
- Go to the Google Cloud Console
- Open your project or create a new project


- Click APIs & Services

- Go to OAuth consent screen

- You'll have to fill in the fields in Overview to continue. Click Get started to start filling out this information:

- App Name: Name of this app, which should be the same as what you used when creating the project in Android Studio
- User Support Email: This will show the Google Account your are login in with and any Google Groups you manage

- Audience:
- Internal for an app used only within your organization. If you don't have an organization associated to the Google Cloud Project then you won't be able to select this.
- External will be what we are using.

- Contact Info: This can have any email that you want to be the point of contact for the application

- Review Google API Services: User Data Policy.
- Once you have reviewing and agreeing to the User Data Policy, click Create

Set up OAuth clients
Now that we have a Google Cloud Project set up, we need to add a Web Client and Android Client so that we can make API calls to the OAuth backend server with their client IDs.
For the Android Web Client, you'll need:
- Your app's package name (eg. com.example.example)
- Your app's SHA-1 signature
- What is a SHA-1 Signature?
- The SHA-1 fingerprint is a cryptographic hash that's generated from your app's signing key. It facts as a unique identifier for your specific app's signing certificate. Think of it like a digital "signature" for your app.
- Why do we need the SHA-1 signature?
- The SHA-1 fingerprint ensures that only your app, signed with your specific signing key, can request access tokens using your OAuth 2.0 client ID, preventing other apps (even those with the same package name) from accessing your project's resources and user data.
- Think of it like this:
- Your app's signing key is like the physical key to your app's "door." It's what allows access to the app's inner workings.
- The SHA-1 fingerprint is like a unique keycard ID that's linked to your physical key. It's a specific code that identifies that particular key.
- The OAuth 2.0 client ID is like a entry code to a specific Google resource or service (e.g. Google Sign-in).
- When you provide the SHA-1 fingerprint during OAuth client setup, you're essentially telling Google: "Only the keycard with this specific ID (SHA-1) can open this access code (client ID)." This makes sure only your app can access the Google services linked to that entry code."
- What is a SHA-1 Signature?
For the Web Client, all we need is the name that you want to use for identifying the client in the console.
Create Android OAuth 2.0 client
- Go to the Clients page

- Click Create Client

- Select Android for the Application type
- You will need to specify your app's package name
- From Android Studio we will need to get our app's SHA-1 signature and copy/paste it into here:
- Go to Android Studio and open the terminal
- Run this command:
keytool -list -v -keystore ~/.android/debug.keystore -alias androiddebugkey -storepass android -keypass android
-list: This option tells keytool to list the contents of the keystore.-v: This option enables verbose output, providing more detailed information about the entry.-keystore ~/.android/debug.keystore: This specifies the path to the keystore file.-alias androiddebugkey: This specifies the alias (entry name) of the key you want to inspect.-storepass android: This provides the password for the keystore file.-keypass android: This provides the password for the private key of the specified alias.
- Copy the value of the SHA-1 signature:

- Go back to the Google Cloud window and paste in the SHA-1 signature value:
- Your screen should now look similar to this, and you can click Create:


Create web OAuth 2.0 client
- To create a Web application client ID, repeat steps 1-2 from the Create Android Client section and select Web Application for the Application Type
- Give the client a name (this will be the OAuth Client):

- Click Create

- Go ahead and copy the client ID from the popup window, you'll need this later

Now that we have our OAuth Clients all set up, we can return to Android Studio make our Sign in With Google Android app!
4. Set Up Android Virtual Device
For rapid testing of your application without a physical Android device, you will want to create an Android Virtual Device that you can build and immediately run your app on from Android Studio. If you want to test with a physical Android device, you can follow the instructions from the Android devloper documentation
Create an Android Virtual Device
- In Android Studio, open up the Device Manager

- Click the + button > Create Virtual Device

- From here you can add any device that you need for your project. For the purposes of this Codelab, select Medium Phone then click Next

- Now you can configure the device for your project by giving it a unique name, choosing the version of Android that the device will run and more. Make sure that the API is set to API 36 "Baklava"; Android 16 then click Finish

- You should see the new device show up in the Device Manager. To verify that the device runs, go ahead and click
 next to the device you just created
 - The device should be running now!

Sign into the Android Virtual Device
The device that you just created works, now to prevent errors when testing Sign in With Google we will need to sign in to the device with a Google Account.
- Go to Settings:
- Click the center of the screen on the virtual device and swipe up

- Look for the Settings app and click it

- Click Google in Settings

- Click Sign in and follow the prompts to sign in to your Google Account

- You should now be signed in on the device

Your Virtual Android Device is now ready for testing!
5. Add dependencies
Duration 5:00
In order to make OAuth API calls, we need to first integrate the needed libraries that allow us to make authentitcation requests and use Google IDs to make those requests:
- libs.googleid
- libs.play.services.auth
- Go to File > Project Structure:

- Then go to Dependencies > app > '+' > Library Dependency

- Now we need to add our libraries:
- In the search dialog, type in googleid and click Search
- There should only be one entry, go ahead and select it and the highest version available (At the time of this Codelab itis 1.1.1)
- Click OK

- Repeat steps 1-3 but search in instead for "play-services-auth" and select the line with "com.google.android.gms" as the Group ID and "play-services-auth" as the Artifact Name

- Click OK

6. Bottom sheet flow
The bottom sheet flow leverages the Credential Manager API for a streamlined way for users to sign in to your app using their Google accounts on Android. It's designed to be quick and convenient, especially for returning users. This flow should be triggered on app launch.
Build the sign-in request
- To get started, go ahead and remove the
Greeting()andGreetingPreview()functions from theMainActivity.kt, we won't need them. - Now we will need to make sure that the packages we need are imported for this project. Go ahead and add the following
importstatements after the existing ones starting on line 3::import android.content.ContentValues.TAG import android.content.Context import android.credentials.GetCredentialException import android.os.Build import android.util.Log import android.widget.Toast import androidx.annotation.RequiresApi import androidx.compose.foundation.clickable import androidx.compose.foundation.Image import androidx.compose.foundation.layout.Arrangement import androidx.compose.foundation.layout.Column import androidx.compose.material3.MaterialTheme import androidx.compose.material3.Surface import androidx.compose.runtime.rememberCoroutineScope import androidx.compose.ui.Alignment import androidx.compose.ui.platform.LocalContext import androidx.compose.ui.res.painterResource import androidx.credentials.CredentialManager import androidx.credentials.exceptions.GetCredentialCancellationException import androidx.credentials.exceptions.GetCredentialCustomException import androidx.credentials.exceptions.NoCredentialException import androidx.credentials.GetCredentialRequest import com.google.android.libraries.identity.googleid.GetGoogleIdOption import com.google.android.libraries.identity.googleid.GetSignInWithGoogleOption import com.google.android.libraries.identity.googleid.GoogleIdTokenParsingException import java.security.SecureRandom import java.util.Base64 import kotlinx.coroutines.CoroutineScope import androidx.compose.runtime.LaunchedEffect import kotlinx.coroutines.delay import kotlinx.coroutines.launch - Next, we have to create our function for building out the Bottom Sheet request. Paste this code in below the MainActivity Class
//This line is not needed for the project to build, but you will see errors if it is not present.
//This code will not work on Android versions < UpsideDownCake
@RequiresApi(Build.VERSION_CODES.UPSIDE_DOWN_CAKE)
@Composable
fun BottomSheet(webClientId: String) {
val context = LocalContext.current
// LaunchedEffect is used to run a suspend function when the composable is first launched.
LaunchedEffect(Unit) {
// Create a Google ID option with filtering by authorized accounts enabled.
val googleIdOption: GetGoogleIdOption = GetGoogleIdOption.Builder()
.setFilterByAuthorizedAccounts(true)
.setServerClientId(webClientId)
.setNonce(generateSecureRandomNonce())
.build()
// Create a credential request with the Google ID option.
val request: GetCredentialRequest = GetCredentialRequest.Builder()
.addCredentialOption(googleIdOption)
.build()
// Attempt to sign in with the created request using an authorized account
val e = signIn(request, context)
// If the sign-in fails with NoCredentialException, there are no authorized accounts.
// In this case, we attempt to sign in again with filtering disabled.
if (e is NoCredentialException) {
val googleIdOptionFalse: GetGoogleIdOption = GetGoogleIdOption.Builder()
.setFilterByAuthorizedAccounts(false)
.setServerClientId(webClientId)
.setNonce(generateSecureRandomNonce())
.build()
val requestFalse: GetCredentialRequest = GetCredentialRequest.Builder()
.addCredentialOption(googleIdOptionFalse)
.build()
//We will build out this function in a moment
signIn(requestFalse, context)
}
}
}
//This function is used to generate a secure nonce to pass in with our request
fun generateSecureRandomNonce(byteLength: Int = 32): String {
val randomBytes = ByteArray(byteLength)
SecureRandom.getInstanceStrong().nextBytes(randomBytes)
return Base64.getUrlEncoder().withoutPadding().encodeToString(randomBytes)
}
Let's breakdown what this code is doing:
fun BottomSheet(webClientId: String) {...}: Creates a function called BottomSheet that takes one string argument called webClientid
val context = LocalContext.current: Retrieves the current Android context. This is needed for various operations, including launching UI components.LaunchedEffect(Unit) { ... }:LaunchedEffectis a Jetpack Compose composable that allows you to run a suspend function (a function that can pause and resume execution) within the composable's lifecycle. Unit as the key means that this effect will only run once when the composable is first launched.val googleIdOption: GetGoogleIdOption = ...: Creates aGetGoogleIdOptionobject. This object configures the type of credential being requested from Google..Builder(): A builder pattern is used to configure the options..setFilterByAuthorizedAccounts(true): Specifies whether to allow the user to select from all Google accounts, or just the ones that have already authorized the app. In this case, it's set to true, meaning that the request will be made using credentials that the user has previously authorized for use with this app, if any are available..setServerClientId(webClientId): Sets the server client ID, which is a unique identifier for your app's backend. This is required to get an ID token..setNonce(generateSecureRandomNonce()): Sets a nonce, a random value, to prevent replay attacks and ensure the ID token is associated with the specific request..build(): Creates theGetGoogleIdOptionobject with the specified configuration.
val request: GetCredentialRequest = ...: Creates aGetCredentialRequestobject. This object encapsulates the entire credential request..Builder(): Starts the builder pattern to configure the request..addCredentialOption(googleIdOption): Adds the googleIdOption to the request, specifying that we want to request a Google ID token..build(): Creates theGetCredentialRequestobject.
val e = signIn(request, context): This attempts to sign the user in with the created request and the current context. The result of the signIn function is stored in e. This variable will contain either the successful result or an exception.if (e is NoCredentialException) { ... }: This is a conditional check. If the signIn function fails with a NoCredentialException, it means that there are no previously authorized accounts available.val googleIdOptionFalse: GetGoogleIdOption = ...: If the previoussignInfailed, this part creates a newGetGoogleIdOption..setFilterByAuthorizedAccounts(false): This is the critical difference from the first option. It disables the filtering of authorized accounts, meaning that any Google account on the device can be used to sign in.val requestFalse: GetCredentialRequest = ...: A newGetCredentialRequestis created with thegoogleIdOptionFalse.signIn(requestFalse, context): This attempts to sign in the user with the new request that allows any account to be used.
In essence, this code prepares a request to the Credential Manager API to retrieve a Google ID token for the user, using the provided configurations. The GetCredentialRequest can then be used to launch the credential manager UI, where the user can select their Google account and grant the necessary permissions.
fun generateSecureRandomNonce(byteLength: Int = 32): String: This defines a function named generateSecureRandomNonce. It accepts an integer argument byteLength (with a default value of 32) that specifies the desired length of the nonce in bytes. It returns a String, which will be the Base64-encoded representation of the random bytes.
val randomBytes = ByteArray(byteLength): Creates a byte array of the specified byteLength to hold the random bytes.SecureRandom.getInstanceStrong().nextBytes(randomBytes):SecureRandom.getInstanceStrong(): This obtains a cryptographically strong random number generator. This is crucial for security, as it ensures the generated numbers are truly random and not predictable. It uses the strongest available source of entropy on the system..nextBytes(randomBytes): This populates the randomBytes array with random bytes generated by the SecureRandom instance.
return Base64.getUrlEncoder().withoutPadding().encodeToString(randomBytes):Base64.getUrlEncoder(): This gets a Base64 encoder that uses a URL-safe alphabet (using - and _ instead of + and /). This is important because it ensures the resulting string can be safely used in URLs without needing further encoding..withoutPadding(): This removes any padding characters from the Base64 encoded string. This is often desirable to make the nonce slightly shorter and more compact..encodeToString(randomBytes): This encodes the randomBytes into a Base64 string and returns it.
To summarize, This function generates a cryptographically strong random nonce of a specified length, encodes it using URL-safe Base64, and returns the resulting string. This is a standard practice for generating nonces that are safe for use in security-sensitive contexts.
Make the sign-in request
Now that we are able to build our sign-in request, we can use Credential Manager to use it for signing in. To do this we need to create a function that handles passing sign-in requests using Credential Manager, while handling common exceptions that we could encounter.
You can paste in this function below the BottomSheet() function to accomplish this.
//This code will not work on Android versions < UPSIDE_DOWN_CAKE when GetCredentialException is
//is thrown.
@RequiresApi(Build.VERSION_CODES.UPSIDE_DOWN_CAKE)
suspend fun signIn(request: GetCredentialRequest, context: Context): Exception? {
val credentialManager = CredentialManager.create(context)
val failureMessage = "Sign in failed!"
var e: Exception? = null
//using delay() here helps prevent NoCredentialException when the BottomSheet Flow is triggered
//on the initial running of our app
delay(250)
try {
// The getCredential is called to request a credential from Credential Manager.
val result = credentialManager.getCredential(
request = request,
context = context,
)
Log.i(TAG, result.toString())
Toast.makeText(context, "Sign in successful!", Toast.LENGTH_SHORT).show()
Log.i(TAG, "(☞゚ヮ゚)☞ Sign in Successful! ☜(゚ヮ゚☜)")
} catch (e: GetCredentialException) {
Toast.makeText(context, failureMessage, Toast.LENGTH_SHORT).show()
Log.e(TAG, failureMessage + ": Failure getting credentials", e)
} catch (e: GoogleIdTokenParsingException) {
Toast.makeText(context, failureMessage, Toast.LENGTH_SHORT).show()
Log.e(TAG, failureMessage + ": Issue with parsing received GoogleIdToken", e)
} catch (e: NoCredentialException) {
Toast.makeText(context, failureMessage, Toast.LENGTH_SHORT).show()
Log.e(TAG, failureMessage + ": No credentials found", e)
return e
} catch (e: GetCredentialCustomException) {
Toast.makeText(context, failureMessage, Toast.LENGTH_SHORT).show()
Log.e(TAG, failureMessage + ": Issue with custom credential request", e)
} catch (e: GetCredentialCancellationException) {
Toast.makeText(context, ": Sign-in cancelled", Toast.LENGTH_SHORT).show()
Log.e(TAG, failureMessage + ": Sign-in was cancelled", e)
}
return e
}
Now to breakdown what the code is doing here:
suspend fun signIn(request: GetCredentialRequest, context: Context): Exception?: This defines a suspend function named signIn. This means it can be paused and resumed without blocking the main thread.It returns an Exception? which will be null if the sign in is successful or the specific exception if the sign in fails.
It takes two parameters:
request: AGetCredentialRequestobject, which contains the configuration for the type of credential to retrieve (e.g., Google ID).context: The Android Context needed to interact with the system.
For the body of the function:
val credentialManager = CredentialManager.create(context): Creates an instance of CredentialManager, which is the main interface for interacting with the Credential Manager API. This is how the app will start the sign in flow.val failureMessage = "Sign in failed!": Defines a string (failureMessage) to be displayed in a toast when sign-in fails.var e: Exception? = null: This line initializes a variable e to store any exception that may occur during the process, starting with null.delay(250): Introduces a 250-millisecond delay. This is a workaround for a potential issue where NoCredentialException might be thrown immediately when the app starts, especially when using a BottomSheet flow. This gives time for the system to initialize the credential manager.try { ... } catch (e: Exception) { ... }:A try-catch block is used for robust error handling. This ensures that if any error occurs during the sign-in process, the app won't crash, and it can handle the exception gracefully.val result = credentialManager.getCredential(request = request, context = context): This is where the actual call to the Credential Manager API happens and initiates the credential retrieval process. It takes the request and context as input and will present a UI to the user to select a credential. If successful, it will return a result containing the selected credential. The result of this operation,GetCredentialResponse, is stored in theresultvariable.Toast.makeText(context, "Sign in successful!", Toast.LENGTH_SHORT).show():Displays a short toast message indicating that sign-in was successful.Log.i(TAG, "Sign in Successful!"): Logs a fun, successful message to the logcat.catch (e: GetCredentialException): Handles exceptions of typeGetCredentialException. This is a parent class for several specific exceptions that can occur during the credential fetching process.catch (e: GoogleIdTokenParsingException): Handles exceptions that occur when there is an error parsing the Google ID Token.catch (e: NoCredentialException): Handles theNoCredentialException, which is thrown when no credentials are available for the user (e.g., they haven't saved any, or they don't have a Google account).- Crucially, this function returns the exception stored in
e,NoCredentialException, allowing the caller to handle the specific case if no credentials are available.
- Crucially, this function returns the exception stored in
catch (e: GetCredentialCustomException): Handles custom exceptions that might be thrown by the credential provider.catch (e: GetCredentialCancellationException): Handles theGetCredentialCancellationException, which is thrown when the user cancels the sign-in process.Toast.makeText(context, failureMessage, Toast.LENGTH_SHORT).show(): Displays a toast message indicating that sign-in failed using the failureMessage.Log.e(TAG, "", e): Logs the exception to the Android logcat using Log.e, which is used for errors. This will include the stacktrace of the exception to help debug. It also includes the angry emoticon for fun.
return e: The function returns the exception if any was caught, or null if the sign in was successful.
In summary, this code provides a way to handle user sign-in using the Credential Manager API, manages the asynchronous operation, handles potential errors, and provides feedback to the user through toasts and logs while adding a touch of humor to the error handling.
Implement the bottom sheet flow on the app
Now we can set up a call to trigger the BottomSheet flow in our MainActivity class by using the following code and our Web Application Client ID that we copied from the Google Cloud Console earlier:
class MainActivity : ComponentActivity() {
@RequiresApi(Build.VERSION_CODES.UPSIDE_DOWN_CAKE)
override fun onCreate(savedInstanceState: Bundle?) {
super.onCreate(savedInstanceState)
//replace with your own web client ID from Google Cloud Console
val webClientId = "YOUR_CLIENT_ID_HERE"
setContent {
//ExampleTheme - this is derived from the name of the project not any added library
//e.g. if this project was named "Testing" it would be generated as TestingTheme
ExampleTheme {
Surface(
modifier = Modifier.fillMaxSize(), color = MaterialTheme.colorScheme.background,
) {
//This will trigger on launch
BottomSheet(webClientId)
}
}
}
}
}
Now we can save our project (File > Save) and run it:
- Press the run button:

- Once your app runs on the emulator, you should see the sign-in BottomSheet pop up. Go ahead and click Continue to test the sign-in

- You should see a Toast message showing that the sign-in was successful!

7. Button flow

The Button Flow for Sign in with Google makes it easier for users to sign up or log in to your Android app using their existing Google account. They'll hit it if they dismiss the bottom sheet or just prefer explicitly using their Google account for sign-in or sign-up. For developers, it means smoother onboarding and less friction during sign-up.
While this can be done with an out of the box Jetpack Compose button, we'll be using a pre-approved brand icon from the Sign in with Google Branding Guidelines page.
Add brand icon to the project
- Download the ZIP of pre-approved brand icons here
- Uncompress signin-assest.zip from your downloads (this will vary based on your computer's operating system). Now you can open the signin-assets folder and look through the available icons. For this Codelab, we'll be using
signin-assets/Android/png@2x/neutral/android_neutral_sq_SI@2x.png. - Copy the file
- Paste into the project in Android Studio under res > drawable by right clicking the drawable folder and clicking Paste (you may have to expand the res folder to see it)

- A dialog will show prompting you to rename the file and confirm the directory that it will be added to. Rename the asset to siwg_button.png then click OK

Button flow code
This code will use the same signIn() function that is used for BottomSheet() but uses GetSignInWithGoogleOption instead of GetGoogleIdOption since this flow doesn't leverage the on device stored credentials and passkeys for showing sign in options. Here is the code that you can paste in below the BottomSheet() function:
@RequiresApi(Build.VERSION_CODES.UPSIDE_DOWN_CAKE)
@Composable
fun ButtonUI(webClientId: String) {
val context = LocalContext.current
val coroutineScope = rememberCoroutineScope()
val onClick: () -> Unit = {
val signInWithGoogleOption: GetSignInWithGoogleOption = GetSignInWithGoogleOption
.Builder(serverClientId = webClientId)
.setNonce(generateSecureRandomNonce())
.build()
val request: GetCredentialRequest = GetCredentialRequest.Builder()
.addCredentialOption(signInWithGoogleOption)
.build()
coroutineScope.launch {
signIn(request, context)
}
}
Image(
painter = painterResource(id = R.drawable.siwg_button),
contentDescription = "",
modifier = Modifier
.fillMaxSize()
.clickable(enabled = true, onClick = onClick)
)
}
To breakdown what the code is doing:
fun ButtonUI(webClientId: String): This declares a function named ButtonUI that accepts a webClientId (your Google Cloud project's client ID) as an argument.
val context = LocalContext.current: Retrieves the current Android context. This is needed for various operations, including launching UI components.
val coroutineScope = rememberCoroutineScope(): Creates a coroutine scope. This is used to manage asynchronous tasks, allowing the code to run without blocking the main thread. The rememberCoroutineScope() is a composable function from Jetpack Compose that will provide a scope that is tied to the lifecycle of the composable.
val onClick: () -> Unit = { ... }: This creates a lambda function that will be executed when the button is clicked. The lambda function will:
val signInWithGoogleOption: GetSignInWithGoogleOption = GetSignInWithGoogleOption.Builder(serverClientId = webClientId).setNonce(generateSecureRandomNonce()).build(): This part creates aGetSignInWithGoogleOptionobject. This object is used to specify the parameters for the "Sign in with Google" process, it requires thewebClientIdand a nonce (a random string used for security).val request: GetCredentialRequest = GetCredentialRequest.Builder().addCredentialOption(signInWithGoogleOption).build(): This builds aGetCredentialRequestobject. This request will be used to get the user credential using the Credential Manager. TheGetCredentialRequestadds the previously createdGetSignInWithGoogleOptionas an option, in order to request a "Sign in with Google" credential.
coroutineScope.launch { ... }: ACoroutineScopeto manage asynchronous operations (using coroutines).signIn(request, context): calls our previously definedsignIn() function
Image(...): This renders an image using the painterResource that loads the image R.drawable.siwg_button
Modifier.fillMaxSize().clickable(enabled = true, onClick = onClick):fillMaxSize(): Makes the image fill the available space.clickable(enabled = true, onClick = onClick): Makes the image clickable, and when clicked, it executes the onClick lambda function previously defined.
In summary, this code sets up a "Sign in with Google" button in a Jetpack Compose UI. When the button is clicked, it prepares a credential request to launch the Credential Manager and allow the user to sign in with their Google account.
Now need to update the MainActivity class to run our ButtonUI() function:
class MainActivity : ComponentActivity() {
@RequiresApi(Build.VERSION_CODES.UPSIDE_DOWN_CAKE)
override fun onCreate(savedInstanceState: Bundle?) {
super.onCreate(savedInstanceState)
//replace with your own web client ID from Google Cloud Console
val webClientId = "YOUR_CLIENT_ID_HERE"
setContent {
//ExampleTheme - this is derived from the name of the project not any added library
//e.g. if this project was named "Testing" it would be generated as TestingTheme
ExampleTheme {
Surface(
modifier = Modifier.fillMaxSize(), color = MaterialTheme.colorScheme.background,
) {
Column(
verticalArrangement = Arrangement.Center,
horizontalAlignment = Alignment.CenterHorizontally
) {
//This will trigger on launch
BottomSheet(webClientId)
//This requires the user to press the button
ButtonUI(webClientId)
}
}
}
}
}
}
Now we can save our project (File > Save) and run it:
- Press the run button:
- Once the apps runs on the emulator, the BottomSheet should show up. Click outside of it to close it.

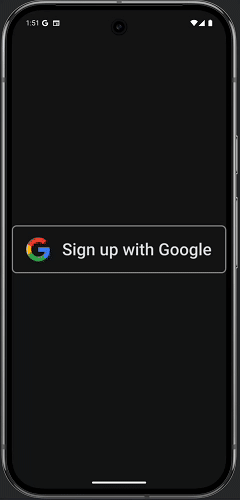
- Now you should see the button we created showing in the app. Go ahead and click it to see the sign-in dialogue

- Click your account to sign in!
8. Conclusion
You finished this codelab! For more information or help regarding Sign in With Google on Android, see the Frequently Asked Questions section below:
Frequently Asked Questions
- Stackoverflow
- Android Credential Manager Troubleshooting Guide
- Android Credential Manager FAQ
- OAuth App Verification Help Center
Full MainActivity.kt code
Here is the full code for MainActivity.kt for reference:
package com.example.example
import android.os.Bundle
import androidx.activity.ComponentActivity
import androidx.activity.compose.setContent
import androidx.compose.foundation.layout.fillMaxSize
import androidx.compose.runtime.Composable
import androidx.compose.ui.Modifier
import com.example.example.ui.theme.ExampleTheme
import android.content.ContentValues.TAG
import android.content.Context
import android.credentials.GetCredentialException
import android.os.Build
import android.util.Log
import android.widget.Toast
import androidx.annotation.RequiresApi
import androidx.compose.foundation.clickable
import androidx.compose.foundation.Image
import androidx.compose.foundation.layout.Arrangement
import androidx.compose.foundation.layout.Column
import androidx.compose.material3.MaterialTheme
import androidx.compose.material3.Surface
import androidx.compose.runtime.rememberCoroutineScope
import androidx.compose.ui.Alignment
import androidx.compose.ui.platform.LocalContext
import androidx.compose.ui.res.painterResource
import androidx.credentials.CredentialManager
import androidx.credentials.exceptions.GetCredentialCancellationException
import androidx.credentials.exceptions.GetCredentialCustomException
import androidx.credentials.exceptions.NoCredentialException
import androidx.credentials.GetCredentialRequest
import com.google.android.libraries.identity.googleid.GetGoogleIdOption
import com.google.android.libraries.identity.googleid.GetSignInWithGoogleOption
import com.google.android.libraries.identity.googleid.GoogleIdTokenParsingException
import java.security.SecureRandom
import java.util.Base64
import kotlinx.coroutines.CoroutineScope
import androidx.compose.runtime.LaunchedEffect
import kotlinx.coroutines.delay
import kotlinx.coroutines.launch
class MainActivity : ComponentActivity() {
@RequiresApi(Build.VERSION_CODES.UPSIDE_DOWN_CAKE)
override fun onCreate(savedInstanceState: Bundle?) {
super.onCreate(savedInstanceState)
//replace with your own web client ID from Google Cloud Console
val webClientId = "YOUR_CLIENT_ID_HERE"
setContent {
//ExampleTheme - this is derived from the name of the project not any added library
//e.g. if this project was named "Testing" it would be generated as TestingTheme
ExampleTheme {
Surface(
modifier = Modifier.fillMaxSize(), color = MaterialTheme.colorScheme.background,
) {
Column(
verticalArrangement = Arrangement.Center,
horizontalAlignment = Alignment.CenterHorizontally
) {
//This will trigger on launch
BottomSheet(webClientId)
//This requires the user to press the button
ButtonUI(webClientId)
}
}
}
}
}
}
//This line is not needed for the project to build, but you will see errors if it is not present.
//This code will not work on Android versions < UpsideDownCake
@RequiresApi(Build.VERSION_CODES.UPSIDE_DOWN_CAKE)
@Composable
fun BottomSheet(webClientId: String) {
val context = LocalContext.current
// LaunchedEffect is used to run a suspend function when the composable is first launched.
LaunchedEffect(Unit) {
// Create a Google ID option with filtering by authorized accounts enabled.
val googleIdOption: GetGoogleIdOption = GetGoogleIdOption.Builder()
.setFilterByAuthorizedAccounts(true)
.setServerClientId(webClientId)
.setNonce(generateSecureRandomNonce())
.build()
// Create a credential request with the Google ID option.
val request: GetCredentialRequest = GetCredentialRequest.Builder()
.addCredentialOption(googleIdOption)
.build()
// Attempt to sign in with the created request using an authorized account
val e = signIn(request, context)
// If the sign-in fails with NoCredentialException, there are no authorized accounts.
// In this case, we attempt to sign in again with filtering disabled.
if (e is NoCredentialException) {
val googleIdOptionFalse: GetGoogleIdOption = GetGoogleIdOption.Builder()
.setFilterByAuthorizedAccounts(false)
.setServerClientId(webClientId)
.setNonce(generateSecureRandomNonce())
.build()
val requestFalse: GetCredentialRequest = GetCredentialRequest.Builder()
.addCredentialOption(googleIdOptionFalse)
.build()
signIn(requestFalse, context)
}
}
}
@RequiresApi(Build.VERSION_CODES.UPSIDE_DOWN_CAKE)
@Composable
fun ButtonUI(webClientId: String) {
val context = LocalContext.current
val coroutineScope = rememberCoroutineScope()
val onClick: () -> Unit = {
val signInWithGoogleOption: GetSignInWithGoogleOption = GetSignInWithGoogleOption
.Builder(serverClientId = webClientId)
.setNonce(generateSecureRandomNonce())
.build()
val request: GetCredentialRequest = GetCredentialRequest.Builder()
.addCredentialOption(signInWithGoogleOption)
.build()
signIn(coroutineScope, request, context)
}
Image(
painter = painterResource(id = R.drawable.siwg_button),
contentDescription = "",
modifier = Modifier
.fillMaxSize()
.clickable(enabled = true, onClick = onClick)
)
}
fun generateSecureRandomNonce(byteLength: Int = 32): String {
val randomBytes = ByteArray(byteLength)
SecureRandom.getInstanceStrong().nextBytes(randomBytes)
return Base64.getUrlEncoder().withoutPadding().encodeToString(randomBytes)
}
//This code will not work on Android versions < UPSIDE_DOWN_CAKE when GetCredentialException is
//is thrown.
@RequiresApi(Build.VERSION_CODES.UPSIDE_DOWN_CAKE)
suspend fun signIn(request: GetCredentialRequest, context: Context): Exception? {
    val credentialManager = CredentialManager.create(context)
    val failureMessage = "Sign in failed!"
    var e: Exception? = null
    //using delay() here helps prevent NoCredentialException when the BottomSheet Flow is triggered
    //on the initial running of our app
    delay(250)
    try {
        // The getCredential is called to request a credential from Credential Manager.
        val result = credentialManager.getCredential(
            request = request,
            context = context,
        )
        Log.i(TAG, result.toString())

        Toast.makeText(context, "Sign in successful!", Toast.LENGTH_SHORT).show()
        Log.i(TAG, "(☞゚ヮ゚)☞  Sign in Successful!  ☜(゚ヮ゚☜)")

    } catch (e: GetCredentialException) {
        Toast.makeText(context, failureMessage, Toast.LENGTH_SHORT).show()
        Log.e(TAG, failureMessage + ": Failure getting credentials", e)

    } catch (e: GoogleIdTokenParsingException) {
        Toast.makeText(context, failureMessage, Toast.LENGTH_SHORT).show()
        Log.e(TAG, failureMessage + ": Issue with parsing received GoogleIdToken", e)

    } catch (e: NoCredentialException) {
        Toast.makeText(context, failureMessage, Toast.LENGTH_SHORT).show()
        Log.e(TAG, failureMessage + ": No credentials found", e)
        return e

    } catch (e: GetCredentialCustomException) {
        Toast.makeText(context, failureMessage, Toast.LENGTH_SHORT).show()
        Log.e(TAG, failureMessage + ": Issue with custom credential request", e)

    } catch (e: GetCredentialCancellationException) {
        Toast.makeText(context, ": Sign-in cancelled", Toast.LENGTH_SHORT).show()
        Log.e(TAG, failureMessage + ": Sign-in was cancelled", e)
    }
    return e
}