Blogger has made a lot of the latest features, including search preferences for meta tag optimization for SEO friendly. However, with standard features of bloggers, not enough to be number one in the Search Engines.
Most Blogger template maker just make a standard meta tag alone, of course, the next task is for the blog owner to better optimize how the blog more successful in the Search Engine. Not quite with a great view, a lot of backlinks, good content and so on.
Below I share the best meta tag for blogger, for the optimization of your blog.
Log into the template editor and find the following code:
<title><data:blog.pageTitle/></title>
Replace with the following code (edit your blog name, keywords, description, etc.)
<!-- Meta Title ErrorPage/404 -->
<b:if cond='data:blog.pageType == "error_page"'>
<title>404: Sorry the page you are looking is not found | blogname</title>
</b:if>
<b:if cond='data:blog.pageType != "item"'>
<!-- Meta Title Search Page -->
<b:if cond='data:blog.searchQuery'>
<title>Keyword search for :: <data:blog.searchQuery/> :: | blogname</title>
</b:if>
<b:if cond='data:blog.pageType == "archive"'>
<!-- Meta Title Archive Page -->
<title>Post Archive by Month <data:blog.pageName/> | blogname</title>
<!-- Meta Description Archive Page -->
<meta expr:content='"Post Archive by Month " + data:blog.pageName + " learn more please visit blogname"' name='description'/>
<b:else/>
<b:if cond='data:blog.pageType == "static_page"'>
<!-- Meta Title Pages -->
<title><data:blog.pageName/> | blogname</title>
<!-- Meta Description Pages -->
<meta expr:content='data:blog.pageName + ". Please read the article " + data:blog.pageName + " learn more please visit blogname"' name='description'/>
<b:else/>
<!-- Meta Title Label Page -->
<b:if cond='data:blog.searchLabel'>
<title>Search for Label :: <data:blog.pageName/> :: | blogname</title>
<!-- Meta Description Label Page -->
<meta expr:content='"Search for category ::" + data:blog.pageName + ":: learn more please visit blogname."' name='description'/>
<b:else/>
<!-- Meta Title Homepage -->
<title><data:blog.pageTitle/></title>
<!-- Meta Description Homepage -->
<meta expr:content='data:blog.pageTitle + " Write your blog description here."' name='description'/>
</b:if>
</b:if>
</b:if>
<!-- Meta Keyword Homepage-->
<meta content='keyword1, keyword2, etc' name='keywords'/>
<b:else/>
<!-- Meta Title Post Page -->
<title><data:blog.pageName/> - blogname</title>
<!-- Meta Description Active Post Page -->
<b:if cond='data:blog.metaDescription'>
<meta expr:content='data:blog.metaDescription' itemprop='description'/>
<b:else/>
<!-- Show if the Meta Description post Page is not active-->
<meta expr:content='data:blog.pageName + ". Please read the article " + data:blog.pageName + " learn more please visit blogname"' name='description'/>
</b:if>
<!-- Meta Keyword Post Page -->
<meta expr:content='data:blog.pageName + ", keyword1, keyword2, dst"' name='keywords'/>
</b:if>
Once you've added the meta tag before, please adjust or replace the meta tags on
Showing posts with label hacks. Show all posts
Showing posts with label hacks. Show all posts
Friday, June 14, 2013
Friday, February 20, 2009
Post Summary And Read More
My old friends here are very well aware of the Peek-A-Boo-Posts hack
that Ramani and I came up with several years ago. It required quite some
template hacking and javascript too.
In this tutorial you will learn how to tweak your blog without any javascript to get a similar effect. On our homepage, all posts will show a short summary, followed by a "Read More" link. Clicking the "Read More"-link will bring up the post page with the full post text.
Step 1: Back up your template
Open the Layout|Edit HTML-tab on your Dashboard, and download the template as an XML-file to your harddisk. If anything goes wrong, upload it again and there will be no problem at all.
Step 2: Modify the template code
Scroll down and look for the following piece of code:
This is the piece of template code that displays the post-body on the screen. We have to add a few lines of code here:
Now save your template.
Step 3: Modify your post template
In your Blog Settings you can modify the post template. Change it to:
And save your settings.
This will take care of all new posts. Type the summary text in between the summary-div-tags. Type the rest of the post between the other div-tags, and publish!
Step 4: Modify old posts
If you want older posts to have summaries as well, change every post and add a summary-div and restofpost-div.
And furthermore...
The summary-div is not really necessary, as the code only hides the restofpost-div if we are on the homepage. If you want some other styling for the summary, add CSS-tags to the skin-part of your blog.
In this tutorial you will learn how to tweak your blog without any javascript to get a similar effect. On our homepage, all posts will show a short summary, followed by a "Read More" link. Clicking the "Read More"-link will bring up the post page with the full post text.
Step 1: Back up your template
Open the Layout|Edit HTML-tab on your Dashboard, and download the template as an XML-file to your harddisk. If anything goes wrong, upload it again and there will be no problem at all.
Step 2: Modify the template code
Scroll down and look for the following piece of code:
<div class='post-body entry-content'>
  <data:post.body/>
  <div style='clear: both;'/> <!-- clear for photos floats -->
</div>
This is the piece of template code that displays the post-body on the screen. We have to add a few lines of code here:
<div class='post-body entry-content'>
  <b:if cond='data:blog.homepageUrl == data:blog.url'>
    <style type='text/css'>.restofpost {display:none;}</style>
  </b:if>
  <data:post.body/>
  <b:if cond='data:post.link'>
    <a expr:href='data:post.link'>Read more...</a>
  <b:else/>
    <b:if cond='data:post.url'>
      <a expr:href='data:post.url'>Read more...</a>
    </b:if>
  </b:if>
  <div style='clear: both;'/> <!-- clear for photos floats -->
</div>
Now save your template.
Step 3: Modify your post template
In your Blog Settings you can modify the post template. Change it to:
<div class="summary">Type summary here</div>
<div class="restofpost">Type rest of post here</div>
And save your settings.
This will take care of all new posts. Type the summary text in between the summary-div-tags. Type the rest of the post between the other div-tags, and publish!
Step 4: Modify old posts
If you want older posts to have summaries as well, change every post and add a summary-div and restofpost-div.
And furthermore...
The summary-div is not really necessary, as the code only hides the restofpost-div if we are on the homepage. If you want some other styling for the summary, add CSS-tags to the skin-part of your blog.
Sunday, February 15, 2009
More If Then Ideas
Now that my train of thought has started on how to use the <b:if> -
<b:else/> constructions to enhance the Bloggger experience, I got
some new ideas that really need some investigation.
Idea 1: Table of Contents
We can tweak the Blogpost Widget, so that it displays only posttitles when we are on the Blog Homepage, and full posts when we are on an Item Page. In the Blog Settings we can set that our Blog should display 365 days on 1 page, allowing for a maximum of 500 posts to be displayed.
Idea 2: Post Summaries on front page
By default, we have 1 Blogpost Widget on our Blog. But we can easily add a second Blogpost Widget to our Blog. We can modify Blogpost Widget #1 to be displayed only on the Homepage, and #2 to be displayed on Itempages.
In our posts we could use 2 span-tags, one for a summary and one for a full post text. In Blogpost Widget #1 we only display the summary-span, in Blogpost Widget #2 we only display the full text span. It can be done with javascript. The challenge is to see if it can be done without!
Idea 3: Featured Posts on front page
If we can have 2 Blogpost Widgets, we can have 3 as well.
Widget #1 shows on item pages, just as we are used to. Widget #2 and #3 are shown only on the Homepage, where #2 filters for 'Tutorial' and #3 filters for 'Template'. And #2 and #3 are side by side.
Well, I have to do some experimenting to get this to work. Please feel free to create your own solutions, and throw in your own ideas as well!
Saturday, August 2, 2008
Please change URL's
In my last post I have informed you of my ISP changing my homepage URL. I
hve repaired most of the links in this blog, but if you have installed
my widgets (such as Recent Posts and Recent Comments, you will have to
change the link in your own blog as well.
Please change all referrals to "http://home.planet.nl/~hansoosting/......." to "http://home.kpn.nl/oosti468/......" to get your widgets working again.
Good luck and sorry for the inconvenience.
Tip: download my javascript-files, and upload them at your own web-space.
Please change all referrals to "http://home.planet.nl/~hansoosting/......." to "http://home.kpn.nl/oosti468/......" to get your widgets working again.
Good luck and sorry for the inconvenience.
Tip: download my javascript-files, and upload them at your own web-space.
Wednesday, June 11, 2008
Speeding Up BlogTOC
Some of you who are using my (much
appreciated) BlogTOC widget have mentioned the long load times of their
blog as a result of the BlogTOC widget. Also, some of you want to
display the Table of Contents automatically, without the visitor having
to click on the Show TOC link.
Well, I will share some ideas with you regarding this subject.
Speeding up stuff
If you implement the BlogTOC widget in the standard way, the entire code of the widget is placed in a Blogger Page Element, usually somewhere at the top of you blog.
Now, while your Blog is loading, all code is processed from top to bottom. The piece of code that is the most time-consuming is the code that retrieves the Blogger Feed, parses it, and puts the data in a set of javascript arrays. This slows down loading, but once the data has loaded displaying it is done lightning-fast.
A good solution is, to move the retrieval-code to a page element that is completely at the bottom of your blog page.
I have moved the code to the bottom of the footer, and that has sped up loading a lot.
The code you have to move is this:
Automatic display of TOC
If you want the TOC to auto-display, add a simple line of javascript code at the end:
Well, I will share some ideas with you regarding this subject.
Speeding up stuff
If you implement the BlogTOC widget in the standard way, the entire code of the widget is placed in a Blogger Page Element, usually somewhere at the top of you blog.
Now, while your Blog is loading, all code is processed from top to bottom. The piece of code that is the most time-consuming is the code that retrieves the Blogger Feed, parses it, and puts the data in a set of javascript arrays. This slows down loading, but once the data has loaded displaying it is done lightning-fast.
A good solution is, to move the retrieval-code to a page element that is completely at the bottom of your blog page.
I have moved the code to the bottom of the footer, and that has sped up loading a lot.
The code you have to move is this:
<script src="http://yourblog.blogspot.com/feeds/posts/default?alt=json-in-script&start-index=1&max-results=100&callback=loadtoc"></script>
Automatic display of TOC
If you want the TOC to auto-display, add a simple line of javascript code at the end:
<script type="text/javascript">showToc();</script>
Wednesday, April 4, 2007
Get the New BlogToc Hack!
It is new. It is working with the speed of light. It is AJAX-based. It is BlogTOC.
BlogTOC is my new Blogger Table Of Contents Hack. Its extremely easy to install. It shows a Table of Contents with Post Titles, Post Dates and Labels. Hovering your mouse over the Post Title triggers a Pop Up with a summary of your post.
If you click the column headers, the TOC will be sorted any way you like: by Title (ascending or descending), and by Date (oldest first or newest first).
In my right sidebar, you will see a "Show TOC" -link. Click it to display the TOC. Click it again, and the TOC disappears in cyberspace! If that isn't magic!
It is now on this Blog in beta version, so please test it here and give your feedback. Planned developments are:
- Filtering of labels
- Adding custom CSS classes
- A Beautiful Beta Installer
Sunday, April 1, 2007
Visit the Knowledge Base!
Beautiful Beta Wiki is now growing steadily (just the way a snail moves ... steadily). Today I added an in-depth tutorial
about the inner workings of the Posts Widget. That's the thingy that
puts your blog's posts on the screen. This tutorial can help you
understand how it works, so that you can design your own modifications.
But of what use is knowledge if there is no practical application for it? (Well, the sheer BEAUTY of knowledge!). Okay, so that's why I added several simple hacks to the Wiki (more to follow).
Enjoy!
But of what use is knowledge if there is no practical application for it? (Well, the sheer BEAUTY of knowledge!). Okay, so that's why I added several simple hacks to the Wiki (more to follow).
Enjoy!
Saturday, February 3, 2007
Post Update Trick
My Recent Posts Widget now and then leads
to discussions with other Bloggers about the order in which recent posts
appear. Updated posts appear at the top of the recent posts list, even
if their publishdate is somewhere far in the past. From a technical
point of view, this is quite logic: people subscribe to a feed to be
informed about changes in the blog, so if an old post is updated, it
should appear in the feed immediately. But many times changes are just
cosmetic: correcting a typo, repairing a dead link, or assigning a new
label. In that case, appearance of the post in the feed is a little bit
annoying or confusing.
Some readers suggested that I should change the coding of the widget, and leave out updated posts. I think that is not a very good idea, because an updated post could contain relevant new information. So I came up with an interesting trick.
Add the following styling definition to your blog's template:
Now, whenever you update a post, at the beginning of the post insert update-information, using the following html:
If you publish your post, the update info will not be displayed on your blogpage, but the feed, and therefor also the Recent Posts Widget, will show the update-text.
Some readers suggested that I should change the coding of the widget, and leave out updated posts. I think that is not a very good idea, because an updated post could contain relevant new information. So I came up with an interesting trick.
Add the following styling definition to your blog's template:
.updateinfo { display:none; }
Now, whenever you update a post, at the beginning of the post insert update-information, using the following html:
<span class="updateinfo">UPDATE: Repaired some dead links. Content has not be changed.</span>
If you publish your post, the update info will not be displayed on your blogpage, but the feed, and therefor also the Recent Posts Widget, will show the update-text.
Thursday, January 25, 2007
Playing with the Feed Links
Now and then one of your questions
triggers my own curiousity. Shrish asked how to hide the Feed Link at
the bottom of the frontpage, while keeping the Feed Link at each
postpage. And how to change the text of the link. Well, here is how it
is done. A new hack.
Step 1: Backup your template.
Better be safe than sorry.
Step 2: Edit you template
Open your template in HTML-mode, and search for the includable with the id feedLinksBody. You have to add some lines of code to it to make the hack work. Below, you will find the code of the includable, the new lines are marked in red.
Adding these 2 lines of code makes the Feed Link only show up on an Item Page, and not on the Main Page or an Archive Page.
If you want to change the text of the Feed Link from "Subscribe to:" into something else, you have to replace <data:feedLinksMsg/> with your own text.
The same can be done with the "Post Comments" text, and with the "(Atom)" text.
Just replace <data:f.name/> and <data:f.feedType/> respectively with your own text (or remove them completely).
Step 1: Backup your template.
Better be safe than sorry.
Step 2: Edit you template
Open your template in HTML-mode, and search for the includable with the id feedLinksBody. You have to add some lines of code to it to make the hack work. Below, you will find the code of the includable, the new lines are marked in red.
<b:includable id='feedLinksBody' var='links'>
  <b:if cond='data:blog.pageType == "item"'>
    <div class='feed-links'>
    <data:feedLinksMsg/>
    <b:loop values='data:links' var='f'>
       <a class='feed-link' expr:href='data:f.url' expr:type='data:f.mimeType' target='_blank'><data:f.name/> (<data:f.feedType/>)</a>
    </b:loop>
    </div>
  </b:if>
</b:includable>
Adding these 2 lines of code makes the Feed Link only show up on an Item Page, and not on the Main Page or an Archive Page.
If you want to change the text of the Feed Link from "Subscribe to:" into something else, you have to replace <data:feedLinksMsg/> with your own text.
The same can be done with the "Post Comments" text, and with the "(Atom)" text.
Just replace <data:f.name/> and <data:f.feedType/> respectively with your own text (or remove them completely).
Thursday, December 21, 2006
Adding Google Bookmarks to your Bookmarks Bar
Some of you have installed the Social Bookmarking Bar that I developed a few months ago. I got a request to add Google Bookmarks to this bar, as many readers are using this service. Well, here it is. If you are new to this, first take a look at this post and install the Bookmark Bar.
Add Google with the following line of code. Put it in your template, inside the post widget, where all the other bookmark links are.
<a expr:href='"http://www.google.com/bookmarks/mark?op=add&bkmk=" + data:post.url + "&title="+data:post.title' expr:onmouseout='"javascript:showsbtext(\"sbtxt" + data:post.id + "\",0);"' expr:onmouseover='"javascript:showsbtext(\"sbtxt" + data:post.id + "\",19);"' target='_blank'><img alt='Google' src='http://home.planet.nl/~hansoosting/images/icon_sb_goo.gif'/></a>
Tuesday, December 12, 2006
Style Switcher
Last night I discovered Purplemoggy's
great blog, with interesting hacks. I stumbled on his template
switcher, and today I couldn't resist the temptation to apply it to my
own Blog as an experiment. So now, Beautiful Beta is a seasoned blog, as
you can see in the sidebar! Select your mood, and the Blog will follow!
Check out Purplemoggy's tutorial.
Saturday, November 25, 2006
Customizable Recent Posts Widget
Now that we understand the JSON-feed
mechanism, it is quite easy to convert all our feeds to customizable
widgets, that you can copy to your own sidebar. You can use the widget
to display your own recent posts on your own blog, but you can in fact
display the post-feeds of any Blogger blog you like.
Installation is easy.
Install Widget
Go to the Widgets & Downloads Page and click the Install Recent Posts button.
This will bring up a pop-up window in which you can customize the widget settings, before adding it to your blog.
Replace 'beautifulbeta' with the name of your own blog.
Set the number of recent posts you want to show (default = 5).
If you want the post date to be displayed, check the box (default = checked).
If you want a post summary to be displayed, check the other box (default = checked), and enter the number of characters of the postsummary that you want to display (default = 100).
If you want the standard styling, select the 'standard' radio-button. If you want to define your own CSS-definitions, select 'custom css'. After installing the widget you will have to add CSS-definitions to your blog's template for the classes .bbrecpost, .bbrecpostsum and .bbwidgetfooter.
Now click the 'Customize' button, or click 'Reset' to return to the default values. If you are satisfied with the settings, click 'Add Widget To My Blog'. This will bring up the Blogger-screen that lets you select your Blog to install the widget to. Click the blue 'Add' button to add the widget to your blog.
Update 1: the widget did not work for Short feeds. That is fixed now, it will work for both Full and Short feeds.
Update 2: it is not longer needed to add the javascript library to your template. The widget now realy is plug and play.
Update 3: you can install the widget using Beautiful Beta's Widget Installer. Click-n-Go, no hacking or editing needed!
If your Blog is published to your own FTP-site, click here for the FTP-version of this widget.
Thursday, November 23, 2006
Customizable Recent Comments Widget
It is a Recent Comments Widget. You can
install it to your Blog with one mouseclick. You can customize it
without any template-hacking. It is completely flexible. And it is free!
It is based on the new JSON-feeds that are available from Blogger. That means you can have as many comments in your sidebar as you wish, you can have long or short summaries, and you can choose to add the date and the posttitle to the comment-summary as well. Now THAT's what we call flexibility.
I was inspired to create this widget by Ramani and Hoctro, who implemented a JSON-based Recent Comments widget. But I still missed date and posttitle options, things I recently hacked with in my own way. So I took up where Ramani stopped, and created this widget that you can see now in my sidebar.
How to Install the Widget
Go to the Widgets & Downloads Page and click the Install Recent Comments button.
This will bring up a pop-up window in which you can customize the widget settings, before adding it to your blog.
Replace 'beautifulbeta' with the name of your own blog.
Set the number of recent posts you want to show (default = 5).
If you want the post date to be displayed, check the box (default = checked).
If you want a post summary to be displayed, check the other box (default = checked), and enter the number of characters of the postsummary that you want to display (default = 100).
If you select standard styling, a predefined styling will be used. If you select custom css, you can define your own styling using the classes bbrecpost, bbrecpostsum and bbwidgetfooter.
Now click the 'Customize' button, or click 'Reset' to return to the default values. If you are satisfied with the settings, click 'Add Widget To My Blog'. This will bring up the Blogger-screen that lets you select your Blog to install the widget to. Click the blue 'Add' button to add the widget to your blog.
Wednesday, November 22, 2006
New Recent Comments Hack
Recent comments can be displayed in the
sidebar of your Blog using the Feed page element. As a Feed-url you can
provide "http://yourblogname/feeds/comments/full" to get the last 5
comments, with author and name. That's the standard functionality, and I
really didn't like it at all. The standard comments-feed has a few
things missing. First of all, the first few words of the comment are
displayed as a link, but clicking the link brings you to the top of the
post-item page in stead of to the comment itself. That is because of a
bug in the link that is provided by Blogger. Second, I want to see on
what post a person has commented. The feed doesn't provide for the post
title, but we could obtain it from the link - and that is where this
hack kicks in.
Our objective is to create a Recent Comments widget, that displays recent comments in the following format: "On [date & year] [author] commented on [post title]: [comment-summary] (more)".
Here is how you do it.
Step 1: Make a backup of your template.
Step 2: Add a standard recent comments widget to your Blog.
From the dashboard select your Blog and click Layout. Go to the Template tab and select Page Elements. In your sidebar add a Feed page element.
Enter your comment feed url.

Tick Item dates and Item sources on.
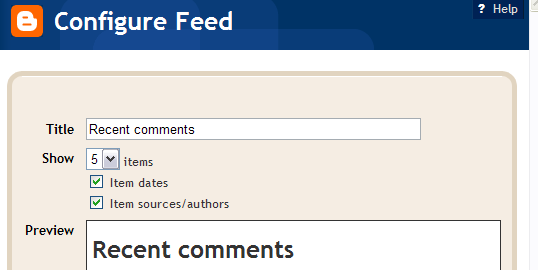
Save your template and view your Blog. You now have a standard recent comments widget.
Step 3: Add some javascript to the head of your template.
If you added my social bookmarking hack, you can skip this step.
If not, go to the Template tab, click Edit HTML, and add the following line of code to your templates head, just above the </head>-tag:
<script src='http://home.planet.nl/~hansoosting/downloads/beautifulbeta.js' type='text/javascript'/>
Save the template.
Step 4: Replace the widget coding
Go to the Template tab, and click Edit HTML. Now find your sidebar, and look for the new widget you just created. It will look something like this:
<b:widget id='Feed2' locked='false' title='Recent comments' type='Feed'/>
Now click Expand Widget Templates, and look for the widget. Use Ctrl-F to find it, using it's ID (in this example Feed2).
Replace the entire widget by the following code:
<b:widget id='Feed2' locked='false' title='Recent comments' type='Feed'>
<b:includable id='main'>
<h2><data:title/></h2>
<div class='widget-content'>
<ul expr:id='data:widget.instanceId + "_feedItemListDisplay"'>
<b:loop values='data:feedData.items' var='i'>
<li>
<b:if cond='data:showItemDate'>
<b:if cond='data:i.str_published != ""'>
<span class='item-date'>
On <data:i.str_published/>
</span>
</b:if>
</b:if>
<b:if cond='data:showItemAuthor'>
<b:if cond='data:i.author != ""'>
<span class='item-author'>
 - <data:i.author/> commented on
</span>
</b:if>
</b:if>
<script type='text/javascript'>getPostTitle("<data:i.alternate.href/>")</script> :
<span class='item-title'>
<data:i.title/> <script type='text/javascript'>getCommentLink("<data:i.alternate.href/>")</script>
</span>
</li>
</b:loop>
</ul>
<b:include name='quickedit'/>
</div>
</b:includable>
</b:widget>
Save your template.
Your hack is implemented now.
Tech stuff.
I started with the standard-widget. First I canged the order of the <data>-elements to date, author, comment-summary. The comment-summary is represented by <data:i.title/>. In the standard widget, the comment summary is embedded in an anchor that links (or should link) to the comment. The consruction looks like this:
<a expr:href='data:i.alternate.href'><data:i.title/></a>
The link-address of the <data:i.alternate.href/>-field has the following format: "http://yourblog.blogspot.com/year/month/posttitle.html#number".
We will use this link to parse the posttitle from it, and to retrieve the correct comment-permalink. The correct permalink to the comment has the folowing format:
"http://yourblog.blogspot.com/year/month/posttitle.html#comment-number".
I wrote 2 js functions. The first function, getPostTitle, is handed the alternate.href, and writes the post title as a hyperlink to the post-item-page to the document. The second function, getCommentLink, is handed the alternate.href, builds the correct permalink, and displays it as a (more)-link.
Sunday, October 15, 2006
Table of Contents
A little while ago I thought it would be
nice to have a Table of Contents on my Blog. So I experimented a bit on
how this could be done without a lot of hacking, and also without
outside help such as del.icio.us.
Ramani has some interesting hacks, and 2 of them I combined into a new one.
If you want to list all your posts in one page, you can use the following url:
http://yourblog/search/label/?max-results=100
Is it as simple as that?
Yes it is!
The max-results is limited to 100 results. This is a Blogger server-side restriction. So it will give a TOC for only the 100 latest posts.
If we want to display only post titles we have to do a little more hacking, but Ramani has explained how to do this on archive pages. I just applied this to label pages.
Edit your template, find the Blog widget, and replace the entire main-includable with this txt-file. Save your template.
Add the url to a convenient place in your menubar or sidebar, and ready you are.
Adding a menubar to your Blog
Missing a real menubar on you Blog? This
hack explains how you can add a simple menubar to the top of your Blog.
It is in fact a simple link list, and that is a standard page element of
Blogger Beta. I have added a new section at the top of the Blog Page,
and the link list is inside that section. Of course there are some
tricks to play, such as hiding the link list title, and showing the
links list elements side by side. Here is how it is done.
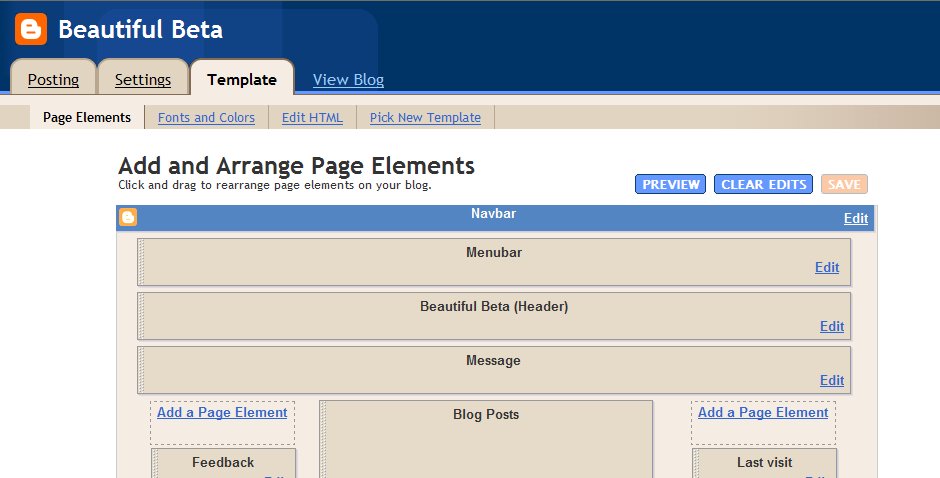
In this Page Layout you can see where I have added the Menubar. The code of this section is highlighted in red:
<div id='header-wrapper'>
<b:section class='menubar' id='menubar' maxwidgets='1' showaddelement='yes'>
<b:widget id='LinkList2' locked='true' title='Menubar' type='LinkList'/>
</b:section>
<b:section class='header' id='header' maxwidgets='1' showaddelement='no'>
<b:widget id='Header1' locked='false' title='Beautiful Beta (Header)' type='Header'/>
</b:section>
</div>
To the CSS-part of your template, add coding for the menubar-id:
#menubar h2 {display:none;}
#menubar ul {
list-style: none;
}
#menubar li {
float: left;
}
#menubar a:link, #menubar a:visited, #menubar a:hover {
padding: 5px;
display: block;
color: $headerTextColor;
}
#menubar a:hover {
background-color: $headerCornersColor;
}
The menubar title is hidden, so that only the options are visible. The list-elements are set to none, so that there are no bullets in front of the menu options. And if a menu-option is hovered over, it is highlighted.
Random Rotating Banners
Gabriel Lau published a great hack today that offers you a Random Rotating Banner on your Blog! This is a standard Wordpress-plugin, but now we Bloggers can use this one too. Nice hack, Gab!
Monday, October 9, 2006
Sticky Posts (no longer sticky, this one)
Wouldn't it be great to have a real sticky post at the top of your page? Well, you are reading a sticky post right now.
I already developed a sticky message-board at the top of my Blog, but that is not really a post, and you can't leave comments on it.
So right now I am "burning the night-oil" on sticky posts for Blogger Beta. I am onto some interesting javascript, but a lot of work has still to be done.
But this morning, wide awake after a good night's rest, a tremendously simple solution revealed itself before my inner eye. So... this is my Mark I Sticky Post.
Please let me know how you feel about Sticky Posts. Do you need them? Should we develop a more elegant hack?
As I said before, the solution I used here is tremendously simple and doesn't require any hacking. When you have written your post, click Post Options and set the date of the post anywhere in the future. As you can see, I set the date of this sticky post at December 31 in the year 9999 (but it was posted on October 7, 2006).
And if you don't need the post to be sticky an longer, set the date to somewhere in the recent past.
What we should do to make this real good is adding some code to the template that checks whether the date-header is in the future or not. If so, it should not be displayed. Maybe one of you guys has some spare time the next few days to give it a try!
Sunday, October 8, 2006
Blog Navigation: Top of Page and Top of Post
This hack adds two new links to the footer of your post. One link to the top of the page, and one to the top of the post.
Implementing this hack is easy if you follow the next steps.
Step 1: Backup your template by downloading it and saving it to your harddisk.
Step 2: Edit the HTML of your template, and expand the widgets.
Step 3: Find the post includable, and add the code to it that is highlighted in red:
<b:includable id='post' var='post'>
<div class='post uncustomized-post-template' expr:id='"post-" + data:post.id' >
If you are using the Peek-A-Boo hack, this code is already there.
Step 4: Scroll down to the code-lines for the post-footer. Just below the code for the quick-edit icon, insert this code:
<!-- to top of page and top of blog -->
<a href='javascript:scroll(0,0)' title='Scroll to top of this page'>Top of Page</a>
<a expr:onclick='"javascript:document.getElementById(\"post-" + data:post.id + "\").scrollIntoView(true);"' href='javascript:void(0);' title='Scroll to top of post'>Top of Post</a>
Save the template and you are done.
Friday, October 6, 2006
Pullquotes for your Blog
It is definitely an oldy, but it is an oldy I really like. I first encountered it at AnnieBlueSky's BlogU.
It is an easy trick to let your post jump out of the screen, by showing
an interesting quote, that gives the essential idea of the post itself.
Sometimes text needs a little help to make it more interesting. Graphics works miracles in this department. But often you don't have a graphic that you can use. Jazzing up your text is an excellent option.
The pullquotes are easy to implement: you only have to add some CSS to your template, so strictly speaking it is not even hacking. Or maybe we could call it soft-hacking.
The only thing you have to do is add a class called "pullquote" to your template, and configure it any which way you like. In your post, add a <span class="pullquote"> around the text that you want to show in the box, and there you go.
This is the CSS that I added to my template. As you see, I defined color variables, so that I can set the color from my Fonts and Colors page.
.pullquote {
width: 15%;
background-color:$pullquoteBgColor;
background-image: url(http://home.planet.nl/~hansoosting/images/quotes_grey.gif);
background-repeat: no-repeat;
color:$pullquoteTextColor;
float: right;
border:1px solid $borderColor;
font-weight:bold;
line-height:120%;
padding:40px 10px 10px 10px;
margin-top:10px;
margin-left:10px;
}
Color Variables that need to be defined are:
pullquoteBgColor, pullquoteTextColor and borderColor
Subscribe to:
Posts (Atom)