Intro arduino r3
0 recomendaciones66 vistas

El documento describe un fab-lab en Cáceres que ofrece un espacio para experimentar y aprender en el contexto de la fabricación digital, abierto a estudiantes y comunidad en general. Se presentan detalles sobre la programación de Arduino, incluyendo la estructura básica de código, tipos de datos, operaciones y ejemplos de proyectos. Además, se abordan herramientas y módulos disponibles, así como la utilización de sensores y actuadores para la creación de dispositivos interactivos.


Intro arduino r3
- 1. http://SolEpcc.unex.es @SolEpccSaltar a Arduino Saltar a instalación Saltar a programación Saltar a presentación
- 7. http://SolEpcc.unex.es @SolEpcc • Es un Fab-Lab (Fabrication Laboratory) – Con sede en la Escuela Politécnica de Cáceres
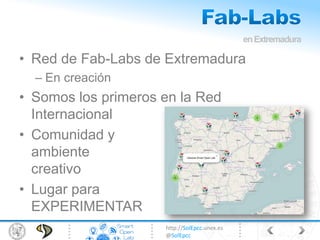
- 8. http://SolEpcc.unex.es @SolEpcc • Red de Fab-Labs de Extremadura – En creación • Somos los primeros en la Red Internacional • Comunidad y ambiente creativo • Lugar para EXPERIMENTAR enExtremadura
- 9. http://SolEpcc.unex.es @SolEpcc • El Laboratorio externo está abierto a todo el mundo – Contiene material “fungible”, placas de prototipado y SoCs (Raspberry Pi, Galileo…) – Se realizan cursos, prácticas…
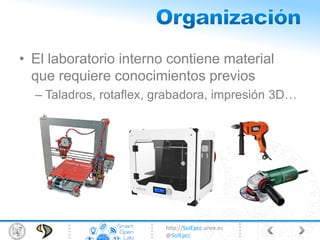
- 10. http://SolEpcc.unex.es @SolEpcc • El laboratorio interno contiene material que requiere conocimientos previos – Taladros, rotaflex, grabadora, impresión 3D…
- 11. http://SolEpcc.unex.es @SolEpcc • Es un espacio abierto a TODOS – Estudiantes, profesores, PAS,… – Y ¡Gente de fuera de la Universidad! • Respetar el código de convivencia y ser participativo – El aprendizaje es colaborativo – Los proyectos son compartidos al menos con el resto de miembros • Cada cual elige cómo compartirlo fuera de SOL • Asociación creada (no universitaria) – Acceso preferente a cursos/talleres – Taller siempre disponible (llave) – 10€/año ¿CÓMO?
- 13. http://SolEpcc.unex.es @SolEpcc • Algunos presentados como candidatos para creación de empresas y torneos mundiales de ingeniería
- 15. http://SolEpcc.unex.es @SolEpcc Conectar Arduino mediante USB Instalar driver • Sólo si no se autoinstala • Se encuentra en la carpeta del IDE Abrir IDE • Herramientas -> Tarjeta -> Arduino UNO • Herramientas -> Puerto Serie -> COM# HardwareeIDE 15
- 16. http://SolEpcc.unex.es @SolEpcc • Estructura del código: setup{ //código que se ejecuta //una vez al inicio } loop{ //código que se ejecuta //repetidamente }
- 17. http://SolEpcc.unex.es @SolEpcc int valorSensor=20; void setup() { Serial.begin(9600); Serial.println (“Bienvenido!”); } void loop() { Serial.print("valor = " ); Serial.println(valorSensor); } • Variable (caja/almacén) • Una sola vez • Continuamente 1erprograma: comunicación(serie)conArduino-PC
- 18. http://SolEpcc.unex.es @SolEpcc • Típicamente los computadores trabajan y transmiten bits • Cada bit tiene 2 estados: • ENCENDIDO / APAGADO • VERDADERO / FALSO • 1 / 0 • HIGH / LOW • ¿Cuántos estados diferentes puedes representar con 2 LEDs? INTRO 00 0 01 1 10 2 11 3
- 19. http://SolEpcc.unex.es @SolEpcc • ¿Y dónde se almacenan estos datos?¡variables! – boolean true o false, 0 ó 1 (1 bit 1 byte) – byte, char, unsigned char del 0 al 255 – int, unsigned int del 0 al 65535 – long, unsigned long, double, float 32 bits TIPOSdeDATOS 8 bits 16 bits 32 bits char int, unsigned int long, unsigned long float
- 20. http://SolEpcc.unex.es @SolEpcc • Y en el programa: ¿Cómo se especifica? – variables (son cajas que almacenan bits) tipo nombre; tipo nombre = valor; tipo nombre1, nombre2,…; int x; float voltage = 5.0; bool mivar1, mivar2; const int LEDPIN = 7; TIPOSdeDATOS
- 21. http://SolEpcc.unex.es @SolEpcc ENCENDER LAS 3 LUCES DE UNA HABITACIÓN SI ESTÁN APAGADAS: REPETIR 3 VECES SELECCIONAR UNA LUZ SI LUZ APAGADA Cambiar el interruptor de posición ----------------------------------------------------------------------------------- x = 1; do{ int interruptor = seleccionar_siguiente_interruptor(); interruptor.off(); } while (++x != 3); RECETAdeCOCINA,…INDICAUNAFORMADEHACERLASCOSAS // Podemos poner comentarios así
- 22. http://SolEpcc.unex.es @SolEpcc • Cada línea de un algoritmo se llama sentencia – Asignación: da valor a una variable • b = 3; – Operadores matemáticos • a = b + 1; • +, -, *, /, % (modulo), ++, -- int mi_var; void setup() { Serial.begin(9600); mi_var = 2; } void loop() { Serial.print("t valor = " ); Serial.println(mi_var); mi_var = mi_var + 1; } //probar a cambiar por: mi_var++; //probar a cambiar por: mi_var *= 2; 2doprograma,asignación yop.matemáticos
- 23. http://SolEpcc.unex.es @SolEpcc • Sentencias: – Operadores relacionales >, <, ==, >=, <=, != – Operadores lógicos • &&, ||, !(not) – Operadores lógicos de bit • &, |, ^(xor), ~(negación) • <<(desplaz. left), >>(desplaz. right) operadoresrelacionalesylógicos
- 24. http://SolEpcc.unex.es @SolEpcc si (llueve) LEDparaguasOn(); sino LEDparaguasOff(); ---------------------------------- si (llueve){ LEDparaguasOn(); AvisarLlegoTarde(); } sino LEDparaguasOff(); int x = 5; void loop(){ if (x > 4){ Serial.println(“Verdad”); Serial.println(x); } else Serial.println(“Falso”); } //Cambiar valor de x //Cambiar por !(x > 4) CONDICIONALES: Bifurcaciones
- 25. http://SolEpcc.unex.es @SolEpcc En base al valor de tiempo llueve: EncenderLED; RecogerToldo; nieva: RecogerToldo; MandarMensajeMovil; por defecto: RecogerTemperatura; si (Temperatura>28) int selector = 1; void loop(){ switch (selector){ case 1: Serial.println(“1”); break; case 2: Serial.println(“2”); break; default: Serial.println(“otro”); break; selector++; } CONDICIONALES:switch-case
- 26. http://SolEpcc.unex.es @SolEpcc Mientras (1){ x=0; Mientras (x<10){ Imprimir (x) Incrementar (x) } } int x=0; while (x < 10){ Serial.println(x); x++; } ---------------------------- do{ Serial.println(x); }while (++x < 10); BUCLES:while,do…while
- 27. http://SolEpcc.unex.es @SolEpcc Repetir acciones x veces: Para (x=0) hasta (x<10) (x++) { Imprimir(x); } int i=0; void loop(){ for (i=0; i<10; i++){ Serial.println(i); } BUCLES:for
- 28. http://SolEpcc.unex.es @SolEpcc num sumaNumeros(num1, num2) { num = num1+num2; } ------------------------------------ int mediaNumeros (int a, int b){ int c; c = a+b; c /=2; return c; } void setup() { Serial.begin(9600); } int valor1, valor2; void loop() { Serial.print("Introduce un valor:"); valor1 = Serial.read(); Serial.print("Introduce otro valor:"); valor2 = Serial.read(); Serial.print("La media es "); Serial.println (mediaNumeros(valor1, valor2) ); } Agrupandosentencias •Serial.read(); //reads first byte from buffer •Serial.available(); // returns the number of bytes in the buffer •Serial.flush(); // clears the buffer
- 30. http://SolEpcc.unex.es @SolEpcc • ¿Qué es Arduino? – Intro – DIY, Open Hardware… – Arduino Uno • Formas de prototipado • Programación – Intro – Ejemplos
- 32. http://SolEpcc.unex.es @SolEpcc • Multiplatforma (Windows, Linux, Mac) • Energía via USB o externo – (Adaptador AC/DC o batería) • Muchas alternativas Intro Arduino Mega 2560 Arduino Ethernet Arduino Pro Mini http://www.arduino.cc/
- 34. http://SolEpcc.unex.es @SolEpcc Arduino Uno Digital I/O Pins 14 (6 PWM) Analog Input Pins 6 Flash Memory 32 KB SRAM 2 KB EEPROM 1 KB Voltaje 5V Cost ~ 30.00€ • Flash memory – Almacena el sketch • SRAM – Donde el sketch crea y manipula las variables • EEPROM – Memoria no volátil donde almacenar información ArduinoUno
- 37. http://SolEpcc.unex.es @SolEpcc • PWM: modulación por ancho de pulsos (Pulse-Width Modulation) • E.g., control de motores, ADCs
- 40. http://SolEpcc.unex.es @SolEpcc Problemas:Requiereciertosconocimientosyhabilidades
- 42. http://SolEpcc.unex.es @SolEpcc • Lenguaje propio basado en “wiring” – Parecido a C • Ejemplos de sentencias: – digitalWrite(pin#, HIGH or LOW); – digitalRead(pin#); – Serial.println(“hola”);
- 43. http://SolEpcc.unex.es @SolEpcc • LED • Relé • Buzzer pinMode(#,OUTPUT); # es el número de pin #define O0 11 void setup() { pinMode(O0, OUTPUT); } void loop() { digitalWrite(O0, HIGH); } //Cambiar HIGH por LOW //Cambiar O0 por 13 Output:Enelsetup()pinMode.CódigoescrituraLED Arduino V
- 44. http://SolEpcc.unex.es @SolEpcc • Botón • Potenciómetro • LDR pinMode(#,INPUT); # es el número de pin #define I0 A0 int valor_boton; void setup() { Serial.begin (9600); pinMode(I0,INPUT); } void loop() { valor_boton = digitalRead(I0); Serial.println (valor_boton); } Input:Enelsetup()pinMode.Códigolecturadebotón Arduino V High(5V) 1KΩ INPUT_PULLUP Si el PIN no se conecta toma valor 1
- 45. http://SolEpcc.unex.es @SolEpcc • Toma valores discretos: – 0 ó 1, LOW ó HIGH,… – Realmente es un voltaje: • HIGH (~ 2.7V-5V) • LOW (~ 1.2V-0V) var = digitalRead(#); //devuelve el valor leído digitalWrite(#, value); //value debe ser HIGH o LOW • Toma valores continuos: – Teóricamente infinitos – Al tratarlos con un micro controlador/procesador • 0,1,2,3,4,5,6… (no solo enteros) son voltajes var = analogRead(#); analogWrite(#, value); //value es valor discreto (0-255) 5 V 0 V 5 V 0 V
- 46. http://SolEpcc.unex.es @SolEpcc analogWrite(pin, val); 46C Programming analogWrite(pin, valor); pin – pin de salida valor – valor de 8 bit 0 => 0V … 255 => 5V
- 47. http://SolEpcc.unex.es @SolEpcc • #define O0 11 • #define O1 10 • #define O2 9 • #define O3 6 • #define O4 5 • #define O5 3 • #define I0 A0 • #define I1 A1 • #define I2 A2 • #define I3 A3 • #define I4 A4 • #define I5 A5 Definicióndelospines 47 SOLO PARA THINKERKIT!!! http://arduino.cc/es/Reference/HomePage http://www.tinkerkit.com/reference/
- 48. http://SolEpcc.unex.es @SolEpcc • Hacer que un LED se encienda y apague continuamente • Conectar un LED al output O0. • Los zócalos se conectan con sensores/actuadores del mismo color. • pinMode – INPUT – OUTPUT • digitalWrite – HIGH – LOW • delay #define O0 11 void setup() { pinMode(O0, OUTPUT); } void loop() { digitalWrite(O0, HIGH); delay(1000); digitalWrite(O0, LOW); delay(1000); } Ejemplo1 48
- 49. http://SolEpcc.unex.es @SolEpcc • Hacer que el LED se encienda cuando toquemos un pulsador • Conectar el pulsador o el sensor táctil a I0 (#define I0 A0) • digitalRead – True – False #define O0 11 #define I0 A0 void setup() { pinMode(O0,OUTPUT); pinMode(I0,INPUT); } void loop() { if(digitalRead(I0)){ digitalWrite(O0, HIGH); }else{ digitalWrite(O0, LOW); } delay(10); } Ejemplo2 49
- 50. http://SolEpcc.unex.es @SolEpcc • Controlar la potencia de luz de un LED con un eje de un joystick • Conectar a I0 uno de los zócalos del joystick • analogRead • map – Re-mapea un número de un rango a otro – y=map(x,1,150,0,20); – 1,150rango original de x – 0,20rango destino de y • analogWrite #define O0 11 #define I0 A0 int analogInputValue = 0; int analogOutputValue = 0; void setup() { pinMode(O0,OUTPUT); pinMode(I0,INPUT); } void loop() { analogInputValue = analogRead(I0); analogOutputValue = map(analogInputValue,0,1023,0,255); analogWrite(O0,analogOutputValue); delay(10); } Ejemplo3 50
- 51. http://SolEpcc.unex.es @SolEpcc • Controlar la potencia de luz de dos LEDs con los dos ejes de un joystick • Pines O0 y O1 configurados como salidas analógicas (conectar dos LEDs) • Pines I0 e I1 configurados como entradas analógicas (conectar los dos zócalos del joystick) • Mapear las entradas con las salidas • #define O0 11 • #define O1 10 • #define O2 9 • #define O3 6 • #define O4 5 • #define O5 3 • #define I0 A0 • #define I1 A1 • #define I2 A2 • #define I3 A3 • #define I4 A4 • #define I5 A5 Ejemplo4 51
- 52. http://SolEpcc.unex.es @SolEpcc #define O0 11 #define O1 10 #define I0 A0 #define I1 A1 int analogSensorValue1 = 0; int analogSensorValue2 = 0; int analogOutputValue1 = 0; int analogOutputValue2 = 0; int digitalOutputValue1 = LOW; void setup() { Serial.begin(9600); pinMode(O0,OUTPUT); pinMode(O1,OUTPUT); pinMode(I0, INPUT); pinMode(I1,INPUT); } void loop() { analogSensorValue1 = analogRead(I0); analogSensorValue2 = analogRead(I1); analogOutputValue1 = map(analogSensorValue1, 0, 1023, 0, 255); analogOutputValue2 = map(analogSensorValue2, 0, 1023, 0, 255); analogWrite(O0, analogOutputValue1); analogWrite(O1, analogOutputValue2); Serial.print("sensor = " ); Serial.print(analogSensorValue1); Serial.print("t output = "); Serial.println(analogOutputValue1); delay(10); } Ejemplo4 52
- 53. http://SolEpcc.unex.es @SolEpcc • Relé interruptor – permite que señales de baja potencia accionen mecanismos de potencia elevada – NO: Normally Open – NC: Normally Close ENCENDERYAPAGAROBJETOSELECTRICOS: RELÉ
- 54. http://SolEpcc.unex.es @SolEpcc FSM(FiniteStateMachine) 5410/3/2014 Condición de transición: delay 1 segundo Estado: Estado1 Acciones: LED3 está OFF LED4 está ON Estado: Estado1 Acciones: LED3 está ON LED4 está OFF Condición de transición: delay 2 segundos start
- 55. http://SolEpcc.unex.es @SolEpcc #define STATE1 1 #define STATE2 2 #define STATE_END 100 unsigned char state=1; //init. to state1 void setup() { pinMode (3, OUTPUT); pinMode (4, OUTPUT); } void loop() { switch(state) { case STATE1: digitalWrite(3, HIGH); // LED OFF digitalWrite(4, LOW); // LED OFF delay(1000); state=STATE2; break; case STATE2: digitalWrite(3, LOW); // LED ON digitalWrite(4, HIGH); // LED OFF delay(2000); state=STATE1; break; default: state=STATE_END; break; } } Códigodeejemplo 5510/3/2014
- 56. http://SolEpcc.unex.es @SolEpcc 220 Ω 1 KΩ Resistencias típicas 10 KΩ Sonelementosquelimitanelpasodelacorriente Código de colores
- 57. http://SolEpcc.unex.es @SolEpcc Medir continuidad: • Muy útil para saber si hay un contacto roto o uno que no debería existir Continuidad