SlideShare a Scribd company logo
9
Most read
14
Most read
23
Most read
1
User Manual
Content
content....................................................................................................................................................................1
1.software introduction......................................................................................................................................3
1.1 MSLA resin 3D printer.........................................................................................................................3
1.2 DLP resin 3D printer.............................................................................................................................3
1.3 SLA resin 3D printer.............................................................................................................................4
2. software installing..........................................................................................................................................4
2.1 software download............................................................................................................................4
2.2 Software installation........................................................................................................................5
3. User login.........................................................................................................................................................7
4. Software operation........................................................................................................................................7
4.1 Main Menu...........................................................................................................................................8
4.1.1 Open project..........................................................................................................................8
4.1.2 Save project...........................................................................................................................8
4.1.3 Open….....................................................................................................................................8
4.1.4 Save as…..................................................................................................................................8
4.1.5 Open Recent……....................................................................................................................8
4.1.6 Account..................................................................................................................................8
4.1.7 Language................................................................................................................................8
4.1.8 Help.........................................................................................................................................8
4.1.9 Examples................................................................................................................................8
4.1.10 Quit.........................................................................................................................................8
4.2 Introduction of menu.......................................................................................................................8
4.2.1 Open file.................................................................................................................................8
4.2.2 Save file...................................................................................................................................8
4.2.3 Screenshots / Recording.....................................................................................................8
4.2.4 Undo & Redo.........................................................................................................................9
4.2.5 Clone Current Model...........................................................................................................9
4.2.6 Auto layout............................................................................................................................9
4.2.7 Hollow.....................................................................................................................................9
4.2.8 Dig hole.................................................................................................................................10
4.3 Model Editing....................................................................................................................................10
4.3.1 Move.....................................................................................................................................10
4.3.2 Rotation................................................................................................................................11
2
4.3.3 Zoom.....................................................................................................................................11
4.3.4 Mirror...................................................................................................................................11
4.4 Mouse operation..............................................................................................................................12
4.4.1 Left click...............................................................................................................................12
4.4.2 Left key press......................................................................................................................12
4.4.3 Right key press...................................................................................................................12
4.4.4 Mouse scroll pulley...........................................................................................................12
4.5 Views...................................................................................................................................................12
4.5.1 M o v e ...............................................................................................................................13
4.5.2 Rotate..................................................................................................................................13
4.5.3 Scale......................................................................................................................................13
4.5.4 Front view/home...............................................................................................................13
4.5.5 Othographic/Perspective..............................................................................................13
4.5.6 Top/Left/Front....................................................................................................................13
4.5.7 Solid/X-Ray..........................................................................................................................13
4.5.8 Model preview...................................................................................................................13
4.5.9 Expand/Hide.......................................................................................................................13
4.6 Common settings.............................................................................................................................14
4.6.1 File list..................................................................................................................................14
4.6.2 Slice settings.......................................................................................................................14
4.6.3 Slice.......................................................................................................................................19
4.6.4 Slice Preview.......................................................................................................................19
4.7 Support setting.................................................................................................................................20
4.7.1 Lift height.............................................................................................................................21
4.7.2 Support setting...................................................................................................................21
4.7.3 Automatic support............................................................................................................21
4.7.4 Add support........................................................................................................................21
4.7.5 Delete support....................................................................................................................21
4.7.6 Edite support.................................................................................................................21
4.7.7 Remove all............................................................................................................................21
4.8 Printing process...............................................................................................................................22
4.8.1 choose printer.....................................................................................................................22
4.8.2 Slice........................................................................................................................................23
4.8.3 Preview and export............................................................................................................23
3
1. Software Introduction
1.1 MSLA resin Printer:
9 types for now :
 AnyCubic Photon
 Phrozen Shuffle XL
 Phrozen Shuffle
 WanHao D7
 WanHao D8
 SparkMaker FHD
 SparkMaker
 Orbeat D100
 ELEGOO MARS
1.2 DLP resin 3D Printer:
4
1.3 SLA resin 3D Printer:
2. Software installing
2.1 Software download
A:Open the browser and input this website::www.cbd-3d.com reach PRODUCTS->
ChiTuBox then turn to www.chitubox.com/home
5
B:Download on the official website:http//www.chitubox.com
2.2 Software installation
(1)Register the email to log in and download, open the downloaded installation package, and
follow the prompts to complete the installation (register the email login, select the version
compatible with your computer for Windows (32), Windows (64), Mac, Linux
6
(2)Start the software using the desktop icon or the shortcut in the start menu.
When opening the software for the first time, the machine selection box will pop up,
and you can choose the machine you want.
7
3. User login (optional, non-compulsory)
4. Software operation
8
4.1 Main Menu
4.1.8 Help
Check for updates: Check the current version
4.1.9 Example: A cube model and a cylinder model.
4.1.10 Exit: Close the ChiTuBox
4.2 Introduction of Menu
4.2.1 Open file:load into one or multiple files.
4.2.2 Save file:Save the current file
4.2.3 Screen capture/recording: Watermark, recording and Capture
4.1.1 Open Project: Open the project you need to operate
4.1.2 Save Project: Save the manipulated model to the specified
directory path
4.1.3 Open: Open the model
4.1.4 Save as: Save as other file format
4.1.5 Open recent: Open recent files
4.1.6 Account: Login and Authorization
4.1.7 Language: Users can choose their own language according to
their needs (English, Simplified Chinese, Traditional Chinese,
German, French, Russian, Korean, Italian, Brazilian Portuguese,
Turkish, Greek, Spanish)
9
(1) Watermark: Add watermarking information to the picture (date, author, etc.)
(2) Screen recording: You can set time (/ s), frame rate (/ fps),
(3) Capture: Click the “Start” button
4.2.4 Undo & Redo
4.2.5 Clone the current model
4.2.6 Auto layout:
Center X-side Y-side
4.2.7 Hollow: inter or outer hollow, can set wall thickness and precision.
10
4.2.8 Dig Hole: Shape and size can be seted, keep the hole, add a hole.
4.3 Model Edition
4.3.1 Move
(1) Move X,Y and Z axes respectively: Scroll the mouse or enter data directly.
(2) The model can be placed directly on the platform, centered or reset.
11
4.3.2 Rotate: Turn and rotate model (shortcut: double click )
4.3.3 Zoom :Zoom on X, Y and Z axes respectively:
4.3.4 Mirror
(1) X Mirror: Mirror the current model with the X axis as the axis of symmetry
(2) Y Mirror: Mirror the current model with the Y axis as the axis of symmetry
(3) Z mirror: Mirror the current model with the Z axis as the axis of symmetry
12
4.4 Mouse operation (operate in the middle page)
4.4.1 Left click: Click to select the model, platform, or blank space
4.4.2 Left click and hold on
(1) Left click model can move the model on the platform.
(2) Left click on the platform or blank space can move the platform
4.4.3 Right click and hold on: Rotate the platform.
4.4.4 Scroll the mouse wheel : Zoom view
4.5 Views
13
4.5.1 Move
(1) Hold down left button of mouse and drag
(2) Holds down the mouse wheel and drag
4.5.2 Rotate: Hold down right button of mouse and drag.
4.5.3 Scale: scrolling mouse wheel
4.5.4 Home: Make platform right front view face user
4.5.5 Switching orthographic and perspective
4.5.6 Top/front/left view
4.5.7 Solid and X-ray perspective
4.5.8 Model bar: Real-time cross-sectional view of the model;
up and down have one, two, three times the speed of the slice play and
pause buttons.
4.5.9 Expand/Hide: Expand and hide the content on the right
14
4.6 Common settings
4.6.1 File List: All the models on the platform are listed in the file list, and can be
edited or deleted by choosing all/single models.
4.6.2 Slicing settings:
You can click on the button in the lower left corner,
add your own printer, and then set the relevant parameters.
<Import>: Import resin configuration file
(This file also contains support parameters);
<Export>: Export resin configuration file
(This file also contains support parameters);
15
(1)Machine
<Name>: Printer name, you can enter the name directly for modification;
<Resolution>: The resolution of projector or LCD screen, which directly affects the
dimensional accuracy of printing;
<Lock Ratio>:
Normally, the size ratio of the XY platform is equal to the resolution ratio, that is, the
locking ratio.
In some cases, such as DLP projector due to accuracy or machine design reasons, the
size of XY platform is not necessarily the same as the resolution ratio, it can input the
actual projection size.
<Size>: Maximum print size of machine.
(2)resin
16
<Resin Type>: Different resin types have different parameters, and some resin
parameters recommended by enterprises have been integrated..
<Resin Density>: Resin density, used to calculate weight;
<Resin Cost>: Resin price, used to calculate costs;
(3)Print
<Layer Thickness>: Thickness of each layer, such as 0.025/0.05/0.1mm.
<Bottom Layer Count>: The number of solidified layers should be strengthened at
the bottom, in order to make the model stick to the platform better.
<Exposure Time>: Exposure Time of normal Layer
<Bottom exposure time>: The exposure time of the bottom layers is longer than that
of the normal layers, so that the resin can be cured thoroughly and the model can
adhere to the platform as far as possible.
<Light-off Delay>:
Final light-off time = maximum value (total time of Z-axis up and down movement,
light-off delay time). For example,total Z-axis up down movement cycle is 6 seconds,
If "light-off delay" is set to 10 seconds,final light-off time is 10 seconds.
If "light-off delay" is set to 1 second, final light-off time is 6 seconds.
<Bottom Light-off Delay>: Light-off delay time of the bottom layers.
<Bottom Lift Distance>: When printing the bottom layers, the lifting distance of the
forming platform.
<Lifting Distance>: When printing the normal layers, the lifting distance of the
17
forming platform.
<Bottom Lift Speed>: When printing the bottom layers, the lifting speed of the
forming platform.
<Lift Speed>: When printing the normal layers, the lifting speed of the forming
platform.
<Retract Speed>: The downward speed of the forming platform
(4)Infill
<Infill Structure>: The type of infill in the model, such as the grid structure.
(5)Gcode
18
<Start>: Preprocessing commands executed at the beginning of printing. (Modifiable)
<Interlayer>: Commands executed on each layer during printing. (Modifiable)
{image} The name of the resulting exposure image
{raise_pos} Corresponding to the raised position, is an absolute coordinate value,
value = exposure position + lift height
{raise_speed} Is the lifting speed, the lifting speed = the bottom lifting speed or the
lifting speed
{fall_pos} Corresponding to the falling position, is an absolute coordinate, value =
exposure position
{fall_speed} Is the falling speed, the falling speed = the bottom falling speed or the
falling speed
{exposure_time} Corresponding to the underlying exposure time or exposure time,
the unit is ms
<End>: Command executed at the end of printing. (Modifiable)
{machine_height} corresponds to the height of the machine size
(6)Advanced
19
<Bottom Light PWM>: The intensity of the light source when printing the bottom
layers.(some priters support this command)
< Light PWM>: The intensity of the light source when printing the normal
layers.(Some priters support this command)
<Anti-aliasing>: Turn on anti-aliasing to make the model surface smoother.
As shown below: anti-aliasing is not selected, ,anti-aliasing is selected
No X 4
4.6.3 Slice
Click on the “Slice”to start the model slicing process. (you can choose the
corresponding parameters to slice)
4.6.4 Slice Preview
Support for slice layer and solid model preview.
20
4.7 Support setting
21
4.7.1 Z Lift Height (the default is 5mm), can be customized
4.7.2 Support setting( refresh fold expand)
(1) Select the size of the support, there are three choices: Light, Medium and Heavy.
(2) Top: Set the parameters of the top of the support, which can be customized by
the user.
(3) Millde: Set the parameters of the middle of the support, which can be customized
by the user.
(4) Bottom: Set the parameters of the bottom of the support, which can be
customized by the user.
(5) Raft: Set the parameters of the raft, which can be customized by the user.
4.7.3 Auto support( refresh fold expand):Set the parameters
of the auto support, which can be customized by the user.
(1) Click this button to automatically add support to the model
(no support will be generated on the model).
(2) Click this button to automatically add support to the model
(support is also generated on the model).
+Platform +All
4.7.4 Add Support: Add support in manual mode.
4.7.5 Delete support: Delete support in manual mode.
4.7.6 Edit Support: Edit selected support.
4.7.7 Remove all: Remove all support.
22
4.8 Printing process
4.8.1 Add new printer(Or select an existing printer)
in the settings menu and set the parameters. If you don't have your machine in the
list, you can choose Default and set the parameters yourself.
23
4.8.2 Slice: After setting all the parameters, click the slice menu.
4.8.3 Preview and Export: After the slice is finished, it will automatically enter the
preview mode(drag the upper slider to preview the layer). you can save the slice file
or return to re-edit.

More Related Content

DOC
Đề tài: Quản lí tiền điện
PPTX
Mems reliability & failure mechanisms
PPTX
Uses,mis uses and risk of software
PPTX
Presentation on Faculty of Engineering and Technology
PDF
3D PRINTER Seminar fair report (pdf)
PPT
Touch screen
PDF
Workshop diy 3 d printing makerbots 2012
PPTX
3 D Printing Tutorial
Đề tài: Quản lí tiền điện
Mems reliability & failure mechanisms
Uses,mis uses and risk of software
Presentation on Faculty of Engineering and Technology
3D PRINTER Seminar fair report (pdf)
Touch screen
Workshop diy 3 d printing makerbots 2012
3 D Printing Tutorial

Similar to Chitubox user manual v1.0 en (6)

PDF
Zmorph Dual Head User Manual for Printing
PPTX
Liquid-Based Rapid Prototyping Systems.pptx
PDF
Makerbot Replicator 2 Primer
PDF
Manual open source cnc 3 d makerbot
PDF
Manual Open Source CNC 3D makerbots
PDF
Manual de Impresora de resina Creality Halot One
Zmorph Dual Head User Manual for Printing
Liquid-Based Rapid Prototyping Systems.pptx
Makerbot Replicator 2 Primer
Manual open source cnc 3 d makerbot
Manual Open Source CNC 3D makerbots
Manual de Impresora de resina Creality Halot One
Ad

Recently uploaded (20)

PDF
From MVP to Full-Scale Product A Startup’s Software Journey.pdf
PDF
Encapsulation theory and applications.pdf
PPTX
A Presentation on Artificial Intelligence
PDF
Profit Center Accounting in SAP S/4HANA, S4F28 Col11
PDF
Zenith AI: Advanced Artificial Intelligence
PDF
Mushroom cultivation and it's methods.pdf
PDF
A comparative analysis of optical character recognition models for extracting...
PDF
Hindi spoken digit analysis for native and non-native speakers
PDF
Accuracy of neural networks in brain wave diagnosis of schizophrenia
PDF
project resource management chapter-09.pdf
PDF
Assigned Numbers - 2025 - Bluetooth® Document
PDF
MIND Revenue Release Quarter 2 2025 Press Release
PPTX
A Presentation on Touch Screen Technology
PDF
Unlocking AI with Model Context Protocol (MCP)
PDF
August Patch Tuesday
PDF
Hybrid model detection and classification of lung cancer
PDF
Agricultural_Statistics_at_a_Glance_2022_0.pdf
PPTX
cloud_computing_Infrastucture_as_cloud_p
PDF
DASA ADMISSION 2024_FirstRound_FirstRank_LastRank.pdf
PDF
7 ChatGPT Prompts to Help You Define Your Ideal Customer Profile.pdf
From MVP to Full-Scale Product A Startup’s Software Journey.pdf
Encapsulation theory and applications.pdf
A Presentation on Artificial Intelligence
Profit Center Accounting in SAP S/4HANA, S4F28 Col11
Zenith AI: Advanced Artificial Intelligence
Mushroom cultivation and it's methods.pdf
A comparative analysis of optical character recognition models for extracting...
Hindi spoken digit analysis for native and non-native speakers
Accuracy of neural networks in brain wave diagnosis of schizophrenia
project resource management chapter-09.pdf
Assigned Numbers - 2025 - Bluetooth® Document
MIND Revenue Release Quarter 2 2025 Press Release
A Presentation on Touch Screen Technology
Unlocking AI with Model Context Protocol (MCP)
August Patch Tuesday
Hybrid model detection and classification of lung cancer
Agricultural_Statistics_at_a_Glance_2022_0.pdf
cloud_computing_Infrastucture_as_cloud_p
DASA ADMISSION 2024_FirstRound_FirstRank_LastRank.pdf
7 ChatGPT Prompts to Help You Define Your Ideal Customer Profile.pdf
Ad

Chitubox user manual v1.0 en

  • 1. 1 User Manual Content content....................................................................................................................................................................1 1.software introduction......................................................................................................................................3 1.1 MSLA resin 3D printer.........................................................................................................................3 1.2 DLP resin 3D printer.............................................................................................................................3 1.3 SLA resin 3D printer.............................................................................................................................4 2. software installing..........................................................................................................................................4 2.1 software download............................................................................................................................4 2.2 Software installation........................................................................................................................5 3. User login.........................................................................................................................................................7 4. Software operation........................................................................................................................................7 4.1 Main Menu...........................................................................................................................................8 4.1.1 Open project..........................................................................................................................8 4.1.2 Save project...........................................................................................................................8 4.1.3 Open….....................................................................................................................................8 4.1.4 Save as…..................................................................................................................................8 4.1.5 Open Recent……....................................................................................................................8 4.1.6 Account..................................................................................................................................8 4.1.7 Language................................................................................................................................8 4.1.8 Help.........................................................................................................................................8 4.1.9 Examples................................................................................................................................8 4.1.10 Quit.........................................................................................................................................8 4.2 Introduction of menu.......................................................................................................................8 4.2.1 Open file.................................................................................................................................8 4.2.2 Save file...................................................................................................................................8 4.2.3 Screenshots / Recording.....................................................................................................8 4.2.4 Undo & Redo.........................................................................................................................9 4.2.5 Clone Current Model...........................................................................................................9 4.2.6 Auto layout............................................................................................................................9 4.2.7 Hollow.....................................................................................................................................9 4.2.8 Dig hole.................................................................................................................................10 4.3 Model Editing....................................................................................................................................10 4.3.1 Move.....................................................................................................................................10 4.3.2 Rotation................................................................................................................................11
  • 2. 2 4.3.3 Zoom.....................................................................................................................................11 4.3.4 Mirror...................................................................................................................................11 4.4 Mouse operation..............................................................................................................................12 4.4.1 Left click...............................................................................................................................12 4.4.2 Left key press......................................................................................................................12 4.4.3 Right key press...................................................................................................................12 4.4.4 Mouse scroll pulley...........................................................................................................12 4.5 Views...................................................................................................................................................12 4.5.1 M o v e ...............................................................................................................................13 4.5.2 Rotate..................................................................................................................................13 4.5.3 Scale......................................................................................................................................13 4.5.4 Front view/home...............................................................................................................13 4.5.5 Othographic/Perspective..............................................................................................13 4.5.6 Top/Left/Front....................................................................................................................13 4.5.7 Solid/X-Ray..........................................................................................................................13 4.5.8 Model preview...................................................................................................................13 4.5.9 Expand/Hide.......................................................................................................................13 4.6 Common settings.............................................................................................................................14 4.6.1 File list..................................................................................................................................14 4.6.2 Slice settings.......................................................................................................................14 4.6.3 Slice.......................................................................................................................................19 4.6.4 Slice Preview.......................................................................................................................19 4.7 Support setting.................................................................................................................................20 4.7.1 Lift height.............................................................................................................................21 4.7.2 Support setting...................................................................................................................21 4.7.3 Automatic support............................................................................................................21 4.7.4 Add support........................................................................................................................21 4.7.5 Delete support....................................................................................................................21 4.7.6 Edite support.................................................................................................................21 4.7.7 Remove all............................................................................................................................21 4.8 Printing process...............................................................................................................................22 4.8.1 choose printer.....................................................................................................................22 4.8.2 Slice........................................................................................................................................23 4.8.3 Preview and export............................................................................................................23
  • 3. 3 1. Software Introduction 1.1 MSLA resin Printer: 9 types for now :  AnyCubic Photon  Phrozen Shuffle XL  Phrozen Shuffle  WanHao D7  WanHao D8  SparkMaker FHD  SparkMaker  Orbeat D100  ELEGOO MARS 1.2 DLP resin 3D Printer:
  • 4. 4 1.3 SLA resin 3D Printer: 2. Software installing 2.1 Software download A:Open the browser and input this website::www.cbd-3d.com reach PRODUCTS-> ChiTuBox then turn to www.chitubox.com/home
  • 5. 5 B:Download on the official website:http//www.chitubox.com 2.2 Software installation (1)Register the email to log in and download, open the downloaded installation package, and follow the prompts to complete the installation (register the email login, select the version compatible with your computer for Windows (32), Windows (64), Mac, Linux
  • 6. 6 (2)Start the software using the desktop icon or the shortcut in the start menu. When opening the software for the first time, the machine selection box will pop up, and you can choose the machine you want.
  • 7. 7 3. User login (optional, non-compulsory) 4. Software operation
  • 8. 8 4.1 Main Menu 4.1.8 Help Check for updates: Check the current version 4.1.9 Example: A cube model and a cylinder model. 4.1.10 Exit: Close the ChiTuBox 4.2 Introduction of Menu 4.2.1 Open file:load into one or multiple files. 4.2.2 Save file:Save the current file 4.2.3 Screen capture/recording: Watermark, recording and Capture 4.1.1 Open Project: Open the project you need to operate 4.1.2 Save Project: Save the manipulated model to the specified directory path 4.1.3 Open: Open the model 4.1.4 Save as: Save as other file format 4.1.5 Open recent: Open recent files 4.1.6 Account: Login and Authorization 4.1.7 Language: Users can choose their own language according to their needs (English, Simplified Chinese, Traditional Chinese, German, French, Russian, Korean, Italian, Brazilian Portuguese, Turkish, Greek, Spanish)
  • 9. 9 (1) Watermark: Add watermarking information to the picture (date, author, etc.) (2) Screen recording: You can set time (/ s), frame rate (/ fps), (3) Capture: Click the “Start” button 4.2.4 Undo & Redo 4.2.5 Clone the current model 4.2.6 Auto layout: Center X-side Y-side 4.2.7 Hollow: inter or outer hollow, can set wall thickness and precision.
  • 10. 10 4.2.8 Dig Hole: Shape and size can be seted, keep the hole, add a hole. 4.3 Model Edition 4.3.1 Move (1) Move X,Y and Z axes respectively: Scroll the mouse or enter data directly. (2) The model can be placed directly on the platform, centered or reset.
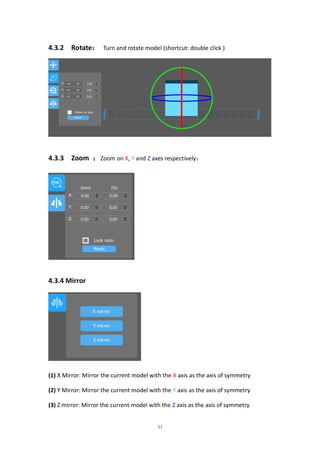
  • 11. 11 4.3.2 Rotate: Turn and rotate model (shortcut: double click ) 4.3.3 Zoom :Zoom on X, Y and Z axes respectively: 4.3.4 Mirror (1) X Mirror: Mirror the current model with the X axis as the axis of symmetry (2) Y Mirror: Mirror the current model with the Y axis as the axis of symmetry (3) Z mirror: Mirror the current model with the Z axis as the axis of symmetry
  • 12. 12 4.4 Mouse operation (operate in the middle page) 4.4.1 Left click: Click to select the model, platform, or blank space 4.4.2 Left click and hold on (1) Left click model can move the model on the platform. (2) Left click on the platform or blank space can move the platform 4.4.3 Right click and hold on: Rotate the platform. 4.4.4 Scroll the mouse wheel : Zoom view 4.5 Views
  • 13. 13 4.5.1 Move (1) Hold down left button of mouse and drag (2) Holds down the mouse wheel and drag 4.5.2 Rotate: Hold down right button of mouse and drag. 4.5.3 Scale: scrolling mouse wheel 4.5.4 Home: Make platform right front view face user 4.5.5 Switching orthographic and perspective 4.5.6 Top/front/left view 4.5.7 Solid and X-ray perspective 4.5.8 Model bar: Real-time cross-sectional view of the model; up and down have one, two, three times the speed of the slice play and pause buttons. 4.5.9 Expand/Hide: Expand and hide the content on the right
  • 14. 14 4.6 Common settings 4.6.1 File List: All the models on the platform are listed in the file list, and can be edited or deleted by choosing all/single models. 4.6.2 Slicing settings: You can click on the button in the lower left corner, add your own printer, and then set the relevant parameters. <Import>: Import resin configuration file (This file also contains support parameters); <Export>: Export resin configuration file (This file also contains support parameters);
  • 15. 15 (1)Machine <Name>: Printer name, you can enter the name directly for modification; <Resolution>: The resolution of projector or LCD screen, which directly affects the dimensional accuracy of printing; <Lock Ratio>: Normally, the size ratio of the XY platform is equal to the resolution ratio, that is, the locking ratio. In some cases, such as DLP projector due to accuracy or machine design reasons, the size of XY platform is not necessarily the same as the resolution ratio, it can input the actual projection size. <Size>: Maximum print size of machine. (2)resin
  • 16. 16 <Resin Type>: Different resin types have different parameters, and some resin parameters recommended by enterprises have been integrated.. <Resin Density>: Resin density, used to calculate weight; <Resin Cost>: Resin price, used to calculate costs; (3)Print <Layer Thickness>: Thickness of each layer, such as 0.025/0.05/0.1mm. <Bottom Layer Count>: The number of solidified layers should be strengthened at the bottom, in order to make the model stick to the platform better. <Exposure Time>: Exposure Time of normal Layer <Bottom exposure time>: The exposure time of the bottom layers is longer than that of the normal layers, so that the resin can be cured thoroughly and the model can adhere to the platform as far as possible. <Light-off Delay>: Final light-off time = maximum value (total time of Z-axis up and down movement, light-off delay time). For example,total Z-axis up down movement cycle is 6 seconds, If "light-off delay" is set to 10 seconds,final light-off time is 10 seconds. If "light-off delay" is set to 1 second, final light-off time is 6 seconds. <Bottom Light-off Delay>: Light-off delay time of the bottom layers. <Bottom Lift Distance>: When printing the bottom layers, the lifting distance of the forming platform. <Lifting Distance>: When printing the normal layers, the lifting distance of the
  • 17. 17 forming platform. <Bottom Lift Speed>: When printing the bottom layers, the lifting speed of the forming platform. <Lift Speed>: When printing the normal layers, the lifting speed of the forming platform. <Retract Speed>: The downward speed of the forming platform (4)Infill <Infill Structure>: The type of infill in the model, such as the grid structure. (5)Gcode
  • 18. 18 <Start>: Preprocessing commands executed at the beginning of printing. (Modifiable) <Interlayer>: Commands executed on each layer during printing. (Modifiable) {image} The name of the resulting exposure image {raise_pos} Corresponding to the raised position, is an absolute coordinate value, value = exposure position + lift height {raise_speed} Is the lifting speed, the lifting speed = the bottom lifting speed or the lifting speed {fall_pos} Corresponding to the falling position, is an absolute coordinate, value = exposure position {fall_speed} Is the falling speed, the falling speed = the bottom falling speed or the falling speed {exposure_time} Corresponding to the underlying exposure time or exposure time, the unit is ms <End>: Command executed at the end of printing. (Modifiable) {machine_height} corresponds to the height of the machine size (6)Advanced
  • 19. 19 <Bottom Light PWM>: The intensity of the light source when printing the bottom layers.(some priters support this command) < Light PWM>: The intensity of the light source when printing the normal layers.(Some priters support this command) <Anti-aliasing>: Turn on anti-aliasing to make the model surface smoother. As shown below: anti-aliasing is not selected, ,anti-aliasing is selected No X 4 4.6.3 Slice Click on the “Slice”to start the model slicing process. (you can choose the corresponding parameters to slice) 4.6.4 Slice Preview Support for slice layer and solid model preview.
  • 21. 21 4.7.1 Z Lift Height (the default is 5mm), can be customized 4.7.2 Support setting( refresh fold expand) (1) Select the size of the support, there are three choices: Light, Medium and Heavy. (2) Top: Set the parameters of the top of the support, which can be customized by the user. (3) Millde: Set the parameters of the middle of the support, which can be customized by the user. (4) Bottom: Set the parameters of the bottom of the support, which can be customized by the user. (5) Raft: Set the parameters of the raft, which can be customized by the user. 4.7.3 Auto support( refresh fold expand):Set the parameters of the auto support, which can be customized by the user. (1) Click this button to automatically add support to the model (no support will be generated on the model). (2) Click this button to automatically add support to the model (support is also generated on the model). +Platform +All 4.7.4 Add Support: Add support in manual mode. 4.7.5 Delete support: Delete support in manual mode. 4.7.6 Edit Support: Edit selected support. 4.7.7 Remove all: Remove all support.
  • 22. 22 4.8 Printing process 4.8.1 Add new printer(Or select an existing printer) in the settings menu and set the parameters. If you don't have your machine in the list, you can choose Default and set the parameters yourself.
  • 23. 23 4.8.2 Slice: After setting all the parameters, click the slice menu. 4.8.3 Preview and Export: After the slice is finished, it will automatically enter the preview mode(drag the upper slider to preview the layer). you can save the slice file or return to re-edit.