SlideShare a Scribd company logo
CoDing
GameS
A STEP-BY-STEP VISUAL GUIDE TO BUILDING
YOUR OWN COMPUTER GAMES
IN SCRATCH™
0 x
= } 0 0
1 1
: )
0
= 1
>
*
*
/
( 0 =
1
0 1
1 * y :
:
x 0 0
1
)
1
: y x 0
0
0
0
*
1
1
1
1
=
(
coding games with scratch for using in school
GameS
CoD ng
IN SCRATCH™
coding games with scratch for using in school
JON WOODCOCK
GameS
CoD ng
IN SCRATCH™
DK UK
Senior editor Ben Morgan
Project art editor Laura Brim
Editors Lizzie Davey, Ashwin Khurana, Steve Setford
US editors Jill Hamilton, Margaret Parrish
Designers Mabel Chan, Peter Radcliffe, Steve Woosnam-Savage
Jacket design development manager Sophia MTT
Jacket editor Claire Gell
Producer, pre-production Francesca Wardell
Producer Mary Slater
Managing editor Paula Regan
Managing art editor Owen Peyton Jones
Publisher Andrew Macintyre
Associate publishing director Liz Wheeler
Art director Karen Self
Design director Stuart Jackman
Publishing director Jonathan Metcalf
DK DELHI
Project editor Suefa Lee
Project art editor Parul Gambhir
Editor Sonia Yooshing
Art editors Sanjay Chauhan, Upasana Sharma
Assistant art editor Simar Dhamija
Senior DTP designers Harish Aggarwal, Vishal Bhatia
Senior managing editor Rohan Sinha
Managing art editor Sudakshina Basu
Pre-production manager Balwant Singh
Jacket designer Suhita Dharamjit
Managing jackets editor Saloni Singh
First American Edition, 2016
Published in the United States by DK Publishing
345 Hudson Street, New York, New York 10014
Copyright © 2015 Dorling Kindersley Limited
DK, a Division of Penguin Random House LLC
16 17 18 19 20 10 9 8 7 6 5 4 3 2 1
001—283034—January/2016
All rights reserved.
Without limiting the rights reserved under copyright above, no part of this
publication may be reproduced, stored in a retrieval system, or transmitted in any
form or by any means, electronic, mechanical, photocopying, recording or
otherwise, without the prior written permission of the copyright
owner. Published in Great Britain by Dorling Kindersley Limited.
A catalog record for this book is available from the
Library of Congress.
ISBN: 978-1-4654-3935-2
DK books are available at special discounts when purchased in bulk for sales
promotions, premiums, fund-raising, or educational use. For details, contact: DK
Publishing Special Markets, 345 Hudson Street, New York, New York 10014
or SpecialSales@dk.com
Printed in China
A WORLD OF IDEAS:
SEE ALL THERE IS TO KNOW
www.dk.com
DR. JON WOODCOCK MA (OXON) has a degree in physics from the University of
Oxford and a PhD in computational astrophysics from the University of London.
He started coding at the age of eight and has programmed all kinds of computers,
from single-chip microcontrollers to world-class supercomputers. His many projects
include giant space simulations, research in high-tech companies, and intelligent
robots made from junk. Jon has a passion for science and technology education,
giving talks on space and running computer programming clubs in schools. He has
worked on numerous science and technology books as a contributor and consultant,
including DK’s Computer Coding for Kids and Computer Coding Made Easy.
Contents
COMPUTER GAMES
12 What makes a good game?
14 Atmosphere
16 Types of games
18 How coding works
GETTING STARTED
22 Introducing Scratch
24 Getting Scratch
26 Scratch tour
CHEESE CHASE
50 How to build Cheese Chase
JUMPY MONKEY
90 How to build Jumpy Monkey
STAR HUNTER
30 How to build Star Hunter
CIRCLE WARS
74 How to build Circle Wars
8 FOREWORD
Score 8
Time 23.5
Score 30 High Score 90
Score 0
11
LaunchSpeed
SET LAUNCH ANGLE
SET LAUNCH SPEED
SPACE TO FIRE
DOOM ON THE BROOM
108 How to build Doom on the Broom
TROPICAL TUNES
190 How to build Tropical Tunes
GLACIER RACE
166 How to build Glacier Race
DOG’S DINNER
130 How to build Dog’s Dinner
WHAT NEXT?
206 Remixing and beyond
208 Better Scratch
210 The next level
212 Jobs making games
214 Have fun!
GLOSSARY & INDEX
218 Glossary
220 Index
224 Acknowledgments
Find out more at:
www.dk.com/computercoding
Score 25 Lives 3 0
Score
Ben Gems: 20
Laura Gems: 13
Countdown 11
Foreword
Many of the people who have shaped our digital world started out by coding
games for fun. Bill Gates, cofounder of Microsoft, wrote his first computer
program at the age of 13—a tic tac toe game. Just a few years later a teenage
Steve Jobs and his friend Steve Wozniak, who later founded Apple together,
created the arcade game Breakout.
They started coding simply because they enjoyed it. They had no idea how far
it would take them or that the companies they were to build would change
the world. You might be the next one like them. Coding doesn’t have to
become a career, but it’s an amazing skill and can unlock exciting doors to
your future. Or you might just want to play around with code for the fun of it.
Computer games open up worlds of imagination. They reach out across
the internet and allow us to play together. They are packed with creativity,
from music, stories, and art to ingenious coding. And we’re hooked on
them: so much so that the games industry is now worth more than the
movie industry. It’s huge.
And now, instead of being just a player, you can become a game maker too.
You can take control of every aspect of those imaginary worlds: how they
look, sound, and feel. You get to invent the stories, the heroes, the villains,
and the landscapes.
But first you need to take control of your computer. To tell a computer what
to do, you need to speak its language and become a programmer! Thanks to
languages like Scratch, it’s never been easier. Just follow the simple steps
in this book to build each game and you’ll see what goes on inside each one.
Follow the chapters in order, and you’ll pick up the essential skills you need
to design and build your very own games.
Let’s get
coding!
coding games with scratch for using in school
Computer
games
12 C O M P U T E R G A M E S
What makes a
good game?
Some games have a magical quality
that makes you want to play them
time and again. Game designers call
it playability. To make a game with
great playability, you need to think
about all the ingredients that make up
the game and how they work together.
◁ Characters
In most games, the player uses an on-screen
character to enter the game world. It could
an animal, a princess, a racecar, or even just
a simple bubble. To create a sense of danger
or competition, such games usually also
have enemy characters that the player has
to defeat or escape from.
△ Objects
Nearly all games include objects, from stars and coins that
boost health or scores to keys that unlock doors. Not all
objects are good—some get in the player’s way, sap their
health, or steal their treasures. Objects can also work
together to create puzzles for the player to solve.
△ Mechanics
These are the“verbs”in a game—actions
such as running, jumping, flying, capturing
objects, casting spells, and using weapons.
The mechanics are the core of the game, and
well-designed mechanics make a good game.
◁ Rules
The rules of a game tell you
what you’re allowed and not
allowed to do. For example, can
you walk through walls or do
they block your path? Can you
stop and think or do you have
to beat the clock?
I have the
perfect recipe!
13
W H AT M A K E S A G O O D G A M E ?
◁ Controls
Keyboards, mice, joysticks,
and motion sensors all make
good controllers. Games are
more fun when the player
feels in complete control
of the character, so the
controls should be easy to
master and the computer
should respond instantly.
◁ World
Think about the world in
which a game is played. Is
it 2D or 3D? Does the player
view the game from above,
from the side, or from within?
Does the game world have
walls or boundaries that limit
the player’s movement or is
it open like the outdoors?
G A M E D E S I G N
Playability
Games don’t have to be complicated to make
people want to play them over and over again.
One of the first successful computer games
was a simple tennis simulator called Pong. The
ball was a white square and the racquets were
white lines that could only move up and down.
Although there were no fancy graphics, people
loved Pong because it had great playability. They
could compete against friends, just like in real
tennis, and it was just hard enough to demand
intense concentration and a steady hand,
leaving players always wanting another game.
△ Difficulty level
A game’s no fun if it’s too easy or too hard. Many
games make the challenges easy at the start, while
the player is learning, and more difficult later as the
player’s skills improve. Getting the difficulty level
just right is the key to making a great game.
△ Goals
Every game challenges the player to achieve some
kind of goal, whether it’s winning a race, conquering
an enemy, beating a high score, or simply surviving
for as long you can. Most games have lots of small
goals, such as unlocking doors to new levels or
winning new vehicles or skills.
YOU SCORED
25,547,010
POINTS!!!
14 C O M P U T E R G A M E S
Atmosphere
A good game, just like a movie or a book, can
draw you in and change the way you feel by
creating a certain atmosphere. Here are some
of the tricks game designers use to conjure
up an atmosphere.
◁ Telling stories
A background story helps set the scene for
a game and gives meaning to the player’s
actions. Blockbuster games have movielike
plots with twists, but even simple games
can benefit from some kind of story if it
makes players feel they’re on a mission.
Thinking of a story also helps you give a
game a consistent theme.
▷ Faster, faster!
The speed of a game
changes the level of
excitement a player feels.
It’s easy to stay calm
when you can stop and
think about what to do
next, but with a ticking
clock and fast music,
you can’t help but feel
under pressure.
◁ Color scheme
You can change the atmosphere in a game
simply by altering the colors. Bright blue,
yellow, and green feels warm and sunny, for
instance, while icy blues and white feel wintry,
and darker colors make a game feel spooky.
△ Boo!
Do things jump out at the
player? Fear and suspense can
make a game scary and put the
player on edge. What’s around
the next corner? What’s behind
that door? The wait can be
worse than the scare!
▷ Sound
Sounds can have a strong effect
on how we feel. Changing the
tune can make the same scene
feel exciting, scary, or even silly,
and a sudden noise after a quiet
spell can cause a jolt of terror.
Modern games use realistic sound
effects to make players feel like
they’re inside the action.
15
AT M O S P H E R E
Where are you?
One of the easiest ways to create
atmosphere is to give a game a location
by adding a background image. To make
the illusion more convincing, make sure the
game’s characters match the setting—don’t
put racecars in the deep sea or unicorns in
outer space, for instance.
△ Spooky forest
A dark forest is the perfect setting
for ghosts, ghouls, and witches.
△ Tropical beach
A sunny beach creates a carnival
mood for the colorful steel drums.
△ Deep-sea adventure
Octopuses and starfish fit well
with this underwater scene.
◁ Snow and ice
A snowy scene is the
backdrop for a race
along an icy road.
▽ Graphics
The graphics in the first games were simple
geometric shapes, but as computers became
more powerful, the graphics in games got
better. Many console games now feature
photorealistic 3D images, but games based
on simple, cartoonlike graphics are as
popular as ever and can help create a more
playful atmosphere.
G A M E D E S I G N
Virtual reality
Virtual reality goggles
could make the games
of the future much more
realistic. They work by
presenting each eye with
a slightly different image,
creating a 3D experience.
Motion sensors in the
headset track the player’s
movements and adjust
the images to match,
allowing the player to
turn around and look in
any direction, just like in
the real world. As a result,
a player feels inside the
game world rather than
watching it through
a screen.
16 C O M P U T E R G A M E S
Types of games
Games come in all shapes and sizes, but most fit
into one of just a few main categories, called genres.
Some gamers like the platform games genre best,
whereas others prefer racing games or strategy
games. What are your favorite genres?
△ Combat
Nimble fingerwork is vital for games involving close-
quarters combat. The key to success is knowing when
and how to use many different attack and defense
moves, from slams and somersaults to special powers.
△ Role-playing
Dungeons, dragons, and castles
feature in these adventure games.
Players may roam freely or follow
a set storyline, with their character
developing specialized skills as it
advances, such as casting spells or
sword-fighting. Some role-playing
games are played online, allowing
lots of players to interact in the
same game world.
◁ Traditional
When you can’t find
an opponent to play with
you, a computer can
challenge you to a game of
cards, chess, or a million
other popular board games.
△ Sandbox
Some games force players along a set path, but
sandbox games are the opposite: they give you
complete freedom to explore the game world at
your own pace and choose different quests within it.
▷ Racing
Racing games create the illusion of speed
by making the scenery scroll past the
player’s viewpoint. To succeed, you need
to learn each racetrack inside out so you
can start tricky maneuvers in advance.
17
T Y P E S O F G A M E S
△ Puzzle
Some people love to exercise their brains with
puzzles. There are many different types, from
colorful tile-matching games to number puzzles and
escape games, in which you need to use your
imagination to find your way from room to room.
△ Simulator
If you want a puppy but don’t want the trouble of feeding
and walking it, a virtual pet might suit you. Simulators aim
to re-create real-life situations. Some are more than just a
game: flight simulators are so accurate and realistic that
professional pilots use them for training.
△ Sport
Play the game of your choice as your favorite team, set in
a realistic stadium with roaring crowds. Sports games let
you compete in famous tournaments such as the soccer
World Cup, with the computer referee ensuring fair play.
▷ Strategy
Decisions, decisions. What are the best choices
to make if you’re running a zoo, fighting a war, or
building a whole civilization? Strategy games give
the player godlike powers over many different
characters at once, but you have to manage
resources cleverly or your empire will collapse.
◁ Music and dance
Dance-mat games involve
tapping the feet or jumping
over a stream of obstacles
in time to the rhythm. Music
games allow you to play along
with a virtual band using a
pretend instrument. You need
to hit the right notes on time to
complete each level.
18 C O M P U T E R G A M E S
Score 10
How coding works
A computer can’t think for itself—it works by blindly following
instructions. It can only carry out a complex task if that task has
been broken down into simple steps that tell it exactly what to
do and in what order. Writing these instructions in a language
a computer understands is called coding.
Planning a game
Imagine you want to create a game
in which you fly a parrot over a river,
collecting apples as they drift downstream
but avoiding an angry lion. You would
need to give the computer a separate set
of instructions for each object in the game:
the apple, the parrot, and the lion.
Jump to the left edge of the screen.
Move a bit to the right.
Repeat the following steps over and over again:
If I get to the right edge of the screen then
If I touch the parrot then
jump back to the left edge.
add one to the parrot’s score and
jump back to the left edge.
▽ Apple
You can’t simply tell the computer
that the apple drifts down the river
and vanishes when the parrot eats it.
Instead, you need to break down this
complicated task into a set of very
simple steps as shown here.
The player makes the
parrot fly left and right with
the left and right arrow keys.
Pressing the space key makes
the parrot dive, but the game
ends if you touch the lion.
The lion walks left
and right, following
the parrot.
The player wins a
point each time the
parrot gets an apple.
The apple drifts downstream
over and over. It reappears on
the left if the parrot takes it.
19
H O W C O D I N G W O R K S
▷ Parrot
The parrot is more complicated than the apple because
the player controls it and it can move up, down, left,
and right. Even so, it’s possible to make all of this work
by writing a sequence of simple instructions.
▷ Lion
The lion is the player’s enemy and can
end the game if the parrot touches it.
It is controlled by a simple program.
Jump to the middle of the screen.
If the parrot is to my left then
Repeat these steps in turn:
If the parrot is to my right then
If the parrot touches me then
move a bit to my left.
move a bit to my right.
stop the game.
Jump to the top right of the screen.
If the player presses the left arrow then
If the player presses the right arrow then
If the player presses the space key then
Repeat these steps in turn:
move a bit to the left if I can.
move a bit to the right if I can.
move all the way to the bottom of the screen taking a second and
move all the way back to the top taking a second
Programming languages
The instructions on this page are in simple
English, but if you wanted to create the game
on a computer, you would need to translate
them into special words that the computer
can understand: a programming language.
Writing programs with a programming
language is called coding or programming.
This book uses the programming language
Scratch, which is ideal for learning about
coding and great for making games.
L I N G O
coding games with scratch for using in school
Getting
started
22 G E T T I N G S TA R T E D
Experimenting
Scratch is all about experimenting. Once
you’ve built a game, it’s easy to add things
to it or change how it works by tinkering
with the script. You can see the effect of
your changes straight away.
E X P E R T T I P S
Introducing Scratch
All the games in this book are made with a programming
language called Scratch. Scratch is easy to learn because
you don’t have to type any complicated code. Instead,
you build programs from ready-made blocks.
Sprites
Sprites are the things that move around or react in
the game. They can be anything from animals and
people to pizzas or spaceships. You can bring each
sprite to life on screen with a list of instructions
called a script.
Scripts
Scripts are made of text blocks that you can
drag with a computer mouse and join like
pieces of a jigsaw puzzle. Each block has one
instruction so it’s easy to understand.
Starting from scratch
A project in Scratch usually starts with choosing the objects,
or sprites, that will appear in the game. Scratch has a large
library of sprites, or you can create your own.
Working together
Games are usually made up of several sprites working
together, each controlled by its own script. Scripts
make sprites move around, crash into each other,
create sounds, and change color or shape.
Some sprites act as
enemies to make a
game more difficult.
The characters and other
objects in Scratch games are
called sprites.
when space ▾ key pressed
move 20 steps
say Hello!
The cat sprite
appears whenever
you start a new
Scratch project.
HELP!
Hello!
23
I N T R O D U C I N G S C R AT C H
A typical Scratch project
Once you’ve built a script, you can click the green flag to see what
it does. All the action takes place in a part of the Scratch window
called the“stage”. Sprites move about on the stage, often in front
of a background image that helps create atmosphere.
The enemy dinosaur
sprite chases the
player’s cat sprite.
The red button
stops a program.
point towards Cat ▾
when clicked
move 15 steps
The“forever”
block keeps
the sprite
moving
endlessly.
Background image
Several sprites can be
on the stage at once.
▷ Running a program
Starting, or“running”, a
program activates the
scripts that you’ve built.
To make the stage fill your
whole computer screen,
click the blue symbol in
the top left.
▽ Making sprites move
In a typical game, the player moves one sprite
and the other sprites are programmed to move
automatically. The script below makes the
dinosaur in this project chase the cat.
The green flag starts,
or runs, the program.
forever
Cat Cruncher
by GreenDino99
24 G E T T I N G S TA R T E D
Getting Scratch
In order to try the projects in this book, you’ll
need to set up Scratch on a desktop or laptop
computer. The two ways of setting up Scratch
(online and offline) are shown below.
Online Scratch
If you have a reliable internet connection,
you can run Scratch online in a browser
window without downloading anything.
You will need to set up a Scratch account.
Double-click the icon on the
desktop and Scratch will
open, ready for you to
begin programming.
There’s no need to
create a user account
if you use the offline
version of Scratch.
To set up the online version, visit the Scratch website at
scratch.mit.edu and click“Join Scratch”. You will need
to set up an account with a username and password.
Your games will stay private unless you click“Share”,
which will publish them on the web.
For the offline version of Scratch, go to scratch.mit.edu/
scratch2download. Follow the instructions on screen
to download the installation files, then double-click
them. After installation, a Scratch icon will appear
on your desktop.
Join Scratch
1
Install Scratch
1
After you’ve joined the Scratch website, click“Sign in”and
enter your username and password. It’s best not to use your
real name as your username. Click“Create”at the top of the
screen to start a new project. If you use the online version
of Scratch, you can access your projects from any computer.
Why “Scratch”?
Scratch is named after“scratching”, a
technique rappers and DJs use to
remix music on a turntable. The
Scratch programming language lets
you copy other people’s projects
and remix them to make your
own unique
versions.
L I N G O
Sign in
2
Offline Scratch
You can also download the Scratch
program to your computer so you can use
it offline. This is particularly useful if your
internet connection is unreliable.
Launch Scratch
2
25
G E T T I N G S C R AT C H
◁ Saving
If you use Scratch offline, remember to save
from time to time. The online version saves
automatically. Online, you can undo all the
changes you’ve made since you last opened a
project by choosing“Revert”in the File menu.
△ Hardware
You can use Scratch on desktop or laptop
computers, but it’s easier if you use a
mouse than a touchpad. Scratch apps for
tablets and smartphones are also being
developed.
△ Operating system
The online version of Scratch works well
on Windows, Ubuntu, and Mac computers,
although it won’t work on tablets. The
offline version of Scratch works well on
Windows and Mac computers. If your
computer uses Ubuntu, try the online
version instead.
Motion
Looks Control
Events
Sound Sensing
Pen Operators
Data More Blocks
Scripts Costumes Sounds
Cat
x: –126 y: 96 direction 0.0
File Edit Share Help
Cat game
move 10 steps
glide 1 secs to x: 0 y: 0
go to x: 0 y: 0
point in direction 90 ▾
point towards ▾
go to mouse-pointer ▾
turn 15 degrees
turn 15 degrees
move 10 steps
go to mouse-pointer ▾
forever
when clicked
SCRATCH
▷ Version 2.0
This version of Scratch was released
in 2013. New features include a
“Backpack”for storing costumes,
media, and scripts; a cloning
function; a sound editor; and a
more sophisticated paint editor.
Old and
new versions
This book is based on
Scratch 2.0, the latest
version at the time of
writing. The projects
in this book will not
work with older
versions of Scratch,
so make sure
you have 2.0.
▽ Version 1.4
In older versions of Scratch, such as
Scratch 1.4, the stage is on the right
and the scripts area is in the middle.
Scripts
File ▾ Edit ▾ Tips
Untitled
by abcd (unshared)
Motion
Looks Control
Events
Sound Sensing
Pen Operators
Data More Blocks
Costumes Sounds
x: 153 y: -61
Sprites
Stage
1 backdrop
New backdrop:
Monkey 2 Numbanas 1
New sprite:
x: -126
y: 96
SCRATCH
Backpack
move 10 steps
glide 1 secs to x: 0 y: 0
go to x: 0 y: 0
point in direction 90 ▾
point towards ▾
go to mouse pointer ▾
turn 15 degrees
turn 15 degrees
move 10 steps
go to mouse pointer ▾
forever
when clicked
?
LaunchSpeed 11
Arrow 1 Numbanas 2
go to Launcher ▾
play sound boing ▾
when space ▾ key pressed
LAUNCH ANGLE
LAUNCH SPEED
PRESS SPACE TO FIRE
26 G E T T I N G S TA R T E D
Scratch tour
The Scratch window
is divided into several
different areas. Scripts are
built on the right, while the
stage on the left shows the
game running.
Selected
sprite
Buttons to add
new sprites
△ Scratch window
The stage and sprites list occupy the left of
the Scratch window, while script-building
areas are on the right. The tabs above the
scripts area reveal other Scratch features.
Cursor tools
Menus
Click a sprite on the
stage or in the sprites
list to select it.
Change
language
Switch to full
screen view
Click these icons to
change the backdrop
image on the stage.
STAGE INFO BACKPACK
Name of the game
File ▾ Edit ▾ Tips
Jumpy Monkey
by Gabby Gibbon (unshared)
x: 153 y: -61
Sprites
Stage
4 backdrops
New backdrop:
Monkey2 Launcher NumBananas1
New sprite:
SCRATCH ?
STAGE AREA BLOCKS
PALETTE
SPRITES
LIST
SCRIPTS
AREA
Sprites list
All the sprites used in your
project appear here. When
you select a sprite, its scripts
appear in the scripts area.
The stage
When you play a game or run any
other kind of project in Scratch, you
see the action happening on the
stage, which serves as a miniature
screen. You can see changes to your
script take effect immediately on the
stage simply by clicking the green
flag button to run the project.
11
LaunchSpeed
NumBananas2
LAUNCH ANGLE
LAUNCH SPEED
PRESS SPACE TO FIRE
27
S C R AT C H T O U R
The x and y
coordinates
give the
sprite’s
location on
the stage.
Zoom in
on scripts
Keep the
Scripts tab
selected to
build scripts.
Use the Sounds
tab to add music
and sound effects
to games.
Blocks palette
Instruction blocks for making
scripts appear in the middle of
the Scratch window. Drag the
ones you want to use to the
scripts area.
These scripts control
the Launcher sprite.
Backpack
Store useful scripts,
sprites, costumes, and
sounds in the backpack
so you can use them in
other projects.
Current
sprite
selected
Scripts
Motion
Looks Control
Events
Sound Sensing
Pen Operators
Data More Blocks
Costumes Sounds
x: –126
y: 96
Backpack
move 10 steps
glide 1 secs to x: 0 y: 0
go to x: 0 y: 0
point in direction 90 ▾
point towards ▾
go to mouse-pointer ▾
turn 15 degrees
turn 15 degrees
point in direction 45 ▾
go to x: -200 y: -140
when clicked
Click these headings
to reveal different
sets of blocks.
Blocks snap
together—use
the mouse to
move them
around.
The Costumes
tab lets you
change how
sprites look.
Scripts area
You can drag blocks into this part
of the Scratch window and join
them together to build scripts for
each sprite in your game.
go to front
set LaunchSpeed ▾ to 10
set Left arrow ▾ key pressed
turn 2 degrees
coding games with scratch for using in school
Star
Hunter
30 S TA R H U N T E R
How to build
Star Hunter
Welcome to your first Scratch game:
Star Hunter, a fast-paced, underwater
treasure hunt. Just follow the simple
steps in this chapter to build the
game, then challenge a friend to beat
your score.
Click this icon to
make the game fill
your screen.
An underwater
backdrop image
sets the scene.
The score shows
how many stars
you’ve collected.
Type in the name
of your game.
◁ Stars
These appear one at a time
in random places. Touch a star
to score a point.
◁ Octopuses
The octopuses patrol the seas
but they swim more slowly
than you. If you touch one,
the game is over!
◁ Cat
Move the cat around the
screen with your computer
mouse—the cat sprite follows
the mouse-pointer.
The aim of this game is to collect as
many gold stars as you can. Use the cat
to collect the stars, but watch out for
deadly octopuses. You’ll need to move
quickly to succeed. The main sprites
in the game are shown below.
AIM OF THE GAME
Star Hunter
by Octoblaster99 (unshared)
Score 0
31
H O W T O B U I L D S TA R H U N T E R
◁ Under the sea
Star Hunter is set in the deep
sea, but you can change the
backdrop to anything you like,
from outer space to a picture
of your bedroom.
Collect stars
to score points.
You play the game as a cat.
Move your computer mouse
to move the cat.
Don’t touch the octopuses!
There are three octopuses and
they move in different ways.
Click the stop sign
to end a game.
Click the green flag
to start a new game. GAME CONTROLS
Use a computer mouse
or touchpad to control
this game.
Ready?
Let’s code!
32 S TA R H U N T E R
Building scripts
Like any Scratch program, Star Hunter is made by joining
colored blocks like the pieces of a jigsaw puzzle. Each block
is an instruction that tells a sprite what to do. Let’s start by
programming the game’s main sprite: the cat.
Start Scratch and choose either“create”or
“New Project”. You’ll see a screen like the one
below, with the cat sprite in place. In the
middle is a set of blue instruction blocks.
Drag your chosen blocks
here to build a script.
Clicking the
buttons here
reveals different
sets of blocks.
Now select the yellow Control
button and look for a“forever”block.
Drag the
“forever”block to
the scripts area.
Scripts
Motion
Looks Control
Events
Sound Sensing
Pen Operators
Data More Blocks
wait 10 secs
forever
repeat 10
Click Control
to reveal the
yellow blocks.
Choose blocks
from the list in
the middle.
We’ll program the cat to move
wherever the player moves the
computer mouse. Click on the“go to
mouse-pointer”block and drag it to
the right part of the screen—the
scripts area.
Some blocks include
a drop-down menu.
go to mouse-pointer ▾
Scripts
File ▾ Edit ▾ Tips
Star Hunter
by Octoblaster99 (unshared)
Costumes Sounds
x: 153 y: -61
Sprites
Stage
1 backdrop
New backdrop:
Sprite 1
New sprite:
SCRATCH
Backpack
Motion
Looks Control
Events
Sound Sensing
Pen Operators
Data More Blocks
x: -126
y: 96
Costumes Sounds
The blue Motion
blocks control the way
sprites move.
1
2 3
move 10 steps
glide 1 secs to x: 0 y: 0
go to x: 0 y: 0
point in direction 90 ▾
point towards ▾
go to mouse pointer ▾
turn 15 degrees
turn 15 degrees
go to mouse-pointer ▾
33
G A M E P R O G R E S S 1 4 %
Click the
green flag
to play.
This block starts the
game when you click
the green flag.
This block makes the
block inside it repeat
over and over again.
This block makes the
cat move with the
player’s mouse-pointer.
You can stop the
script by clicking the
red stop button.
Now look at the top right
of the stage—you’ll see
a green flag. Click this to
run your script.
Move your mouse and watch what
happens. If you followed all the
steps, the cat will move with the
mouse-pointer around the stage.
▷ Well done!
You have created your first
Scratch project. Let’s add some
more things to the project to
build a game.
Next, select the brown Events button. Look for
a block with a green flag. Drag it to the right and add
it to the top of your script. Read through the script
and think about what each block does.
Drag it to the right and drop it over
the blue block. It will wrap around
it like this:
forever
when clicked
go to mouse-pointer ▾
forever
go to mouse-pointer ▾
Star Hunter
by Octoblaster99 (unshared)
x: 153 y: -61
Sprites
Stage
1 backdrop
New backdrop:
New sprite:
Backpack
move 10 steps
glide 1 secs to x: 0 y: 0
go to x: 0 y: 0
point in direction 90 ▾
point towards ▾
go to mouse pointer ▾
turn 15 degrees
turn 15 degrees
Sprite 1
Scripts
Motion
Looks Control
Events
Sound Sensing
Pen Operators
Data More Blocks
Costumes Sounds
x: -126
y: 96
go to mouse-pointer ▾
forever
when clicked
File ▾ Edit ▾ Tips
SCRATCH
Bravo!
4
6
7
5
34 S TA R H U N T E R
The backdrop is just
decoration and doesn’t
affect the sprites.
Star Hunter
by Octoblaster99 (unshared)
Setting the scene
At the moment, the stage is just a boring white
rectangle. Let’s create some atmosphere by
adding scenery and sound effects. To change
the scenery, we add a“backdrop”image.
Click this icon
to open the
backdrop
library.
Stage
1 backdrop
New backdrop:
To the left of the sprites list is a
button to add a picture from the
backdrop library. Click it and look for
“underwater2”. Select the image and
click“OK”. The backdrop will now fill
the stage.
The cat is called“Sprite1”. Let’s fix that. In the sprites
list, select Sprite1 (the cat) and click on the blue“i”
in the corner to get more information about the
sprite. Change the name to“Cat”.
Cat
The new
name appears.
Click here to
bring up the
information
pop-up box.
Type the sprite’s
name here.
direction: 90°
x: 84 y: -69
rotation style:
can drag in player:
show:
Sprite 1
Cat
8
9
G A M E P R O G R E S S 2 9 % 35
Sound effects
Now we’ll add a bubbling sound to the cat sprite
to make it sound like we’re underwater.
when clicked
Click Sound in the
blocks palette to find
this block.
The“forever”block makes
the program return to the
start of the block.
Blocks run from top
to bottom.
Highlight the cat in the sprites list and
then click the Sounds tab above the
blocks palette. Click the speaker icon to
choose a sound from the library.
Click the Scripts tab and add the
following script to the cat sprite, but
leave the old script in place because
you need both. The new script repeats
the bubbles sound. The“play sound ...
until done”block waits for the sound to
finish before letting it start again. Run
the game to hear the sound effect.
Look for“bubbles”in the
library. You can preview
sounds by clicking the play
symbol. To load a sound
into the game, click the
speaker icon and then“OK”.
Now you’ll see bubbles in
your list of sounds.
You can add
sounds to the stage as
well as to sprites.
Loops
A loop is a section of code that
repeats over and over again. The
“forever”block creates a loop that
carries on forever, but other types
of loop can repeat an action a fixed
number of times. Loops are very
common in almost all computer
programming languages.
Choose a sound
from the library
Record a sound
Use a sound from
your computer.
Scripts Costumes Sounds
Sounds tab
This is how long
the sound lasts.
Delete
sounds here.
bubbles
00:04.08
2
forever
forever
when clicked
E X P E R T T I P S
New sound:
play sound bubbles ▾ until done
11
12
10
36 S TA R H U N T E R
Add an enemy
The game needs an enemy to make things more
interesting. Let’s add an octopus with a deadly
sting. The octopus will patrol the stage, moving
left and right, and the player will have to keep
out of its way or the game is over.
The left option makes
the sprite turn upside
down when it bounces.
The right option makes
the sprite bounce
without turning round.
The middle option makes
the sprite flip sideways
when it bounces.
This block stops
the octopus from
moving off the
edge of the stage.
The“forever”
block repeats
everything
inside.
This block runs the
script when the
game begins.
Motion blocks are dark
blue and control the
way sprites move.
Click here to open
the sprite library.
New sprite:
Octopus
forever
if on edge, bounce
when clicked
move 10 steps
Octopus
direction: 90°
x: 84 y: -69
rotation style:
can drag in player:
show:
To add a second sprite to the
project, click the icon shown
below to open up the sprite
library. Choose the octopus
and click“OK”.
Now run the script. The octopus will patrol left and
right, but you’ll notice it’s upside down half the
time. We can fix this by changing the way the sprite
turns around when it changes direction. Highlight
the octopus and click the blue“i”. In the pop-up
box, there are three options after“rotation style”.
Choose the middle option and run the
project. The octopus should now stay right
side up and facing forward all the time. You
can adjust its starting position on the screen
by dragging it with the mouse.
Add the following script to
the octopus sprite. To find
the blue blocks, click on
Motion in the blocks
palette. The two Motion
blocks used here make the
octopus move left and
right across the stage.
The octopus sprite will
appear in your sprites list.
13
15
14
16
Star Hunter
by Octoblaster99 (unshared)
37
G A M E P R O G R E S S 4 3 %
Collisions
So far the octopus and cat move through each other
without anything happening. We need to add
a script to make them stop moving when they collide.
Collision detection is very important in computer games.
E X P E R T T I P S
This block
ends the game
when the
sprites collide.
This block detects
a collision.
Sensing blocks
are pale blue.
Octopus touching cat?
True False
Stop the sprites Keep going
“if then”
You make decisions every day.
If it’s raining, you might use
an umbrella. If it isn’t, you don’t.
Computer programs do the same
thing by using what programmers
call conditional statements, such
as“if then”. When Scratch reaches
an“if then”block, it runs the blocks
inside only if the statement is true.
Highlight the octopus and drag
a yellow“if then”block to an empty
part of the scripts area. Now add
a pale blue“touching” block to the
top of the“if then”block. Click the
drop-down menu and choose“Cat”.
This script will help the octopus
detect the cat.
Choose Control in the blocks palette
again, and add a“stop all”block to
the middle of the“if then”block. This
will stop all action if the octopus is
touching the cat, ending the game.
Now add the“if then”blocks you’ve built
to the octopus’s main script, placing it
carefully after the blue Motion blocks.
Also, add a“wait 0.5 sec”before the loop.
Run the project and see what happens.
The“stop all”block only
runs if the answer to
the question in the
“touching”block is yes.
forever
if on edge, bounce
when clicked
move 10 steps
stop all ▾
stop all ▾
mouse-pointer
edge
Cat
if
if
if
then
then
then
touching Cat ▾ ?
touching Cat ▾ ?
touching Cat ▾ ?
18
17
19
The“wait”block adds a
slight delay before the
octopus starts moving.
wait 0.5 sec
38 S TA R H U N T E R
More enemies
Let’s add more enemies to the game, but to make things
more challenging, we’ll make them move in different
directions. We can tell each sprite exactly which way
to go by using a block that works like a compass.
Add a purple“set size”block to the top of the
octopus’s script, after the“when clicked”block. Set
the octopus’s size to 35% to make the game a bit
easier. Then add a blue“point in direction”block.
To change the octopus’s direction, click on
the window in the“point in direction”block
and type 135 in place of 90. This will make
the octopus move diagonally.
Now we can duplicate our octopus to create more
enemies. Right-click on the octopus in the sprites
list (or control-click if you have a Mac) and choose
“duplicate”. Copies of the Octopus sprite will appear
in the sprites list, named Octopus2 and Octopus3.
Each will have a copy of the first octopus’s script.
E X P E R T T I P S
Directions
Scratch uses degrees to set direction. You
can choose any number from –179° to
180°. Negative numbers point sprites left;
positive numbers point them right. Use
0° to go up and 180° to go straight down.
This number tells the
octopus which direction
to set off in.
Click in this window
and type 35 to set the
octopus’s size to 35%.
Type 135 into this
window.
The drop-down
menu gives you
four quick options.
point in direction 135 ▾
(90) right
(–90) left
(0) up
(180) down
Sprites
Cat Octopus
Choose“duplicate”.
This menu appears
if you right-click
on a sprite.
info
duplicate
delete
save to local file
–90° moves a
sprite straight
to the left.
180° moves a
sprite straight
down.
22
21
20
90°
–90°
0°
180°
when clicked
wait 0.5 sec
set size to 35%
point in direction 135 ▾
39
G A M E P R O G R E S S 5 7 %
To make the octopuses move in different directions,
change the number in the“point in direction”block for
each new octopus. Leave the first Octopus sprite’s
direction as 135, but set Octopus2 to 0 and Octopus3
to 90. Run the project and try to avoid all the enemies.
For more variety, let’s make one
of the octopuses set off in a
random direction. To do this, we
use a green“pick random”block.
This is Scratch’s way of rolling a
dice to generate a random
number. Choose Operators in
the blocks palette to find the
block and add it to the first
octopus’s script. Run the project
a few times to see the octopus
choose different starting
directions.
E X P E R T T I P S
Random numbers
Why do so many games use dice?
Dice create surprises in a game
because they make different things
happen to each player. A random
number is one you can’t predict in
advance, just like the roll of a dice.
You can get the cat to say a random
dice roll using this simple code.
set size to 35%
forever
if on edge, bounce
when clicked
move 2 steps
stop all ▾
if then
touching Cat ▾ ?
move 2 steps
if on edge, bounce
point in direction pick random –179 to 180
Type 180 in the
second window.
This block picks a random
number from 1 to 6.
Type –179 in the
first window.
Changing this number adjusts
the octopus’s speed.
when clicked
say pick random 1 to 6
24
23
25
2
If it’s too hard to stay alive, make the
octopuses slower by lowering the
number of steps in their“move”blocks
to two. Remember to change the
script for all three octopus sprites.
wait 0.5 sec
40 S TA R H U N T E R
Collecting stars
In many games, the player has to collect valuable
items to win points or to stay alive. In Star Hunter,
we use gold stars as underwater treasure that the
player has to collect. We’ll use random numbers
again to make each star appear in a new place.
Click the“choose new sprite”symbol in the sprites
list and choose the“Star1”sprite from the library.
26
Click this symbol
to open the sprite
library.
The Star1 sprite will
appear in your
sprites list.
Sprites
Cat Octopus Octopus2 Octopus3
New sprite:
Star1 Star1
Add the following script to Star1. This script will make the star
move to a random new location whenever the cat touches it. The
green blocks create random numbers called coordinates, which
Scratch uses to pinpoint locations on the stage.
forever
when clicked
if then
touching Cat ▾ ?
go to x: y: pick random –150 to 150
Star1: x position 60
Star1: y position 78
Type the numbers shown
here into the green blocks.
The“forever”block repeats
the blocks inside it.
The“go to”block only
runs if the answer to
the question is yes.
The“if then”block
checks whether the cat
is touching the star.
28
27
pick random –200 to 200
To see the star’s coordinates change when it
moves, choose Motion in the blocks palette and
put ticks by“x position”and“y position”. Now run
the game: you’ll see the star’s x and y coordinates
update each time the cat makes it move. Untick
both boxes before you carry on.
41
G A M E P R O G R E S S 7 1 %
E X P E R T T I P S
Using coordinates
To pinpoint a location on the stage, Scratch
uses numbers called coordinates. These
work just like graph coordinates, with x
numbers for horizontal positions and
y numbers for vertical. To find the
coordinates for a spot on the stage, just
count the steps across and up from the
center of the stage. Positive coordinates
are up or right, negative coordinates are
down or left. Every spot on the stage has
a unique pair of coordinates that can be
used to send a sprite to that position.
The x axis is longer than
the y axis and extends
from –240 to 240.
x
y
–60
–120
–180
–240 0 120 180
60 240
60
–60
–120
–180
120
180
(x:–190, y:–150)
(x:90, y:–130)
(x:180, y:50)
(x:–100, y:100)
You can add a sound effect that plays
when the cat touches a star. First
make sure that the star is selected in
the sprites list, then click the Sounds
tab above the blocks palette. Click the
speaker symbol to open the sound
library. Choose“fairydust”and click
“OK”. Now add the pink“play sound”
block to the star’s script and choose
“fairydust”in the drop-down list.
go to x: y: pick random –150 to 150
Insert the“play sound”block into
Star1’s existing script, then use
the drop-down menu to choose
which sound to play.
29
pick random –200 to 200
if then
touching Cat ▾ ?
play sound fairydust ▾
Star Hunter
by Octoblaster99
42 S TA R H U N T E R
7
6
9
With any sprite selected, choose
Data in the blocks palette. Click on
the button“Make a Variable”.
You’ll see a new set of blocks appear, including
one for the score. Make sure the box next to it is
checked to make the score appear on the stage.
A pop-up box appears asking you to
give your variable a name. Type“Score”
in the box. Make sure the option“For
all sprites”is selected and hit“OK”.
The score counter will appear in the
top left of the stage but you can drag
it anywhere you like.
Make a Variable
set Score ▾ to 0
show variable Score ▾
change Score ▾ by 1
Score
hide variable Score ▾
This option makes the
variable available for
every sprite.
Scripts
Motion
Looks Control
Events
Sound Sensing
Pen Operators
Data More Blocks
Make a Variable
Make a List
Costumes Sounds
New Variable
OK Cancel
Variable name:
For all sprites For this sprite only
Score
Keeping score
Computer games often need to keep track of vital
statistics such as the player’s score or health. We
call these changing numbers“variables”. To keep
track of the player’s score in Star Hunter, we’ll
create a variable that counts the number of stars
the player has collected.
31
33
30
32
Star Hunter
by Octoblaster99 (unshared)
0
Score
You can use the
mouse to move the
score display.
Click here to
create a new
variable.
43
G A M E P R O G R E S S 8 6 %
We want the score to start at zero and increase by one each
time the cat touches a star. Select the star sprite and add
the two orange Data blocks below to its script.
Add this block to set the score
to zero at the start of a game.
Add this one to make the
score increase when the
cat catches a star.
forever
if then
touching Cat ▾ ?
when clicked
set Score ▾ to 0
change Score ▾ by 1
Now click the green flag to
run the script and see what
happens when the cat
collects each star. See if you
can collect 20 stars without
bumping into an octopus.
E X P E R T T I P S
Variables
A variable works like a box that you can store
information in, such as a number than can
change. In math, we use letters for variables,
such as x and y. In computer programming,
we give variables names such as“Score”and
use them for storing not just numbers but
any kind of information. Try to choose a
name that tells you what the variable is for,
such as“Speed”or“Score”. Most computer
languages won’t let you put spaces in the
names of variables, so a good tip is to
combine words. Instead of using“dog speed”,
for instance, type“DogSpeed”.
Hey, I’m X
years old!
Big deal, I’m
Y years old!
play sound fairydust ▾
If you use the offline
version of Scratch, don’t
forget to save your work
from time to time.
34
35
go to x: y: pick random –150 to 150
pick random –200 to 200
44 S TA R H U N T E R
Right-click the script for Octopus2 and select“delete”
to remove it. Replace it with the following script. This
will make the octopus chase the cat.
Run the project and see how the
game plays. You’ll probably find it
hard to escape the octopus because
it moves quickly. To slow it down,
change the number of steps to two.
You can make the game get harder as you play.
Select the original octopus sprite and click Data
in the blocks palette. Drag the“Score”block
into the octopus’s“move”block. Now try the
game. The more points you get, the faster the
octopus swims.
If it gets too hard too quickly, we can make things
more gradual. Choose Operators in the blocks
palette and find the small green“divide”block.
Rearrange the“move”block so it looks like the
image below. Type“3”in the second round window.
Better enemies
Now we have a working game, we can test it and experiment with
changes that make it easier, harder, or—most important—more fun.
One way to make the game more interesting is to make the three
octopuses do different things.
This block starts
the chase.
This number
controls the
octopus’s speed.
point towards Cat ▾
forever
when clicked
move 5 steps
move 2 steps
move 2 steps
stop all ▾
if then
touching Cat ▾ ?
set size to 35%
move steps
Score
Score
move steps
/ 3
The green block divides the
score by 3 to make the octopus
speed up more gradually.
Drop the“Score”
block into the
circular window in
the“move”block.
Score
37
39
36
38
wait 0.5 sec
The octopus will
move the same
number of steps
as the score.
45
G A M E P R O G R E S S 1 0 0 %
Now we’ll make Octopus3 patrol in a regular pattern. To do this,
we’ll use a new Motion block that makes it glide smoothly from
point to point, rather than moving in steps. Replace the script
for Octopus3 with the following two scripts. These run at the
same time, one checking for collisions and the other moving the
octopus around its patrol route.
Now run the project
and watch Octopus3.
It should swim in a
repeating triangle
pattern.
The two scripts
are separate in
the scripts area.
40
41
Motion
Looks Control
Events
Sound Sensing
Pen Operators
Data More Blocks
move 10 steps
glide 1 secs to x: 0 y: 0
go to x: 0 y: 0
point in direction 90 ▾
point towards ▾
go to mouse-pointer ▾
turn 15 degrees
turn 15 degrees
forever
when clicked
stop all ▾
if then
touching Cat ▾ ?
set size to 35%
wait 0.5 sec
forever
glide 3 secs to x: 0 y: –150
glide 3 secs to x: 200 y: 100
glide 3 secs to x: –200 y: 100
when clicked
x: –126
y: 96
Type these
numbers into the
“glide”blocks.
Scripts Costumes Sounds
Star Hunter
by Octoblaster99 (unshared)
To change the shape
of the triangle, try
different numbers in
the“glide”blocks.
I feel like I’m
swimming in
circles...
0
Score
46 S TA R H U N T E R
Hacks and tweaks
You’ve built a fun game, but that’s just the
beginning. Scratch makes it easy to change
and adapt games as much as you want. You
might find bugs that need fixing, or you might
want to make the game harder or easier. Here
are some suggestions to get you started.
L I N G O
Bugs
A bug is an error in a program. The
first computers made mistakes
when real insects, or bugs, got in
their circuits. The name stuck.
Today, programmers often spend
as much time finding and fixing
bugs as they do writing code in
the first place.
△ Fine-tuning
The best games have been carefully tested to
make sure they play well. Test every change
you make and get friends to play your games
to see how well they work.
go to x: 0 y: 0
when clicked
Add this block to make
Octopus2 start in the
center of the stage.
▽ Debug Octopus2
If Octopus2 ends up in the top-right corner at the end
of a game, it can trap the player in the next game and
end it too quickly. This is a bug. To fix it, you could drag
the octopus away from the corner before starting, but
it’s better to use a script that moves it automatically.
Insert a“go to”block at the start of the script for
Octopus2 to send it to the center of the stage.
Star Hunter
by Octoblaster99 (unshared)
Octopus2 can
trap the player
in the top-right
corner.
47
H A C K S A N D T W E A K S
▽ Different colors
Make your octopuses different colors
by using the“set color”block from
the Looks section. Place it under the
“set size”block at the start of the script.
▽ Flashing colors
You can make an octopus change color continually
to create a flashing effect. Add the script below to
any octopus. Try experimenting with different
numbers in the“change color”block.
△ Scuba diver
To make the underwater theme more
convincing, replace the cat with a diver.
Click on the cat in the sprites list, then
open the Costumes tab and click on the
sprite symbol to open the library. Load
the costume called“diver1”.
▽ Play with size
You can change how easy the game is by adjusting
the size of the sprites. Change the number in the
octopuses’blue“move”blocks to alter their speed.
Change the purple“set size”blocks to make sprites
larger or smaller. Fine-tune the numbers until the
game is just hard enough to be fun.
Change this
number to make
colors change
faster or slower.
Try setting this number
anywhere from –100 to 100 to
see the full range of colors.
set color ▾ effect to 50
set size to 50%
set size to 100%
Hey! Turn me back
into a cat!
next costume
forever
forever
when clicked
when clicked
wait 0.1 secs
◁ Swimming animation
To add a professional touch to Star
Hunter, animate the octopuses
so that they look as if they’re
swimming. Add this script to an
empty part of the scripts area for
each octopus to make them switch
between two different poses.
change color ▾ effect by 25
coding games with scratch for using in school
Cheese
Chase
50 C H E E S E C H A S E
Cheese Chase
by SuperMimi (unshared)
◁ Mimi
You play the game as the
mouse. Use the arrow
keys on your keyboard to
make her run up, down,
left, or right.
◁ Beetles
Beetles scuttle along the
edges and make random
turns when they hit a wall.
◁ Ghosts
Ghosts can float through
walls. They can appear
anywhere without warning
and then disappear. The beetles are small
enough to let the mouse
squeeze past.
Only the ghosts can
move through walls.
Score 30
How to build
Cheese Chase
Some of the world’s first and most
popular computer games were
maze games. In a maze game, quick
thinking is essential as you race
around tight corners, avoiding
monsters and collecting treats.
Mimi the mouse is hungry and stuck in
a maze. Help her find the cheese but
avoid the evil beetles. And watch out
for ghosts—the maze is haunted!
AIM OF THE GAME
51
H O W T O B U I L D C H E E S E C H A S E
GAME CONTROLS
Players use the arrow
keys on a keyboard
as game controls.
Collect blocks of cheese
to score points.
You can create a
maze with any
arrangement of walls.
The game remembers
the highest score. Can
you beat it?
High Score 90
◁ Chase the cheese
There are countless ways to
change Cheese Chase and
create your own version of the
game. For instance, you can
adjust the speed, increase
the number of beetles, and
change the shape of the maze.
Click the green flag
to start a new game.
Click the
stop sign to
end a game.
52 C H E E S E C H A S E
point in direction 0 ▾
move 5 steps
if then
key up arrow ▾ pressed?
Keyboard control
Many games let the player use the keyboard to control the
action. In Cheese Chase, the player uses the arrow keys on
the keyboard to move Mimi the mouse around the stage.
Start by creating a keyboard control script for Mimi.
Sprites
Sprite 1
duplicate
delete
save to local file
hide
Start Scratch and choose“New Project”. Delete the
cat by right-clicking and selecting“delete”. If you
use a Mac computer, instead of right-clicking
you can hold down the control key and click.
Click the“New sprite”symbol and
look through the sprite library
for Mouse1. Click“OK”. The mouse
should now be on the stage and
in the sprites list.
Click here to open
the sprite library.
New sprite:
Add this script to the mouse to
move the sprite up the stage
using the up arrow key. To find
the different-colored blocks,
remember to click the different
options in the Scripts tab. Read
through the script carefully and
think about what it does. Run
the script by clicking the green
flag. You should be able to move
the Mouse sprite up the stage
using the up arrow key.
forever
The mouse is
highlighted in
blue to show it’s
your current
sprite.
The blocks inside the
“if then”block only run
when the answer to the
question is yes.
Everything inside
the“forever”loop
repeats endlessly.
Click the triangle and select
“up arrow”to choose the
correct keyboard key.
This block makes the
mouse face upward.
This block makes
the mouse move.
1 2
3
when clicked
Mouse1
53
G A M E P R O G R E S S 1 1 %
To make the other arrow keys work, add three more“if then”blocks
like the first one, but choose a different arrow key and direction
for each one. To move right, select the right arrow key and set
the direction to 90. For down, set it to 180. For left, set it to –90.
Read through the finished script to make sure you understand it.
Now click the green flag to run the script. You should be able
to move the mouse in all directions around the stage using the
arrow keys. If it’s not working, go back and check all the steps.
G A M E D E S I G N
when clicked
Make sure the arrow
key matches the
direction value.
Each“if then”block should
be inside the“forever”loop,
but not inside any of the
other“if then”blocks.
forever
point in direction 0 ▾
point in direction 180 ▾
point in direction 90 ▾
point in direction –90 ▾
move 5 steps
move 5 steps
move 5 steps
move 5 steps
if
if
if
if
then
then
then
then
key up arrow ▾ pressed?
key down arrow ▾ pressed?
key right arrow ▾ pressed?
key left arrow ▾ pressed?
Controllers
In Cheese Chase, we use the arrow
keys to control the game, and in
Star Hunter we used the mouse.
Other computer games use very
different types of controller.
▷ Console
controller
Console controllers
usually have two
small joysticks
controlled with your thumbs, along
with a range of other buttons. They
are ideal for complex games that
need a lot of different controls.
▷ Dance mats
You control the game
by stepping on giant
keys. Dance mats
are good for games
involving physical
activity, but they
don’t give fine control.
▷ Motion sensor
These controllers
detect movement,
which makes them
ideal for sports games
where you swing your
arms to use a racquet
or bat, for example.
▷ Camera
Special cameras
in some game
consoles allow the
player to use body
movements to
control the game.
4
5
54 C H E E S E C H A S E
Using the paint editor
Cheese Chase now has its mouse heroine and she’s
hungry, but there’s no cheese yet for her to chase.
The sprite library in Scratch doesn’t include a
picture of cheese, so you’ll need to make one
yourself. You can do this with Scratch’s paint editor.
My cheese piece is
a masterpiece!
Create a blank sprite by clicking the small paintbrush
symbol above the sprites list. This will open Scratch’s
paint editor in a screen like the one below. Make
sure that“Bitmap Mode”is selected at the bottom.
Now draw the cheese. Use the paintbrush
tool and choose black from the color palette
at the bottom of the screen. Draw the outline
of the cheese. If you want perfectly straight lines,
use the line tool. Your cheese drawing might be
too big at first, but you can make it smaller later.
6
7
Flip
Line thickness
Use this tool to
set the center of
the sprite.
Color palette
Solid
Outline
Redo
Undo
Straight line tool
Paintbrush tool
Eraser
Use this tool to
duplicate part of
a drawing.
Use this tool
to select part
of a drawing.
Use this tool
to fill a shape
with color.
Crop
Rectangle tool
Circle tool
costume1
Convert to vector
Bitmap Mode
100%
Clear Add Import
Use this tool to
draw wiggly lines.
Use this tool to
draw straight lines.
55
G A M E P R O G R E S S 2 2 %
If you like, use the circle tool to draw
holes in the cheese. Make the circle
an outline rather than a solid circle
by choosing the outline option at
the bottom.
Now set the center of your cheese.
Click the“Set costume center”tool in
the top right and then click the middle
of the cheese. The cheese is now ready
to be added to the game.
To keep score, we need to create a variable called
“Score”. Choose Data in the blocks palette and
click on“Make a Variable”. Type the word“Score”
in the pop-up box. The score counter will now
appear on the stage.
To add color, choose yellow and use the
fill tool to fill in the cheese. If your color spills out
and fills the whole background, click on the“undo”
button. Make sure your lines don’t have any gaps,
then try again.
Now add a script to make the cheese appear in a random location.
When the mouse touches it, there will be a“pop”noise, the player
will score ten points, and the cheese will move to a new location.
Run the script and try catching the cheese. It should be easy—
but that’s because you haven’t added enemies yet...
when clicked
set Score ▾ to 0
forever
go to x: y:
pick random –220 to 220 pick random –160 to 160
wait until touching Mouse1 ▾ ?
change Score ▾ by 10
play sound pop ▾
This block moves the
Cheese sprite to random
locations around the stage.
The script pauses here
until the mouse arrives.
8 9
10 11
12
Score 0
Select this
tool and click
inside the
shape to fill
it with color.
Use this tool
to draw holes.
Select this
tool and click
in the middle
of the cheese.
This shows the
number in the
“Score”variable.
The background
should stay this
pattern to show
it’s transparent.
56 C H E E S E C H A S E
Getting spooky
Adding our first enemy to the project will make Cheese Chase
into a proper game. A ghost is a good first enemy for this game
because it can float through walls, so you won’t need to change
the ghost’s script when we add the maze.
Click the“New sprite”symbol and
select a ghost sprite from the
sprite library. Click“OK”to add
it to the project.
Click here to
open the library.
The ghost is now
your selected sprite.
New sprite:
13
Ghost1
This block keeps the ghost
on screen for 3–6 seconds.
touching Mouse 1 ▾ ?
This block ends the game if
the ghost touches the mouse.
Add the following script to the ghost to make
it chase the mouse. If it touches the mouse, the
game will end. You might recognize most of this
code from Star Hunter.
when clicked
set rotation style left-right ▾
if then
stop all ▾
when clicked
hide
hide
wait secs
pick random 5 to 10
go to x: y:
pick random –220 to 220 pick random –160 to 160
show
This block keeps
the ghost hidden
for 5–10 seconds.
Starts a new script.
Ghost1 will now
have two scripts.
This block stops the
ghost from spinning
upside down.
forever
point towards Mouse 1 ▾
This block
makes the
ghost move
slowly.
move 1 steps
forever
This block makes the ghost appear
in a random place on the stage.
14
Now add a separate script to make the ghost appear
and disappear for random amounts of time. The“hide”
block makes the sprite disappear, and“show”makes it
appear again.
15
wait secs
pick random 3 to 6
The ghost starts
off hidden.
57
G A M E P R O G R E S S 3 3 %
Next, add music to the game. We usually add music
to the stage rather than a sprite. Click the stage area
on the left of the sprites list to highlight it in blue. Click
the Scripts tab and add the following script to play
a sound over and over. Click“Sound”in the blocks
palette to find the“play sound until done”block.
when clicked
forever
play sound pop ▾ until done
Now click the Sounds tab above the blocks palette.
Click the speaker symbol to open the sound library.
Select the category“Music Loops”on the left, then
choose the music“xylo1”and click“OK”. Repeat the
process to load“dance celebrate”into the game too.
Return to the Scripts tab and change the selected
sound from“pop”to“xylo1”. Run the game and think
about how it feels to play. Next try the sound“dance
celebrate”. Which one is better?
forever
play sound xylo1 ▾ until done
The sound
repeats until
the game ends.
Watch a scary film with the sound
off and it’s not so scary anymore.
Games are the same—the music
sets the mood. A fast-paced
game will use music with a
driving beat to make you hurry.
A spooky game should have
haunting music to make you feel
uneasy—happy, bouncy music
would break the spell. A puzzle
game might have echoing, eerie
music to create a sense of mystery.
Some games use music as a key
part of the game play, such as
those where the player has to
dance or push buttons in time
to the beat.
G A M E D E S I G N
Music in games
You never know where
I’ll appear next!
Scripts
New sound:
Costumes Sounds
Sounds tab
Click the triangle to
choose the sound.
This opens the
sound library.
16
17
18
58 C H E E S E C H A S E
Making mazes
Mimi the mouse can run anywhere she likes on the
stage. Put a stop to that by adding a maze. The maze
will make it difficult for her to move from one place to
another, adding an extra challenge to Cheese Chase.
The maze will be a sprite, not a backdrop,
because that makes it easier to detect
when another sprite touches it. Draw
it in Scratch’s paint editor. Click on the
paintbrush symbol in the sprites list,
then click on the blue“i”and rename
the sprite“Maze”.
Now you can start using the paint editor. Make
sure“Bitmap Mode”is selected in the bottom
right. If not, click the“Convert to bitmap”button
to change the mode. Choose the line tool
and set the line width control to the middle.
Then pick a dark color for the maze walls.
Select“Bitmap
Mode”before
you draw
the maze.
Line tool
Rename the
sprite“Maze”.
Slide the
line width
control to
the middle.
Choose a
color before
you start
drawing.
This opens the
paint editor.
Mouse1 Cheese Ghost1
Draw the maze in the
empty space here.
ENTER MAZE HERE
costume1
Convert to vector
Bitmap Mode
100%
Clear Add Import
Sprite1
Name this
sprite“Cheese”.
19
20
Sprites New sprite:
59
G A M E P R O G R E S S 4 4 %
Now draw the maze. Start by drawing the outside of
the maze at the outer edge of the checkered drawing
area. Hold down the shift key on your keyboard to
make sure lines are perfectly vertical or horizontal.
Then add the inside walls.
Finally, we need to add a script to make sure
the maze is always in the center of the stage
so it’s fully visible. With the Maze sprite
selected, click on the Scripts tab and add
the following script.
when clicked
go to x: 0 y: 0
Run the project. You’ll find that Mimi
can run through walls, but don’t worry
because we’ll fix that later.
At the center of
the stage, x is 0
and y is 0.
Make sure that the
lines of the maze are
perfectly straight.
21
22
costume1
Convert to vector
Bitmap Mode
100%
Clear Add Import
23
60 C H E E S E C H A S E
Mimi, the ghost, and the cheese are all too
big for the maze, so we need to shrink them.
Add the following blocks at the beginning
of Mimi’s script, before the“forever”block,
and fill in the numbers below.
Now add a purple“set size to”block to the ghost’s
main script. Set the size to 35 percent. Add a“set
size to”block to the Cheese sprite too, and adjust
the percentage until the cheese is about twice the
size of Mimi.
If you use the eraser, be careful not to leave any
flecks of paint behind because Mimi will stop if she
hits them. Check the corners of the maze for bumps
that Mimi might get stuck on and remove them.
Add a background color to the
game by painting a backdrop, not
the Maze sprite. At the bottom left
of the screen, click the paintbrush
symbol in the stage info area.
This opens the paint editor. Make
sure“Bitmap Mode”is selected at
the bottom.
set size to 35 %
go to x: –200 y: 75
point in direction 90 ▾
when clicked
Remove bumps with
the eraser tool.
This makes Mimi
about a third of
her current size.
This sends her
at the top left when
the game starts.
Mimi is half
the size of the
cheese.
This block makes
her face right.
Click here
to paint the
backdrop.
Passages should be
wide enough for Mimi
to pass her enemies.
Stage
1 backdrop
New backdrop:
You might need to fine-tune your Maze
costume to make sure Mimi can fit through
all the passages with enough room to pass
her enemies (which we’re going to add
later). To alter the maze, select the Maze
sprite and click the Costumes tab. Use
the eraser tool to remove walls or the
selection tool to move them.
24
26
27
25
28
61
G A M E P R O G R E S S 5 6 %
Choose a color,
select the fill
tool , and
then click on the
backdrop to fill
it with color.
Try different
colors to see
which one looks
best in the maze.
Score
Score
Score
Score
30
30
30
30
High Score
High Score
High Score
High Score
96
96
96
96
29
G A M E D E S I G N
Space in games
How the obstacles in a game are laid out
has a big effect on how you play. A maze
is the perfect obstacle to demonstrate this.
△ Open space
The player can move in any
direction most of the time.
A game like this needs fast-
moving enemies or lots of
enemies to make it challenging.
△ Closed-in space
The player is forced to move in a very
limited way. Just one enemy patrolling
the corridors of this maze would make
life hard. The player has to think ahead
to avoid getting trapped.
△ Balanced space
This is what the maze in Cheese
Chase is designed to be. It limits
the player’s movement enough
to make the game interesting,
but allows some freedom.
Walls restrict
movement.
62 C H E E S E C H A S E
Mousetrap
Mimi can currently run straight through the walls of
the maze like a ghost, but we want her to stay trapped
inside the passages. Time to change her script.
Select Mimi and drag the
following blocks to an empty
part of the scripts area. This
set of blocks will make Mimi
reverse if she runs into a wall.
This block makes
Mimi move five
steps backward.
Insert the blocks four times into Mimi’s
main script. To make copies, right-click
(or control-click if you use a Mac) on
the new blocks and select“duplicate”.
Place the duplicates after each“move
5 steps”block.
move –5 steps
if touching Maze ▾ ? then
forever
point in direction 0 ▾
point in direction 180 ▾
point in direction 90 ▾
point in direction –90 ▾
move 5 steps
move 5 steps
move 5 steps
move 5 steps
if
if
if
if
then
then
then
then
key up arrow ▾ pressed?
key down arrow ▾ pressed?
key right arrow ▾ pressed?
key left arrow ▾ pressed?
Uh oh!
30
31
Insert the new blocks
four times into the
mouse’s script.
move –5 steps
if touching Maze ▾ ? then
63
G A M E P R O G R E S S 6 7 %
If Mimi’s tail or paws touch a wall when she
turns around, she can get stuck. We can fix
this bug by making some changes to Mimi’s
costume in the paint editor.
Select Mouse2 in the sprites list and click
the Costumes tab above the blocks palette.
Choose“Convert to bitmap”at the bottom,
and then use the eraser tool to trim Mimi’s tail.
There’s another problem that we can fix. Every
sprite has a center point, but if this isn’t in the
exact center, the mouse will wobble when its
direction changes and might overlap a wall and
get stuck. Choose the“Set costume center”tool
and then click in the exact middle of Mimi to
correct her center point.
Mimi moves five
steps backward.
Touching the wall triggers
the reverse move.
If Mimi’s tail overlaps
the wall, she might
stop moving.
Set costume center
E X P E R T T I P S
Bounding boxes
One of the big challenges that game
programmers face is detecting when
sprites with complicated shapes
collide. Even in simple 2D games,
collision detection can cause
problems, such as sprites getting
stuck or solid objects merging. A
common solution is to use“bounding
boxes”—invisible rectangles or circles
that surround the sprite. When these
simple shapes intersect, a collision
is detected. In 3D games, spheres
or 3D boxes can do the same job.
▷ How does it work?
You might wonder why Mimi has
to move five steps backward. The
reason is that she normally moves
forward five steps at a time. The
backward move reverses the
forward one, making her stand
still. This happens so quickly that
you don’t see her reverse.
Ouch!
Mimi moves five
steps forward.
32 33
34
Mouse1 Clear Add Import
64 C H E E S E C H A S E
Beetle mania
Now for Mimi’s main enemies: a small army
of evil beetles that scurry around inside the
maze. If she bumps into one, the game ends.
Click the“New sprite”symbol
and choose the Beetle sprite
from the library.
Now drag the“pick random”block into the
first window of an“equal to”block. Then
drag the“equal to”block into an“if then
else”block.
The beetle is
now your
selected sprite.
You may need to change
these numbers if the
beetle starts on a wall. Click the“pick random”block.
You’ll see“1”or“2”appear in
a speech bubble at random.
This block
makes the
beetle reverse
and then turn
right when it
hits a wall.
This is an“equal
to”block.
This block
makes the
beetle
turn right.
Type“2”here
Add the following script to set the beetle’s size,
location, and direction. It uses a“forever”loop to
move the beetle, and an“if then”block to make it
stop and turn right whenever it hits a wall.
To make the beetles move automatically, you
need to create a sequence of steps for them to
follow. Programmers call this an algorithm. Our
algorithm will tell each beetle to move forward
until it hits a wall. Then it will stop, turn, and
move forward again.
Run the script. You might notice a glitch: the
beetle always turns right and ends up going around
in loops. We need to change the script so that the
beetle turns left or right at random. To make a
random choice, use a“pick random”block. Drag
it to an empty part of the scripts area and set the
second number to 2.
when clicked
STOP
forever
set size to 30 %
move 5 steps
go to x: –130 y: 80
point in direction 90 ▾
turn 90 degrees
move –5 steps
if then
touching Maze ▾ ?
1
if
else
then
= 1
pick random 1 to 2
Type“1”in
this window.
pick random 1 to 2
35
36
37
38
39
Beetle
65
G A M E P R O G R E S S 7 8 %
Add two“turn 90 degrees”blocks to make the beetle
turn left or right. Read through the script carefully and
see if you can figure out how it works.
Remove the“turn 90 degrees”block from the beetle’s original script and
put the“if then else”block in its place, as below. Run the project and watch
what happens. Check there’s enough room for Mimi to squeeze past the
beetle. If not, adjust the maze in the paint editor.
The blocks inside the
“if then”block run
only when the beetle
touches the maze.
Question
GO
when clicked
forever
set size to 30 %
move 5 steps
go to x: –130 y: 80
point in direction 90 ▾
turn 90 degrees
turn 90 degrees
turn 90 degrees
turn 90 degrees
move –5 steps
if then
touching Maze ▾ ?
E X P E R T T I P S
if then else
The“if then else”block is just like
an“if then”but with an extra trick.
A normal“if then”asks a question
and runs the blocks inside only if
the answer is yes. The“if then else”
block can hold two groups of
blocks: one to run if the answer is
yes, and another if the answer is
no. The words“if”,“then”, and“else”
are used in nearly all computer
languages to make decisions
between two options.
if
else
then
= 1
= 1
pick random 1 to 2
pick random 1 to 2
if
if
else
else
then
then
The blocks inside
the second gap run
if the answer is no.
The blocks
inside the first
gap run if the
answer is yes.
41
40
66 C H E E S E C H A S E
Add the“if then”blocks shown below to the beetle’s
script. The new blocks check whether the beetle is
touching Mimi and, if it is, send a message. Select
“Mouse1”in the“touching”block.
Now give the message a name.
Select“message1”in the“broadcast”
block, choose“new message”, and
type“GameOver”.
Sending messages
The next step is to make the beetle end the game if Mimi
bumps into it. Instead of using another“touching”block
in Mimi’s script, you can use a message. Scratch lets you
send messages between sprites to trigger scripts. The
beetle will send a message to Mimi that stops her script.
set size to 30 %
go to x: –130 y: 80
point to direction 90 ▾
move 5 steps
when clicked
forever
if then
then
touching Mouse1 ▾ ?
pick random 1 to 2 = 1
broadcast message 1 ▾
move –5 steps
if
else
turn 90 degrees
This block is found under
Events. It sends a message
when the beetle hits Mimi.
Type "GameOver".
Select“Mouse1”.
I have a message
for you…
New Message
OK Cancel
Message Name: GameOver
if then
touching Maze ▾ ?
42
43
turn 90 degrees
broadcast message1 ▾
message1
new message…
67
G A M E P R O G R E S S 8 9 %
Now add an extra script to Mimi to receive the
message. Drag the following blocks to an empty
part of her scripts area. Try the game out. Mimi
should stop moving when she touches the beetle,
but the beetle will continue to move. Later we’ll
use a message to show a“GAME OVER!”sign as well.
The game needs more beetles. Copy
the Beetle sprite by right-clicking on
it (use control-click if you work on a
Mac) and then choose“duplicate”.
Make three new beetles. These will
all have the same script. See what
happens when you run the project.
You’ll need to change the numbers in the“go to”
blocks for each new beetle so they don’t all start
in the same place. Starting in different corners
works quite well. Experiment!
when I receive GameOver ▾
stop other scripts in sprite ▾
E X P E R T T I P S
Messages
Messages provide a neat
way of making sprites react
to each other. We could
have made the mouse
check if it’s touching a
beetle, but that would
mean adding “if then” and
“touching” blocks to Mimi’s
script for all four beetles.
By using messages, we can
add more enemies without
changing Mimi’s code.
Beetles start
in corners.
This block
stops Mimi’s
main script.
Select“duplicate”to
create new beetles.
Score 30
all
this script
other scripts in sprite
44
45
46
Sprites
Beetle Beetle3 Beetle4
info
duplicate
delete
save to local file
hide
68 C H E E S E C H A S E
High score
You can make a game more fun by
adding a high score for players to beat.
We create this in the same way as the
score tracker: by making a variable and
displaying it on the stage.
Select Data in the blocks palette. Click
“Make a Variable”and create a new variable
called“High Score”. A new block will appear,
and the high score counter will appear on
the stage. Drag it wherever you like.
Now add an extra set of blocks to the Cheese
sprite’s“forever”loop to test for a new high score
each time the player gains points. Run the project
and see if anyone can beat your high score.
when clicked
set size to 70 %
set Score ▾ to 0
forever
go to x: y:
pick random –220 to 220 pick random –160 to 160
wait until touching Mouse1 ▾ ?
change Score ▾ by 10
play sound pop ▾
The“if then”block tests
whether the high score
has been beaten. If so,
the score becomes the
new high score.
if then
Score > High Score
set High Score ▾ to Score
Find the“more
than”block in
Operators.
47
48
New Variable
OK Cancel
Variable name:
For all sprites For this sprite only
High Score
69
G A M E P R O G R E S S 1 0 0 %
Game over!
At the moment, the only signal the game has ended is that the mouse
stops moving. You can add a finishing touch to any game by displaying
a large, bold“GAME OVER!”sign. To do this you need to create a“Game
Over!”sprite and use the“GameOver”message to make it appear.
Click the paintbrush
symbol in the
sprites list to create
a new sprite with the
paint editor. Using
”Bitmap Mode”, draw
a rectangle and fill it
with a dark color.
Now switch to“Vector
Mode”. Choose a bright
color and use the text
tool to type“GAME
OVER!”in the rectangle.
Change the font to
“Scratch”and use the
selection tool to make
the text large.
You don’t want the
“GAME OVER!”sign
to show until the
game is really over,
so let’s hide it with
a script. Switch to
the Scripts tab and
add these blocks.
Now add a script
to make the sprite
appear when the
game ends. You
can use the same
message that
stops Mimi to
trigger this script.
Score 30 High Score 96
when clicked
hide
go to front
show
Run the game. You should now see
the“GAME OVER!”sign when you
get caught by a beetle. To make
the sign work with the ghost too,
replace its“stop all”block with a
“broadcast GameOver”block.
This block ensures
other sprites are
behind the sign.
This places the
“GAME OVER!”
sign in the middle.
when I receive GameOver ▾
go to x: 0 y: 0
GAME
OVER!
49
50
51
52
Don’t forget
to check
the sprite’s
center with
the set
center tool.
Use the
selection
tool to
enlarge
the text.
To change
the font,
highlight
the text
first.
Change the font
to Scratch.
costume1
Convert to bitmap
Vector Mode
100%
Clear Add Import
Donegal
Gloria
Helvetica
Marker
Mystery
Scratch
Font:
Scratch ▾
GAME
OVER!
70 C H E E S E C H A S E
△ Add sounds
Jazz up the game with some sound effects using
the“play sounds”block when the ghost appears,
when the game ends, or when you get a high
score. There are lots of sounds in Scratch’s sound
library that you can experiment with.
◁ Play on
You need to play the game a lot
to find out what works and what
can be improved. Get other people
to play. You can adjust many
properties of the game until you
get the right configuration: a game
where the abilities of the player
and enemies are well balanced.
▷ Tweak timings
You might find Cheese Chase harder
than Star Hunter. To make it easier,
you can make the beetles slower or
make the ghost appear for a shorter
time. You can also speed up Mimi. For
variety, try making each beetle run
at a different speed.
▽ Vanishing cheese
For an extra challenge, make the cheese spend only ten seconds
or so in each spot before moving to a new location. This will force
the player to move fast. To do this, give the cheese an extra script
with a“forever”loop containing a“wait 10 secs”block, followed by
a copy of the“go to”block from the main script.
▷ Rocket power
Add a power boost that hides all
the enemies for ten seconds when
the mouse touches it. To do this,
you would need to add a new sprite
and a message to trigger a hide-
wait-show script in each enemy.
when clicked
forever
wait 10 secs
go to x: y:
pick random –220 to 220 pick random –160 to 160
This block picks a
random location
for the cheese.
Hacks and tweaks
Take Cheese Chase to the next level by
tweaking the rules of the game and the
way the sprites behave. You can also
experiment with big changes that turn
Cheese Chase into a totally different
kind of game.
71
H A C K S A N D T W E A K S
Adding instructions
Players like to see a game’s
instructions clearly before they
start playing. Here are three
ways of including instructions.
▷ Don’t touch the walls
Make the game end if Mimi touches the walls of
the maze. Add a script to the Maze sprite to send the
message“GameOver”if she touches the maze. This
makes the game much harder. To make it even harder,
try switching the player’s controls from the keyboard
to the computer mouse. The game then becomes a
test of a steady hand.
▽ Project page
The easiest way to include instructions
is to simply type them in the instructions box
on the project page. You need to log in to an
online Scratch account to do this.
Type the
instructions
here.
▽ Instructions sprite
You can use the paint editor to create an
Instructions sprite in the same way that
you created the Game Over sprite. Give
it the following script to show the sprite
at the start of the game and to hide
it once the player presses the space bar.
show
hide
go to x: 0 y: 0
▽ Speech bubbles
Make your game characters tell the player
the instructions using speech bubbles. Add
a“say”block to the start of Mimi’s script to
explain the game. Don’t forget to add“wait”
blocks to the enemies’scripts—otherwise
there’s a risk you’ll lose before you start!
when clicked
when clicked
go to front
wait until key space ▾ pressed ?
The Instructions sprite
appears until you press
the space bar.
Do as
I say!
Add this“wait until”block
to the start of every other
sprite’s script so they
don’t start moving until
the game begins.
wait until key space ▾ pressed ?
GAME
OVER!
Tell people how to use your project
(such as which keys to press)
Add project tags.
How did you make the project ?
Did you use ideas, scripts or artworks from
other people ? Thank them here.
Modified: 8 Jun 2015
Unshared
9 scripts
6 sprites
DRAFT
Cheese Chase
by SuperMimi
Instructions
Notes and Credits
c
0 0 1 1
Score 30 High Score 96
set size to 35 %
coding games with scratch for using in school
Circle
Wars
74 C I R C L E W A R S
How to build
Circle Wars
Lightning reactions are essential
in Circle Wars, a fast-paced game in
which you hunt green circles while
being chased by red ones. The
game uses Scratch’s clones feature,
which can turn a single sprite into
an army of sinister copies.
Move the blue circle around the screen
using the mouse. Collect the pale green
circles, but avoid the red ones that march
toward you like a zombie army. The solid
green and solid red circles drop clones of
themselves as they roam around. Score
more than 20 points to win and go below
–20 to lose.
AIM OF THE GAME
Circle Wars
by HappyShrimp321 (unshared)
Score 8
The solid green circle lays
the friendly clones.
The score rises or
falls as green and red
clones are touched
by the player.
Time 23.5
◁ Enemies
Steer clear of the red enemy
circles. Touch one and it takes
three points off your score, before
vanishing with a clash of cymbals.
◁ Friends
The friendly circles are green.
When you touch one, you
score a point and the circle
disappears with a pop.
◁ Player
The player is the blue circle.
If you don’t keep moving
quickly, the enemy circles
will soon overwhelm you.
The timer shows
how long each
game takes.
75
H O W T O B U I L D C I R C L E W A R S
The solid red circle lays
the enemy clones.
Clones of the solid red
circle chase the player.
Clones of the solid green
circle chase the player.
Player
Click the stop sign
to end a game.
Click the green flag
to start a new game. GAME CONTROLS
Use a computer mouse
or touchpad to control
this game.
◁ Is it art?
Not all games use cartoon
sprites. With its colored
circles, this game looks more
like a piece of modern art.
Once you’ve built it, why not
make up a story to explain
the game. You can change
the sprites, colors, and
backdrop to tell that story.
It’s all my
own work!
Don’t let them
get you!
76 C I R C L E W A R S
You now need to center
the sprite. Select the“Set
costume center”tool (top
right) and then click in the
very center of the circle.
Rename the sprite“Player”
by clicking on the blue“i”
in the sprites list.
Creating the sprites
First you need to create the three sprites for
the main game. These are all simple colored
circles, so you can draw them yourself. Start
by following these instructions to create the
player’s character—the blue circle.
New sprite:
Select solid color.
Click here to paint
a new sprite.
Circle tool
E X P E R T T I P S
Resizing the circle
If your circle is too big
or too small, you can
change the size of it
by selecting either the
“Grow”or“Shrink”tool
on the bar along the top
of the Scratch screen,
then clicking on the circle.
Look on the stage to compare the
size of your new sprite to the cat.
Grow
Shrink
Player
circle
Friend
circle
Enemy
circle
Start a new project and name it
“Circle Wars”. Click the paintbrush
symbol at the top of the sprites
list to paint a new sprite.
To draw a blue
circle, first select
“Bitmap Mode”
(bottom right).
Then choose
blue in the
color palette.
Click the circle tool on the left
and then select a solid color
(rather than an outline) at the
bottom left of the paint editor.
While holding down the shift
key (this gives you a circle
rather than an oval), click with
the mouse and drag to draw
a circle. The circle should be
about the size of the cat’s
head. When you’re happy with
the circle’s size, delete the cat
sprite (right-click on it and
select“delete”).
1
5
3
2
4
77
G A M E P R O G R E S S 2 0 %
Start by right-clicking on the Player sprite and selecting
“duplicate”. Do this twice. You’ll now have three blue circles.
Rename Player2 as“Friends”and Player3 as“Enemies”.
Select the Friends sprite and click the
Costumes tab. Choose green in the
color palette. Select the“Fill with color”
tool and click inside the blue circle to
make it turn green.
Repeat the steps
for the Enemies
sprite, but color
this sprite red. You
should now have
three different
colored sprites.
Select the Player sprite, click Data, and make a variable
called“Score”for all sprites. Then put a check in the
variable’s box to show“Score”on the stage.
Add the script below to get the blue circle
following the mouse. Read it through and
make sure you understand what it does.
Run the script to check it works. The red
and green circles won’t do anything yet.
Making friends and enemies
You can now make the green friend and red
enemy circles. You can use other colors if you like,
but make sure you can easily tell the three
different circles apart.
Checking this box
ensures that the
score will appear
on the stage.
This block“glues”the Player sprite
to the mouse-pointer.
“Fill with
color”tool
Click inside the
blue circle to
make it green.
Player
Sprites
Enemies
Player Friends
Instant player control
Now add a score display and a script to make
the Player sprite stick to the mouse-pointer—
just like in Star Hunter.
I have some friends
and quite a few
enemies!
OK Cancel
Variable name:
For all sprites For this sprite only
Score
when clicked
forever
set Score ▾ to 0
go to mouse-pointer ▾
Score
Selecting
“duplicate”
makes a copy
of the sprite.
info
duplicate
delete
6
7
8
9
10
New Variable
78 C I R C L E W A R S
Select the green Friends sprite.
Add this script to make the
circle bounce around the stage
with a random change of
direction every 250 steps.
Run the project and
watch the green circle’s
unpredictable journey. The
Friends sprite moves 250
steps in 10-step jumps but it
doesn’t get stuck to the walls.
After 250 steps, the“forever”
loop goes back to the start.
The sprite changes direction
randomly and sets off again.
March of the clones
From just two sprites—the green and
red circles—you can create an army
of friends and enemies to pursue the
player’s blue circle. You can do this
through the magic of cloning. Before
you create your clones, first get the
Friends sprite moving randomly
around the stage.
The“repeat”loop
runs the blocks
inside it 25 times.
The blocks inside
repeat 4 times.
After 4 repeats, the
next block is run.
Picks random
direction
Random direction
changes happen
every 250 steps.
when clicked
when clicked
forever
repeat 25
repeat 4
move 10 steps
move 100 steps
if on edge, bounce
I’m not!
point in direction pick random –180 to 180
Repeat loops
You’ve already seen
“forever”loops that
repeat a group of blocks
nonstop. A“repeat”loop
does a similar job, but it
only repeats the blocks
inside a fixed number of
times. This type of loop
is sometimes called a
“for”loop, because it
repeats for a certain
number of times. The
example shown here
repeats an action four
times to draw a square.
We’re all
different!
We’re all
different!
We’re all
different!
pen down
turn 90 degrees
pen up
11
12
E X P E R T T I P S
79
G A M E P R O G R E S S 4 0 %
Add a“create clone of myself”
block as the last block in the
“forever”loop. You’ll find it in
the yellow Control section.
This block will create a clone
of the Friends sprite after
each 250-step movement.
Run the project. At each change of
direction, the sprite leaves a copy
of itself—a clone. The clones aren’t
just pictures—they are fully working
copies of the original sprite, and you
can give them their own instructions.
New clones are controlled by a special
script that starts with the block“when
I start as a clone”. Add the script below
to the Friends sprite. The script tells
each clone to move toward the Player
sprite for 300 steps, after which the
clone is deleted and vanishes from the
stage. The clones move one step at a
time. They move more slowly than the
original Friends sprite, which moves
in 10-step jumps.
Run the script and watch the green
clones advance slowly toward the
Player sprite. Don’t worry—they’re
the good guys!
Making clones
Now we’re going to make our
friendly clone army. These are
the clones you need to catch
to score points.
All clones run their own
copy of this script.
The instructions
within the block
are repeated
300 times.
The clone moves slowly
toward the Player sprite
in 1-step jumps.
This block makes
all the clones
transparent.
The clone disappears
after 300 steps.
Drag this block into
the bottom of the
“forever”loop.
when clicked
forever
repeat 25
repeat 300
move 10 steps
if on edge, bounce
point in direction pick random –180 to 180
create clone of myself ▾
when I start as a clone
set ghost ▾ effect to 50
point towards Player ▾
move 1 steps
delete this clone
16
15
13
14
A new clone is
created every
250 steps.
80 C I R C L E W A R S
Add an“if then”block
containing the blocks shown
here to check whether the
clone is touching the Player
sprite after each move. Try
running the project now—the
score should increase as you
touch green circles, which
instantly disappear with a pop.
Destroying clones
The last part of the script for
the Friends clone checks if the
clone is touching the Player.
If it is, the clone gets deleted. repeat 300
E X P E R T T I P S
Clones
Clones are useful any time you want lots of
copies of a sprite. Many programming
languages let you make copies of things, but
they are often called objects rather than clones.
Such languages are called“object oriented”
languages and include Java and C++. In Scratch,
there are three orange blocks that control
clones, all found in the Control section.
△ When a clone starts, it runs the script headed with
this block. Clones don’t run the sprite’s main script,
but they can run all other scripts in the sprite’s scripts
area, such as scripts triggered by messages.
△ This block gets rid of the clone. All clones
disappear from the stage when a project stops,
leaving just the original sprite.
△ This block creates a clone of the sprite. The clone
is identical to the sprite and appears in the same
position and facing the same direction, so you
won’t be able to see it until it moves.
when I start as a clone
set ghost ▾ effect to 50
point towards Player ▾
move 1 steps
delete this clone
delete this clone
delete this clone
if then
touching Player ▾ ?
change Score ▾ by 1
play sound pop ▾
create clone of myself ▾
When the Player sprite touches
the clone, the clone is destroyed.
Make sure the
“if then”block is inside
the“repeat”loop.
POP!
17
81
G A M E P R O G R E S S 6 0 %
To copy scripts, just click, drag, and
drop scripts from one sprite onto
another. Drag the two scripts you
made for the Friends sprite onto the
Enemies sprite, one at a time. This
makes copies of the scripts in the
Enemies sprite.
Select the Enemies sprite. The
scripts you dragged and dropped
will probably be on top of one
another, because any copied script
just appears at the top left of the
scripts area. To rearrange them,
right-click on the background and
select“clean up”.
Now adjust the Enemies clone
script so that it takes points away
when the Player touches a red clone.
Alter the“change Score by”block so
it changes the score by –3 instead of
+1. You really want to avoid those
nasty red enemies!
Add a sound to tell the player that
points have been lost. Load the
cymbal sound into the Enemies
sprite by selecting“cymbal”in the
sound library. Alter the script to play
“cymbal”, not ”pop”. You’ll now hear
which type of clone you’ve touched.
Run the project. Check that you
now have both red and green
clones, and that touching a red
clone takes 3 points off your score.
Enemy clones
Now you need to add scripts to the Enemies sprite
to make it produce clones that chase the Player.
You can do this by copying the scripts from the
Friends sprite across to the Enemies sprite.
Release the mouse
when the mouse-
pointer is over the
red circle.
Change the script to
play a cymbal sound.
The“clean up”
option reveals
any hidden scripts.
This reduces the player’s
score by 3 points.
change Score ▾ by –3
play sound cymbal ▾
Sprites
Player Friends
clean up
add comment
She may not be the
best player, but she is
the loudest!
22
19
18
20
21
when clicked
forever
repeat 25
move 10 steps
if on edge, bounce
point in direction pick random –180 to 180
create clone of myself ▾
82 C I R C L E W A R S
Add the new“if then”blocks shown here
to the Player sprite. They check your score.
If the score is greater than 20, you win, and
a thought bubble with the word“Victory!”
appears. If the score is less than –20, you
lose, and the sprite thinks“Defeat!”
Win or lose?
You’ve created two ever-expanding
clone armies: one of friendly circles that
help you win points, and one of evil
circles that make you lose points. Next
you need to add the code that tells you
if you’ve won or lost the game.
These blocks run
when the score
is more than 20.
This block sets the score
to 0 at the start.
You can find this
block in the green
Operators section.
The Player sprite stops
following the mouse-pointer
when either the winning or
losing score is reached.
These blocks run
when the score
is less than –20.
when clicked
forever
set Score ▾ to 0
go to mouse-pointer ▾
if
if
if
then
then
then
Score
Score
Score
> 20
> 20
< –20
think Victory!
think Victory!
think Defeat!
stop this script ▾
stop this script ▾
stop this script ▾
Score 21 Score –21
Victory! Defeat!
L I N G O
Comparison operators
Earlier we saw how you can use“if then”blocks
to create true or false statements—also known
as Boolean expressions—that lead to different
outcomes. For example, in Star Hunter,“if
touching cat then play sound fairydust”makes
a sound play only when the cat gets a star. We
can do the same thing with numbers by using
what are called comparison operators:
When we add these to“if then”blocks, they create
statements that are either true or false. In Circle
Wars, the“is more than”operator tells you that
you’ve won the game when you score over 20.
is less than
5 > 1
3 = 3
2 < 5
equals is more than
23
83
G A M E P R O G R E S S 8 0 %
By copying“timer”to the variable
“Time”, each trip around the loop will
now display the time on the stage. But
the moment the player wins or loses,
the time stops being updated (the
script is stopped) and the total time
it took to win or lose is shown.
Click on the Data section and make a
variable“Time”for all sprites. To show
it on the stage, check the box next to
the variable’s block. Select the Player
sprite. Click on Sensing in the blocks
palette. Add“reset timer”to the Player’s
script, just before the“forever”loop. Go
back to Data and drag a“set Time to”
block to the script and add“timer”to it,
making it the last instruction in the
forever loop.
Run the game. Try to touch only the green
circles. Check that the game ends when the
key scores are reached, and check that the
Player sprite thinks“Victory!”or“Defeat!”You
can reduce the score needed to win if you find
it too difficult. But don’t make the game too
easy—Circle Wars is meant to be a challenge!
This block starts the
timing from 0.
Total number
of seconds
in the game
Time 41.573
when clicked
forever
set Score ▾ to 0
go to mouse-pointer ▾
if
if
then
then
Score
Score
> 20
< –20
think Victory!
think Defeat!
stop this script ▾
stop this script ▾
Adding a timer
To add some competition to the
game, you can include an on-screen
timer that shows players how long
they take to complete a game.
reset timer
timer
set Time ▾ to
I think it must be
lunch time!
I am the
champion!
26
25
24
This block updates
the Time display
every time the
loop repeats.
84 C I R C L E W A R S
Instructions
Players need to know the rules of the
game. Create a special sprite that shows
the instructions for Circle Wars when
the game begins.
Use the paintbrush symbol to create a new
sprite and rename it“Instructions”. Select
“Bitmap Mode”and choose a color. Select the
“Fill with color”tool and click on the drawing
area to fill it with your chosen color.
Now select black from the palette as the
color for the text. Then choose the text tool
and type out the instructions shown here.
If the text doesn’t fit, use the select tool to
resize it by pulling the corner points in or
out. When you’ve finished, click outside the
box around the text to stop editing.
“Fill with color”tool
You are the blue circle.
Move using the mouse.
Be quick!
Try to touch the friendly green circles.
Each one gives you 1 point.
Avoid the enemy red circles.
Each one you touch takes 3 points.
Score more than 20 to win.
Score less than –20 and you lose.
Press the space bar to start!
Text tool
“Select”tool
Choosing a light background color
will make the text easier to read.
You may want to decorate your
instructions with colored circles.
Use black
for the text.
Game stories
Computer games usually have a story to explain why the
action in the game is happening. At the moment, Circle
Wars has no story. Can you make one up? It could be a
battle in space, with a blue spaceship saving friendly
green spaceships and trying to avoid being hit by the red
enemy craft. Let your imagination run riot! Including
some of the story in your instructions will help make the
game more interesting and exciting for the player.
G A M E D E S I G N
27
29
28
85
G A M E P R O G R E S S 1 0 0 %
You also need to add
a“wait until key space
pressed”block immediately
after the green flag blocks
in the Player, Friends, and
Enemies sprites’scripts. This
will hold back all the action
until the space bar is pressed.
Run the project and your
instructions should appear,
filling the screen until you
press the space bar. Players will
have plenty of time to read and
understand the instructions,
letting them start the game
when they’re ready.
Add a“wait until key
space pressed”block
to the scripts of all
three sprites.
This block hides the Instruction
sprite when the player presses
the space bar to start playing.
hide
Add this script to the sprite
to show the instructions
on the stage at the start of
the game. Read it carefully.
Can you see how it works?
when clicked
go to x 0 y: 0
wait until key space ▾ pressed?
show
go to front
These blocks show the instructions
in the center of the screen in front
of other sprites.
I’m ready
to play!
Did someone
mention space?
32
30
31
when clicked
forever
set Score ▾ to 0
go to mouse-pointer ▾
if
if
then
then
Score
Score
> 20
< –20
think Victory!
think Defeat!
stop this script ▾
stop this script ▾
reset timer
timer
set Time ▾ to
wait until key space ▾ pressed?
86 C I R C L E W A R S
Hacks and tweaks
You’ve got Circle Wars working—well done!
Now to personalize it and make it your own.
Try these suggestions and your own ideas.
Once you’ve created something unique, why
not share it on the Scratch projects website?
Remove the
“go to”block.
▽ What’s the story?
Did you think of a story to explain what’s going on in
Circle Wars? Maybe it’s the attack of the dragons, and
the princess player has to eat cakes to survive? Add
some scenery and music to the game to fit with that
story. Experiment with different stories and looks.
▽ Tweak the timer
The number in the timer flickers because it shows lots of
decimal places. To round the value so it shows only whole
seconds, use the green“round”block near the bottom of
the Operators section. Try adding a“Best time”for winning
players, just as you added a“High score”in Cheese Chase.
▷ Slow down, blue!
To make things tricky, change
the blue circle’s script so that it
no longer“sticks”to the mouse
pointer but chases slowly after
it. You could also invent simple
keyboard controls for the sprite.
△ Find a balance
Experiment with different speeds, or change
how many points you win or lose for touching
Friends and Enemies. It’s not difficult to make
the game very hard or very easy, but can you
find a balance to make it just the right level?
▷ The war’s over!
Add a broadcast message to
reveal a“Game over!”sprite when
the player wins or loses, like you
did in Cheese Chase. You can
change the text of the“Game
over!”sprite so that it relates to
your story about the game.
go to mouse-pointer ▾
set Time ▾ to timer
round
G A M E
O V E R !
That’s their best
time yet!
Add the“point towards”
block and an instruction
to“move 5 steps”.
point towards mouse pointer ▾
move 5 steps
87
H A C K S A N D T W E A K S
Orange, yellow,
pink, and purple
circles are enemies.
Change the Friends’
score value to this.
The bigger the clone, the more
points you win or lose.
Use this
scoring for
Enemies.
Green and
blue circles
are friends.
Insert this instruction immediately
after“when I start as a clone”.
◁ Shape shifting
Introduce another shape into the game.
It could be a square that eats red circles,
a triangle that runs away from the player,
a hexagon that makes the player shrink
or grow, or anything else you want to try.
▽ Change the colors
Vary the clones’colors. Click on the Friends sprite. Add
the“set color effect to”block from the Looks section to
the sprite’s clone script. Then drag“pick random”from
Operators into the block’s window and change the
values to –30 and 30. Do the same for the Enemies
sprite. New clones will now have different colors!
▷ Change the size
Add the“change size by”block to
the scripts of both the Friends and
Enemies sprites to make each clone
a random size. Alter the scoring so
that the size of the circle you touch
determines how many points you
score. You’ll also need to change
the totals needed to win or lose. Try
more than 2,000 points for victory,
and less than –2,000 for defeat.
when I start as a clone
set ghost ▾ effect to 50
set color ▾ effect to
change size by
pick random –30 to 30
size
change Score ▾ by
change Score ▾ by 0 – size
repeat 300
repeat 300
From green
Operators section
Change the values
to“–30”and“30”.
coding games with scratch for using in school
Jumpy
Monkey
90 J U M P Y M O N K E Y
How to build
Jumpy Monkey
In the real world there are laws
you just can’t break. For example,
the law of gravity means that
something that goes up must
always come down again. Jumpy
Monkey shows you how to add
gravity to your game worlds.
This number shows you
how fast the monkey will
fly once he is launched.
The monkey is launched
from the arrow when
you press the space key.
The instructions
appear on the
game at the start.
◁ Bananas
If the monkey touches any
of the bananas he will eat
them. Keep going until he
eats all the bananas.
◁ Monkey
Select the monkey’s launch
speed with the up and down
arrow keys, then press the
space key to launch him.
The monkey is on a mission to collect
bananas. Choose which direction he
leaps in and how fast he goes. You need
to send him over the palm tree to grab the
bananas using the fewest possible jumps.
AIM OF THE GAME
Jumpy Monkey
by FunkyMonkey66 (unshared)
◁ Launcher
Point this arrow in the
direction you want to launch
the monkey by using the left
and right arrow keys.
11
LaunchSpeed
SET LAUNCH ANGLE
SET LAUNCH SPEED
PRESS SPACE TO FIRE
91
H O W T O B U I L D J U M P Y M O N K E Y
Avoid the tree—
the monkey can’t
fly through it.
◁ Flying monkey
Try to collect all the
bananas using as few
launches as possible.
The game will record how
many launches you use.
The monkey flies
through the air
like a cannonball.
There are three
bunches of bananas
to collect each time
you play the game.
GAME CONTROLS
Players use the arrow keys
and space key on the
keyboard as game controls.
Down with
gravity!
Space
92 J U M P Y M O N K E Y
Launching the monkey
This game uses a big arrow to help the player choose
the monkey’s precise launch direction. We’ll ignore
gravity to start off with, but you’ll need to add it later
to get the monkey past the tree.
Start a new project and call it“Jumpy Monkey”.
Delete the cat sprite and load two sprites from
the library—“Monkey2”and “Arrow1”. Select the
arrow sprite and rename it “Launcher”by clicking
on the“i” and typing the new name into the box.
This script runs
when the right arrow
key is pressed.
This block moves the
arrow to the bottom
left of the stage.
Select the Launcher sprite, then add these three scripts to set up the Launcher
and allow the player to control its angle using the left and right arrow keys on
the keyboard. The direction of the arrow is the direction that the monkey will
launch. Run the scripts and try turning the arrow.
Go to Data, select“make a variable”, and
add a variable called“LaunchSpeed”.
The new variable will automatically show
up on the stage.
Select this
option, then
click“OK”.
New Variable
OK Cancel
Variable name:
For all sprites For this sprite only
LaunchSpeed
Monkey2 Arrow1
when clicked
set LaunchSpeed ▾ to 10
point in direction 45 ▾
go to x: –200 y: –140
go to front
when left arrow ▾ key pressed
when right arrow ▾ key pressed
turn 1 degrees
turn 1 degrees
This keeps the arrow
visible, with the monkey
behind it.
Type here
to rename
the sprite.
This script runs
when the left arrow
key is pressed.
Launcher
direction: 90°
x: 73 y: -17
rotation style:
can drag in player:
show:
Click here
1
3
2
93
G A M E P R O G R E S S 1 7 %
Maximum
speed
Minimum
speed
Now that you can aim, you need controls to set the
speed of the launch. Add these scripts to change
the speed using the up and down arrow keys.
Events
The key presses and mouse clicks that
a computer detects are known as events.
The brown Events blocks in Scratch trigger
a script whenever a particular event occurs.
We’ve seen them used with messages in
Cheese Chase, but Scratch also lets you trigger
scripts using keys, mouse clicks, sound levels,
and even movement detected by a webcam.
Don’t be afraid to experiment.
▷ Setting things off
Events blocks such as these are used to trigger a
script whenever the event they describe occurs.
change LaunchSpeed ▾ by 0.1
change LaunchSpeed ▾ by –0.1
when up arrow ▾ key pressed
when space ▾ key pressed
when loudness ▾ > 10
when this sprite clicked
when down arrow ▾ key pressed
if
if
then
then
LaunchSpeed
LaunchSpeed
< 20
> 1
loudness
timer
video motion
This increases the
launch speed.
This reduces the
launch speed.
L I N G O
4
94 J U M P Y M O N K E Y
Now select the
Monkey sprite. Add
this script to shrink
him down to the right
size and move him
behind the Launcher.
when clicked
set rotation style don’t rotate ▾
set size to 35 %
To launch the monkey when the
space bar is pressed, add this new
script to the Monkey sprite.“Repeat
until”is a new type of loop block
that keeps repeating the block
inside until the condition becomes
true—in this case, the monkey
keeps moving until it touches the
edge of the stage.
This makes the
monkey’s direction
match the direction
of the launch arrow.
The“repeat until”block
keeps the monkey moving
to the edge of the stage.
E X P E R T T I P S
“repeat until”
Do you want to keep repeating an action only until something
happens and then move on to the rest of the script? The“repeat until”
block can help your code when“forever”and“repeat”loops aren’t
flexible enough. Most programming languages use similar loops, but
some call them“while”loops—these continue while the condition is
true, rather than looping until the condition is true. There are always
different ways to think about the same problem.
repeat until
go to Launcher ▾
go to Launcher ▾
go to Launcher ▾
when space ▾ key pressed
point in direction
move
touching edge ▾ ?
direction ▾ of Launcher ▾
LaunchSpeed steps
5
6
95
G A M E P R O G R E S S 3 3 %
Try setting the Launcher angle and
speed using the arrow keys, and
pressing the space bar to fire the
monkey. He goes in a completely
straight line until he hits the edge
of the stage. Real things don’t do
this—they fall back toward the
ground as they move. We’ll add gravity
to the game later to make the monkey
behave realistically.
Bananas and palm trees
The point of this game is for the monkey to collect
bananas. By using clones, you can add just one Bananas
sprite but give the monkey plenty of fruit to aim for.
when clicked
hide
set NumBananas ▾ to 3
create clone of myself ▾
repeat NumBananas
Add the Bananas sprite to the project. Make
a variable for all sprites called“NumBananas”
to keep track of the number of bananas
on the stage—start with three. Build the
following script to clone the bananas, but
don’t run it yet because you still need to tell
the clones what to do. We only need the clones,
so hide the original
Bananas sprite.
11
LaunchSpeed
The loop runs
three times.
7
8
Jumpy Monkey
by FunkyMonkey66 (unshared)
96 J U M P Y M O N K E Y
show
delete this clone
change NumBananas ▾ by –1
when I start as a clone
go to x:
set size to %
set color ▾ effect to
wait until
pick random 0 to 200 y: pick random –140 to 140
pick random 50 to 100
pick random –10 to 20
touching Monkey2 ▾ ?
broadcast GameOver ▾
if then
NumBananas = 0
Add the next script to place each banana clone in a random spot on the right
of the stage, change how it looks, and make sure it’s not hidden. The clone
will wait for the monkey to touch it and then disappear. If it’s the last banana,
it sends a“GameOver”message, which you need to create as a new message.
The game is too easy—
we need an obstacle. Add
the Palmtree sprite to the
project. Drag and drop
the tree at the bottom of
the stage.
Run the project. You
should be able to get the
monkey to collect all the
bananas. There is no script
run by the“GameOver”
message yet.
Position the palm
tree so that part
of its trunk is off
the stage.
△ Tree on stage
Make sure your palm tree is slightly off-
center, toward the left of the stage, or
the bananas will get stuck behind the
tree and the game won’t work.
Yum yum!
Choose“new
message”
and call it
“GameOver”.
9
10 11 Jumpy Monkey
by FunkyMonkey66
The ranges
of the“pick
random”blocks
send bananas
only to the right
side of the stage.
97
G A M E P R O G R E S S 5 0 %
At the moment, the monkey can fly straight
through the tree. Change his script so that
he stops flying if he touches it.
△ Logic blocks
Logical Operators blocks such as these three
let you test for complex sets of conditions.
move
move
steps
steps
LaunchSpeed
LaunchSpeed
repeat until touching edge ▾ ?
repeat until touching edge ▾ ? or touching Palmtree ▾ ?
Run the project. The monkey should
stop flying when he hits the tree,
which makes any bananas to the
right of the tree impossible to reach.
Don’t worry, gravity will come to the
rescue soon.
The block is true if
either or both blocks
inside are true.
The block is only true
if both blocks inside
are true.
The block is only
true if the block
inside is false.
E X P E R T T I P S
“or”, “and”, “not”
So far, most of the“if then”blocks in this book have tested only a
single condition, such as“if touching cat”in the Star Hunter game.
In this chapter, however, you need to test two conditions at once:
“touching edge or touching Palmtree”. Complex sets of conditions
like this occur a lot in coding, so you need a way to combine them.
In Scratch, the green Operators blocks do the job. You’ll see words
like“or”,“and”, and“not”in almost every programming language,
or special symbols that do the same job.
or
not
and
I want those bananas!
12
13
Modify the script
by adding the“or”
block from the
Operators menu.
The current script
Add a“touching Palmtree?”
block from the Sensing section.
98 J U M P Y M O N K E Y
Make two more variables for all sprites:“FallSpeed”and
“Gravity”. Then add a“set Gravity”block to the monkey’s
“when clicked”script and amend his“when space key
pressed”script as shown below. The new blocks use
variables to simulate gravity.“FallSpeed”keeps track
of how many steps the monkey needs to be moved
down by gravity. The value of“Gravity”is how much
“FallSpeed”increases each time the monkey moves.
when clicked
set rotation style don’t rotate ▾
go to Launcher ▾
set size to 35 %
set Gravity ▾ to –0.2
set FallSpeed ▾ to 0
This new block contains the variable
“Gravity”, which makes the monkey
fall faster each time the loop runs.
Add this block
to the“when
clicked”script.
This new block
shows that at the
moment of launch,
the monkey isn’t
falling yet.
This new block moves
the monkey down.
△ Hiding variables
If you don’t want variables to appear
on the stage, you need to uncheck the
box next to them in the Data section.
Do this for these two new variables.
Deselect the box next
to a variable to stop it
appearing on the stage.
Make a Variable
Make a List
FallSpeed
Gravity
LaunchSpeed
NumBananas
go to Launcher ▾
go to Launcher ▾
when space ▾ key pressed
point in direction direction ▾ of Launcher ▾
move
change y by
change FallSpeed ▾ by
steps
LaunchSpeed
FallSpeed
Gravity
14
repeat until touching edge ▾ ? or touching Palmtree ▾ ?
99
G A M E P R O G R E S S 6 7 %
Without gravity this
monkey flies off in a
straight line.
Gravity pulls this monkey
downward, making him
fall faster every second.
Without gravity the
monkey would get
to here.
With gravity the
monkey ends
up here.
△ Gravity effect
When“FallSpeed”is combined with
the straight line from the Launcher,
the monkey’s path curves back
toward the ground in a realistic manner.
◁ Falling faster
The“FallSpeed”variable makes the
monkey fall farther each time
the“repeat”loop runs.
Run the project again—you can now direct the monkey over the
tree to reach the tricky low bananas. But how exactly is the Scratch
gravity working? Every second, the monkey falls a little bit faster
than the second before, creating a downward curve.
Falls this far in the
first second.
Falls this far in the
second second.
Falls this far in the
third second.
E X P E R T T I P S
Real world gravity
In the real world, when you try to throw
something in a straight line it curves slowly
back toward the ground as gravity pulls it
down. To make the game work in the same
way, you move the monkey along the
straight line, but also add a downward
move after each shift along that line, to
create the same effect as the constant
downward tug of gravity. This allows the
monkey’s movement to seem natural,
making the game more engaging.
The monkey moves
sideways by the same
amount each second.
It falls by an
increasing amount
each second.
15
100 J U M P Y M O N K E Y
Game over
When the monkey has collected all the bananas, a“GameOver”message
is broadcast, ending the game. Make a sign to go with it to tell the player
how many launches were used to collect the bananas.
Click the paintbrush symbol to paint a new
sprite and make a sign like the one below, leaving
a gap in the text where the number of launches will
go. You can make the sign as plain or as decorative
as you like. Name the new sprite“GameOver”.
Now add a variable for all sprites to count the
number of launches. Call this variable“Launches”,
show it on the stage, and right-click on it to change
it to“large readout”. This shows just the value and
not the name of the variable. You’ll reposition the
launch counter later.
Now add these scripts to your sign. Together,
they will count the number of times you
launch the monkey and will display that
number at the end of the game.
Launches 0
when clicked
set Launches ▾ to 0
change Launches ▾ by 1
go to x: 0 y: 0
Hide variable Launches ▾
Show variable Launches ▾
hide
show
go to front
stop all ▾
Select“large
readout”.
You don’t want
to see this
variable until
the game’s over.
This shows
the value of
“Launches”at the
end of the game.
This block counts the
number of times the
space key is pressed.
when I receive GameOver ▾
when space ▾ key pressed
WELL DONE!
You used launches
normal readout
large readout
slider
hide
Leave a
gap here.
17
16 18
Right-click on“Launches”
on the stage.
101
G A M E P R O G R E S S 8 3 %
Make some noise
To make the game more interesting, you can add some sound
effects. Follow the instructions below to play different sounds
when the monkey is launched and when he eats the bananas.
Run the game and collect all the bananas. When
you see the“Game Over”sign on the stage, drag
the“Launches”counter into the gap in the sign.
Scratch will remember its position in future games,
so the sign will always be in the right place.
Click the Monkey sprite, select the
Sounds tab, and load“boing”from
the library. Then add a“play sound”
block to the existing monkey script
in the position shown here. This will
make the“boing”sound play every
time the monkey jumps.
Click the Bananas sprite and load
“chomp”from the sound library.
Then add a“play sound”block to
the existing banana script in the
position shown here. Now the
“chomping”sound will play each
time the monkey gets a banana.
To add a backdrop, click on the stage information
area in the bottom left and then choose the
Backdrop tab at the top. Either paint your own
scenery or load an image from the library. Use
the text tool to add the game’s instructions to
the image, as shown below.
Draw the arrows with the
pencil or paintbrush tool.
Drag the“Launches”number
into the gap you left in the sign.
WELL DONE!
You used launches
7
go to Launcher ▾
when space ▾ key pressed
Add this sound
block to the existing
Monkey2 script.
Add this sound
block to the
existing Bananas
sprite script.
show
change NumBananas ▾ by -1
wait until touching Monkey2 ▾ ?
19
21
22
20
play sound boing ▾
play sound chomp ▾
LAUNCH ANGLE
LAUNCH SPEED
PRESS SPACE TO FIRE
Jumpy Monkey
by FunkyMonkey66 (unshared)
Jumpy Monkey
by FunkyMonkey66 (unshared)
102 J U M P Y M O N K E Y
Playing with gravity
Add a slider to the game to allow you
to experiment with the“Gravity”
variable. The slider will allow you to
tweak the“Gravity”value—you can
even make the monkey fall upward.
Displaying variables
You can change how a variable is shown on the
stage. There are three different options: normal
readout, large readout, and slider. You can also hide
the variable using this menu. Choose the look that
works best for your game.
Gravity
Gravity
0
0
Shows
the name.
Shows just
the value.
Lets you change
the value.
Select the
“slider”
option.
Move this with your mouse
to adjust the number.
Set the range of the slider
by right-clicking on the
slider again.
E X P E R T T I P S
To adjust gravity in your game world, show
the“Gravity”variable on the stage by
checking its box in the Data section. Then
right-click the variable display on the stage
and select“slider”. The slider lets you change
the value of a variable on the stage.
To set the range of the variable, right-click on the slider and
type in the minimum and maximum values—for this game use
–2.0 and 2.0. Make sure you type 2.0 not just 2, or the slider will
only allow you to select whole numbers within the range.
Hides the variable
from the stage.
normal readout
large readout
slider
hide
normal readout
large readout
slider
hide
Gravity 0
Gravity
Gravity
0
–0.18
normal readout
large readout
slider
set slider min and max
hide
Slider Range
OK Cancel
Min:
Max:
–2.0
2.0
23
24
-0.2
103
G A M E P R O G R E S S 1 0 0 %
G A M E D E S I G N
Game physics
Physics is the science of forces and movement in the
real world. Game physics is all about getting that
science into games, so that things react and move
around in realistic ways—being pulled down by
gravity, for instance, or bouncing. Programmers have
to solve all types of physics problems to make games
more realistic or fun. When objects collide, should they
bounce or crunch? How should objects move when
they go underwater or into space?
△ Defying gravity
Game physics doesn’t have to be like real-world
physics—you can create worlds with gravity
that makes things fall upward or even sideways.
Gravity can be much stronger or weaker than
in real life—perhaps balls fly higher with each
bounce, until they shoot off into space.
No gravity makes
the monkey
move in a
straight line.
A positive gravity
value will make the
monkey fall upward.
A negative gravity value makes
the monkey fall downward,
which is closest to real life.
Now play around with the gravity settings in this game
using the slider. Using the suggested value of –0.2 works
well, but take a look at what happens when you increase
or decrease this number—if it is positive, the monkey
will fall upward.
When you’ve finished experimenting
with gravity, right-click on the slider
and select“hide”to return the game
to normal. Now you know how
gravity works, you could try making
a version of the game with reverse
gravity so the monkey falls upward.
Think about what changes you’d
need to make to the game for this
to work, like moving the Launcher
to fire downward.
Help!!!!
26
25
104 J U M P Y M O N K E Y
Hacks and tweaks
Congratulations—you’ve built your first game with
gravity. Once you’ve tried the game a few times, you
can start to play around with the code to make the
game your own. Here are a few ideas to try out.
◁ Banana bonanza
Try adding more bananas,
making then bigger or smaller,
and put them in different
places on the screen.
▽ Fruit salad
Add more fruits with a different score for each
type. You’ll need to make a“Score”variable
and add extra sprites—there are oranges and
watermelons in the Scratch sprite library.
▽ Beat the clock
You can add a timer to make the player complete the game in
a set time. Create a new variable called“TimeLeft”and add the
script below to the Monkey2 sprite. Then create a new sprite,
click on the Costumes tab, and make a sign that says“Times Up!”
Finally, add the two scripts on the right to this sprite.
This sets the
timer to 20.
Make sure this
variable is visible
on the stage.
wait 1 secs
change TimeLeft ▾ by –1
repeat 20
when clicked
set TimeLeft ▾ to 20
Broadcasts Time’s Up ▾
when clicked
hide
show
go to x: 0 y: 0
go to front
when I receive Time’s Up ▾
stop all ▾
These scripts hide
and display the
“Time’s Up”sign.
105
H A C K S A N D T W E A K S
▽ Mouse control
You could use a computer mouse as the
controller for this game instead of the
keyboard. The three blocks below allow you
to set the launch angle and speed as well as
making the monkey jump. See if you can
figure out some code to use them.
▽ Launch speed slide
You’ve already tried adding a slider to
control gravity. You could also add a
slider to adjust launch speed.
▷ Bouncing bananas
To make the game a bit harder, you
could try changing the Bananas
sprite scripts so that the bananas
bounce up and down on the stage.
▷ Danger! Snake!
Add another challenge by
creating an obstacle that gets
in the monkey’s way or maybe
ends the game—perhaps a giant
monkey-eating snake or spider?
▽ Bug or bonus?
You might have discovered that you can adjust
the monkey’s speed in flight with the arrow
keys. You can fix this by adding a new variable,
“MonkeySpeed”, and copying the value of
“LaunchSpeed”into it at launch. Then use
MonkeySpeed not LaunchSpeed in the move
block for the monkey. Or, if you enjoy being able to
change the monkey’s speed, leave the game as it is.
Sliders let you
change these
variables using the
mouse instead of
the arrow keys.
Use this block
to make the
monkey jump.
Gravity
LaunchSpeed
0
0
distance to mouse-pointer ▾
mouse down?
This block could
be used to set
launch speed.
Use this block to
set launch angle.
point towards mouse-pointer ▾
coding games with scratch for using in school
Doom on
the Broom
108
How to build Doom
on the Broom
Games usually have a theme.
This spooky game starts with bats
swooping in on the player, followed
by scary ghouls and monsters. Get
ready to bring these sprites to life
with animation.
The witch is out riding her broomstick in the
woods when creatures of the night begin
to advance on her from all sides. She must
cast her fireball spell to dispose of the bats,
ghosts, ghouls, and dragons that have taken
a fancy to her for dinner.
◁ Witch
The witch sits in the center
of the screen. Spin her
broomstick with the arrow
keys and cast fireballs with
the space bar.
◁ Enemies
Every enemy hit by a fireball is
destroyed and a point is scored.
As you win points, the game
speeds up.
◁ Lives
The witch loses a life if she is
touched by any of her enemies.
But if a flying hippo touches
her, she wins an extra life.
Doom on the Broom
by WorkingWitch111 (unshared)
Score 25
AIM OF THE GAME
Superfast brown bats
have a speedier attack.
Slow-moving ghosts
drift in and fade away
when hit.
D O O M O N T H E B R O O M
EXTRA
LIFE
109
Lives 3
◁ Staying alive
As the game progresses,
more and more monsters fly
toward the witch. The player
must turn the broomstick
quickly and pick off enemies
one by one.
The witch stays in the
center of the stage.
Fireballs are the
witch’s only weapon.
Fire-breathing dragons
spiral in to catch the witch.
Like dragons,
ghouls spiral in
toward the witch.
Black bats flap
straight toward
the witch.
To make the game last
longer, you can increase
the number of lives.
Do you dare
to begin?
H O W T O B U I L D D O O M O N T H E B R O O M
GAME CONTROLS
Use the arrow keys and the
space bar on the keyboard
as game controls.
Space
110 D O O M O N T H E B R O O M
Setting the scene
Doom on the Broom has a spooky theme. The
sprites, backdrop, and music are all chosen to
create a certain atmosphere that draws the
player into the game world. Start by putting
together the Witch sprite, a dark wood, and
some creepy music.
Start a new project and call it Doom on the Broom.
Delete the Cat sprite. Click the sprite symbol in the
sprites list and choose the Witch sprite from the library.
Load the sound“cave”from the sound library
and add this script to the stage’s scripts area.
Run the project and admire the spooky
atmosphere you’ve created.
Click on the“Choose backdrop from library”
symbol and add the backdrop“woods”.
This will lend an eerie setting to the game,
which fits with the theme.
play sound cave ▾ until done
change color ▾ effect by 1
forever
forever
when clicked
when clicked
Witch
This block keeps
the sound playing
in a loop.
Click to open the
sprite library.
New sprite:
The Witch sprite will
appear in your sprites list.
For extra creepiness, add another script to
the stage to make it slowly but continually
change color while the game is playing.
This block changes all the
colors in the backdrop by
a small amount each time
it’s run.
1
2 3
4 Doom on the Broom
by WorkingWitch111 (unshared)
Doom on the Broom
by WorkingWitch111 (unshared)
111
G A M E P R O G R E S S 1 1 %
G A M E D E S I G N
Animation
You can make pictures appear to move by
showing slightly different versions of the
same picture one after another. This fools the
brain into thinking that it is a single moving
image. This is called animation, and it is how
all cartoons work. Scratch lets you animate a
sprite by rapidly changing costumes that show
it in different poses. When these costumes appear
one after the other, you can see flapping bats,
walking cats, and jumping frogs.
The bat looks scary but
it doesn’t move. Click the
Costumes tab and look
in the middle—you’ll
notice the bat has two
different costumes. These
two costumes can be
used to make the bat
flap its wings.
Add this script to the bat to make
the costumes swap back and forth.
Now run the project to see the bat
flapping its wings.
This sets the flap
speed of the bat.
New costume: next costume
bat2-b
151x78
2
bat2-a
139x87
1
wait 0.1 secs
forever
when clicked
Now add the witch’s first enemy:
a sinister black bat. Open the
sprite library, select Bat2, and
click“OK”.
Bat2
5
6
7
112 D O O M O N T H E B R O O M
Controlling the witch
Your spooky game is now starting to take shape,
but you’ll need to add some more scripts to get
things working. The next script lets the player
take control of the witch.
when clicked
E X P E R T T I P S
Arithmetic operators
Computer programmers have to
use special symbols to do math.
Almost every computer language
uses * for multiply and / for divide
because the usual symbols aren’t
on a computer keyboard. Look in
the green Operators section for the
arithmetic operators. Click on the
blocks in the scripts area to see the
answers appear in a speech bubble.
Go to Data in the blocks palette and then click“Make
a Variable”. Create the variables“Score”,“Lives”, and
“GameSpeed”, making sure that the“For all sprites”option
is selected. Show the variable“Score”and“Lives”on the
stage. Add the following script to the witch to set things
up and to control her with the arrow keys. Read the script
carefully and test it to see if it works.
set GameSpeed ▾
set Score ▾
set Lives ▾
to 1
to 0
to 3
set size to 35 %
show
go to x: 0 y: 0
point in direction 90 ▾
if
if
key left arrow ▾ pressed ? then
key right arrow ▾ pressed ? then
forever
turn
turn
degrees
degrees
GameSpeed * 2
GameSpeed * 2
These blocks set
up the game and
the Witch sprite.
This control loop continually checks
on the arrow keys that spin the witch.
This controls how
fast the witch turns.
◁ Controlling the pace
The variable“GameSpeed”
controls the overall pace of
the game. For now fix it at 1.
Later, you’ll find out how to
increase it as the score rises,
speeding up the game.
9
5
14
3.5
7 + 2
7 – 2
7 * 2
7 / 2
8
This block fixes the pace
of the game at 1.
113
G A M E P R O G R E S S 2 2 %
Casting fireballs
The witch’s only defense against the
rampaging spooks will be her fireball
spell. The next script will make a fireball
shoot from her broomstick when the
player presses the space bar.
show
move 20 steps
move 10 steps
delete this clone
go to Witch ▾
direction ▾ of Witch ▾
when I start as a clone
point in direction
repeat until touching edge ▾ ?
Add the Ball sprite from the
library and rename it“Fireball”.
It’s currently too big, but you’ll
shrink it down in a moment.
Add the following two
scripts to the Fireball sprite.
Each fireball launched by
the witch will be a clone
of the sprite.
Now add this script to the witch to create
a clone of the Fireball sprite when the
space bar is pressed. The“wait until”block
pauses the script until the space bar is
released, so only one fireball is launched
for each press. Try the script and check if
you can spin the witch and shoot fireballs.
The fireball shoots off,
disappearing at the edge
of the stage.
This block hides the
original sprite so that
you only see the clones.
These blocks make
a fireball appear at the
tip of the witch’s broom.
The fireball copies its
direction from the witch.
This makes the clone visible while
the original sprite stays hidden.
Click the blue“i”button to
open the information panel
and rename the sprite.
Fireball
when clicked
set size to 10 %
hide
9
10
11
if key space ▾ pressed ? then
forever
when clicked
create clone of Fireball ▾
wait until not key space ▾ pressed ?
This block creates a
clone and triggers
the script above.
Without this block, the player could hold the
space bar for a constant stream of fireballs.
Find this block in the Sensing
section and change“x position”to
“direction”in the drop-down menu.
114 D O O M O N T H E B R O O M
Add these two scripts to the bat.
They work together to create an
endless supply of bats that advance
toward the witch from random
points around the edge of the stage.
These blocks send
the bat clone to the
edge of the stage.
These blocks
create bats every
5–10 seconds.
Click the drop-down menu,
select“New message”, and
name the message“Lose a life”.
This moves the bat toward
the center of the stage until
it touches the witch.
This block destroys the
bat when a fireball hits it.
Bat attack
One flapping bat isn’t going to scare a
powerful spellcaster like the witch, but
you can add clones to make a whole
squadron of bats.
when clicked
when I start as a clone
hide
show
forever
wait secs
point in direction
move steps
pick random 5 to 10
set rotation style left-right ▾
go to x: 0 y: 0
move 300 steps
create clone of myself ▾
broadcast Lose a life ▾
play sound pop ▾ until done
change Score ▾ by 1
delete this clone
delete this clone
point towards Witch ▾
pick random –180 to 180
GameSpeed
repeat until
if then
touching Witch ▾ ?
touching Fireball ▾ ?
This block hides the
original sprite, so you
only see the clones.
12
115
G A M E P R O G R E S S 3 3 %
It’s a good idea to remove all the bats whenever
the witch loses a life. This gives her a chance
to recover before the next wave of attackers.
Add this script to the bat to do the job. When
the message“Lose a life”is received, every
clone runs the script and all the bats disappear.
Run the project to see if it works. A bat should
appear after a few seconds and will move
toward the witch. Soon more will appear.
The witch should be able to use her fireballs
to destroy them. All the bats will disappear
when one finally reaches the witch.
You might notice that the bats aren’t flapping
anymore. To fix this, adjust the script below
so that it runs for each clone rather than just
the original sprite.
Add this block to the
start of the script.
The hidden
bat moves to
the center of
the stage.
It moves to
the edge of
the stage and
reveals itself.
Remove this
block.
The bat picks a
random direction.
when clicked
when I receive Lose a life ▾
when I start as a clone
forever
wait 0.1 secs
next costume
delete this clone
▷ How does it work?
The three blue Motion blocks at the start
of the bat clone’s script move the clone to a
random point at the edge of the stage. The
hidden clone first moves to the center and
picks a random direction. Then it moves
300 steps—far enough to reach the edge
in any direction. This way, bat clones will
attack from every direction with equal
chance. The witch doesn’t touch the bat
when it first moves to the center, because
you can’t touch a hidden sprite.
13
15
14
116 D O O M O N T H E B R O O M
Adding explosions
Not much happens when the witch loses
a life. Fix this to make the witch go out
with a bang by creating some fireworks,
adding a scream, and updating the
counter that shows how many lives
she has left.
Add this script to the witch to make
her react to losing a life. If she still
has lives left, she will disappear for
two seconds before returning to
battle. If she’s out of lives, then it’s
game over. Add a new message,
“GameOver!”, which you’ll need later
in the project. Now try the game
again. The witch should lose lives
and stop completely when the
“Lives”variable has a value of 0.
To create fireworks you need a new sprite. Load
another Ball sprite from the sprite library rather
than copying the Fireball sprite. Rename this new
sprite“Explosion”and then click on the Costumes
tab. Select the second costume so that the ball
turns blue.
when I receive Lose a life ▾
hide
play sound scream-female ▾
change Lives ▾ by –1
if
Load“scream-
female”from the
sound library.
This makes the witch
reappear after a pause
if she has any lives left.
The“GameOver!”message
will trigger a sign that
you’ll create later.
Select the second
costume for the
Ball sprite.
ball-b
45x45
2
Lives > 0 then
show
wait 2 secs
else
wait 1 secs
stop all ▾
broadcast GameOver ! ▾ and wait
16
17
117
G A M E P R O G R E S S 4 4 %
When a bat touches the
witch, she explodes into a
circle of flying blue balls.
Now add these two scripts to the Explosion sprite.
The first script creates 72 tiny, hidden blue ball clones,
all pointing in different directions. The second script
makes them fly out in a circle from the witch’s location.
Read the scripts carefully and try to work out what
triggers the explosion.
When the Explosion sprite
receives the message“Lose a life”,
all the blue ball clones appear
at the witch’s location and
explode out to the edge of the
stage before hiding once again.
Run the game and let a bat reach
the witch to check how it works.
when I receive Lose a life ▾
show
create clone of myself ▾
when clicked
set size to 5 %
hide
hide
repeat 72
turn 5 degrees
go to Witch ▾
repeat until touching edge ▾ ?
move 10 steps
This makes each clone point
in a different direction.
The Explosion clones move
outward, disappearing at the
edge of the stage.
18
19 Doom on the Broom
by WorkingWitch111 (unshared)
Score Lives
0 1
118 D O O M O N T H E B R O O M
Bat 2
Speedy specter
It’s now time to increase the fear factor and add
a different type of bat to the game. You can copy the
existing black bat, and add new costumes and alter
the scripts to create a superfast brown bat.
To avoid having to rebuild every script
from the black bat, simply right-click it
and create a copy by selecting“duplicate”.
A sprite named Bat3 will appear in the
sprites list. Rename it“Fast bat”.
Add the two new costumes,
“bat1-a”and“bat1-b”. They
show a brown bat with wings
in two different positions.
Now delete the unnecessary black bat
costumes in this sprite. To do this, select
the costume you want to delete and then
click the small“x”in the top right.
Scripts
New costume:
Costumes
1
1
Bat2-a
139x87
2
Bat2-b
151x78
Click here to add
new costumes.
Click on Fast bat’s Costumes tab—you’ll see the
copied black bat’s two costumes. To make Fast bat
look different from the black bat, you need to load
some new costumes. Click on the symbol at the
top to choose a new costume from the library.
3
bat1-a
115x125
4
bat1-b
101x103
Click here to
delete the
costume.
Click here to
copy the sprite.
Bat2-a
139x87
info
duplicate
Use costumes to change
our looks, expressions,
or posture.
20
21
23
22
119
G A M E P R O G R E S S 5 6 %
The game would be too hard with lots of
fast bats, so make the following changes
to the existing script to make them appear
later in the game and less frequently.
This block sets
the time between
the Fast bats.
Add a
“wait
20 secs”
block.
when clicked
set rotation style left-right ▾
create clone of myself ▾
hide
forever
wait pick random 15 to 20
Scripts
Motion
Looks Control
Events
Sound Sensing
Pen Operators
Data More Blocks
Costumes Sounds
x: -166
y: 27
move 10 steps
glide 1 secs to x: 0 y: 0
go to x: 0 y: 0
point in direction 90 ▾
point towards ▾
go to mouse-pointer ▾
turn 15 degrees
turn 15 degrees
when I start as a clone
forever
wait 0.15 secs
next costume
when clicked
set rotation style left-right ▾
create clone of myself ▾
hide
wait 20 sec
forever
when I start as a clone
show
point in direction
move
go to x: 0 y: 0
move 300 steps
broadcast Lose a life ▾
play sound pop ▾ until done
change Score ▾ by 1
delete this clone
delete this clone
point towards Witch ▾
pick random –180 to 180
repeat until
if then
touching Witch ▾ ?
touching Fireball ▾ ?
when I receive Lose life ▾
delete this clone
wait pick random 15 to 20
To speed up the fast bat, change
its“move”block to make the
brown bat move twice as fast
as the black bat.
move steps
play sound pop ▾ until done
change Score ▾ by 1
delete this clone
GameSpeed
repeat until
if then
touching Witch ▾ ?
touching Fireball ▾ ?
* 2
move steps
GameSpeed
Add the green
Operators
block to the
“move”block.
Check that you have four scripts in Fast bat’s scripts
area, just like in Bat2. Run the game. After a few
black bats have attacked, a faster, much more
dangerous one will appear, flapping away.
Fast bat’s scripts area
should look like this.
Type“2”
here.
Type“15”here.
24
25 26
* 2 steps
GameSpeed
wait 20 secs
120 D O O M O N T H E B R O O M
Dragon
direction: 90°
x: -127 y: 106
rotation style:
can drag in player:
show:
Fire-breathing dragon
The witch’s next enemy is a fire-breathing
dragon. Instead of flapping straight toward
the witch as the bats do, it will spiral in
slowly, which gives her more time to
defend herself.
Copy the Bat2 sprite again, but
rename it“Dragon”. Load the
two new costumes“dragon1-a”
and“dragon1-b”, then delete
the two bat costumes.
Next, modify the dragon’s
movement to make it fly in
a spiral path by moving the
“point towards Witch”block
into the“repeat until”
loop and adding a“turn
right 80 degrees”block.
Now make a few changes to the scripts in the
copied sprite. First, change the costume script
to make the dragon breathe fire in short bursts.
Type the
new sprite’s
name here.
Dragon
27 28
29
wait 2 secs
when I start as a clone
switch costume to dragon1-a ▾
switch costume to dragon1-b ▾
forever
The second costume
shows the dragon
breathing fire.
The first costume
shows the dragon
with no fire.
wait 0.5 secs
move steps
play sound pop ▾ until done
change Score ▾ by 1
delete this clone
GameSpeed
if then
touching Fireball ▾ ?
point towards Witch ▾
turn 80 degrees
repeat until touching Witch ▾ ?
These blocks make
the dragon spiral in
toward the witch.
121
G A M E P R O G R E S S 6 7 %
Add a“wait 10 secs”block to the
main script to delay the dragon’s
arrival on the stage. Then change
the numbers in the“pick random”
block to“10”and“15”. This will
make a clone of the dragon appear
every 10–15 seconds. Once you’ve
made all the changes, test the
game to see if it works.
G A M E D E S I G N
Working with themes
In Doom on the Broom, spooky scenery and
supernatural characters work together to give the
game a theme. A strong theme that ties together
△ Story
A background story or quest helps give a game a
theme. Perhaps the player is trying to escape a haunted
house, search for underwater treasure, or explore an
alien planet. Instead of inventing a story, you can use
a well-known one, but give it a twist, such as putting
Goldilocks and the three bears in space.
△ Sprites
The player is usually the hero in a game, so choose
a likable sprite. The enemies don’t have to look
scary—even cute sprites can seem scary when they
attack. If players have to collect objects, make them
look valuable, such as coins or gems.
△ Music and sound effects
Sounds in a game have a big influence on how the
player feels. Spooky music makes the player nervous,
but happy music makes a game feel cheerful, even if
the pictures are spooky. Choose sound effects carefully
so they match the sprite or situation that triggers them.
△ Scenery
If you choose the right backdrop, sprites in the game
will look like they are really there rather than stuck on
top. You can create your own backdrops in Scratch’s
paint editor, but you can also upload images you’ve
found or created elsewhere.
the elements of a game can make it feel polished
and professional. Working with themes is also great
fun because you can let your imagination run wild.
30
create clone of myself ▾
hide
forever
wait pick random 10 to 15
Type“10”and“15”
in the windows.
secs
Add a 10-second
delay.
wait 10 secs
when clicked
set rotation style left–right ▾
122 D O O M O N T H E B R O O M
Ghost
Supernatural heroes should have supernatural enemies, so
add some ghosts and ghouls to chase the witch. Instead of
vanishing when fireballs hit them, the ghosts will fade away.
To create the ghost,
make a copy of the Bat2
sprite again. Rename
the new sprite“Ghost”
and replace the Bat2
costumes with“ghost2-a”
and“ghost2-b”.
Modify the script below
so the costumes change
every second.
Change the
number to“1”.
when I start as a clone
forever
wait 1 secs
next costume
You can add sounds to
your sprites from the
sound library.
1
Bat2-a
139x87
Change the ghost’s script so that it moves slowly and fades out
when hit by a fireball. Click the Sounds tab above the blocks
palette and load the“screech”sound from the sound library.
Then change the selection in the“play sound”block to“screech”
to make the ghost scream when it vanishes.
31
33
32
2
ghost2-b
138x141
move 1 steps
play sound screech ▾
repeat until
if then
touching Witch ▾ ?
touching Fireball ▾ ?
Change the block
to“move 1 steps”.
This makes
the ghost fade.
change Score ▾ by 1
delete this clone
repeat 100
change ghost ▾ effect by 1
123
G A M E P R O G R E S S 7 8 %
pick random 5 to 7
Now add a“wait 10 secs”block
to the main script to delay
the ghost’s first appearance.
Change the numbers in the“pick
random”block to make ghosts
appear more often than bats.
The Scratch library has two ghoul costumes that you can use
to make another animated enemy. Copy the Dragon sprite
and rename the copy“Ghoul”. Click the Costumes tab, load
the two ghoul costumes—“ghoul-a”and“ghoul-b”—and
then delete the dragon’s costumes. Update the ghoul’s script
to use the new costumes and adjust the timings.
Once all of your
changes are complete,
test the game. Try
fireballing each
enemy to make sure
the code works.
Add a“wait 10
secs”block.
hide
forever
wait secs
create clone of myself ▾
Doom on the Broom
x: 153 y: -61
Sprites
Stage
1 backdrop
New backdrop:
New sprite:
Backpack
move 10 steps
glide 1 secs to x: 0 y: 0
go to x: 0 y: 0
point in direction 90 ▾
point towards ▾
go to mouse-pointer ▾
turn 15 degrees
turn 15 degrees
Ghost
Scripts
Motion
Looks Control
Events
Sound Sensing
Pen Operators
Data More Blocks
Costumes Sounds
x: –157
y: –27
File ▾ Edit ▾ Tips
SCRATCH
Score 25 Lives 3
Witch
Dragon
Fireball Explosion Bat2 Fast Bat
ghoul-a ghoul-b
wait 0.5 secs
wait 2 secs
when I start as a clone
switch costume to ghoul-a ▾
switch costume to ghoul-b ▾
forever
when I receive Lose a life ▾
delete this clone
repeat 100
play sound screech ▾
change ghost ▾ effect by 1
repeat until
then
touching Witch ▾ ?
touching Fireball ▾ ?
change Score ▾ by 1
delete this clone
when I start as a clone
show
go to x: 0 y: 0
move 300 steps
broadcast Lose a life ▾
delete this clone
point towards Witch ▾
when clicked
hide
forever
wait secs
set rotation style left-right ▾
create clone of myself ▾
wait 10 secs
when I start as a clone
wait 1 secs
next costume
The ghost should
slowly fade when
hit with a fireball.
Ghosts appear
every 5–7
seconds.
by WorkingWitch111 (unshared)
Double-click
on the header
block to see
the animation
working in the
sprites list.
when clicked
set rotation style left-right ▾
34
35
36
wait 10 secs
pick random 5 to 7
forever
point in direction pick random –180 to 180
move 1 steps
if
124 D O O M O N T H E B R O O M
Finishing touches
It’s time to add some finishing touches to the
game. To make it look more professional, add
a“Game Over!”screen that appears when the
witch runs out of lives. You can also program
the witch to give instructions to the players
at the start of the game.
Click on the paintbrush symbol
in the sprites list to create a new
sprite in the paint editor. Using
“Bitmap Mode”, draw a rectangle
and fill it with a dark color. Now
switch to“Vector Mode”. Click
on the text tool, choose a font
you like, and select red for the
text color. Click in the rectangle
and type“GAME OVER!”and
use the selection tool to make
the text large. Remember to
fix the center of the sprite with
the“Set costume center”tool.
Now add these scripts to the Game Over sprite
to hide it at the start and show it only at the end
when the witch loses all her lives. Run the game.
Once the witch loses all her lives, the message
will be displayed on the stage.
hide
show
go to x: 0 y: 0
when clicked
when I receive Gameover ▾
Select a
font here.
This centres
the sign.
Rename
the sprite
“Game Over”.
GAME
OVER!
Type“GAME
OVER!”here.
“Set costume
center”tool
37
38
wait 1 secs
Selection
tool
Game Over
GameOver!
Convert to bitmap
Vector Mode
100%
Clear Add Import
Donegal
Gloria
Helvetica
Marker
Mystery
Scratch
Font:
Scratch ▾
GAME
OVER!
125
G A M E P R O G R E S S 8 9 %
Challenger mode
As players become more skilled and score
more points, they may start to get bored
with the game. You can prevent this by
making the game faster as it progresses.
Add a script to the witch so that she gives instructions
to the player at the start of the game. You can change
the three seconds in the“say”block if it’s too quick, but
not for too long—those bats won’t wait.
To make the game speed up as the player
scores points, add a block inside the witch’s
movement loop that sets the“GameSpeed”
variable using the variable“Score”.
say Press arrow keys to turn. Press space bar to cast a fireball. ▾ for 3 secs
when clicked
set GameSpeed ▾ to Score / 100 + 1
if
if
key left arrow ▾ pressed ? then
key right arrow ▾ pressed ? then
forever
▷ How does it work?
The GameSpeed setting increases
with the score. For every 100 points,
the speed increases by 1. When the
score is 0, GameSpeed is 1. When
the score is 50, GameSpeed is 1.5,
and after 100 points the game runs
at double speed.
This is the
starting speed
of the game.
Press arrow keys to
turn. Press space bar
to cast a fireball.
Lower this value to
make the game
speed up sooner.
Type the
instructions here.
turn degrees
GameSpeed * 2
turn
39
40
degrees
GameSpeed * 2
126 D O O M O N T H E B R O O M
Extra lives hippo
So far you’ve mainly added enemies. To help the player,
add a friendly flying hippo that gives the witch extra
lives if it reaches her without getting hit by a fireball.
move steps
play sound pop ▾ until done
delete this clone
GameSpeed
repeat until
if then
touching Witch ▾ ?
touching Fireball ▾ ?
Copy the Bat2 sprite, but replace its
costumes with two copies of hippo1.
Use the paint editor to write the messages
“EXTRA LIFE”and“DON’T FIREBALL ME!”
on the costumes so the player knows it
isn’t an enemy. Rename the sprite“Hippo”.
Amend the scripts so that instead of gaining a point
when you fireball the hippo, you earn an extra life when
it touches you. Change the value in the“point in direction”
block so the text on the hippo doesn’t get reversed.
Change the wait time in the costume
script so that the hippo swaps
costumes once a second, giving
players time to read the signs.
when I start as a clone
forever
next costume
wait 1 secs
EXTRA
LIFE
DON’T
FIREBALL
ME!
show
point in direction
move 300 steps
point towards Witch ▾
pick random –180 to 0
Change this
value to“0”.
41
42
43
This makes the hippo
alternate between
its two costumes
every second.
This block adds an extra
life to the Witch sprite’s
lives counter.
delete this clone
change Lives ▾ by 1
127
G A M E P R O G R E S S 1 0 0 %
when clicked
hide
set rotation style don’t rotate ▾
create clone of myself ▾
forever
wait secs
pick random 30 to 60
To avoid making the game
too easy, make the extra lives
hippos rare. Change this
script so they appear only
every 30–60 seconds.
Change this
to“60”.
Change this
to“30”.
44
Hacks and tweaks
Now that your game works, you can
experiment and make it your own by
changing and adding elements. Try
these suggestions to get started.
This block will keep
the witch flying.
▷ Flying Witch
You can make the witch fly
instead of rotating on the
spot by adding the script
shown here. To make her
turn faster while flying,
increase the numbers in
her“turn”blocks.
▷ Mouse control
Use this script to let the
player spin the witch
with a mouse rather
than the keyboard. If
the game is too easy,
increase the GameSpeed
value. You can also try
changing the code
so the computer mouse
casts the fireballs.
when clicked
forever
turn 45 degrees
point towards mouse-pointer ▾
move 1 steps
forever
△ Spell binder
Can you think of another spell that
the witch can cast? Tweak her script
and costumes so she strikes her
enemies with lightning, or make
her cast some other fancy spells.
This block stops
the controls from
being too easy.
when clicked
Change this to
“don’t rotate”.
coding games with scratch for using in school
Dog’s
Dinner
130 D O G ’ S D I N N E R
How to build
Dog’s Dinner
Dog’s Dinner is a platform game.
In this type of game, the player’s
character jumps from platform to
platform collecting goodies and
avoiding enemies and traps. The
key to success is timing your jumps
perfectly so you stay in the game.
The dog likes bones but hates junk food.
Steer him through three levels, jumping
from platform to platform. Collect all
the tasty bones on the stage and then
go through the portal to the next level.
But make sure he avoids the unhealthy
cakes, cheese puffs, and donuts!
AIM OF THE GAME
Collect all the bones—you can’t get
through the portal without them.
◁ Junk food
If the dog touches any junk food,
it’s game over and you have to
start again on Level 1—no matter
which level you were on!
◁ Bones
You need to collect all the
bones to open the portal to
the next level. It will remain
shut until you have them all.
◁ Dog
Use the left and right arrow
keys to make the dog run.
When he needs to jump,
press the space key.
The dog runs and jumps around the
level. He can jump only when he’s
standing on a platform.
Dog’s Dinner
by HappyShrimp321 (unshared)
131
The dog must
jump over the gaps.
When you’ve collected all the
bones, the portal to the next
level flashes to show it’s open.
The donut is a moving
hazard. It flies from
side to side, getting
in the dog’s way.
Click the stop sign
to end a game.
Click the green flag
to start a new game.
Cheese puffs and cakes are
static junk foods—unlike
the donut, they don’t move.
I always demand
quality food!
H O W T O B U I L D D O G ’ S D I N N E R
GAME CONTROLS
Players use the arrow
keys and space bar
on the keyboard as
game controls.
132 D O G ’ S D I N N E R
Hold down the shift key
and drag the mouse-
pointer over the paint
editor to draw a small
red square. If you click
outside your block
and look at the list of
costumes, you’ll see
the size of the square;
aim for 35x35.
Create a new project and name it“Dog’s Dinner”. To make
your simple player, click the paintbrush symbol at the top
of the sprites list. Make sure you’re in“Bitmap Mode”.
Choose red in the color palette in the paint editor, select
the rectangle tool, and click on the filled square option.
Player on a platform
This is a complicated game, so you’ll need to check your
work carefully at every stage. But don’t worry, the
project builds gradually, one step at a time. Start by
getting a very simple player sprite to work properly
with a platform. At first, the player is just a red square.
This makes it easy to sense collisions with the
platforms. You can add the blue dog on top of it later.
The block should be
smaller than the cat’s
face on the stage.
Choose red from
the palette.
Select“Bitmap
Mode”.
New sprite:
Click the
paintbrush
symbol.
When you click
outside the
block, its size is
shown here.
At last I’m going
to be a star!
100%
Bitmap Mode
Convert to vector
Click on the
filled square.
costume1
Scripts
New costume:
Costumes
costume1
35x35
1
2
2
133
G A M E P R O G R E S S 7 %
Select the“Set costume center”tool in the
top-right corner of the paint editor. Set the
center of your sprite near the top of the
block (this will be useful later).
Rename the sprite
“PlayerBlock”. That’s
your player sprite
done. Now you can
delete the cat sprite.
Now add a simple platform.
Click the paintbrush
symbol in the sprites list
again to create a new
sprite. Use the rectangle
tool to draw a floor with
two obstacle blocks on top.
Call this sprite“Platforms”.
On the stage, drag your
PlayerBlock and place it
between the obstacles, but
make sure it’s not touching
the platform.
PlayerBlock
We don’t need you
for this game Cat, so
we’re deleting you.
Yes, I know…
but I’ll be back!
Platforms
sprite
Obstacles on
platform
PlayerBlock
sprite
Dog’s Dinner
6
5
You can resize your block if it’s too big or too small.
Using the“Select”tool, click and drag to draw a
square around the block. Use the corner points to
resize it. Do this until the size is right.
“Select”tool
Use the corner points
to resize the block.
4
by HappyShrimp321 (unshared)
3
134 D O G ’ S D I N N E R
Running around
The next step is to make the PlayerBlock run
when the player presses the arrow keys. You’ll
need a script that will stop it running through
obstacles by making it reverse when it touches
them. To make the code easier to read, you’ll be
making your own customized Scratch blocks.
With the PlayerBlock sprite selected,
go to the blocks palette under the
Scripts tab and click on More Blocks.
There are no blocks in this section yet, only
some buttons. Click on the“Make a block”
button, and a box called“New Block”will
pop up. Type“Run controls”in the window
to name your new block and then click“OK”.
I love using these
subprogram
blocks!
The new block appears in the More Blocks
section, and a special purple“define”header
block appears in the scripts area.
New Block
Run controls
▸ Options
OK Cancel
Type the name of your
new block here.
Make a Block
Run controls
define Run controls
Costumes Sounds
Scripts
Motion
Looks Control
Events
Sound Sensing
Pen Operators
Data More Blocks
Make a Block
Add an Extension
7
9
8
Subprograms
Scratch lets you group together blocks under a“define”header
block and run them by using a new block that you name. This
saves you building the same group of blocks again if you want to
use it in more than one place. (However, the new block will only
work with the sprite that you created it for.) Giving your new block
a meaningful name will make your code easy to understand. Most
programming languages let you take some useful code, give it a
name, and wrap it up as a unit. Different languages call these units
different things: subprograms, subroutines, procedures, and
functions are some common names.
L I N G O
135
G A M E P R O G R E S S 1 3 %
In the Data section, create a
variable for all sprites called
“RunSpeed”to control how
fast the player moves left and
right. Uncheck the box so it
doesn’t appear on the stage.
Then build the script shown
here under the“define”
header. Anywhere we use the
“Run controls”block, Scratch
will now run this script.
Next, add the script below
to use your new custom
block in a“forever”loop.
Now run the project. You should
be able to move the red block
left and right with the arrow
keys, but not be able to move
through the obstacles.
Type“5”here.
When the right arrow
key is pressed, the
PlayerBlock moves right.
The left control works
in a similar way to
the right control.
If the PlayerBlock
touches the platform,
the move is reversed.
define Run controls
if
if
then
then
key right arrow ▾ pressed?
key left arrow ▾ pressed?
if
if
then
then
touching Platforms ▾ ?
0 –
0 –
change x by
change x by
RunSpeed
RunSpeed
change x by
change x by
RunSpeed
RunSpeed
The red block is trapped
between the blue squares.
12
10
11
Run controls
when clicked
forever
set RunSpeed ▾ to 5
136 D O G ’ S D I N N E R
Up and down
Platform games are all about jumping. You
can’t jump without gravity, so you need to
add some simulated gravity to the game. You
may recognize how the simulated gravity
works if you built the Jumpy Monkey game.
Add two more variables for all
sprites:“Gravity”and“FallSpeed”.
Uncheck both boxes. Then click on
More Blocks and make a new block
called“Simulate gravity”, following
the script shown here. It moves the
PlayerBlock down by the amount
“FallSpeed”and then checks to
see if the PlayerBlock has hit the
platforms. If so, it reverses the last
move and sets“FallSpeed”to zero
so that the platform stops the
player’s fall.
Insert the blocks
shown here into the
PlayerBlock’s main
script. Make sure
you set the value of
“Gravity”to“–1”and
set FallSpeed to“0”.
When“FallSpeed”is negative,
the PlayerBlock falls.
Gravity
change FallSpeed ▾ by
change y by
0 –
change y by
set FallSpeed ▾ to 0
else
if then
touching Platforms ▾ ?
define Simulate gravity
If the PlayerBlock isn’t
touching a platform, this
block makes it fall faster.
You need to set
the value of
gravity!
Run controls
when clicked
forever
set RunSpeed ▾ to 5
set Gravity ▾ to –1
set FallSpeed ▾ to 0
Simulate gravity
FallSpeed
FallSpeed
14
13
Insert“set Gravity to”and
“set Fallspeed to”here.
Put“Simulate gravity”
into the“forever”loop.
This block makes the PlayerBlock stop
falling when it lands on a platform.
137
G A M E P R O G R E S S 2 0 %
Run the project. Grab the
red square with the mouse
and drop it from above the
platform. It will fall down and
come to rest on the platform.
But there’s a problem: it slows
down just above the platform.
That’s because our method
makes the block reverse after
hitting the platform and then
start falling again at a slower
speed. We can fix that later.
Now to create the jump. It’s
really easy: just add some new
code to give the PlayerBlock an
upward kick when you press
the space bar. First, make a new
variable for all sprites called
“TakeoffSpeed”. This is the
player’s upward speed on a
jump. Then create a new block
called“Jump control”and
define it as shown here.
Add the“set TakeoffSpeed to”
block into the PlayerBlock’s
main script and set it to“12”.
Insert the“Jump control”
block into the“forever”loop.
This block makes
“FallSpeed”positive, so
the PlayerBlock rises.
It finally stops
one step above
the platform.
The PlayerBlock
doesn’t fall very
smoothly as it
gets near to
the platform.
Run controls
define Jump control
if then
key space ▾ pressed?
TakeoffSpeed
when clicked
forever
set RunSpeed ▾ to 5
set TakeoffSpeed ▾ to 12
set Gravity ▾ to –1
set FallSpeed ▾ to 0
set FallSpeed ▾ to
Simulate gravity
Jump control
I think he forgot
to set his takeoff
speed!
What happened
there?
16
15
17
Insert“set TakeoffSpeed to“ here.
Put“Jump
control”into the
“forever”loop.
138 D O G ’ S D I N N E R
Fixing the jumping bugs
There are two bugs that spoil our jumps: one causes
the PlayerBlock to jump infinitely high; the other
keeps it from falling smoothly. You can fix them by
tweaking the jump and gravity controls.
To fix the infinite jump bug, add a
test to the“Jump control”script to
check whether the player is on or
just above the platform. (Remember
that the“Simulate gravity”script
leaves the PlayerBlock one step
above the platform, so the two
sprites aren’t touching.) This fix will
disable the space key when the
player is in mid-jump.
Try the code above and you’ll find you
can only make single jumps from the
platform and can’t leap higher by tapping
the space key space lots of times.
This block makes the
PlayerBlock jump
only when it’s
touching a platform.
This block cancels the
small downward step.
This block moves the
PlayerBlock down one step.
Maximum jump
height now
define Jump control
if then
key space ▾ pressed?
if then
touching Platforms ▾ ?
TakeoffSpeed
set FallSpeed ▾ to
change y by –1
change y by 1
Now run the project. Press the space key briefly.
The PlayerBlock jumps up and comes back down
again. You should be able to combine the run
and jump controls to jump onto or over the
obstacles on the platform. You now have the
makings of a platform game! However, there’s
another bug: if you keep the space key pressed,
the PlayerBlock goes up forever.
Try to leap over
obstacles.
What’s your
maximum jump
height?
18
20
19
139
G A M E P R O G R E S S 2 7 %
To fix the other jumping bug (pausing just above the platform and then falling
slowly again), you need to change what happens when the PlayerBlock touches
the platform. At the moment, the red square reverses by the whole“FallSpeed”
number when it hits a platform. Instead, we’ll make it reverse in tiny steps until
it’s just above the platform. Create a new variable called“ReverseStep”for all
sprites. Change the“define Simulate gravity”script as shown here.
The PlayerBlock lands
inside the platform.
It reverses in single
steps until it’s just
above the platform.
▽ How it works
When the PlayerBlock hits the
platform, the“repeat until”
loop reverses the PlayerBlock
until it sits just one step above
the platform.
This“if then else”
block works out
which way the
PlayerBlock needs
to reverse.
If the PlayerBlock is
falling (“FallSpeed”is
negative),“ReverseStep”
is set to +1 (up).
If the PlayerBlock is
rising or stationary,
“ReverseStep”is set
to –1 (down).
The red square
reverses by 1 step.
21
define Simulate gravity
FallSpeed
set ReverseStep ▾ to 1
FallSpeed
set ReverseStep ▾ to –1
touching Platforms ▾ ?
repeat until not touching Platforms ▾ ?
change y by
then
then
else
if
if
< 0
change y by
Gravity
ReverseStep
set FallSpeed ▾ to 0
change FallSpeed ▾ by
else
140 D O G ’ S D I N N E R
Try the jump again to see
for yourself. You’ll notice
that the PlayerBlock rises
back out of the platform
very slowly. But we don’t
want that part to happen in
slow motion! Scratch has a
trick to fix this. Right-click
on the“define Simulate
gravity”header block and
select“edit”from the
pop-up menu that appears.
An“Edit Block”box
appears. Click on“Options”
and check“Run without
screen refresh”. This will
make the gravity script
run continually (without
showing each reverse
step), which will get rid of
the slow-motion effect.
Now try jumping again. The tweaks
you’ve made should help the PlayerBlock
jump and land very smoothly.
define Simulate gravity
change y by FallSpeed
set reverseStep ▾ to 1
if FallSpeed
if touching Platfor
delete
add comment
help
edit
Check this box and
the whole script will
run much faster.
▾ Options
Add number input:
Add string input:
Add boolean input:
Add label text:
Run without screen refresh
OK Cancel
text
Simulate gravity
I’ve never seen a
square land so
smoothly!
Edit Block
23
24
22
141
G A M E P R O G R E S S 3 3 %
G A M E D E S I G N
Which jump?
Games use many different types
of jump. Which type you choose
is key to your game’s design.
Here are three common jumps.
▽ Single jump
This is the jump you have in Dog’s
Dinner—you can only jump if you’re
on the ground. You go up and then
down, but in some games you can
steer left and right during the jump.
▽ Double jump
This is the jump you had before you
fixed the infinite jumping bug—you
can jump again in the air to go higher.
In some games there are limits on
double jumping—for example, you
can only do it if you’re going up.
▽ Wall jump
When you touch a wall, you can jump
up again. Ninja-type characters often
have this power. It’s not very realistic
but it’s lots of fun!
Falling off the level
Platform games are all about staying on the platforms.
Add the next script to the PlayerBlock to make the
game end if it falls to the bottom of the stage.
Make a new block
called“Fallen off”,
shown below, to
check whether the
PlayerBlock is at
the bottom of the
stage. Add it to the
“forever”loop. Then
build the short script
at the bottom of the
page to stop the
sprite when it gets
the“Game over”
message. Test the
new code: the
controls should stop
working when you
hit the deck.
Drop this block inside
the“forever”block.
25
Run controls
when clicked
forever
set RunSpeed ▾ to 5
set TakeoffSpeed ▾ to 12
set Gravity ▾ to –1
set FallSpeed ▾ to 0
Simulate gravity
Jump control
define Fallen off
y position
if
Choose“new message”
in this window and then
type in“Game over”.
This block broadcasts the message
when the sprite is less than 20 steps
from the bottom of the stage.
The“stop”block
prevents the
player from moving
any further.
stop other scripts in sprite ▾
when I receive Game over ▾
< –160
broadcast Game over ▾ and wait
then
Fallen off
142 D O G ’ S D I N N E R
Adding a character
A red square isn’t a very interesting main
character for a platform game. You need
something fun that you can animate. It’s
time to introduce the dog.
Click the sprite symbol
in the sprites list to add
a new sprite from the
library. Select Dog2 and
click“OK”. Dog2 is a
great sprite to use as
it has more than one
costume, which means
you can animate it.
You only need Dog2’s
first two costumes for
now, so go to the
Costumes tab and
delete the last costume
(dog2-c).
Add the script on the left
to Dog2. It sticks the dog
to the front of the red
PlayerBlock so that it
moves with it on the
stage. The dog switches
continually between its
two costumes when you
press the left and right
arrow keys, which makes
it look like it’s walking.
This block makes the dog
face to the right at the start.
The“next costume”blocks
animate the dog’s walk.
The“go to”block places the
dog on the red square.
The dog appears in front
of the red square.
The dog faces left if the left
arrow key is pressed.
set rotation style left-right ▾
when clicked
set size to 50 %
show
go to front
next costume
next costume
point in direction 90 ▾
forever
go to PlayerBlock ▾
if
if
then
then
key left arrow ▾ pressed?
key right arrow ▾ pressed?
point in direction –90 ▾
point in direction 90 ▾
Costumes
for walking
animation
Delete this
costume.
27
26
28
New costume:
dog2-a
127x110
dog2-b
127x104
2
1
dog2-c
121x109
3
duplicate
delete
save to local file
Time for me to
disappear!
Look –
I’m walking!
143
G A M E P R O G R E S S 4 0 %
Run the project—the dog will now
run around the stage with the
PlayerBlock. If its paws are too low
down on the platform, you can raise
the center point of the PlayerBlock
costume (since the dog sticks itself
to the PlayerBlock). The dog is just
decoration, so it doesn’t really
matter if its paws stick out as it
walks. It’s the red square that’s
doing all the collision detection.
You can shift the dog
up or down on the
platform by moving
the center of the
PlayerBlock sprite.
G A M E D E S I G N
Collision detection
Collision detection—knowing when and how
two objects are touching—is a big programming
challenge when building games. This book uses
simple collision detection in most games, but
Dog’s Dinner uses a collision-detection sprite.
▽ Simple collision detection
This method simply checks whether the player
sprite is touching a hazard. It’s fine for simple
games, but without extra code you don’t know
which part of the player is touching and
how much is overlapping.
And animating the sprite
may mean its paws stick
out when you swap
costumes, creating
false collisions.
▽ Collision-detection sprite
Using a simple rectangle with an animated sprite
on top (like our red square and blue dog) avoids
the problem with costumes, because the
PlayerBlock is always the same shape
and size. But you still don’t
know which part of it has been
touched. Programming tricks
like our reversing script can
solve some of the problems.
▽ Mathematical collision detection
If you know where everything in the game is
and exactly what size it is, then by using
clever math you can work
out when and how things
hit each other. But be
warned: this can get
really complicated,
as you can see below!
▽ Bumper sprites
You can surround the player with“bumper”
sprites that move with it and detect collisions in
each direction. Knowing which direction you’ve
hit something allows
you to bounce off
it correctly. Extra
sprites and scripts
are needed for this
type of detection.
B
U
M
P
!
B
U
M
P
!
B
U
M
P
!
B
U
M
P
t
o
t
h
e
f
r
o
n
t
!
if sqrt((dogx–jellyx)^2+(dogy–jellyy)^2) <
(dogR+jellyR) then BUMP!
29
144 D O G ’ S D I N N E R
Howling dog
To give your blue dog more
personality, make him howl
with disappointment when
the game ends.
Load the Dog2 sprite from the
library again as a new sprite, but
keep only the dog2-c costume this
time. Rename the sprite“Howling
Dog”. Load the“wolf howl”sound
from the sound library.
Add these two scripts to
make Howling Dog appear
when the game ends.
Add the short script below to the
original Dog2 sprite (not the new
Howling Dog sprite) to make it vanish
when Howling Dog appears. Run the
project and see what happens when
the dog falls off the platform.
The Howling Dog sprite is
hidden until the message
“Game over”is broadcast.
Delete the dog2-a and
dog2-b costumes, because
you only need dog2-c.
Here we go again!
31
30
32
dog2-c
Scripts Costumes Sounds
New costume:
Howling Dog
121x109
1
go to front
go to PlayerBlock ▾
when I receive Game over ▾
set rotation style all around ▾
set size to 50 %
hide
play sound wolf howl ▾
point in direction 0 ▾
show
hide
when clicked
145
G A M E P R O G R E S S 4 7 %
Making the levels
The next step is to create the game’s three levels. You’ll
need to draw the platforms for each level by hand,
matching the pictures on the next three pages as closely
as you can. (You’ll add the sprites later.) Skip forward to
page 148 to find out how to paint the platforms—you
can refer back to pages 145–7 once you’ve started.
To help show where the platforms go, this image includes Scratch’s
xy-grid. To see the grid when you draw the platforms, select the stage
info area in the lower left and click on the backdrop symbol to open
the backdrop library. Scroll to the end and choose“xy-grid”. It isn’t
essential to do this, but you might find it handy. You can replace the
xy-grid with color backgrounds after you’ve made the platforms.
▽ Level 1
Simple colored steps allow the dog to
hop downhill, collecting bones. Watch
out for the donut, which slides left and
right—you need to choose just the
right moment to drop past it.
 1 0 0
1 0 0
 2 0 0
 1 0 0
Y
1 0 0
X
Dog’s Dinner
by HappyShrimp321 (unshared)
146 D O G ’ S D I N N E R
▽ Level 2
On Level 2, the platforms are arranged like the
rungs of a ladder. You need to position the
platforms very carefully so the dog can drop
down without getting stuck but without
making it too easy.
Dog’s Dinner
HappyShrimp321 (unshared)
 1 0 0
2 0 0
 2 0 0 X
1 0 0
100
Y
147
G A M E P R O G R E S S 5 3 %
▽ Level 3
On the last level, some players will be
tempted to try to jump over the donut, but
it’s a trap! It’s much easier to collect the first
bone and then go back left to avoid the
donut altogether.
Dog’s Dinner
HappyShrimp321 (unshared)
X
100
100
200
200
Y
100
1 0 0
148 D O G ’ S D I N N E R
Drawing the platforms
Now to create the platforms. Dog’s Dinner has three
levels, so you need to create three sets of platforms.
Each one will be a costume in the Platforms sprite.
Create a variable called“Level”for the game’s three
levels. Uncheck the box so that it doesn’t show on
the stage. To make the game use the correct level
costume, add this script to the Platforms sprite.
Before you start drawing, click once on this script
with the mouse. This runs just this script, centering
the sprite on the stage so that platforms will appear
in the correct position when you draw them.
With the Platforms sprite selected, click on the Costumes tab
and then use the paintbrush symbol to create three new
costumes. Delete the old test platform costume. Then use
the rectangle tool to draw the platforms on each level. Try
to match the pictures on the previous pages. Don’t worry
about getting them perfect, as you can adjust them later.
This block changes
the platforms.
Don’t add color to the
checked area.
Use the rectangle tool.
Name each costume.
The“Select”
tool lets you
select and
move a
platform.
Select
solid
color.
This block changes the
colored backgrounds.
Make sure
you’re in
“Bitmap
Mode”.
34
33 when I receive Setup ▾
switch costume to
switch backdrop to
go to x: 0 y: 0
Level
Level
New costume:
Level 1 Clear Add Import
Level 1
397x230
Convert to vector
Bitmap Mode
100%
1
Create a new message called
“Setup”, which we’ll use later to
reset the game each time it starts.
149
G A M E P R O G R E S S 6 0 %
To add color to the
backgrounds, select the
stage info area to the
left of the sprites list and
then the Backdrops tab.
Use the fill tool to fill the
paint area with color.
Then click on the“Paint
new backdrop”symbol
to make a new backdrop
and fill it with a different
color. Repeat to make a
third backdrop.
Make sure the costumes appear in
the correct order here. You can drag
and drop them to change the order.
New backdrop:
35
Level 3
480x279
3
Level 2 Clear Add Import
New costume:
Convert to vector
Bitmap Mode
100%
Level 2
313x360
2
Level 1
397x230
Scripts Backdrops
backdrop3
480x360
3
backdrop2
480x360
2
backdrop1
480x360
1
Level 2
313x360
2
Level 1
397x230
New costume:
1
Clear Add Import
Level 3
Bitmap Mode
Convert to vector
100%
1
Click here to paint
a new backdrop.
150 D O G ’ S D I N N E R
Creating a game control sprite
To make the levels change and set the start
positions of all the objects on each level, you
will need to build a control script. It’s a good
idea to keep this script in its own sprite.
Create two variables,“Bones”(to count the number of
bones left on the level) and“LevelOver”(to show when the
player has finished the current level). Uncheck their boxes.
Make an empty sprite using the paintbrush symbol in the
sprites list. Name it“Game Control”. Add the following
script. It’s a loop that repeats for every level. You also need
to make two new messages:“Start”and“Win”.
The“Setup”message
tells all sprites to
move to the correct
position on this level.
When the player completes the game,
the“Win”message is sent.
set Level ▾ to 1
set Bones ▾ to 0
broadcast Setup ▾ and wait
broadcast Start ▾
broadcast Win ▾
when clicked
repeat until Level = 4
wait until LevelOver = 1
change Level ▾ by 1
△ How it works
This script goes once around the loop for each level
of the game. Then it moves on to the next block,
which broadcasts a“Win”message to say that the
player has won. The first broadcast is the message
“Setup”, which gets the sprites and background in
position ready for the start of this level. It waits for
all the receiving blocks to finish setting up before
moving on. Then the“Start”message is sent. This
triggers all the working scripts for the level, which
move the sprites and look out for collisions.
You have me under
your complete
control!
I have you under my
complete control!
That’s what happens
when you go looking
for collisions!
“Start”tells all sprites
that this level is now
running and makes
them check for
collisions or move.
“LevelOver”is set to 1
when the player reaches
the portal, signaling the
end of the level.
36
151
G A M E P R O G R E S S 6 7 %
Change the PlayerBlock’s main script so
that the Game Control sprite’s loop can
trigger it with the“Start”message.
With the PlayerBlock sprite still selected, add this
next script to set its start position for each level
when the“Setup”message is received. The script
starts by ghosting the sprite completely, so that
you see only the dog, not the red square. Ghosting
is different from hiding a sprite because collisions
can still occur—which is exactly what we want!
You also need to change Dog2’s script so
that it’s triggered by the“Start”message.
Swap the
green flag
header for
the“when I
receive Start”
message.
Run controls
Fallen off
when clicked
forever
set RunSpeed ▾ to 5
set TakeoffSpeed ▾ to 12
set Gravity ▾ to –1
set FallSpeed ▾ to 0
Simulate gravity
Jump control
set ghost ▾ effect to 100
set rotation style don’t-rotate ▾
if
if
if
then
then
then
Level
Level
Level
= 1
= 2
= 3
go to x: –120 y: 135
go to x: 20 y: 180
go to x: –30 y: 140
set rotation style left-right ▾
when clicked
set size to 50 %
show
point in direction 90 ▾
forever
go to PlayerBlock ▾
39
37 38
when I receive Start ▾
when I receive Setup ▾
when I receive Start ▾
152 D O G ’ S D I N N E R
Placing the portals
Your game needs portals for the player to be
able to progress through the levels. A portal is
like a doorway that opens up when the player
has completed a level.
Try running the project again. You should be
able to run and jump on the Level 1 platforms,
but at the moment there’s no way to get to
Level 2. Click the sprite symbol in the sprites
list to open the sprite library. Add Button1 to
your game and change its name to“Portal”.
The portal needs a“Setup”script to position it
correctly in each level and to make it slightly
see-through before it opens.
set ghost ▾ effect to 50
set color ▾ effect to 0
if
if
if
then
then
then
Level
Level
Level
= 1
= 2
= 3
go to x: 200 y: –40
go to x: 100 y: –150
go to x: 175 y: –125
set LevelOver ▾ to 0
“LevelOver”is set to 0 to
show that the level is not
over because the bones
haven’t been collected.
The“set color effect to”
block is set to 0, which
means that the sprite
appears in its normal
green color at the start
of each level.
The“ghost”block
makes the portal
slightly transparent.
The“go to”blocks set the portal’s position
on the stage for each level. Don’t worry if
the portal isn’t in quite the right place—
we’ll fine-tune everything later.
Bones??
I’d rather have
some fish!
when I receive Setup ▾
41
40
No. It’s the door
to the next room!
Is this the portal
to the next level?
153
G A M E P R O G R E S S 7 3 %
The Portal’s second script waits for the bones to be collected
and opens the Portal by showing it changing color until the
player touches it. Run the game. We haven’t added bones to
the game yet, so the portal will open immediately. You
should be able to run through all the levels. If you can’t, go
back and carefully check all the steps.
set LevelOver ▾ to 1
set ghost ▾ effect to 0
change color ▾ effect by 25
repeat until touching PlayerBlock ▾ ?
The open portal is
no longer ghosted.
Setting“LevelOver”
to 1 triggers a
change of level.
The portal changes color
until the player touches it.
L I N G O
“LevelOver”is a variable that the portal’s script
uses to tell the Game Control sprite when the
level is complete. (Remember the“wait until”
block in the Game Control sprite’s loop? It
makes the script wait before switching to the
new level.)“LevelOver”allows different parts of
a program to communicate. Programmers call a
variable used in this way a“flag”, and it is an
alternative to using a message.
When“LevelOver”is 0 (because the level isn’t
over), we say that the flag is unset. When
“LevelOver”is 1 (because the player has
reached the open portal), we say that the
flag is set. Messages can only start scripts,
but by using a flag you can pause a script in
the middle until something happens. In the
Game Control sprite’s loop, the“wait until”
block pauses until the flag equals 1.
Flag unset
LevelOver = 0
Flag set
LevelOver = 1
Flag set
when I receive Start ▾
wait until Bones = 0
42
Flags
154 D O G ’ S D I N N E R
Add the script on the
right to set Bone1’s
position on each level.
The x and y coordinates
determine where this
bone will appear on the
stage at each level of
the game. The positions
may not match your
platform designs
exactly, but they’ll be
fine for now.
when I receive Setup ▾
show
change Bones ▾ by 1
if
if
if
then
then
then
Level
Level
Level
= 1
= 2
= 3
go to x: –175 y: –95
go to x: –30 y: –110
go to x: –150 y: –65
Each bone adds 1 to the
“Bones”counter when it
puts itself in position.
The“if then”
blocks set the
position of Bone1
for each level.
You can fine-tune
the positions of the
bone later on.
Add the“Start”script shown on the left
to Bone1 to make it hide when the dog
collects it. It also updates the“Bones”
counter. Load the sound“dog1”to this
sprite, so the dog gives a happy“woof”
when he gets a bone. Run the project.
At the moment, you should only have to
collect one bone before the portal opens.
The number of
bones to collect
falls by 1.
Nothing happens with
this script until the dog
touches the bone.
when I receive Start ▾
play sound dog1 ▾
hide
change Bones ▾ by –1
wait until touching PlayerBlock ▾ ?
Someone keeps
hiding all the
bones!
BONE 1
44
45
Bones for the dog
It’s not much fun just racing through the levels
without having anything else to do. Let’s add
some bones that the dog must collect to open
the portal. After all, he’s getting hungry!
Create a new sprite and
draw a bone about the same
size as the dog. Use the
paintbrush tool for the black
outline and the fill tool to
color it white. Call it“Bone1”.
Don’t forget to center it. Bone1
43
155
G A M E P R O G R E S S 8 0 %
The game needs more than one bone, so right-click
on the Bone1 sprite and select“duplicate”. Do this
twice. This will give you three bone sprites.
The bones’scripts manage the number
of bones on a level automatically. Run
the project. You should find that the
portal won’t open until you’ve
collected all three bones.
You need to change the“Setup”scripts for
Bone2 and Bone3 so that they appear in
different places from Bone1 on each level.
Change the numbers in the“go to”blocks
to match those shown here.
when I receive Setup ▾
show
change Bones ▾ by 1
if
if
if
then
then
then
Level
Level
Level
= 1
= 2
= 3
go to x: –10 y: 105
go to x: –10 y: 80
go to x: 0 y: 15
when I receive Setup ▾
show
change Bones ▾ by 1
if
if
if
then
then
then
Level
Level
Level
= 1
= 2
= 3
go to x: 35 y: –70
go to x: 60 y: –60
go to x: 120 y: 140
These blocks test which
level the bone is on and set
its position on the stage.
That’s more like
it!
BONE 2
BONE 3
47
46
48
Sprites
Bone3
Bone2
New sprite:
Bone1
156 D O G ’ S D I N N E R
Add one last script to detect a collision
with the PlayerBlock and end the game—
junk food really is bad for you!
Now run the game and try getting
past the donut. If you hit the donut,
the dog will stop and howl.
when I receive Start ▾
wait until touching PlayerBlock ▾ ?
broadcast Game over ▾
ARRRRGH!
JUNK FOOD!
52
53
Now add this“Setup”script to shrink
and position the donut for each level.
Next, add this“Start”script to get
the donut patrolling back and forth.
when I receive Setup ▾
if
if
if
then
then
then
Level
Level
Level
= 1
= 2
= 3
go to x: 140 y: 35
go to x: 0 y: 15
go to x: 70 y: 30
when I receive Start ▾
Patrol
to right
Patrol
to left
Go to the sprite library,
select Donut, and then
click“OK”to load it into
the game.
Junk food
The dog is having a rather easy time of it
with all those bones to eat. Adding some
obstacles and hazards will make the game
more difficult. Start with the flying donut. Load this
donut sprite.
This sets the
donut at the
correct size.
set rotation style left-right ▾
set size to 50 %
forever
point in direction 90 ▾
point in direction –90 ▾
repeat 35
repeat 35
move 3 steps
move 3 steps
50 51
49
Donut
157
G A M E P R O G R E S S 8 7 %
Create a new blank sprite called
“Hazards”and add the two scripts shown
here. The“Setup”script selects the
correct costume for the level and centers
it on the stage (just like in Platforms).
Click on the“Setup”script to center the
sprite before you design its costumes.
You need three costumes for the Hazards sprite.
Use the paintbrush symbol to create two extra
blank costumes. Select“costume1”and click the
“Add”button at the top. Load the“cheese puffs”
costume from the library. Use the“Select”tool to
make it smaller and position it as shown here.
Then, from the costume library, add two cakes to
“costume2”and one to“costume3”. Make them
smaller and position them. You can fine-tune
their positions later.
This script ends the
game if the dog
touches a hazard.
Hazardous snacks
As well as the flying donuts there are a
number of fixed traps on the levels. To
keep things simple, all these hazards are
part of a single sprite with three different
costumes—one for each level.
when I receive Setup ▾
go to x: 0 y: 0
when I receive Start ▾
wait until touching PlayerBlock ▾ ?
broadcast Game over ▾
switch costume to Level
Use a bowl of
cheese puffs
in Level 1.
Use two cakes
in Level 2.
Use one cake
in Level 3.
Most of the costume should
have the checked pattern
for a see-through color.
54
55
158 D O G ’ S D I N N E R
Most problems can be fixed by adjusting the
positions and sizes of the platforms. Select the
Platforms sprite and click the Costumes tab.
Use the“Select”tool in the paint editor to
move, stretch, or resize the Level 1 platforms.
Click outside the selection box to show your
changes on the stage. Adjust the platforms
until Level 1 matches page 145.
Fine-tuning
Now that your platforms, portals, bones, and hazards are all
in roughly the right place, run the project and see if the game
works. You might find that some sprites aren’t positioned
correctly. The game might be too tricky or the dog might get
stuck. If so, you need to fine-tune your levels. The hints and
tips here will also be handy if you want to design new levels.
Fine-tune the
cheese puffs
using the
“Select”tool.
To move a platform,
click inside the
selection and drag.
Click and drag the small
squares to stretch and
resize the selection.
You can reposition all the other
sprites by using their x and y
coordinates. Select a sprite on the
stage and drag it where you want.
Hover the mouse-pointer over the
center of the sprite and make a
note of the x and y numbers that
appear under the stage. Copy the
numbers into the blue“go to”
block in the sprite’s Level 1 script.
Copied numbers go here
if Level = 2
go to x: 35 y: –70
56
58
Use the same method to fine-tune the
position of the Hazards sprite. Select it in the
sprites list and click on the Costumes tab. Use
the“Select”tool to adjust the position of the
snack in the first costume (which appears in
Level 1). Click outside the selection box to
check your changes on the stage.
57
Dog’s Dinner
by HappyShrimp321 (unshared)
x: 35 y: –70
159
G A M E P R O G R E S S 9 3 %
If you need to move the sliding donut,
bear in mind that the“go to”block sets
its start position. To change how far it
slides, adjust the numbers in its two
“repeat”loops. One controls how far it
goes to the right, the other to the left.
You should now have Level 1 working beautifully. To work
on another level and its sprites, you can make a temporary
change to the script for the Game Control sprite. Change
the number in the“set Level to”block to“2”. Run the game
and Level 2 appears on the stage. Fine-tune your sprites’
positions. But remember to change the number in“set
Level to”back to“1”when you’re done.
The bone’s new coordinates
appear automatically in the“go
to”block in the blocks palette.
Drag sprite to
new position
Change the“1”to the level you
want to work on, and that’s
where the game will start.
E X P E R T T I P S
The “go to”trick
To reposition a sprite
perfectly, use this sneaky
trick. First drag the sprite
on the stage to where you
want it. Then look at the
unused“go to”block in the
Motion section under the
Scripts tab. The sprite’s
coordinates will have
appeared automatically in
this block. Now you can
simply drag the block into
your script without needing
to do any typing. Easy!
go to x: 35 y: –70
when I receive Start ▾
forever
point in direction 90 ▾
point in direction –90 ▾
repeat 35
repeat 35
move 3 steps
move 3 steps
set Level ▾ to 1
set Bones ▾ to 0
broadcast Setup ▾ and wait
broadcast Start ▾
broadcast Win ▾
when clicked
repeat until Level = 4
wait until LevelOver = 1
change Score ▾ by 1
point towards ▾
go to mouse-pointer ▾
glide 1 secs to x: 35 y: –70
Moves
donut
left
Moves
donut
right
59 60
160 D O G ’ S D I N N E R
To show the correct sign to the player when
the Signs sprite receives a message, add the
three scripts below. Run the project to check
that the correct signs show as you play.
Signs and music
The game won’t be complete until
you’ve added some instructions and
other messages for the player. You
can also load some music into it to
make it even more entertaining.
switch costume to Instructions ▾
when clicked
go to x: 0 y: 0
show
show
show
go to front
go to front
go to front
hide
wait until touching PlayerBlock ▾ ?
switch costume to Win ▾
switch costume to Lose ▾
The instructions vanish
when the player’s sprite
touches them.
62
To give instructions and other messages
to the player, use the paintbrush symbol to
create a new blank sprite and call it“Signs”.
Add the costumes below to the Signs sprite.
Name them“Instructions”,“Win”, and“Lose”.
MOVE: ARROW KEYS
JUMP: SPACE KEY
DOG’S DINNER
COLLECT ALL BONES
TO OPEN PORTAL TO
NEXT LEVEL
DOG DOES NOT LIKE
JUNK FOOD!
YOU WIN!
ARRRRGH!
JUNK FOOD!
when I receive Win ▾
Instructions
Win
Lose
when I receive Game over ▾
61
161
G A M E P R O G R E S S 1 0 0 %
Add the next script to the Game Control
sprite to swap the music at the moment the
new level starts and to announce the start
of each level with a sound effect. Load the
“space ripple”sound into the sprite.
To play a victory tune when the dog
finishes the final level, load“triumph”from
the sound library and add this script to the
Game Control sprite. Run the game. Check
that the music changes for each level, and
that sound effects play at the start of each
level and at the end of the game.
You can give each level its own music. Select the Game
Control sprite and load these sounds from the Scratch
sound library:“xylo2”,“xylo3”, and“xylo4”. The script
below will swap the music each time you change level.
The first“repeat”loop plays
“xylo2”until the player
reaches Level 2.
when clicked
repeat until
repeat until
repeat until
Level
Level
Level
= 2
= 3
= 4
play sound xylo2 ▾ until done
play sound xylo3 ▾ until done
play sound xylo4 ▾ until done
66
64
Check the positions of the
instructions. You may need to
rearrange them so that they don’t
overlap the images on the stage.
65
Altogether
now!
when I receive Start ▾
stop all sounds
play sound space ripple ▾
stop all sounds
play sound triumph ▾
when I receive Win ▾
DOG’S DINNER
MOVE: ARROW KEYS
JUMP: SPACE KEY
DOG DOES NOT LIKE
JUNK FOOD!
COLLECT ALL BONES
TO OPEN PORTAL TO
NEXT LEVEL
Dog’s Dinner
by HappyShrimp321 (unshared)
63
162 D O G ’ S D I N N E R
Hacks and tweaks
Congratulations, your platform game is up
and running! Test it and ask your friends to
play it. You may need to adjust the sprites’
positions and edit your platforms and hazards
a little to make the game play smoothly and
to get the difficulty level just right.
E X P E R T T I P S
◁ Extra levels
To make the game longer you could
create extra levels. You would have to give
the Platforms and Hazards sprites more
costumes, and edit the scripts to add“if
Level =”blocks to place the bones, portal,
and donut at the start of each level. Don’t
forget to change the“Level = 4”block in
the Game Control sprite’s loop, so that
the game will end after the player has
completed all the new levels.
▽ Victory dance
If you think the end of the game isn’t exciting
enough, change the script for the“Win”message
to do something more spectacular. Maybe the
dog could do a little victory dance? Why not
add a new sign for when the dog falls off the
platforms and ends up at the bottom of the
stage? You could make the dog disappear too.
You won!
Let’s celebrate!
Oh, it was
nothing really!
File ▾ Edit ▾ Tips
Dog’s Dinner
by HappyShrimp321 (u
ATCH
New
Save now
Save as a copy
Backing up
Save a backup copy of the game
under a different name before you
start making changes. If you do this,
you’ll always have the copy to go
back to if you make mistakes when
tweaking the code. To save with the
online Scratch editor, select the File
menu and click on“Save as a copy”.
163
H O W T O B U I L D D O G ’ S D I N N E R
Increasing this number
makes the dog jump higher.
Decreasing this number
makes the jumps less floaty.
◁ Adjust the jump
You have total control over the dog’s jumps. You can
make him leap higher by increasing the value of the
“TakeoffSpeed”variable. You can also make the value
of ”Gravity”smaller or larger to control how much each
jump floats. Why not add a special level with reverse
gravity, so that gravity pulls you up, not down? You will
need to make code changes to set the jump variables
just for that level with an“if then”block, and also to
detect when the dog“falls”off the top of the level!
▷ Mega-challenge
Can you figure out how to give the dog a limited
number of lives? You’d need a new variable called
“Lives”, and you’d have to reprogram all the“Game
over”messages to subtract 1 from the variable
until you reach the last life. The Game Control
sprite’s loop would also need changing. It’s an
expert programming challenge that needs clear
thinking and hard work!
Designing levels
Designing how all the challenges and rewards in
a level fit together is a tricky job. You need to plan
every detail and get a friend to test it to see if it’s
too easy or too hard. Make sure you can complete
the level yourself before asking the friend to try.
G A M E D E S I G N
Timing Are your moving hazards going so fast you
can’t get past them, or so slow there’s no challenge?
Adjust their speeds until you’re happy with them.
Spacing Is the player able to jump from platform to
platform easily—or perhaps too easily? Make the gaps
between the platforms bigger or smaller to suit the
level you’re designing.
Tricks Try fooling the player into following what
appears to be an obvious way through a level but then
turns out to be a trap. The correct way will be an easier
but less obvious, solution.
Tools Computer games often come with level design
tools that are unlocked once you finish the game.
Using these you can create your own challenges and
puzzles within the game. You can usually share your
customized levels online, so that others can try them.
I’ve got three
lives now!
Big deal!
I’ve got nine!
I’ve unlocked
my tools!
Are your hazards
moving too fast?
when clicked
set TakeoffSpeed ▾ to 12
set RunSpeed ▾ to 5
set Gravity ▾ to –1
coding games with scratch for using in school
Glacier
Race
G L A C I E R R A C E
166
How to build
Glacier Race
Glacier Race is a two-player game in
which you race up the screen, swerving
around obstacles and collecting gems
as you go. There’s no finish line in
this race—the winner is simply the
person with the most gems when
the time runs out.
It’s red car versus blue car in a race against
the clock. Win by collecting more gems than
your opponent before the countdown ends.
Every gem you grab adds an extra second
to the race countdown, but stay clear of the
snow or you’ll end up in a spin.
◁ Cars
Use the game controls to keep
your car on the ice and collect
gems. You can also push the
other car off the road to gain
an advantage.
◁ Obstacles
Avoid the giant snowballs
and the edge of the road
or you’ll spin out of control.
◁ Penguin
The penguin is the master
of ceremonies. He asks
the players’names at the
start, gives instructions,
and announces the winner
at the end.
Glacier Race
by SnowmobileDave (unshared)
Ben Gems: 20
Laura Gems: 13
AIM OF THE GAME
The player with
the most gems
wins the game.
The red car starts on the left and
is controlled using the W, A, S,
and D keys on the keyboard.
Name of the game.
H O W T O B U I L D G L A C I E R R A C E 167
GAME CONTROLS
Use the arrow keys and
the W, A, S, and D keys
on the keyboard as
game controls.
Countdown 11
◁ Icy adventure
This fast-paced racing game
is more fun because you
play against an opponent.
Challenge a friend or family
member to see who can
collect the most gems.
May the best
driver win!
Collect gems to score a point and
add a second to the countdown
so you can race a little longer.
The countdown starts with
20 seconds. When it reaches
zero the game ends.
Snowy hills and
trees whiz past
as the cars race.
The blue car starts on
the right and is controlled
with the arrow keys.
G L A C I E R R A C E
168
The game loop
Fast games need clever code. This game uses
something called a“game loop”to keep all the
action happening just when it should. It’s as if
the game loop bangs a drum, and with each
beat all the other sprites move one step. Start
by creating a blank sprite to hold the game
loop’s script.
Start a new project and delete the cat sprite. Use the paintbrush
symbol to create a blank sprite and rename it“Game Loop”.
Then make a variable for all sprites called“Countdown”for the
game timer and show it on the stage. Build the following script
to make the game loop. You’ll need to create the messages
“Setup”,“Calculate”,“Move”, and“Game Over”.
Game
over!
Ben
wins!
△ How does it work?
When the project runs, the script sends out a“Setup”message
that tells all the sprites to get ready for the game. It waits for
them to finish, and then the main loop begins. The loop sends out
messages telling every sprite in the game when to run each part
of their code. The loop ends only when the countdown reaches
zero, at which point the“Game Over!”message is sent so all sprites
can perform any final actions and the winner is announced.
broadcast Setup ▾ and wait
broadcast Calculate ▾ and wait
broadcast Move ▾ and wait
broadcast Game Over ▾
repeat until
when clicked
Countdown < 1
Create the variable
“Countdown”in the
Data section.
1
broadcast message1 ▾
message1
new message…
Use the“broadcast”
block to create the
messages for your
script.
Name the
message here.
New Message
OK Cancel
Message name: Setup
169
G A M E P R O G R E S S 1 1 %
Create two new variables for all sprites: “RoadY”(to
store the y coordinate used to position our moving
scenery) and“CarSpeed”(to set how quickly the cars
can move around the stage). Uncheck the boxes in
the Data section so they aren’t displayed on the
stage. Add the script on the right to set the values
of the variables at the start of the game.
set RoadY ▾ to 0
set RoadSpeed ▾ to –5
set CarSpeed ▾ to 5
change RoadY ▾ by RoadSpeed
set Countdown ▾ to 20
change RoadY ▾ by 720
reset timer
if
when I receive Setup ▾
when I receive Calculate ▾
RoadY < –360 then
E X P E R T T I P S
Game loops
Using one main loop to keep
everything in sync is common in
computer games. The loop keeps
all the sprites in step and makes
the code tidy and short. It also
helps the game run quickly—in
Glacier Race, the game loop runs
as fast as 30 times per second.
In Scratch, a program with lots of
sprites each with their own loops
can become slow as the computer
has to constantly jump between
them. Using a single game loop
fixes this problem, but be careful
not to use loops elsewhere in the
game because they will slow it down.
Everyone
move!
This block sets the time limit
for the game in seconds.
The y coordinate of the
road decreases from 360
to –360 before jumping
back to 360 as the road
repeats itself.
Add another variable for all
sprites called“RoadSpeed”
to store the speed of the
moving scenery. Uncheck
the box. Then create
a script to calculate the
position of the road each
time the game loop runs.
You’ll see how this works
once you’ve made the
road sprites.
2
3
G L A C I E R R A C E
170
Scrolling road
In Glacier Race, players feel as if they’re moving
quickly along the road, but in reality their cars
don’t move very far on the stage—it’s the road
that moves instead. The road is made up of two
sprites that fit together seamlessly: Road1 and
Road2. These roads take turns scrolling down
the stage, making the cars appear to move
faster than they really are.
Create a new sprite and
call it“Road1”. In the
paint editor, choose the
paintbrush tool and
set the thickness slider
to the middle. Draw the
edges of the road and
make sure they run all the
way from the top to the
bottom without any gaps.
Then use the fill tool
to color the area on both
sides of the road white,
creating a snowy setting.
Now duplicate the Road1 sprite to make Road2.
Select Road2 and go to the Costumes tab. Click
on the“Flip up-down”button at the top right
and the road costume will turn upside down.
The edges of Road1 and Road2 will now match
as they are mirror images. They’ll look odd on
the stage at the moment, but you’ll fix that later.
Leave the
road empty.
Road2
Road1
Use this tool
to flip the
costume
upside down.
The highlighted
area is visible
on the stage.
The two road
sprites join
perfectly with
each other.
The cars appear to move
forward as Road1 and Road2
move down the stage.
Flip up-down
Thickness slider
Fill these
areas in
with white.
5
4 costume1
Convert to vector
Bitmap Mode
100%
Clear Add Import
Sprites
Road2
Road1
171
G A M E P R O G R E S S 2 2 %
L I N G O
Scrolling
Moving everything on the
screen together in the same
direction is called scrolling.
In Glacier Race, the road
scrolls downward. You might
have heard of games called
side-scrollers, which means
the scene moves left or right
as the player moves the
character on the screen.
Add these scripts to Road1
to get the road moving.
They position the road
using the“RoadY”variable
in the game loop. Try
running the project—
half the road will scroll
down the screen.
Make the scenery more interesting by adding
some trees. Select Road1 and click on the
Costumes tab. Click the“Add”button on top
and add the tree costume. Shrink it by using
the selection box and place it on the snow.
Add as many trees as you like. Repeat the
process for Road2.
Now build the following scripts for Road2 to
make the second road sprite work together
with the first. Run the project—the road
should scroll smoothly down the screen.
To add color to the road, paint
the backdrop rather than the
sprites, or else the cars will
collide with the road surface.
Select the stage and click
on the Backdrops tab. Use
the fill tool to fill it with an
icy blue color.
when I receive Setup ▾
when I receive Setup ▾ when I receive Move ▾
when I receive Move ▾
go to x: 0 y: 360
go to x: 0 y: 0 go to x: 0 y:
go to x: 0 y:
go to x: 0 y:
go back 10 layers
go back 10 layers
RoadY
if
else
then
RoadY < 0
RoadY — 360
RoadY + 360
Road2 is positioned above or
below Road1, depending on
where Road1 is on the stage.
This block makes the
game start with Road1
filling the stage.
This variable is set
in the Game Loop
when the message
“Calculate”is sent.
This block makes
Road1 change position
when the Game Loop
broadcasts the
“Move”message.
This makes sure the
scenery stays behind
the other sprites.
6
7 8
9
backdrop 1
480x360
G L A C I E R R A C E
172
Racecars
Now it’s time to add the racecars.
Once you’ve got one car moving, you
can duplicate it to make the second
one and save yourself a lot of work.
Click the sprite symbol and load Cat1 from the
library—you can use this sprite to ensure the car is
the right size. Now open the paint editor and click on
“Convert to bitmap”. Use the rectangle and circle tools
to draw a car like the one shown here. Make sure you
draw the car facing right or it will point the wrong way
in the game. Remember to delete the cat image once
you’ve finished and use the“Set costume center”tool
to center the car.
Rename the sprite“RedCar”in the sprites
list. Then create a new variable,“spinning”,
which you’ll use later to say when a car
is in a spin. Note that for this variable, you
need to select the option“for this sprite
only”and uncheck the box in the Data
section so that the variable doesn’t show
on the stage.
Remember that in this project, sprites can run
scripts only when they get messages from the
Game Loop. Add the following script to set
up the red car at the start of the game.
The script runs
when the“Setup”
message is sent
by the Game
Loop at the start
of the game.
The car doesn’t
spin when the
“spinning”
variable is set
at zero.
Make your race car
a bit bigger than
the cat. The next
script will shrink it.
when I receive Setup ▾
set size to 30 %
show
go to front
go to x: –40 y: 0
point in direction 0 ▾
set spinning ▾ to 0
Use the circle
tool to draw an
oval shape.
Use the rectangle tool
to draw the body and
wheels of the car.
Click here.
10
12
11
New Variable
OK Cancel
Variable name:
For all sprites For this sprite only
spinning
173
G A M E P R O G R E S S 3 3 %
You now need to add keyboard controls
for the car. Choose More Blocks in
the blocks palette and then click on
“Make a Block”. Create a new block
called“car controls”and add this script
to its“define”block.
Add a script to run the“car controls”
block when the car receives the message
“Move”from the Game Loop. Run the
project. You should now be able to steer
the red car along the road using the keys
W, A, S, and D.
The car usually
points straight
up the screen.
This block
moves the
car sideways.
This block
moves the car
up the stage.
This block makes
the car turn a
little to the left.
This block makes the
car appear to stop by
moving it down the
stage at the same
speed as the road.
The“Move”message is
sent by the Game Loop
many times per second.
This block makes
the car turn a little
to the right.
when I receive Move ▾
car controls
point in direction 0 ▾
define car controls
point in direction 30 ▾
point in direction –30 ▾
if
if
if
if
then
then
then
then
key d ▾ pressed?
key w ▾ pressed?
key s ▾ pressed?
key a ▾ pressed?
change x by
change y by
change y by
0 –
change x by
CarSpeed
CarSpeed
RoadSpeed
CarSpeed
Make a Block
car controls
define car controls
13
14
G L A C I E R R A C E
174
Collisions and spins
To make the game challenging,
you can force players to avoid the
snow by making their cars spin out
of control if they touch it. You need
to create some more new blocks to
make this work.
With RedCar selected, create a new block to detect
the snow. Choose More Blocks in the blocks palette
and then click“Make a Block”. Name the block“check
collisions”and create the following script.
Now create another block, call it
“spin”, and add the script shown
here. The“spin”block runs when
the car is spinning. It turns the
car round and reduces the
“spinning”variable by one. When
the variable reaches zero, the
spin ends and the car is reset
at the bottom of the stage.
define check collisions
define spin
if or then
set spinning ▾ to 30
touching Road1 ▾ ? touching Road2 ▾ ?
The“touching”block only detects
the painted parts of the road
sprite’s costume, not the road itself.
This block
moves the car
down the stage
as if it’s stopped
on the road.
Load the sound“rattle”from
the sound library to see it
in the drop-down menu.
This block tells the car
how long to spin for.
These blocks reset the car
at the bottom of the stage.
play sound rattle ▾
turn 30 degrees
change spinning ▾ by –1
change y by RoadSpeed
if then
spinning = 0
go to x: –40 y: –180
point in direction 0▾
This block checks
if the spin is over.
15
16
Road
hog!
175
G A M E P R O G R E S S 4 4 %
Finally, change the existing
script triggered by the“Move”
message to look like the one
shown here. Now you can only
control the car if the“spinning”
variable is zero. Collisions are
checked only when you’re not
in a spin—otherwise you’d
spin forever! Run the game.
The car should spin
if it hits the snow.
To add some snowball obstacles, create a
new sprite in the paint editor. Make it about
the size of the car on the stage. To get the
correct size, watch it appear on the stage
after you’ve drawn it. You can also see the
costume’s size in the costume list—aim for
about 40x40. Name the new sprite“Snowball”.
These
numbers
show the
costume’s size.
if
else
spin
when I receive
car controls
check collisions
Move ▾
then
spinning = 0
If the value for
“spinning”is more than
zero, the car will spin.
17
18
costume1 Clear Add Import
New costume:
1
costume1
40x40
If the car isn’t spinning, the
controls work and collisions
are checked for.
G L A C I E R R A C E
176
Add the following three scripts to the Snowball sprite.
The Snowball sprite is cloned to make lots of obstacles,
but you might notice that there’s no“create clone”block
here. The clones will be created by the Game Loop sprite,
using some code that we’ll add next.
Now select the Game Loop sprite and add this
script to make a new snowball appear with a
chance of one in 200 every time the loop repeats.
go to front
hide
show
change y by RoadSpeed
delete this clone
create clone of Snowball ▾
if
if
when I receive Setup ▾
when I receive Move ▾
when I start as a clone
y position < –175 then
pick random 1 to 200 = 1 then
go to x: y: 180
pick random –200 to 200
This block hides
the original sprite
so that you only
see the clones.
The snowball disappears
when it reaches the bottom
of the stage.
Each snowball moves down the stage
at the same speed as the road, making
it appear stationary.
The snowball clone
starts at a random point
along the top edge of
the stage.
Making this number
bigger creates fewer
snowballs.
20
19
177
G A M E P R O G R E S S 5 6 %
Sprites
RedCar
To make the car spin when it hits a snowball, you
need to add the Snowball sprite to the list of possible
collisions for the red car. Run the game. You should
now see the car spin when it hits a snowball.
Duplicate the RedCar sprite and name the copy
“BlueCar”. Note that the duplicate sprite gets its
own copy of all the scripts. This includes a copy
of the“spinning”variable (set to“for this sprite
only”), which can be different from the red car’s.
set spinning ▾ to 30
if
touching Road1 ▾ ? or touching Road2 ▾ ?
define check collisions
or touching Snowball ▾ ? then
Select the BlueCar sprite and click
on the Costumes tab to open the
paint editor. Use the fill tool to
change the color of the car.
Slot one“or”block
into another.
Use the fill tool to
paint the car blue.
Player two
You now need to create the second player’s car.
Doing this is easy—you simply copy the first
car, recolor it blue, and tweak the scripts.
22
21
23
duplicate
delete
save to local file
hide
G L A C I E R R A C E
178
point in direction 30 ▾
point in direction –30 ▾
if
if
if
if
then
then
then
then
key right arrow ▾ pressed?
key up arrow ▾ pressed?
key down arrow ▾ pressed?
key left arrow ▾ pressed?
change x by
change y by
change y by
change x by
CarSpeed
CarSpeed
RoadSpeed
CarSpeed
go to front
go to x: 40 y: 0
point in direction 0 ▾
set spinning ▾ to 0
if then
spinning = 0
go to x: 40 y: –180
point in direction 0▾
Now select the Scripts tab to see BlueCar’s
scripts. Change the x coordinates in its“go to”
blocks to 40 in both the“Define spin”script
and the“When I receive Setup”script. This
makes the blue and red cars start next
to each other.
In the“Define car controls”
script, change the“key
pressed”blocks so that
the blue car can be
steered using the arrow
keys on the keyboard.
Then run the game.
Both the cars should race
along the track, but they
can drive through each
other at the moment.
Change the x coordinate
to 40 here too.
Change the x
coordinate to 40.
▷ Change the script
In the“key pressed?”blocks,
replace key“d”with“right
arrow”, key“a”with“left arrow”,
key“w”with“up arrow”, and
key“s”with“down arrow”.
24
25
Select the arrow keys in all
four“key pressed?”blocks.
0 –
179
G A M E P R O G R E S S 6 7 %
if then
touching RedCar ▾ ?
if then
touching BlueCar ▾ ?
broadcast bounce ▾
broadcast bounce ▾
when I receive bounce ▾
turn 180 degrees
turn 180 degrees
point towards BlueCar ▾
point towards RedCar ▾
move 20 steps
move 20 steps
point in direction 0 ▾
To stop the cars driving through each other, you
need to make them sense each other and then
bounce apart. Add a new“if then”block to
RedCar’s“Define check collisions”script as shown
here. Create the message“bounce”, and then add
a new script to make RedCar move away from
BlueCar when it receives the message.
Now make the same changes to BlueCar’s scripts so it
can sense when it touches RedCar and bounce. Run the
game to check the cars bounce when they collide.
This new script makes
RedCar bounce away
from BlueCar.
Add these new blocks
to the existing script.
This time the“touching”
block checks for collisions
with the red car.
Get out of
my way!
26
27
Choose
RedCar
here.
set spinning ▾ to 30
if touching Road1 ▾ ? or or
touching Road2 ▾ ? touching Snowball ▾ ?
define check collisions
then
G L A C I E R R A C E
180
Collecting gems
The next step is to create the colorful
gems that the players battle to collect.
Each gem will be a clone of a single
gem sprite, which makes it easy to
put lots of gems on the stage at once.
Click the paintbrush symbol
in the sprites area to create
a new sprite with the paint
editor. To create a gem, use
the line tool to draw six
triangles arranged in a
hexagon. Fill each one with
a different shade of green.
Make it similar in size to the
snowball and center it when
you’ve finished.
Create two variables—“RedCarGems”and
“BlueCarGems”(both for all sprites)—to
tally how many gems each car collects.
Now add these scripts to the Gem
sprite; they’re similar to the scripts
for the snowballs.
when I receive Setup ▾
when I start as a clone
hide
show
go to front
set RedCarGems ▾ to 0
set BlueCarGems ▾ to 0
go to x:
set color ▾ effect to
y: 180
pick random –200 to 200
pick random –100 to 100
These blocks
reset the
scores when
the game starts.
This block picks a random
color for the gem clones.
Use this tool to set the
center of the costume.
28
29
Name the
sprite“Gem”.
costume1 Clear Add Import
1
Gem
40x33
181
G A M E P R O G R E S S 7 8 %
Add the following script to move the gems along
with the road and to update the total number of
gems collected by each car. Load the“fairydust”
sound to the Gem sprite so that it plays each time
a gem is collected.
when I receive Move ▾
play sound fairydust ▾
change RedCarGems ▾ by 1
change BlueCarGems ▾ by 1
change Countdown ▾ by 1
delete this clone
delete this clone
change y by RoadSpeed
if
if
then
then
touching RedCar ▾ ?
touching BlueCar ▾ ?
delete this clone
if then
< –175
y position
This block moves the gem with
the road so that it appears to
be fixed in one spot.
This block deletes
the gem if it reaches
the bottom of the
stage without
being collected.
Collecting a gem adds
1 point to the score.
Collecting a gem adds 1
second to the countdown.
30
G L A C I E R R A C E
182
Penguin in charge
A proper start and finish can make
a game look more professional.
Add a penguin race official to ask
the players’names, start the race,
and announce the winners.
In the Game Loop sprite, add a second“if then”block to the“when I
receive Move”script to create the gem clones. Run the game and try
collecting gems. The snowballs will prevent players from rushing to
the top and collecting all the gems. The gems and snowballs together
create the balance and challenge of the game.
First, create four variables for all sprites:
“RedName”and“BlueName”to store
each driver’s name; and“RedInfo”
and“BlueInfo”to show each driver’s
score during the race. Then add the
Penguin2 sprite to talk to the players,
and load the“gong”sound from the
library to Penguin2.
You’ll notice that the
countdown isn’t working
and the game never ends.
To fix the problem, add the
script on the right to the
Game Loop sprite and try
the game again. When the
countdown reaches zero,
the game should stop.
create clone of Snowball ▾
create clone of Gem ▾
if then
then
if
when I receive Move ▾
pick random 1 to 200 = 1
pick random 1 to 20 = 1
The chance of a new gem is 1 in 20, making
gems 10 times more common than snowballs.
Add these
blocks
to the
existing
script.
This“if then”block plays
“pop”sounds in the last
10 seconds of the game
to warn the players
time is running out.
31
32
33
Penguin2
change Countdown ▾ by –1
reset timer
if
if
when I receive Calculate ▾
timer > 1 then
The script runs only if 1
second has passed since
the last timer reset.
This block takes 1 second
off the countdown.
then
Countdown < 10
play sound pop ▾
183
G A M E P R O G R E S S 8 9 %
Add this“Setup”script to the Penguin2 sprite.
The Game Loop uses a“broadcast and wait”
block, so the race doesn’t start until the players
put in their names and the penguin shouts“Go!”
reset timer
hide variable RedInfo ▾
show variable RedInfo ▾
ask Red driver, your controls are the W, A, S, and D keys. What’s your name? and wait
ask How much is the cactus juice? and wait
ask Blue driver, your controls are the arrow keys. What’s your name? and wait
hide variable BlueInfo ▾
show variable BlueInfo ▾
go to x: –180 y: –30
say Go! for 1.5 secs
go to front
show
hide
when I receive Setup ▾
set RedName ▾ to
set BlueName ▾ to
answer
answer
GO!
The“hide variable”block
controls when a variable
is shown on the stage.
The players’names
are stored in variables.
This block asks a
question and waits
for the player to reply.
These blocks show
the players’names
on the stage.
34
E X P E R T T I P S
The ask and answer blocks
A sprite can put a question to the person at the computer by using the“ask”
block. Anything typed as the reply is stored in the“answer”block, which can
then be used inside other blocks just like a variable can.
join
think answer ?? That’s daylight robbery!
Type this text
in the box.
when clicked
next costume
$100
How much is
the cactus juice?
$100?? That’s
daylight robbery!
G L A C I E R R A C E
184
Add this script to the Penguin sprite to set the
“RedInfo”and“BlueInfo”variables, which are
displayed on the screen to show the scores.
when I receive Calculate ▾
set RedInfo ▾ to
set BlueInfo ▾ to
join
join
join Gems:
join Gems:
RedCarGems
BlueCarGems
RedName
BlueName
Run the game. Hide all variables except“Countdown”,
“RedInfo”, and“BlueInfo”by unchecking their boxes
in the Data section. Then right-click the RedInfo and
BlueInfo signs on the stage and choose“large readout”.
To make everything look tidy, drag the signs to the top
left and move the countdown to the top right.
Type a space before“Gems:”so that
it doesn’t form a single word with
the player’s name on the stage.
L I N G O
String
Programmers call
an item of data that
contains words and
letters a“string”. It
can include any
character on the
keyboard and can
be of any length.
Make a Variable
BlueInfo
Countdown
RedInfo
Check boxes to show
the variable on
the stage.
35
36
Glacier Race
by SnowmobileDave (unshared)
Ben Gems: 20
Laura Gems: 13
Countdown 11
185
G A M E P R O G R E S S 1 0 0 %
To make the penguin announce the winner, add
the next script. This script has one“if then else”
block inside another. Think about the three possible
results—red wins, blue wins, and a tie—and it
should all make perfect sense.
when I receive GameOver ▾
show
go to front
play sound gong▾
play sound dance around ▾ until done
go to x: 0 y: 0
say
say
join
say It’s a draw! Try again.
if
if
else
else
then
RedCarGems > BlueCarGems
RedName wins!
Finally, add some rhythmic dance
music to make the game feel faster.
Load“dance around”to the Game
Loop sprite and then add this script.
It’s a loop, and extra loops can slow
everything down, but since it only
runs once every few seconds it won’t
affect the game play.
forever
when clicked
Type a space before
the word“wins!”
Load“dance around”
from the sound library.
Since the only possibility left is a tie, you
don’t need to add an“equals”block.
If the blue car
collects more
gems, it is declared
the winner.
It’s a tie!
Try again.
38
One“if”block
inside another
is called a
“nested if”.
If the red car collects
more gems, it is
declared the winner.
RedCarGems < BlueCarGems
join BlueName wins!
then
37
186 G L A C I E R R A C E
△ Instructions
Remember to add instructions to the
project page in Scratch. Make it clear
that it’s a competition to get the most
gems and not a race to the finish line.
Give players a helpful hint by telling
them they can push the other player
off the road.
△ One-player game
Experiment with a one-player version of the game
where you play against a computer-controlled blue car.
First save a copy of the project so you don’t spoil the
two-player version. Change the car controls for the blue
car, as shown here, and then try the game. The blue car
will chase the red car and crash into it.
▷ Fine-tuning
To change how hard or easy the game
is, adjust the“CarSpeed”,“RoadSpeed”,
and“Countdown”variables that are set
at the start. You can also adjust how long
the cars spin after a crash, how big the
bounce is when they collide, and how
often snowballs and gems appear. Try to
get just the right balance to make the
game challenging but not too hard.
△ Change the scenery
It’s easy to change the setting of Glacier Race by
repainting the scenery. You can make the players
race through a desert canyon or a dirt track in
a forest. Remember to change the snowballs to
match your theme.
▽ Record your own sounds
You can use your own voice to make announcements in
the game. To record your voice, you need a computer with
a microphone. Select the Penguin sprite and click on the
Sounds tab. Then click the microphone icon to make a
recording. Replace the Penguin’s“say”block with a“play
sound”block and choose your recording.
Ben Gems: 20
Laura Gems: 13
Countdown 11
Hacks and tweaks
Now over to you! Personalize this race with
your own features and adjustments. Make it as
fast, slow, hard, fast, serious, or silly as you like.
point towards RedCar ▾
define car controls
move CarSpeed steps
Click here to make
a recording.
Scripts
New sound:
Costumes Sounds
Glacier Race
by SnowmobileDave (unshared)
1. Collect gems
2. Avoid snow
3. Shove other driver off road
187
H A C K S A N D T W E A K S
G A M E D E S I G N
when I receive Calculate ▾
set RoadSpeed ▾ to –5
change RoadY ▾ by RoadSpeed
△ Tracking
This camera follows the player
around the game. In Glacier
Race, the camera follows the
cars, keeping them in view
as the road moves by.
△ First person
This camera shows the view the
player would see through their own
eyes. First-person games make the
player feel immersed in the action,
rather than watching from afar.
△ Third person
This type of camera is positioned
just behind the player’s sprite.
The player feels involved in the
action, but can clearly see what
the sprite is doing.
◁ Fixed
The camera watches all
the action from one spot,
without moving. Most of
the games in this book use
this simple camera, either
with a side or bird’s-eye
view of the action.
△ Need for speed
For extra thrills, you can make the game speed up as
players collect more gems. To do this, change the“set
RoadSpeed”block in the Game Loop sprite so that the
variable changes with each gem collected.
Camera angles
Game designers often talk about
the“camera”in a computer game.
This refers to how the picture on the
screen follows the action in the game.
There is no real camera, but if you
imagine a camera capturing the
action, you can think about different
ways of showing what’s going on.
Here are some common camera
views in computer games.
–5 – RedCarGems + BlueCarGems / 30
Insert these blocks into the
second window of the“set
RoadSpeed”block.
Put the“addition”block
into the first window of
the“division”block, and
then insert it into the
“subtraction”block.
coding games with scratch for using in school
Tropical
Tunes
190 T R O P I C A L T U N E S
◁ Drums
Click the drums in order
to repeat the tune the
game plays to you.
How to build
Tropical Tunes
Computer games aren’t just
about quick reflexes—they can
also challenge your thinking
powers. Here’s a brain game to
test how good your memory is.
Click this icon to
make the game fill
your screen.
You score a point
each time you click
on the correct drum.
◁ Game over
Make a mistake and
the game ends. As the
tune gets longer, the
game gets harder.
◁ Listen
The drums play a tune,
starting with a single note
and then adding one new
note each time.
In Tropical Tunes, you have to listen
to the drums play and then repeat
the ever-growing tune. Make a mistake
and the game’s over. The longer you
can match the tune, the higher
your score.
Tropical Tunes
by CrazyDrummer123 (unshared)
Score 0
AIM OF THE GAME
191
H O W T O B U I L D T R O P I C A L T U N E S
A tropical backdrop sets the
scene, but the background in
this game isn’t important.
◁ Harder and harder
This game gets harder
the longer you play. To help
you remember the sequence,
each drum plays a different
note and has a different
color, but eventually you
won’t be able to remember
the whole pattern!
The drums jump
out when they
play a note.
Click the stop sign
to end the game.
Click the green flag
to start a new game.
GAME CONTROLS
Use a computer mouse
or touchpad to play
this game.
How good is
your memory?
192 T R O P I C A L T U N E S
Make a drum
This game is quite complicated,
so you’ll need to work through the
instructions carefully. To get started,
follow the directions to make one
drum with all the scripts it needs.
Once that’s done you can copy it
to make all four drums. Later, you’ll
create a game loop called the
“master controller”to play the drums.
Tropical Tunes
by CrazyDrummer123 (unshared)
Click this icon to open
the backdrop library.
Stage
1 backdrop
New backdrop:
The name“Drum1”
will be given
to the sprite
automatically. Drum1
Create a new Scratch project and
add or create any backdrop you
want. A tropical theme works
well with this game.
The game needs four drums, but you
can make just one to start with. Delete
the cat sprite and add the“Drum1”sprite
from the sprite library. Drag it to the
lower left of the stage.
2
1
Give the game
a title.
193
G A M E P R O G R E S S 2 0 %
Two types of variable
You may have noticed the option to choose“For all sprites”or“For this sprite
only”when you create a variable. So far you’ve mostly used“For all sprites”,
but you’ll need to use both options in this game.
New Variable
OK Cancel
Variable name:
For all sprites For this sprite only
ClickedDrum
ClickedDrum
Uncheck the boxes.
This drum’s
variable
information
is set up in
these three
blocks.
DrumToPlay
New Variable
OK Cancel
Variable name:
For all sprites For this sprite only
drumColor
drumNote
drumNumber
drumColor
set instrument to 18 ▾
Build the script below for Drum1. It sets up the drum’s
number, color, the note it plays, and the type of sound
it makes (like a steel drum). Run the project to set the
variables and watch the drum change color.
when clicked
set drumNumber ▾ to 1
set drumColor ▾ to 100
set drumNote ▾ to 60
set color ▾ effect to drumColor
This selects the
steel drum sound.
Before you can start making the
scripts that bring the drum to
life, you need to create some
variables. Click on the Data section
and make two variables for all
sprites called“DrumToPlay”and
“ClickedDrum”. Uncheck their
boxes. Every sprite in the
game can use these variables.
3
Now add three variables“For this
sprite only”. Call them“drumColor”,
“drumNote”, and“drumNumber”. These
variables will store information about
only Drum1: its number, its color,
and which note it plays. Using“For this
sprite only”enables you to copy this
sprite to make more drums later, while
allowing each drum to have different
values for these variables.
4
5 L I N G O
Variables
Programmers have special terms
for variables that apply to all
sprites or only one sprite.
▷ Those that apply
to only one sprite are
called local variables.
To help you tell which is which, all
the global variable names in this
book start with a capital letter
and local variable names don’t.
▷ Those that apply
to all sprites are called
global variables.
Uncheck the boxes
here too.
194 T R O P I C A L T U N E S
define play drum
play note drumNote for 0.4 beats
set size to 150 %
set size to 100 %
play drum
when this sprite clicked
Click on the sprite
to test this script.
Type the name of the
new block in here.
Scripts
Motion
Looks Control
Events
Sound Sensing
Pen Operators
Data More Blocks
Make a Block
Costumes Sounds
Make a Block
play drum
define play drum
▸ Options
New Block
OK Cancel
play drum
Making your own block
In Dog’s Dinner and Glacier Racer, you
found out how to create your own
customized Scratch blocks. You’ll need
to create a few more in this game.
Select“Make a Block”and a box will pop
up. Type in the name of your new block:
“play drum”. Then click“OK”.
Next, the new block appears in the blocks palette
and a special purple header block,“define play
drum”, appears in the scripts area.
Build this script below the“define play drum”
block. Then, anywhere you use the“play drum”
block, Scratch will run the script. The script will
make the drum grow in size, play a note, and
then shrink back to normal. You can test the
new“play drum”block by clicking on it.
Now add this short script to Drum1. Click the
drum on the stage to test it. Before testing,
you’ll need to click the green flag to set the
value of drumNote.
Go to the blocks palette and select“More Blocks”.
The option“Make a Block”will be visible.
6
7
8
9
10
195
G A M E P R O G R E S S 4 0 %
This variable for all sprites tells
the game which drum to play.
Remote control drums
Tropical Tunes makes the drums play a sequence that the player
has to copy. The game controls the drums by using a master
controller to send messages to them and then wait for a reply.
Before you set up the master controller, give Drum1 the scripts
it needs to receive and broadcast messages.
Build this script, which
will be triggered by
a message called
“RemoteControl”. Create
the message by selecting
the drop-down menu on
the“when I receive”
block. Choose“new
message”and type in
“RemoteControl”.
▽How it works
Eventually there will be four drums numbered
1 to 4 (the local variable drumNumber). Before
the master controller broadcasts“RemoteControl”
it will set the global variable“DrumToPlay”to
the number of the drum it wants to sound,
and only the matching drum will play. We
will add these steps later.
Drum1 Drum3 Drum4
set DrumToPlay ▾ to 2
broadcast RemoteControl ▾ and wait
when I receive RemoteControl ▾
if DrumToPlay = drumNumber then
play drum
IGNORES PLAYS IGNORES IGNORES
Only Drum2 plays,
because its“drumNumber”
matches“DrumToPlay”.
Don’t add these blocks yet—
we’ll use them later.
11
MESSAGE
Create a new message
called“RemoteControl”.
Drum2
196 T R O P I C A L T U N E S
When the player clicks a drum, the
master controller will need to check
it’s the right one. To make this work,
you need to make the clicked drum
do two things. First, it will change
the global variable“ClickedDrum”
to its own number. Then it will
broadcast a message to make the
master controller run its check.
Change Drum1’s“when this sprite
clicked”script to look like this.
Duplicate the drum three times, then change the values of the
three local variables as shown below to give each drum a different
number, color, and note. Arrange the drums on the stage, ordered
from one to four.
Four drums
You now have one drum complete with its scripts. You can copy
it three times to create the four drums you need for this game.
Drum1 Drum2 Drum3 Drum4
when this sprite clicked
The drum changes
the global variable
“ClickedDrum”to
its own number.
to 2 to 3 to 4
to 60 to 170 to 30
to 62 to 64 to 65
Now run the project. Each drum should
become a different colour. Click on them
in turn to hear them play. If they move
instead of playing, click on the blue full-
screen symbol in the top left of the stage.
Nothing else will work yet, but it’s good
to test that your drums all play correctly.
set ClickedDrum ▾ to drumNumber
broadcast Clicked ▾
play drum
12
13
14
Create a new message
and call it“Clicked”.
when clicked
set drumNumber ▾ to 1
set drumColour ▾ to 100
set drumNote ▾ to 60
197
G A M E P R O G R E S S 6 0 %
The master controller
Now you need to create the game’s main brain: the
master controller. The master controller broadcasts the
“RemoteControl”message that plays the drums, but it
does several other jobs too. It generates the drumbeat
sequence the player has to follow; it checks that the
player has clicked the right drum; and it keeps track of
the score. It will need several scripts to do all this.
The stage is a good
place to put the master
controller scripts as they
don’t belong to any one
sprite. Click on the stage
info area at the bottom
left of the screen to
choose the stage.
Stage
1 backdrop
New backdrop:
15
Click here to
add scripts to
the stage.
The master controller will keep track
of the ever-growing sequence of
drumbeats by storing them in a
numbered list. To create the list,
open the Data blocks section and
click the“Make a List”button. Name
it“DrumOrder”—it’s going to store
the order in which the drums will
play. Check the box so you can see
it on the stage.
Check here to show
the list on the stage.
New List
OK Cancel
List name:
For all sprites
DrumOrder
16
Make a list
DrumOrder
198 T R O P I C A L T U N E S
With the stage selected, build this test
script to generate a random sequence
of seven drum numbers in the list. This
script isn’t part of the final game (for
that, the script will need to add notes
one by one). However, building it will
show you how lists work and will let
you try out the drums.
17
Run the script and watch the
“DrumOrder”list on the stage
slowly fill up. It will look like
this, but your numbers won’t
be the same. The drums don’t
play yet because there are no
blocks to tell them to.
18 DrumOrder
4
3
1
3
1
2
2
1
2
3
4
5
6
7
+ length: 7
This block clears the list
at the start of the test.
This block adds a random drum
number to the end of the list.
The“wait”block gives
you time to see what’s
going on.
Lists
Making a list is a great way to store
information, and lots of programming
languages use them. They are handy
for all sorts of things, from creating
leaderboards and doing complex
calculations to giving sprites artificial
intelligence. In Tropical Tunes, we use
a list to store numbers, but you can
store words in lists too.
You can use a list to
make a sprite say
something random
when you click on it.
when this sprite clicked
say item pick random 1 to 5 of Insults ▾
Cat Cruncher
by GreenDino99
Insults
You’re so dumb.
I hate you!
What’s that smell?
Make like a tree!
Take a hike!
1
2
3
4
5
+ length: 5
E X P E R T T I P S
Lists are usually
hidden, but you
can display them
on the stage just
like variables.
Take a hike!
when clicked
delete all ▾ of DrumOrder ▾
repeat 7
wait 1 sec
add pick random 1 to 4 to DrumOrder ▾
199
G A M E P R O G R E S S 8 0 %
Now create another new
block called“play sequence”
and build the script shown
here. It will play the notes in
the list in order by travelling
once though the blocks in
the loop for each item in
the“DrumOrder”list, setting
“DrumToPlay”from the list,
and then sending out the
“RemoteControl”message.
You will need to create a
new variable for all sprites
called“Count”.
Commanding
the drums
set DrumToPlay ▾ to item Count of DrumOrder ▾
set Count ▾ to 0
change Count ▾ by 1
This block puts the
drum’s number in the
“DrumtoPlay”variable.
The“Count”variable
keeps track as the
program works down
the list.
19
Add the new“play sequence”
block to the test script.
20
Broadcast blocks
There are two types of broadcast Scratch blocks. They are useful in different ways.
E X P E R T T I P S
broadcast Message ▾
define play sequence
broadcast Message ▾ and wait
broadcast RemoteControl▾ and wait
repeat length of DrumOrder ▾
wait 0.25 secs
This blocks
tells the drums
to play.
△ Broadcast
This sends the message but then continues straight
to the next block without waiting. This is useful for
triggering an event without stopping what’s going
on, such as launching an arrow without pausing
the loop that moves the player’s sprite.
△ Broadcast and wait
This sends the message but then waits until all
receiving scripts have finished before running
the next block. This is useful when you don’t want
the script to continue until something’s finished,
such as the drum playing in this game.
when clicked
delete all ▾ of DrumOrder ▾
repeat 7
wait 1 secs
add pick random 1 to 4 to DrumOrder ▾
play sequence
Place the new“play
sequence”block here.
200 T R O P I C A L T U N E S
When an
item in the
list is read,
its index
number
flashes.
Now run the script. Watch the numbers alongside the items in
“DrumOrder”light up as they are read by the script, then hear
and see the correct drum play each time. You can check the
“DrumToPlay”variable’s check box to show the number used
with the“Remote Control”message for each note.
21 DrumOrder
4
4
3
3
2
4
4
1
2
3
4
5
6
7
+ length: 7
Adding notes to the tune
So far you’ve just been testing the
drums. It’s now time to get them
playing the sequences needed in
the game, starting with one note
and adding another note each time
the player repeats the tune correctly.
The test script isn’t needed any more
so replace it with this one. You’ll need
to create another new block called
“wait for player”—its script is shown
in the next step. You’ll also need to
create a new variable for all sprites,
called“Score”, and check it so it
appears on the stage.
22
This block adds
a new drum to
the bottom of
the list.
when clicked
forever
wait for player
set Score ▾ to 0
wait 2 secs
If you run the project now, the drums
will play one note and then wait. You
can click as many drums as you like
but nothing will happen because
you haven’t programmed the master
controller to respond to the“Clicked”
message yet.
24
delete all▾ of DrumOrder
add pick random 1 to 4 to DrumOrder ▾
Select the check box to
show the“DrumToPlay”
variable on screen.
Make a Variable
DrumToPlay
define wait for player
Add a new variable called“CorrectCount”to count how
many drums the player gets right. Then create this script,
which holds up the loop while it waits for the player to
get the whole drum sequence right.
23
set Count ▾ to 0
set CorrectCount ▾ to 0
wait until CorrectCount = length of DrumOrder ▾
Create a new variable
called“Score”.
Create a new
block called
“wait for player”.
play sequence
201
G A M E P R O G R E S S 1 0 0 %
Add the next script to the stage to increase“CorrectCount”
by one for each correct click. When the drums are clicked, they
play and send the“Clicked”message, having put their number
in“ClickedDrum”. This script will be triggered by that“Clicked”
message. If the numbers don’t match, the game ends.
Checking the player’s tune
Now you need to add a script to respond to the
player’s clicks on the drums. Every click creates a
“Clicked”message that can trigger a script to check
which drum was clicked and count the number of
correct clicks. If the player clicks the wrong drum,
the script will broadcast a“GameOver”message.
Add a game-over script to the stage. You’ll need
to load the“bell toll”sound to the stage from the
Scratch sound library.
when I receive Clicked ▾
25
26
when I receive GameOver ▾
stop all ▾
The game is complete. Now try playing it, but
remember to uncheck“DrumOrder”in the Data
section of the blocks palette or the player can just
read the correct drum order off the list.
27
play sound bell toll ▾ until done
change Count ▾ by 1
else
broadcast GameOver ▾
change CorrectCount ▾ by 1
if item Count of DrumOrder ▾ = ClickedDrum then
change Score ▾ by 1
This is the
number of
the correct
drum held
in the list.
This is the number of
the drum you clicked.
Create a new
message
called
“GameOver”.
Uncheck the
box to hide the
drum order from
the player.
Make a List
DrumOrder
202 T R O P I C A L T U N E S
Hacks and tweaks
Once everything is
working smoothly,
you can play around
with the code and
tweak the game to try and
make it more exciting or
harder. Here are some ideas.
▷ How it works
This game relies on two messages:
“RemoteControl”, which tells a drum
to play, and“Clicked”, which tells the
master controller that a drum has been
clicked by the player. The master
controller has a loop that uses these two
messages in turn—to play the tune and
then check the player’s reaction.
Drum1 Drum2 Drum3 Drum4
Master controller
“Clicked”message tells
the master controller
when a drum is clicked.
“RemoteControl”message
makes the drums play.
The master
controller loops
through these
three actions.
Adds note to sequence
Plays sequence
Waits for player to click sequence
△ Talking shark
Try adding a shark sprite that swims
up and gives instructions—make
him talk using the“say”block.
△ Round counter
Create a new global variable
“Round”and show it on the
stage. Set it to zero at the start
of a game and increase it by
one every time the player
completes a sequence
correctly (at the end of the
master controller loop).
▽ Another drum
Add a fifth drum. You’ll
need to change its drum
number, note, and
color values, and check
anywhere in the code that
thinks there are only four
drums—such as the
random block in the
master controller.
◁ Game over
Add a“Game Over”
sign or make the shark
swim back onto the
stage to say it.
Obey me!
GAME
OVER!
14
203
H A C K S A N D T W E A K S
Debugging
Bugs are errors in programs. Getting rid of them is called debugging. If
a program isn’t working properly, there are a number of common Scratch
problems you can check for, which are shown below. If you’re following
instructions and something isn’t working, it’s also worth going back to
the beginning and checking all the steps—there could be a small mistake
in one of your scripts that is affecting the whole game.
E X P E R T T I P S
Have you missed
out any blocks?
Are your loops
and“if”blocks
one inside the
other when
they shouldn’t
be? Or are
they one after
another when
they should
be inside?
Don’t type in variable
names—use the orange
variable blocks instead.
Have you
confused similar
blocks like“go
to”and“point
toward”?
Are all the numbers in
the windows of the
Scratch blocks correct?
Have you selected the correct
item in the drop-down menus?
Is a loop that
should be around
the blocks missing?
Try showing key variables on the stage
by checking their boxes in the orange
Data section. If their values look odd or
don’t change, they might give you a
clue about what’s wrong.
Sprites
Drum1 Drum2
Are the scripts
attached to the
correct sprite or
the stage? It’s easy
to put a script in
the wrong place.
If a sprite
disappears from the
stage, check that it’s
not hidden:right-
click on the sprite in
the sprites list and
choose“show”.
ClickedDrum
DrumToPlay
info
duplicate
delete
save to local file
show
Drum1 Drum2
Sprites
Stage
1 backdrop
New backdrop:
when I receive Clicked ▾
change Count ▾ by 1
if item Count of DrumOrder ▾ = ClickedDrum then
change CorrectCount ▾ by 1
change Score ▾ by 1
else
broadcast GameOver ▾
go to Launcher ▾
coding games with scratch for using in school
What
next?
206 W H AT N E X T ?
Remixing and beyond
The Scratch website allows you to see other users’ code and reuse
it in your own games; this is called remixing. Millions of projects
have been shared online and you can dive into every one. It’s a
great place to share your games and find ideas.
Exploring Scratch
To see games shared by other Scratch users, go
to the Scratch website at www.scratch.mit.edu
and click on Explore.
Create Explore Discuss Help Join Scratch Sign In
Search
Star Hunter Doom on the Broom Jumpy Monkey
by Octoblaster999 by WorkingWitch111 by FunkyMonkey66
924 500 27 8224 883 496 40 7727 352 285 17 4325
SCRATCH
Projects Studios
Go
Shared ▾ Past 30 days ▾
Sort by:
Featured
All
Animations
Art
Games
Music
Stories
Tag:
Explore
Remix
Click here to see
shared projects.
A studio is a set of
projects with a
particular theme.
Click on the
preview picture to
choose a project.
Click the full-screen
symbol to try out a
game at full size.
Instructions
Defend the witch against creatures of the night
by turning her broomstick (arrow keys) and
casting fireballs (space key). Flying hippos give
extra lives but make sure you don’t hit them
with fireballs!
Modified: 8 Jun 2015
Shared: 15 May 2015
9 scripts
6 sprites
Doom on the Broom
by WorkingWitch111
Notes and credits
Everything in this game was created by me.
c
496 883 7727 297
See inside
Click“See inside”
to see the scripts.
Then click“Remix”
to save your own
version so you
can change it.
207
R E M I X I N G A N D B E Y O N D
Creating your own games
Once you’ve built all the games in this book, you’ll
probably be bursting with your own game ideas.
Here are some tips to help you get started.
Big and small ideas
Good ideas can come to
you at surprising times,
so be ready to jot them
down before you forget
them. Don’t just keep
notes about new games
—write down ideas about
smaller details such as
characters, objects, levels,
and actions.
Code your game
Start with the basics. Begin by coding the main
character so it works with your chosen controls
(keyboard or mouse). Then build up slowly,
adding one sprite at a time and creating the
scripts it needs to play its part in the game.
Share it!
Click the“See project page”button at the top
right of the Scratch editor and add a few words to
explain how to play the game. Then click on“Share”
to allow the whole world to play your masterpiece.
Well done, you are now a game maker!
Beg, borrow, and steal
People say the best ideas are stolen. Scratch allows
you to steal ideas from everyone else, so go ahead.
Look through other people’s projects and save any
sprites, costumes, backdrops, sounds, or scripts you
like in your backpack, so you can reuse them later.
Testing
Once you’re happy with the game, ask someone
else to play it. They might find problems that you
missed because you know the game too well. Fix
any bugs and make sure it all runs smoothly.
1
3
5
2
4
See project page
Share
208 W H AT N E X T ?
Better Scratch
Good programmers try to write code
that’s easy to understand and change.
There are many ways in which you can
improve your projects and expand
your knowledge of Scratch. Here are
a few of them.
▽ Backpack
The backpack is a feature found at the bottom
of the Scratch screen. It lets you store useful
scripts, sprites, sounds, and costumes and
move them from project to project. But
remember that you can only use it online.
△ Use clear names
Scratch lets you choose names for sprites,
variables, and messages. Make sure you
use meaningful names, such as“Dragon”or
“Score”, to make your Scratch code readable.
△ No unexplained numbers
Avoid writing code that contains unexplained
numbers. To make your code easier to read,
add a comment or use a variable so the
number explains itself.
△ Comments
You can add comments to any block to explain your
code. To do this, right-click (control click on a Mac)
on it and select“Add comment”. This can remind
you when you read code written a while ago.
set x to 240
Sound
Scream-female
Costume
monkey2-a
Backdrop
Underwater2 Script
when clicked
wait until touching Sprite1 ▾ ?
stop all ▾
switch costume to dragon1-b ▾
Drag and drop
a script or sprite
to copy it to the
backpack.
Setting a variable
helps you change
this number in
just one place.
set ScreenEdge ▾ to 240
set x to ScreenEdge
when I start as a clone
forever
wait 1 secs
next costume
the ghost’s
costume loop
Fish1
Backpack
209
B E T T E R S C R AT C H
△ Your own images
You can import any image into Scratch, but don’t
share a project containing photos of people you
know. You can also create your own images with a
graphics program or the paint editor in Scratch.
△ Your own sounds
You can record your own music and sound effects
through your computer’s microphone and edit
them in Scratch. You can also find free music
and sounds on the web to use in your games.
E X P E R T T I P S
Making your project different
Scratch projects often look and sound similar if you only use
resources from the Scratch library. To make yours different,
import your own images and sounds into Scratch.
The help tool
Are you still unsure about how to use
certain blocks? The help tool in Scratch
will let you master the function of each
block with ease.
To find out more about a
particular block, first click the
“Block help”symbol in the toolbar
at the top of the screen.
1
After the mouse-pointer turns into
a question mark, click on any block
in the blocks palette. A help window
opens with tips on how to use that block.
2
The mouse-pointer turns
into a question mark.
if on edge, bounce
if on edge, bounce
?
“Block help”
symbol
Click here to upload
an image file from
your computer.
Click here to use
your webcam to
take a picture.
Click here to use
a sound file from
your computer.
All Tips
If touching the edge of the stage, then
bounce away
The sprite will bounce at an angle if it is touching
the side, top, or bottom of the stage
?
if on edge, bounce
forever
when clicked
move 10 steps
Use this to
record sounds.
A help
window
opens.
210 W H AT N E X T ?
The next level
Once you’ve made a few Scratch games of your own, you
may want to expand your horizons. There’s a whole world of
knowledge and experience you can tap into to improve
your game design and programming.
Game design
Begin by improving your knowledge of
games and how they’re created. The following
activities will expand your imagination and
stimulate your game-design brain.
◁ Play games
Playing games can trigger ideas for new
ones. Try out different games and watch other
people playing them. Think about the actions
(mechanics), rules, and goals that make a good
game work. Imagine how you might code these
different parts of the game yourself.
△ Learn from the experts
Many game designers love to talk
and write about how they design
games. You can find their tips on
video-sharing websites and in
blogs and magazines.
◁ Keep notes
Keep a notebook of game ideas,
drawings, stories, and anything that
you find fun or interesting—you
never know what might be useful
later. You could even start a blog
about gaming to share your ideas
with friends and family.
▷ Explore
gaming history
Find out more about the
history of gaming. Visit a
video game museum or
a vintage arcade. There
are lots of free online
versions of famous video
games, so it’s easy to try
classic games this way.
△ Think visually
Thinking visually is a vital skill for a game
designer. Practice drawing or try making
models. To help create animations, film
someone walking and then pause the video
during playback to see their posture changing.
▷ Find stories
Ideas for games and the characters
in them often come from stories.
Next time you watch a good film or
read a good book, think how you
might turn it into a game.
GAME
OVER!
211
T H E N E X T L E V E L
Programming
To make computer games, you need to know
how to code. Brushing up on your coding
skills will help you make better games.
△ Code together
Join or start a coding club at your school
or library. Collaborating on projects with
other coders is a great way to fire your
imagination and supercharge your skills.
△ Try a game engine
You don’t have to build computer
games from scratch—you can use
programs called game engines to
do a lot of the difficult coding for
you. You can find game engines
online. Many can be tried for free.
▷ Sharpen your Scratch
Try the tutorials and
explanations on the Scratch
website. Learn everything you
can about Scratch and you’ll
be able to code things you
never dreamed possible.
▷ Learn another language
Scratch is a great springboard to learn other
programming languages, such as Python or
JavaScript. There are lots of online coding
courses, including some that focus on
games. Python has a great add-on called
Pygame that helps you create games.
◁ Do your research
If you have a technical mind and
want to learn more about the latest
advances in computer games, read
up on 3D graphics, game physics,
and artificial intelligence.
E X P E R T T I P S
Game engines
A game engine is a program
that contains already-made code
for building games. It works a bit
like Scratch, but it’s designed for
professional game developers
rather than beginners learning to
code. Game engines provide easy
ways to detect controller inputs
and to guide sprites around the
screen. Solutions to problems
caused by collision detection
and game physics are built in.
Game engines can also convert
games to run on consoles and
mobiles, saving you the nuisance
of rewriting all the code.
212 W H AT N E X T ?
Jobs making games
Some computer games are created by a single programmer,
but others are put together by huge teams. The computer
games industry employs thousands of people. Most of them
specialize in just one part of the process.
Who makes games?
Game studios are companies that make games and
employ specialists to work as a team. On smaller games,
each person usually has more than one job. On a big
project, there might be dozens of programmers and
artists, each working on just a small part of the game.
△ Sound designer
The sound effects in a game help
to set the scene. They are created
by a sound designer, who also
decides how the composer’s
music will be used in the game.
◁ Artist
Everything the
player sees—the
characters, objects,
and scenery—are
created by artists,
often working as a
team under a single
lead artist.
△ Producer
The person in charge of a project
and all the people working on it
is called a producer. It’s the job of
this producer to make sure the
game is the best it can be.
△ Game designer
The game designer creates the
rules, goals, and mechanics that
make a game interesting and fun
for players. Playability is the
designer’s main focus.
△ Writer
The stories and characters in a game
are developed by writers. In a game
with cutscenes (short, movielike
sequences), the writer is responsible
for what the characters say.
L I N G O
Game types
Indie games Short for“independent
games”, these are created by people
working on their own or in small teams.
Many feature creative new ideas not seen
in mainstream games.
AAA games These are the biggest games
and are expected to sell millions of copies.
They take many months or even years to
make and have huge teams and budgets
of many millions of dollars.
△ Composer
A composer is a professional
musician who writes new
music. Good music is vital
because it helps create
atmosphere in a game.
213
J O B S M A K I N G G A M E S
Game development
Games go through lots of
different versions before the final
one is released for sale. The early
versions take the game from a
basic idea to a finished product
and usually follow the sequence
shown here.
△ Tester
It might sound like a dream job playing
games all day, but it’s a serious and important
part of developing a game. A tester has to
play the game over and over to check if it
works correctly and is not too easy or hard.
△ Programmer
Programmers take all the
ideas and building blocks
created by the team and
use them to write code
that makes the game work.
△ Game publisher
Some games have a publisher,
a company that pays for the
game’s development and then
advertises and distributes the
final product.
G A M E D E S I G N
From blocks to riches
In 2009, Swedish programmer Markus
“Notch”Persson released the first
version of Minecraft, a building game
he’d made. By 2014, Minecraft had
around 100 million registered users and
was sold to Microsoft for $2.5 billion.
Prototype
The prototype is an
experimental version of
the game built to see if
the basic idea works and
is fun to play.
Alpha
The alpha version has all the
main features, but they might
not be fully working. They are
improved and major bugs are
fixed before the next stage.
Beta
The beta version of the
game has everything, but it
needs polishing and still has
minor bugs, which need to
be found and fixed.
Release
The release is the final version,
fully tested and fixed. Some
games are available as“early access”
releases for fans to test before the
game is 100 percent finished.
1
3
2
4
214 W H AT N E X T ?
Have fun!
Games can transport you to different worlds and take you
through a whirlwind of emotions, but the most important
part of gaming and making games is to have fun.
Party time!
Playing games with people is
much more fun than playing on
your own. Why not grab some
snacks and invite your friends
around to play your favorite
multiplayer game? You could
also get them to try out games
you’ve made in Scratch and ask
them to suggest improvements.
They might even want to create
their own versions.
Hold a game jam
A game jam is a game-making party. People get together for
a day or two to race against time as they build a game from
start to finish. Every year, countless game jams take place. Some
take place in a single location, but others are scattered across
the world and linked through the internet or even held entirely
online. Why not hold a mini Scratch jam at your home or school?
Pick a theme and ask a teacher or parent to help arrange
computer access, judging, and prizes.
▷ Choose a theme
Game jams usually have a
theme, such as“jumping
games”or“games with bees in
them”. Prizes are awarded for
building the best games.
215
H A V E F U N !
Challenge yourself
It’s good to push yourself sometimes, so why
not set yourself a game challenge? It could be
anything from making a fully playable game in
just 15 minutes to making a game for every letter
of the alphabet. You could also keep a diary or
blog to describe your experiences, or create a
Scratch studio to share your challenge games.
Find or start a game club
If your school or library has a coding club,
you can ask them to run some sessions
on game design and programming. Start
a group within the club for people who
have a special interest in making games.
Genre
1. Maze
2. Jumping
3. Quiz
4. Vehicle simulator
5. Virtual pet
6. Interactive story
Extra feature
1. Patrolling enemies
2. High score
3. Collecting objects
4. Life counter
5. Time limit
6. Multiplayer
Setting
1. Forest
2. Space
3. Underwater
4. City
5. Castle
6. Beach
E X P E R T T I P S
Game idea generator
For some people, the hardest part of creating games is having
the idea for a game in the first place. Here’s a trick to help give you
inspiration. Roll a dice to choose a number from each column, and
then combine the results to generate a random game idea. Feel free
to change it—it’s just to get your creative brain in gear!
coding games with scratch for using in school
Glossary
and Index
G L O S S A R Y A N D I N D E X
218
Glossary
algorithm
A set of step-by-step
instructions that perform
a task. Computer programs
are based on algorithms.
animation
Changing pictures
quickly to create the
illusion of movement.
artificial intelligence (AI)
Programming to make
characters such as enemies
in a game appear to behave
in intelligent ways.
assets
All the pictures and
sounds used in a game.
backdrop
The picture behind
the sprites on the
stage in Scratch.
backpack
A storage area in Scratch
that allows you to copy
things between projects.
block
An instruction in Scratch
that can be joined to other
blocks to build a script.
Boolean expression
A statement that is
either true or false,
leading to two possible
outcomes. Boolean
blocks in Scratch
are hexagonal rather
than round.
branch
A point in a program where
two different options are
available, such as the“if then
else”block in Scratch.
bug
A coding error that makes
a program behave in an
unexpected way. Bugs are
named after the insects that
got into the wiring of early
computers, causing errors.
camera
The imaginary camera
through which a player
views a game.
collision detection
Programming that detects
when two objects in a
game are touching.
condition
A“true or false”statement
used to make a decision
in a program. See also
Boolean expression.
console
A computer that is used
just for playing games.
costume
The picture a sprite shows
on the stage. Rapidly
changing a sprite’s costumes
can create an animation.
data
Information, such as text,
symbols, or numbers.
debug
To look for and correct errors
in a program.
directory
A place to store files to keep
them organized.
event
Something a computer
program can react to, such
as a key being pressed or
the mouse being clicked.
execute
See run.
export
To send something to the
computer from Scratch,
such as a sprite or a
whole project saved
as a computer file.
file
A collection of data stored
with a name.
flag
A variable that is used
to pass information
from one sprite or
script to another.
function
Code that carries out a
specific task, working like a
program within a program.
Also called a procedure,
subprogram, or subroutine.
game engine
A program that helps
a programmer make
games by providing
already-made code for
many common game
features, such as
animation, controls,
and game physics.
game jam
A competition in
which game makers
race against the clock
to build the best game.
game loop
A loop that controls
everything that happens
in a computer game.
game physics
Programming to create
forces and collisions
between objects in
a game.
genre
A type of computer game.
Platform games and
first-person shooters
are common genres.
global variable
A variable that can be
changed and used by
any sprite in a project.
graphics
Visual elements on a
screen that are not text,
such as pictures, icons,
and symbols.
GUI
The GUI, or graphical user
interface, is the name for
the buttons and windows
that make up the part
of the program you can
see and interact with.
hardware
The physical parts of a
computer that you can
see or touch, such as
wires, the keyboard,
and the screen.
G L O S S A R Y 219
header block
A Scratch block that starts
a script, such as the“when
green flag clicked”block.
Also known as a hat block.
import
To bring something in from
outside Scratch, such as a
picture or sound clip from
the computer’s files.
index number
A number given to an item
in a list.
input
Data that is entered into a
computer. Keyboards, mice,
and microphones can be
used to input data.
integer
A whole number. An integer
does not contain a decimal
point, nor is it written as
a fraction.
interface
The means by which the
user interacts with software
or hardware. See GUI.
library
A collection of sprites,
costumes, or sounds that can
be used in Scratch programs.
list
A collection of items stored
in a numbered order.
local variable
A variable that can be
changed by only one sprite.
Each copy or clone of a sprite
has its own separate version
of the variable.
loop
A part of a program that
repeats itself, removing the
need to type out the same
piece of code multiple times.
mechanics
The actions a player can
do in a game, such as
jump, collect objects,
or become invisible.
memory
A computer chip inside a
computer that stores data.
message
A way to send information
between sprites.
network
A group of interconnected
computers that exchange
data. The internet is a
giant network.
operating system (OS)
The program that controls
everything on a computer,
such as Windows, OS X,
or Linux.
operator
A Scratch block that uses
data to work something
out, such as checking
whether two values are
equal or adding two
numbers together.
output
Data that is produced by
a computer program and
viewed by the user.
pixel art
A drawing made of giant
pixels or blocks, mimicking
the appearance of graphics
in early computer games.
pixels
The colored dots on a screen
that make up graphics.
procedure
Code that carries out a
specific task, working like a
program within a program.
Also called a function,
subprogram, or subroutine.
program
A set of instructions that a
computer follows in order
to complete a task.
programming language
A language that is used
to give instructions to
a computer.
project
Scratch’s name for a program
and all the assets that go
with it.
random
A function in a computer
program that allows
unpredictable outcomes.
Useful when creating games.
recursion
See recursion.
run
The command to make
a program start.
Scratcher
Someone who uses Scratch.
script
A stack of instruction blocks
under a header block that
are run in order.
server
A computer that stores files
accessible via a network.
software
Programs that run on
a computer and control
how it works.
sprite
A picture on the stage in
Scratch that a script can
move and change.
stage
The screenlike area of the
Scratch interface in which
projects runs.
statement
The smallest complete
instruction a programming
language can be broken
down into.
string
A series of characters. Strings
can contain numbers, letters,
or symbols such as a colon.
subprogram or subroutine
Code that carries out a
specific task, working like a
program within a program.
Also called a function
or procedure.
variable
A place to store data that can
change in a program, such as
the player’s score. A variable
has a name and a value.
220 G L O S S A R Y A N D I N D E X
Index
Page numbers in bold refer
to main entries.
3D experience 15
3D graphics 211
A
AAA games 212
actions 12, 210
“addition” block 187
algorithms 64
alpha versions 213
“and” block 97
animation 47, 108, 111, 142,
210
and rapid costume change
111
“answer” blocks 183
apps, Scratch 25
arithmetic operators 112
arrow keys 51, 52–3, 91, 92–3, 95,
109, 178
artificial intelligence 211
giving sprites 198
artists 213
“ask” blocks 183
atmosphere 14–15
creating 34
and music 57, 121
B
backdrop library 145, 192
backdrops 15
adding 34, 110
adding color 149
choice of 121
continually changing color 110
creating your own 121
Dog’s Dinner 145
Doom on the Broom 110
Glacier Race 171
Jumpy Monkey 101
painting 60–1
platforms 149
Star Hunter 30–1, 34
Tropical Tunes 191, 192
xy-grid 145
backing up 162
backpack (Scratch) 25, 26, 27,
207, 208
balanced space 61
“Best time” 86
beta versions 213
Bitmap Mode 54, 58, 60, 69, 76,
84, 124, 132
blocks
adding comments 208
confusing similar 203
customized 134–5, 194
help tool 209
making 134, 194
and scripts 22
subprograms 134
blocks palette 26, 27, 134, 173,
194
blogs, gaming 210
board games 16
Boolean expressions 82
“bounce” message 179
bouncing 103, 105
bounding boxes 63
brain games 190
see also Tropical Tunes
“broadcast” blocks 66, 168, 199
“broadcast Game Over” block 69
“broadcast and wait” block 183,
199
bugs 46, 63, 203, 207
fixing jumping 138–40
bumper sprites 143
C
C++ 80
“Calculate” message 168
calculations 198
camera angles 187
cameras 53
“car controls” block 173, 178
card games 16
center points, sprites 63, 69, 76
moving 143
“change color” block 47, 87
“change score by” block 81
“change size by” block 87
characters 12
Cheese Chase 50
Dog’s Dinner 130
Doom on the Broom 108, 142–4
Glacier Race 166
Jumpy Monkey 90
and location 15
Star Hunter 30
“check collisions” block 174, 179
Cheese Chase 48–71
adding enemies 56, 64–5
adding instructions 71
adding music 57
adding sounds 70
aim of the game 50–1
game over 69
hacks and tweaks 70–1
high score 68
keyboard control 52–3
maze making 58–61
mouse trap 62–3
using paint editor 54–5
chess 16
circle tool 55, 76, 172
Circle Wars 72–87
adding a timer 83
aim of the game 74–5
clones 78–81
creating the sprites 76
hacks and tweaks 86–7
instant player control 77
instructions 84–5
making friends and enemies
77
win or lose? 82–3
“clean up” option 81
clones 25, 74–5, 78–81,
80, 113
changing color/size 87,
113
and costume change 115
destroying 80
enemy 81, 114
explosion 116–17
and Game Loop sprite
176
making 79, 95
closed-in space 61
clubs
coding 211
game 215
coding
bugs 46
clubs 211
how it works 18–19
improving your skills 211
collecting
bones 154–5
gems 180–2
stars 40–1
collision detection 63, 143,
156, 211
collision-detection sprite
143
collisions 37
false 143
and ghosting 151
Glacier Race 174–5, 177, 179
with platforms 132
color palette 76, 77, 84, 132
colors
and atmosphere 14
and backdrop 60–1
changing 47, 87
flashing 47
paint editor 55
combat games 16
comments, adding to blocks
208
comparison operators 82
composers 212
conditional statements 37, 97
console controllers 53, 211
control loops 112
controller inputs 211
controllers 13, 53
arrow keys 51, 52–3, 91, 92–3,
95, 109, 131, 167, 178
cameras 53
consoles 53, 211
dance mats 53
keyboards 52–3
letter keys 167, 173
motion sensors 53
mouse 25, 31, 71, 75, 77, 105,
127, 191
space bar 91, 109, 131
switching 71, 105, 127
touchpad 75, 191
“Convert to bitmap” 172
coordinates 40
using 41
x and y 154, 158, 159
copies, backup 162
costumes 47
alternating 126, 142
and animation 111, 142
changing 111, 118, 120, 122,
123, 126
deleting 118
and different levels 155
and false collisions 143
“Flip up-down” button 170
and instructions 160
Platforms sprite 148, 149
costumes library 118, 123
Costumes tab 60, 111
“Count” variable 199
countdown timers 104, 182
adding seconds to 181
taking seconds off 182
“Countdown” variable 168
“create clone” block 79, 80, 176
221
I N D E X
D
dance mats 53
dance-mat games 17, 53
“data” block 42, 43, 44, 197
debugging 46, 203
“define” block 134, 173, 178
“delete this clone” block 79, 80,
113, 122
desktop computers 25
dice 39
difficulty level 13
adjusting 47, 70–1, 86, 96, 125,
127, 163, 186, 202
extra lives 126–7
directions 38, 39
“division” block 187
Dog’s Dinner 128–63
adding a character 142–4
adding sound 144
aim of the game 130–1
bones for the dog 154–5
creating a game control
sprite 150–1
drawing the platforms 148–9
falling off the level 141
fine-tuning 158–9
fixing the jumping bugs
138–40
hacks and tweaks 162–3
hazardous food 157
junk food 156
making the levels 145–7
placing the portals 152–3
player on a platform 132–3
running around 134–5
signs and music 160–1
up and down 136–8
Doom on the Broom 106–27
adding explosions 116–17
aim of the game 108–9
bat attack 114–15
casting fireballs 113
challenger mode 125
controlling the witch 112
extra lives hippo 126–7
finishing touches 124–5
fire-breathing dragon 120–1
ghosts and ghouls 122–3
hacks and tweaks 127
setting the scene 110–11
speedy specter 118–19
double jump 141
drawing 210
designers see game designers
“duplicate” 67, 77
E
“early access” versions 213
enemies 12, 22
adding 36, 38–9, 56, 64–5, 77,
111, 118–23
better 44–5
clones 81
supernatural 122–3
“equal to” block 64
“equals” operator 82
eraser tool 60, 63
escape games 17
events 93
Events blocks 93
events button 33
experimenting 22
explosions 116–17
F
“Fall Speed” variable 98–9, 136,
139
“Fallen off” block 141
false statements 82
fill tool 61, 177
fine-tuning 46, 158–9, 186
see also hacks and tweaks
fireworks 116–17
first-person games 187
fixed camera angle 187
flags 153
“Flip up-down” button 170
font size 69
“For all sprites” variable 193
“for” loops 78
“For this sprite only” variable 193
“forever” block 23, 32, 35
“forever” loops 52, 53, 64, 70,
78, 79
friends
adding 77
cloning 78–80
extra lives 126–7
functions 134
G
game challenges 215
game clubs 215
Game Control sprite 150–1, 153,
159, 161, 162, 163
game design
animation 111
camera angles 187
collision detection 143
controllers 53
designing levels 163
from blocks to riches 213
game physics 103
game stories 14, 84, 87
music 57
the next level 210
playability 13
space 61
virtual reality 15
working with themes 121
game designers 212
learning from 210
game development 213
game engines 211
game idea generator 215
game jams 214
Game Loop sprite 168, 176,
182, 185
game loops 168, 169, 171,
172, 173
Game Over! 66, 67, 69, 86, 96,
100–1, 124, 141, 162, 163,
168, 201, 202
game physics 103, 211
game publishers 213
“Game Speed” variable 112,
125, 127
games
atmosphere 14–15
Cheese Chase 48–71
Circle Wars 72–87
creating your own 207
debugging 46, 203
Dog’s Dinner 128–63
fine-tuning 46, 158–9, 186
game types 212
Glacier Race 164–87
good ingredients 12–13
how coding works 18–19
improving your knowledge
of 210
jobs making games 212–13
Jumpy Monkey 88–105
planning a game 18
playing 210
Star Hunter 28–47
stories 14, 86, 87
testing 207
Tropical Tunes 188–203
types of 16–17
gaming history 210
genres 16–17, 215
“ghost” block 152
ghosting 151
Glacier Race 164–87
adding obstacles 175–7
adding sounds 174, 182,
185
aims of the game 166–7
collecting gems 180–2
collisions and spins 174–7
fine-tuning 186
the game loop 168–9
hacks and tweaks 186–7
one-player version 186
penguin in charge 182–5
player two 177–9
race cars 172–3
scrolling road 170–1
“glide” blocks 45
global variables 193, 195,
196
“go to” blocks 40, 67, 70,
152, 155, 159, 178
“go to mouse-pointer” block
32, 77
“go to” trick 159
goals 13, 210
goggles, virtual reality 15
graphics 15
graphics programs 209
gravity 90, 92, 95, 98–9, 136
defying 103
experimenting with 102–3
real world 99
reverse 103, 163
“Gravity” variable 98, 102, 136,
163
“Grow” tool 76
H
hacks and tweaks
Cheese Chase 70–1
Circle Wars 86–7
Dog’s Dinner 162–3
Doom on the Broom 127
Glacier Race 186–7
Jumpy Monkey 104–5
Star Hunter 46–7
Tropical Tunes 202
hardware 25
hazards 156–7
adjusting speed of 163
Hazards sprite 157, 158, 162
health 12, 42
help tool 209
“hide” block 56, 85
222 G L O S S A R Y A N D I N D E X
“hide variable” block 183
hide-wait-show scripts 70
high score 68
history, gaming 210
I
“if Level =” blocks 162
“if then” blocks 37, 40, 52, 53,
62, 64, 65, 66, 80, 82, 97, 154,
179, 182
“if then else” blocks 65, 139,
185
images, importing your own
209
Indie games 212
instructions
and blocks 22
for games 71, 84–5, 101, 125,
160–1, 186, 202
and scripts 22
writing sequences of 18–19
“is less than” operator 82
“is more than” operator 82
J
JavaScript 80, 211
joysticks 13, 53
“Jump control” block 137, 138
jumping 136–8
adjusting the jump 163
bugs 138–40
types of jump 141
Jumpy Monkey 88–105
adding gravity 98–9
adding sound 101
aim of the game 90–1
bananas and palm trees
95–7
game over 100–1
hacks and tweaks 104–5
launching the monkey 92–5
playing with gravity 102–3
K
“key pressed” blocks 178
keyboard
arrow keys 51, 52–3, 91, 92–3,
95, 109, 131, 167, 178
control 52–3
and events 93
letter keys 167, 173
shift key 59
space bar 91, 109, 113, 131
L
laptops 25
“Launch Speed” variable 92
“Launches” variable 100
leaderboards 198
level design tools 163
“Level Over” variable 150, 152, 153
levels 130–1
adjusting platforms 158
changing music 161
creating extra 162
customized 163
designing 163
designing new 158
falling off 141
fine-tuning 158
making the 145–7
and portals 152
line tool 54, 180
line width control 58
lists 198
lives 108
extra lives 126–7
limited number of 163
“Lives” variable 112, 116, 163
losing 114, 115
running out of 124
local variables 193
locations, and atmosphere 15
logic blocks 97
loops 35
bugs 203
control 112
game 168, 169
and levels 150
repeat 78, 94
and speed of game 185
“Lose a life” 114, 115, 116, 117
losing 82–3
M
Mac computers 25
“Make a block” button 134, 173,
194
“Make a list” button 197
master controller 192, 195, 196,
197, 200, 202
mathematical collision detection
143
maze games 50
see also Cheese Chase
maze making 58–61
mechanics 12
memory, testing your 190, 191
messages 67
“Bounce” 179
“Calculate” 168
“Clicked” 200, 201, 202
“GameOver” 66–7, 86, 96, 100,
141, 144, 163, 168, 201
“Lose a life” 114, 115, 116, 117
“Move” 168, 171, 173, 175
“RemoteControl” 195, 197, 200,
202
“Setup” 144, 150, 168, 172
“Start” 150
“Win” 150
microphone 186, 209
Microsoft 213
Minecraft 213
mobile phones 211
modeling 210
motion blocks 32, 36, 45, 115
motion sensors 53
mouse 25, 31, 71, 75, 77, 105, 127,
191
and events 93
“move” blocks 39
“Move” message 168, 171, 173,
175
movement
and center point 143
and costume change 111, 142
detection 93
directions 38
modifying 119, 120
scrolling 171
and space 61
music 57, 121, 161, 185
importing your own 209
and levels 161
music games 17
see also Tropical Tunes
“Music Loops” 57
N
names, choice of 208
negative coordinates 41
“nested if” blocks 185
“next costume” block 142
“not” block 97
notes, keeping 207, 210
number puzzles 17
numbers, unexplained 208
O
“object oriented” languages
80
objects 12
choice of 22, 121
clones 80
obstacles 61
creating 105, 156
Dog’s Dinner 156–7
Glacier Race 166, 175–7
Jumpy Monkey 96–7
on platforms 133
offline Scratch 24, 25
one-player games 186
online Scratch 24, 25
open space 61
operating systems 25
Operator blocks 44, 97
“or” block 97
P
paint editor 54–5, 58, 71, 76, 132,
172, 177, 180, 209
parties, game 214
personalization 86–7, 104–5, 127,
162–3, 186–7, 209
Persson, Markus “Notch” 213
photorealistic images 15
physics, game 103, 211
“pick random” block 39, 64, 121,
123, 127
platform games 130, 136
adding a character 142–4
falling off the level 141
see also Dog’s Dinner
Platform sprites 133, 148, 162
costumes 148
platforms
adding 133
adjusting positions and sizes 158
collisions with 132
drawing 145, 148–9
making the levels 145–7
player sprites working with
132–3
“play drum” block 194
“play sequence” block 199
“play sound” block 101, 186
playability 12, 13
Player Block
adding a character 142–4
creating 132–3
fixing jumping bugs 138–40
running around 134–5
up and down 136–8
player two 177–9
“point in direction” block 38, 113,
126, 173
“point towards” block 120
points, winning 40
Pong 13
portals 130–1, 150
placing the 152–3
223
I N D E X
positive coordinates 41
procedures 134
producers 212
programmers 212
programming see coding
programming languages 19
arithmetic operators 112
and clones 80
and game loops 169
learning other 211
lists 198
mathematical collision
detection 143
and new blocks 134
or/and/not 97
and repeat until 94
see also Scratch
programs, running 23
project page 71, 186, 207
projects
making them different 209
sharing 206
prototypes 213
puzzles 12, 17
Pygame 211
Python 211
Q
questions, sprites’ 183
R
racing games 16
see also Glacier Race
random block 202
random direction changes 78,
114, 115
random locations 55, 70, 96, 114,
115
random numbers 39, 40
random sequences 198
random speech 198
random time 56
ready-made blocks 22
recording your own sounds 186,
209
rectangle tool 132, 148, 172
release version 213
remixing 206
“Remote Control” message 195,
197, 200, 202
“repeat” loops 78
“repeat until” block 94, 97, 113,
120, 122, 139
“reset timer” block 83
reverse gravity 103, 163
“Reverse Step” variable 139
road, scrolling 170–1
road sprites 170–1
role-playing games 16
rotation style 36
“round” block 86
round counter 202
rules 12, 210
“Run controls” block 134, 135
“Run Speed” variable 135
“Run without screen refresh” 140
S
sandbox games 16
saving 25, 43, 162
“say” block 125, 186, 202
scary features 14, 57
Doom on the Broom 108, 110,
118–19, 122–3
scenery 121
changing 186
making more interesting 171
moving 169, 171
“score” block 44
score counter 42, 55
“Score” variable 112, 200
scores 13
Cheese Chase 68
Circle Wars 77, 82–3
Glacier Race 181, 182, 184
high score 68
Jumpy Monkey 100–1
and sounds 81
Star Hunter 42–3
Tropical Tunes 197
Scratch 19, 22–7
expanding knowledge of 208–9
exploring 206
introducing 22–3
learning more about 211
name of 24
old and new versions 25
online/offline 24
setting up 24–5
website 206
window 26–7
Scratch projects website 86
Scratch jams 214
scripts 22
activating 23
building 32–3
copying 81
and events 93
and messages 66, 67
pausing 153
triggering 93
in wrong place 203
scripts area 26, 27
scrolling 171
selection tool 60, 158
“Sensing” blocks 83
“set color” block 47, 152
“Set costume center” tool 55, 63
“set Fallspeed” block 136
“set Gravity” block 98, 136
“set Level to” block 159
“set size” blocks 38, 47, 60
“set TakeoffSpeed” block 137
setting 215
“Setup” message 144, 150, 168,
172
shape shifting 87
sharing 207
shift key 59
“show” block 56
“Shrink” tool 76
side-scrollers 171
Signs sprite 160
simple collision detection 143
“Simulate gravity” block 136,
138, 139, 140
simulator games 17
single jump 141
size, changing 47, 60, 76, 94, 133
sliders 102–3, 105
slow-motion effect, getting rid
of 140
smartphones, Scratch apps
for 25
sound designers 212
sounds
adding 35, 81, 101, 110, 161, 174
at end of game 161
atmosphere 14, 110, 121
and changing levels 161
Cheese Chase 57, 70
Circle Wars 81
Dog’s Dinner 144, 161
Doom on the Broom 110, 116,
122
and events 93
Glacier Race 174, 182, 185
importing your own 209
Jumpy Monkey 101
music 57
recording your own 186
and scores 81
Star Hunter 35, 41
sound library 70, 116, 122, 144,
174, 182, 185, 201
space bar 91, 109, 113, 131
disabling 138
space in games 61
speech bubbles
and arithmetic operators 112
for game instructions 71, 125
speed
and atmosphere 14
and difficulty level 70, 125
and excitement 187
experimenting with 86
fall speed 98
Game Speed variable 112, 125,
127
of hazards 163
of launch 93
“spin” block 174
“spinning” variable 172, 174, 175
spooky features see scary features
sports games 17, 53
sprite library 36, 52, 56, 104, 110,
111, 142, 156
sprites list 26
sprites 22
artificial intelligence 198
asking questions 183
blank 54
bumper sprites 143
center points 63, 69, 76, 124,
133, 172
changing costumes 111, 118,
120, 126, 157
Cheese Chase 50
choice of 121
Circle Wars 74, 75
clones 74, 78–81
collision-detection sprite 143
creating 76
Doom on the Broom 108, 110,
118–23
drawing and painting 54–5, 172
duplicating 38, 67, 77, 118, 120,
122, 126, 155, 177, 193, 196
Explosion sprites 116–17
Extra Life sprites 126–7
Game Control sprite 150–1, 153,
159, 161, 162, 163
Game Loop sprite 168, 176, 182,
185
Game Over sprite 69, 100, 124,
153
gem sprites 180–2
getting stuck 63, 158
ghosting 151
Glacier Race 166
Hazards sprite 157, 158, 162
hidden 203
Instructions sprite 71, 84–5
Jumpy Monkey 90
Launcher sprite 92
mazes as 58
and messages 66, 67
movement 23
naming 34
Platforms sprite 133, 148, 162
224 G L O S S A R Y A N D I N D E X
Player Block sprite 132–3
programming 32–3, 52, 64–5
renaming 12, 58, 76, 92, 116,
118, 120, 122, 133, 177
repositioning 158, 159
resizing 47, 60, 76, 94, 133
road 170–1
Signs sprite 160
sounds 35, 101
Star Hunter 30
supernatural 122–3
Tropical Tunes 190, 192
variables for 182, 193
working with platforms 132–3
stage 23, 26
adding music 57
adding sounds 35
displaying variables on 102, 203
and master controller scripts
197
mazes 58, 59
Star Hunter 28–47
adding enemies 36, 38–9
aim of game 30–1
better enemies 44–5
building scripts 32–3
collecting stars 40–1
collisions 37
hacks and tweaks 46–7
keeping score 42–3
setting the scene 34
sound effects 35, 41
“Start” message 150, 151, 168
staying alive 40
“stop all” block 37, 69
“stop” block 141
stories, game 14, 84, 86
choice of 121
ideas for 210
strategy games 17
strings 184
subprograms 134
subroutines 134
“subtraction” block 187
“switch costume to” block 160
T
tablets, Scratch apps for 25
“Takeoff Speed” variable 137, 163
tasks, breaking down 18
testers 213
testing 46, 207
text tool 84
themes, working with 121
third-person games 187
thought bubbles, victory or
defeat 82
tile-matching games 17
timers 83
countdown 104
tweaking 86
“touching” blocks 37, 62, 65, 66,
98, 174, 179
tracking 187
touchpad 75, 191
traditional games 16
traps 157, 163
treasure hunts 30
Tropical Tunes 188–203
adding notes to the tune 200
aim of the game 190–1
checking the player’s tune 201
commanding the drums
199–200
debugging 203
four drums 196
hacks and tweaks 202
make a drum 192
making your own block 194
master controller 197
remote control drums 195–6
two types of variables 193
true statements 82, 94
“turn 90 degrees” block 65
“turn” blocks 127
tweaks see hacks and tweaks
two-player games 166
adding player two 177–9
see also Glacier Race
U
Ubuntu computers 256
“undo” button 55
user account, Scratch 24
V
variables 42, 43, 193, 208
adjusting 186
BlueCarGems 180
CarSpeed 169, 186
Correct Count 200, 201
Count 199
Countdown 168, 186
displaying 102
FallSpeed 98–9, 139
flags 153
“for all sprites” 193
“for this sprite only“ 193
GameSpeed 112, 125
global variables 193, 195, 196
gravity simulation 98–9
hiding 98, 100, 102, 184
high score 68
Launches 100
LaunchSpeed 92
LevelOver 150, 152, 153
Lives 112, 116, 163
local variables 193
naming 43
players’ names 183
RedCarGems 180
ReverseStep 139
RoadSpeed 169, 186, 187
RoadY 169, 171
Round 202
RunSpeed 135
score 55, 77, 112, 200
setting range 102
showing on stage 102, 203
and sliders 102–3, 105
spinning 172, 174, 175
for sprites 182
TakeoffSpeed 137, 163
time 83
Tropical Tunes 193
“Vector Mode” 124
virtual reality 15
visual thought 210
voice, recording your own 186
W
“wait 10 secs” block 70, 121, 123
“wait” blocks 37, 71, 153
“wait for player” block 200
“wait until key space pressed”
block 85, 113
wall jump 141
webcams 93, 209
“when clicked” block 38
“when I receive” block 195
“when I start as a clone” block
79, 80, 113, 122, 123
“while” loops 94
“Win” message 150, 162
Windows computers 25
winning 82–3
world, game 13
writers 211
X
x axis 41
xy-grid 145
Y
y axis 411
Acknowledgments
Dorling Kindersley would like to thank: Bahja Norwood for editorial assistance and testing;
Caroline Hunt for proofreading; and Helen Peters for the index.
Dorling Kindersley India would like to thank Riji Raju for editorial assistance.
Scratch is developed by the Lifelong Kindergarten Group at MIT Media Lab. See http://scratch.mit.edu

More Related Content

PPTX
Starting a code Club proposal
PPTX
Computer Coding with Scratch: Lesson 2_primaryschoollessons
PPTX
Scratch for kids language in Program.pptx
PPT
Kodu game design
PDF
scratch course-part2-2023.pdf
PDF
scratch-3-tutorial.pdf
PPTX
Coding For Kids
PPTX
8 Benefits of Coding
Starting a code Club proposal
Computer Coding with Scratch: Lesson 2_primaryschoollessons
Scratch for kids language in Program.pptx
Kodu game design
scratch course-part2-2023.pdf
scratch-3-tutorial.pdf
Coding For Kids
8 Benefits of Coding

What's hot (20)

PDF
Tutorial for Estimating Broad and Narrow Sense Heritability using R
PDF
Email MCQ (Computer E-Mail Related Question)
PPTX
Stuy on inheritence pattern and frequency of genetic trait for earlobes
PPTX
Study of genetic variability in germplasm of common bread wheat
PDF
mushroom-report
PPTX
Unit 9 and 10c Indian Goat breeds.pptx
PPTX
Plant breeding : incompatibility and male sterility
PPTX
Accelerating crop genetic gains with genomic selection
PPTX
HERITABILITY, GENETIC ADVANCE, GENOTYPE -ENVIRONMENT INTERACTION
PPTX
Round-the-year-fodder-production.pptx
PPT
Economic importance of goats
PPTX
Variance and GE Interactions
PPTX
Gene interactions and multiple alleles.pptx
PPTX
synopsis seminar on maize
PPTX
Analysis of Variance (ANOVA), MANOVA: Expected variance components, Random an...
PPTX
Unit 4 Housing systems of Livestock and Poultry.pptx
PPTX
Genetic divergence for yield and yield components and phenotyping against YMD...
PPTX
Bases of selection family
PPTX
Buffalo breeds
PPTX
Wide hybridization in chickpea
Tutorial for Estimating Broad and Narrow Sense Heritability using R
Email MCQ (Computer E-Mail Related Question)
Stuy on inheritence pattern and frequency of genetic trait for earlobes
Study of genetic variability in germplasm of common bread wheat
mushroom-report
Unit 9 and 10c Indian Goat breeds.pptx
Plant breeding : incompatibility and male sterility
Accelerating crop genetic gains with genomic selection
HERITABILITY, GENETIC ADVANCE, GENOTYPE -ENVIRONMENT INTERACTION
Round-the-year-fodder-production.pptx
Economic importance of goats
Variance and GE Interactions
Gene interactions and multiple alleles.pptx
synopsis seminar on maize
Analysis of Variance (ANOVA), MANOVA: Expected variance components, Random an...
Unit 4 Housing systems of Livestock and Poultry.pptx
Genetic divergence for yield and yield components and phenotyping against YMD...
Bases of selection family
Buffalo breeds
Wide hybridization in chickpea
Ad

Similar to coding games with scratch for using in school (20)

PPTX
Designing games with kodu_game_lab_v1
PDF
The Principles of Game Design
PDF
Anthony Beyer - Introducing Game Development To Children
PPT
Game design
PPT
An Introductory Lesson to Game Making
PDF
Build Your Own Games.pdf
PPT
Central AR Library System
PPT
MO Library Association Preconference: Get Your Game On
PDF
Overview of Computer Games
PPT
Help! My Library is Turning Into a Arcade
PDF
MIND GAME ZONE - Abhijeet
PPT
PDF
Game Design for Game Developers by Iain Lobb
PPT
PPTX
Kodu Together: Video Game Programming & Publishing
PDF
Unit 1-NEW - game game Game Core Design.pdf
PPTX
Computer games
PPT
Get Your Game On: Gaming at the Library
PPTX
Writing a gaming proposal
PPTX
Game Design Principles and Inspiration
Designing games with kodu_game_lab_v1
The Principles of Game Design
Anthony Beyer - Introducing Game Development To Children
Game design
An Introductory Lesson to Game Making
Build Your Own Games.pdf
Central AR Library System
MO Library Association Preconference: Get Your Game On
Overview of Computer Games
Help! My Library is Turning Into a Arcade
MIND GAME ZONE - Abhijeet
Game Design for Game Developers by Iain Lobb
Kodu Together: Video Game Programming & Publishing
Unit 1-NEW - game game Game Core Design.pdf
Computer games
Get Your Game On: Gaming at the Library
Writing a gaming proposal
Game Design Principles and Inspiration
Ad

More from Melina Maurer (11)

PDF
ANEXOPARA LA ENSEÑANZA EN ARGENTINA Y SUS
PDF
Herramientas Ludificación para escuela primaria
PDF
Defensa de TFI en la universidad de buenos aires
PDF
Ejemplo de CV de LED manager para educación
PDF
La importancia de programar en la escuela
PDF
diversity-inclusion-charter_french_vf-3.pdf
PDF
MGPEDU- GESTIÓN DE PROYECTOS EDUCATIVOS_PROF. PATRICIA TORRIJOS.pdf
PPTX
Día_1._Bienestar Vf Juli.pptx
PDF
simuladoresvirtuales-230118094946-c802ed3d.pdf
PDF
Rencontre-EDI-Administration.pdf
PDF
atelier_edi_no2.pdf
ANEXOPARA LA ENSEÑANZA EN ARGENTINA Y SUS
Herramientas Ludificación para escuela primaria
Defensa de TFI en la universidad de buenos aires
Ejemplo de CV de LED manager para educación
La importancia de programar en la escuela
diversity-inclusion-charter_french_vf-3.pdf
MGPEDU- GESTIÓN DE PROYECTOS EDUCATIVOS_PROF. PATRICIA TORRIJOS.pdf
Día_1._Bienestar Vf Juli.pptx
simuladoresvirtuales-230118094946-c802ed3d.pdf
Rencontre-EDI-Administration.pdf
atelier_edi_no2.pdf

Recently uploaded (20)

PDF
Weekly quiz Compilation Jan -July 25.pdf
PDF
Module 4: Burden of Disease Tutorial Slides S2 2025
PPTX
UV-Visible spectroscopy..pptx UV-Visible Spectroscopy – Electronic Transition...
PDF
GENETICS IN BIOLOGY IN SECONDARY LEVEL FORM 3
PDF
Microbial disease of the cardiovascular and lymphatic systems
PPTX
school management -TNTEU- B.Ed., Semester II Unit 1.pptx
PPTX
1st Inaugural Professorial Lecture held on 19th February 2020 (Governance and...
PDF
STATICS OF THE RIGID BODIES Hibbelers.pdf
PDF
Paper A Mock Exam 9_ Attempt review.pdf.
PDF
Practical Manual AGRO-233 Principles and Practices of Natural Farming
PDF
OBE - B.A.(HON'S) IN INTERIOR ARCHITECTURE -Ar.MOHIUDDIN.pdf
PDF
2.FourierTransform-ShortQuestionswithAnswers.pdf
PDF
RTP_AR_KS1_Tutor's Guide_English [FOR REPRODUCTION].pdf
PDF
Computing-Curriculum for Schools in Ghana
PDF
The Lost Whites of Pakistan by Jahanzaib Mughal.pdf
PPTX
PPT- ENG7_QUARTER1_LESSON1_WEEK1. IMAGERY -DESCRIPTIONS pptx.pptx
PDF
01-Introduction-to-Information-Management.pdf
PDF
A systematic review of self-coping strategies used by university students to ...
PDF
LDMMIA Reiki Yoga Finals Review Spring Summer
PDF
A GUIDE TO GENETICS FOR UNDERGRADUATE MEDICAL STUDENTS
Weekly quiz Compilation Jan -July 25.pdf
Module 4: Burden of Disease Tutorial Slides S2 2025
UV-Visible spectroscopy..pptx UV-Visible Spectroscopy – Electronic Transition...
GENETICS IN BIOLOGY IN SECONDARY LEVEL FORM 3
Microbial disease of the cardiovascular and lymphatic systems
school management -TNTEU- B.Ed., Semester II Unit 1.pptx
1st Inaugural Professorial Lecture held on 19th February 2020 (Governance and...
STATICS OF THE RIGID BODIES Hibbelers.pdf
Paper A Mock Exam 9_ Attempt review.pdf.
Practical Manual AGRO-233 Principles and Practices of Natural Farming
OBE - B.A.(HON'S) IN INTERIOR ARCHITECTURE -Ar.MOHIUDDIN.pdf
2.FourierTransform-ShortQuestionswithAnswers.pdf
RTP_AR_KS1_Tutor's Guide_English [FOR REPRODUCTION].pdf
Computing-Curriculum for Schools in Ghana
The Lost Whites of Pakistan by Jahanzaib Mughal.pdf
PPT- ENG7_QUARTER1_LESSON1_WEEK1. IMAGERY -DESCRIPTIONS pptx.pptx
01-Introduction-to-Information-Management.pdf
A systematic review of self-coping strategies used by university students to ...
LDMMIA Reiki Yoga Finals Review Spring Summer
A GUIDE TO GENETICS FOR UNDERGRADUATE MEDICAL STUDENTS

coding games with scratch for using in school

  • 1. CoDing GameS A STEP-BY-STEP VISUAL GUIDE TO BUILDING YOUR OWN COMPUTER GAMES IN SCRATCH™ 0 x = } 0 0 1 1 : ) 0 = 1 > * * / ( 0 = 1 0 1 1 * y : : x 0 0 1 ) 1 : y x 0 0 0 0 * 1 1 1 1 = (
  • 6. DK UK Senior editor Ben Morgan Project art editor Laura Brim Editors Lizzie Davey, Ashwin Khurana, Steve Setford US editors Jill Hamilton, Margaret Parrish Designers Mabel Chan, Peter Radcliffe, Steve Woosnam-Savage Jacket design development manager Sophia MTT Jacket editor Claire Gell Producer, pre-production Francesca Wardell Producer Mary Slater Managing editor Paula Regan Managing art editor Owen Peyton Jones Publisher Andrew Macintyre Associate publishing director Liz Wheeler Art director Karen Self Design director Stuart Jackman Publishing director Jonathan Metcalf DK DELHI Project editor Suefa Lee Project art editor Parul Gambhir Editor Sonia Yooshing Art editors Sanjay Chauhan, Upasana Sharma Assistant art editor Simar Dhamija Senior DTP designers Harish Aggarwal, Vishal Bhatia Senior managing editor Rohan Sinha Managing art editor Sudakshina Basu Pre-production manager Balwant Singh Jacket designer Suhita Dharamjit Managing jackets editor Saloni Singh First American Edition, 2016 Published in the United States by DK Publishing 345 Hudson Street, New York, New York 10014 Copyright © 2015 Dorling Kindersley Limited DK, a Division of Penguin Random House LLC 16 17 18 19 20 10 9 8 7 6 5 4 3 2 1 001—283034—January/2016 All rights reserved. Without limiting the rights reserved under copyright above, no part of this publication may be reproduced, stored in a retrieval system, or transmitted in any form or by any means, electronic, mechanical, photocopying, recording or otherwise, without the prior written permission of the copyright owner. Published in Great Britain by Dorling Kindersley Limited. A catalog record for this book is available from the Library of Congress. ISBN: 978-1-4654-3935-2 DK books are available at special discounts when purchased in bulk for sales promotions, premiums, fund-raising, or educational use. For details, contact: DK Publishing Special Markets, 345 Hudson Street, New York, New York 10014 or SpecialSales@dk.com Printed in China A WORLD OF IDEAS: SEE ALL THERE IS TO KNOW www.dk.com
  • 7. DR. JON WOODCOCK MA (OXON) has a degree in physics from the University of Oxford and a PhD in computational astrophysics from the University of London. He started coding at the age of eight and has programmed all kinds of computers, from single-chip microcontrollers to world-class supercomputers. His many projects include giant space simulations, research in high-tech companies, and intelligent robots made from junk. Jon has a passion for science and technology education, giving talks on space and running computer programming clubs in schools. He has worked on numerous science and technology books as a contributor and consultant, including DK’s Computer Coding for Kids and Computer Coding Made Easy.
  • 8. Contents COMPUTER GAMES 12 What makes a good game? 14 Atmosphere 16 Types of games 18 How coding works GETTING STARTED 22 Introducing Scratch 24 Getting Scratch 26 Scratch tour CHEESE CHASE 50 How to build Cheese Chase JUMPY MONKEY 90 How to build Jumpy Monkey STAR HUNTER 30 How to build Star Hunter CIRCLE WARS 74 How to build Circle Wars 8 FOREWORD Score 8 Time 23.5 Score 30 High Score 90 Score 0 11 LaunchSpeed SET LAUNCH ANGLE SET LAUNCH SPEED SPACE TO FIRE
  • 9. DOOM ON THE BROOM 108 How to build Doom on the Broom TROPICAL TUNES 190 How to build Tropical Tunes GLACIER RACE 166 How to build Glacier Race DOG’S DINNER 130 How to build Dog’s Dinner WHAT NEXT? 206 Remixing and beyond 208 Better Scratch 210 The next level 212 Jobs making games 214 Have fun! GLOSSARY & INDEX 218 Glossary 220 Index 224 Acknowledgments Find out more at: www.dk.com/computercoding Score 25 Lives 3 0 Score Ben Gems: 20 Laura Gems: 13 Countdown 11
  • 10. Foreword Many of the people who have shaped our digital world started out by coding games for fun. Bill Gates, cofounder of Microsoft, wrote his first computer program at the age of 13—a tic tac toe game. Just a few years later a teenage Steve Jobs and his friend Steve Wozniak, who later founded Apple together, created the arcade game Breakout. They started coding simply because they enjoyed it. They had no idea how far it would take them or that the companies they were to build would change the world. You might be the next one like them. Coding doesn’t have to become a career, but it’s an amazing skill and can unlock exciting doors to your future. Or you might just want to play around with code for the fun of it. Computer games open up worlds of imagination. They reach out across the internet and allow us to play together. They are packed with creativity, from music, stories, and art to ingenious coding. And we’re hooked on them: so much so that the games industry is now worth more than the movie industry. It’s huge.
  • 11. And now, instead of being just a player, you can become a game maker too. You can take control of every aspect of those imaginary worlds: how they look, sound, and feel. You get to invent the stories, the heroes, the villains, and the landscapes. But first you need to take control of your computer. To tell a computer what to do, you need to speak its language and become a programmer! Thanks to languages like Scratch, it’s never been easier. Just follow the simple steps in this book to build each game and you’ll see what goes on inside each one. Follow the chapters in order, and you’ll pick up the essential skills you need to design and build your very own games. Let’s get coding!
  • 14. 12 C O M P U T E R G A M E S What makes a good game? Some games have a magical quality that makes you want to play them time and again. Game designers call it playability. To make a game with great playability, you need to think about all the ingredients that make up the game and how they work together. ◁ Characters In most games, the player uses an on-screen character to enter the game world. It could an animal, a princess, a racecar, or even just a simple bubble. To create a sense of danger or competition, such games usually also have enemy characters that the player has to defeat or escape from. △ Objects Nearly all games include objects, from stars and coins that boost health or scores to keys that unlock doors. Not all objects are good—some get in the player’s way, sap their health, or steal their treasures. Objects can also work together to create puzzles for the player to solve. △ Mechanics These are the“verbs”in a game—actions such as running, jumping, flying, capturing objects, casting spells, and using weapons. The mechanics are the core of the game, and well-designed mechanics make a good game. ◁ Rules The rules of a game tell you what you’re allowed and not allowed to do. For example, can you walk through walls or do they block your path? Can you stop and think or do you have to beat the clock? I have the perfect recipe!
  • 15. 13 W H AT M A K E S A G O O D G A M E ? ◁ Controls Keyboards, mice, joysticks, and motion sensors all make good controllers. Games are more fun when the player feels in complete control of the character, so the controls should be easy to master and the computer should respond instantly. ◁ World Think about the world in which a game is played. Is it 2D or 3D? Does the player view the game from above, from the side, or from within? Does the game world have walls or boundaries that limit the player’s movement or is it open like the outdoors? G A M E D E S I G N Playability Games don’t have to be complicated to make people want to play them over and over again. One of the first successful computer games was a simple tennis simulator called Pong. The ball was a white square and the racquets were white lines that could only move up and down. Although there were no fancy graphics, people loved Pong because it had great playability. They could compete against friends, just like in real tennis, and it was just hard enough to demand intense concentration and a steady hand, leaving players always wanting another game. △ Difficulty level A game’s no fun if it’s too easy or too hard. Many games make the challenges easy at the start, while the player is learning, and more difficult later as the player’s skills improve. Getting the difficulty level just right is the key to making a great game. △ Goals Every game challenges the player to achieve some kind of goal, whether it’s winning a race, conquering an enemy, beating a high score, or simply surviving for as long you can. Most games have lots of small goals, such as unlocking doors to new levels or winning new vehicles or skills. YOU SCORED 25,547,010 POINTS!!!
  • 16. 14 C O M P U T E R G A M E S Atmosphere A good game, just like a movie or a book, can draw you in and change the way you feel by creating a certain atmosphere. Here are some of the tricks game designers use to conjure up an atmosphere. ◁ Telling stories A background story helps set the scene for a game and gives meaning to the player’s actions. Blockbuster games have movielike plots with twists, but even simple games can benefit from some kind of story if it makes players feel they’re on a mission. Thinking of a story also helps you give a game a consistent theme. ▷ Faster, faster! The speed of a game changes the level of excitement a player feels. It’s easy to stay calm when you can stop and think about what to do next, but with a ticking clock and fast music, you can’t help but feel under pressure. ◁ Color scheme You can change the atmosphere in a game simply by altering the colors. Bright blue, yellow, and green feels warm and sunny, for instance, while icy blues and white feel wintry, and darker colors make a game feel spooky. △ Boo! Do things jump out at the player? Fear and suspense can make a game scary and put the player on edge. What’s around the next corner? What’s behind that door? The wait can be worse than the scare! ▷ Sound Sounds can have a strong effect on how we feel. Changing the tune can make the same scene feel exciting, scary, or even silly, and a sudden noise after a quiet spell can cause a jolt of terror. Modern games use realistic sound effects to make players feel like they’re inside the action.
  • 17. 15 AT M O S P H E R E Where are you? One of the easiest ways to create atmosphere is to give a game a location by adding a background image. To make the illusion more convincing, make sure the game’s characters match the setting—don’t put racecars in the deep sea or unicorns in outer space, for instance. △ Spooky forest A dark forest is the perfect setting for ghosts, ghouls, and witches. △ Tropical beach A sunny beach creates a carnival mood for the colorful steel drums. △ Deep-sea adventure Octopuses and starfish fit well with this underwater scene. ◁ Snow and ice A snowy scene is the backdrop for a race along an icy road. ▽ Graphics The graphics in the first games were simple geometric shapes, but as computers became more powerful, the graphics in games got better. Many console games now feature photorealistic 3D images, but games based on simple, cartoonlike graphics are as popular as ever and can help create a more playful atmosphere. G A M E D E S I G N Virtual reality Virtual reality goggles could make the games of the future much more realistic. They work by presenting each eye with a slightly different image, creating a 3D experience. Motion sensors in the headset track the player’s movements and adjust the images to match, allowing the player to turn around and look in any direction, just like in the real world. As a result, a player feels inside the game world rather than watching it through a screen.
  • 18. 16 C O M P U T E R G A M E S Types of games Games come in all shapes and sizes, but most fit into one of just a few main categories, called genres. Some gamers like the platform games genre best, whereas others prefer racing games or strategy games. What are your favorite genres? △ Combat Nimble fingerwork is vital for games involving close- quarters combat. The key to success is knowing when and how to use many different attack and defense moves, from slams and somersaults to special powers. △ Role-playing Dungeons, dragons, and castles feature in these adventure games. Players may roam freely or follow a set storyline, with their character developing specialized skills as it advances, such as casting spells or sword-fighting. Some role-playing games are played online, allowing lots of players to interact in the same game world. ◁ Traditional When you can’t find an opponent to play with you, a computer can challenge you to a game of cards, chess, or a million other popular board games. △ Sandbox Some games force players along a set path, but sandbox games are the opposite: they give you complete freedom to explore the game world at your own pace and choose different quests within it. ▷ Racing Racing games create the illusion of speed by making the scenery scroll past the player’s viewpoint. To succeed, you need to learn each racetrack inside out so you can start tricky maneuvers in advance.
  • 19. 17 T Y P E S O F G A M E S △ Puzzle Some people love to exercise their brains with puzzles. There are many different types, from colorful tile-matching games to number puzzles and escape games, in which you need to use your imagination to find your way from room to room. △ Simulator If you want a puppy but don’t want the trouble of feeding and walking it, a virtual pet might suit you. Simulators aim to re-create real-life situations. Some are more than just a game: flight simulators are so accurate and realistic that professional pilots use them for training. △ Sport Play the game of your choice as your favorite team, set in a realistic stadium with roaring crowds. Sports games let you compete in famous tournaments such as the soccer World Cup, with the computer referee ensuring fair play. ▷ Strategy Decisions, decisions. What are the best choices to make if you’re running a zoo, fighting a war, or building a whole civilization? Strategy games give the player godlike powers over many different characters at once, but you have to manage resources cleverly or your empire will collapse. ◁ Music and dance Dance-mat games involve tapping the feet or jumping over a stream of obstacles in time to the rhythm. Music games allow you to play along with a virtual band using a pretend instrument. You need to hit the right notes on time to complete each level.
  • 20. 18 C O M P U T E R G A M E S Score 10 How coding works A computer can’t think for itself—it works by blindly following instructions. It can only carry out a complex task if that task has been broken down into simple steps that tell it exactly what to do and in what order. Writing these instructions in a language a computer understands is called coding. Planning a game Imagine you want to create a game in which you fly a parrot over a river, collecting apples as they drift downstream but avoiding an angry lion. You would need to give the computer a separate set of instructions for each object in the game: the apple, the parrot, and the lion. Jump to the left edge of the screen. Move a bit to the right. Repeat the following steps over and over again: If I get to the right edge of the screen then If I touch the parrot then jump back to the left edge. add one to the parrot’s score and jump back to the left edge. ▽ Apple You can’t simply tell the computer that the apple drifts down the river and vanishes when the parrot eats it. Instead, you need to break down this complicated task into a set of very simple steps as shown here. The player makes the parrot fly left and right with the left and right arrow keys. Pressing the space key makes the parrot dive, but the game ends if you touch the lion. The lion walks left and right, following the parrot. The player wins a point each time the parrot gets an apple. The apple drifts downstream over and over. It reappears on the left if the parrot takes it.
  • 21. 19 H O W C O D I N G W O R K S ▷ Parrot The parrot is more complicated than the apple because the player controls it and it can move up, down, left, and right. Even so, it’s possible to make all of this work by writing a sequence of simple instructions. ▷ Lion The lion is the player’s enemy and can end the game if the parrot touches it. It is controlled by a simple program. Jump to the middle of the screen. If the parrot is to my left then Repeat these steps in turn: If the parrot is to my right then If the parrot touches me then move a bit to my left. move a bit to my right. stop the game. Jump to the top right of the screen. If the player presses the left arrow then If the player presses the right arrow then If the player presses the space key then Repeat these steps in turn: move a bit to the left if I can. move a bit to the right if I can. move all the way to the bottom of the screen taking a second and move all the way back to the top taking a second Programming languages The instructions on this page are in simple English, but if you wanted to create the game on a computer, you would need to translate them into special words that the computer can understand: a programming language. Writing programs with a programming language is called coding or programming. This book uses the programming language Scratch, which is ideal for learning about coding and great for making games. L I N G O
  • 24. 22 G E T T I N G S TA R T E D Experimenting Scratch is all about experimenting. Once you’ve built a game, it’s easy to add things to it or change how it works by tinkering with the script. You can see the effect of your changes straight away. E X P E R T T I P S Introducing Scratch All the games in this book are made with a programming language called Scratch. Scratch is easy to learn because you don’t have to type any complicated code. Instead, you build programs from ready-made blocks. Sprites Sprites are the things that move around or react in the game. They can be anything from animals and people to pizzas or spaceships. You can bring each sprite to life on screen with a list of instructions called a script. Scripts Scripts are made of text blocks that you can drag with a computer mouse and join like pieces of a jigsaw puzzle. Each block has one instruction so it’s easy to understand. Starting from scratch A project in Scratch usually starts with choosing the objects, or sprites, that will appear in the game. Scratch has a large library of sprites, or you can create your own. Working together Games are usually made up of several sprites working together, each controlled by its own script. Scripts make sprites move around, crash into each other, create sounds, and change color or shape. Some sprites act as enemies to make a game more difficult. The characters and other objects in Scratch games are called sprites. when space ▾ key pressed move 20 steps say Hello! The cat sprite appears whenever you start a new Scratch project. HELP! Hello!
  • 25. 23 I N T R O D U C I N G S C R AT C H A typical Scratch project Once you’ve built a script, you can click the green flag to see what it does. All the action takes place in a part of the Scratch window called the“stage”. Sprites move about on the stage, often in front of a background image that helps create atmosphere. The enemy dinosaur sprite chases the player’s cat sprite. The red button stops a program. point towards Cat ▾ when clicked move 15 steps The“forever” block keeps the sprite moving endlessly. Background image Several sprites can be on the stage at once. ▷ Running a program Starting, or“running”, a program activates the scripts that you’ve built. To make the stage fill your whole computer screen, click the blue symbol in the top left. ▽ Making sprites move In a typical game, the player moves one sprite and the other sprites are programmed to move automatically. The script below makes the dinosaur in this project chase the cat. The green flag starts, or runs, the program. forever Cat Cruncher by GreenDino99
  • 26. 24 G E T T I N G S TA R T E D Getting Scratch In order to try the projects in this book, you’ll need to set up Scratch on a desktop or laptop computer. The two ways of setting up Scratch (online and offline) are shown below. Online Scratch If you have a reliable internet connection, you can run Scratch online in a browser window without downloading anything. You will need to set up a Scratch account. Double-click the icon on the desktop and Scratch will open, ready for you to begin programming. There’s no need to create a user account if you use the offline version of Scratch. To set up the online version, visit the Scratch website at scratch.mit.edu and click“Join Scratch”. You will need to set up an account with a username and password. Your games will stay private unless you click“Share”, which will publish them on the web. For the offline version of Scratch, go to scratch.mit.edu/ scratch2download. Follow the instructions on screen to download the installation files, then double-click them. After installation, a Scratch icon will appear on your desktop. Join Scratch 1 Install Scratch 1 After you’ve joined the Scratch website, click“Sign in”and enter your username and password. It’s best not to use your real name as your username. Click“Create”at the top of the screen to start a new project. If you use the online version of Scratch, you can access your projects from any computer. Why “Scratch”? Scratch is named after“scratching”, a technique rappers and DJs use to remix music on a turntable. The Scratch programming language lets you copy other people’s projects and remix them to make your own unique versions. L I N G O Sign in 2 Offline Scratch You can also download the Scratch program to your computer so you can use it offline. This is particularly useful if your internet connection is unreliable. Launch Scratch 2
  • 27. 25 G E T T I N G S C R AT C H ◁ Saving If you use Scratch offline, remember to save from time to time. The online version saves automatically. Online, you can undo all the changes you’ve made since you last opened a project by choosing“Revert”in the File menu. △ Hardware You can use Scratch on desktop or laptop computers, but it’s easier if you use a mouse than a touchpad. Scratch apps for tablets and smartphones are also being developed. △ Operating system The online version of Scratch works well on Windows, Ubuntu, and Mac computers, although it won’t work on tablets. The offline version of Scratch works well on Windows and Mac computers. If your computer uses Ubuntu, try the online version instead. Motion Looks Control Events Sound Sensing Pen Operators Data More Blocks Scripts Costumes Sounds Cat x: –126 y: 96 direction 0.0 File Edit Share Help Cat game move 10 steps glide 1 secs to x: 0 y: 0 go to x: 0 y: 0 point in direction 90 ▾ point towards ▾ go to mouse-pointer ▾ turn 15 degrees turn 15 degrees move 10 steps go to mouse-pointer ▾ forever when clicked SCRATCH ▷ Version 2.0 This version of Scratch was released in 2013. New features include a “Backpack”for storing costumes, media, and scripts; a cloning function; a sound editor; and a more sophisticated paint editor. Old and new versions This book is based on Scratch 2.0, the latest version at the time of writing. The projects in this book will not work with older versions of Scratch, so make sure you have 2.0. ▽ Version 1.4 In older versions of Scratch, such as Scratch 1.4, the stage is on the right and the scripts area is in the middle. Scripts File ▾ Edit ▾ Tips Untitled by abcd (unshared) Motion Looks Control Events Sound Sensing Pen Operators Data More Blocks Costumes Sounds x: 153 y: -61 Sprites Stage 1 backdrop New backdrop: Monkey 2 Numbanas 1 New sprite: x: -126 y: 96 SCRATCH Backpack move 10 steps glide 1 secs to x: 0 y: 0 go to x: 0 y: 0 point in direction 90 ▾ point towards ▾ go to mouse pointer ▾ turn 15 degrees turn 15 degrees move 10 steps go to mouse pointer ▾ forever when clicked ? LaunchSpeed 11 Arrow 1 Numbanas 2 go to Launcher ▾ play sound boing ▾ when space ▾ key pressed LAUNCH ANGLE LAUNCH SPEED PRESS SPACE TO FIRE
  • 28. 26 G E T T I N G S TA R T E D Scratch tour The Scratch window is divided into several different areas. Scripts are built on the right, while the stage on the left shows the game running. Selected sprite Buttons to add new sprites △ Scratch window The stage and sprites list occupy the left of the Scratch window, while script-building areas are on the right. The tabs above the scripts area reveal other Scratch features. Cursor tools Menus Click a sprite on the stage or in the sprites list to select it. Change language Switch to full screen view Click these icons to change the backdrop image on the stage. STAGE INFO BACKPACK Name of the game File ▾ Edit ▾ Tips Jumpy Monkey by Gabby Gibbon (unshared) x: 153 y: -61 Sprites Stage 4 backdrops New backdrop: Monkey2 Launcher NumBananas1 New sprite: SCRATCH ? STAGE AREA BLOCKS PALETTE SPRITES LIST SCRIPTS AREA Sprites list All the sprites used in your project appear here. When you select a sprite, its scripts appear in the scripts area. The stage When you play a game or run any other kind of project in Scratch, you see the action happening on the stage, which serves as a miniature screen. You can see changes to your script take effect immediately on the stage simply by clicking the green flag button to run the project. 11 LaunchSpeed NumBananas2 LAUNCH ANGLE LAUNCH SPEED PRESS SPACE TO FIRE
  • 29. 27 S C R AT C H T O U R The x and y coordinates give the sprite’s location on the stage. Zoom in on scripts Keep the Scripts tab selected to build scripts. Use the Sounds tab to add music and sound effects to games. Blocks palette Instruction blocks for making scripts appear in the middle of the Scratch window. Drag the ones you want to use to the scripts area. These scripts control the Launcher sprite. Backpack Store useful scripts, sprites, costumes, and sounds in the backpack so you can use them in other projects. Current sprite selected Scripts Motion Looks Control Events Sound Sensing Pen Operators Data More Blocks Costumes Sounds x: –126 y: 96 Backpack move 10 steps glide 1 secs to x: 0 y: 0 go to x: 0 y: 0 point in direction 90 ▾ point towards ▾ go to mouse-pointer ▾ turn 15 degrees turn 15 degrees point in direction 45 ▾ go to x: -200 y: -140 when clicked Click these headings to reveal different sets of blocks. Blocks snap together—use the mouse to move them around. The Costumes tab lets you change how sprites look. Scripts area You can drag blocks into this part of the Scratch window and join them together to build scripts for each sprite in your game. go to front set LaunchSpeed ▾ to 10 set Left arrow ▾ key pressed turn 2 degrees
  • 32. 30 S TA R H U N T E R How to build Star Hunter Welcome to your first Scratch game: Star Hunter, a fast-paced, underwater treasure hunt. Just follow the simple steps in this chapter to build the game, then challenge a friend to beat your score. Click this icon to make the game fill your screen. An underwater backdrop image sets the scene. The score shows how many stars you’ve collected. Type in the name of your game. ◁ Stars These appear one at a time in random places. Touch a star to score a point. ◁ Octopuses The octopuses patrol the seas but they swim more slowly than you. If you touch one, the game is over! ◁ Cat Move the cat around the screen with your computer mouse—the cat sprite follows the mouse-pointer. The aim of this game is to collect as many gold stars as you can. Use the cat to collect the stars, but watch out for deadly octopuses. You’ll need to move quickly to succeed. The main sprites in the game are shown below. AIM OF THE GAME Star Hunter by Octoblaster99 (unshared) Score 0
  • 33. 31 H O W T O B U I L D S TA R H U N T E R ◁ Under the sea Star Hunter is set in the deep sea, but you can change the backdrop to anything you like, from outer space to a picture of your bedroom. Collect stars to score points. You play the game as a cat. Move your computer mouse to move the cat. Don’t touch the octopuses! There are three octopuses and they move in different ways. Click the stop sign to end a game. Click the green flag to start a new game. GAME CONTROLS Use a computer mouse or touchpad to control this game. Ready? Let’s code!
  • 34. 32 S TA R H U N T E R Building scripts Like any Scratch program, Star Hunter is made by joining colored blocks like the pieces of a jigsaw puzzle. Each block is an instruction that tells a sprite what to do. Let’s start by programming the game’s main sprite: the cat. Start Scratch and choose either“create”or “New Project”. You’ll see a screen like the one below, with the cat sprite in place. In the middle is a set of blue instruction blocks. Drag your chosen blocks here to build a script. Clicking the buttons here reveals different sets of blocks. Now select the yellow Control button and look for a“forever”block. Drag the “forever”block to the scripts area. Scripts Motion Looks Control Events Sound Sensing Pen Operators Data More Blocks wait 10 secs forever repeat 10 Click Control to reveal the yellow blocks. Choose blocks from the list in the middle. We’ll program the cat to move wherever the player moves the computer mouse. Click on the“go to mouse-pointer”block and drag it to the right part of the screen—the scripts area. Some blocks include a drop-down menu. go to mouse-pointer ▾ Scripts File ▾ Edit ▾ Tips Star Hunter by Octoblaster99 (unshared) Costumes Sounds x: 153 y: -61 Sprites Stage 1 backdrop New backdrop: Sprite 1 New sprite: SCRATCH Backpack Motion Looks Control Events Sound Sensing Pen Operators Data More Blocks x: -126 y: 96 Costumes Sounds The blue Motion blocks control the way sprites move. 1 2 3 move 10 steps glide 1 secs to x: 0 y: 0 go to x: 0 y: 0 point in direction 90 ▾ point towards ▾ go to mouse pointer ▾ turn 15 degrees turn 15 degrees go to mouse-pointer ▾
  • 35. 33 G A M E P R O G R E S S 1 4 % Click the green flag to play. This block starts the game when you click the green flag. This block makes the block inside it repeat over and over again. This block makes the cat move with the player’s mouse-pointer. You can stop the script by clicking the red stop button. Now look at the top right of the stage—you’ll see a green flag. Click this to run your script. Move your mouse and watch what happens. If you followed all the steps, the cat will move with the mouse-pointer around the stage. ▷ Well done! You have created your first Scratch project. Let’s add some more things to the project to build a game. Next, select the brown Events button. Look for a block with a green flag. Drag it to the right and add it to the top of your script. Read through the script and think about what each block does. Drag it to the right and drop it over the blue block. It will wrap around it like this: forever when clicked go to mouse-pointer ▾ forever go to mouse-pointer ▾ Star Hunter by Octoblaster99 (unshared) x: 153 y: -61 Sprites Stage 1 backdrop New backdrop: New sprite: Backpack move 10 steps glide 1 secs to x: 0 y: 0 go to x: 0 y: 0 point in direction 90 ▾ point towards ▾ go to mouse pointer ▾ turn 15 degrees turn 15 degrees Sprite 1 Scripts Motion Looks Control Events Sound Sensing Pen Operators Data More Blocks Costumes Sounds x: -126 y: 96 go to mouse-pointer ▾ forever when clicked File ▾ Edit ▾ Tips SCRATCH Bravo! 4 6 7 5
  • 36. 34 S TA R H U N T E R The backdrop is just decoration and doesn’t affect the sprites. Star Hunter by Octoblaster99 (unshared) Setting the scene At the moment, the stage is just a boring white rectangle. Let’s create some atmosphere by adding scenery and sound effects. To change the scenery, we add a“backdrop”image. Click this icon to open the backdrop library. Stage 1 backdrop New backdrop: To the left of the sprites list is a button to add a picture from the backdrop library. Click it and look for “underwater2”. Select the image and click“OK”. The backdrop will now fill the stage. The cat is called“Sprite1”. Let’s fix that. In the sprites list, select Sprite1 (the cat) and click on the blue“i” in the corner to get more information about the sprite. Change the name to“Cat”. Cat The new name appears. Click here to bring up the information pop-up box. Type the sprite’s name here. direction: 90° x: 84 y: -69 rotation style: can drag in player: show: Sprite 1 Cat 8 9
  • 37. G A M E P R O G R E S S 2 9 % 35 Sound effects Now we’ll add a bubbling sound to the cat sprite to make it sound like we’re underwater. when clicked Click Sound in the blocks palette to find this block. The“forever”block makes the program return to the start of the block. Blocks run from top to bottom. Highlight the cat in the sprites list and then click the Sounds tab above the blocks palette. Click the speaker icon to choose a sound from the library. Click the Scripts tab and add the following script to the cat sprite, but leave the old script in place because you need both. The new script repeats the bubbles sound. The“play sound ... until done”block waits for the sound to finish before letting it start again. Run the game to hear the sound effect. Look for“bubbles”in the library. You can preview sounds by clicking the play symbol. To load a sound into the game, click the speaker icon and then“OK”. Now you’ll see bubbles in your list of sounds. You can add sounds to the stage as well as to sprites. Loops A loop is a section of code that repeats over and over again. The “forever”block creates a loop that carries on forever, but other types of loop can repeat an action a fixed number of times. Loops are very common in almost all computer programming languages. Choose a sound from the library Record a sound Use a sound from your computer. Scripts Costumes Sounds Sounds tab This is how long the sound lasts. Delete sounds here. bubbles 00:04.08 2 forever forever when clicked E X P E R T T I P S New sound: play sound bubbles ▾ until done play sound bubbles ▾ until done 11 12 10
  • 38. 36 S TA R H U N T E R Add an enemy The game needs an enemy to make things more interesting. Let’s add an octopus with a deadly sting. The octopus will patrol the stage, moving left and right, and the player will have to keep out of its way or the game is over. The left option makes the sprite turn upside down when it bounces. The right option makes the sprite bounce without turning round. The middle option makes the sprite flip sideways when it bounces. This block stops the octopus from moving off the edge of the stage. The“forever” block repeats everything inside. This block runs the script when the game begins. Motion blocks are dark blue and control the way sprites move. Click here to open the sprite library. New sprite: Octopus forever if on edge, bounce when clicked move 10 steps Octopus direction: 90° x: 84 y: -69 rotation style: can drag in player: show: To add a second sprite to the project, click the icon shown below to open up the sprite library. Choose the octopus and click“OK”. Now run the script. The octopus will patrol left and right, but you’ll notice it’s upside down half the time. We can fix this by changing the way the sprite turns around when it changes direction. Highlight the octopus and click the blue“i”. In the pop-up box, there are three options after“rotation style”. Choose the middle option and run the project. The octopus should now stay right side up and facing forward all the time. You can adjust its starting position on the screen by dragging it with the mouse. Add the following script to the octopus sprite. To find the blue blocks, click on Motion in the blocks palette. The two Motion blocks used here make the octopus move left and right across the stage. The octopus sprite will appear in your sprites list. 13 15 14 16 Star Hunter by Octoblaster99 (unshared)
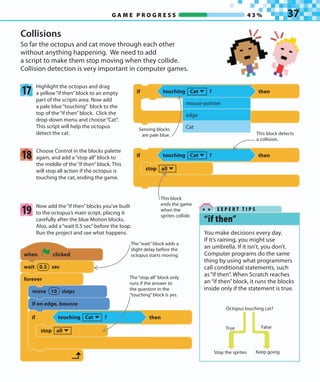
  • 39. 37 G A M E P R O G R E S S 4 3 % Collisions So far the octopus and cat move through each other without anything happening. We need to add a script to make them stop moving when they collide. Collision detection is very important in computer games. E X P E R T T I P S This block ends the game when the sprites collide. This block detects a collision. Sensing blocks are pale blue. Octopus touching cat? True False Stop the sprites Keep going “if then” You make decisions every day. If it’s raining, you might use an umbrella. If it isn’t, you don’t. Computer programs do the same thing by using what programmers call conditional statements, such as“if then”. When Scratch reaches an“if then”block, it runs the blocks inside only if the statement is true. Highlight the octopus and drag a yellow“if then”block to an empty part of the scripts area. Now add a pale blue“touching” block to the top of the“if then”block. Click the drop-down menu and choose“Cat”. This script will help the octopus detect the cat. Choose Control in the blocks palette again, and add a“stop all”block to the middle of the“if then”block. This will stop all action if the octopus is touching the cat, ending the game. Now add the“if then”blocks you’ve built to the octopus’s main script, placing it carefully after the blue Motion blocks. Also, add a“wait 0.5 sec”before the loop. Run the project and see what happens. The“stop all”block only runs if the answer to the question in the “touching”block is yes. forever if on edge, bounce when clicked move 10 steps stop all ▾ stop all ▾ mouse-pointer edge Cat if if if then then then touching Cat ▾ ? touching Cat ▾ ? touching Cat ▾ ? 18 17 19 The“wait”block adds a slight delay before the octopus starts moving. wait 0.5 sec
  • 40. 38 S TA R H U N T E R More enemies Let’s add more enemies to the game, but to make things more challenging, we’ll make them move in different directions. We can tell each sprite exactly which way to go by using a block that works like a compass. Add a purple“set size”block to the top of the octopus’s script, after the“when clicked”block. Set the octopus’s size to 35% to make the game a bit easier. Then add a blue“point in direction”block. To change the octopus’s direction, click on the window in the“point in direction”block and type 135 in place of 90. This will make the octopus move diagonally. Now we can duplicate our octopus to create more enemies. Right-click on the octopus in the sprites list (or control-click if you have a Mac) and choose “duplicate”. Copies of the Octopus sprite will appear in the sprites list, named Octopus2 and Octopus3. Each will have a copy of the first octopus’s script. E X P E R T T I P S Directions Scratch uses degrees to set direction. You can choose any number from –179° to 180°. Negative numbers point sprites left; positive numbers point them right. Use 0° to go up and 180° to go straight down. This number tells the octopus which direction to set off in. Click in this window and type 35 to set the octopus’s size to 35%. Type 135 into this window. The drop-down menu gives you four quick options. point in direction 135 ▾ (90) right (–90) left (0) up (180) down Sprites Cat Octopus Choose“duplicate”. This menu appears if you right-click on a sprite. info duplicate delete save to local file –90° moves a sprite straight to the left. 180° moves a sprite straight down. 22 21 20 90° –90° 0° 180° when clicked wait 0.5 sec set size to 35% point in direction 135 ▾
  • 41. 39 G A M E P R O G R E S S 5 7 % To make the octopuses move in different directions, change the number in the“point in direction”block for each new octopus. Leave the first Octopus sprite’s direction as 135, but set Octopus2 to 0 and Octopus3 to 90. Run the project and try to avoid all the enemies. For more variety, let’s make one of the octopuses set off in a random direction. To do this, we use a green“pick random”block. This is Scratch’s way of rolling a dice to generate a random number. Choose Operators in the blocks palette to find the block and add it to the first octopus’s script. Run the project a few times to see the octopus choose different starting directions. E X P E R T T I P S Random numbers Why do so many games use dice? Dice create surprises in a game because they make different things happen to each player. A random number is one you can’t predict in advance, just like the roll of a dice. You can get the cat to say a random dice roll using this simple code. set size to 35% forever if on edge, bounce when clicked move 2 steps stop all ▾ if then touching Cat ▾ ? move 2 steps if on edge, bounce point in direction pick random –179 to 180 Type 180 in the second window. This block picks a random number from 1 to 6. Type –179 in the first window. Changing this number adjusts the octopus’s speed. when clicked say pick random 1 to 6 24 23 25 2 If it’s too hard to stay alive, make the octopuses slower by lowering the number of steps in their“move”blocks to two. Remember to change the script for all three octopus sprites. wait 0.5 sec
  • 42. 40 S TA R H U N T E R Collecting stars In many games, the player has to collect valuable items to win points or to stay alive. In Star Hunter, we use gold stars as underwater treasure that the player has to collect. We’ll use random numbers again to make each star appear in a new place. Click the“choose new sprite”symbol in the sprites list and choose the“Star1”sprite from the library. 26 Click this symbol to open the sprite library. The Star1 sprite will appear in your sprites list. Sprites Cat Octopus Octopus2 Octopus3 New sprite: Star1 Star1 Add the following script to Star1. This script will make the star move to a random new location whenever the cat touches it. The green blocks create random numbers called coordinates, which Scratch uses to pinpoint locations on the stage. forever when clicked if then touching Cat ▾ ? go to x: y: pick random –150 to 150 Star1: x position 60 Star1: y position 78 Type the numbers shown here into the green blocks. The“forever”block repeats the blocks inside it. The“go to”block only runs if the answer to the question is yes. The“if then”block checks whether the cat is touching the star. 28 27 pick random –200 to 200 To see the star’s coordinates change when it moves, choose Motion in the blocks palette and put ticks by“x position”and“y position”. Now run the game: you’ll see the star’s x and y coordinates update each time the cat makes it move. Untick both boxes before you carry on.
  • 43. 41 G A M E P R O G R E S S 7 1 % E X P E R T T I P S Using coordinates To pinpoint a location on the stage, Scratch uses numbers called coordinates. These work just like graph coordinates, with x numbers for horizontal positions and y numbers for vertical. To find the coordinates for a spot on the stage, just count the steps across and up from the center of the stage. Positive coordinates are up or right, negative coordinates are down or left. Every spot on the stage has a unique pair of coordinates that can be used to send a sprite to that position. The x axis is longer than the y axis and extends from –240 to 240. x y –60 –120 –180 –240 0 120 180 60 240 60 –60 –120 –180 120 180 (x:–190, y:–150) (x:90, y:–130) (x:180, y:50) (x:–100, y:100) You can add a sound effect that plays when the cat touches a star. First make sure that the star is selected in the sprites list, then click the Sounds tab above the blocks palette. Click the speaker symbol to open the sound library. Choose“fairydust”and click “OK”. Now add the pink“play sound” block to the star’s script and choose “fairydust”in the drop-down list. go to x: y: pick random –150 to 150 Insert the“play sound”block into Star1’s existing script, then use the drop-down menu to choose which sound to play. 29 pick random –200 to 200 if then touching Cat ▾ ? play sound fairydust ▾ Star Hunter by Octoblaster99
  • 44. 42 S TA R H U N T E R 7 6 9 With any sprite selected, choose Data in the blocks palette. Click on the button“Make a Variable”. You’ll see a new set of blocks appear, including one for the score. Make sure the box next to it is checked to make the score appear on the stage. A pop-up box appears asking you to give your variable a name. Type“Score” in the box. Make sure the option“For all sprites”is selected and hit“OK”. The score counter will appear in the top left of the stage but you can drag it anywhere you like. Make a Variable set Score ▾ to 0 show variable Score ▾ change Score ▾ by 1 Score hide variable Score ▾ This option makes the variable available for every sprite. Scripts Motion Looks Control Events Sound Sensing Pen Operators Data More Blocks Make a Variable Make a List Costumes Sounds New Variable OK Cancel Variable name: For all sprites For this sprite only Score Keeping score Computer games often need to keep track of vital statistics such as the player’s score or health. We call these changing numbers“variables”. To keep track of the player’s score in Star Hunter, we’ll create a variable that counts the number of stars the player has collected. 31 33 30 32 Star Hunter by Octoblaster99 (unshared) 0 Score You can use the mouse to move the score display. Click here to create a new variable.
  • 45. 43 G A M E P R O G R E S S 8 6 % We want the score to start at zero and increase by one each time the cat touches a star. Select the star sprite and add the two orange Data blocks below to its script. Add this block to set the score to zero at the start of a game. Add this one to make the score increase when the cat catches a star. forever if then touching Cat ▾ ? when clicked set Score ▾ to 0 change Score ▾ by 1 Now click the green flag to run the script and see what happens when the cat collects each star. See if you can collect 20 stars without bumping into an octopus. E X P E R T T I P S Variables A variable works like a box that you can store information in, such as a number than can change. In math, we use letters for variables, such as x and y. In computer programming, we give variables names such as“Score”and use them for storing not just numbers but any kind of information. Try to choose a name that tells you what the variable is for, such as“Speed”or“Score”. Most computer languages won’t let you put spaces in the names of variables, so a good tip is to combine words. Instead of using“dog speed”, for instance, type“DogSpeed”. Hey, I’m X years old! Big deal, I’m Y years old! play sound fairydust ▾ If you use the offline version of Scratch, don’t forget to save your work from time to time. 34 35 go to x: y: pick random –150 to 150 pick random –200 to 200
  • 46. 44 S TA R H U N T E R Right-click the script for Octopus2 and select“delete” to remove it. Replace it with the following script. This will make the octopus chase the cat. Run the project and see how the game plays. You’ll probably find it hard to escape the octopus because it moves quickly. To slow it down, change the number of steps to two. You can make the game get harder as you play. Select the original octopus sprite and click Data in the blocks palette. Drag the“Score”block into the octopus’s“move”block. Now try the game. The more points you get, the faster the octopus swims. If it gets too hard too quickly, we can make things more gradual. Choose Operators in the blocks palette and find the small green“divide”block. Rearrange the“move”block so it looks like the image below. Type“3”in the second round window. Better enemies Now we have a working game, we can test it and experiment with changes that make it easier, harder, or—most important—more fun. One way to make the game more interesting is to make the three octopuses do different things. This block starts the chase. This number controls the octopus’s speed. point towards Cat ▾ forever when clicked move 5 steps move 2 steps move 2 steps stop all ▾ if then touching Cat ▾ ? set size to 35% move steps Score Score move steps / 3 The green block divides the score by 3 to make the octopus speed up more gradually. Drop the“Score” block into the circular window in the“move”block. Score 37 39 36 38 wait 0.5 sec The octopus will move the same number of steps as the score.
  • 47. 45 G A M E P R O G R E S S 1 0 0 % Now we’ll make Octopus3 patrol in a regular pattern. To do this, we’ll use a new Motion block that makes it glide smoothly from point to point, rather than moving in steps. Replace the script for Octopus3 with the following two scripts. These run at the same time, one checking for collisions and the other moving the octopus around its patrol route. Now run the project and watch Octopus3. It should swim in a repeating triangle pattern. The two scripts are separate in the scripts area. 40 41 Motion Looks Control Events Sound Sensing Pen Operators Data More Blocks move 10 steps glide 1 secs to x: 0 y: 0 go to x: 0 y: 0 point in direction 90 ▾ point towards ▾ go to mouse-pointer ▾ turn 15 degrees turn 15 degrees forever when clicked stop all ▾ if then touching Cat ▾ ? set size to 35% wait 0.5 sec forever glide 3 secs to x: 0 y: –150 glide 3 secs to x: 200 y: 100 glide 3 secs to x: –200 y: 100 when clicked x: –126 y: 96 Type these numbers into the “glide”blocks. Scripts Costumes Sounds Star Hunter by Octoblaster99 (unshared) To change the shape of the triangle, try different numbers in the“glide”blocks. I feel like I’m swimming in circles... 0 Score
  • 48. 46 S TA R H U N T E R Hacks and tweaks You’ve built a fun game, but that’s just the beginning. Scratch makes it easy to change and adapt games as much as you want. You might find bugs that need fixing, or you might want to make the game harder or easier. Here are some suggestions to get you started. L I N G O Bugs A bug is an error in a program. The first computers made mistakes when real insects, or bugs, got in their circuits. The name stuck. Today, programmers often spend as much time finding and fixing bugs as they do writing code in the first place. △ Fine-tuning The best games have been carefully tested to make sure they play well. Test every change you make and get friends to play your games to see how well they work. go to x: 0 y: 0 when clicked Add this block to make Octopus2 start in the center of the stage. ▽ Debug Octopus2 If Octopus2 ends up in the top-right corner at the end of a game, it can trap the player in the next game and end it too quickly. This is a bug. To fix it, you could drag the octopus away from the corner before starting, but it’s better to use a script that moves it automatically. Insert a“go to”block at the start of the script for Octopus2 to send it to the center of the stage. Star Hunter by Octoblaster99 (unshared) Octopus2 can trap the player in the top-right corner.
  • 49. 47 H A C K S A N D T W E A K S ▽ Different colors Make your octopuses different colors by using the“set color”block from the Looks section. Place it under the “set size”block at the start of the script. ▽ Flashing colors You can make an octopus change color continually to create a flashing effect. Add the script below to any octopus. Try experimenting with different numbers in the“change color”block. △ Scuba diver To make the underwater theme more convincing, replace the cat with a diver. Click on the cat in the sprites list, then open the Costumes tab and click on the sprite symbol to open the library. Load the costume called“diver1”. ▽ Play with size You can change how easy the game is by adjusting the size of the sprites. Change the number in the octopuses’blue“move”blocks to alter their speed. Change the purple“set size”blocks to make sprites larger or smaller. Fine-tune the numbers until the game is just hard enough to be fun. Change this number to make colors change faster or slower. Try setting this number anywhere from –100 to 100 to see the full range of colors. set color ▾ effect to 50 set size to 50% set size to 100% Hey! Turn me back into a cat! next costume forever forever when clicked when clicked wait 0.1 secs ◁ Swimming animation To add a professional touch to Star Hunter, animate the octopuses so that they look as if they’re swimming. Add this script to an empty part of the scripts area for each octopus to make them switch between two different poses. change color ▾ effect by 25
  • 52. 50 C H E E S E C H A S E Cheese Chase by SuperMimi (unshared) ◁ Mimi You play the game as the mouse. Use the arrow keys on your keyboard to make her run up, down, left, or right. ◁ Beetles Beetles scuttle along the edges and make random turns when they hit a wall. ◁ Ghosts Ghosts can float through walls. They can appear anywhere without warning and then disappear. The beetles are small enough to let the mouse squeeze past. Only the ghosts can move through walls. Score 30 How to build Cheese Chase Some of the world’s first and most popular computer games were maze games. In a maze game, quick thinking is essential as you race around tight corners, avoiding monsters and collecting treats. Mimi the mouse is hungry and stuck in a maze. Help her find the cheese but avoid the evil beetles. And watch out for ghosts—the maze is haunted! AIM OF THE GAME
  • 53. 51 H O W T O B U I L D C H E E S E C H A S E GAME CONTROLS Players use the arrow keys on a keyboard as game controls. Collect blocks of cheese to score points. You can create a maze with any arrangement of walls. The game remembers the highest score. Can you beat it? High Score 90 ◁ Chase the cheese There are countless ways to change Cheese Chase and create your own version of the game. For instance, you can adjust the speed, increase the number of beetles, and change the shape of the maze. Click the green flag to start a new game. Click the stop sign to end a game.
  • 54. 52 C H E E S E C H A S E point in direction 0 ▾ move 5 steps if then key up arrow ▾ pressed? Keyboard control Many games let the player use the keyboard to control the action. In Cheese Chase, the player uses the arrow keys on the keyboard to move Mimi the mouse around the stage. Start by creating a keyboard control script for Mimi. Sprites Sprite 1 duplicate delete save to local file hide Start Scratch and choose“New Project”. Delete the cat by right-clicking and selecting“delete”. If you use a Mac computer, instead of right-clicking you can hold down the control key and click. Click the“New sprite”symbol and look through the sprite library for Mouse1. Click“OK”. The mouse should now be on the stage and in the sprites list. Click here to open the sprite library. New sprite: Add this script to the mouse to move the sprite up the stage using the up arrow key. To find the different-colored blocks, remember to click the different options in the Scripts tab. Read through the script carefully and think about what it does. Run the script by clicking the green flag. You should be able to move the Mouse sprite up the stage using the up arrow key. forever The mouse is highlighted in blue to show it’s your current sprite. The blocks inside the “if then”block only run when the answer to the question is yes. Everything inside the“forever”loop repeats endlessly. Click the triangle and select “up arrow”to choose the correct keyboard key. This block makes the mouse face upward. This block makes the mouse move. 1 2 3 when clicked Mouse1
  • 55. 53 G A M E P R O G R E S S 1 1 % To make the other arrow keys work, add three more“if then”blocks like the first one, but choose a different arrow key and direction for each one. To move right, select the right arrow key and set the direction to 90. For down, set it to 180. For left, set it to –90. Read through the finished script to make sure you understand it. Now click the green flag to run the script. You should be able to move the mouse in all directions around the stage using the arrow keys. If it’s not working, go back and check all the steps. G A M E D E S I G N when clicked Make sure the arrow key matches the direction value. Each“if then”block should be inside the“forever”loop, but not inside any of the other“if then”blocks. forever point in direction 0 ▾ point in direction 180 ▾ point in direction 90 ▾ point in direction –90 ▾ move 5 steps move 5 steps move 5 steps move 5 steps if if if if then then then then key up arrow ▾ pressed? key down arrow ▾ pressed? key right arrow ▾ pressed? key left arrow ▾ pressed? Controllers In Cheese Chase, we use the arrow keys to control the game, and in Star Hunter we used the mouse. Other computer games use very different types of controller. ▷ Console controller Console controllers usually have two small joysticks controlled with your thumbs, along with a range of other buttons. They are ideal for complex games that need a lot of different controls. ▷ Dance mats You control the game by stepping on giant keys. Dance mats are good for games involving physical activity, but they don’t give fine control. ▷ Motion sensor These controllers detect movement, which makes them ideal for sports games where you swing your arms to use a racquet or bat, for example. ▷ Camera Special cameras in some game consoles allow the player to use body movements to control the game. 4 5
  • 56. 54 C H E E S E C H A S E Using the paint editor Cheese Chase now has its mouse heroine and she’s hungry, but there’s no cheese yet for her to chase. The sprite library in Scratch doesn’t include a picture of cheese, so you’ll need to make one yourself. You can do this with Scratch’s paint editor. My cheese piece is a masterpiece! Create a blank sprite by clicking the small paintbrush symbol above the sprites list. This will open Scratch’s paint editor in a screen like the one below. Make sure that“Bitmap Mode”is selected at the bottom. Now draw the cheese. Use the paintbrush tool and choose black from the color palette at the bottom of the screen. Draw the outline of the cheese. If you want perfectly straight lines, use the line tool. Your cheese drawing might be too big at first, but you can make it smaller later. 6 7 Flip Line thickness Use this tool to set the center of the sprite. Color palette Solid Outline Redo Undo Straight line tool Paintbrush tool Eraser Use this tool to duplicate part of a drawing. Use this tool to select part of a drawing. Use this tool to fill a shape with color. Crop Rectangle tool Circle tool costume1 Convert to vector Bitmap Mode 100% Clear Add Import Use this tool to draw wiggly lines. Use this tool to draw straight lines.
  • 57. 55 G A M E P R O G R E S S 2 2 % If you like, use the circle tool to draw holes in the cheese. Make the circle an outline rather than a solid circle by choosing the outline option at the bottom. Now set the center of your cheese. Click the“Set costume center”tool in the top right and then click the middle of the cheese. The cheese is now ready to be added to the game. To keep score, we need to create a variable called “Score”. Choose Data in the blocks palette and click on“Make a Variable”. Type the word“Score” in the pop-up box. The score counter will now appear on the stage. To add color, choose yellow and use the fill tool to fill in the cheese. If your color spills out and fills the whole background, click on the“undo” button. Make sure your lines don’t have any gaps, then try again. Now add a script to make the cheese appear in a random location. When the mouse touches it, there will be a“pop”noise, the player will score ten points, and the cheese will move to a new location. Run the script and try catching the cheese. It should be easy— but that’s because you haven’t added enemies yet... when clicked set Score ▾ to 0 forever go to x: y: pick random –220 to 220 pick random –160 to 160 wait until touching Mouse1 ▾ ? change Score ▾ by 10 play sound pop ▾ This block moves the Cheese sprite to random locations around the stage. The script pauses here until the mouse arrives. 8 9 10 11 12 Score 0 Select this tool and click inside the shape to fill it with color. Use this tool to draw holes. Select this tool and click in the middle of the cheese. This shows the number in the “Score”variable. The background should stay this pattern to show it’s transparent.
  • 58. 56 C H E E S E C H A S E Getting spooky Adding our first enemy to the project will make Cheese Chase into a proper game. A ghost is a good first enemy for this game because it can float through walls, so you won’t need to change the ghost’s script when we add the maze. Click the“New sprite”symbol and select a ghost sprite from the sprite library. Click“OK”to add it to the project. Click here to open the library. The ghost is now your selected sprite. New sprite: 13 Ghost1 This block keeps the ghost on screen for 3–6 seconds. touching Mouse 1 ▾ ? This block ends the game if the ghost touches the mouse. Add the following script to the ghost to make it chase the mouse. If it touches the mouse, the game will end. You might recognize most of this code from Star Hunter. when clicked set rotation style left-right ▾ if then stop all ▾ when clicked hide hide wait secs pick random 5 to 10 go to x: y: pick random –220 to 220 pick random –160 to 160 show This block keeps the ghost hidden for 5–10 seconds. Starts a new script. Ghost1 will now have two scripts. This block stops the ghost from spinning upside down. forever point towards Mouse 1 ▾ This block makes the ghost move slowly. move 1 steps forever This block makes the ghost appear in a random place on the stage. 14 Now add a separate script to make the ghost appear and disappear for random amounts of time. The“hide” block makes the sprite disappear, and“show”makes it appear again. 15 wait secs pick random 3 to 6 The ghost starts off hidden.
  • 59. 57 G A M E P R O G R E S S 3 3 % Next, add music to the game. We usually add music to the stage rather than a sprite. Click the stage area on the left of the sprites list to highlight it in blue. Click the Scripts tab and add the following script to play a sound over and over. Click“Sound”in the blocks palette to find the“play sound until done”block. when clicked forever play sound pop ▾ until done Now click the Sounds tab above the blocks palette. Click the speaker symbol to open the sound library. Select the category“Music Loops”on the left, then choose the music“xylo1”and click“OK”. Repeat the process to load“dance celebrate”into the game too. Return to the Scripts tab and change the selected sound from“pop”to“xylo1”. Run the game and think about how it feels to play. Next try the sound“dance celebrate”. Which one is better? forever play sound xylo1 ▾ until done The sound repeats until the game ends. Watch a scary film with the sound off and it’s not so scary anymore. Games are the same—the music sets the mood. A fast-paced game will use music with a driving beat to make you hurry. A spooky game should have haunting music to make you feel uneasy—happy, bouncy music would break the spell. A puzzle game might have echoing, eerie music to create a sense of mystery. Some games use music as a key part of the game play, such as those where the player has to dance or push buttons in time to the beat. G A M E D E S I G N Music in games You never know where I’ll appear next! Scripts New sound: Costumes Sounds Sounds tab Click the triangle to choose the sound. This opens the sound library. 16 17 18
  • 60. 58 C H E E S E C H A S E Making mazes Mimi the mouse can run anywhere she likes on the stage. Put a stop to that by adding a maze. The maze will make it difficult for her to move from one place to another, adding an extra challenge to Cheese Chase. The maze will be a sprite, not a backdrop, because that makes it easier to detect when another sprite touches it. Draw it in Scratch’s paint editor. Click on the paintbrush symbol in the sprites list, then click on the blue“i”and rename the sprite“Maze”. Now you can start using the paint editor. Make sure“Bitmap Mode”is selected in the bottom right. If not, click the“Convert to bitmap”button to change the mode. Choose the line tool and set the line width control to the middle. Then pick a dark color for the maze walls. Select“Bitmap Mode”before you draw the maze. Line tool Rename the sprite“Maze”. Slide the line width control to the middle. Choose a color before you start drawing. This opens the paint editor. Mouse1 Cheese Ghost1 Draw the maze in the empty space here. ENTER MAZE HERE costume1 Convert to vector Bitmap Mode 100% Clear Add Import Sprite1 Name this sprite“Cheese”. 19 20 Sprites New sprite:
  • 61. 59 G A M E P R O G R E S S 4 4 % Now draw the maze. Start by drawing the outside of the maze at the outer edge of the checkered drawing area. Hold down the shift key on your keyboard to make sure lines are perfectly vertical or horizontal. Then add the inside walls. Finally, we need to add a script to make sure the maze is always in the center of the stage so it’s fully visible. With the Maze sprite selected, click on the Scripts tab and add the following script. when clicked go to x: 0 y: 0 Run the project. You’ll find that Mimi can run through walls, but don’t worry because we’ll fix that later. At the center of the stage, x is 0 and y is 0. Make sure that the lines of the maze are perfectly straight. 21 22 costume1 Convert to vector Bitmap Mode 100% Clear Add Import 23
  • 62. 60 C H E E S E C H A S E Mimi, the ghost, and the cheese are all too big for the maze, so we need to shrink them. Add the following blocks at the beginning of Mimi’s script, before the“forever”block, and fill in the numbers below. Now add a purple“set size to”block to the ghost’s main script. Set the size to 35 percent. Add a“set size to”block to the Cheese sprite too, and adjust the percentage until the cheese is about twice the size of Mimi. If you use the eraser, be careful not to leave any flecks of paint behind because Mimi will stop if she hits them. Check the corners of the maze for bumps that Mimi might get stuck on and remove them. Add a background color to the game by painting a backdrop, not the Maze sprite. At the bottom left of the screen, click the paintbrush symbol in the stage info area. This opens the paint editor. Make sure“Bitmap Mode”is selected at the bottom. set size to 35 % go to x: –200 y: 75 point in direction 90 ▾ when clicked Remove bumps with the eraser tool. This makes Mimi about a third of her current size. This sends her at the top left when the game starts. Mimi is half the size of the cheese. This block makes her face right. Click here to paint the backdrop. Passages should be wide enough for Mimi to pass her enemies. Stage 1 backdrop New backdrop: You might need to fine-tune your Maze costume to make sure Mimi can fit through all the passages with enough room to pass her enemies (which we’re going to add later). To alter the maze, select the Maze sprite and click the Costumes tab. Use the eraser tool to remove walls or the selection tool to move them. 24 26 27 25 28
  • 63. 61 G A M E P R O G R E S S 5 6 % Choose a color, select the fill tool , and then click on the backdrop to fill it with color. Try different colors to see which one looks best in the maze. Score Score Score Score 30 30 30 30 High Score High Score High Score High Score 96 96 96 96 29 G A M E D E S I G N Space in games How the obstacles in a game are laid out has a big effect on how you play. A maze is the perfect obstacle to demonstrate this. △ Open space The player can move in any direction most of the time. A game like this needs fast- moving enemies or lots of enemies to make it challenging. △ Closed-in space The player is forced to move in a very limited way. Just one enemy patrolling the corridors of this maze would make life hard. The player has to think ahead to avoid getting trapped. △ Balanced space This is what the maze in Cheese Chase is designed to be. It limits the player’s movement enough to make the game interesting, but allows some freedom. Walls restrict movement.
  • 64. 62 C H E E S E C H A S E Mousetrap Mimi can currently run straight through the walls of the maze like a ghost, but we want her to stay trapped inside the passages. Time to change her script. Select Mimi and drag the following blocks to an empty part of the scripts area. This set of blocks will make Mimi reverse if she runs into a wall. This block makes Mimi move five steps backward. Insert the blocks four times into Mimi’s main script. To make copies, right-click (or control-click if you use a Mac) on the new blocks and select“duplicate”. Place the duplicates after each“move 5 steps”block. move –5 steps if touching Maze ▾ ? then forever point in direction 0 ▾ point in direction 180 ▾ point in direction 90 ▾ point in direction –90 ▾ move 5 steps move 5 steps move 5 steps move 5 steps if if if if then then then then key up arrow ▾ pressed? key down arrow ▾ pressed? key right arrow ▾ pressed? key left arrow ▾ pressed? Uh oh! 30 31 Insert the new blocks four times into the mouse’s script. move –5 steps if touching Maze ▾ ? then
  • 65. 63 G A M E P R O G R E S S 6 7 % If Mimi’s tail or paws touch a wall when she turns around, she can get stuck. We can fix this bug by making some changes to Mimi’s costume in the paint editor. Select Mouse2 in the sprites list and click the Costumes tab above the blocks palette. Choose“Convert to bitmap”at the bottom, and then use the eraser tool to trim Mimi’s tail. There’s another problem that we can fix. Every sprite has a center point, but if this isn’t in the exact center, the mouse will wobble when its direction changes and might overlap a wall and get stuck. Choose the“Set costume center”tool and then click in the exact middle of Mimi to correct her center point. Mimi moves five steps backward. Touching the wall triggers the reverse move. If Mimi’s tail overlaps the wall, she might stop moving. Set costume center E X P E R T T I P S Bounding boxes One of the big challenges that game programmers face is detecting when sprites with complicated shapes collide. Even in simple 2D games, collision detection can cause problems, such as sprites getting stuck or solid objects merging. A common solution is to use“bounding boxes”—invisible rectangles or circles that surround the sprite. When these simple shapes intersect, a collision is detected. In 3D games, spheres or 3D boxes can do the same job. ▷ How does it work? You might wonder why Mimi has to move five steps backward. The reason is that she normally moves forward five steps at a time. The backward move reverses the forward one, making her stand still. This happens so quickly that you don’t see her reverse. Ouch! Mimi moves five steps forward. 32 33 34 Mouse1 Clear Add Import
  • 66. 64 C H E E S E C H A S E Beetle mania Now for Mimi’s main enemies: a small army of evil beetles that scurry around inside the maze. If she bumps into one, the game ends. Click the“New sprite”symbol and choose the Beetle sprite from the library. Now drag the“pick random”block into the first window of an“equal to”block. Then drag the“equal to”block into an“if then else”block. The beetle is now your selected sprite. You may need to change these numbers if the beetle starts on a wall. Click the“pick random”block. You’ll see“1”or“2”appear in a speech bubble at random. This block makes the beetle reverse and then turn right when it hits a wall. This is an“equal to”block. This block makes the beetle turn right. Type“2”here Add the following script to set the beetle’s size, location, and direction. It uses a“forever”loop to move the beetle, and an“if then”block to make it stop and turn right whenever it hits a wall. To make the beetles move automatically, you need to create a sequence of steps for them to follow. Programmers call this an algorithm. Our algorithm will tell each beetle to move forward until it hits a wall. Then it will stop, turn, and move forward again. Run the script. You might notice a glitch: the beetle always turns right and ends up going around in loops. We need to change the script so that the beetle turns left or right at random. To make a random choice, use a“pick random”block. Drag it to an empty part of the scripts area and set the second number to 2. when clicked STOP forever set size to 30 % move 5 steps go to x: –130 y: 80 point in direction 90 ▾ turn 90 degrees move –5 steps if then touching Maze ▾ ? 1 if else then = 1 pick random 1 to 2 Type“1”in this window. pick random 1 to 2 35 36 37 38 39 Beetle
  • 67. 65 G A M E P R O G R E S S 7 8 % Add two“turn 90 degrees”blocks to make the beetle turn left or right. Read through the script carefully and see if you can figure out how it works. Remove the“turn 90 degrees”block from the beetle’s original script and put the“if then else”block in its place, as below. Run the project and watch what happens. Check there’s enough room for Mimi to squeeze past the beetle. If not, adjust the maze in the paint editor. The blocks inside the “if then”block run only when the beetle touches the maze. Question GO when clicked forever set size to 30 % move 5 steps go to x: –130 y: 80 point in direction 90 ▾ turn 90 degrees turn 90 degrees turn 90 degrees turn 90 degrees move –5 steps if then touching Maze ▾ ? E X P E R T T I P S if then else The“if then else”block is just like an“if then”but with an extra trick. A normal“if then”asks a question and runs the blocks inside only if the answer is yes. The“if then else” block can hold two groups of blocks: one to run if the answer is yes, and another if the answer is no. The words“if”,“then”, and“else” are used in nearly all computer languages to make decisions between two options. if else then = 1 = 1 pick random 1 to 2 pick random 1 to 2 if if else else then then The blocks inside the second gap run if the answer is no. The blocks inside the first gap run if the answer is yes. 41 40
  • 68. 66 C H E E S E C H A S E Add the“if then”blocks shown below to the beetle’s script. The new blocks check whether the beetle is touching Mimi and, if it is, send a message. Select “Mouse1”in the“touching”block. Now give the message a name. Select“message1”in the“broadcast” block, choose“new message”, and type“GameOver”. Sending messages The next step is to make the beetle end the game if Mimi bumps into it. Instead of using another“touching”block in Mimi’s script, you can use a message. Scratch lets you send messages between sprites to trigger scripts. The beetle will send a message to Mimi that stops her script. set size to 30 % go to x: –130 y: 80 point to direction 90 ▾ move 5 steps when clicked forever if then then touching Mouse1 ▾ ? pick random 1 to 2 = 1 broadcast message 1 ▾ move –5 steps if else turn 90 degrees This block is found under Events. It sends a message when the beetle hits Mimi. Type "GameOver". Select“Mouse1”. I have a message for you… New Message OK Cancel Message Name: GameOver if then touching Maze ▾ ? 42 43 turn 90 degrees broadcast message1 ▾ message1 new message…
  • 69. 67 G A M E P R O G R E S S 8 9 % Now add an extra script to Mimi to receive the message. Drag the following blocks to an empty part of her scripts area. Try the game out. Mimi should stop moving when she touches the beetle, but the beetle will continue to move. Later we’ll use a message to show a“GAME OVER!”sign as well. The game needs more beetles. Copy the Beetle sprite by right-clicking on it (use control-click if you work on a Mac) and then choose“duplicate”. Make three new beetles. These will all have the same script. See what happens when you run the project. You’ll need to change the numbers in the“go to” blocks for each new beetle so they don’t all start in the same place. Starting in different corners works quite well. Experiment! when I receive GameOver ▾ stop other scripts in sprite ▾ E X P E R T T I P S Messages Messages provide a neat way of making sprites react to each other. We could have made the mouse check if it’s touching a beetle, but that would mean adding “if then” and “touching” blocks to Mimi’s script for all four beetles. By using messages, we can add more enemies without changing Mimi’s code. Beetles start in corners. This block stops Mimi’s main script. Select“duplicate”to create new beetles. Score 30 all this script other scripts in sprite 44 45 46 Sprites Beetle Beetle3 Beetle4 info duplicate delete save to local file hide
  • 70. 68 C H E E S E C H A S E High score You can make a game more fun by adding a high score for players to beat. We create this in the same way as the score tracker: by making a variable and displaying it on the stage. Select Data in the blocks palette. Click “Make a Variable”and create a new variable called“High Score”. A new block will appear, and the high score counter will appear on the stage. Drag it wherever you like. Now add an extra set of blocks to the Cheese sprite’s“forever”loop to test for a new high score each time the player gains points. Run the project and see if anyone can beat your high score. when clicked set size to 70 % set Score ▾ to 0 forever go to x: y: pick random –220 to 220 pick random –160 to 160 wait until touching Mouse1 ▾ ? change Score ▾ by 10 play sound pop ▾ The“if then”block tests whether the high score has been beaten. If so, the score becomes the new high score. if then Score > High Score set High Score ▾ to Score Find the“more than”block in Operators. 47 48 New Variable OK Cancel Variable name: For all sprites For this sprite only High Score
  • 71. 69 G A M E P R O G R E S S 1 0 0 % Game over! At the moment, the only signal the game has ended is that the mouse stops moving. You can add a finishing touch to any game by displaying a large, bold“GAME OVER!”sign. To do this you need to create a“Game Over!”sprite and use the“GameOver”message to make it appear. Click the paintbrush symbol in the sprites list to create a new sprite with the paint editor. Using ”Bitmap Mode”, draw a rectangle and fill it with a dark color. Now switch to“Vector Mode”. Choose a bright color and use the text tool to type“GAME OVER!”in the rectangle. Change the font to “Scratch”and use the selection tool to make the text large. You don’t want the “GAME OVER!”sign to show until the game is really over, so let’s hide it with a script. Switch to the Scripts tab and add these blocks. Now add a script to make the sprite appear when the game ends. You can use the same message that stops Mimi to trigger this script. Score 30 High Score 96 when clicked hide go to front show Run the game. You should now see the“GAME OVER!”sign when you get caught by a beetle. To make the sign work with the ghost too, replace its“stop all”block with a “broadcast GameOver”block. This block ensures other sprites are behind the sign. This places the “GAME OVER!” sign in the middle. when I receive GameOver ▾ go to x: 0 y: 0 GAME OVER! 49 50 51 52 Don’t forget to check the sprite’s center with the set center tool. Use the selection tool to enlarge the text. To change the font, highlight the text first. Change the font to Scratch. costume1 Convert to bitmap Vector Mode 100% Clear Add Import Donegal Gloria Helvetica Marker Mystery Scratch Font: Scratch ▾ GAME OVER!
  • 72. 70 C H E E S E C H A S E △ Add sounds Jazz up the game with some sound effects using the“play sounds”block when the ghost appears, when the game ends, or when you get a high score. There are lots of sounds in Scratch’s sound library that you can experiment with. ◁ Play on You need to play the game a lot to find out what works and what can be improved. Get other people to play. You can adjust many properties of the game until you get the right configuration: a game where the abilities of the player and enemies are well balanced. ▷ Tweak timings You might find Cheese Chase harder than Star Hunter. To make it easier, you can make the beetles slower or make the ghost appear for a shorter time. You can also speed up Mimi. For variety, try making each beetle run at a different speed. ▽ Vanishing cheese For an extra challenge, make the cheese spend only ten seconds or so in each spot before moving to a new location. This will force the player to move fast. To do this, give the cheese an extra script with a“forever”loop containing a“wait 10 secs”block, followed by a copy of the“go to”block from the main script. ▷ Rocket power Add a power boost that hides all the enemies for ten seconds when the mouse touches it. To do this, you would need to add a new sprite and a message to trigger a hide- wait-show script in each enemy. when clicked forever wait 10 secs go to x: y: pick random –220 to 220 pick random –160 to 160 This block picks a random location for the cheese. Hacks and tweaks Take Cheese Chase to the next level by tweaking the rules of the game and the way the sprites behave. You can also experiment with big changes that turn Cheese Chase into a totally different kind of game.
  • 73. 71 H A C K S A N D T W E A K S Adding instructions Players like to see a game’s instructions clearly before they start playing. Here are three ways of including instructions. ▷ Don’t touch the walls Make the game end if Mimi touches the walls of the maze. Add a script to the Maze sprite to send the message“GameOver”if she touches the maze. This makes the game much harder. To make it even harder, try switching the player’s controls from the keyboard to the computer mouse. The game then becomes a test of a steady hand. ▽ Project page The easiest way to include instructions is to simply type them in the instructions box on the project page. You need to log in to an online Scratch account to do this. Type the instructions here. ▽ Instructions sprite You can use the paint editor to create an Instructions sprite in the same way that you created the Game Over sprite. Give it the following script to show the sprite at the start of the game and to hide it once the player presses the space bar. show hide go to x: 0 y: 0 ▽ Speech bubbles Make your game characters tell the player the instructions using speech bubbles. Add a“say”block to the start of Mimi’s script to explain the game. Don’t forget to add“wait” blocks to the enemies’scripts—otherwise there’s a risk you’ll lose before you start! when clicked when clicked go to front wait until key space ▾ pressed ? The Instructions sprite appears until you press the space bar. Do as I say! Add this“wait until”block to the start of every other sprite’s script so they don’t start moving until the game begins. wait until key space ▾ pressed ? GAME OVER! Tell people how to use your project (such as which keys to press) Add project tags. How did you make the project ? Did you use ideas, scripts or artworks from other people ? Thank them here. Modified: 8 Jun 2015 Unshared 9 scripts 6 sprites DRAFT Cheese Chase by SuperMimi Instructions Notes and Credits c 0 0 1 1 Score 30 High Score 96 set size to 35 %
  • 76. 74 C I R C L E W A R S How to build Circle Wars Lightning reactions are essential in Circle Wars, a fast-paced game in which you hunt green circles while being chased by red ones. The game uses Scratch’s clones feature, which can turn a single sprite into an army of sinister copies. Move the blue circle around the screen using the mouse. Collect the pale green circles, but avoid the red ones that march toward you like a zombie army. The solid green and solid red circles drop clones of themselves as they roam around. Score more than 20 points to win and go below –20 to lose. AIM OF THE GAME Circle Wars by HappyShrimp321 (unshared) Score 8 The solid green circle lays the friendly clones. The score rises or falls as green and red clones are touched by the player. Time 23.5 ◁ Enemies Steer clear of the red enemy circles. Touch one and it takes three points off your score, before vanishing with a clash of cymbals. ◁ Friends The friendly circles are green. When you touch one, you score a point and the circle disappears with a pop. ◁ Player The player is the blue circle. If you don’t keep moving quickly, the enemy circles will soon overwhelm you. The timer shows how long each game takes.
  • 77. 75 H O W T O B U I L D C I R C L E W A R S The solid red circle lays the enemy clones. Clones of the solid red circle chase the player. Clones of the solid green circle chase the player. Player Click the stop sign to end a game. Click the green flag to start a new game. GAME CONTROLS Use a computer mouse or touchpad to control this game. ◁ Is it art? Not all games use cartoon sprites. With its colored circles, this game looks more like a piece of modern art. Once you’ve built it, why not make up a story to explain the game. You can change the sprites, colors, and backdrop to tell that story. It’s all my own work! Don’t let them get you!
  • 78. 76 C I R C L E W A R S You now need to center the sprite. Select the“Set costume center”tool (top right) and then click in the very center of the circle. Rename the sprite“Player” by clicking on the blue“i” in the sprites list. Creating the sprites First you need to create the three sprites for the main game. These are all simple colored circles, so you can draw them yourself. Start by following these instructions to create the player’s character—the blue circle. New sprite: Select solid color. Click here to paint a new sprite. Circle tool E X P E R T T I P S Resizing the circle If your circle is too big or too small, you can change the size of it by selecting either the “Grow”or“Shrink”tool on the bar along the top of the Scratch screen, then clicking on the circle. Look on the stage to compare the size of your new sprite to the cat. Grow Shrink Player circle Friend circle Enemy circle Start a new project and name it “Circle Wars”. Click the paintbrush symbol at the top of the sprites list to paint a new sprite. To draw a blue circle, first select “Bitmap Mode” (bottom right). Then choose blue in the color palette. Click the circle tool on the left and then select a solid color (rather than an outline) at the bottom left of the paint editor. While holding down the shift key (this gives you a circle rather than an oval), click with the mouse and drag to draw a circle. The circle should be about the size of the cat’s head. When you’re happy with the circle’s size, delete the cat sprite (right-click on it and select“delete”). 1 5 3 2 4
  • 79. 77 G A M E P R O G R E S S 2 0 % Start by right-clicking on the Player sprite and selecting “duplicate”. Do this twice. You’ll now have three blue circles. Rename Player2 as“Friends”and Player3 as“Enemies”. Select the Friends sprite and click the Costumes tab. Choose green in the color palette. Select the“Fill with color” tool and click inside the blue circle to make it turn green. Repeat the steps for the Enemies sprite, but color this sprite red. You should now have three different colored sprites. Select the Player sprite, click Data, and make a variable called“Score”for all sprites. Then put a check in the variable’s box to show“Score”on the stage. Add the script below to get the blue circle following the mouse. Read it through and make sure you understand what it does. Run the script to check it works. The red and green circles won’t do anything yet. Making friends and enemies You can now make the green friend and red enemy circles. You can use other colors if you like, but make sure you can easily tell the three different circles apart. Checking this box ensures that the score will appear on the stage. This block“glues”the Player sprite to the mouse-pointer. “Fill with color”tool Click inside the blue circle to make it green. Player Sprites Enemies Player Friends Instant player control Now add a score display and a script to make the Player sprite stick to the mouse-pointer— just like in Star Hunter. I have some friends and quite a few enemies! OK Cancel Variable name: For all sprites For this sprite only Score when clicked forever set Score ▾ to 0 go to mouse-pointer ▾ Score Selecting “duplicate” makes a copy of the sprite. info duplicate delete 6 7 8 9 10 New Variable
  • 80. 78 C I R C L E W A R S Select the green Friends sprite. Add this script to make the circle bounce around the stage with a random change of direction every 250 steps. Run the project and watch the green circle’s unpredictable journey. The Friends sprite moves 250 steps in 10-step jumps but it doesn’t get stuck to the walls. After 250 steps, the“forever” loop goes back to the start. The sprite changes direction randomly and sets off again. March of the clones From just two sprites—the green and red circles—you can create an army of friends and enemies to pursue the player’s blue circle. You can do this through the magic of cloning. Before you create your clones, first get the Friends sprite moving randomly around the stage. The“repeat”loop runs the blocks inside it 25 times. The blocks inside repeat 4 times. After 4 repeats, the next block is run. Picks random direction Random direction changes happen every 250 steps. when clicked when clicked forever repeat 25 repeat 4 move 10 steps move 100 steps if on edge, bounce I’m not! point in direction pick random –180 to 180 Repeat loops You’ve already seen “forever”loops that repeat a group of blocks nonstop. A“repeat”loop does a similar job, but it only repeats the blocks inside a fixed number of times. This type of loop is sometimes called a “for”loop, because it repeats for a certain number of times. The example shown here repeats an action four times to draw a square. We’re all different! We’re all different! We’re all different! pen down turn 90 degrees pen up 11 12 E X P E R T T I P S
  • 81. 79 G A M E P R O G R E S S 4 0 % Add a“create clone of myself” block as the last block in the “forever”loop. You’ll find it in the yellow Control section. This block will create a clone of the Friends sprite after each 250-step movement. Run the project. At each change of direction, the sprite leaves a copy of itself—a clone. The clones aren’t just pictures—they are fully working copies of the original sprite, and you can give them their own instructions. New clones are controlled by a special script that starts with the block“when I start as a clone”. Add the script below to the Friends sprite. The script tells each clone to move toward the Player sprite for 300 steps, after which the clone is deleted and vanishes from the stage. The clones move one step at a time. They move more slowly than the original Friends sprite, which moves in 10-step jumps. Run the script and watch the green clones advance slowly toward the Player sprite. Don’t worry—they’re the good guys! Making clones Now we’re going to make our friendly clone army. These are the clones you need to catch to score points. All clones run their own copy of this script. The instructions within the block are repeated 300 times. The clone moves slowly toward the Player sprite in 1-step jumps. This block makes all the clones transparent. The clone disappears after 300 steps. Drag this block into the bottom of the “forever”loop. when clicked forever repeat 25 repeat 300 move 10 steps if on edge, bounce point in direction pick random –180 to 180 create clone of myself ▾ when I start as a clone set ghost ▾ effect to 50 point towards Player ▾ move 1 steps delete this clone 16 15 13 14 A new clone is created every 250 steps.
  • 82. 80 C I R C L E W A R S Add an“if then”block containing the blocks shown here to check whether the clone is touching the Player sprite after each move. Try running the project now—the score should increase as you touch green circles, which instantly disappear with a pop. Destroying clones The last part of the script for the Friends clone checks if the clone is touching the Player. If it is, the clone gets deleted. repeat 300 E X P E R T T I P S Clones Clones are useful any time you want lots of copies of a sprite. Many programming languages let you make copies of things, but they are often called objects rather than clones. Such languages are called“object oriented” languages and include Java and C++. In Scratch, there are three orange blocks that control clones, all found in the Control section. △ When a clone starts, it runs the script headed with this block. Clones don’t run the sprite’s main script, but they can run all other scripts in the sprite’s scripts area, such as scripts triggered by messages. △ This block gets rid of the clone. All clones disappear from the stage when a project stops, leaving just the original sprite. △ This block creates a clone of the sprite. The clone is identical to the sprite and appears in the same position and facing the same direction, so you won’t be able to see it until it moves. when I start as a clone when I start as a clone set ghost ▾ effect to 50 point towards Player ▾ move 1 steps delete this clone delete this clone delete this clone if then touching Player ▾ ? change Score ▾ by 1 play sound pop ▾ create clone of myself ▾ When the Player sprite touches the clone, the clone is destroyed. Make sure the “if then”block is inside the“repeat”loop. POP! 17
  • 83. 81 G A M E P R O G R E S S 6 0 % To copy scripts, just click, drag, and drop scripts from one sprite onto another. Drag the two scripts you made for the Friends sprite onto the Enemies sprite, one at a time. This makes copies of the scripts in the Enemies sprite. Select the Enemies sprite. The scripts you dragged and dropped will probably be on top of one another, because any copied script just appears at the top left of the scripts area. To rearrange them, right-click on the background and select“clean up”. Now adjust the Enemies clone script so that it takes points away when the Player touches a red clone. Alter the“change Score by”block so it changes the score by –3 instead of +1. You really want to avoid those nasty red enemies! Add a sound to tell the player that points have been lost. Load the cymbal sound into the Enemies sprite by selecting“cymbal”in the sound library. Alter the script to play “cymbal”, not ”pop”. You’ll now hear which type of clone you’ve touched. Run the project. Check that you now have both red and green clones, and that touching a red clone takes 3 points off your score. Enemy clones Now you need to add scripts to the Enemies sprite to make it produce clones that chase the Player. You can do this by copying the scripts from the Friends sprite across to the Enemies sprite. Release the mouse when the mouse- pointer is over the red circle. Change the script to play a cymbal sound. The“clean up” option reveals any hidden scripts. This reduces the player’s score by 3 points. change Score ▾ by –3 play sound cymbal ▾ Sprites Player Friends clean up add comment She may not be the best player, but she is the loudest! 22 19 18 20 21 when clicked forever repeat 25 move 10 steps if on edge, bounce point in direction pick random –180 to 180 create clone of myself ▾
  • 84. 82 C I R C L E W A R S Add the new“if then”blocks shown here to the Player sprite. They check your score. If the score is greater than 20, you win, and a thought bubble with the word“Victory!” appears. If the score is less than –20, you lose, and the sprite thinks“Defeat!” Win or lose? You’ve created two ever-expanding clone armies: one of friendly circles that help you win points, and one of evil circles that make you lose points. Next you need to add the code that tells you if you’ve won or lost the game. These blocks run when the score is more than 20. This block sets the score to 0 at the start. You can find this block in the green Operators section. The Player sprite stops following the mouse-pointer when either the winning or losing score is reached. These blocks run when the score is less than –20. when clicked forever set Score ▾ to 0 go to mouse-pointer ▾ if if if then then then Score Score Score > 20 > 20 < –20 think Victory! think Victory! think Defeat! stop this script ▾ stop this script ▾ stop this script ▾ Score 21 Score –21 Victory! Defeat! L I N G O Comparison operators Earlier we saw how you can use“if then”blocks to create true or false statements—also known as Boolean expressions—that lead to different outcomes. For example, in Star Hunter,“if touching cat then play sound fairydust”makes a sound play only when the cat gets a star. We can do the same thing with numbers by using what are called comparison operators: When we add these to“if then”blocks, they create statements that are either true or false. In Circle Wars, the“is more than”operator tells you that you’ve won the game when you score over 20. is less than 5 > 1 3 = 3 2 < 5 equals is more than 23
  • 85. 83 G A M E P R O G R E S S 8 0 % By copying“timer”to the variable “Time”, each trip around the loop will now display the time on the stage. But the moment the player wins or loses, the time stops being updated (the script is stopped) and the total time it took to win or lose is shown. Click on the Data section and make a variable“Time”for all sprites. To show it on the stage, check the box next to the variable’s block. Select the Player sprite. Click on Sensing in the blocks palette. Add“reset timer”to the Player’s script, just before the“forever”loop. Go back to Data and drag a“set Time to” block to the script and add“timer”to it, making it the last instruction in the forever loop. Run the game. Try to touch only the green circles. Check that the game ends when the key scores are reached, and check that the Player sprite thinks“Victory!”or“Defeat!”You can reduce the score needed to win if you find it too difficult. But don’t make the game too easy—Circle Wars is meant to be a challenge! This block starts the timing from 0. Total number of seconds in the game Time 41.573 when clicked forever set Score ▾ to 0 go to mouse-pointer ▾ if if then then Score Score > 20 < –20 think Victory! think Defeat! stop this script ▾ stop this script ▾ Adding a timer To add some competition to the game, you can include an on-screen timer that shows players how long they take to complete a game. reset timer timer set Time ▾ to I think it must be lunch time! I am the champion! 26 25 24 This block updates the Time display every time the loop repeats.
  • 86. 84 C I R C L E W A R S Instructions Players need to know the rules of the game. Create a special sprite that shows the instructions for Circle Wars when the game begins. Use the paintbrush symbol to create a new sprite and rename it“Instructions”. Select “Bitmap Mode”and choose a color. Select the “Fill with color”tool and click on the drawing area to fill it with your chosen color. Now select black from the palette as the color for the text. Then choose the text tool and type out the instructions shown here. If the text doesn’t fit, use the select tool to resize it by pulling the corner points in or out. When you’ve finished, click outside the box around the text to stop editing. “Fill with color”tool You are the blue circle. Move using the mouse. Be quick! Try to touch the friendly green circles. Each one gives you 1 point. Avoid the enemy red circles. Each one you touch takes 3 points. Score more than 20 to win. Score less than –20 and you lose. Press the space bar to start! Text tool “Select”tool Choosing a light background color will make the text easier to read. You may want to decorate your instructions with colored circles. Use black for the text. Game stories Computer games usually have a story to explain why the action in the game is happening. At the moment, Circle Wars has no story. Can you make one up? It could be a battle in space, with a blue spaceship saving friendly green spaceships and trying to avoid being hit by the red enemy craft. Let your imagination run riot! Including some of the story in your instructions will help make the game more interesting and exciting for the player. G A M E D E S I G N 27 29 28
  • 87. 85 G A M E P R O G R E S S 1 0 0 % You also need to add a“wait until key space pressed”block immediately after the green flag blocks in the Player, Friends, and Enemies sprites’scripts. This will hold back all the action until the space bar is pressed. Run the project and your instructions should appear, filling the screen until you press the space bar. Players will have plenty of time to read and understand the instructions, letting them start the game when they’re ready. Add a“wait until key space pressed”block to the scripts of all three sprites. This block hides the Instruction sprite when the player presses the space bar to start playing. hide Add this script to the sprite to show the instructions on the stage at the start of the game. Read it carefully. Can you see how it works? when clicked go to x 0 y: 0 wait until key space ▾ pressed? show go to front These blocks show the instructions in the center of the screen in front of other sprites. I’m ready to play! Did someone mention space? 32 30 31 when clicked forever set Score ▾ to 0 go to mouse-pointer ▾ if if then then Score Score > 20 < –20 think Victory! think Defeat! stop this script ▾ stop this script ▾ reset timer timer set Time ▾ to wait until key space ▾ pressed?
  • 88. 86 C I R C L E W A R S Hacks and tweaks You’ve got Circle Wars working—well done! Now to personalize it and make it your own. Try these suggestions and your own ideas. Once you’ve created something unique, why not share it on the Scratch projects website? Remove the “go to”block. ▽ What’s the story? Did you think of a story to explain what’s going on in Circle Wars? Maybe it’s the attack of the dragons, and the princess player has to eat cakes to survive? Add some scenery and music to the game to fit with that story. Experiment with different stories and looks. ▽ Tweak the timer The number in the timer flickers because it shows lots of decimal places. To round the value so it shows only whole seconds, use the green“round”block near the bottom of the Operators section. Try adding a“Best time”for winning players, just as you added a“High score”in Cheese Chase. ▷ Slow down, blue! To make things tricky, change the blue circle’s script so that it no longer“sticks”to the mouse pointer but chases slowly after it. You could also invent simple keyboard controls for the sprite. △ Find a balance Experiment with different speeds, or change how many points you win or lose for touching Friends and Enemies. It’s not difficult to make the game very hard or very easy, but can you find a balance to make it just the right level? ▷ The war’s over! Add a broadcast message to reveal a“Game over!”sprite when the player wins or loses, like you did in Cheese Chase. You can change the text of the“Game over!”sprite so that it relates to your story about the game. go to mouse-pointer ▾ set Time ▾ to timer round G A M E O V E R ! That’s their best time yet! Add the“point towards” block and an instruction to“move 5 steps”. point towards mouse pointer ▾ move 5 steps
  • 89. 87 H A C K S A N D T W E A K S Orange, yellow, pink, and purple circles are enemies. Change the Friends’ score value to this. The bigger the clone, the more points you win or lose. Use this scoring for Enemies. Green and blue circles are friends. Insert this instruction immediately after“when I start as a clone”. ◁ Shape shifting Introduce another shape into the game. It could be a square that eats red circles, a triangle that runs away from the player, a hexagon that makes the player shrink or grow, or anything else you want to try. ▽ Change the colors Vary the clones’colors. Click on the Friends sprite. Add the“set color effect to”block from the Looks section to the sprite’s clone script. Then drag“pick random”from Operators into the block’s window and change the values to –30 and 30. Do the same for the Enemies sprite. New clones will now have different colors! ▷ Change the size Add the“change size by”block to the scripts of both the Friends and Enemies sprites to make each clone a random size. Alter the scoring so that the size of the circle you touch determines how many points you score. You’ll also need to change the totals needed to win or lose. Try more than 2,000 points for victory, and less than –2,000 for defeat. when I start as a clone when I start as a clone set ghost ▾ effect to 50 set ghost ▾ effect to 50 set color ▾ effect to change size by pick random –30 to 30 pick random –30 to 30 size change Score ▾ by change Score ▾ by 0 – size repeat 300 repeat 300 From green Operators section Change the values to“–30”and“30”.
  • 92. 90 J U M P Y M O N K E Y How to build Jumpy Monkey In the real world there are laws you just can’t break. For example, the law of gravity means that something that goes up must always come down again. Jumpy Monkey shows you how to add gravity to your game worlds. This number shows you how fast the monkey will fly once he is launched. The monkey is launched from the arrow when you press the space key. The instructions appear on the game at the start. ◁ Bananas If the monkey touches any of the bananas he will eat them. Keep going until he eats all the bananas. ◁ Monkey Select the monkey’s launch speed with the up and down arrow keys, then press the space key to launch him. The monkey is on a mission to collect bananas. Choose which direction he leaps in and how fast he goes. You need to send him over the palm tree to grab the bananas using the fewest possible jumps. AIM OF THE GAME Jumpy Monkey by FunkyMonkey66 (unshared) ◁ Launcher Point this arrow in the direction you want to launch the monkey by using the left and right arrow keys. 11 LaunchSpeed SET LAUNCH ANGLE SET LAUNCH SPEED PRESS SPACE TO FIRE
  • 93. 91 H O W T O B U I L D J U M P Y M O N K E Y Avoid the tree— the monkey can’t fly through it. ◁ Flying monkey Try to collect all the bananas using as few launches as possible. The game will record how many launches you use. The monkey flies through the air like a cannonball. There are three bunches of bananas to collect each time you play the game. GAME CONTROLS Players use the arrow keys and space key on the keyboard as game controls. Down with gravity! Space
  • 94. 92 J U M P Y M O N K E Y Launching the monkey This game uses a big arrow to help the player choose the monkey’s precise launch direction. We’ll ignore gravity to start off with, but you’ll need to add it later to get the monkey past the tree. Start a new project and call it“Jumpy Monkey”. Delete the cat sprite and load two sprites from the library—“Monkey2”and “Arrow1”. Select the arrow sprite and rename it “Launcher”by clicking on the“i” and typing the new name into the box. This script runs when the right arrow key is pressed. This block moves the arrow to the bottom left of the stage. Select the Launcher sprite, then add these three scripts to set up the Launcher and allow the player to control its angle using the left and right arrow keys on the keyboard. The direction of the arrow is the direction that the monkey will launch. Run the scripts and try turning the arrow. Go to Data, select“make a variable”, and add a variable called“LaunchSpeed”. The new variable will automatically show up on the stage. Select this option, then click“OK”. New Variable OK Cancel Variable name: For all sprites For this sprite only LaunchSpeed Monkey2 Arrow1 when clicked set LaunchSpeed ▾ to 10 point in direction 45 ▾ go to x: –200 y: –140 go to front when left arrow ▾ key pressed when right arrow ▾ key pressed turn 1 degrees turn 1 degrees This keeps the arrow visible, with the monkey behind it. Type here to rename the sprite. This script runs when the left arrow key is pressed. Launcher direction: 90° x: 73 y: -17 rotation style: can drag in player: show: Click here 1 3 2
  • 95. 93 G A M E P R O G R E S S 1 7 % Maximum speed Minimum speed Now that you can aim, you need controls to set the speed of the launch. Add these scripts to change the speed using the up and down arrow keys. Events The key presses and mouse clicks that a computer detects are known as events. The brown Events blocks in Scratch trigger a script whenever a particular event occurs. We’ve seen them used with messages in Cheese Chase, but Scratch also lets you trigger scripts using keys, mouse clicks, sound levels, and even movement detected by a webcam. Don’t be afraid to experiment. ▷ Setting things off Events blocks such as these are used to trigger a script whenever the event they describe occurs. change LaunchSpeed ▾ by 0.1 change LaunchSpeed ▾ by –0.1 when up arrow ▾ key pressed when space ▾ key pressed when loudness ▾ > 10 when this sprite clicked when down arrow ▾ key pressed if if then then LaunchSpeed LaunchSpeed < 20 > 1 loudness timer video motion This increases the launch speed. This reduces the launch speed. L I N G O 4
  • 96. 94 J U M P Y M O N K E Y Now select the Monkey sprite. Add this script to shrink him down to the right size and move him behind the Launcher. when clicked set rotation style don’t rotate ▾ set size to 35 % To launch the monkey when the space bar is pressed, add this new script to the Monkey sprite.“Repeat until”is a new type of loop block that keeps repeating the block inside until the condition becomes true—in this case, the monkey keeps moving until it touches the edge of the stage. This makes the monkey’s direction match the direction of the launch arrow. The“repeat until”block keeps the monkey moving to the edge of the stage. E X P E R T T I P S “repeat until” Do you want to keep repeating an action only until something happens and then move on to the rest of the script? The“repeat until” block can help your code when“forever”and“repeat”loops aren’t flexible enough. Most programming languages use similar loops, but some call them“while”loops—these continue while the condition is true, rather than looping until the condition is true. There are always different ways to think about the same problem. repeat until go to Launcher ▾ go to Launcher ▾ go to Launcher ▾ when space ▾ key pressed point in direction move touching edge ▾ ? direction ▾ of Launcher ▾ LaunchSpeed steps 5 6
  • 97. 95 G A M E P R O G R E S S 3 3 % Try setting the Launcher angle and speed using the arrow keys, and pressing the space bar to fire the monkey. He goes in a completely straight line until he hits the edge of the stage. Real things don’t do this—they fall back toward the ground as they move. We’ll add gravity to the game later to make the monkey behave realistically. Bananas and palm trees The point of this game is for the monkey to collect bananas. By using clones, you can add just one Bananas sprite but give the monkey plenty of fruit to aim for. when clicked hide set NumBananas ▾ to 3 create clone of myself ▾ repeat NumBananas Add the Bananas sprite to the project. Make a variable for all sprites called“NumBananas” to keep track of the number of bananas on the stage—start with three. Build the following script to clone the bananas, but don’t run it yet because you still need to tell the clones what to do. We only need the clones, so hide the original Bananas sprite. 11 LaunchSpeed The loop runs three times. 7 8 Jumpy Monkey by FunkyMonkey66 (unshared)
  • 98. 96 J U M P Y M O N K E Y show delete this clone change NumBananas ▾ by –1 when I start as a clone go to x: set size to % set color ▾ effect to wait until pick random 0 to 200 y: pick random –140 to 140 pick random 50 to 100 pick random –10 to 20 touching Monkey2 ▾ ? broadcast GameOver ▾ if then NumBananas = 0 Add the next script to place each banana clone in a random spot on the right of the stage, change how it looks, and make sure it’s not hidden. The clone will wait for the monkey to touch it and then disappear. If it’s the last banana, it sends a“GameOver”message, which you need to create as a new message. The game is too easy— we need an obstacle. Add the Palmtree sprite to the project. Drag and drop the tree at the bottom of the stage. Run the project. You should be able to get the monkey to collect all the bananas. There is no script run by the“GameOver” message yet. Position the palm tree so that part of its trunk is off the stage. △ Tree on stage Make sure your palm tree is slightly off- center, toward the left of the stage, or the bananas will get stuck behind the tree and the game won’t work. Yum yum! Choose“new message” and call it “GameOver”. 9 10 11 Jumpy Monkey by FunkyMonkey66 The ranges of the“pick random”blocks send bananas only to the right side of the stage.
  • 99. 97 G A M E P R O G R E S S 5 0 % At the moment, the monkey can fly straight through the tree. Change his script so that he stops flying if he touches it. △ Logic blocks Logical Operators blocks such as these three let you test for complex sets of conditions. move move steps steps LaunchSpeed LaunchSpeed repeat until touching edge ▾ ? repeat until touching edge ▾ ? or touching Palmtree ▾ ? Run the project. The monkey should stop flying when he hits the tree, which makes any bananas to the right of the tree impossible to reach. Don’t worry, gravity will come to the rescue soon. The block is true if either or both blocks inside are true. The block is only true if both blocks inside are true. The block is only true if the block inside is false. E X P E R T T I P S “or”, “and”, “not” So far, most of the“if then”blocks in this book have tested only a single condition, such as“if touching cat”in the Star Hunter game. In this chapter, however, you need to test two conditions at once: “touching edge or touching Palmtree”. Complex sets of conditions like this occur a lot in coding, so you need a way to combine them. In Scratch, the green Operators blocks do the job. You’ll see words like“or”,“and”, and“not”in almost every programming language, or special symbols that do the same job. or not and I want those bananas! 12 13 Modify the script by adding the“or” block from the Operators menu. The current script Add a“touching Palmtree?” block from the Sensing section.
  • 100. 98 J U M P Y M O N K E Y Make two more variables for all sprites:“FallSpeed”and “Gravity”. Then add a“set Gravity”block to the monkey’s “when clicked”script and amend his“when space key pressed”script as shown below. The new blocks use variables to simulate gravity.“FallSpeed”keeps track of how many steps the monkey needs to be moved down by gravity. The value of“Gravity”is how much “FallSpeed”increases each time the monkey moves. when clicked set rotation style don’t rotate ▾ go to Launcher ▾ set size to 35 % set Gravity ▾ to –0.2 set FallSpeed ▾ to 0 This new block contains the variable “Gravity”, which makes the monkey fall faster each time the loop runs. Add this block to the“when clicked”script. This new block shows that at the moment of launch, the monkey isn’t falling yet. This new block moves the monkey down. △ Hiding variables If you don’t want variables to appear on the stage, you need to uncheck the box next to them in the Data section. Do this for these two new variables. Deselect the box next to a variable to stop it appearing on the stage. Make a Variable Make a List FallSpeed Gravity LaunchSpeed NumBananas go to Launcher ▾ go to Launcher ▾ when space ▾ key pressed point in direction direction ▾ of Launcher ▾ move change y by change FallSpeed ▾ by steps LaunchSpeed FallSpeed Gravity 14 repeat until touching edge ▾ ? or touching Palmtree ▾ ?
  • 101. 99 G A M E P R O G R E S S 6 7 % Without gravity this monkey flies off in a straight line. Gravity pulls this monkey downward, making him fall faster every second. Without gravity the monkey would get to here. With gravity the monkey ends up here. △ Gravity effect When“FallSpeed”is combined with the straight line from the Launcher, the monkey’s path curves back toward the ground in a realistic manner. ◁ Falling faster The“FallSpeed”variable makes the monkey fall farther each time the“repeat”loop runs. Run the project again—you can now direct the monkey over the tree to reach the tricky low bananas. But how exactly is the Scratch gravity working? Every second, the monkey falls a little bit faster than the second before, creating a downward curve. Falls this far in the first second. Falls this far in the second second. Falls this far in the third second. E X P E R T T I P S Real world gravity In the real world, when you try to throw something in a straight line it curves slowly back toward the ground as gravity pulls it down. To make the game work in the same way, you move the monkey along the straight line, but also add a downward move after each shift along that line, to create the same effect as the constant downward tug of gravity. This allows the monkey’s movement to seem natural, making the game more engaging. The monkey moves sideways by the same amount each second. It falls by an increasing amount each second. 15
  • 102. 100 J U M P Y M O N K E Y Game over When the monkey has collected all the bananas, a“GameOver”message is broadcast, ending the game. Make a sign to go with it to tell the player how many launches were used to collect the bananas. Click the paintbrush symbol to paint a new sprite and make a sign like the one below, leaving a gap in the text where the number of launches will go. You can make the sign as plain or as decorative as you like. Name the new sprite“GameOver”. Now add a variable for all sprites to count the number of launches. Call this variable“Launches”, show it on the stage, and right-click on it to change it to“large readout”. This shows just the value and not the name of the variable. You’ll reposition the launch counter later. Now add these scripts to your sign. Together, they will count the number of times you launch the monkey and will display that number at the end of the game. Launches 0 when clicked set Launches ▾ to 0 change Launches ▾ by 1 go to x: 0 y: 0 Hide variable Launches ▾ Show variable Launches ▾ hide show go to front stop all ▾ Select“large readout”. You don’t want to see this variable until the game’s over. This shows the value of “Launches”at the end of the game. This block counts the number of times the space key is pressed. when I receive GameOver ▾ when space ▾ key pressed WELL DONE! You used launches normal readout large readout slider hide Leave a gap here. 17 16 18 Right-click on“Launches” on the stage.
  • 103. 101 G A M E P R O G R E S S 8 3 % Make some noise To make the game more interesting, you can add some sound effects. Follow the instructions below to play different sounds when the monkey is launched and when he eats the bananas. Run the game and collect all the bananas. When you see the“Game Over”sign on the stage, drag the“Launches”counter into the gap in the sign. Scratch will remember its position in future games, so the sign will always be in the right place. Click the Monkey sprite, select the Sounds tab, and load“boing”from the library. Then add a“play sound” block to the existing monkey script in the position shown here. This will make the“boing”sound play every time the monkey jumps. Click the Bananas sprite and load “chomp”from the sound library. Then add a“play sound”block to the existing banana script in the position shown here. Now the “chomping”sound will play each time the monkey gets a banana. To add a backdrop, click on the stage information area in the bottom left and then choose the Backdrop tab at the top. Either paint your own scenery or load an image from the library. Use the text tool to add the game’s instructions to the image, as shown below. Draw the arrows with the pencil or paintbrush tool. Drag the“Launches”number into the gap you left in the sign. WELL DONE! You used launches 7 go to Launcher ▾ when space ▾ key pressed Add this sound block to the existing Monkey2 script. Add this sound block to the existing Bananas sprite script. show change NumBananas ▾ by -1 wait until touching Monkey2 ▾ ? 19 21 22 20 play sound boing ▾ play sound chomp ▾ LAUNCH ANGLE LAUNCH SPEED PRESS SPACE TO FIRE Jumpy Monkey by FunkyMonkey66 (unshared) Jumpy Monkey by FunkyMonkey66 (unshared)
  • 104. 102 J U M P Y M O N K E Y Playing with gravity Add a slider to the game to allow you to experiment with the“Gravity” variable. The slider will allow you to tweak the“Gravity”value—you can even make the monkey fall upward. Displaying variables You can change how a variable is shown on the stage. There are three different options: normal readout, large readout, and slider. You can also hide the variable using this menu. Choose the look that works best for your game. Gravity Gravity 0 0 Shows the name. Shows just the value. Lets you change the value. Select the “slider” option. Move this with your mouse to adjust the number. Set the range of the slider by right-clicking on the slider again. E X P E R T T I P S To adjust gravity in your game world, show the“Gravity”variable on the stage by checking its box in the Data section. Then right-click the variable display on the stage and select“slider”. The slider lets you change the value of a variable on the stage. To set the range of the variable, right-click on the slider and type in the minimum and maximum values—for this game use –2.0 and 2.0. Make sure you type 2.0 not just 2, or the slider will only allow you to select whole numbers within the range. Hides the variable from the stage. normal readout large readout slider hide normal readout large readout slider hide Gravity 0 Gravity Gravity 0 –0.18 normal readout large readout slider set slider min and max hide Slider Range OK Cancel Min: Max: –2.0 2.0 23 24 -0.2
  • 105. 103 G A M E P R O G R E S S 1 0 0 % G A M E D E S I G N Game physics Physics is the science of forces and movement in the real world. Game physics is all about getting that science into games, so that things react and move around in realistic ways—being pulled down by gravity, for instance, or bouncing. Programmers have to solve all types of physics problems to make games more realistic or fun. When objects collide, should they bounce or crunch? How should objects move when they go underwater or into space? △ Defying gravity Game physics doesn’t have to be like real-world physics—you can create worlds with gravity that makes things fall upward or even sideways. Gravity can be much stronger or weaker than in real life—perhaps balls fly higher with each bounce, until they shoot off into space. No gravity makes the monkey move in a straight line. A positive gravity value will make the monkey fall upward. A negative gravity value makes the monkey fall downward, which is closest to real life. Now play around with the gravity settings in this game using the slider. Using the suggested value of –0.2 works well, but take a look at what happens when you increase or decrease this number—if it is positive, the monkey will fall upward. When you’ve finished experimenting with gravity, right-click on the slider and select“hide”to return the game to normal. Now you know how gravity works, you could try making a version of the game with reverse gravity so the monkey falls upward. Think about what changes you’d need to make to the game for this to work, like moving the Launcher to fire downward. Help!!!! 26 25
  • 106. 104 J U M P Y M O N K E Y Hacks and tweaks Congratulations—you’ve built your first game with gravity. Once you’ve tried the game a few times, you can start to play around with the code to make the game your own. Here are a few ideas to try out. ◁ Banana bonanza Try adding more bananas, making then bigger or smaller, and put them in different places on the screen. ▽ Fruit salad Add more fruits with a different score for each type. You’ll need to make a“Score”variable and add extra sprites—there are oranges and watermelons in the Scratch sprite library. ▽ Beat the clock You can add a timer to make the player complete the game in a set time. Create a new variable called“TimeLeft”and add the script below to the Monkey2 sprite. Then create a new sprite, click on the Costumes tab, and make a sign that says“Times Up!” Finally, add the two scripts on the right to this sprite. This sets the timer to 20. Make sure this variable is visible on the stage. wait 1 secs change TimeLeft ▾ by –1 repeat 20 when clicked set TimeLeft ▾ to 20 Broadcasts Time’s Up ▾ when clicked hide show go to x: 0 y: 0 go to front when I receive Time’s Up ▾ stop all ▾ These scripts hide and display the “Time’s Up”sign.
  • 107. 105 H A C K S A N D T W E A K S ▽ Mouse control You could use a computer mouse as the controller for this game instead of the keyboard. The three blocks below allow you to set the launch angle and speed as well as making the monkey jump. See if you can figure out some code to use them. ▽ Launch speed slide You’ve already tried adding a slider to control gravity. You could also add a slider to adjust launch speed. ▷ Bouncing bananas To make the game a bit harder, you could try changing the Bananas sprite scripts so that the bananas bounce up and down on the stage. ▷ Danger! Snake! Add another challenge by creating an obstacle that gets in the monkey’s way or maybe ends the game—perhaps a giant monkey-eating snake or spider? ▽ Bug or bonus? You might have discovered that you can adjust the monkey’s speed in flight with the arrow keys. You can fix this by adding a new variable, “MonkeySpeed”, and copying the value of “LaunchSpeed”into it at launch. Then use MonkeySpeed not LaunchSpeed in the move block for the monkey. Or, if you enjoy being able to change the monkey’s speed, leave the game as it is. Sliders let you change these variables using the mouse instead of the arrow keys. Use this block to make the monkey jump. Gravity LaunchSpeed 0 0 distance to mouse-pointer ▾ mouse down? This block could be used to set launch speed. Use this block to set launch angle. point towards mouse-pointer ▾
  • 110. 108 How to build Doom on the Broom Games usually have a theme. This spooky game starts with bats swooping in on the player, followed by scary ghouls and monsters. Get ready to bring these sprites to life with animation. The witch is out riding her broomstick in the woods when creatures of the night begin to advance on her from all sides. She must cast her fireball spell to dispose of the bats, ghosts, ghouls, and dragons that have taken a fancy to her for dinner. ◁ Witch The witch sits in the center of the screen. Spin her broomstick with the arrow keys and cast fireballs with the space bar. ◁ Enemies Every enemy hit by a fireball is destroyed and a point is scored. As you win points, the game speeds up. ◁ Lives The witch loses a life if she is touched by any of her enemies. But if a flying hippo touches her, she wins an extra life. Doom on the Broom by WorkingWitch111 (unshared) Score 25 AIM OF THE GAME Superfast brown bats have a speedier attack. Slow-moving ghosts drift in and fade away when hit. D O O M O N T H E B R O O M EXTRA LIFE
  • 111. 109 Lives 3 ◁ Staying alive As the game progresses, more and more monsters fly toward the witch. The player must turn the broomstick quickly and pick off enemies one by one. The witch stays in the center of the stage. Fireballs are the witch’s only weapon. Fire-breathing dragons spiral in to catch the witch. Like dragons, ghouls spiral in toward the witch. Black bats flap straight toward the witch. To make the game last longer, you can increase the number of lives. Do you dare to begin? H O W T O B U I L D D O O M O N T H E B R O O M GAME CONTROLS Use the arrow keys and the space bar on the keyboard as game controls. Space
  • 112. 110 D O O M O N T H E B R O O M Setting the scene Doom on the Broom has a spooky theme. The sprites, backdrop, and music are all chosen to create a certain atmosphere that draws the player into the game world. Start by putting together the Witch sprite, a dark wood, and some creepy music. Start a new project and call it Doom on the Broom. Delete the Cat sprite. Click the sprite symbol in the sprites list and choose the Witch sprite from the library. Load the sound“cave”from the sound library and add this script to the stage’s scripts area. Run the project and admire the spooky atmosphere you’ve created. Click on the“Choose backdrop from library” symbol and add the backdrop“woods”. This will lend an eerie setting to the game, which fits with the theme. play sound cave ▾ until done change color ▾ effect by 1 forever forever when clicked when clicked Witch This block keeps the sound playing in a loop. Click to open the sprite library. New sprite: The Witch sprite will appear in your sprites list. For extra creepiness, add another script to the stage to make it slowly but continually change color while the game is playing. This block changes all the colors in the backdrop by a small amount each time it’s run. 1 2 3 4 Doom on the Broom by WorkingWitch111 (unshared) Doom on the Broom by WorkingWitch111 (unshared)
  • 113. 111 G A M E P R O G R E S S 1 1 % G A M E D E S I G N Animation You can make pictures appear to move by showing slightly different versions of the same picture one after another. This fools the brain into thinking that it is a single moving image. This is called animation, and it is how all cartoons work. Scratch lets you animate a sprite by rapidly changing costumes that show it in different poses. When these costumes appear one after the other, you can see flapping bats, walking cats, and jumping frogs. The bat looks scary but it doesn’t move. Click the Costumes tab and look in the middle—you’ll notice the bat has two different costumes. These two costumes can be used to make the bat flap its wings. Add this script to the bat to make the costumes swap back and forth. Now run the project to see the bat flapping its wings. This sets the flap speed of the bat. New costume: next costume bat2-b 151x78 2 bat2-a 139x87 1 wait 0.1 secs forever when clicked Now add the witch’s first enemy: a sinister black bat. Open the sprite library, select Bat2, and click“OK”. Bat2 5 6 7
  • 114. 112 D O O M O N T H E B R O O M Controlling the witch Your spooky game is now starting to take shape, but you’ll need to add some more scripts to get things working. The next script lets the player take control of the witch. when clicked E X P E R T T I P S Arithmetic operators Computer programmers have to use special symbols to do math. Almost every computer language uses * for multiply and / for divide because the usual symbols aren’t on a computer keyboard. Look in the green Operators section for the arithmetic operators. Click on the blocks in the scripts area to see the answers appear in a speech bubble. Go to Data in the blocks palette and then click“Make a Variable”. Create the variables“Score”,“Lives”, and “GameSpeed”, making sure that the“For all sprites”option is selected. Show the variable“Score”and“Lives”on the stage. Add the following script to the witch to set things up and to control her with the arrow keys. Read the script carefully and test it to see if it works. set GameSpeed ▾ set Score ▾ set Lives ▾ to 1 to 0 to 3 set size to 35 % show go to x: 0 y: 0 point in direction 90 ▾ if if key left arrow ▾ pressed ? then key right arrow ▾ pressed ? then forever turn turn degrees degrees GameSpeed * 2 GameSpeed * 2 These blocks set up the game and the Witch sprite. This control loop continually checks on the arrow keys that spin the witch. This controls how fast the witch turns. ◁ Controlling the pace The variable“GameSpeed” controls the overall pace of the game. For now fix it at 1. Later, you’ll find out how to increase it as the score rises, speeding up the game. 9 5 14 3.5 7 + 2 7 – 2 7 * 2 7 / 2 8 This block fixes the pace of the game at 1.
  • 115. 113 G A M E P R O G R E S S 2 2 % Casting fireballs The witch’s only defense against the rampaging spooks will be her fireball spell. The next script will make a fireball shoot from her broomstick when the player presses the space bar. show move 20 steps move 10 steps delete this clone go to Witch ▾ direction ▾ of Witch ▾ when I start as a clone point in direction repeat until touching edge ▾ ? Add the Ball sprite from the library and rename it“Fireball”. It’s currently too big, but you’ll shrink it down in a moment. Add the following two scripts to the Fireball sprite. Each fireball launched by the witch will be a clone of the sprite. Now add this script to the witch to create a clone of the Fireball sprite when the space bar is pressed. The“wait until”block pauses the script until the space bar is released, so only one fireball is launched for each press. Try the script and check if you can spin the witch and shoot fireballs. The fireball shoots off, disappearing at the edge of the stage. This block hides the original sprite so that you only see the clones. These blocks make a fireball appear at the tip of the witch’s broom. The fireball copies its direction from the witch. This makes the clone visible while the original sprite stays hidden. Click the blue“i”button to open the information panel and rename the sprite. Fireball when clicked set size to 10 % hide 9 10 11 if key space ▾ pressed ? then forever when clicked create clone of Fireball ▾ wait until not key space ▾ pressed ? This block creates a clone and triggers the script above. Without this block, the player could hold the space bar for a constant stream of fireballs. Find this block in the Sensing section and change“x position”to “direction”in the drop-down menu.
  • 116. 114 D O O M O N T H E B R O O M Add these two scripts to the bat. They work together to create an endless supply of bats that advance toward the witch from random points around the edge of the stage. These blocks send the bat clone to the edge of the stage. These blocks create bats every 5–10 seconds. Click the drop-down menu, select“New message”, and name the message“Lose a life”. This moves the bat toward the center of the stage until it touches the witch. This block destroys the bat when a fireball hits it. Bat attack One flapping bat isn’t going to scare a powerful spellcaster like the witch, but you can add clones to make a whole squadron of bats. when clicked when I start as a clone hide show forever wait secs point in direction move steps pick random 5 to 10 set rotation style left-right ▾ go to x: 0 y: 0 move 300 steps create clone of myself ▾ broadcast Lose a life ▾ play sound pop ▾ until done change Score ▾ by 1 delete this clone delete this clone point towards Witch ▾ pick random –180 to 180 GameSpeed repeat until if then touching Witch ▾ ? touching Fireball ▾ ? This block hides the original sprite, so you only see the clones. 12
  • 117. 115 G A M E P R O G R E S S 3 3 % It’s a good idea to remove all the bats whenever the witch loses a life. This gives her a chance to recover before the next wave of attackers. Add this script to the bat to do the job. When the message“Lose a life”is received, every clone runs the script and all the bats disappear. Run the project to see if it works. A bat should appear after a few seconds and will move toward the witch. Soon more will appear. The witch should be able to use her fireballs to destroy them. All the bats will disappear when one finally reaches the witch. You might notice that the bats aren’t flapping anymore. To fix this, adjust the script below so that it runs for each clone rather than just the original sprite. Add this block to the start of the script. The hidden bat moves to the center of the stage. It moves to the edge of the stage and reveals itself. Remove this block. The bat picks a random direction. when clicked when I receive Lose a life ▾ when I start as a clone forever wait 0.1 secs next costume delete this clone ▷ How does it work? The three blue Motion blocks at the start of the bat clone’s script move the clone to a random point at the edge of the stage. The hidden clone first moves to the center and picks a random direction. Then it moves 300 steps—far enough to reach the edge in any direction. This way, bat clones will attack from every direction with equal chance. The witch doesn’t touch the bat when it first moves to the center, because you can’t touch a hidden sprite. 13 15 14
  • 118. 116 D O O M O N T H E B R O O M Adding explosions Not much happens when the witch loses a life. Fix this to make the witch go out with a bang by creating some fireworks, adding a scream, and updating the counter that shows how many lives she has left. Add this script to the witch to make her react to losing a life. If she still has lives left, she will disappear for two seconds before returning to battle. If she’s out of lives, then it’s game over. Add a new message, “GameOver!”, which you’ll need later in the project. Now try the game again. The witch should lose lives and stop completely when the “Lives”variable has a value of 0. To create fireworks you need a new sprite. Load another Ball sprite from the sprite library rather than copying the Fireball sprite. Rename this new sprite“Explosion”and then click on the Costumes tab. Select the second costume so that the ball turns blue. when I receive Lose a life ▾ hide play sound scream-female ▾ change Lives ▾ by –1 if Load“scream- female”from the sound library. This makes the witch reappear after a pause if she has any lives left. The“GameOver!”message will trigger a sign that you’ll create later. Select the second costume for the Ball sprite. ball-b 45x45 2 Lives > 0 then show wait 2 secs else wait 1 secs stop all ▾ broadcast GameOver ! ▾ and wait 16 17
  • 119. 117 G A M E P R O G R E S S 4 4 % When a bat touches the witch, she explodes into a circle of flying blue balls. Now add these two scripts to the Explosion sprite. The first script creates 72 tiny, hidden blue ball clones, all pointing in different directions. The second script makes them fly out in a circle from the witch’s location. Read the scripts carefully and try to work out what triggers the explosion. When the Explosion sprite receives the message“Lose a life”, all the blue ball clones appear at the witch’s location and explode out to the edge of the stage before hiding once again. Run the game and let a bat reach the witch to check how it works. when I receive Lose a life ▾ show create clone of myself ▾ when clicked set size to 5 % hide hide repeat 72 turn 5 degrees go to Witch ▾ repeat until touching edge ▾ ? move 10 steps This makes each clone point in a different direction. The Explosion clones move outward, disappearing at the edge of the stage. 18 19 Doom on the Broom by WorkingWitch111 (unshared) Score Lives 0 1
  • 120. 118 D O O M O N T H E B R O O M Bat 2 Speedy specter It’s now time to increase the fear factor and add a different type of bat to the game. You can copy the existing black bat, and add new costumes and alter the scripts to create a superfast brown bat. To avoid having to rebuild every script from the black bat, simply right-click it and create a copy by selecting“duplicate”. A sprite named Bat3 will appear in the sprites list. Rename it“Fast bat”. Add the two new costumes, “bat1-a”and“bat1-b”. They show a brown bat with wings in two different positions. Now delete the unnecessary black bat costumes in this sprite. To do this, select the costume you want to delete and then click the small“x”in the top right. Scripts New costume: Costumes 1 1 Bat2-a 139x87 2 Bat2-b 151x78 Click here to add new costumes. Click on Fast bat’s Costumes tab—you’ll see the copied black bat’s two costumes. To make Fast bat look different from the black bat, you need to load some new costumes. Click on the symbol at the top to choose a new costume from the library. 3 bat1-a 115x125 4 bat1-b 101x103 Click here to delete the costume. Click here to copy the sprite. Bat2-a 139x87 info duplicate Use costumes to change our looks, expressions, or posture. 20 21 23 22
  • 121. 119 G A M E P R O G R E S S 5 6 % The game would be too hard with lots of fast bats, so make the following changes to the existing script to make them appear later in the game and less frequently. This block sets the time between the Fast bats. Add a “wait 20 secs” block. when clicked set rotation style left-right ▾ create clone of myself ▾ hide forever wait pick random 15 to 20 Scripts Motion Looks Control Events Sound Sensing Pen Operators Data More Blocks Costumes Sounds x: -166 y: 27 move 10 steps glide 1 secs to x: 0 y: 0 go to x: 0 y: 0 point in direction 90 ▾ point towards ▾ go to mouse-pointer ▾ turn 15 degrees turn 15 degrees when I start as a clone forever wait 0.15 secs next costume when clicked set rotation style left-right ▾ create clone of myself ▾ hide wait 20 sec forever when I start as a clone show point in direction move go to x: 0 y: 0 move 300 steps broadcast Lose a life ▾ play sound pop ▾ until done change Score ▾ by 1 delete this clone delete this clone point towards Witch ▾ pick random –180 to 180 repeat until if then touching Witch ▾ ? touching Fireball ▾ ? when I receive Lose life ▾ delete this clone wait pick random 15 to 20 To speed up the fast bat, change its“move”block to make the brown bat move twice as fast as the black bat. move steps play sound pop ▾ until done change Score ▾ by 1 delete this clone GameSpeed repeat until if then touching Witch ▾ ? touching Fireball ▾ ? * 2 move steps GameSpeed Add the green Operators block to the “move”block. Check that you have four scripts in Fast bat’s scripts area, just like in Bat2. Run the game. After a few black bats have attacked, a faster, much more dangerous one will appear, flapping away. Fast bat’s scripts area should look like this. Type“2” here. Type“15”here. 24 25 26 * 2 steps GameSpeed wait 20 secs
  • 122. 120 D O O M O N T H E B R O O M Dragon direction: 90° x: -127 y: 106 rotation style: can drag in player: show: Fire-breathing dragon The witch’s next enemy is a fire-breathing dragon. Instead of flapping straight toward the witch as the bats do, it will spiral in slowly, which gives her more time to defend herself. Copy the Bat2 sprite again, but rename it“Dragon”. Load the two new costumes“dragon1-a” and“dragon1-b”, then delete the two bat costumes. Next, modify the dragon’s movement to make it fly in a spiral path by moving the “point towards Witch”block into the“repeat until” loop and adding a“turn right 80 degrees”block. Now make a few changes to the scripts in the copied sprite. First, change the costume script to make the dragon breathe fire in short bursts. Type the new sprite’s name here. Dragon 27 28 29 wait 2 secs when I start as a clone switch costume to dragon1-a ▾ switch costume to dragon1-b ▾ forever The second costume shows the dragon breathing fire. The first costume shows the dragon with no fire. wait 0.5 secs move steps play sound pop ▾ until done change Score ▾ by 1 delete this clone GameSpeed if then touching Fireball ▾ ? point towards Witch ▾ turn 80 degrees repeat until touching Witch ▾ ? These blocks make the dragon spiral in toward the witch.
  • 123. 121 G A M E P R O G R E S S 6 7 % Add a“wait 10 secs”block to the main script to delay the dragon’s arrival on the stage. Then change the numbers in the“pick random” block to“10”and“15”. This will make a clone of the dragon appear every 10–15 seconds. Once you’ve made all the changes, test the game to see if it works. G A M E D E S I G N Working with themes In Doom on the Broom, spooky scenery and supernatural characters work together to give the game a theme. A strong theme that ties together △ Story A background story or quest helps give a game a theme. Perhaps the player is trying to escape a haunted house, search for underwater treasure, or explore an alien planet. Instead of inventing a story, you can use a well-known one, but give it a twist, such as putting Goldilocks and the three bears in space. △ Sprites The player is usually the hero in a game, so choose a likable sprite. The enemies don’t have to look scary—even cute sprites can seem scary when they attack. If players have to collect objects, make them look valuable, such as coins or gems. △ Music and sound effects Sounds in a game have a big influence on how the player feels. Spooky music makes the player nervous, but happy music makes a game feel cheerful, even if the pictures are spooky. Choose sound effects carefully so they match the sprite or situation that triggers them. △ Scenery If you choose the right backdrop, sprites in the game will look like they are really there rather than stuck on top. You can create your own backdrops in Scratch’s paint editor, but you can also upload images you’ve found or created elsewhere. the elements of a game can make it feel polished and professional. Working with themes is also great fun because you can let your imagination run wild. 30 create clone of myself ▾ hide forever wait pick random 10 to 15 Type“10”and“15” in the windows. secs Add a 10-second delay. wait 10 secs when clicked set rotation style left–right ▾
  • 124. 122 D O O M O N T H E B R O O M Ghost Supernatural heroes should have supernatural enemies, so add some ghosts and ghouls to chase the witch. Instead of vanishing when fireballs hit them, the ghosts will fade away. To create the ghost, make a copy of the Bat2 sprite again. Rename the new sprite“Ghost” and replace the Bat2 costumes with“ghost2-a” and“ghost2-b”. Modify the script below so the costumes change every second. Change the number to“1”. when I start as a clone forever wait 1 secs next costume You can add sounds to your sprites from the sound library. 1 Bat2-a 139x87 Change the ghost’s script so that it moves slowly and fades out when hit by a fireball. Click the Sounds tab above the blocks palette and load the“screech”sound from the sound library. Then change the selection in the“play sound”block to“screech” to make the ghost scream when it vanishes. 31 33 32 2 ghost2-b 138x141 move 1 steps play sound screech ▾ repeat until if then touching Witch ▾ ? touching Fireball ▾ ? Change the block to“move 1 steps”. This makes the ghost fade. change Score ▾ by 1 delete this clone repeat 100 change ghost ▾ effect by 1
  • 125. 123 G A M E P R O G R E S S 7 8 % pick random 5 to 7 Now add a“wait 10 secs”block to the main script to delay the ghost’s first appearance. Change the numbers in the“pick random”block to make ghosts appear more often than bats. The Scratch library has two ghoul costumes that you can use to make another animated enemy. Copy the Dragon sprite and rename the copy“Ghoul”. Click the Costumes tab, load the two ghoul costumes—“ghoul-a”and“ghoul-b”—and then delete the dragon’s costumes. Update the ghoul’s script to use the new costumes and adjust the timings. Once all of your changes are complete, test the game. Try fireballing each enemy to make sure the code works. Add a“wait 10 secs”block. hide forever wait secs create clone of myself ▾ Doom on the Broom x: 153 y: -61 Sprites Stage 1 backdrop New backdrop: New sprite: Backpack move 10 steps glide 1 secs to x: 0 y: 0 go to x: 0 y: 0 point in direction 90 ▾ point towards ▾ go to mouse-pointer ▾ turn 15 degrees turn 15 degrees Ghost Scripts Motion Looks Control Events Sound Sensing Pen Operators Data More Blocks Costumes Sounds x: –157 y: –27 File ▾ Edit ▾ Tips SCRATCH Score 25 Lives 3 Witch Dragon Fireball Explosion Bat2 Fast Bat ghoul-a ghoul-b wait 0.5 secs wait 2 secs when I start as a clone switch costume to ghoul-a ▾ switch costume to ghoul-b ▾ forever when I receive Lose a life ▾ delete this clone repeat 100 play sound screech ▾ change ghost ▾ effect by 1 repeat until then touching Witch ▾ ? touching Fireball ▾ ? change Score ▾ by 1 delete this clone when I start as a clone show go to x: 0 y: 0 move 300 steps broadcast Lose a life ▾ delete this clone point towards Witch ▾ when clicked hide forever wait secs set rotation style left-right ▾ create clone of myself ▾ wait 10 secs when I start as a clone wait 1 secs next costume The ghost should slowly fade when hit with a fireball. Ghosts appear every 5–7 seconds. by WorkingWitch111 (unshared) Double-click on the header block to see the animation working in the sprites list. when clicked set rotation style left-right ▾ 34 35 36 wait 10 secs pick random 5 to 7 forever point in direction pick random –180 to 180 move 1 steps if
  • 126. 124 D O O M O N T H E B R O O M Finishing touches It’s time to add some finishing touches to the game. To make it look more professional, add a“Game Over!”screen that appears when the witch runs out of lives. You can also program the witch to give instructions to the players at the start of the game. Click on the paintbrush symbol in the sprites list to create a new sprite in the paint editor. Using “Bitmap Mode”, draw a rectangle and fill it with a dark color. Now switch to“Vector Mode”. Click on the text tool, choose a font you like, and select red for the text color. Click in the rectangle and type“GAME OVER!”and use the selection tool to make the text large. Remember to fix the center of the sprite with the“Set costume center”tool. Now add these scripts to the Game Over sprite to hide it at the start and show it only at the end when the witch loses all her lives. Run the game. Once the witch loses all her lives, the message will be displayed on the stage. hide show go to x: 0 y: 0 when clicked when I receive Gameover ▾ Select a font here. This centres the sign. Rename the sprite “Game Over”. GAME OVER! Type“GAME OVER!”here. “Set costume center”tool 37 38 wait 1 secs Selection tool Game Over GameOver! Convert to bitmap Vector Mode 100% Clear Add Import Donegal Gloria Helvetica Marker Mystery Scratch Font: Scratch ▾ GAME OVER!
  • 127. 125 G A M E P R O G R E S S 8 9 % Challenger mode As players become more skilled and score more points, they may start to get bored with the game. You can prevent this by making the game faster as it progresses. Add a script to the witch so that she gives instructions to the player at the start of the game. You can change the three seconds in the“say”block if it’s too quick, but not for too long—those bats won’t wait. To make the game speed up as the player scores points, add a block inside the witch’s movement loop that sets the“GameSpeed” variable using the variable“Score”. say Press arrow keys to turn. Press space bar to cast a fireball. ▾ for 3 secs when clicked set GameSpeed ▾ to Score / 100 + 1 if if key left arrow ▾ pressed ? then key right arrow ▾ pressed ? then forever ▷ How does it work? The GameSpeed setting increases with the score. For every 100 points, the speed increases by 1. When the score is 0, GameSpeed is 1. When the score is 50, GameSpeed is 1.5, and after 100 points the game runs at double speed. This is the starting speed of the game. Press arrow keys to turn. Press space bar to cast a fireball. Lower this value to make the game speed up sooner. Type the instructions here. turn degrees GameSpeed * 2 turn 39 40 degrees GameSpeed * 2
  • 128. 126 D O O M O N T H E B R O O M Extra lives hippo So far you’ve mainly added enemies. To help the player, add a friendly flying hippo that gives the witch extra lives if it reaches her without getting hit by a fireball. move steps play sound pop ▾ until done delete this clone GameSpeed repeat until if then touching Witch ▾ ? touching Fireball ▾ ? Copy the Bat2 sprite, but replace its costumes with two copies of hippo1. Use the paint editor to write the messages “EXTRA LIFE”and“DON’T FIREBALL ME!” on the costumes so the player knows it isn’t an enemy. Rename the sprite“Hippo”. Amend the scripts so that instead of gaining a point when you fireball the hippo, you earn an extra life when it touches you. Change the value in the“point in direction” block so the text on the hippo doesn’t get reversed. Change the wait time in the costume script so that the hippo swaps costumes once a second, giving players time to read the signs. when I start as a clone forever next costume wait 1 secs EXTRA LIFE DON’T FIREBALL ME! show point in direction move 300 steps point towards Witch ▾ pick random –180 to 0 Change this value to“0”. 41 42 43 This makes the hippo alternate between its two costumes every second. This block adds an extra life to the Witch sprite’s lives counter. delete this clone change Lives ▾ by 1
  • 129. 127 G A M E P R O G R E S S 1 0 0 % when clicked hide set rotation style don’t rotate ▾ create clone of myself ▾ forever wait secs pick random 30 to 60 To avoid making the game too easy, make the extra lives hippos rare. Change this script so they appear only every 30–60 seconds. Change this to“60”. Change this to“30”. 44 Hacks and tweaks Now that your game works, you can experiment and make it your own by changing and adding elements. Try these suggestions to get started. This block will keep the witch flying. ▷ Flying Witch You can make the witch fly instead of rotating on the spot by adding the script shown here. To make her turn faster while flying, increase the numbers in her“turn”blocks. ▷ Mouse control Use this script to let the player spin the witch with a mouse rather than the keyboard. If the game is too easy, increase the GameSpeed value. You can also try changing the code so the computer mouse casts the fireballs. when clicked forever turn 45 degrees point towards mouse-pointer ▾ move 1 steps forever △ Spell binder Can you think of another spell that the witch can cast? Tweak her script and costumes so she strikes her enemies with lightning, or make her cast some other fancy spells. This block stops the controls from being too easy. when clicked Change this to “don’t rotate”.
  • 132. 130 D O G ’ S D I N N E R How to build Dog’s Dinner Dog’s Dinner is a platform game. In this type of game, the player’s character jumps from platform to platform collecting goodies and avoiding enemies and traps. The key to success is timing your jumps perfectly so you stay in the game. The dog likes bones but hates junk food. Steer him through three levels, jumping from platform to platform. Collect all the tasty bones on the stage and then go through the portal to the next level. But make sure he avoids the unhealthy cakes, cheese puffs, and donuts! AIM OF THE GAME Collect all the bones—you can’t get through the portal without them. ◁ Junk food If the dog touches any junk food, it’s game over and you have to start again on Level 1—no matter which level you were on! ◁ Bones You need to collect all the bones to open the portal to the next level. It will remain shut until you have them all. ◁ Dog Use the left and right arrow keys to make the dog run. When he needs to jump, press the space key. The dog runs and jumps around the level. He can jump only when he’s standing on a platform. Dog’s Dinner by HappyShrimp321 (unshared)
  • 133. 131 The dog must jump over the gaps. When you’ve collected all the bones, the portal to the next level flashes to show it’s open. The donut is a moving hazard. It flies from side to side, getting in the dog’s way. Click the stop sign to end a game. Click the green flag to start a new game. Cheese puffs and cakes are static junk foods—unlike the donut, they don’t move. I always demand quality food! H O W T O B U I L D D O G ’ S D I N N E R GAME CONTROLS Players use the arrow keys and space bar on the keyboard as game controls.
  • 134. 132 D O G ’ S D I N N E R Hold down the shift key and drag the mouse- pointer over the paint editor to draw a small red square. If you click outside your block and look at the list of costumes, you’ll see the size of the square; aim for 35x35. Create a new project and name it“Dog’s Dinner”. To make your simple player, click the paintbrush symbol at the top of the sprites list. Make sure you’re in“Bitmap Mode”. Choose red in the color palette in the paint editor, select the rectangle tool, and click on the filled square option. Player on a platform This is a complicated game, so you’ll need to check your work carefully at every stage. But don’t worry, the project builds gradually, one step at a time. Start by getting a very simple player sprite to work properly with a platform. At first, the player is just a red square. This makes it easy to sense collisions with the platforms. You can add the blue dog on top of it later. The block should be smaller than the cat’s face on the stage. Choose red from the palette. Select“Bitmap Mode”. New sprite: Click the paintbrush symbol. When you click outside the block, its size is shown here. At last I’m going to be a star! 100% Bitmap Mode Convert to vector Click on the filled square. costume1 Scripts New costume: Costumes costume1 35x35 1 2 2
  • 135. 133 G A M E P R O G R E S S 7 % Select the“Set costume center”tool in the top-right corner of the paint editor. Set the center of your sprite near the top of the block (this will be useful later). Rename the sprite “PlayerBlock”. That’s your player sprite done. Now you can delete the cat sprite. Now add a simple platform. Click the paintbrush symbol in the sprites list again to create a new sprite. Use the rectangle tool to draw a floor with two obstacle blocks on top. Call this sprite“Platforms”. On the stage, drag your PlayerBlock and place it between the obstacles, but make sure it’s not touching the platform. PlayerBlock We don’t need you for this game Cat, so we’re deleting you. Yes, I know… but I’ll be back! Platforms sprite Obstacles on platform PlayerBlock sprite Dog’s Dinner 6 5 You can resize your block if it’s too big or too small. Using the“Select”tool, click and drag to draw a square around the block. Use the corner points to resize it. Do this until the size is right. “Select”tool Use the corner points to resize the block. 4 by HappyShrimp321 (unshared) 3
  • 136. 134 D O G ’ S D I N N E R Running around The next step is to make the PlayerBlock run when the player presses the arrow keys. You’ll need a script that will stop it running through obstacles by making it reverse when it touches them. To make the code easier to read, you’ll be making your own customized Scratch blocks. With the PlayerBlock sprite selected, go to the blocks palette under the Scripts tab and click on More Blocks. There are no blocks in this section yet, only some buttons. Click on the“Make a block” button, and a box called“New Block”will pop up. Type“Run controls”in the window to name your new block and then click“OK”. I love using these subprogram blocks! The new block appears in the More Blocks section, and a special purple“define”header block appears in the scripts area. New Block Run controls ▸ Options OK Cancel Type the name of your new block here. Make a Block Run controls define Run controls Costumes Sounds Scripts Motion Looks Control Events Sound Sensing Pen Operators Data More Blocks Make a Block Add an Extension 7 9 8 Subprograms Scratch lets you group together blocks under a“define”header block and run them by using a new block that you name. This saves you building the same group of blocks again if you want to use it in more than one place. (However, the new block will only work with the sprite that you created it for.) Giving your new block a meaningful name will make your code easy to understand. Most programming languages let you take some useful code, give it a name, and wrap it up as a unit. Different languages call these units different things: subprograms, subroutines, procedures, and functions are some common names. L I N G O
  • 137. 135 G A M E P R O G R E S S 1 3 % In the Data section, create a variable for all sprites called “RunSpeed”to control how fast the player moves left and right. Uncheck the box so it doesn’t appear on the stage. Then build the script shown here under the“define” header. Anywhere we use the “Run controls”block, Scratch will now run this script. Next, add the script below to use your new custom block in a“forever”loop. Now run the project. You should be able to move the red block left and right with the arrow keys, but not be able to move through the obstacles. Type“5”here. When the right arrow key is pressed, the PlayerBlock moves right. The left control works in a similar way to the right control. If the PlayerBlock touches the platform, the move is reversed. define Run controls if if then then key right arrow ▾ pressed? key left arrow ▾ pressed? if if then then touching Platforms ▾ ? touching Platforms ▾ ? 0 – 0 – change x by change x by RunSpeed RunSpeed change x by change x by RunSpeed RunSpeed The red block is trapped between the blue squares. 12 10 11 Run controls when clicked forever set RunSpeed ▾ to 5
  • 138. 136 D O G ’ S D I N N E R Up and down Platform games are all about jumping. You can’t jump without gravity, so you need to add some simulated gravity to the game. You may recognize how the simulated gravity works if you built the Jumpy Monkey game. Add two more variables for all sprites:“Gravity”and“FallSpeed”. Uncheck both boxes. Then click on More Blocks and make a new block called“Simulate gravity”, following the script shown here. It moves the PlayerBlock down by the amount “FallSpeed”and then checks to see if the PlayerBlock has hit the platforms. If so, it reverses the last move and sets“FallSpeed”to zero so that the platform stops the player’s fall. Insert the blocks shown here into the PlayerBlock’s main script. Make sure you set the value of “Gravity”to“–1”and set FallSpeed to“0”. When“FallSpeed”is negative, the PlayerBlock falls. Gravity change FallSpeed ▾ by change y by 0 – change y by set FallSpeed ▾ to 0 else if then touching Platforms ▾ ? define Simulate gravity If the PlayerBlock isn’t touching a platform, this block makes it fall faster. You need to set the value of gravity! Run controls when clicked forever set RunSpeed ▾ to 5 set Gravity ▾ to –1 set FallSpeed ▾ to 0 Simulate gravity FallSpeed FallSpeed 14 13 Insert“set Gravity to”and “set Fallspeed to”here. Put“Simulate gravity” into the“forever”loop. This block makes the PlayerBlock stop falling when it lands on a platform.
  • 139. 137 G A M E P R O G R E S S 2 0 % Run the project. Grab the red square with the mouse and drop it from above the platform. It will fall down and come to rest on the platform. But there’s a problem: it slows down just above the platform. That’s because our method makes the block reverse after hitting the platform and then start falling again at a slower speed. We can fix that later. Now to create the jump. It’s really easy: just add some new code to give the PlayerBlock an upward kick when you press the space bar. First, make a new variable for all sprites called “TakeoffSpeed”. This is the player’s upward speed on a jump. Then create a new block called“Jump control”and define it as shown here. Add the“set TakeoffSpeed to” block into the PlayerBlock’s main script and set it to“12”. Insert the“Jump control” block into the“forever”loop. This block makes “FallSpeed”positive, so the PlayerBlock rises. It finally stops one step above the platform. The PlayerBlock doesn’t fall very smoothly as it gets near to the platform. Run controls define Jump control if then key space ▾ pressed? TakeoffSpeed when clicked forever set RunSpeed ▾ to 5 set TakeoffSpeed ▾ to 12 set Gravity ▾ to –1 set FallSpeed ▾ to 0 set FallSpeed ▾ to Simulate gravity Jump control I think he forgot to set his takeoff speed! What happened there? 16 15 17 Insert“set TakeoffSpeed to“ here. Put“Jump control”into the “forever”loop.
  • 140. 138 D O G ’ S D I N N E R Fixing the jumping bugs There are two bugs that spoil our jumps: one causes the PlayerBlock to jump infinitely high; the other keeps it from falling smoothly. You can fix them by tweaking the jump and gravity controls. To fix the infinite jump bug, add a test to the“Jump control”script to check whether the player is on or just above the platform. (Remember that the“Simulate gravity”script leaves the PlayerBlock one step above the platform, so the two sprites aren’t touching.) This fix will disable the space key when the player is in mid-jump. Try the code above and you’ll find you can only make single jumps from the platform and can’t leap higher by tapping the space key space lots of times. This block makes the PlayerBlock jump only when it’s touching a platform. This block cancels the small downward step. This block moves the PlayerBlock down one step. Maximum jump height now define Jump control if then key space ▾ pressed? if then touching Platforms ▾ ? TakeoffSpeed set FallSpeed ▾ to change y by –1 change y by 1 Now run the project. Press the space key briefly. The PlayerBlock jumps up and comes back down again. You should be able to combine the run and jump controls to jump onto or over the obstacles on the platform. You now have the makings of a platform game! However, there’s another bug: if you keep the space key pressed, the PlayerBlock goes up forever. Try to leap over obstacles. What’s your maximum jump height? 18 20 19
  • 141. 139 G A M E P R O G R E S S 2 7 % To fix the other jumping bug (pausing just above the platform and then falling slowly again), you need to change what happens when the PlayerBlock touches the platform. At the moment, the red square reverses by the whole“FallSpeed” number when it hits a platform. Instead, we’ll make it reverse in tiny steps until it’s just above the platform. Create a new variable called“ReverseStep”for all sprites. Change the“define Simulate gravity”script as shown here. The PlayerBlock lands inside the platform. It reverses in single steps until it’s just above the platform. ▽ How it works When the PlayerBlock hits the platform, the“repeat until” loop reverses the PlayerBlock until it sits just one step above the platform. This“if then else” block works out which way the PlayerBlock needs to reverse. If the PlayerBlock is falling (“FallSpeed”is negative),“ReverseStep” is set to +1 (up). If the PlayerBlock is rising or stationary, “ReverseStep”is set to –1 (down). The red square reverses by 1 step. 21 define Simulate gravity FallSpeed set ReverseStep ▾ to 1 FallSpeed set ReverseStep ▾ to –1 touching Platforms ▾ ? repeat until not touching Platforms ▾ ? change y by then then else if if < 0 change y by Gravity ReverseStep set FallSpeed ▾ to 0 change FallSpeed ▾ by else
  • 142. 140 D O G ’ S D I N N E R Try the jump again to see for yourself. You’ll notice that the PlayerBlock rises back out of the platform very slowly. But we don’t want that part to happen in slow motion! Scratch has a trick to fix this. Right-click on the“define Simulate gravity”header block and select“edit”from the pop-up menu that appears. An“Edit Block”box appears. Click on“Options” and check“Run without screen refresh”. This will make the gravity script run continually (without showing each reverse step), which will get rid of the slow-motion effect. Now try jumping again. The tweaks you’ve made should help the PlayerBlock jump and land very smoothly. define Simulate gravity change y by FallSpeed set reverseStep ▾ to 1 if FallSpeed if touching Platfor delete add comment help edit Check this box and the whole script will run much faster. ▾ Options Add number input: Add string input: Add boolean input: Add label text: Run without screen refresh OK Cancel text Simulate gravity I’ve never seen a square land so smoothly! Edit Block 23 24 22
  • 143. 141 G A M E P R O G R E S S 3 3 % G A M E D E S I G N Which jump? Games use many different types of jump. Which type you choose is key to your game’s design. Here are three common jumps. ▽ Single jump This is the jump you have in Dog’s Dinner—you can only jump if you’re on the ground. You go up and then down, but in some games you can steer left and right during the jump. ▽ Double jump This is the jump you had before you fixed the infinite jumping bug—you can jump again in the air to go higher. In some games there are limits on double jumping—for example, you can only do it if you’re going up. ▽ Wall jump When you touch a wall, you can jump up again. Ninja-type characters often have this power. It’s not very realistic but it’s lots of fun! Falling off the level Platform games are all about staying on the platforms. Add the next script to the PlayerBlock to make the game end if it falls to the bottom of the stage. Make a new block called“Fallen off”, shown below, to check whether the PlayerBlock is at the bottom of the stage. Add it to the “forever”loop. Then build the short script at the bottom of the page to stop the sprite when it gets the“Game over” message. Test the new code: the controls should stop working when you hit the deck. Drop this block inside the“forever”block. 25 Run controls when clicked forever set RunSpeed ▾ to 5 set TakeoffSpeed ▾ to 12 set Gravity ▾ to –1 set FallSpeed ▾ to 0 Simulate gravity Jump control define Fallen off y position if Choose“new message” in this window and then type in“Game over”. This block broadcasts the message when the sprite is less than 20 steps from the bottom of the stage. The“stop”block prevents the player from moving any further. stop other scripts in sprite ▾ when I receive Game over ▾ < –160 broadcast Game over ▾ and wait then Fallen off
  • 144. 142 D O G ’ S D I N N E R Adding a character A red square isn’t a very interesting main character for a platform game. You need something fun that you can animate. It’s time to introduce the dog. Click the sprite symbol in the sprites list to add a new sprite from the library. Select Dog2 and click“OK”. Dog2 is a great sprite to use as it has more than one costume, which means you can animate it. You only need Dog2’s first two costumes for now, so go to the Costumes tab and delete the last costume (dog2-c). Add the script on the left to Dog2. It sticks the dog to the front of the red PlayerBlock so that it moves with it on the stage. The dog switches continually between its two costumes when you press the left and right arrow keys, which makes it look like it’s walking. This block makes the dog face to the right at the start. The“next costume”blocks animate the dog’s walk. The“go to”block places the dog on the red square. The dog appears in front of the red square. The dog faces left if the left arrow key is pressed. set rotation style left-right ▾ when clicked set size to 50 % show go to front next costume next costume point in direction 90 ▾ forever go to PlayerBlock ▾ if if then then key left arrow ▾ pressed? key right arrow ▾ pressed? point in direction –90 ▾ point in direction 90 ▾ Costumes for walking animation Delete this costume. 27 26 28 New costume: dog2-a 127x110 dog2-b 127x104 2 1 dog2-c 121x109 3 duplicate delete save to local file Time for me to disappear! Look – I’m walking!
  • 145. 143 G A M E P R O G R E S S 4 0 % Run the project—the dog will now run around the stage with the PlayerBlock. If its paws are too low down on the platform, you can raise the center point of the PlayerBlock costume (since the dog sticks itself to the PlayerBlock). The dog is just decoration, so it doesn’t really matter if its paws stick out as it walks. It’s the red square that’s doing all the collision detection. You can shift the dog up or down on the platform by moving the center of the PlayerBlock sprite. G A M E D E S I G N Collision detection Collision detection—knowing when and how two objects are touching—is a big programming challenge when building games. This book uses simple collision detection in most games, but Dog’s Dinner uses a collision-detection sprite. ▽ Simple collision detection This method simply checks whether the player sprite is touching a hazard. It’s fine for simple games, but without extra code you don’t know which part of the player is touching and how much is overlapping. And animating the sprite may mean its paws stick out when you swap costumes, creating false collisions. ▽ Collision-detection sprite Using a simple rectangle with an animated sprite on top (like our red square and blue dog) avoids the problem with costumes, because the PlayerBlock is always the same shape and size. But you still don’t know which part of it has been touched. Programming tricks like our reversing script can solve some of the problems. ▽ Mathematical collision detection If you know where everything in the game is and exactly what size it is, then by using clever math you can work out when and how things hit each other. But be warned: this can get really complicated, as you can see below! ▽ Bumper sprites You can surround the player with“bumper” sprites that move with it and detect collisions in each direction. Knowing which direction you’ve hit something allows you to bounce off it correctly. Extra sprites and scripts are needed for this type of detection. B U M P ! B U M P ! B U M P ! B U M P t o t h e f r o n t ! if sqrt((dogx–jellyx)^2+(dogy–jellyy)^2) < (dogR+jellyR) then BUMP! 29
  • 146. 144 D O G ’ S D I N N E R Howling dog To give your blue dog more personality, make him howl with disappointment when the game ends. Load the Dog2 sprite from the library again as a new sprite, but keep only the dog2-c costume this time. Rename the sprite“Howling Dog”. Load the“wolf howl”sound from the sound library. Add these two scripts to make Howling Dog appear when the game ends. Add the short script below to the original Dog2 sprite (not the new Howling Dog sprite) to make it vanish when Howling Dog appears. Run the project and see what happens when the dog falls off the platform. The Howling Dog sprite is hidden until the message “Game over”is broadcast. Delete the dog2-a and dog2-b costumes, because you only need dog2-c. Here we go again! 31 30 32 dog2-c Scripts Costumes Sounds New costume: Howling Dog 121x109 1 go to front go to PlayerBlock ▾ when I receive Game over ▾ when I receive Game over ▾ set rotation style all around ▾ set size to 50 % hide play sound wolf howl ▾ point in direction 0 ▾ show hide when clicked
  • 147. 145 G A M E P R O G R E S S 4 7 % Making the levels The next step is to create the game’s three levels. You’ll need to draw the platforms for each level by hand, matching the pictures on the next three pages as closely as you can. (You’ll add the sprites later.) Skip forward to page 148 to find out how to paint the platforms—you can refer back to pages 145–7 once you’ve started. To help show where the platforms go, this image includes Scratch’s xy-grid. To see the grid when you draw the platforms, select the stage info area in the lower left and click on the backdrop symbol to open the backdrop library. Scroll to the end and choose“xy-grid”. It isn’t essential to do this, but you might find it handy. You can replace the xy-grid with color backgrounds after you’ve made the platforms. ▽ Level 1 Simple colored steps allow the dog to hop downhill, collecting bones. Watch out for the donut, which slides left and right—you need to choose just the right moment to drop past it.  1 0 0 1 0 0  2 0 0  1 0 0 Y 1 0 0 X Dog’s Dinner by HappyShrimp321 (unshared)
  • 148. 146 D O G ’ S D I N N E R ▽ Level 2 On Level 2, the platforms are arranged like the rungs of a ladder. You need to position the platforms very carefully so the dog can drop down without getting stuck but without making it too easy. Dog’s Dinner HappyShrimp321 (unshared)  1 0 0 2 0 0  2 0 0 X 1 0 0 100 Y
  • 149. 147 G A M E P R O G R E S S 5 3 % ▽ Level 3 On the last level, some players will be tempted to try to jump over the donut, but it’s a trap! It’s much easier to collect the first bone and then go back left to avoid the donut altogether. Dog’s Dinner HappyShrimp321 (unshared) X 100 100 200 200 Y 100 1 0 0
  • 150. 148 D O G ’ S D I N N E R Drawing the platforms Now to create the platforms. Dog’s Dinner has three levels, so you need to create three sets of platforms. Each one will be a costume in the Platforms sprite. Create a variable called“Level”for the game’s three levels. Uncheck the box so that it doesn’t show on the stage. To make the game use the correct level costume, add this script to the Platforms sprite. Before you start drawing, click once on this script with the mouse. This runs just this script, centering the sprite on the stage so that platforms will appear in the correct position when you draw them. With the Platforms sprite selected, click on the Costumes tab and then use the paintbrush symbol to create three new costumes. Delete the old test platform costume. Then use the rectangle tool to draw the platforms on each level. Try to match the pictures on the previous pages. Don’t worry about getting them perfect, as you can adjust them later. This block changes the platforms. Don’t add color to the checked area. Use the rectangle tool. Name each costume. The“Select” tool lets you select and move a platform. Select solid color. This block changes the colored backgrounds. Make sure you’re in “Bitmap Mode”. 34 33 when I receive Setup ▾ switch costume to switch backdrop to go to x: 0 y: 0 Level Level New costume: Level 1 Clear Add Import Level 1 397x230 Convert to vector Bitmap Mode 100% 1 Create a new message called “Setup”, which we’ll use later to reset the game each time it starts.
  • 151. 149 G A M E P R O G R E S S 6 0 % To add color to the backgrounds, select the stage info area to the left of the sprites list and then the Backdrops tab. Use the fill tool to fill the paint area with color. Then click on the“Paint new backdrop”symbol to make a new backdrop and fill it with a different color. Repeat to make a third backdrop. Make sure the costumes appear in the correct order here. You can drag and drop them to change the order. New backdrop: 35 Level 3 480x279 3 Level 2 Clear Add Import New costume: Convert to vector Bitmap Mode 100% Level 2 313x360 2 Level 1 397x230 Scripts Backdrops backdrop3 480x360 3 backdrop2 480x360 2 backdrop1 480x360 1 Level 2 313x360 2 Level 1 397x230 New costume: 1 Clear Add Import Level 3 Bitmap Mode Convert to vector 100% 1 Click here to paint a new backdrop.
  • 152. 150 D O G ’ S D I N N E R Creating a game control sprite To make the levels change and set the start positions of all the objects on each level, you will need to build a control script. It’s a good idea to keep this script in its own sprite. Create two variables,“Bones”(to count the number of bones left on the level) and“LevelOver”(to show when the player has finished the current level). Uncheck their boxes. Make an empty sprite using the paintbrush symbol in the sprites list. Name it“Game Control”. Add the following script. It’s a loop that repeats for every level. You also need to make two new messages:“Start”and“Win”. The“Setup”message tells all sprites to move to the correct position on this level. When the player completes the game, the“Win”message is sent. set Level ▾ to 1 set Bones ▾ to 0 broadcast Setup ▾ and wait broadcast Start ▾ broadcast Win ▾ when clicked repeat until Level = 4 wait until LevelOver = 1 change Level ▾ by 1 △ How it works This script goes once around the loop for each level of the game. Then it moves on to the next block, which broadcasts a“Win”message to say that the player has won. The first broadcast is the message “Setup”, which gets the sprites and background in position ready for the start of this level. It waits for all the receiving blocks to finish setting up before moving on. Then the“Start”message is sent. This triggers all the working scripts for the level, which move the sprites and look out for collisions. You have me under your complete control! I have you under my complete control! That’s what happens when you go looking for collisions! “Start”tells all sprites that this level is now running and makes them check for collisions or move. “LevelOver”is set to 1 when the player reaches the portal, signaling the end of the level. 36
  • 153. 151 G A M E P R O G R E S S 6 7 % Change the PlayerBlock’s main script so that the Game Control sprite’s loop can trigger it with the“Start”message. With the PlayerBlock sprite still selected, add this next script to set its start position for each level when the“Setup”message is received. The script starts by ghosting the sprite completely, so that you see only the dog, not the red square. Ghosting is different from hiding a sprite because collisions can still occur—which is exactly what we want! You also need to change Dog2’s script so that it’s triggered by the“Start”message. Swap the green flag header for the“when I receive Start” message. Run controls Fallen off when clicked forever set RunSpeed ▾ to 5 set TakeoffSpeed ▾ to 12 set Gravity ▾ to –1 set FallSpeed ▾ to 0 Simulate gravity Jump control set ghost ▾ effect to 100 set rotation style don’t-rotate ▾ if if if then then then Level Level Level = 1 = 2 = 3 go to x: –120 y: 135 go to x: 20 y: 180 go to x: –30 y: 140 set rotation style left-right ▾ when clicked set size to 50 % show point in direction 90 ▾ forever go to PlayerBlock ▾ 39 37 38 when I receive Start ▾ when I receive Setup ▾ when I receive Start ▾
  • 154. 152 D O G ’ S D I N N E R Placing the portals Your game needs portals for the player to be able to progress through the levels. A portal is like a doorway that opens up when the player has completed a level. Try running the project again. You should be able to run and jump on the Level 1 platforms, but at the moment there’s no way to get to Level 2. Click the sprite symbol in the sprites list to open the sprite library. Add Button1 to your game and change its name to“Portal”. The portal needs a“Setup”script to position it correctly in each level and to make it slightly see-through before it opens. set ghost ▾ effect to 50 set color ▾ effect to 0 if if if then then then Level Level Level = 1 = 2 = 3 go to x: 200 y: –40 go to x: 100 y: –150 go to x: 175 y: –125 set LevelOver ▾ to 0 “LevelOver”is set to 0 to show that the level is not over because the bones haven’t been collected. The“set color effect to” block is set to 0, which means that the sprite appears in its normal green color at the start of each level. The“ghost”block makes the portal slightly transparent. The“go to”blocks set the portal’s position on the stage for each level. Don’t worry if the portal isn’t in quite the right place— we’ll fine-tune everything later. Bones?? I’d rather have some fish! when I receive Setup ▾ 41 40 No. It’s the door to the next room! Is this the portal to the next level?
  • 155. 153 G A M E P R O G R E S S 7 3 % The Portal’s second script waits for the bones to be collected and opens the Portal by showing it changing color until the player touches it. Run the game. We haven’t added bones to the game yet, so the portal will open immediately. You should be able to run through all the levels. If you can’t, go back and carefully check all the steps. set LevelOver ▾ to 1 set ghost ▾ effect to 0 change color ▾ effect by 25 repeat until touching PlayerBlock ▾ ? The open portal is no longer ghosted. Setting“LevelOver” to 1 triggers a change of level. The portal changes color until the player touches it. L I N G O “LevelOver”is a variable that the portal’s script uses to tell the Game Control sprite when the level is complete. (Remember the“wait until” block in the Game Control sprite’s loop? It makes the script wait before switching to the new level.)“LevelOver”allows different parts of a program to communicate. Programmers call a variable used in this way a“flag”, and it is an alternative to using a message. When“LevelOver”is 0 (because the level isn’t over), we say that the flag is unset. When “LevelOver”is 1 (because the player has reached the open portal), we say that the flag is set. Messages can only start scripts, but by using a flag you can pause a script in the middle until something happens. In the Game Control sprite’s loop, the“wait until” block pauses until the flag equals 1. Flag unset LevelOver = 0 Flag set LevelOver = 1 Flag set when I receive Start ▾ wait until Bones = 0 42 Flags
  • 156. 154 D O G ’ S D I N N E R Add the script on the right to set Bone1’s position on each level. The x and y coordinates determine where this bone will appear on the stage at each level of the game. The positions may not match your platform designs exactly, but they’ll be fine for now. when I receive Setup ▾ show change Bones ▾ by 1 if if if then then then Level Level Level = 1 = 2 = 3 go to x: –175 y: –95 go to x: –30 y: –110 go to x: –150 y: –65 Each bone adds 1 to the “Bones”counter when it puts itself in position. The“if then” blocks set the position of Bone1 for each level. You can fine-tune the positions of the bone later on. Add the“Start”script shown on the left to Bone1 to make it hide when the dog collects it. It also updates the“Bones” counter. Load the sound“dog1”to this sprite, so the dog gives a happy“woof” when he gets a bone. Run the project. At the moment, you should only have to collect one bone before the portal opens. The number of bones to collect falls by 1. Nothing happens with this script until the dog touches the bone. when I receive Start ▾ play sound dog1 ▾ hide change Bones ▾ by –1 wait until touching PlayerBlock ▾ ? Someone keeps hiding all the bones! BONE 1 44 45 Bones for the dog It’s not much fun just racing through the levels without having anything else to do. Let’s add some bones that the dog must collect to open the portal. After all, he’s getting hungry! Create a new sprite and draw a bone about the same size as the dog. Use the paintbrush tool for the black outline and the fill tool to color it white. Call it“Bone1”. Don’t forget to center it. Bone1 43
  • 157. 155 G A M E P R O G R E S S 8 0 % The game needs more than one bone, so right-click on the Bone1 sprite and select“duplicate”. Do this twice. This will give you three bone sprites. The bones’scripts manage the number of bones on a level automatically. Run the project. You should find that the portal won’t open until you’ve collected all three bones. You need to change the“Setup”scripts for Bone2 and Bone3 so that they appear in different places from Bone1 on each level. Change the numbers in the“go to”blocks to match those shown here. when I receive Setup ▾ show change Bones ▾ by 1 if if if then then then Level Level Level = 1 = 2 = 3 go to x: –10 y: 105 go to x: –10 y: 80 go to x: 0 y: 15 when I receive Setup ▾ show change Bones ▾ by 1 if if if then then then Level Level Level = 1 = 2 = 3 go to x: 35 y: –70 go to x: 60 y: –60 go to x: 120 y: 140 These blocks test which level the bone is on and set its position on the stage. That’s more like it! BONE 2 BONE 3 47 46 48 Sprites Bone3 Bone2 New sprite: Bone1
  • 158. 156 D O G ’ S D I N N E R Add one last script to detect a collision with the PlayerBlock and end the game— junk food really is bad for you! Now run the game and try getting past the donut. If you hit the donut, the dog will stop and howl. when I receive Start ▾ wait until touching PlayerBlock ▾ ? broadcast Game over ▾ ARRRRGH! JUNK FOOD! 52 53 Now add this“Setup”script to shrink and position the donut for each level. Next, add this“Start”script to get the donut patrolling back and forth. when I receive Setup ▾ if if if then then then Level Level Level = 1 = 2 = 3 go to x: 140 y: 35 go to x: 0 y: 15 go to x: 70 y: 30 when I receive Start ▾ Patrol to right Patrol to left Go to the sprite library, select Donut, and then click“OK”to load it into the game. Junk food The dog is having a rather easy time of it with all those bones to eat. Adding some obstacles and hazards will make the game more difficult. Start with the flying donut. Load this donut sprite. This sets the donut at the correct size. set rotation style left-right ▾ set size to 50 % forever point in direction 90 ▾ point in direction –90 ▾ repeat 35 repeat 35 move 3 steps move 3 steps 50 51 49 Donut
  • 159. 157 G A M E P R O G R E S S 8 7 % Create a new blank sprite called “Hazards”and add the two scripts shown here. The“Setup”script selects the correct costume for the level and centers it on the stage (just like in Platforms). Click on the“Setup”script to center the sprite before you design its costumes. You need three costumes for the Hazards sprite. Use the paintbrush symbol to create two extra blank costumes. Select“costume1”and click the “Add”button at the top. Load the“cheese puffs” costume from the library. Use the“Select”tool to make it smaller and position it as shown here. Then, from the costume library, add two cakes to “costume2”and one to“costume3”. Make them smaller and position them. You can fine-tune their positions later. This script ends the game if the dog touches a hazard. Hazardous snacks As well as the flying donuts there are a number of fixed traps on the levels. To keep things simple, all these hazards are part of a single sprite with three different costumes—one for each level. when I receive Setup ▾ go to x: 0 y: 0 when I receive Start ▾ wait until touching PlayerBlock ▾ ? broadcast Game over ▾ switch costume to Level Use a bowl of cheese puffs in Level 1. Use two cakes in Level 2. Use one cake in Level 3. Most of the costume should have the checked pattern for a see-through color. 54 55
  • 160. 158 D O G ’ S D I N N E R Most problems can be fixed by adjusting the positions and sizes of the platforms. Select the Platforms sprite and click the Costumes tab. Use the“Select”tool in the paint editor to move, stretch, or resize the Level 1 platforms. Click outside the selection box to show your changes on the stage. Adjust the platforms until Level 1 matches page 145. Fine-tuning Now that your platforms, portals, bones, and hazards are all in roughly the right place, run the project and see if the game works. You might find that some sprites aren’t positioned correctly. The game might be too tricky or the dog might get stuck. If so, you need to fine-tune your levels. The hints and tips here will also be handy if you want to design new levels. Fine-tune the cheese puffs using the “Select”tool. To move a platform, click inside the selection and drag. Click and drag the small squares to stretch and resize the selection. You can reposition all the other sprites by using their x and y coordinates. Select a sprite on the stage and drag it where you want. Hover the mouse-pointer over the center of the sprite and make a note of the x and y numbers that appear under the stage. Copy the numbers into the blue“go to” block in the sprite’s Level 1 script. Copied numbers go here if Level = 2 go to x: 35 y: –70 56 58 Use the same method to fine-tune the position of the Hazards sprite. Select it in the sprites list and click on the Costumes tab. Use the“Select”tool to adjust the position of the snack in the first costume (which appears in Level 1). Click outside the selection box to check your changes on the stage. 57 Dog’s Dinner by HappyShrimp321 (unshared) x: 35 y: –70
  • 161. 159 G A M E P R O G R E S S 9 3 % If you need to move the sliding donut, bear in mind that the“go to”block sets its start position. To change how far it slides, adjust the numbers in its two “repeat”loops. One controls how far it goes to the right, the other to the left. You should now have Level 1 working beautifully. To work on another level and its sprites, you can make a temporary change to the script for the Game Control sprite. Change the number in the“set Level to”block to“2”. Run the game and Level 2 appears on the stage. Fine-tune your sprites’ positions. But remember to change the number in“set Level to”back to“1”when you’re done. The bone’s new coordinates appear automatically in the“go to”block in the blocks palette. Drag sprite to new position Change the“1”to the level you want to work on, and that’s where the game will start. E X P E R T T I P S The “go to”trick To reposition a sprite perfectly, use this sneaky trick. First drag the sprite on the stage to where you want it. Then look at the unused“go to”block in the Motion section under the Scripts tab. The sprite’s coordinates will have appeared automatically in this block. Now you can simply drag the block into your script without needing to do any typing. Easy! go to x: 35 y: –70 when I receive Start ▾ forever point in direction 90 ▾ point in direction 90 ▾ point in direction –90 ▾ repeat 35 repeat 35 move 3 steps move 3 steps set Level ▾ to 1 set Bones ▾ to 0 broadcast Setup ▾ and wait broadcast Start ▾ broadcast Win ▾ when clicked repeat until Level = 4 wait until LevelOver = 1 change Score ▾ by 1 point towards ▾ go to mouse-pointer ▾ glide 1 secs to x: 35 y: –70 Moves donut left Moves donut right 59 60
  • 162. 160 D O G ’ S D I N N E R To show the correct sign to the player when the Signs sprite receives a message, add the three scripts below. Run the project to check that the correct signs show as you play. Signs and music The game won’t be complete until you’ve added some instructions and other messages for the player. You can also load some music into it to make it even more entertaining. switch costume to Instructions ▾ when clicked go to x: 0 y: 0 show show show go to front go to front go to front hide wait until touching PlayerBlock ▾ ? switch costume to Win ▾ switch costume to Lose ▾ The instructions vanish when the player’s sprite touches them. 62 To give instructions and other messages to the player, use the paintbrush symbol to create a new blank sprite and call it“Signs”. Add the costumes below to the Signs sprite. Name them“Instructions”,“Win”, and“Lose”. MOVE: ARROW KEYS JUMP: SPACE KEY DOG’S DINNER COLLECT ALL BONES TO OPEN PORTAL TO NEXT LEVEL DOG DOES NOT LIKE JUNK FOOD! YOU WIN! ARRRRGH! JUNK FOOD! when I receive Win ▾ Instructions Win Lose when I receive Game over ▾ 61
  • 163. 161 G A M E P R O G R E S S 1 0 0 % Add the next script to the Game Control sprite to swap the music at the moment the new level starts and to announce the start of each level with a sound effect. Load the “space ripple”sound into the sprite. To play a victory tune when the dog finishes the final level, load“triumph”from the sound library and add this script to the Game Control sprite. Run the game. Check that the music changes for each level, and that sound effects play at the start of each level and at the end of the game. You can give each level its own music. Select the Game Control sprite and load these sounds from the Scratch sound library:“xylo2”,“xylo3”, and“xylo4”. The script below will swap the music each time you change level. The first“repeat”loop plays “xylo2”until the player reaches Level 2. when clicked repeat until repeat until repeat until Level Level Level = 2 = 3 = 4 play sound xylo2 ▾ until done play sound xylo3 ▾ until done play sound xylo4 ▾ until done 66 64 Check the positions of the instructions. You may need to rearrange them so that they don’t overlap the images on the stage. 65 Altogether now! when I receive Start ▾ stop all sounds play sound space ripple ▾ stop all sounds play sound triumph ▾ when I receive Win ▾ DOG’S DINNER MOVE: ARROW KEYS JUMP: SPACE KEY DOG DOES NOT LIKE JUNK FOOD! COLLECT ALL BONES TO OPEN PORTAL TO NEXT LEVEL Dog’s Dinner by HappyShrimp321 (unshared) 63
  • 164. 162 D O G ’ S D I N N E R Hacks and tweaks Congratulations, your platform game is up and running! Test it and ask your friends to play it. You may need to adjust the sprites’ positions and edit your platforms and hazards a little to make the game play smoothly and to get the difficulty level just right. E X P E R T T I P S ◁ Extra levels To make the game longer you could create extra levels. You would have to give the Platforms and Hazards sprites more costumes, and edit the scripts to add“if Level =”blocks to place the bones, portal, and donut at the start of each level. Don’t forget to change the“Level = 4”block in the Game Control sprite’s loop, so that the game will end after the player has completed all the new levels. ▽ Victory dance If you think the end of the game isn’t exciting enough, change the script for the“Win”message to do something more spectacular. Maybe the dog could do a little victory dance? Why not add a new sign for when the dog falls off the platforms and ends up at the bottom of the stage? You could make the dog disappear too. You won! Let’s celebrate! Oh, it was nothing really! File ▾ Edit ▾ Tips Dog’s Dinner by HappyShrimp321 (u ATCH New Save now Save as a copy Backing up Save a backup copy of the game under a different name before you start making changes. If you do this, you’ll always have the copy to go back to if you make mistakes when tweaking the code. To save with the online Scratch editor, select the File menu and click on“Save as a copy”.
  • 165. 163 H O W T O B U I L D D O G ’ S D I N N E R Increasing this number makes the dog jump higher. Decreasing this number makes the jumps less floaty. ◁ Adjust the jump You have total control over the dog’s jumps. You can make him leap higher by increasing the value of the “TakeoffSpeed”variable. You can also make the value of ”Gravity”smaller or larger to control how much each jump floats. Why not add a special level with reverse gravity, so that gravity pulls you up, not down? You will need to make code changes to set the jump variables just for that level with an“if then”block, and also to detect when the dog“falls”off the top of the level! ▷ Mega-challenge Can you figure out how to give the dog a limited number of lives? You’d need a new variable called “Lives”, and you’d have to reprogram all the“Game over”messages to subtract 1 from the variable until you reach the last life. The Game Control sprite’s loop would also need changing. It’s an expert programming challenge that needs clear thinking and hard work! Designing levels Designing how all the challenges and rewards in a level fit together is a tricky job. You need to plan every detail and get a friend to test it to see if it’s too easy or too hard. Make sure you can complete the level yourself before asking the friend to try. G A M E D E S I G N Timing Are your moving hazards going so fast you can’t get past them, or so slow there’s no challenge? Adjust their speeds until you’re happy with them. Spacing Is the player able to jump from platform to platform easily—or perhaps too easily? Make the gaps between the platforms bigger or smaller to suit the level you’re designing. Tricks Try fooling the player into following what appears to be an obvious way through a level but then turns out to be a trap. The correct way will be an easier but less obvious, solution. Tools Computer games often come with level design tools that are unlocked once you finish the game. Using these you can create your own challenges and puzzles within the game. You can usually share your customized levels online, so that others can try them. I’ve got three lives now! Big deal! I’ve got nine! I’ve unlocked my tools! Are your hazards moving too fast? when clicked set TakeoffSpeed ▾ to 12 set RunSpeed ▾ to 5 set Gravity ▾ to –1
  • 168. G L A C I E R R A C E 166 How to build Glacier Race Glacier Race is a two-player game in which you race up the screen, swerving around obstacles and collecting gems as you go. There’s no finish line in this race—the winner is simply the person with the most gems when the time runs out. It’s red car versus blue car in a race against the clock. Win by collecting more gems than your opponent before the countdown ends. Every gem you grab adds an extra second to the race countdown, but stay clear of the snow or you’ll end up in a spin. ◁ Cars Use the game controls to keep your car on the ice and collect gems. You can also push the other car off the road to gain an advantage. ◁ Obstacles Avoid the giant snowballs and the edge of the road or you’ll spin out of control. ◁ Penguin The penguin is the master of ceremonies. He asks the players’names at the start, gives instructions, and announces the winner at the end. Glacier Race by SnowmobileDave (unshared) Ben Gems: 20 Laura Gems: 13 AIM OF THE GAME The player with the most gems wins the game. The red car starts on the left and is controlled using the W, A, S, and D keys on the keyboard. Name of the game.
  • 169. H O W T O B U I L D G L A C I E R R A C E 167 GAME CONTROLS Use the arrow keys and the W, A, S, and D keys on the keyboard as game controls. Countdown 11 ◁ Icy adventure This fast-paced racing game is more fun because you play against an opponent. Challenge a friend or family member to see who can collect the most gems. May the best driver win! Collect gems to score a point and add a second to the countdown so you can race a little longer. The countdown starts with 20 seconds. When it reaches zero the game ends. Snowy hills and trees whiz past as the cars race. The blue car starts on the right and is controlled with the arrow keys.
  • 170. G L A C I E R R A C E 168 The game loop Fast games need clever code. This game uses something called a“game loop”to keep all the action happening just when it should. It’s as if the game loop bangs a drum, and with each beat all the other sprites move one step. Start by creating a blank sprite to hold the game loop’s script. Start a new project and delete the cat sprite. Use the paintbrush symbol to create a blank sprite and rename it“Game Loop”. Then make a variable for all sprites called“Countdown”for the game timer and show it on the stage. Build the following script to make the game loop. You’ll need to create the messages “Setup”,“Calculate”,“Move”, and“Game Over”. Game over! Ben wins! △ How does it work? When the project runs, the script sends out a“Setup”message that tells all the sprites to get ready for the game. It waits for them to finish, and then the main loop begins. The loop sends out messages telling every sprite in the game when to run each part of their code. The loop ends only when the countdown reaches zero, at which point the“Game Over!”message is sent so all sprites can perform any final actions and the winner is announced. broadcast Setup ▾ and wait broadcast Calculate ▾ and wait broadcast Move ▾ and wait broadcast Game Over ▾ repeat until when clicked Countdown < 1 Create the variable “Countdown”in the Data section. 1 broadcast message1 ▾ message1 new message… Use the“broadcast” block to create the messages for your script. Name the message here. New Message OK Cancel Message name: Setup
  • 171. 169 G A M E P R O G R E S S 1 1 % Create two new variables for all sprites: “RoadY”(to store the y coordinate used to position our moving scenery) and“CarSpeed”(to set how quickly the cars can move around the stage). Uncheck the boxes in the Data section so they aren’t displayed on the stage. Add the script on the right to set the values of the variables at the start of the game. set RoadY ▾ to 0 set RoadSpeed ▾ to –5 set CarSpeed ▾ to 5 change RoadY ▾ by RoadSpeed set Countdown ▾ to 20 change RoadY ▾ by 720 reset timer if when I receive Setup ▾ when I receive Calculate ▾ RoadY < –360 then E X P E R T T I P S Game loops Using one main loop to keep everything in sync is common in computer games. The loop keeps all the sprites in step and makes the code tidy and short. It also helps the game run quickly—in Glacier Race, the game loop runs as fast as 30 times per second. In Scratch, a program with lots of sprites each with their own loops can become slow as the computer has to constantly jump between them. Using a single game loop fixes this problem, but be careful not to use loops elsewhere in the game because they will slow it down. Everyone move! This block sets the time limit for the game in seconds. The y coordinate of the road decreases from 360 to –360 before jumping back to 360 as the road repeats itself. Add another variable for all sprites called“RoadSpeed” to store the speed of the moving scenery. Uncheck the box. Then create a script to calculate the position of the road each time the game loop runs. You’ll see how this works once you’ve made the road sprites. 2 3
  • 172. G L A C I E R R A C E 170 Scrolling road In Glacier Race, players feel as if they’re moving quickly along the road, but in reality their cars don’t move very far on the stage—it’s the road that moves instead. The road is made up of two sprites that fit together seamlessly: Road1 and Road2. These roads take turns scrolling down the stage, making the cars appear to move faster than they really are. Create a new sprite and call it“Road1”. In the paint editor, choose the paintbrush tool and set the thickness slider to the middle. Draw the edges of the road and make sure they run all the way from the top to the bottom without any gaps. Then use the fill tool to color the area on both sides of the road white, creating a snowy setting. Now duplicate the Road1 sprite to make Road2. Select Road2 and go to the Costumes tab. Click on the“Flip up-down”button at the top right and the road costume will turn upside down. The edges of Road1 and Road2 will now match as they are mirror images. They’ll look odd on the stage at the moment, but you’ll fix that later. Leave the road empty. Road2 Road1 Use this tool to flip the costume upside down. The highlighted area is visible on the stage. The two road sprites join perfectly with each other. The cars appear to move forward as Road1 and Road2 move down the stage. Flip up-down Thickness slider Fill these areas in with white. 5 4 costume1 Convert to vector Bitmap Mode 100% Clear Add Import Sprites Road2 Road1
  • 173. 171 G A M E P R O G R E S S 2 2 % L I N G O Scrolling Moving everything on the screen together in the same direction is called scrolling. In Glacier Race, the road scrolls downward. You might have heard of games called side-scrollers, which means the scene moves left or right as the player moves the character on the screen. Add these scripts to Road1 to get the road moving. They position the road using the“RoadY”variable in the game loop. Try running the project— half the road will scroll down the screen. Make the scenery more interesting by adding some trees. Select Road1 and click on the Costumes tab. Click the“Add”button on top and add the tree costume. Shrink it by using the selection box and place it on the snow. Add as many trees as you like. Repeat the process for Road2. Now build the following scripts for Road2 to make the second road sprite work together with the first. Run the project—the road should scroll smoothly down the screen. To add color to the road, paint the backdrop rather than the sprites, or else the cars will collide with the road surface. Select the stage and click on the Backdrops tab. Use the fill tool to fill it with an icy blue color. when I receive Setup ▾ when I receive Setup ▾ when I receive Move ▾ when I receive Move ▾ go to x: 0 y: 360 go to x: 0 y: 0 go to x: 0 y: go to x: 0 y: go to x: 0 y: go back 10 layers go back 10 layers RoadY if else then RoadY < 0 RoadY — 360 RoadY + 360 Road2 is positioned above or below Road1, depending on where Road1 is on the stage. This block makes the game start with Road1 filling the stage. This variable is set in the Game Loop when the message “Calculate”is sent. This block makes Road1 change position when the Game Loop broadcasts the “Move”message. This makes sure the scenery stays behind the other sprites. 6 7 8 9 backdrop 1 480x360
  • 174. G L A C I E R R A C E 172 Racecars Now it’s time to add the racecars. Once you’ve got one car moving, you can duplicate it to make the second one and save yourself a lot of work. Click the sprite symbol and load Cat1 from the library—you can use this sprite to ensure the car is the right size. Now open the paint editor and click on “Convert to bitmap”. Use the rectangle and circle tools to draw a car like the one shown here. Make sure you draw the car facing right or it will point the wrong way in the game. Remember to delete the cat image once you’ve finished and use the“Set costume center”tool to center the car. Rename the sprite“RedCar”in the sprites list. Then create a new variable,“spinning”, which you’ll use later to say when a car is in a spin. Note that for this variable, you need to select the option“for this sprite only”and uncheck the box in the Data section so that the variable doesn’t show on the stage. Remember that in this project, sprites can run scripts only when they get messages from the Game Loop. Add the following script to set up the red car at the start of the game. The script runs when the“Setup” message is sent by the Game Loop at the start of the game. The car doesn’t spin when the “spinning” variable is set at zero. Make your race car a bit bigger than the cat. The next script will shrink it. when I receive Setup ▾ set size to 30 % show go to front go to x: –40 y: 0 point in direction 0 ▾ set spinning ▾ to 0 Use the circle tool to draw an oval shape. Use the rectangle tool to draw the body and wheels of the car. Click here. 10 12 11 New Variable OK Cancel Variable name: For all sprites For this sprite only spinning
  • 175. 173 G A M E P R O G R E S S 3 3 % You now need to add keyboard controls for the car. Choose More Blocks in the blocks palette and then click on “Make a Block”. Create a new block called“car controls”and add this script to its“define”block. Add a script to run the“car controls” block when the car receives the message “Move”from the Game Loop. Run the project. You should now be able to steer the red car along the road using the keys W, A, S, and D. The car usually points straight up the screen. This block moves the car sideways. This block moves the car up the stage. This block makes the car turn a little to the left. This block makes the car appear to stop by moving it down the stage at the same speed as the road. The“Move”message is sent by the Game Loop many times per second. This block makes the car turn a little to the right. when I receive Move ▾ car controls point in direction 0 ▾ define car controls point in direction 30 ▾ point in direction –30 ▾ if if if if then then then then key d ▾ pressed? key w ▾ pressed? key s ▾ pressed? key a ▾ pressed? change x by change y by change y by 0 – change x by CarSpeed CarSpeed RoadSpeed CarSpeed Make a Block car controls define car controls 13 14
  • 176. G L A C I E R R A C E 174 Collisions and spins To make the game challenging, you can force players to avoid the snow by making their cars spin out of control if they touch it. You need to create some more new blocks to make this work. With RedCar selected, create a new block to detect the snow. Choose More Blocks in the blocks palette and then click“Make a Block”. Name the block“check collisions”and create the following script. Now create another block, call it “spin”, and add the script shown here. The“spin”block runs when the car is spinning. It turns the car round and reduces the “spinning”variable by one. When the variable reaches zero, the spin ends and the car is reset at the bottom of the stage. define check collisions define spin if or then set spinning ▾ to 30 touching Road1 ▾ ? touching Road2 ▾ ? The“touching”block only detects the painted parts of the road sprite’s costume, not the road itself. This block moves the car down the stage as if it’s stopped on the road. Load the sound“rattle”from the sound library to see it in the drop-down menu. This block tells the car how long to spin for. These blocks reset the car at the bottom of the stage. play sound rattle ▾ turn 30 degrees change spinning ▾ by –1 change y by RoadSpeed if then spinning = 0 go to x: –40 y: –180 point in direction 0▾ This block checks if the spin is over. 15 16 Road hog!
  • 177. 175 G A M E P R O G R E S S 4 4 % Finally, change the existing script triggered by the“Move” message to look like the one shown here. Now you can only control the car if the“spinning” variable is zero. Collisions are checked only when you’re not in a spin—otherwise you’d spin forever! Run the game. The car should spin if it hits the snow. To add some snowball obstacles, create a new sprite in the paint editor. Make it about the size of the car on the stage. To get the correct size, watch it appear on the stage after you’ve drawn it. You can also see the costume’s size in the costume list—aim for about 40x40. Name the new sprite“Snowball”. These numbers show the costume’s size. if else spin when I receive car controls check collisions Move ▾ then spinning = 0 If the value for “spinning”is more than zero, the car will spin. 17 18 costume1 Clear Add Import New costume: 1 costume1 40x40 If the car isn’t spinning, the controls work and collisions are checked for.
  • 178. G L A C I E R R A C E 176 Add the following three scripts to the Snowball sprite. The Snowball sprite is cloned to make lots of obstacles, but you might notice that there’s no“create clone”block here. The clones will be created by the Game Loop sprite, using some code that we’ll add next. Now select the Game Loop sprite and add this script to make a new snowball appear with a chance of one in 200 every time the loop repeats. go to front hide show change y by RoadSpeed delete this clone create clone of Snowball ▾ if if when I receive Setup ▾ when I receive Move ▾ when I receive Move ▾ when I start as a clone y position < –175 then pick random 1 to 200 = 1 then go to x: y: 180 pick random –200 to 200 This block hides the original sprite so that you only see the clones. The snowball disappears when it reaches the bottom of the stage. Each snowball moves down the stage at the same speed as the road, making it appear stationary. The snowball clone starts at a random point along the top edge of the stage. Making this number bigger creates fewer snowballs. 20 19
  • 179. 177 G A M E P R O G R E S S 5 6 % Sprites RedCar To make the car spin when it hits a snowball, you need to add the Snowball sprite to the list of possible collisions for the red car. Run the game. You should now see the car spin when it hits a snowball. Duplicate the RedCar sprite and name the copy “BlueCar”. Note that the duplicate sprite gets its own copy of all the scripts. This includes a copy of the“spinning”variable (set to“for this sprite only”), which can be different from the red car’s. set spinning ▾ to 30 if touching Road1 ▾ ? or touching Road2 ▾ ? define check collisions or touching Snowball ▾ ? then Select the BlueCar sprite and click on the Costumes tab to open the paint editor. Use the fill tool to change the color of the car. Slot one“or”block into another. Use the fill tool to paint the car blue. Player two You now need to create the second player’s car. Doing this is easy—you simply copy the first car, recolor it blue, and tweak the scripts. 22 21 23 duplicate delete save to local file hide
  • 180. G L A C I E R R A C E 178 point in direction 30 ▾ point in direction –30 ▾ if if if if then then then then key right arrow ▾ pressed? key up arrow ▾ pressed? key down arrow ▾ pressed? key left arrow ▾ pressed? change x by change y by change y by change x by CarSpeed CarSpeed RoadSpeed CarSpeed go to front go to x: 40 y: 0 point in direction 0 ▾ set spinning ▾ to 0 if then spinning = 0 go to x: 40 y: –180 point in direction 0▾ Now select the Scripts tab to see BlueCar’s scripts. Change the x coordinates in its“go to” blocks to 40 in both the“Define spin”script and the“When I receive Setup”script. This makes the blue and red cars start next to each other. In the“Define car controls” script, change the“key pressed”blocks so that the blue car can be steered using the arrow keys on the keyboard. Then run the game. Both the cars should race along the track, but they can drive through each other at the moment. Change the x coordinate to 40 here too. Change the x coordinate to 40. ▷ Change the script In the“key pressed?”blocks, replace key“d”with“right arrow”, key“a”with“left arrow”, key“w”with“up arrow”, and key“s”with“down arrow”. 24 25 Select the arrow keys in all four“key pressed?”blocks. 0 –
  • 181. 179 G A M E P R O G R E S S 6 7 % if then touching RedCar ▾ ? if then touching BlueCar ▾ ? broadcast bounce ▾ broadcast bounce ▾ when I receive bounce ▾ when I receive bounce ▾ turn 180 degrees turn 180 degrees point towards BlueCar ▾ point towards RedCar ▾ move 20 steps move 20 steps point in direction 0 ▾ point in direction 0 ▾ To stop the cars driving through each other, you need to make them sense each other and then bounce apart. Add a new“if then”block to RedCar’s“Define check collisions”script as shown here. Create the message“bounce”, and then add a new script to make RedCar move away from BlueCar when it receives the message. Now make the same changes to BlueCar’s scripts so it can sense when it touches RedCar and bounce. Run the game to check the cars bounce when they collide. This new script makes RedCar bounce away from BlueCar. Add these new blocks to the existing script. This time the“touching” block checks for collisions with the red car. Get out of my way! 26 27 Choose RedCar here. set spinning ▾ to 30 if touching Road1 ▾ ? or or touching Road2 ▾ ? touching Snowball ▾ ? define check collisions then
  • 182. G L A C I E R R A C E 180 Collecting gems The next step is to create the colorful gems that the players battle to collect. Each gem will be a clone of a single gem sprite, which makes it easy to put lots of gems on the stage at once. Click the paintbrush symbol in the sprites area to create a new sprite with the paint editor. To create a gem, use the line tool to draw six triangles arranged in a hexagon. Fill each one with a different shade of green. Make it similar in size to the snowball and center it when you’ve finished. Create two variables—“RedCarGems”and “BlueCarGems”(both for all sprites)—to tally how many gems each car collects. Now add these scripts to the Gem sprite; they’re similar to the scripts for the snowballs. when I receive Setup ▾ when I start as a clone hide show go to front set RedCarGems ▾ to 0 set BlueCarGems ▾ to 0 go to x: set color ▾ effect to y: 180 pick random –200 to 200 pick random –100 to 100 These blocks reset the scores when the game starts. This block picks a random color for the gem clones. Use this tool to set the center of the costume. 28 29 Name the sprite“Gem”. costume1 Clear Add Import 1 Gem 40x33
  • 183. 181 G A M E P R O G R E S S 7 8 % Add the following script to move the gems along with the road and to update the total number of gems collected by each car. Load the“fairydust” sound to the Gem sprite so that it plays each time a gem is collected. when I receive Move ▾ play sound fairydust ▾ play sound fairydust ▾ change RedCarGems ▾ by 1 change BlueCarGems ▾ by 1 change Countdown ▾ by 1 change Countdown ▾ by 1 delete this clone delete this clone change y by RoadSpeed if if then then touching RedCar ▾ ? touching BlueCar ▾ ? delete this clone if then < –175 y position This block moves the gem with the road so that it appears to be fixed in one spot. This block deletes the gem if it reaches the bottom of the stage without being collected. Collecting a gem adds 1 point to the score. Collecting a gem adds 1 second to the countdown. 30
  • 184. G L A C I E R R A C E 182 Penguin in charge A proper start and finish can make a game look more professional. Add a penguin race official to ask the players’names, start the race, and announce the winners. In the Game Loop sprite, add a second“if then”block to the“when I receive Move”script to create the gem clones. Run the game and try collecting gems. The snowballs will prevent players from rushing to the top and collecting all the gems. The gems and snowballs together create the balance and challenge of the game. First, create four variables for all sprites: “RedName”and“BlueName”to store each driver’s name; and“RedInfo” and“BlueInfo”to show each driver’s score during the race. Then add the Penguin2 sprite to talk to the players, and load the“gong”sound from the library to Penguin2. You’ll notice that the countdown isn’t working and the game never ends. To fix the problem, add the script on the right to the Game Loop sprite and try the game again. When the countdown reaches zero, the game should stop. create clone of Snowball ▾ create clone of Gem ▾ if then then if when I receive Move ▾ pick random 1 to 200 = 1 pick random 1 to 20 = 1 The chance of a new gem is 1 in 20, making gems 10 times more common than snowballs. Add these blocks to the existing script. This“if then”block plays “pop”sounds in the last 10 seconds of the game to warn the players time is running out. 31 32 33 Penguin2 change Countdown ▾ by –1 reset timer if if when I receive Calculate ▾ timer > 1 then The script runs only if 1 second has passed since the last timer reset. This block takes 1 second off the countdown. then Countdown < 10 play sound pop ▾
  • 185. 183 G A M E P R O G R E S S 8 9 % Add this“Setup”script to the Penguin2 sprite. The Game Loop uses a“broadcast and wait” block, so the race doesn’t start until the players put in their names and the penguin shouts“Go!” reset timer hide variable RedInfo ▾ show variable RedInfo ▾ ask Red driver, your controls are the W, A, S, and D keys. What’s your name? and wait ask How much is the cactus juice? and wait ask Blue driver, your controls are the arrow keys. What’s your name? and wait hide variable BlueInfo ▾ show variable BlueInfo ▾ go to x: –180 y: –30 say Go! for 1.5 secs go to front show hide when I receive Setup ▾ set RedName ▾ to set BlueName ▾ to answer answer GO! The“hide variable”block controls when a variable is shown on the stage. The players’names are stored in variables. This block asks a question and waits for the player to reply. These blocks show the players’names on the stage. 34 E X P E R T T I P S The ask and answer blocks A sprite can put a question to the person at the computer by using the“ask” block. Anything typed as the reply is stored in the“answer”block, which can then be used inside other blocks just like a variable can. join think answer ?? That’s daylight robbery! Type this text in the box. when clicked next costume $100 How much is the cactus juice? $100?? That’s daylight robbery!
  • 186. G L A C I E R R A C E 184 Add this script to the Penguin sprite to set the “RedInfo”and“BlueInfo”variables, which are displayed on the screen to show the scores. when I receive Calculate ▾ set RedInfo ▾ to set BlueInfo ▾ to join join join Gems: join Gems: RedCarGems BlueCarGems RedName BlueName Run the game. Hide all variables except“Countdown”, “RedInfo”, and“BlueInfo”by unchecking their boxes in the Data section. Then right-click the RedInfo and BlueInfo signs on the stage and choose“large readout”. To make everything look tidy, drag the signs to the top left and move the countdown to the top right. Type a space before“Gems:”so that it doesn’t form a single word with the player’s name on the stage. L I N G O String Programmers call an item of data that contains words and letters a“string”. It can include any character on the keyboard and can be of any length. Make a Variable BlueInfo Countdown RedInfo Check boxes to show the variable on the stage. 35 36 Glacier Race by SnowmobileDave (unshared) Ben Gems: 20 Laura Gems: 13 Countdown 11
  • 187. 185 G A M E P R O G R E S S 1 0 0 % To make the penguin announce the winner, add the next script. This script has one“if then else” block inside another. Think about the three possible results—red wins, blue wins, and a tie—and it should all make perfect sense. when I receive GameOver ▾ show go to front play sound gong▾ play sound dance around ▾ until done go to x: 0 y: 0 say say join say It’s a draw! Try again. if if else else then RedCarGems > BlueCarGems RedName wins! Finally, add some rhythmic dance music to make the game feel faster. Load“dance around”to the Game Loop sprite and then add this script. It’s a loop, and extra loops can slow everything down, but since it only runs once every few seconds it won’t affect the game play. forever when clicked Type a space before the word“wins!” Load“dance around” from the sound library. Since the only possibility left is a tie, you don’t need to add an“equals”block. If the blue car collects more gems, it is declared the winner. It’s a tie! Try again. 38 One“if”block inside another is called a “nested if”. If the red car collects more gems, it is declared the winner. RedCarGems < BlueCarGems join BlueName wins! then 37
  • 188. 186 G L A C I E R R A C E △ Instructions Remember to add instructions to the project page in Scratch. Make it clear that it’s a competition to get the most gems and not a race to the finish line. Give players a helpful hint by telling them they can push the other player off the road. △ One-player game Experiment with a one-player version of the game where you play against a computer-controlled blue car. First save a copy of the project so you don’t spoil the two-player version. Change the car controls for the blue car, as shown here, and then try the game. The blue car will chase the red car and crash into it. ▷ Fine-tuning To change how hard or easy the game is, adjust the“CarSpeed”,“RoadSpeed”, and“Countdown”variables that are set at the start. You can also adjust how long the cars spin after a crash, how big the bounce is when they collide, and how often snowballs and gems appear. Try to get just the right balance to make the game challenging but not too hard. △ Change the scenery It’s easy to change the setting of Glacier Race by repainting the scenery. You can make the players race through a desert canyon or a dirt track in a forest. Remember to change the snowballs to match your theme. ▽ Record your own sounds You can use your own voice to make announcements in the game. To record your voice, you need a computer with a microphone. Select the Penguin sprite and click on the Sounds tab. Then click the microphone icon to make a recording. Replace the Penguin’s“say”block with a“play sound”block and choose your recording. Ben Gems: 20 Laura Gems: 13 Countdown 11 Hacks and tweaks Now over to you! Personalize this race with your own features and adjustments. Make it as fast, slow, hard, fast, serious, or silly as you like. point towards RedCar ▾ define car controls move CarSpeed steps Click here to make a recording. Scripts New sound: Costumes Sounds Glacier Race by SnowmobileDave (unshared) 1. Collect gems 2. Avoid snow 3. Shove other driver off road
  • 189. 187 H A C K S A N D T W E A K S G A M E D E S I G N when I receive Calculate ▾ set RoadSpeed ▾ to –5 change RoadY ▾ by RoadSpeed △ Tracking This camera follows the player around the game. In Glacier Race, the camera follows the cars, keeping them in view as the road moves by. △ First person This camera shows the view the player would see through their own eyes. First-person games make the player feel immersed in the action, rather than watching from afar. △ Third person This type of camera is positioned just behind the player’s sprite. The player feels involved in the action, but can clearly see what the sprite is doing. ◁ Fixed The camera watches all the action from one spot, without moving. Most of the games in this book use this simple camera, either with a side or bird’s-eye view of the action. △ Need for speed For extra thrills, you can make the game speed up as players collect more gems. To do this, change the“set RoadSpeed”block in the Game Loop sprite so that the variable changes with each gem collected. Camera angles Game designers often talk about the“camera”in a computer game. This refers to how the picture on the screen follows the action in the game. There is no real camera, but if you imagine a camera capturing the action, you can think about different ways of showing what’s going on. Here are some common camera views in computer games. –5 – RedCarGems + BlueCarGems / 30 Insert these blocks into the second window of the“set RoadSpeed”block. Put the“addition”block into the first window of the“division”block, and then insert it into the “subtraction”block.
  • 192. 190 T R O P I C A L T U N E S ◁ Drums Click the drums in order to repeat the tune the game plays to you. How to build Tropical Tunes Computer games aren’t just about quick reflexes—they can also challenge your thinking powers. Here’s a brain game to test how good your memory is. Click this icon to make the game fill your screen. You score a point each time you click on the correct drum. ◁ Game over Make a mistake and the game ends. As the tune gets longer, the game gets harder. ◁ Listen The drums play a tune, starting with a single note and then adding one new note each time. In Tropical Tunes, you have to listen to the drums play and then repeat the ever-growing tune. Make a mistake and the game’s over. The longer you can match the tune, the higher your score. Tropical Tunes by CrazyDrummer123 (unshared) Score 0 AIM OF THE GAME
  • 193. 191 H O W T O B U I L D T R O P I C A L T U N E S A tropical backdrop sets the scene, but the background in this game isn’t important. ◁ Harder and harder This game gets harder the longer you play. To help you remember the sequence, each drum plays a different note and has a different color, but eventually you won’t be able to remember the whole pattern! The drums jump out when they play a note. Click the stop sign to end the game. Click the green flag to start a new game. GAME CONTROLS Use a computer mouse or touchpad to play this game. How good is your memory?
  • 194. 192 T R O P I C A L T U N E S Make a drum This game is quite complicated, so you’ll need to work through the instructions carefully. To get started, follow the directions to make one drum with all the scripts it needs. Once that’s done you can copy it to make all four drums. Later, you’ll create a game loop called the “master controller”to play the drums. Tropical Tunes by CrazyDrummer123 (unshared) Click this icon to open the backdrop library. Stage 1 backdrop New backdrop: The name“Drum1” will be given to the sprite automatically. Drum1 Create a new Scratch project and add or create any backdrop you want. A tropical theme works well with this game. The game needs four drums, but you can make just one to start with. Delete the cat sprite and add the“Drum1”sprite from the sprite library. Drag it to the lower left of the stage. 2 1 Give the game a title.
  • 195. 193 G A M E P R O G R E S S 2 0 % Two types of variable You may have noticed the option to choose“For all sprites”or“For this sprite only”when you create a variable. So far you’ve mostly used“For all sprites”, but you’ll need to use both options in this game. New Variable OK Cancel Variable name: For all sprites For this sprite only ClickedDrum ClickedDrum Uncheck the boxes. This drum’s variable information is set up in these three blocks. DrumToPlay New Variable OK Cancel Variable name: For all sprites For this sprite only drumColor drumNote drumNumber drumColor set instrument to 18 ▾ Build the script below for Drum1. It sets up the drum’s number, color, the note it plays, and the type of sound it makes (like a steel drum). Run the project to set the variables and watch the drum change color. when clicked set drumNumber ▾ to 1 set drumColor ▾ to 100 set drumNote ▾ to 60 set color ▾ effect to drumColor This selects the steel drum sound. Before you can start making the scripts that bring the drum to life, you need to create some variables. Click on the Data section and make two variables for all sprites called“DrumToPlay”and “ClickedDrum”. Uncheck their boxes. Every sprite in the game can use these variables. 3 Now add three variables“For this sprite only”. Call them“drumColor”, “drumNote”, and“drumNumber”. These variables will store information about only Drum1: its number, its color, and which note it plays. Using“For this sprite only”enables you to copy this sprite to make more drums later, while allowing each drum to have different values for these variables. 4 5 L I N G O Variables Programmers have special terms for variables that apply to all sprites or only one sprite. ▷ Those that apply to only one sprite are called local variables. To help you tell which is which, all the global variable names in this book start with a capital letter and local variable names don’t. ▷ Those that apply to all sprites are called global variables. Uncheck the boxes here too.
  • 196. 194 T R O P I C A L T U N E S define play drum play note drumNote for 0.4 beats set size to 150 % set size to 100 % play drum when this sprite clicked Click on the sprite to test this script. Type the name of the new block in here. Scripts Motion Looks Control Events Sound Sensing Pen Operators Data More Blocks Make a Block Costumes Sounds Make a Block play drum define play drum ▸ Options New Block OK Cancel play drum Making your own block In Dog’s Dinner and Glacier Racer, you found out how to create your own customized Scratch blocks. You’ll need to create a few more in this game. Select“Make a Block”and a box will pop up. Type in the name of your new block: “play drum”. Then click“OK”. Next, the new block appears in the blocks palette and a special purple header block,“define play drum”, appears in the scripts area. Build this script below the“define play drum” block. Then, anywhere you use the“play drum” block, Scratch will run the script. The script will make the drum grow in size, play a note, and then shrink back to normal. You can test the new“play drum”block by clicking on it. Now add this short script to Drum1. Click the drum on the stage to test it. Before testing, you’ll need to click the green flag to set the value of drumNote. Go to the blocks palette and select“More Blocks”. The option“Make a Block”will be visible. 6 7 8 9 10
  • 197. 195 G A M E P R O G R E S S 4 0 % This variable for all sprites tells the game which drum to play. Remote control drums Tropical Tunes makes the drums play a sequence that the player has to copy. The game controls the drums by using a master controller to send messages to them and then wait for a reply. Before you set up the master controller, give Drum1 the scripts it needs to receive and broadcast messages. Build this script, which will be triggered by a message called “RemoteControl”. Create the message by selecting the drop-down menu on the“when I receive” block. Choose“new message”and type in “RemoteControl”. ▽How it works Eventually there will be four drums numbered 1 to 4 (the local variable drumNumber). Before the master controller broadcasts“RemoteControl” it will set the global variable“DrumToPlay”to the number of the drum it wants to sound, and only the matching drum will play. We will add these steps later. Drum1 Drum3 Drum4 set DrumToPlay ▾ to 2 broadcast RemoteControl ▾ and wait when I receive RemoteControl ▾ if DrumToPlay = drumNumber then play drum IGNORES PLAYS IGNORES IGNORES Only Drum2 plays, because its“drumNumber” matches“DrumToPlay”. Don’t add these blocks yet— we’ll use them later. 11 MESSAGE Create a new message called“RemoteControl”. Drum2
  • 198. 196 T R O P I C A L T U N E S When the player clicks a drum, the master controller will need to check it’s the right one. To make this work, you need to make the clicked drum do two things. First, it will change the global variable“ClickedDrum” to its own number. Then it will broadcast a message to make the master controller run its check. Change Drum1’s“when this sprite clicked”script to look like this. Duplicate the drum three times, then change the values of the three local variables as shown below to give each drum a different number, color, and note. Arrange the drums on the stage, ordered from one to four. Four drums You now have one drum complete with its scripts. You can copy it three times to create the four drums you need for this game. Drum1 Drum2 Drum3 Drum4 when this sprite clicked The drum changes the global variable “ClickedDrum”to its own number. to 2 to 3 to 4 to 60 to 170 to 30 to 62 to 64 to 65 Now run the project. Each drum should become a different colour. Click on them in turn to hear them play. If they move instead of playing, click on the blue full- screen symbol in the top left of the stage. Nothing else will work yet, but it’s good to test that your drums all play correctly. set ClickedDrum ▾ to drumNumber broadcast Clicked ▾ play drum 12 13 14 Create a new message and call it“Clicked”. when clicked set drumNumber ▾ to 1 set drumColour ▾ to 100 set drumNote ▾ to 60
  • 199. 197 G A M E P R O G R E S S 6 0 % The master controller Now you need to create the game’s main brain: the master controller. The master controller broadcasts the “RemoteControl”message that plays the drums, but it does several other jobs too. It generates the drumbeat sequence the player has to follow; it checks that the player has clicked the right drum; and it keeps track of the score. It will need several scripts to do all this. The stage is a good place to put the master controller scripts as they don’t belong to any one sprite. Click on the stage info area at the bottom left of the screen to choose the stage. Stage 1 backdrop New backdrop: 15 Click here to add scripts to the stage. The master controller will keep track of the ever-growing sequence of drumbeats by storing them in a numbered list. To create the list, open the Data blocks section and click the“Make a List”button. Name it“DrumOrder”—it’s going to store the order in which the drums will play. Check the box so you can see it on the stage. Check here to show the list on the stage. New List OK Cancel List name: For all sprites DrumOrder 16 Make a list DrumOrder
  • 200. 198 T R O P I C A L T U N E S With the stage selected, build this test script to generate a random sequence of seven drum numbers in the list. This script isn’t part of the final game (for that, the script will need to add notes one by one). However, building it will show you how lists work and will let you try out the drums. 17 Run the script and watch the “DrumOrder”list on the stage slowly fill up. It will look like this, but your numbers won’t be the same. The drums don’t play yet because there are no blocks to tell them to. 18 DrumOrder 4 3 1 3 1 2 2 1 2 3 4 5 6 7 + length: 7 This block clears the list at the start of the test. This block adds a random drum number to the end of the list. The“wait”block gives you time to see what’s going on. Lists Making a list is a great way to store information, and lots of programming languages use them. They are handy for all sorts of things, from creating leaderboards and doing complex calculations to giving sprites artificial intelligence. In Tropical Tunes, we use a list to store numbers, but you can store words in lists too. You can use a list to make a sprite say something random when you click on it. when this sprite clicked say item pick random 1 to 5 of Insults ▾ Cat Cruncher by GreenDino99 Insults You’re so dumb. I hate you! What’s that smell? Make like a tree! Take a hike! 1 2 3 4 5 + length: 5 E X P E R T T I P S Lists are usually hidden, but you can display them on the stage just like variables. Take a hike! when clicked delete all ▾ of DrumOrder ▾ repeat 7 wait 1 sec add pick random 1 to 4 to DrumOrder ▾
  • 201. 199 G A M E P R O G R E S S 8 0 % Now create another new block called“play sequence” and build the script shown here. It will play the notes in the list in order by travelling once though the blocks in the loop for each item in the“DrumOrder”list, setting “DrumToPlay”from the list, and then sending out the “RemoteControl”message. You will need to create a new variable for all sprites called“Count”. Commanding the drums set DrumToPlay ▾ to item Count of DrumOrder ▾ set Count ▾ to 0 change Count ▾ by 1 This block puts the drum’s number in the “DrumtoPlay”variable. The“Count”variable keeps track as the program works down the list. 19 Add the new“play sequence” block to the test script. 20 Broadcast blocks There are two types of broadcast Scratch blocks. They are useful in different ways. E X P E R T T I P S broadcast Message ▾ define play sequence broadcast Message ▾ and wait broadcast RemoteControl▾ and wait repeat length of DrumOrder ▾ wait 0.25 secs This blocks tells the drums to play. △ Broadcast This sends the message but then continues straight to the next block without waiting. This is useful for triggering an event without stopping what’s going on, such as launching an arrow without pausing the loop that moves the player’s sprite. △ Broadcast and wait This sends the message but then waits until all receiving scripts have finished before running the next block. This is useful when you don’t want the script to continue until something’s finished, such as the drum playing in this game. when clicked delete all ▾ of DrumOrder ▾ repeat 7 wait 1 secs add pick random 1 to 4 to DrumOrder ▾ play sequence Place the new“play sequence”block here.
  • 202. 200 T R O P I C A L T U N E S When an item in the list is read, its index number flashes. Now run the script. Watch the numbers alongside the items in “DrumOrder”light up as they are read by the script, then hear and see the correct drum play each time. You can check the “DrumToPlay”variable’s check box to show the number used with the“Remote Control”message for each note. 21 DrumOrder 4 4 3 3 2 4 4 1 2 3 4 5 6 7 + length: 7 Adding notes to the tune So far you’ve just been testing the drums. It’s now time to get them playing the sequences needed in the game, starting with one note and adding another note each time the player repeats the tune correctly. The test script isn’t needed any more so replace it with this one. You’ll need to create another new block called “wait for player”—its script is shown in the next step. You’ll also need to create a new variable for all sprites, called“Score”, and check it so it appears on the stage. 22 This block adds a new drum to the bottom of the list. when clicked forever wait for player set Score ▾ to 0 wait 2 secs If you run the project now, the drums will play one note and then wait. You can click as many drums as you like but nothing will happen because you haven’t programmed the master controller to respond to the“Clicked” message yet. 24 delete all▾ of DrumOrder add pick random 1 to 4 to DrumOrder ▾ Select the check box to show the“DrumToPlay” variable on screen. Make a Variable DrumToPlay define wait for player Add a new variable called“CorrectCount”to count how many drums the player gets right. Then create this script, which holds up the loop while it waits for the player to get the whole drum sequence right. 23 set Count ▾ to 0 set CorrectCount ▾ to 0 wait until CorrectCount = length of DrumOrder ▾ Create a new variable called“Score”. Create a new block called “wait for player”. play sequence
  • 203. 201 G A M E P R O G R E S S 1 0 0 % Add the next script to the stage to increase“CorrectCount” by one for each correct click. When the drums are clicked, they play and send the“Clicked”message, having put their number in“ClickedDrum”. This script will be triggered by that“Clicked” message. If the numbers don’t match, the game ends. Checking the player’s tune Now you need to add a script to respond to the player’s clicks on the drums. Every click creates a “Clicked”message that can trigger a script to check which drum was clicked and count the number of correct clicks. If the player clicks the wrong drum, the script will broadcast a“GameOver”message. Add a game-over script to the stage. You’ll need to load the“bell toll”sound to the stage from the Scratch sound library. when I receive Clicked ▾ 25 26 when I receive GameOver ▾ stop all ▾ The game is complete. Now try playing it, but remember to uncheck“DrumOrder”in the Data section of the blocks palette or the player can just read the correct drum order off the list. 27 play sound bell toll ▾ until done change Count ▾ by 1 else broadcast GameOver ▾ change CorrectCount ▾ by 1 if item Count of DrumOrder ▾ = ClickedDrum then change Score ▾ by 1 This is the number of the correct drum held in the list. This is the number of the drum you clicked. Create a new message called “GameOver”. Uncheck the box to hide the drum order from the player. Make a List DrumOrder
  • 204. 202 T R O P I C A L T U N E S Hacks and tweaks Once everything is working smoothly, you can play around with the code and tweak the game to try and make it more exciting or harder. Here are some ideas. ▷ How it works This game relies on two messages: “RemoteControl”, which tells a drum to play, and“Clicked”, which tells the master controller that a drum has been clicked by the player. The master controller has a loop that uses these two messages in turn—to play the tune and then check the player’s reaction. Drum1 Drum2 Drum3 Drum4 Master controller “Clicked”message tells the master controller when a drum is clicked. “RemoteControl”message makes the drums play. The master controller loops through these three actions. Adds note to sequence Plays sequence Waits for player to click sequence △ Talking shark Try adding a shark sprite that swims up and gives instructions—make him talk using the“say”block. △ Round counter Create a new global variable “Round”and show it on the stage. Set it to zero at the start of a game and increase it by one every time the player completes a sequence correctly (at the end of the master controller loop). ▽ Another drum Add a fifth drum. You’ll need to change its drum number, note, and color values, and check anywhere in the code that thinks there are only four drums—such as the random block in the master controller. ◁ Game over Add a“Game Over” sign or make the shark swim back onto the stage to say it. Obey me! GAME OVER! 14
  • 205. 203 H A C K S A N D T W E A K S Debugging Bugs are errors in programs. Getting rid of them is called debugging. If a program isn’t working properly, there are a number of common Scratch problems you can check for, which are shown below. If you’re following instructions and something isn’t working, it’s also worth going back to the beginning and checking all the steps—there could be a small mistake in one of your scripts that is affecting the whole game. E X P E R T T I P S Have you missed out any blocks? Are your loops and“if”blocks one inside the other when they shouldn’t be? Or are they one after another when they should be inside? Don’t type in variable names—use the orange variable blocks instead. Have you confused similar blocks like“go to”and“point toward”? Are all the numbers in the windows of the Scratch blocks correct? Have you selected the correct item in the drop-down menus? Is a loop that should be around the blocks missing? Try showing key variables on the stage by checking their boxes in the orange Data section. If their values look odd or don’t change, they might give you a clue about what’s wrong. Sprites Drum1 Drum2 Are the scripts attached to the correct sprite or the stage? It’s easy to put a script in the wrong place. If a sprite disappears from the stage, check that it’s not hidden:right- click on the sprite in the sprites list and choose“show”. ClickedDrum DrumToPlay info duplicate delete save to local file show Drum1 Drum2 Sprites Stage 1 backdrop New backdrop: when I receive Clicked ▾ change Count ▾ by 1 if item Count of DrumOrder ▾ = ClickedDrum then change CorrectCount ▾ by 1 change Score ▾ by 1 else broadcast GameOver ▾ go to Launcher ▾
  • 208. 206 W H AT N E X T ? Remixing and beyond The Scratch website allows you to see other users’ code and reuse it in your own games; this is called remixing. Millions of projects have been shared online and you can dive into every one. It’s a great place to share your games and find ideas. Exploring Scratch To see games shared by other Scratch users, go to the Scratch website at www.scratch.mit.edu and click on Explore. Create Explore Discuss Help Join Scratch Sign In Search Star Hunter Doom on the Broom Jumpy Monkey by Octoblaster999 by WorkingWitch111 by FunkyMonkey66 924 500 27 8224 883 496 40 7727 352 285 17 4325 SCRATCH Projects Studios Go Shared ▾ Past 30 days ▾ Sort by: Featured All Animations Art Games Music Stories Tag: Explore Remix Click here to see shared projects. A studio is a set of projects with a particular theme. Click on the preview picture to choose a project. Click the full-screen symbol to try out a game at full size. Instructions Defend the witch against creatures of the night by turning her broomstick (arrow keys) and casting fireballs (space key). Flying hippos give extra lives but make sure you don’t hit them with fireballs! Modified: 8 Jun 2015 Shared: 15 May 2015 9 scripts 6 sprites Doom on the Broom by WorkingWitch111 Notes and credits Everything in this game was created by me. c 496 883 7727 297 See inside Click“See inside” to see the scripts. Then click“Remix” to save your own version so you can change it.
  • 209. 207 R E M I X I N G A N D B E Y O N D Creating your own games Once you’ve built all the games in this book, you’ll probably be bursting with your own game ideas. Here are some tips to help you get started. Big and small ideas Good ideas can come to you at surprising times, so be ready to jot them down before you forget them. Don’t just keep notes about new games —write down ideas about smaller details such as characters, objects, levels, and actions. Code your game Start with the basics. Begin by coding the main character so it works with your chosen controls (keyboard or mouse). Then build up slowly, adding one sprite at a time and creating the scripts it needs to play its part in the game. Share it! Click the“See project page”button at the top right of the Scratch editor and add a few words to explain how to play the game. Then click on“Share” to allow the whole world to play your masterpiece. Well done, you are now a game maker! Beg, borrow, and steal People say the best ideas are stolen. Scratch allows you to steal ideas from everyone else, so go ahead. Look through other people’s projects and save any sprites, costumes, backdrops, sounds, or scripts you like in your backpack, so you can reuse them later. Testing Once you’re happy with the game, ask someone else to play it. They might find problems that you missed because you know the game too well. Fix any bugs and make sure it all runs smoothly. 1 3 5 2 4 See project page Share
  • 210. 208 W H AT N E X T ? Better Scratch Good programmers try to write code that’s easy to understand and change. There are many ways in which you can improve your projects and expand your knowledge of Scratch. Here are a few of them. ▽ Backpack The backpack is a feature found at the bottom of the Scratch screen. It lets you store useful scripts, sprites, sounds, and costumes and move them from project to project. But remember that you can only use it online. △ Use clear names Scratch lets you choose names for sprites, variables, and messages. Make sure you use meaningful names, such as“Dragon”or “Score”, to make your Scratch code readable. △ No unexplained numbers Avoid writing code that contains unexplained numbers. To make your code easier to read, add a comment or use a variable so the number explains itself. △ Comments You can add comments to any block to explain your code. To do this, right-click (control click on a Mac) on it and select“Add comment”. This can remind you when you read code written a while ago. set x to 240 Sound Scream-female Costume monkey2-a Backdrop Underwater2 Script when clicked wait until touching Sprite1 ▾ ? stop all ▾ switch costume to dragon1-b ▾ Drag and drop a script or sprite to copy it to the backpack. Setting a variable helps you change this number in just one place. set ScreenEdge ▾ to 240 set x to ScreenEdge when I start as a clone forever wait 1 secs next costume the ghost’s costume loop Fish1 Backpack
  • 211. 209 B E T T E R S C R AT C H △ Your own images You can import any image into Scratch, but don’t share a project containing photos of people you know. You can also create your own images with a graphics program or the paint editor in Scratch. △ Your own sounds You can record your own music and sound effects through your computer’s microphone and edit them in Scratch. You can also find free music and sounds on the web to use in your games. E X P E R T T I P S Making your project different Scratch projects often look and sound similar if you only use resources from the Scratch library. To make yours different, import your own images and sounds into Scratch. The help tool Are you still unsure about how to use certain blocks? The help tool in Scratch will let you master the function of each block with ease. To find out more about a particular block, first click the “Block help”symbol in the toolbar at the top of the screen. 1 After the mouse-pointer turns into a question mark, click on any block in the blocks palette. A help window opens with tips on how to use that block. 2 The mouse-pointer turns into a question mark. if on edge, bounce if on edge, bounce ? “Block help” symbol Click here to upload an image file from your computer. Click here to use your webcam to take a picture. Click here to use a sound file from your computer. All Tips If touching the edge of the stage, then bounce away The sprite will bounce at an angle if it is touching the side, top, or bottom of the stage ? if on edge, bounce forever when clicked move 10 steps Use this to record sounds. A help window opens.
  • 212. 210 W H AT N E X T ? The next level Once you’ve made a few Scratch games of your own, you may want to expand your horizons. There’s a whole world of knowledge and experience you can tap into to improve your game design and programming. Game design Begin by improving your knowledge of games and how they’re created. The following activities will expand your imagination and stimulate your game-design brain. ◁ Play games Playing games can trigger ideas for new ones. Try out different games and watch other people playing them. Think about the actions (mechanics), rules, and goals that make a good game work. Imagine how you might code these different parts of the game yourself. △ Learn from the experts Many game designers love to talk and write about how they design games. You can find their tips on video-sharing websites and in blogs and magazines. ◁ Keep notes Keep a notebook of game ideas, drawings, stories, and anything that you find fun or interesting—you never know what might be useful later. You could even start a blog about gaming to share your ideas with friends and family. ▷ Explore gaming history Find out more about the history of gaming. Visit a video game museum or a vintage arcade. There are lots of free online versions of famous video games, so it’s easy to try classic games this way. △ Think visually Thinking visually is a vital skill for a game designer. Practice drawing or try making models. To help create animations, film someone walking and then pause the video during playback to see their posture changing. ▷ Find stories Ideas for games and the characters in them often come from stories. Next time you watch a good film or read a good book, think how you might turn it into a game. GAME OVER!
  • 213. 211 T H E N E X T L E V E L Programming To make computer games, you need to know how to code. Brushing up on your coding skills will help you make better games. △ Code together Join or start a coding club at your school or library. Collaborating on projects with other coders is a great way to fire your imagination and supercharge your skills. △ Try a game engine You don’t have to build computer games from scratch—you can use programs called game engines to do a lot of the difficult coding for you. You can find game engines online. Many can be tried for free. ▷ Sharpen your Scratch Try the tutorials and explanations on the Scratch website. Learn everything you can about Scratch and you’ll be able to code things you never dreamed possible. ▷ Learn another language Scratch is a great springboard to learn other programming languages, such as Python or JavaScript. There are lots of online coding courses, including some that focus on games. Python has a great add-on called Pygame that helps you create games. ◁ Do your research If you have a technical mind and want to learn more about the latest advances in computer games, read up on 3D graphics, game physics, and artificial intelligence. E X P E R T T I P S Game engines A game engine is a program that contains already-made code for building games. It works a bit like Scratch, but it’s designed for professional game developers rather than beginners learning to code. Game engines provide easy ways to detect controller inputs and to guide sprites around the screen. Solutions to problems caused by collision detection and game physics are built in. Game engines can also convert games to run on consoles and mobiles, saving you the nuisance of rewriting all the code.
  • 214. 212 W H AT N E X T ? Jobs making games Some computer games are created by a single programmer, but others are put together by huge teams. The computer games industry employs thousands of people. Most of them specialize in just one part of the process. Who makes games? Game studios are companies that make games and employ specialists to work as a team. On smaller games, each person usually has more than one job. On a big project, there might be dozens of programmers and artists, each working on just a small part of the game. △ Sound designer The sound effects in a game help to set the scene. They are created by a sound designer, who also decides how the composer’s music will be used in the game. ◁ Artist Everything the player sees—the characters, objects, and scenery—are created by artists, often working as a team under a single lead artist. △ Producer The person in charge of a project and all the people working on it is called a producer. It’s the job of this producer to make sure the game is the best it can be. △ Game designer The game designer creates the rules, goals, and mechanics that make a game interesting and fun for players. Playability is the designer’s main focus. △ Writer The stories and characters in a game are developed by writers. In a game with cutscenes (short, movielike sequences), the writer is responsible for what the characters say. L I N G O Game types Indie games Short for“independent games”, these are created by people working on their own or in small teams. Many feature creative new ideas not seen in mainstream games. AAA games These are the biggest games and are expected to sell millions of copies. They take many months or even years to make and have huge teams and budgets of many millions of dollars. △ Composer A composer is a professional musician who writes new music. Good music is vital because it helps create atmosphere in a game.
  • 215. 213 J O B S M A K I N G G A M E S Game development Games go through lots of different versions before the final one is released for sale. The early versions take the game from a basic idea to a finished product and usually follow the sequence shown here. △ Tester It might sound like a dream job playing games all day, but it’s a serious and important part of developing a game. A tester has to play the game over and over to check if it works correctly and is not too easy or hard. △ Programmer Programmers take all the ideas and building blocks created by the team and use them to write code that makes the game work. △ Game publisher Some games have a publisher, a company that pays for the game’s development and then advertises and distributes the final product. G A M E D E S I G N From blocks to riches In 2009, Swedish programmer Markus “Notch”Persson released the first version of Minecraft, a building game he’d made. By 2014, Minecraft had around 100 million registered users and was sold to Microsoft for $2.5 billion. Prototype The prototype is an experimental version of the game built to see if the basic idea works and is fun to play. Alpha The alpha version has all the main features, but they might not be fully working. They are improved and major bugs are fixed before the next stage. Beta The beta version of the game has everything, but it needs polishing and still has minor bugs, which need to be found and fixed. Release The release is the final version, fully tested and fixed. Some games are available as“early access” releases for fans to test before the game is 100 percent finished. 1 3 2 4
  • 216. 214 W H AT N E X T ? Have fun! Games can transport you to different worlds and take you through a whirlwind of emotions, but the most important part of gaming and making games is to have fun. Party time! Playing games with people is much more fun than playing on your own. Why not grab some snacks and invite your friends around to play your favorite multiplayer game? You could also get them to try out games you’ve made in Scratch and ask them to suggest improvements. They might even want to create their own versions. Hold a game jam A game jam is a game-making party. People get together for a day or two to race against time as they build a game from start to finish. Every year, countless game jams take place. Some take place in a single location, but others are scattered across the world and linked through the internet or even held entirely online. Why not hold a mini Scratch jam at your home or school? Pick a theme and ask a teacher or parent to help arrange computer access, judging, and prizes. ▷ Choose a theme Game jams usually have a theme, such as“jumping games”or“games with bees in them”. Prizes are awarded for building the best games.
  • 217. 215 H A V E F U N ! Challenge yourself It’s good to push yourself sometimes, so why not set yourself a game challenge? It could be anything from making a fully playable game in just 15 minutes to making a game for every letter of the alphabet. You could also keep a diary or blog to describe your experiences, or create a Scratch studio to share your challenge games. Find or start a game club If your school or library has a coding club, you can ask them to run some sessions on game design and programming. Start a group within the club for people who have a special interest in making games. Genre 1. Maze 2. Jumping 3. Quiz 4. Vehicle simulator 5. Virtual pet 6. Interactive story Extra feature 1. Patrolling enemies 2. High score 3. Collecting objects 4. Life counter 5. Time limit 6. Multiplayer Setting 1. Forest 2. Space 3. Underwater 4. City 5. Castle 6. Beach E X P E R T T I P S Game idea generator For some people, the hardest part of creating games is having the idea for a game in the first place. Here’s a trick to help give you inspiration. Roll a dice to choose a number from each column, and then combine the results to generate a random game idea. Feel free to change it—it’s just to get your creative brain in gear!
  • 220. G L O S S A R Y A N D I N D E X 218 Glossary algorithm A set of step-by-step instructions that perform a task. Computer programs are based on algorithms. animation Changing pictures quickly to create the illusion of movement. artificial intelligence (AI) Programming to make characters such as enemies in a game appear to behave in intelligent ways. assets All the pictures and sounds used in a game. backdrop The picture behind the sprites on the stage in Scratch. backpack A storage area in Scratch that allows you to copy things between projects. block An instruction in Scratch that can be joined to other blocks to build a script. Boolean expression A statement that is either true or false, leading to two possible outcomes. Boolean blocks in Scratch are hexagonal rather than round. branch A point in a program where two different options are available, such as the“if then else”block in Scratch. bug A coding error that makes a program behave in an unexpected way. Bugs are named after the insects that got into the wiring of early computers, causing errors. camera The imaginary camera through which a player views a game. collision detection Programming that detects when two objects in a game are touching. condition A“true or false”statement used to make a decision in a program. See also Boolean expression. console A computer that is used just for playing games. costume The picture a sprite shows on the stage. Rapidly changing a sprite’s costumes can create an animation. data Information, such as text, symbols, or numbers. debug To look for and correct errors in a program. directory A place to store files to keep them organized. event Something a computer program can react to, such as a key being pressed or the mouse being clicked. execute See run. export To send something to the computer from Scratch, such as a sprite or a whole project saved as a computer file. file A collection of data stored with a name. flag A variable that is used to pass information from one sprite or script to another. function Code that carries out a specific task, working like a program within a program. Also called a procedure, subprogram, or subroutine. game engine A program that helps a programmer make games by providing already-made code for many common game features, such as animation, controls, and game physics. game jam A competition in which game makers race against the clock to build the best game. game loop A loop that controls everything that happens in a computer game. game physics Programming to create forces and collisions between objects in a game. genre A type of computer game. Platform games and first-person shooters are common genres. global variable A variable that can be changed and used by any sprite in a project. graphics Visual elements on a screen that are not text, such as pictures, icons, and symbols. GUI The GUI, or graphical user interface, is the name for the buttons and windows that make up the part of the program you can see and interact with. hardware The physical parts of a computer that you can see or touch, such as wires, the keyboard, and the screen.
  • 221. G L O S S A R Y 219 header block A Scratch block that starts a script, such as the“when green flag clicked”block. Also known as a hat block. import To bring something in from outside Scratch, such as a picture or sound clip from the computer’s files. index number A number given to an item in a list. input Data that is entered into a computer. Keyboards, mice, and microphones can be used to input data. integer A whole number. An integer does not contain a decimal point, nor is it written as a fraction. interface The means by which the user interacts with software or hardware. See GUI. library A collection of sprites, costumes, or sounds that can be used in Scratch programs. list A collection of items stored in a numbered order. local variable A variable that can be changed by only one sprite. Each copy or clone of a sprite has its own separate version of the variable. loop A part of a program that repeats itself, removing the need to type out the same piece of code multiple times. mechanics The actions a player can do in a game, such as jump, collect objects, or become invisible. memory A computer chip inside a computer that stores data. message A way to send information between sprites. network A group of interconnected computers that exchange data. The internet is a giant network. operating system (OS) The program that controls everything on a computer, such as Windows, OS X, or Linux. operator A Scratch block that uses data to work something out, such as checking whether two values are equal or adding two numbers together. output Data that is produced by a computer program and viewed by the user. pixel art A drawing made of giant pixels or blocks, mimicking the appearance of graphics in early computer games. pixels The colored dots on a screen that make up graphics. procedure Code that carries out a specific task, working like a program within a program. Also called a function, subprogram, or subroutine. program A set of instructions that a computer follows in order to complete a task. programming language A language that is used to give instructions to a computer. project Scratch’s name for a program and all the assets that go with it. random A function in a computer program that allows unpredictable outcomes. Useful when creating games. recursion See recursion. run The command to make a program start. Scratcher Someone who uses Scratch. script A stack of instruction blocks under a header block that are run in order. server A computer that stores files accessible via a network. software Programs that run on a computer and control how it works. sprite A picture on the stage in Scratch that a script can move and change. stage The screenlike area of the Scratch interface in which projects runs. statement The smallest complete instruction a programming language can be broken down into. string A series of characters. Strings can contain numbers, letters, or symbols such as a colon. subprogram or subroutine Code that carries out a specific task, working like a program within a program. Also called a function or procedure. variable A place to store data that can change in a program, such as the player’s score. A variable has a name and a value.
  • 222. 220 G L O S S A R Y A N D I N D E X Index Page numbers in bold refer to main entries. 3D experience 15 3D graphics 211 A AAA games 212 actions 12, 210 “addition” block 187 algorithms 64 alpha versions 213 “and” block 97 animation 47, 108, 111, 142, 210 and rapid costume change 111 “answer” blocks 183 apps, Scratch 25 arithmetic operators 112 arrow keys 51, 52–3, 91, 92–3, 95, 109, 178 artificial intelligence 211 giving sprites 198 artists 213 “ask” blocks 183 atmosphere 14–15 creating 34 and music 57, 121 B backdrop library 145, 192 backdrops 15 adding 34, 110 adding color 149 choice of 121 continually changing color 110 creating your own 121 Dog’s Dinner 145 Doom on the Broom 110 Glacier Race 171 Jumpy Monkey 101 painting 60–1 platforms 149 Star Hunter 30–1, 34 Tropical Tunes 191, 192 xy-grid 145 backing up 162 backpack (Scratch) 25, 26, 27, 207, 208 balanced space 61 “Best time” 86 beta versions 213 Bitmap Mode 54, 58, 60, 69, 76, 84, 124, 132 blocks adding comments 208 confusing similar 203 customized 134–5, 194 help tool 209 making 134, 194 and scripts 22 subprograms 134 blocks palette 26, 27, 134, 173, 194 blogs, gaming 210 board games 16 Boolean expressions 82 “bounce” message 179 bouncing 103, 105 bounding boxes 63 brain games 190 see also Tropical Tunes “broadcast” blocks 66, 168, 199 “broadcast Game Over” block 69 “broadcast and wait” block 183, 199 bugs 46, 63, 203, 207 fixing jumping 138–40 bumper sprites 143 C C++ 80 “Calculate” message 168 calculations 198 camera angles 187 cameras 53 “car controls” block 173, 178 card games 16 center points, sprites 63, 69, 76 moving 143 “change color” block 47, 87 “change score by” block 81 “change size by” block 87 characters 12 Cheese Chase 50 Dog’s Dinner 130 Doom on the Broom 108, 142–4 Glacier Race 166 Jumpy Monkey 90 and location 15 Star Hunter 30 “check collisions” block 174, 179 Cheese Chase 48–71 adding enemies 56, 64–5 adding instructions 71 adding music 57 adding sounds 70 aim of the game 50–1 game over 69 hacks and tweaks 70–1 high score 68 keyboard control 52–3 maze making 58–61 mouse trap 62–3 using paint editor 54–5 chess 16 circle tool 55, 76, 172 Circle Wars 72–87 adding a timer 83 aim of the game 74–5 clones 78–81 creating the sprites 76 hacks and tweaks 86–7 instant player control 77 instructions 84–5 making friends and enemies 77 win or lose? 82–3 “clean up” option 81 clones 25, 74–5, 78–81, 80, 113 changing color/size 87, 113 and costume change 115 destroying 80 enemy 81, 114 explosion 116–17 and Game Loop sprite 176 making 79, 95 closed-in space 61 clubs coding 211 game 215 coding bugs 46 clubs 211 how it works 18–19 improving your skills 211 collecting bones 154–5 gems 180–2 stars 40–1 collision detection 63, 143, 156, 211 collision-detection sprite 143 collisions 37 false 143 and ghosting 151 Glacier Race 174–5, 177, 179 with platforms 132 color palette 76, 77, 84, 132 colors and atmosphere 14 and backdrop 60–1 changing 47, 87 flashing 47 paint editor 55 combat games 16 comments, adding to blocks 208 comparison operators 82 composers 212 conditional statements 37, 97 console controllers 53, 211 control loops 112 controller inputs 211 controllers 13, 53 arrow keys 51, 52–3, 91, 92–3, 95, 109, 131, 167, 178 cameras 53 consoles 53, 211 dance mats 53 keyboards 52–3 letter keys 167, 173 motion sensors 53 mouse 25, 31, 71, 75, 77, 105, 127, 191 space bar 91, 109, 131 switching 71, 105, 127 touchpad 75, 191 “Convert to bitmap” 172 coordinates 40 using 41 x and y 154, 158, 159 copies, backup 162 costumes 47 alternating 126, 142 and animation 111, 142 changing 111, 118, 120, 122, 123, 126 deleting 118 and different levels 155 and false collisions 143 “Flip up-down” button 170 and instructions 160 Platforms sprite 148, 149 costumes library 118, 123 Costumes tab 60, 111 “Count” variable 199 countdown timers 104, 182 adding seconds to 181 taking seconds off 182 “Countdown” variable 168 “create clone” block 79, 80, 176
  • 223. 221 I N D E X D dance mats 53 dance-mat games 17, 53 “data” block 42, 43, 44, 197 debugging 46, 203 “define” block 134, 173, 178 “delete this clone” block 79, 80, 113, 122 desktop computers 25 dice 39 difficulty level 13 adjusting 47, 70–1, 86, 96, 125, 127, 163, 186, 202 extra lives 126–7 directions 38, 39 “division” block 187 Dog’s Dinner 128–63 adding a character 142–4 adding sound 144 aim of the game 130–1 bones for the dog 154–5 creating a game control sprite 150–1 drawing the platforms 148–9 falling off the level 141 fine-tuning 158–9 fixing the jumping bugs 138–40 hacks and tweaks 162–3 hazardous food 157 junk food 156 making the levels 145–7 placing the portals 152–3 player on a platform 132–3 running around 134–5 signs and music 160–1 up and down 136–8 Doom on the Broom 106–27 adding explosions 116–17 aim of the game 108–9 bat attack 114–15 casting fireballs 113 challenger mode 125 controlling the witch 112 extra lives hippo 126–7 finishing touches 124–5 fire-breathing dragon 120–1 ghosts and ghouls 122–3 hacks and tweaks 127 setting the scene 110–11 speedy specter 118–19 double jump 141 drawing 210 designers see game designers “duplicate” 67, 77 E “early access” versions 213 enemies 12, 22 adding 36, 38–9, 56, 64–5, 77, 111, 118–23 better 44–5 clones 81 supernatural 122–3 “equal to” block 64 “equals” operator 82 eraser tool 60, 63 escape games 17 events 93 Events blocks 93 events button 33 experimenting 22 explosions 116–17 F “Fall Speed” variable 98–9, 136, 139 “Fallen off” block 141 false statements 82 fill tool 61, 177 fine-tuning 46, 158–9, 186 see also hacks and tweaks fireworks 116–17 first-person games 187 fixed camera angle 187 flags 153 “Flip up-down” button 170 font size 69 “For all sprites” variable 193 “for” loops 78 “For this sprite only” variable 193 “forever” block 23, 32, 35 “forever” loops 52, 53, 64, 70, 78, 79 friends adding 77 cloning 78–80 extra lives 126–7 functions 134 G game challenges 215 game clubs 215 Game Control sprite 150–1, 153, 159, 161, 162, 163 game design animation 111 camera angles 187 collision detection 143 controllers 53 designing levels 163 from blocks to riches 213 game physics 103 game stories 14, 84, 87 music 57 the next level 210 playability 13 space 61 virtual reality 15 working with themes 121 game designers 212 learning from 210 game development 213 game engines 211 game idea generator 215 game jams 214 Game Loop sprite 168, 176, 182, 185 game loops 168, 169, 171, 172, 173 Game Over! 66, 67, 69, 86, 96, 100–1, 124, 141, 162, 163, 168, 201, 202 game physics 103, 211 game publishers 213 “Game Speed” variable 112, 125, 127 games atmosphere 14–15 Cheese Chase 48–71 Circle Wars 72–87 creating your own 207 debugging 46, 203 Dog’s Dinner 128–63 fine-tuning 46, 158–9, 186 game types 212 Glacier Race 164–87 good ingredients 12–13 how coding works 18–19 improving your knowledge of 210 jobs making games 212–13 Jumpy Monkey 88–105 planning a game 18 playing 210 Star Hunter 28–47 stories 14, 86, 87 testing 207 Tropical Tunes 188–203 types of 16–17 gaming history 210 genres 16–17, 215 “ghost” block 152 ghosting 151 Glacier Race 164–87 adding obstacles 175–7 adding sounds 174, 182, 185 aims of the game 166–7 collecting gems 180–2 collisions and spins 174–7 fine-tuning 186 the game loop 168–9 hacks and tweaks 186–7 one-player version 186 penguin in charge 182–5 player two 177–9 race cars 172–3 scrolling road 170–1 “glide” blocks 45 global variables 193, 195, 196 “go to” blocks 40, 67, 70, 152, 155, 159, 178 “go to mouse-pointer” block 32, 77 “go to” trick 159 goals 13, 210 goggles, virtual reality 15 graphics 15 graphics programs 209 gravity 90, 92, 95, 98–9, 136 defying 103 experimenting with 102–3 real world 99 reverse 103, 163 “Gravity” variable 98, 102, 136, 163 “Grow” tool 76 H hacks and tweaks Cheese Chase 70–1 Circle Wars 86–7 Dog’s Dinner 162–3 Doom on the Broom 127 Glacier Race 186–7 Jumpy Monkey 104–5 Star Hunter 46–7 Tropical Tunes 202 hardware 25 hazards 156–7 adjusting speed of 163 Hazards sprite 157, 158, 162 health 12, 42 help tool 209 “hide” block 56, 85
  • 224. 222 G L O S S A R Y A N D I N D E X “hide variable” block 183 hide-wait-show scripts 70 high score 68 history, gaming 210 I “if Level =” blocks 162 “if then” blocks 37, 40, 52, 53, 62, 64, 65, 66, 80, 82, 97, 154, 179, 182 “if then else” blocks 65, 139, 185 images, importing your own 209 Indie games 212 instructions and blocks 22 for games 71, 84–5, 101, 125, 160–1, 186, 202 and scripts 22 writing sequences of 18–19 “is less than” operator 82 “is more than” operator 82 J JavaScript 80, 211 joysticks 13, 53 “Jump control” block 137, 138 jumping 136–8 adjusting the jump 163 bugs 138–40 types of jump 141 Jumpy Monkey 88–105 adding gravity 98–9 adding sound 101 aim of the game 90–1 bananas and palm trees 95–7 game over 100–1 hacks and tweaks 104–5 launching the monkey 92–5 playing with gravity 102–3 K “key pressed” blocks 178 keyboard arrow keys 51, 52–3, 91, 92–3, 95, 109, 131, 167, 178 control 52–3 and events 93 letter keys 167, 173 shift key 59 space bar 91, 109, 113, 131 L laptops 25 “Launch Speed” variable 92 “Launches” variable 100 leaderboards 198 level design tools 163 “Level Over” variable 150, 152, 153 levels 130–1 adjusting platforms 158 changing music 161 creating extra 162 customized 163 designing 163 designing new 158 falling off 141 fine-tuning 158 making the 145–7 and portals 152 line tool 54, 180 line width control 58 lists 198 lives 108 extra lives 126–7 limited number of 163 “Lives” variable 112, 116, 163 losing 114, 115 running out of 124 local variables 193 locations, and atmosphere 15 logic blocks 97 loops 35 bugs 203 control 112 game 168, 169 and levels 150 repeat 78, 94 and speed of game 185 “Lose a life” 114, 115, 116, 117 losing 82–3 M Mac computers 25 “Make a block” button 134, 173, 194 “Make a list” button 197 master controller 192, 195, 196, 197, 200, 202 mathematical collision detection 143 maze games 50 see also Cheese Chase maze making 58–61 mechanics 12 memory, testing your 190, 191 messages 67 “Bounce” 179 “Calculate” 168 “Clicked” 200, 201, 202 “GameOver” 66–7, 86, 96, 100, 141, 144, 163, 168, 201 “Lose a life” 114, 115, 116, 117 “Move” 168, 171, 173, 175 “RemoteControl” 195, 197, 200, 202 “Setup” 144, 150, 168, 172 “Start” 150 “Win” 150 microphone 186, 209 Microsoft 213 Minecraft 213 mobile phones 211 modeling 210 motion blocks 32, 36, 45, 115 motion sensors 53 mouse 25, 31, 71, 75, 77, 105, 127, 191 and events 93 “move” blocks 39 “Move” message 168, 171, 173, 175 movement and center point 143 and costume change 111, 142 detection 93 directions 38 modifying 119, 120 scrolling 171 and space 61 music 57, 121, 161, 185 importing your own 209 and levels 161 music games 17 see also Tropical Tunes “Music Loops” 57 N names, choice of 208 negative coordinates 41 “nested if” blocks 185 “next costume” block 142 “not” block 97 notes, keeping 207, 210 number puzzles 17 numbers, unexplained 208 O “object oriented” languages 80 objects 12 choice of 22, 121 clones 80 obstacles 61 creating 105, 156 Dog’s Dinner 156–7 Glacier Race 166, 175–7 Jumpy Monkey 96–7 on platforms 133 offline Scratch 24, 25 one-player games 186 online Scratch 24, 25 open space 61 operating systems 25 Operator blocks 44, 97 “or” block 97 P paint editor 54–5, 58, 71, 76, 132, 172, 177, 180, 209 parties, game 214 personalization 86–7, 104–5, 127, 162–3, 186–7, 209 Persson, Markus “Notch” 213 photorealistic images 15 physics, game 103, 211 “pick random” block 39, 64, 121, 123, 127 platform games 130, 136 adding a character 142–4 falling off the level 141 see also Dog’s Dinner Platform sprites 133, 148, 162 costumes 148 platforms adding 133 adjusting positions and sizes 158 collisions with 132 drawing 145, 148–9 making the levels 145–7 player sprites working with 132–3 “play drum” block 194 “play sequence” block 199 “play sound” block 101, 186 playability 12, 13 Player Block adding a character 142–4 creating 132–3 fixing jumping bugs 138–40 running around 134–5 up and down 136–8 player two 177–9 “point in direction” block 38, 113, 126, 173 “point towards” block 120 points, winning 40 Pong 13 portals 130–1, 150 placing the 152–3
  • 225. 223 I N D E X positive coordinates 41 procedures 134 producers 212 programmers 212 programming see coding programming languages 19 arithmetic operators 112 and clones 80 and game loops 169 learning other 211 lists 198 mathematical collision detection 143 and new blocks 134 or/and/not 97 and repeat until 94 see also Scratch programs, running 23 project page 71, 186, 207 projects making them different 209 sharing 206 prototypes 213 puzzles 12, 17 Pygame 211 Python 211 Q questions, sprites’ 183 R racing games 16 see also Glacier Race random block 202 random direction changes 78, 114, 115 random locations 55, 70, 96, 114, 115 random numbers 39, 40 random sequences 198 random speech 198 random time 56 ready-made blocks 22 recording your own sounds 186, 209 rectangle tool 132, 148, 172 release version 213 remixing 206 “Remote Control” message 195, 197, 200, 202 “repeat” loops 78 “repeat until” block 94, 97, 113, 120, 122, 139 “reset timer” block 83 reverse gravity 103, 163 “Reverse Step” variable 139 road, scrolling 170–1 road sprites 170–1 role-playing games 16 rotation style 36 “round” block 86 round counter 202 rules 12, 210 “Run controls” block 134, 135 “Run Speed” variable 135 “Run without screen refresh” 140 S sandbox games 16 saving 25, 43, 162 “say” block 125, 186, 202 scary features 14, 57 Doom on the Broom 108, 110, 118–19, 122–3 scenery 121 changing 186 making more interesting 171 moving 169, 171 “score” block 44 score counter 42, 55 “Score” variable 112, 200 scores 13 Cheese Chase 68 Circle Wars 77, 82–3 Glacier Race 181, 182, 184 high score 68 Jumpy Monkey 100–1 and sounds 81 Star Hunter 42–3 Tropical Tunes 197 Scratch 19, 22–7 expanding knowledge of 208–9 exploring 206 introducing 22–3 learning more about 211 name of 24 old and new versions 25 online/offline 24 setting up 24–5 website 206 window 26–7 Scratch projects website 86 Scratch jams 214 scripts 22 activating 23 building 32–3 copying 81 and events 93 and messages 66, 67 pausing 153 triggering 93 in wrong place 203 scripts area 26, 27 scrolling 171 selection tool 60, 158 “Sensing” blocks 83 “set color” block 47, 152 “Set costume center” tool 55, 63 “set Fallspeed” block 136 “set Gravity” block 98, 136 “set Level to” block 159 “set size” blocks 38, 47, 60 “set TakeoffSpeed” block 137 setting 215 “Setup” message 144, 150, 168, 172 shape shifting 87 sharing 207 shift key 59 “show” block 56 “Shrink” tool 76 side-scrollers 171 Signs sprite 160 simple collision detection 143 “Simulate gravity” block 136, 138, 139, 140 simulator games 17 single jump 141 size, changing 47, 60, 76, 94, 133 sliders 102–3, 105 slow-motion effect, getting rid of 140 smartphones, Scratch apps for 25 sound designers 212 sounds adding 35, 81, 101, 110, 161, 174 at end of game 161 atmosphere 14, 110, 121 and changing levels 161 Cheese Chase 57, 70 Circle Wars 81 Dog’s Dinner 144, 161 Doom on the Broom 110, 116, 122 and events 93 Glacier Race 174, 182, 185 importing your own 209 Jumpy Monkey 101 music 57 recording your own 186 and scores 81 Star Hunter 35, 41 sound library 70, 116, 122, 144, 174, 182, 185, 201 space bar 91, 109, 113, 131 disabling 138 space in games 61 speech bubbles and arithmetic operators 112 for game instructions 71, 125 speed and atmosphere 14 and difficulty level 70, 125 and excitement 187 experimenting with 86 fall speed 98 Game Speed variable 112, 125, 127 of hazards 163 of launch 93 “spin” block 174 “spinning” variable 172, 174, 175 spooky features see scary features sports games 17, 53 sprite library 36, 52, 56, 104, 110, 111, 142, 156 sprites list 26 sprites 22 artificial intelligence 198 asking questions 183 blank 54 bumper sprites 143 center points 63, 69, 76, 124, 133, 172 changing costumes 111, 118, 120, 126, 157 Cheese Chase 50 choice of 121 Circle Wars 74, 75 clones 74, 78–81 collision-detection sprite 143 creating 76 Doom on the Broom 108, 110, 118–23 drawing and painting 54–5, 172 duplicating 38, 67, 77, 118, 120, 122, 126, 155, 177, 193, 196 Explosion sprites 116–17 Extra Life sprites 126–7 Game Control sprite 150–1, 153, 159, 161, 162, 163 Game Loop sprite 168, 176, 182, 185 Game Over sprite 69, 100, 124, 153 gem sprites 180–2 getting stuck 63, 158 ghosting 151 Glacier Race 166 Hazards sprite 157, 158, 162 hidden 203 Instructions sprite 71, 84–5 Jumpy Monkey 90 Launcher sprite 92 mazes as 58 and messages 66, 67 movement 23 naming 34 Platforms sprite 133, 148, 162
  • 226. 224 G L O S S A R Y A N D I N D E X Player Block sprite 132–3 programming 32–3, 52, 64–5 renaming 12, 58, 76, 92, 116, 118, 120, 122, 133, 177 repositioning 158, 159 resizing 47, 60, 76, 94, 133 road 170–1 Signs sprite 160 sounds 35, 101 Star Hunter 30 supernatural 122–3 Tropical Tunes 190, 192 variables for 182, 193 working with platforms 132–3 stage 23, 26 adding music 57 adding sounds 35 displaying variables on 102, 203 and master controller scripts 197 mazes 58, 59 Star Hunter 28–47 adding enemies 36, 38–9 aim of game 30–1 better enemies 44–5 building scripts 32–3 collecting stars 40–1 collisions 37 hacks and tweaks 46–7 keeping score 42–3 setting the scene 34 sound effects 35, 41 “Start” message 150, 151, 168 staying alive 40 “stop all” block 37, 69 “stop” block 141 stories, game 14, 84, 86 choice of 121 ideas for 210 strategy games 17 strings 184 subprograms 134 subroutines 134 “subtraction” block 187 “switch costume to” block 160 T tablets, Scratch apps for 25 “Takeoff Speed” variable 137, 163 tasks, breaking down 18 testers 213 testing 46, 207 text tool 84 themes, working with 121 third-person games 187 thought bubbles, victory or defeat 82 tile-matching games 17 timers 83 countdown 104 tweaking 86 “touching” blocks 37, 62, 65, 66, 98, 174, 179 tracking 187 touchpad 75, 191 traditional games 16 traps 157, 163 treasure hunts 30 Tropical Tunes 188–203 adding notes to the tune 200 aim of the game 190–1 checking the player’s tune 201 commanding the drums 199–200 debugging 203 four drums 196 hacks and tweaks 202 make a drum 192 making your own block 194 master controller 197 remote control drums 195–6 two types of variables 193 true statements 82, 94 “turn 90 degrees” block 65 “turn” blocks 127 tweaks see hacks and tweaks two-player games 166 adding player two 177–9 see also Glacier Race U Ubuntu computers 256 “undo” button 55 user account, Scratch 24 V variables 42, 43, 193, 208 adjusting 186 BlueCarGems 180 CarSpeed 169, 186 Correct Count 200, 201 Count 199 Countdown 168, 186 displaying 102 FallSpeed 98–9, 139 flags 153 “for all sprites” 193 “for this sprite only“ 193 GameSpeed 112, 125 global variables 193, 195, 196 gravity simulation 98–9 hiding 98, 100, 102, 184 high score 68 Launches 100 LaunchSpeed 92 LevelOver 150, 152, 153 Lives 112, 116, 163 local variables 193 naming 43 players’ names 183 RedCarGems 180 ReverseStep 139 RoadSpeed 169, 186, 187 RoadY 169, 171 Round 202 RunSpeed 135 score 55, 77, 112, 200 setting range 102 showing on stage 102, 203 and sliders 102–3, 105 spinning 172, 174, 175 for sprites 182 TakeoffSpeed 137, 163 time 83 Tropical Tunes 193 “Vector Mode” 124 virtual reality 15 visual thought 210 voice, recording your own 186 W “wait 10 secs” block 70, 121, 123 “wait” blocks 37, 71, 153 “wait for player” block 200 “wait until key space pressed” block 85, 113 wall jump 141 webcams 93, 209 “when clicked” block 38 “when I receive” block 195 “when I start as a clone” block 79, 80, 113, 122, 123 “while” loops 94 “Win” message 150, 162 Windows computers 25 winning 82–3 world, game 13 writers 211 X x axis 41 xy-grid 145 Y y axis 411 Acknowledgments Dorling Kindersley would like to thank: Bahja Norwood for editorial assistance and testing; Caroline Hunt for proofreading; and Helen Peters for the index. Dorling Kindersley India would like to thank Riji Raju for editorial assistance. Scratch is developed by the Lifelong Kindergarten Group at MIT Media Lab. See http://scratch.mit.edu