SlideShare a Scribd company logo
2
Most read
3
Most read
4
Most read
Database Connection
•   For our projects, you may work at home or in the computer
    laboratory. We will use Microsoft Access – there are
    copies of the databases saved as Microsoft SQL Server
    version files for those of you who wish to experiment in
    using SQL Server.
•   ·        MS Access databases are stored in a single file.
•   o   A MS Access database file is much smaller than the
    same data stored in MS SQL Server and is very portable.
•   o   You will learn to access data in the file through Visual
    Basic so you need not have Microsoft Office installed on
    your home computer.
•   o   The database files are named with a .mdb file name
    extension.
   Begin a new project – name it CourseRegistration.

 3. Set the first form's properties as follows:
   FileName = CourseGrid.vb
 Displaying Data
 4. Access the Data section of the Toolbox in

  design view. Add a DataGridView control from
  the toolbox as shown here.
  
5. Click the smart arrow tag in the upper right-corner of the
   DataGridView control – this displays the DataGridView
   Tasks window shown in the figure given above.
 
6. Modify the DataGridView Tasks window as follows:
      Dock property – you can select either the value Fill in the
   Properties window or click the Dock in parent container
   link shown in the figure above – this will cause the control to fill
   the form.
• ·        Check the Enable Column Reordering CheckBox.
• ·        Uncheck the Enable Adding, Enable Editing,
   Enable Deleting –these check boxes that are checked by
   default, but we want this form to be read-only.
• ·        Choose Data Source – click the dropdown and select
   the Add Project Data Source… hyperlink shown in the
   figure below – data sources can also be added with the Data
   menu.
Database Connection
•   7. Data
    Source
    Configuration
    Wizard – the
    wizard displays
    the Choose a
    Data Source
    Type window,
    select the
    Database as a
    data source
    type as shown
    in this figure,
    then click the
    Next button.
   8.   Choose a
    Database
    Model window
    – click Dataset
    option and click
    the Next button.
•   9. Choose
    Your Data
    Connection
    window – click
    the New
    Connection
    button. Your
    software may
    show an existing
    connection such
    as that shown in
    the figure
•   10a. Either a
    Choose Data
    Source or an Add
    Connection
    window will open.
•   ·        If a Choose
    Data Source window
    is displayed as
    shown in this figure,
    we will usually select
    the Microsoft
    Access Database
    File option. Click
    Continue.
   If the Add Connection window is open or if you
    wish to change the type of connection to be
    created, then click the Change button. The
    default Data Source is Microsoft SQL Server
    (SqlClient) as shown in the figure below – to add
    either a SQL Server Database file or MS Access
    database file to your project as the data source,
    click the Change button.
10b. Change Data
  Source window –
  this window may
  display next
  depending on the
  type of database you
  copied from drive Y:
  (either MS SQL
  Server Express or
  MS Access). The
  appearance of the
  window is different
  for different data
  sources. You may
  want to change the
  data source by
  clicking the Change
  button to change to
  Microsoft Access.
   If you are using Microsoft Access:
   ·        The next figure shows the
    Microsoft Access Add Connection
    dialog box, click Browse – locate the
    VBUniversity.mdb file you earlier
    copied to the My Documents
    location – select it and click Open in
    the browse window – you will see the
    path and database file name added to
    the Add Connection dialog box as
    shown in the figure below.
   ·        The database logon will use the
    Admin user – no password is
    necessary for a MS Access database.
   ·        Click the Test Connection
    button – if the connection succeeds,
    you will see a popup window telling
    you that the Test connection
    succeeded. Click OK to close the
    popup and OK to close the Add
    Connection dialog box
12. Choose Your
 Data Connection
 dialog box – you are
 returned to this
 window after
 selecting the
 database. Note that
 the name of the
 database file has
 been added to the
 window. This window
 shows an Access
 database file. Click
 Next.
13. Visual Studio
 now asks if you
 would like the
 database file (local
 data file) added to
 the project as
 shown in the
 Figure 10.13
 below. Click Yes.
•   Clicking Yes causes the database file to copy to the
    project folder's root directory making the project portable
    so you can take it back and forth to/from
    work/home/school – however, the file is copied every
    time you run the project so any changes you make in
    terms of adding new rows, modifying existing rows, or
    deleting rows will not be made permanently to the copy
    of the file without making additional modifications to the
    properties of the database file – we will make those
    changes after configuring the data source.

•   Clicking No causes the project to point (locate) the file
    based on the ConnectionString property setting in its
    original position – a copy of the database file is not made
    in the project.
14. Save the
 Connection String
 to the Application
 Configuration File
 – defaults to a
 selection of Yes –
 saving the
 connection string to a
 configuration file will
 enable you to change
 the string if
 necessary at a later
 point in time. Ensure
 the check box is
 checked, and then
 click Next.
•   15. Choose Your
    Database
    Objects – VB
    retrieves information
    from the database
    file about the tables
    and other database
    objects available for
    your use. This
    takes a few
    moments as shown
    in this figure.
•  15 (continued). Choose
   Your Database Objects –
   you must specify the table(s)
   from which to retrieve the
   data to be data displayed by
   the DataGridView control.
  In this figure, the Tables
   node is expanded and the
   Course table is selected.
• Check the Course table
   checkbox – an alternative is
   to expand the Course table
   node and check just selected
   columns—not all columns
   need be selected if they are
   not needed by the application
   user.
• Change the dataset name
   generated by VB to
   CourseGridDataSet as
   shown.
• Click Finish.
   After the wizard closes, the DataGridView control now
    has column names from the Course table as column
    headings. Also the system component tray displays
    BindingSource, TableAdapter, and DataSet
    objects with names assigned by VB.
    
•   Formatting DataGridView
    Control Output
•   You can edit a DataGridView
    control in order to improve how data
    is displayed in its data columns,
    primarily numeric and date/time
    data columns.

•   Format Column Headings and
    Width
•   Follow these steps to format
    column headings and column width.


•   1. Smart Tag – click the
    DataGridView control's Smart Tag
    arrow to display the
    DataGridView Tasks window
    shown in the figure below – click the
    Edit Columns link as shown in
    this figure.
•   2. Edit Columns window – edit
    the properties indicated.
•    
•   3. CourseID Column – set the
    HeaderText property =
    Course ID (added a blank
    space for readability). DO NOT
    CHANGE the
    DataPropertyName property
    by mistake.
•    
•   4. Title Column.
•     AutoSizeMode property –
    change from Not Set to None.
•   ·        Width property – change
    to 300 pixels – on startup the
    column will now display the
    entire Title column value.
Database Connection
Add a new form to the project. Access the Project | Add Windows Form… menu to add a new
  Windows form.

2. Name the form StudentGrid.vb .
•  ·        Set the form's Font property = 9 point.
•  ·        Set the form's Text property = Student Grid.
•   
•  3. Drag a DataGridView control to the form.
•   
•  4. Click the smart arrow tag of the DataGridView control to display the DataGridView Tasks
   window.
•  ·        Dock the DataGridView control to fill the entire form.
•  ·        Enable column reordering, but disable adding, editing, and deleting data rows.
•   
•  5. Choose a data source – use the existing data connection when the wizard displays the
   Choose Your Data Connection dialog box.
•  ·        Work through the wizard. In the Choose Your Database Objects dialog box select the
   Student table.
•  ·        Name the dataset StudentGridDataSet .
•  ·        Click Finish – when the wizard closes, observe the new objects in the system component
   tray and the columns displayed in the DataGridView control.
•   
•  6. Resize the form to make it large enough to display most of the data columns.

More Related Content

PPTX
Database Concepts and Terminologies
PDF
PDF
Introduction to Database
PDF
Introduction to SQL
PPSX
MS SQL Server
PPTX
Dbms slides
PPTX
Database systems - Chapter 1
PPT
SQL select statement and functions
Database Concepts and Terminologies
Introduction to Database
Introduction to SQL
MS SQL Server
Dbms slides
Database systems - Chapter 1
SQL select statement and functions

What's hot (20)

PPT
PL/SQL Introduction and Concepts
PPTX
Introduction to SQL
PDF
Database Normalization
PPTX
introdution to SQL and SQL functions
PPT
MYSQL.ppt
PPTX
joins in database
PPTX
SQL - Structured query language introduction
PPTX
DBMS & RDBMS (PPT)
PPT
Sql ppt
PPT
14. Query Optimization in DBMS
PPTX
Relational model
PDF
Triggers and Stored Procedures
PPTX
Relational databases
PPT
MySql slides (ppt)
ODP
Partitioning
PPTX
PPT
C#.NET
PPTX
SQL - DML and DDL Commands
PPT
Files Vs DataBase
PPTX
5. stored procedure and functions
PL/SQL Introduction and Concepts
Introduction to SQL
Database Normalization
introdution to SQL and SQL functions
MYSQL.ppt
joins in database
SQL - Structured query language introduction
DBMS & RDBMS (PPT)
Sql ppt
14. Query Optimization in DBMS
Relational model
Triggers and Stored Procedures
Relational databases
MySql slides (ppt)
Partitioning
C#.NET
SQL - DML and DDL Commands
Files Vs DataBase
5. stored procedure and functions
Ad

Viewers also liked (20)

PPTX
Data base connectivity and flex grid in vb
PPTX
Web based database application design using vb.net and sql server
PPT
Database programming in vb net
PPT
ADO CONTROLS - Database usage
PPT
VB6 Using ADO Data Control
PPT
ADO Controls - Database Usage from Exploring MS Visual Basic 6.0 Book
PDF
Visual Studio Toolbox - Introduction To Xamarin.Forms
PPTX
Presentation on visual basic 6 (vb6)
PDF
Connection Database
DOCX
Visual basic
PDF
Base de datos
PPT
Active x
DOCX
Visual C# 2010
PDF
Visual basic 6
PPT
Final project(vb)
PPT
MS Access and Database Fundamentals
PDF
Algorithm Analysis and Design Class Notes
PPTX
Vb.net ide
PPT
Introduction to vb.net
PPS
Vb.net session 01
Data base connectivity and flex grid in vb
Web based database application design using vb.net and sql server
Database programming in vb net
ADO CONTROLS - Database usage
VB6 Using ADO Data Control
ADO Controls - Database Usage from Exploring MS Visual Basic 6.0 Book
Visual Studio Toolbox - Introduction To Xamarin.Forms
Presentation on visual basic 6 (vb6)
Connection Database
Visual basic
Base de datos
Active x
Visual C# 2010
Visual basic 6
Final project(vb)
MS Access and Database Fundamentals
Algorithm Analysis and Design Class Notes
Vb.net ide
Introduction to vb.net
Vb.net session 01
Ad

Similar to Database Connection (20)

PPTX
Access ppt
PPTX
Priyank Goel PPT.pptx
PPTX
Operate Spreadsheet applications ppt.pptx
PPTX
Welcome-slides-durham-tech
PPTX
OPERATE DATABASE APPLICATION
DOCX
Grid view control
DOCX
INTRODUCTION TO ACCESSOBJECTIVESDefine th.docx
PPTX
Database and Access Power Point
PPTX
Database and Access Power Point
PPTX
Database and Access Power Point
PPTX
Baileybatts bailey battsdatabasepowerpoint8
PPTX
Module 08 Access & Use Database Application.pptx
PPT
HARJOT.ppt gggggggggggggggggggggggggggggggggggggggg
PPT
Uses of MS Access in Business
PPS
VISUAL BASIC .net data accesss vii
PPTX
oprate database Application program hardware
PPTX
Database concepts using libre office base
PPTX
Database concepts using libre office base
PPT
Information and communication technology 1
PPTX
2.3.1 creating database, table and relationship on Access 2003
Access ppt
Priyank Goel PPT.pptx
Operate Spreadsheet applications ppt.pptx
Welcome-slides-durham-tech
OPERATE DATABASE APPLICATION
Grid view control
INTRODUCTION TO ACCESSOBJECTIVESDefine th.docx
Database and Access Power Point
Baileybatts bailey battsdatabasepowerpoint8
Module 08 Access & Use Database Application.pptx
HARJOT.ppt gggggggggggggggggggggggggggggggggggggggg
Uses of MS Access in Business
VISUAL BASIC .net data accesss vii
oprate database Application program hardware
Database concepts using libre office base
Information and communication technology 1
2.3.1 creating database, table and relationship on Access 2003

More from John Joseph San Juan (7)

DOC
Consciousness
DOCX
2nd normal form
DOCX
1st normal form
PPTX
PPT
Land Pollution
PPT
Software Vendor (Norton Anti-Virus)
PPT
Consciousness
Consciousness
2nd normal form
1st normal form
Land Pollution
Software Vendor (Norton Anti-Virus)
Consciousness

Recently uploaded (20)

PPTX
Cell Structure & Organelles in detailed.
PDF
VCE English Exam - Section C Student Revision Booklet
PDF
Anesthesia in Laparoscopic Surgery in India
PPTX
Final Presentation General Medicine 03-08-2024.pptx
PDF
Chapter 2 Heredity, Prenatal Development, and Birth.pdf
PPTX
human mycosis Human fungal infections are called human mycosis..pptx
PDF
ANTIBIOTICS.pptx.pdf………………… xxxxxxxxxxxxx
PPTX
The Healthy Child – Unit II | Child Health Nursing I | B.Sc Nursing 5th Semester
PDF
Basic Mud Logging Guide for educational purpose
PDF
BÀI TẬP BỔ TRỢ 4 KỸ NĂNG TIẾNG ANH 9 GLOBAL SUCCESS - CẢ NĂM - BÁM SÁT FORM Đ...
PPTX
Renaissance Architecture: A Journey from Faith to Humanism
PDF
FourierSeries-QuestionsWithAnswers(Part-A).pdf
PPTX
Week 4 Term 3 Study Techniques revisited.pptx
PDF
Abdominal Access Techniques with Prof. Dr. R K Mishra
PPTX
IMMUNITY IMMUNITY refers to protection against infection, and the immune syst...
PPTX
PPH.pptx obstetrics and gynecology in nursing
PDF
grade 11-chemistry_fetena_net_5883.pdf teacher guide for all student
PPTX
PPT- ENG7_QUARTER1_LESSON1_WEEK1. IMAGERY -DESCRIPTIONS pptx.pptx
PDF
Module 4: Burden of Disease Tutorial Slides S2 2025
PPTX
Pharmacology of Heart Failure /Pharmacotherapy of CHF
Cell Structure & Organelles in detailed.
VCE English Exam - Section C Student Revision Booklet
Anesthesia in Laparoscopic Surgery in India
Final Presentation General Medicine 03-08-2024.pptx
Chapter 2 Heredity, Prenatal Development, and Birth.pdf
human mycosis Human fungal infections are called human mycosis..pptx
ANTIBIOTICS.pptx.pdf………………… xxxxxxxxxxxxx
The Healthy Child – Unit II | Child Health Nursing I | B.Sc Nursing 5th Semester
Basic Mud Logging Guide for educational purpose
BÀI TẬP BỔ TRỢ 4 KỸ NĂNG TIẾNG ANH 9 GLOBAL SUCCESS - CẢ NĂM - BÁM SÁT FORM Đ...
Renaissance Architecture: A Journey from Faith to Humanism
FourierSeries-QuestionsWithAnswers(Part-A).pdf
Week 4 Term 3 Study Techniques revisited.pptx
Abdominal Access Techniques with Prof. Dr. R K Mishra
IMMUNITY IMMUNITY refers to protection against infection, and the immune syst...
PPH.pptx obstetrics and gynecology in nursing
grade 11-chemistry_fetena_net_5883.pdf teacher guide for all student
PPT- ENG7_QUARTER1_LESSON1_WEEK1. IMAGERY -DESCRIPTIONS pptx.pptx
Module 4: Burden of Disease Tutorial Slides S2 2025
Pharmacology of Heart Failure /Pharmacotherapy of CHF

Database Connection

  • 2. For our projects, you may work at home or in the computer laboratory. We will use Microsoft Access – there are copies of the databases saved as Microsoft SQL Server version files for those of you who wish to experiment in using SQL Server. • ·        MS Access databases are stored in a single file. • o   A MS Access database file is much smaller than the same data stored in MS SQL Server and is very portable. • o   You will learn to access data in the file through Visual Basic so you need not have Microsoft Office installed on your home computer. • o   The database files are named with a .mdb file name extension.
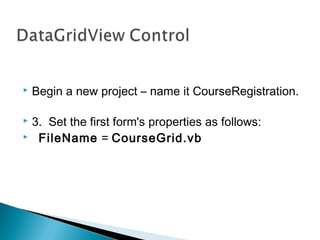
  • 3. Begin a new project – name it CourseRegistration.  3. Set the first form's properties as follows:    FileName = CourseGrid.vb
  • 4.  Displaying Data  4. Access the Data section of the Toolbox in design view. Add a DataGridView control from the toolbox as shown here.   
  • 5. 5. Click the smart arrow tag in the upper right-corner of the DataGridView control – this displays the DataGridView Tasks window shown in the figure given above.   6. Modify the DataGridView Tasks window as follows:       Dock property – you can select either the value Fill in the Properties window or click the Dock in parent container link shown in the figure above – this will cause the control to fill the form. • ·        Check the Enable Column Reordering CheckBox. • ·        Uncheck the Enable Adding, Enable Editing, Enable Deleting –these check boxes that are checked by default, but we want this form to be read-only. • ·        Choose Data Source – click the dropdown and select the Add Project Data Source… hyperlink shown in the figure below – data sources can also be added with the Data menu.
  • 7. 7. Data Source Configuration Wizard – the wizard displays the Choose a Data Source Type window, select the Database as a data source type as shown in this figure, then click the Next button.
  • 8. 8.   Choose a Database Model window – click Dataset option and click the Next button.
  • 9. 9. Choose Your Data Connection window – click the New Connection button. Your software may show an existing connection such as that shown in the figure
  • 10. 10a. Either a Choose Data Source or an Add Connection window will open. • ·        If a Choose Data Source window is displayed as shown in this figure, we will usually select the Microsoft Access Database File option. Click Continue.
  • 11. If the Add Connection window is open or if you wish to change the type of connection to be created, then click the Change button. The default Data Source is Microsoft SQL Server (SqlClient) as shown in the figure below – to add either a SQL Server Database file or MS Access database file to your project as the data source, click the Change button.
  • 12. 10b. Change Data Source window – this window may display next depending on the type of database you copied from drive Y: (either MS SQL Server Express or MS Access). The appearance of the window is different for different data sources. You may want to change the data source by clicking the Change button to change to Microsoft Access.
  • 13. If you are using Microsoft Access:  ·        The next figure shows the Microsoft Access Add Connection dialog box, click Browse – locate the VBUniversity.mdb file you earlier copied to the My Documents location – select it and click Open in the browse window – you will see the path and database file name added to the Add Connection dialog box as shown in the figure below.  ·        The database logon will use the Admin user – no password is necessary for a MS Access database.  ·        Click the Test Connection button – if the connection succeeds, you will see a popup window telling you that the Test connection succeeded. Click OK to close the popup and OK to close the Add Connection dialog box
  • 14. 12. Choose Your Data Connection dialog box – you are returned to this window after selecting the database. Note that the name of the database file has been added to the window. This window shows an Access database file. Click Next.
  • 15. 13. Visual Studio now asks if you would like the database file (local data file) added to the project as shown in the Figure 10.13 below. Click Yes.
  • 16. Clicking Yes causes the database file to copy to the project folder's root directory making the project portable so you can take it back and forth to/from work/home/school – however, the file is copied every time you run the project so any changes you make in terms of adding new rows, modifying existing rows, or deleting rows will not be made permanently to the copy of the file without making additional modifications to the properties of the database file – we will make those changes after configuring the data source. • Clicking No causes the project to point (locate) the file based on the ConnectionString property setting in its original position – a copy of the database file is not made in the project.
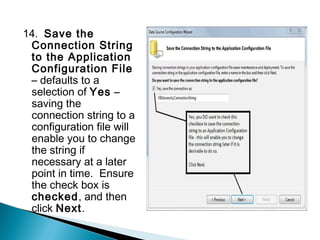
  • 17. 14. Save the Connection String to the Application Configuration File – defaults to a selection of Yes – saving the connection string to a configuration file will enable you to change the string if necessary at a later point in time. Ensure the check box is checked, and then click Next.
  • 18. 15. Choose Your Database Objects – VB retrieves information from the database file about the tables and other database objects available for your use. This takes a few moments as shown in this figure.
  • 19. • 15 (continued). Choose Your Database Objects – you must specify the table(s) from which to retrieve the data to be data displayed by the DataGridView control.   In this figure, the Tables node is expanded and the Course table is selected. • Check the Course table checkbox – an alternative is to expand the Course table node and check just selected columns—not all columns need be selected if they are not needed by the application user. • Change the dataset name generated by VB to CourseGridDataSet as shown. • Click Finish.
  • 20. After the wizard closes, the DataGridView control now has column names from the Course table as column headings. Also the system component tray displays BindingSource, TableAdapter, and DataSet objects with names assigned by VB.   
  • 21. Formatting DataGridView Control Output • You can edit a DataGridView control in order to improve how data is displayed in its data columns, primarily numeric and date/time data columns. • Format Column Headings and Width • Follow these steps to format column headings and column width. • 1. Smart Tag – click the DataGridView control's Smart Tag arrow to display the DataGridView Tasks window shown in the figure below – click the Edit Columns link as shown in this figure.
  • 22. 2. Edit Columns window – edit the properties indicated. •   • 3. CourseID Column – set the HeaderText property = Course ID (added a blank space for readability). DO NOT CHANGE the DataPropertyName property by mistake. •   • 4. Title Column. •   AutoSizeMode property – change from Not Set to None. • ·        Width property – change to 300 pixels – on startup the column will now display the entire Title column value.
  • 24. Add a new form to the project. Access the Project | Add Windows Form… menu to add a new Windows form. 2. Name the form StudentGrid.vb . • ·        Set the form's Font property = 9 point. • ·        Set the form's Text property = Student Grid. •   • 3. Drag a DataGridView control to the form. •   • 4. Click the smart arrow tag of the DataGridView control to display the DataGridView Tasks window. • ·        Dock the DataGridView control to fill the entire form. • ·        Enable column reordering, but disable adding, editing, and deleting data rows. •   • 5. Choose a data source – use the existing data connection when the wizard displays the Choose Your Data Connection dialog box. • ·        Work through the wizard. In the Choose Your Database Objects dialog box select the Student table. • ·        Name the dataset StudentGridDataSet . • ·        Click Finish – when the wizard closes, observe the new objects in the system component tray and the columns displayed in the DataGridView control. •   • 6. Resize the form to make it large enough to display most of the data columns.