Getting started with_data_studio_for_db2
4 likes3,009 views

This document is the introduction chapter of a guide about getting started with IBM Data Studio for DB2. It provides an overview of Data Studio, instructions for installing it, a tour of the main workbench interface, and exercises for users. The chapter aims to help readers understand what Data Studio is, how to set it up, and to begin familiarizing themselves with the workbench environment.


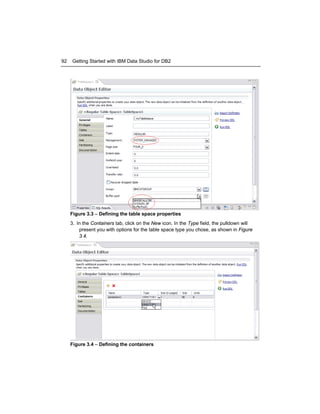


![212
Getting Started with IBM Data Studio for DB2
techniques such as data encryption to guard against data breach or accidental
loss. [1]
Although many products and technologies exist today to help with the phases of the data
lifecycle, IBM is focusing on creating an infrastructure in which specifications made in one
phase can be disseminated through other phases of the lifecycle and automatically
maintained.
Why is this important? Although you may be in school or in a small development shop
where there are very few people other than yourself managing data and applications, there
are real problems as organizations grow and responsibilities become dispersed among
different people and in different locations. For example, data privacy requirements
identified in the design phase may get lost or forgotten as developers start pulling down
data from production for testing purposes. It becomes more and more difficult to identify
how a database schema change will affect the many applications that may be using the
database. And not identifying dependencies properly can result in serious outages.
With an integrated data management approach, the tools can actually help facilitate
collaboration among roles, enforce rules, automate changes while identifying
dependencies, and in general speed up and reduce risk across the lifecycle. This
integrated approach cannot be achieved by unrelated tools. It requires common
infrastructure and shared metadata such that actions in one tool are reflected down the line
when another person uses their tool to support their particular responsibilities. So, as an
example, if the Data Architect defines a column as containing private data (such as credit
card numbers or social security numbers), a developer who is viewing this table in their
development tool should see the column marked as ‘private’ and be able to invoke proper
masking algorithms should data be required for testing.
8.2 Optim solutions for Integrated Data Management
Let’s look at some of the integrated data management solutions from IBM, many of which
are offered under the family name “Optim.”](https://image.slidesharecdn.com/gettingstartedwithdatastudiofordb2-140106201655-phpapp02/85/Getting-started-with_data_studio_for_db2-212-320.jpg)


![216
Getting Started with IBM Data Studio for DB2
In addition, because of the integration with other products, Optim Development Studio
helps developers be cognizant of sensitive data. For example, developers can readily
identify sensitive data based on the privacy metadata captured in InfoSphere Data
Architect. They can create test databases directly from fictional data or can generate
extract definitions for Optim Test Data Management and Data Privacy to create customized
test databases.
Developers can spend considerable time isolating performance issues: first to a specific
SQL statement, then to the source application, then to the originating code. Three-tier
architectures and popular frameworks make this isolation more difficult as the developer
may never see the SQL generated by the framework. Optim Development Studio makes it
easier to isolate problems by providing an outline that traces SQL statements back to the
originating line in the source application, even when using Java frameworks like Hibernate,
OpenJPA, Spring, and others. .
Be sure to read the Getting Started with pureQuery book of this series to read about the
capabilities of Optim Development Studio and pureQuery Runtime.
8.2.3 Develop and Optimize: Optim Query Tuning Solutions
Optim query tuning solutions are comprised of two products: Optim Query Tuner and Optim
Query Workload Tuner. Optim Query Tuner, as mentioned previously, is focused on
enabling developers to tune single queries by providing them with advice on how to
achieve better query performance [2]. See Figure 8.5 for a screenshot.](https://image.slidesharecdn.com/gettingstartedwithdatastudiofordb2-140106201655-phpapp02/85/Getting-started-with_data_studio_for_db2-216-320.jpg)


![Appendix E – Advanced topics in developing Data Web Services 275
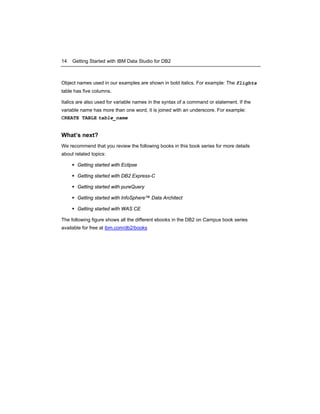
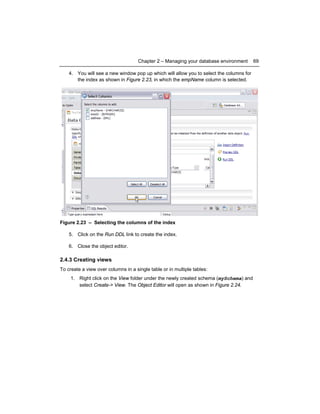
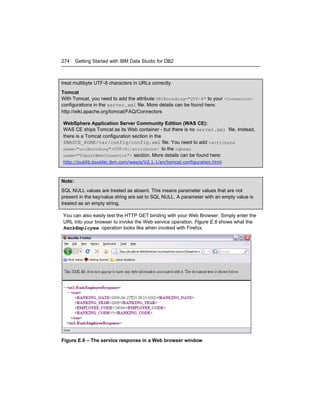
E.1.6 HTTP POST (JSON) Binding
Finally, Data Web Services provides you with a simple JSON binding that can be leveraged
from JavaScript applications –for example, when using AJAX with the XMLHttpRequest
object. In order to test the JSON binding with cURL you need to create the JSON request
message first.
The building rules for a Data Web Services JSON request message are as follows:
{"<operationName>":{"<parameter1>":<value1>,"<parameter1>":<value1>,…}}
Note:
JSON data type formatting:
The data type formats follow the JSON specification. Date, time and timestamp types are
expected to be provided in XSD format: xs:date, xs:time and xs:dateTime. Binary data
types are expected as base64 encoded strings. SQL NULL values are represented as
JSON null.
Create a new file called RankEmployeeJSON.txt. The content of the file should look like
this:
{"RankEmployee":
{"EMPLOYEE_CODE":10004,"RANKING":"Excellent"}
}
The cURL command to send the request to the Web service should look this:
curl.exe -d @"GetBestSellingProductsByMonthJSON.txt"
-H "Content-Type:application/json;charset=utf-8"
-v
http://localhost:8080/WebServicesSimpleService/rest/SimpleService/RankEmployee
The output of the command should look similar to what is shown in Listing E.3.
...
< HTTP/1.1 200 OK
< Server: Apache-Coyote/1.1
< Cache-Control: no-cache, no-store, max-age=0
< Expires: Thu, 01 Jan 1970 00:00:01 GMT
< Content-Type: application/json;charset=UTF-8
< Content-Length: 129
< Date: Sun, 28 Jun 2009 04:48:26 GMT
<
{"RankEmployeeResponse":[{"RANKING_DATE":"2009-06-27T21:48:26.203Z","RANKING_YEA
R":2009,"EMPLOYEE_CODE":10004,"RANKING_CODE":5}]}
Listing E.3 – The service response
The response is also formatted as JSON.](https://image.slidesharecdn.com/gettingstartedwithdatastudiofordb2-140106201655-phpapp02/85/Getting-started-with_data_studio_for_db2-275-320.jpg)


![Appendix E – Advanced topics in developing Data Web Services 283
<?xml version="1.0" encoding="UTF-8" ?>
<xsl:stylesheet xmlns:xsl="http://www.w3.org/1999/XSL/Transform" version="1.0">
<!-- use html as method to indicate that we generate HTML -->
<xsl:output method="html" encoding="UTF-8" media-type="text/html" />
<xsl:template match="/*">
<html>
<head>
<title>Best Selling Products</title>
</head>
<body>
<table border="1">
<tr bgcolor="#9acd32">
<!-- use XML tag names of the first row as table header -->
<xsl:if test="//row">
<xsl:for-each select="//row[1]/*">
<td style="width:150px">
<b>
<xsl:value-of select="local-name()" />
</b>
</td>
</xsl:for-each>
</xsl:if>
</tr>
<!-- iterate over all rows and fill the table -->
<xsl:for-each select="//row">
<tr>
<xsl:for-each select="*">
<td style="width:150px">
<xsl:value-of select="text()" />
</td>
</xsl:for-each>
</tr>
</xsl:for-each>
</table>
</body>
</html>
</xsl:template>
</xsl:stylesheet>
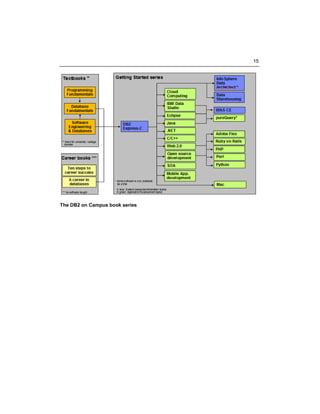
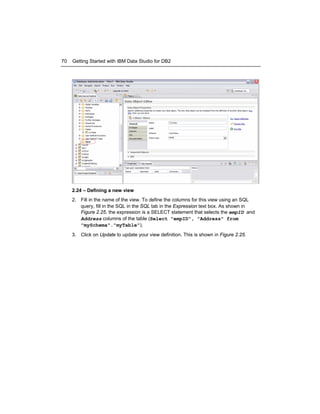
Listing E.7 – XSL script transforming GetBestSellingProductsByMonth response
5. To assign the XSL stylesheet, right-click at the GetBestSellingProductsByMonth
operation and select Manage XSLT… as shown in Figure E 13.](https://image.slidesharecdn.com/gettingstartedwithdatastudiofordb2-140106201655-phpapp02/85/Getting-started-with_data_studio_for_db2-283-320.jpg)


![295
References
[1] HAYES, H. Integrated Data Management: Managing data throughout its lifecycle, developerWorks
article, 2008; updated 2009. Originally published by IBM developerWorks at
http://www.ibm.com/developerworks/data/library/techarticle/dm-0807hayes/. Reprinted by permission.
[2] LEUNG, C. et. al. SQL Tuning: Not just for hardcore DBAs anymore, IBM Database Magazine article,
Issue 2, 2009.
Resources
Web sites
1. Integrated Data Management (Optim and Data Studio) Community Space:
http://www.ibm.com/developerworks/spaces/optim
Use this web site to find links to downloads, technical articles and tutorials, discussion forums,
blogs, videos and demos.
2. Integrated Data Management solutions web site:
www.ibm.com/software/data/optim/
Use this web site to get an understanding of the solutions that are available from IBM for Integrated
Data Management.
3. Team blog: Managing the data lifecycle:
http://www-ibm.com/developerworks/mydeveloperworks/blogs/idm/
Experts from IBM blog on subjects related to Integrated Data Management. Includes everything
from latest news to technical tips
4. Data Studio forum:
http://www.ibm.com/developerworks/forums/forum.jspa?forumID=1086&categoryID=19
Use the forum to post technical questions when you cannot find the answers in the manuals
yourself.
5. Integrated Data Management Information Center:
http://publib.boulder.ibm.com/infocenter/idm/v2r2/index.jsp
The information center provides access to the online manuals. It is the most up-to-date source of
information.](https://image.slidesharecdn.com/gettingstartedwithdatastudiofordb2-140106201655-phpapp02/85/Getting-started-with_data_studio_for_db2-295-320.jpg)


Getting started with_data_studio_for_db2
- 2. 2 Getting Started with IBM Data Studio for DB2 First Edition (December 2009) © Copyright IBM Corporation 2009. All rights reserved. IBM Canada 8200 Warden Avenue Markham, ON L6G 1C7 Canada
- 3. Notices This information was developed for products and services offered in the U.S.A. IBM may not offer the products, services, or features discussed in this document in other countries. Consult your local IBM representative for information on the products and services currently available in your area. Any reference to an IBM product, program, or service is not intended to state or imply that only that IBM product, program, or service may be used. Any functionally equivalent product, program, or service that does not infringe any IBM intellectual property right may be used instead. However, it is the user's responsibility to evaluate and verify the operation of any non-IBM product, program, or service. IBM may have patents or pending patent applications covering subject matter described in this document. The furnishing of this document does not grant you any license to these patents. You can send license inquiries, in writing, to: IBM Director of Licensing IBM Corporation North Castle Drive Armonk, NY 10504-1785 U.S.A. For license inquiries regarding double-byte character set (DBCS) information, contact the IBM Intellectual Property Department in your country or send inquiries, in writing, to: Intellectual Property Licensing Legal and Intellectual Property Law IBM Japan, Ltd. 3-2-12, Roppongi, Minato-ku, Tokyo 106-8711 The following paragraph does not apply to the United Kingdom or any other country where such provisions are inconsistent with local law: INTERNATIONAL BUSINESS MACHINES CORPORATION PROVIDES THIS PUBLICATION "AS IS" WITHOUT WARRANTY OF ANY KIND, EITHER EXPRESS OR IMPLIED, INCLUDING, BUT NOT LIMITED TO, THE IMPLIED WARRANTIES OF NON-INFRINGEMENT, MERCHANTABILITY OR FITNESS FOR A PARTICULAR PURPOSE. Some states do not allow disclaimer of express or implied warranties in certain transactions, therefore, this statement may not apply to you. This information could include technical inaccuracies or typographical errors. Changes are periodically made to the information herein; these changes will be incorporated in new editions of the publication. IBM may make improvements and/or changes in the product(s) and/or the program(s) described in this publication at any time without notice. Any references in this information to non-IBM Web sites are provided for convenience only and do not in any manner serve as an endorsement of those Web sites. The materials at those Web sites are not part of the materials for this IBM product and use of those Web sites is at your own risk. IBM may use or distribute any of the information you supply in any way it believes appropriate without incurring any obligation to you.
- 4. 4 Getting Started with IBM Data Studio for DB2 The licensed program described in this document and all licensed material available for it are provided by IBM under terms of the IBM Customer Agreement, IBM International Program License Agreement or any equivalent agreement between us. Any performance data contained herein was determined in a controlled environment. Therefore, the results obtained in other operating environments may vary significantly. Some measurements may have been made on development-level systems and there is no guarantee that these measurements will be the same on generally available systems. Furthermore, some measurements may have been estimated through extrapolation. Actual results may vary. Users of this document should verify the applicable data for their specific environment. Information concerning non-IBM products was obtained from the suppliers of those products, their published announcements or other publicly available sources. IBM has not tested those products and cannot confirm the accuracy of performance, compatibility or any other claims related to non-IBM products. Questions on the capabilities of non-IBM products should be addressed to the suppliers of those products. All statements regarding IBM's future direction or intent are subject to change or withdrawal without notice, and represent goals and objectives only. This information contains examples of data and reports used in daily business operations. To illustrate them as completely as possible, the examples include the names of individuals, companies, brands, and products. All of these names are fictitious and any similarity to the names and addresses used by an actual business enterprise is entirely coincidental. COPYRIGHT LICENSE: This information contains sample application programs in source language, which illustrate programming techniques on various operating platforms. You may copy, modify, and distribute these sample programs in any form without payment to IBM, for the purposes of developing, using, marketing or distributing application programs conforming to the application programming interface for the operating platform for which the sample programs are written. These examples have not been thoroughly tested under all conditions. IBM, therefore, cannot guarantee or imply reliability, serviceability, or function of these programs. The sample programs are provided "AS IS", without warranty of any kind. IBM shall not be liable for any damages arising out of your use of the sample programs. References in this publication to IBM products or services do not imply that IBM intends to make them available in all countries in which IBM operates. If you are viewing this information softcopy, the photographs and color illustrations may not appear.
- 5. Trademarks BM, the IBM logo, and ibm.com are trademarks or registered trademarks of International Business Machines Corp., registered in many jurisdictions worldwide. Other product and service names might be trademarks of IBM or other companies. A current list of IBM trademarks is available on the Web at “Copyright and trademark information” at www.ibm.com/legal/copytrade.shtml. Java and all Java-based trademarks are trademarks of Sun Microsystems, Inc. in the United States, other countries, or both. Microsoft and Windows are trademarks of Microsoft Corporation in the United States, other countries, or both. Linux is a registered trademark of Linus Torvalds in the United States, other countries, or both. UNIX is a registered trademark of The Open Group in the United States and other countries. Other company, product, or service names may be trademarks or service marks of others.
- 7. 7 Table of contents Preface .......................................................................................................................... 12 Who should read this book? ...................................................................................... 12 How is this book structured? ..................................................................................... 12 A book for the community.......................................................................................... 13 Conventions .............................................................................................................. 13 What’s next?.............................................................................................................. 14 About the authors......................................................................................................... 16 Contributors.................................................................................................................. 18 Acknowledgements...................................................................................................... 19 Chapter 1 – Overview and installation ........................................................................ 21 1.1 Data Studio: The big picture ................................................................................ 21 1.1.1 Data Studio packaging ................................................................................. 23 1.1.2 Career path .................................................................................................. 24 1.1.3 Popular community Web sites and discussion forum.................................... 24 1.1.4 Related free software ................................................................................... 24 1.2 Getting ready to install Data Studio ..................................................................... 25 1.3 Installing Data Studio........................................................................................... 28 1.4 Touring the workbench ........................................................................................ 38 1.4.1 Touring the Data perspective and its views .................................................. 40 1.4.2 Manipulating views ....................................................................................... 41 1.4.3 Resetting the default views for a perspective................................................ 42 1.5 Exercises............................................................................................................. 43 1.6 Summary ............................................................................................................. 45 1.7 Review questions ................................................................................................ 45 Chapter 2 – Managing your database environment ................................................... 47 2.1 Managing your database environment: The big picture ....................................... 47 2.1.1 Database Administration perspective ........................................................... 48 2.2 Working with your DB2 instances ........................................................................ 50 2.3 Working with your DB2 databases....................................................................... 50 2.3.1 Creating a new database.............................................................................. 50 2.3.2 Connecting to a database............................................................................. 54 2.3.3 Stopping and starting instances.................................................................... 58 2.4 Creating database objects ................................................................................... 60 2.4.1 Creating tables ............................................................................................. 63 2.4.2 Creating indexes........................................................................................... 67 2.4.3 Creating views .............................................................................................. 69 2.5 Managing database security................................................................................ 71 2.5.1 Adding users ................................................................................................ 71 2.5.2 Assigning privileges...................................................................................... 73 2.6 Working with existing tables ................................................................................ 76 2.6.1 Analyze impact ............................................................................................. 77
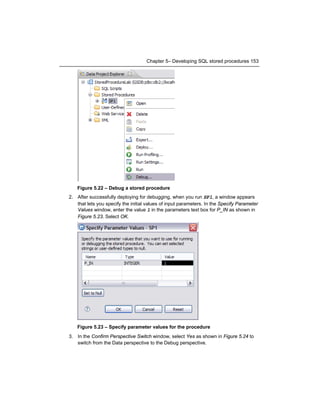
- 8. 8 Getting Started with IBM Data Studio for DB2 2.6.2 Generate DDL .............................................................................................. 78 2.6.3 Altering tables............................................................................................... 80 2.6.4 View sample contents................................................................................... 81 2.6.5 Editing table data.......................................................................................... 81 2.7 Generating an Entity-Relationship diagram ......................................................... 81 2.8 Data Source Explorer flat view ............................................................................ 83 2.9 Exercises............................................................................................................. 86 2.10 Summary ........................................................................................................... 86 2.11 Review questions .............................................................................................. 87 Chapter 3 – Maintaining the database ........................................................................ 89 3.1 Database maintenance: The big picture .............................................................. 89 3.2 Managing storage and memory for better performance ....................................... 90 3.2.1 Creating table spaces................................................................................... 90 3.2.2 Creating and managing buffer pools............................................................. 95 3.2.3 Reorganizing data and gathering statistics ................................................... 98 3.3 Moving data........................................................................................................102 3.3.1 Exporting data .............................................................................................102 3.3.2 Importing data .............................................................................................104 3.4 Planning for recovery: Configuring DB2 logging .................................................107 3.5 Backing up and recovering databases................................................................109 3.5.1 Backup ........................................................................................................109 3.5.2 Restore........................................................................................................112 3.5.3 Rollforward ..................................................................................................115 3.5.4 Recover .......................................................................................................118 3.6 Exercises............................................................................................................119 3.7 Summary ............................................................................................................119 3.8 Review questions ...............................................................................................120 Chapter 4 – Creating SQL and XQuery scripts..........................................................123 4.1 Data development projects and creating scripts: The big picture........................123 4.1.1 Creating a Data Development project..........................................................124 4.2. Creating SQL and XQuery scripts .....................................................................128 4.2.1 Using the SQL and XQuery editor to create SQL scripts .............................129 4.2.2 Using the SQL builder to create SQL scripts ...............................................131 4.3 Running an SQL script .......................................................................................133 4.4 Summary ............................................................................................................135 4.5 Review questions ...............................................................................................135 Chapter 5 – Developing SQL stored procedures ......................................................137 5.1 Stored procedures: The big picture ....................................................................138 5.2 Steps to create a stored procedure ....................................................................138 5.3 Developing a stored procedure: An example ......................................................140 5.3.1 Create a data development project..............................................................140 5.3.2 Create a stored procedure...........................................................................143
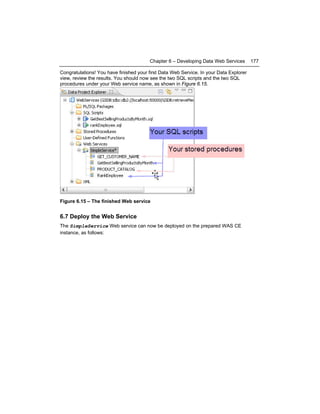
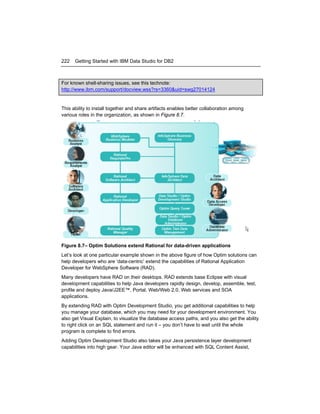
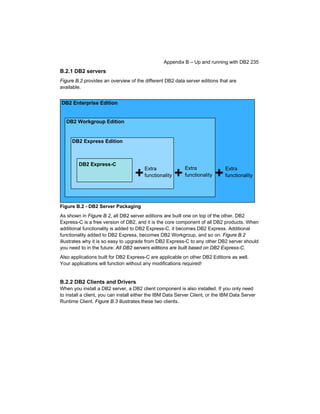
- 9. 9 5.3.3 Deploy a stored procedure ......................................................................... 146 5.3.4 Run the stored procedure ........................................................................... 148 5.3.5 View the output........................................................................................... 149 5.3.6 Edit the procedure ...................................................................................... 149 5.3.7 Deploy the stored procedure for debugging................................................ 150 5.3.8 Run the stored procedure in debug mode .................................................. 152 5.4 Exercises........................................................................................................... 157 5.5 Summary ........................................................................................................... 157 5.6 Review questions .............................................................................................. 158 Chapter 6 – Developing Data Web Services ............................................................. 161 6.1 Data Web Services: The big picture .................................................................. 161 6.1.1 Web services development cycle................................................................ 163 6.1.2 Summary of Data Web Services capabilities in Data Studio ....................... 163 6.2 Configure a WAS CE instance in Data Studio ................................................... 164 6.3 Create a Data Development project................................................................... 169 6.4 Define SQL statements and stored procedures for Web service operations...... 170 6.4.1 Stored procedures used in the Web service ............................................... 170 6.4.2 SQL statements used in the Web service ................................................... 172 6.5 Create a new Web service in your Data Project Explorer .................................. 173 6.6 Add SQL statements and stored procedures as Web Service operations.......... 175 6.7 Deploy the Web Service .................................................................................... 177 6.7.1. The location of the generated WSDL......................................................... 180 6.8 Test the Web Service with the Web Services Explorer ...................................... 182 6.8.1 Testing the GetBestSellingProductsByMonth operation ............................. 184 6.8.2 Testing the PRODUCT_CATALOG operation ............................................ 186 6.9 Exercises........................................................................................................... 188 6.10 Summary ......................................................................................................... 189 6.11 Review questions ............................................................................................ 190 Chapter 7 – Developing user-defined functions ...................................................... 193 7.1 Developing user-defined functions: The big picture ........................................... 193 7.2 Creating a user-defined function........................................................................ 195 7.3 Running user-defined functions ......................................................................... 205 7.4 Summary ........................................................................................................... 206 7.5 Exercise............................................................................................................. 206 7.6 Review questions .............................................................................................. 206 Chapter 8 – Getting even more done ........................................................................ 209 8.1 Integrated data management: The big picture ................................................... 209 8.2 Optim solutions for Integrated Data Management ............................................. 212 8.2.1 Design: InfoSphere Data Architect.............................................................. 213 8.2.2 Develop: Optim Development Studio & Optim pureQuery Runtime ............ 214 8.2.3 Develop and Optimize: Optim Query Tuning Solutions............................... 216 8.2.4 Deploy and Operate: Optim Database Administrator .................................. 218 8.2.5 Summary of capabilities.............................................................................. 219 8.2.6 Job responsibilities and associated products.............................................. 221
- 10. 10 Getting Started with IBM Data Studio for DB2 8.3 Data Studio, Optim and integration with Rational Software ................................221 8.4 Community and resources..................................................................................223 8.5 Exercises............................................................................................................224 8.6 Summary ............................................................................................................224 8.7 Review questions ...............................................................................................225 Appendix A – Solutions to the review questions......................................................227 Appendix B – Up and running with DB2 ....................................................................233 B.1 DB2: The big picture ..........................................................................................233 B.2 DB2 Packaging ..................................................................................................234 B.2.1 DB2 servers ................................................................................................235 B.2.2 DB2 Clients and Drivers ..............................................................................235 B.3 Installing DB2.....................................................................................................236 B.3.1 Installation on Windows ..............................................................................236 B.3.2 Installation on Linux ....................................................................................237 B.4 DB2 Tools ..........................................................................................................238 B.4.1 Control Center.............................................................................................238 B.4.2 Command Line Tools ..................................................................................239 B.5 The DB2 environment ........................................................................................242 B.6 DB2 configuration...............................................................................................244 B.7 Connecting to a database ..................................................................................245 B.8 Basic sample programs......................................................................................247 B.9 DB2 documentation............................................................................................247 Appendix C – Installing the Data Studio stand-alone package................................249 C.1 Before you begin................................................................................................250 C.2 Installation procedure.........................................................................................251 Appendix D – Great Outdoors sample database.......................................................257 D.1 Great Outdoors database data model (partial) ...................................................257 D.2 Table descriptions..............................................................................................259 D.2.1 GOSALES schema .....................................................................................259 D.2.2 GOSALESCT schema ................................................................................261 D.2.3 GOSALESHR schema ................................................................................261 Appendix E – Advanced topics for developing Data Web Services ........................263 E.1 Testing additional Web service bindings ............................................................263 E.1.1 Default XML message schemas..................................................................264 E.1.2 SOAP over HTTP Binding ...........................................................................269 E.1.3 HTTP POST (XML) Binding ........................................................................271 E.1.4 HTTP POST (application/x-www-form-urlencoded) Binding ........................272 E.1.5 HTTP GET Binding .....................................................................................273 E.1.6 HTTP POST (JSON) Binding ......................................................................275 E.2 Simplify access for single-row results.................................................................276 E.3 Processing stored procedures result sets ..........................................................277 E.4 Transform input and output messages using XSL..............................................281
- 11. 11 E.4.1 Creating an XSL stylesheet........................................................................ 281 E.4.2 Data Web Services XSL Extensions .......................................................... 286 E.5 A closer look at the generated runtime artifacts ................................................ 289 E.5.1 JAVA EE artifacts....................................................................................... 291 E.5.2 SOAP framework artifacts .......................................................................... 291 E.5.3 WAS CE artifacts ....................................................................................... 291 E.5.4 Data Web Services artifacts ....................................................................... 292 E.6. Selecting a different SOAP framework ............................................................. 293 References .................................................................................................................. 295 Resources ................................................................................................................... 295 Web sites ................................................................................................................ 295 Books and articles ................................................................................................... 297 Contact emails......................................................................................................... 298
- 12. 12 Preface Keeping your skills current in today's world is becoming increasingly challenging. There are too many new technologies being developed, and little time to learn them all. The DB2 on Campus Book Series has been developed to minimize the time and effort required to learn many of these new technologies. Who should read this book? This book is intended for anyone who needs to learn the basics of database administration and development using Data Studio, the Eclipse-based tool provided at no charge for IBM data servers (DB2® and Informix®). It replaces previous generation tools, such as Developer Workbench and DB2 Control Center. The DB2 Control Center and other DB2 tools are deprecated in DB2 9.7, so it is important to become familiar with Data Studio and related products. How is this book structured? This book is structured as follows: • Chapter 1 includes an introduction to Data Studio and gets you up and running and familiar with the Data Studio Workbench (user interface). • Chapters 2 and 3 focus on database administration tasks: o Chapter 2 gets you connected to the database teaches you how to create and change database objects as well as how to grant authority to others to see those objects. o Chapter 3 goes into more advanced topics around maintaining the system and providing for recoverability. • Chapters 4, 5, 6, and 7 are focused on database development activities including setting up a data development project, creating SQL scripts, and creating and debugging database routines and Data Web Services: o Chapter 4 describes how to create a data development project, which is where artifacts you create for subsequent exercises are stored. It also
- 13. 13 describes how to use the SQL and XQuery editor (and optionally the Query Builder) to create scripts. o Chapter 5 covers SQL stored procedure development and debugging. o Chapter 6 is Data Web Services Development (with advanced topics in Appendix E) o • Chapter 7 is a short chapter on developing user-defined functions. Chapter 8 provides you with more context around how Data Studio fits in with the greater data management capabilities from IBM, and how you can build on your Data Studio skills with use of these products for tasks such as data modeling and design, Java development, managing database schema changes, managing data privacy and much more. Exercises are provided with most chapters. There are also review questions in each chapter to help you learn the material; answers to review questions are included in Appendix A. A book for the community This book was created by the community; a community consisting of university professors, students, and professionals (including IBM employees). The online version of this book is released to the community at no-charge. Numerous members of the community from around the world have participated in developing this book, which will also be translated to several languages by the community. If you would like to provide feedback, contribute new material, improve existing material, or help with translating this book to another language, please send an email of your planned contribution to db2univ@ca.ibm.com with the subject “Data Studio book feedback.” Conventions Many examples of commands, SQL statements, and code are included throughout the book. Specific keywords are written in uppercase bold. For example: A NULL value represents an unknown state. Commands are shown in lowercase bold. For example: The dir command lists all files and subdirectories on Windows®. SQL statements are shown in upper case bold. For example: Use the SELECT statement to retrieve information from a table.
- 14. 14 Getting Started with IBM Data Studio for DB2 Object names used in our examples are shown in bold italics. For example: The flights table has five columns. Italics are also used for variable names in the syntax of a command or statement. If the variable name has more than one word, it is joined with an underscore. For example: CREATE TABLE table_name What’s next? We recommend that you review the following books in this book series for more details about related topics: Getting started with Eclipse Getting started with DB2 Express-C Getting started with pureQuery Getting started with InfoSphere™ Data Architect Getting started with WAS CE The following figure shows all the different ebooks in the DB2 on Campus book series available for free at ibm.com/db2/books
- 15. 15 The DB2 on Campus book series
- 16. 16 Getting Started with IBM Data Studio for DB2 About the authors Debra Eaton is a software information technology specialist with IBM's Central North Technical Sales Team in Chicago. For 20 years she has worked with Fortune 500 companies on a variety of application development projects. Her specialty is database applications and their Integrated Development Environments. Debra has trained a variety of IBM DB2 customers in the area of Application Development, spoken about DB2 application development at International DB2 Users Group (IDUG) and the IBM DB2 Technical conference, and authored several redbooks, white papers and developerWorks tutorials. She can be reached via e-mail at deaton@us.ibm.com. Vitor Rodrigues is a Software Engineer at the IBM Silicon Valley Lab working on Optim™ Development Studio and Data Studio products. Previously held positions include Technical Enablement and Quality Assurance roles in the Data Studio and DB2 pureXML organizations. Prior to joining IBM, Vitor graduated in Computer and Software Engineering from University of Minho, Portugal. He is an IBM Certified Solution Developer for XML and Related Technologies and an IBM Certified Database Administrator - DB2 9 DBA for Linux, UNIX and Windows. Vitor has co-authored several articles and tutorials for developerWorks. Manoj K. Sardana is a staff software engineer working with IBM India software labs. He holds a bachelor’s degree in Computer Science from NITK Surathkal, India. He has worked on various projects within the DB2 team and at the time of this publication is working with the pureQuery development team. He has previously worked on developing the sample application for the new features of DB2 and on functional verification testing for DB2. Manoj is an IBM certified application developer and advance database administrator for DB2 V9. He is also an IBM certified solution developer for XML and related technologies. Manoj likes technical writing and teaching and has presented at various conferences and published articles. In his free time he likes to play with kids and listen to music. Michael Schenker is a software engineer at IBM's Silicon Valley Laboratory in San Jose, Calif. He joined IBM in 2002 and works in the IBM Data Server Tooling area. His subject of expertise is the Web service enablement of IBM's data servers. He holds a master's degree in computer sciences from the University of Applied Sciences in Leipzig, Germany.
- 17. 17 Kathryn Zeidenstein is a member of the Data Studio and Optim Solutions technical enablement team and has responsibility for community building and communications with the technical community. She has many years of experience with IBM starting out as an Information Developer for DB2 for z/OS®, managing the SQL Standards team, managing editor for the Information Management zone on developerWorks® and as product manager and marketing manager for several Information Management products. She has authored or co-authored numerous articles on developerWorks and in other publications. She holds a master’s degree in Professional Writing from Illinois State University. Raul F. Chong is the DB2 on Campus program manager based at the IBM Toronto Laboratory, and a DB2 technical evangelist. His main responsibility is to grow the DB2 community around the world, helping members interact with one another, and contributing to the DB2 forums. Raul joined IBM in 1997 and has held numerous positions in the company. As a DB2 consultant, Raul helped IBM business partners with migrations from other relational database management systems to DB2, as well as with database performance and application design issues. As a DB2 technical support specialist, Raul has helped resolve DB2 problems on the OS/390®, z/OS, Linux®, UNIX® and Windows platforms. Raul has also worked as an information developer for the Application Development Solutions team where he was responsible for the CLI guide and Web services material. Raul has taught many DB2 workshops, has published numerous articles, and has contributed to the DB2 Certification exam tutorials. Raul has summarized many of his DB2 experiences through the years in his book Understanding DB2 - Learning Visually with Examples 2nd Edition (ISBN-10: 0131580183) for which he is the lead author. He has also co-authored the book DB2 SQL PL Essential Guide for DB2 UDB on Linux, UNIX, Windows, i5/OS, and z/OS (ISBN 0131477005), and is the project lead and co-author of the books in the DB2 on Campus book series.
- 18. 18 Contributors The following people edited, reviewed, provided content, and contributed significantly to this book. Contributor Company/Univer sity Position/Occupation Contribution Agatha Colangelo YCDSB: Adult & Continuing Education Instructor. DB2 on Campus Community President Editing and reviewing. Tina Chen IBM, Silicon Valley Laboratory Data Studio Solution Architect Sample database, reviewing, guidance. Clifford Chu IBM, Silicon Valley Laboratory Lead developer, routine tooling Review and guidance. Joseph Fontana IBM Silicon Valley Laboratory and Northern Illinois University Intern, Optim Solutions Technical Enablement. Testing and review. Philip Gunning Gunning Technology Solutions, LLC Principal Consultant Review. Holly Hayes IBM, Silicon Valley Laboratory Integrated Data Management solutions evangelist Review and guidance Jayashree Ramachandran IBM, India Laboratory, Bangalore Software Engineer, Optim Database Administrator Review and contributions to Chapter 2. Marcos Ramirez IBM Silicon Valley Laboratory and San Jose State University Intern, Optim Solutions Technical Enablement. Testing and review. Thomas Sharp IBM, Silicon Valley Laboratory Architect, Routine tooling Technical and editorial review.
- 19. 19 Acknowledgements We greatly thank the following individuals for their assistance in developing materials referenced in this book: Paolo Bruni and the rest of the Redbook team who wrote materials used in the introduction to the Data Web Services chapter. Tina Chen, IBM Silicon Valley Laboratory, for her stored procedure Proof of Technology, which served as a basis for the chapter on developing SQL stored procedures. Holly Hayes, IBM Silicon Valley Laboratory, for her developerWorks article entitled Integrated Data Management: Managing the data lifecycle, which was used extensively in Chapter 8. Jayashree Ramachandran, IBM India Laboratory, who contributed material used in Chapter 2 on using the flat view of the Data Source Explorer. Natasha Tolub for designing the cover of this book. Susan Visser for assistance with publishing this book. Erin Wilson, IBM Silicon Valley Laboratory, for her instructions on setting up the GSDB sample database, and the description and diagram used in Appendix C.
- 21. 21 1 Chapter 1 – Overview and installation The Data Studio product is a member of the IBM® Optim™ family of products, which provides an integrated, modular environment to manage enterprise application data and optimize data-driven applications, across heterogeneous environments, from requirements to retirement. This capability is more generally referred to as Integrated Data Management. Data Studio tooling is built on the open source Eclipse platform, and is available on both Windows and Linux platforms. You can use Data Studio tooling at no charge to help manage and develop applications for any edition of DB2® for Linux®, UNIX®, Windows®, DB2 for i, DB2 for z/OS®, or Informix® Dynamic Server. IBM Data Studio replaces other tools that you may have used with DB2 databases in the past. It is a great tool for working with DB2 databases and we hope that you grab a cup of coffee or your favorite beverage, download IBM Data Studio and DB2 Express-C and put this book to good use. In this chapter you will: Learn about Data Studio capabilities, packaging, and community Make sure your environment is ready to install the Data Studio product Install Data Studio Navigate the Data Studio Eclipse workbench (the user interface) 1.1 Data Studio: The big picture As shown in Figure 1.1, Data Studio tooling provides basic database administration and database development capabilities for DB2 (and also Informix Dynamic Database), including basic support for design (modeling) and query tuning. Data Studio tooling has replaced older tools such as Developer Workbench as of DB2 9.5, and it also replaces the core capabilities in DB2 Control Center.
- 22. 22 Getting Started with IBM Data Studio for DB2 Figure 1.1 – Data Studio provides tooling support for DB2 administrators and developers For data development, it enables you to: Use wizards and editors to create, test, debug, and deploy routines, such as stored procedures and user-defined functions Use the SQL builder and the SQL and XQuery editor to create, edit, and run SQL and XQuery queries Use Visual Explain to visualize access path selection and tune routines and SQL queries Create, test, debug and deploy SQL or Java procedures (also including PL/SQL procedures for DB2 in compatibility mode) Create Web services that expose database operations (SQL SELECT and DML statements, XQuery expressions, or calls to stored procedures) to client applications. Available only in the integrated development environment (IDE) described in the next section. Use wizards and editors to develop XML applications. Available only in the IDE package. Develop SQLJ applications in a Java project – (SQLJ is a Java language that, unlike JDBC, can run static SQL). Available only in the IDE package.
- 23. Chapter 1 – Overview and installation 23 For data and database object management, Data Studio tooling provides the following key features. Typically these tasks are done on test databases that you are using to test your applications. You can: Manage DB2 instances (start and stop, quiesce, configure parameters) Manage and recover databases Connect to DB2 or Informix data sources and browse data objects and their properties Use editors and wizards to create and alter data objects Modify privileges for data objects and authorization IDs Drop data objects from databases Analyze the impact of your changes Manage data in tables including reorganizing, importing, and exporting Backup and recover data Use data diagrams to visualize and print the relationships among data objects Import and export database connections Configure automatic maintenance and logging Rebind packages Data Studio tooling gives you the basic skills you need to become productive on a DB2 data server. It also provides a foundation for enhancing your skills into more advanced database development and management tasks. You can read more about additional capabilities provided using integrated data management solutions from IBM in Chapter 8. 1.1.1 Data Studio packaging Data Studio tooling is currently available in two packages: The integrated development environment (IDE) package includes all administrative capabilities as well as an integrated Eclipse development environment for Java, XML, and Web services. This is the package used in this book because it is the only package that currently supports the Data Web Services capability as well as the ability to shell-share with other Eclipse-based tools. However, if you do not intend to work with Data Web Services, feel free to download and install the stand-alone package. The stand-alone package is a lighter weight offering designed specifically for administrators to get up and running quickly and easily. You can do all the exercises in this book with the stand-alone package except for Data Web Services. Information about installing the stand-alone package is in Appendix C.
- 24. 24 Getting Started with IBM Data Studio for DB2 1.1.2 Career path Getting skilled with Data Studio tooling can help you prepare for a path as a DB2 or Informix DBA or developer. Data Studio works with all members of the DB2 family – whether on Linux, UNIX, Windows, i5/OS, or z/OS – so the skills you learn are transferrable across those varied platforms. At this point, there are no specific professional certifications for Data Studio; however, Data Studio tooling is used in DB2 certification courses such as the one to become an IBM Certified Solution Developer - SQL Procedure Developer (Exam 735). 1.1.3 Popular community Web sites and discussion forum There is a vibrant community around DB2 data servers, which includes discussions and information about Data Studio, including ChannelDB2.com for videos and social networking and PlanetDB2.com as a blog aggregator. You can read more about these communities in the ebook Getting Started with DB2 Express-C. There is also a developerWorks discussion forum on the Data Studio product that many people in the community and in the software labs monitor and respond to at www.ibm.com/developerworks/forums/forum.jspa?forumID=1086 1.1.4 Related free software Data Studio tooling is often used with DB2 Express-C and WAS CE. Both are software products from IBM that you can use at no charge. 1.1.4.1 DB2 Express-C DB2 Express-C is the free version of the DB2 database server. You can use it for development, test, deployment in production, and also embedded in your applications. It is built using the same code base as fee-based DB2 editions; this means that applications developed to work on DB2 Express-C will work with no modification on other DB2 editions. This book uses DB2 Express-C for all exercises. For more information visit www.ibm.com/db2/express or review Appendix B and the ebook Getting started with DB2 Express-C. 1.1.4.2 WebSphere® Application Server Community Edition Data Studio (IDE package) lets you build and deploy Data Web Services. The examples used later in this book assume you are using IBM WebSphere Application Server Community Edition (WAS CE) version 2.1 as the application server for deployment of those Web services. WAS CE is a lightweight Java™ EE 5 application server available free of charge. Built on Apache Geronimo technology, it harnesses the latest innovations from the open-source community to deliver an integrated, readily accessible and flexible foundation for developing and deploying Java applications. Optional technical support for WASCE is available through annual subscription. For more information, visit
- 25. Chapter 1 – Overview and installation 25 www.ibm.com/software/webservers/appserv/community/ or review the ebook Getting started with WAS CE 1.2 Getting ready to install Data Studio This section explains the software prerequisites for Data Studio tooling and provides links to sdownloads for other software that you may find useful when going through this book: 1. Ensure your computer is using any of the following operating systems: Linux® Red Hat Desktop 4.0 x86-32 Red Hat Enterprise Linux 4.0 AS/ES x86-32 Red Hat Enterprise Linux 5.0 AS/ES x86-32 Red Hat Enterprise Linux 5.0 AS/ES x86-64 (running in 32 bit mode) SUSE Linux Enterprise Server 9.0 x86-32 SUSE Linux Enterprise Server 10 x86-32 SUSE Linux Enterprise Desktop 10 x86-32 Note: Other distributions of Linux, such as Ubuntu, may also be used, but are not officially supported. Use at your own risk. Windows® Microsoft Windows XP Professional x64 (SP2) (running in 32 bit mode) Microsoft Windows XP Professional x86-32 (SP2) Microsoft Windows Vista (Business, Enterprise, Ultimate) x86-32 Microsoft Windows Vista (Business, Enterprise, Ultimate) x86-64 (running in 32-bit mode) 2. Review the installation prerequisites in the installation roadmap in the Integrated Data Management Information Center: http://publib.boulder.ibm.com/infocenter/idm/v2r2/topic/com.ibm.datatools.ds.install .doc/topics/c_roadmap_over_ds.html It is also a good idea to check the IBM technotes for any late-breaking changes to installation prerequisites. The one for the Data Studio IDE package is here: http://www01.ibm.com/support/docview.wss?rs=3360&uid=swg27016060 The one for the Data Studio stand-alone package is here: http://www01.ibm.com/support/docview.wss?rs=3360&uid=swg27016061 For a launchpad installation, which is what is shown in this chapter, you must be an admin user, which means that you can write to the default common installation location. On Linux® operating systems, this is the "root" or any user who is using "sudo" to start Installation Manager. On a Microsoft® Windows® XP operating system, a user with write administrative privileges is any user who is a member of the "Administrators" group. On a Microsoft Windows Vista operating system, this is the user who is using "Run As Administrator".
- 26. 26 Getting Started with IBM Data Studio for DB2 Ensure that your user ID does not contain double-byte characters. Note: To perform a non-administrative installation, you cannot use the launchpad. You must instead switch to the InstallerImage_<platform> folder in the disk1 directory, and run userinst.exe (for Windows), or userinst (for Linux). 3. If you don’t already have a DB2 data server installed, you can download and install DB2 Express-C Version 9.7 We will use the free version of DB2, DB2 Express-C, for this book (although any supported version of DB2 you already have is fine as well. To download the latest version of DB2 Express-C, visit www.ibm.com/db2/express and choose the appropriate file to download for the operating system you are using. Ideally, you should install DB2 Express-C before you install Data Studio. Refer to the free ebook Getting Started with DB2 Express-C for more details, and Appendix B, to get a quick overview about DB2 Express-C. 4. Optionally, if you are planning on doing any Data Web Services exercises, you can download and install WebSphere Application Server Community Edition (WAS CE) Version 2.1. You can find the download at www.ibm.com/developerworks/downloads/ws/wasce. 5. Optionally, download the “GO Sales” (GSDB) sample database. Although you can use the SAMPLE database included with DB2 for many of the exercises in this book, we use another database, called GSDB that enables us to illustrate more capabilities. This database represents the sales and customer information for a fictional company called The Great Outdoors Company. You can download the sample database from http://publib.boulder.ibm.com/infocenter/idm/v2r2/topic/com.ibm.sampledata.go.doc /topics/download.html Figure 1.2 shows the link you click on to get the sample database used in this book. It’s fairly large (about 43 MB), so it might take some time to download depending on your download speed.
- 27. Chapter 1 – Overview and installation 27 Figure 1.2 – Link to GSDB database from Integrated Data Management Information Center We will cover how to set up the database later in the next chapter where you will also learn how to create a connection to the database. 6. Download the IBM Data Studio product. To download Data Studio, find the link to the Data Studio download registration page on the Integrated Data Management (IDM) Community Space downloads tab here (Figure 1.3): www.ibm.com/developerworks/spaces/optim?pageid=649 Figure 1.3 – Link to Data Studio from Integrated Data Management community space The exercises in this book assume you are using the IDE package, but you can download the stand-alone package if you prefer and then follow the instructions in Appendix C to install. A direct link to the registration page for the IDE package is here: http://www.ibm.com/services/forms/preLogin.do?lang=en_US&source=swg-idside
- 28. 28 Getting Started with IBM Data Studio for DB2 A direct link to the registration page for the stand-alone package is here: https://www14.software.ibm.com/webapp/iwm/web/preLogin.do?lang=en_US&sourc e=swg-idssa Note: If you do not have an IBM ID already, you will need to create one. You may need to wait for some time (perhaps even as long as a day) before being allowed to download the code. Once you get through registration, you can choose the Linux or Windows package. We will walk through the installation process in the next section. 1.3 Installing Data Studio The Data Studio product can be installed using the Launchpad GUI, which launches IBM Installation Manager, or silently, which means you create a response file of your chosen installation options, and then run that response file. Silent install is mainly useful for larger installations in which installation must be pushed out to many machines. As explained in the Integrated Data Management Information Center (http://publib.boulder.ibm.com/infocenter/idm/v2r2/topic/com.ibm.datatools.ds.install.doc/to pics/c_plan_imover.html ) IBM Installation Manager is a program for installing, updating, and modifying packages. It helps you manage the IBM applications, or packages, that it installs on your computer. Installation Manager does more than install packages: It helps you keep track of what you have installed, determine what is available for you to install, and organize installation directories. This chapter focuses on the Launchpad installation. It assumes you do not have IBM Installation Manager installed. This means that installing Data Studio starts by installing IBM Installation Manager. If you choose to install additional products that also use that release of Installation Manager, you do not need to install Installation Manager again. Figure 1.4 shows the installation process described in this chapter.
- 29. Chapter 1 – Overview and installation 29 Figure 1.4 – A basic installation flow Follow these steps to install the Data Studio product: 1. After you unzip the download package, start the launchpad as follows: Windows: Execute the setup.exe file located in the ibm_data_studio_ide_v22_win directory as shown in Figure 1.5.
- 30. 30 Getting Started with IBM Data Studio for DB2 Figure 1.5 – Click setup.exe from unzipped Data Studio package Linux: Execute the setup command from the root path where you unzipped the image. 2. Select a language and then click OK. The Welcome screen comes up. In the left pane, select Install Product as shown in Figure 1.6. Figure 1.6 – Click Install Product to launch Installation Manager This launches Installation Manager. You will then see a screen that lets you choose which packages to install. 3. Assuming you don’t already have Installation Manager on your machine, you will select the default settings to install both Installation Manager and Data Studio as shown in Figure 1.7. Then click Next.
- 31. Chapter 1 – Overview and installation 31 Figure 1.7 – Install both Installation Manager and Data Studio packages 4. After accepting the license, click Next. You will then be presented with a screen that lets you specify the location directory for shared resources and for Installation Manager itself. You can keep the defaults; however, you’ll want to take note of the fact that you should choose a drive with more space than you think you need just for Data Studio in case you decide to .shell-share with other Eclipse-based products in the future, 5. As shown in Figure 1.8, take the default and then click Next.
- 32. 32 Getting Started with IBM Data Studio for DB2 Figure 1.8 – Select location for shared resources and Installation Manager 6. You will then see a screen that lets you choose whether to create a new package group or extend an existing one. Because we are installing on a machine that does not include any existing package groups, select the radio button to Create a new package group, as shown in Figure 1.9.
- 33. Chapter 1 – Overview and installation 33 Figure 1.9 – Create a new package group for Data Studio 7. In the next screen, take the default option to install the Eclipse that is included with the Data Studio installation. Note: If you already have an Eclipse 3.4.2 on your machine, you can choose to extend that IDE instead of installing an additional copy. This adds the functions of the newly installed product, but maintains your IDE preferences and settings. 8. The next screen lets you choose any additional translations you may wish to install. Select any that are appropriate and then click Next. 9. The next screen shows the lists of features to be installed; take the defaults and then click Next. 10. Finally, you are presented with a summary screen from which you can click the Install button as show in Figure 1.10.
- 34. 34 Getting Started with IBM Data Studio for DB2 Figure 1.10 – Review summary information and then click Install Installation Manager begins the installation. There may be a pause in the progress bar at some point; be sure to wait and not interrupt the processing. When the product successfully installs, you see the screen shown in Figure 1.11.
- 35. Chapter 1 – Overview and installation Figure 1.11 – Congratulations! A successful install. 11. From the success screen shown in Figure 1.11, click on Finish to bring up Data Studio. 12. You will be asked to select a Workspace name. Enter GettingStarted as the name of your workspace as shown in Figure 1.12. Note: A workspace is a location for saving all your work, customizations, and preferences. Your work and other changes in one workspace are not visible if you open a different workspace. The workspace concept comes from Eclipse. 35
- 36. 36 Getting Started with IBM Data Studio for DB2 Figure 1.12 – Enter a workspace name A welcome screen appears as shown below in Figure 1.13. Figure 1.13 – The Welcome screen in Data Studio
- 37. Chapter 1 – Overview and installation 37 13. You will see links to online resources and to information about connecting to a database and a tutorial on starting a data development project. Feel free to explore some of these materials, or go ahead and click on the X as shown in Figure 1.13 to close the Welcome screen. After you close the Welcome screen, the default perspective comes up. As you’ll learn more about in the next section, a perspective is basically a configuration of views and actions that are associated with particular tasks. A view shows your resources, which are associated with editors. The default perspective for Data Studio is the Data perspective as shown in Figure 1.14. You can see the names of the various views there including Data Project Explorer and Outline. We’ll explore the views and the various perspectives a bit more in the next section. Note: If by some chance you already had a workspace named GettingStarted, it would appear with the default views under which you had previously saved it. Figure 1.14 – The default Data perspective in Data Studio
- 38. 38 Getting Started with IBM Data Studio for DB2 1.4 Touring the workbench The term Workbench refers to the desktop development environment. This concept is from Eclipse, so if you are familiar with Eclipse, you may skip this section. The Workbench aims to achieve seamless tool integration and controlled openness by providing a common paradigm for the creation, management, and navigation of workspace resources. Each Workbench window contains one or more perspectives. Perspectives contain views and editors and control what appears in certain menus and tool bars based on a certain task or role. So you will see different views and tasks from the Debug perspective (for Java debugging) than you will for the Data perspective. Let’s look at the Java perspective for fun. One way to open a different perspective is to click on the icon shown below in Figure 1.15 and select Java. An alternate way to open a perspective is to click on Window -> Open Perspective. Figure 1.15 – Opening up a different perspective (in this case, the Java perspective)
- 39. Chapter 1 – Overview and installation 39 As you can see by comparing Figure 1.15 with Figure 1.16 (below), the Java perspective has a different task focus (Java development) than the Data perspective. The outline in this case, for example, would work with Java source code in the editor. The explorer shows Java packages as opposed to database objects. Figure 1.15 – The Java perspective Click on the Data perspective to switch back again so we can describe more fully the capabilities of the Data perspective. Note: For more information about perspectives and views, see the ebook Getting Started with Eclipse.
- 40. 40 Getting Started with IBM Data Studio for DB2 1.4.1 Touring the Data perspective and its views Because most of the work you’ll do in this book is in the Data perspective (including creating SQL procedures and Data Web Services), let’s go ahead and change perspectives by clicking on the icon shown in Figure 1.15 and selecting Data, which once again brings up the perspective shown in Figure 1.17. As we described earlier, views are the windows you see on workbench such as Data Source Explorer and Properties. A view is typically used to navigate a hierarchy of information, open an editor, or display properties for the active editor. The changes that you make to the views (their sizes and positions), and the resources that you create in the views are saved in your workspace, as we mentioned previously. Figure 1.17 – Data perspective views
- 41. Chapter 1 – Overview and installation 41 The views shown in Figure 1.17, working counterclockwise from the top left, are described in Table 1.1 below. View Description Data Project Explorer This view is used by a database developer. It shows Data Development projects (which you will use for SQL and XQuery scripts, stored procedures, functions and Data Web services) and Data Design projects. Data Source Explorer This view allows you to administer a database. It automatically displays detected databases, but you can add new database connections. Properties This view shows the properties of the object currently selected in the workspace. For some objects, you can use this view to edit properties, such as making changes to database objects selected in the Data Source Explorer. From this view you can also see the SQL Results tab, which brings up that view, described below. SQL Results Shows results after you execute SQL or XQuery statements. Outline Displays an outline of a structured file that is currently open in the editor area and lists structural elements. So if you were editing an XML file, you would see the elements of the XML file in an outline format. Table 1.1 – Views in the default Data perspective 1.4.2 Manipulating views The basic view controls are shown in Figure 1.18.
- 42. 42 Getting Started with IBM Data Studio for DB2 Figure 1.18– View controls To close a view, click on the X to the right of the view name as shown in Figure 1.18. There’s no need to panic if you close a view accidentally. Simply go Window -> Show View and select the view you want to re-open. (See Figure 1.19 for an example.) If you don’t see the view you want, click Other… Figure 1.19– Making a closed view reappear 1.4.3 Resetting the default views for a perspective
- 43. Chapter 1 – Overview and installation 43 We encourage you to play around with the views and perspectives in the Workbench. For people not familiar with Eclipse, it can seem a bit strange to have views appearing and disappearing. If you get to the point where you just want it back to the way it was before you started playing, you can reset the perspective from the Window menu as shown in Figure 1.20. Figure 1.20 -- Reset the views to the defaults for the currently open perspective Note: The Reset Perspective menu option shown in Figure 1.20 only resets the current perspective. If you want to change a different perspective, you can go to Windows -> Preferences -> General -> Perspectives, choose a perspective and click the Reset button. The next time you open the Perspective, it will be restored to the default layout. 1.5 Exercises In this set of exercises, you will install Data Studio, get comfortable using the Workbench/Eclipse controls, and install the Great Outdoors sample database. 1. Install Data Studio following the instructions in this chapter. 2. Spend some time getting comfortable with the Data Studio Workbench. For example: Change to the Data perspective. Close the Outline view. Minimize and maximize some of the view windows.
- 44. 44 Getting Started with IBM Data Studio for DB2 Find the menus for each of the views. Reset the Data perspective to its default setting. 3. Optionally, set up the Great Outdoors sample database using the instructions you can find here: http://publib.boulder.ibm.com/infocenter/idm/v2r2/topic/com.ibm.sampledata.go.do c/topics/config_interactive.html See Appendix D for more information about the Great Outdoors Company database. We’ll show you how to create a connection to GSDB in the next chapter. 4. Explore the product documentation. For Data Studio, the online information topics are included in the Integrated Data Management Information Center at http://publib.boulder.ibm.com/infocenter/idm/v2r2/index.jsp and shown in Figure 1.21. Read the product overview and take the relevant tutorials. Figure 1.21 – Integrated Data Management Information Center Welcome screen As Figure 1.21 shows, the Information Center includes information about Data Studio and other products for Integrated Data Management from IBM. The relevant product
- 45. Chapter 1 – Overview and installation 45 overview and tutorials for Data Studio are highlighted above, but you should explore other topics in the task-oriented navigation on the left. 1.6 Summary IBM Data Studio provides tooling support for basic database administration and data development tasks for any member of the DB2 family, making it much easier to learn skills for a particular database system and to transfer those skills to other database systems and platforms. Data Studio is provided at no charge for download and full IBM support is provided for anyone who has a valid license of a DB2 data server or Informix Dynamic Server. There is an active discussion forum at www.ibm.com/developerworks/forums/forum.jspa?forumID=1086 that can provide informal support. Data Studio tooling is built on the open source Eclipse platform and, if you are using the IDE version of the product, it can “shell share” (be installed into the same Eclipse instance) with other products that are on the same release of Eclipse, including other Optim products and Rational® products. You will learn more about some of these other products and capabilities in Chapter 8. This chapter also covered the details of installing the Data Studio IDE package. Installation instructions for the stand-alone package are described in Appendix C. We also reviewed how to navigate the Eclipse Workbench for Data Studio, including how to open up different perspectives and how to manipulate views in a perspective. 1.7 Review questions 1. What open source platform is Data Studio tooling built on? 2. Which IBM products does Data Studio support? 3. What are “perspectives” in an Eclipse-based product such as Data Studio? 4. What is the default perspective after you install the IDE package of Data Studio? 5. True or false: Data Studio can be used at no charge with supported databases. 6. Which of the following development capabilities is not included in Data Studio? A. Development of SQL and Java stored procedures B. Development of SQL and Java user-defined functions C. .NET development D. SQL and XQuery scripting E. Data Web Services development
- 46. 46 Getting Started with IBM Data Studio for DB2 7. Which of the following database administrative capabilities is provided in Data Studio? A. Browse data objects and view their properties B. Recover databases C. Create, alter, and drop database objects D. Authorize users to access database objects E. All of the above 8. Which of the following correctly reflects the downloadable package options for the Data Studio product? A. Binary and source B. Integrated Development Environment (IDE) and stand-alone C. C++ and Java D. Free and chargeable E. None of the above 9. What is the name of the Eclipse view used to browse of the projects that hold SQL scripts, Data Web Services artifacts, and stored procedures? A. Thin Client B. Data Source Explorer C. Data Project Explorer D. Outline E. None of the above 10. In which Eclipse view do results of SQL operations appear? A. Data Source Explorer B. Properties C. Data Project Explorer D. Editor E. None of the above
- 47. 47 2 Chapter 2 – Managing your database environment Whether you are a developer or DBA, everyone working with or connecting to a database needs to understand the basics of managing their database environment. This chapter discusses how to manage your DB2 database environment using Data Studio. Although you can manage and connect to Informix Dynamic Server as well using Data Studio, this chapter focuses on DB2 databases. The exercises assume you are using DB2 Express-C and the GSDB sample database. It also assumes you are using the IDE package of Data Studio, although for database administration tasks, the capability is the same in the standalone package. In this chapter you will learn: How to stop and start a DB2 instance How to create and connect to a database. How to create tables, views and indexes. How to manage users and grant them access to database objects. Note: This book does not explain basic DB2 concepts, but shows you how to work with them. If you are not familiar with DB2 Express-C, review Appendix B, Up and running with DB2. For more details you can also review the Getting Started with DB2 Express-C book which is part of this DB2 on Campus series. 2.1 Managing your database environment: The big picture As mentioned in Chapter 1, Data Studio is the successor of other tools, such as the DB2 Control Center, which was officially deprecated in DB2 9.7, which means it is still supported but will no longer be enhanced. Data Studio tooling includes support for many DBA tasks, which are shown in Figure 2.1.
- 48. 48 Getting Started with IBM Data Studio for DB2 Figure 2.1 – DBAs have a wide range of responsibilities Figure 2.1 shows the basic tasks that any DBA needs to perform. There are other responsibilities such as complying with data privacy requirements that are beyond the scope of Data Studio but are covered in other IBM solutions. You can read more about this in Chapter 8. This chapter briefly explains some basic things DBAs need to know need to know, such as managing instances and connections, and then goes into managing objects, views and indexes and granting privileges. In the next chapter, we will describe tasks required to support availability and maintenance, such as managing table spaces, updating statistics, importing and exporting data, managing user privileges, managing buffer pools, and so on. 2.1.1 Database Administration perspective The Database Administration perspective, as the name suggests, focuses on database administration tasks. You may notice that this view is similar in many ways to the Data perspective, and you can do the same tasks in the Data perspective; however, the Database Administration perspective is tailored to suit the needs of DBAs and is laid out to provide a more straightforward user interface for those tasks. You can switch to the Database Administration perspective by going to Window -> Open Perspective -> Other and selecting Database Administration. Figure 2.2 below shows the views in the Database Administration perspective. For more details regarding the perspectives and their views refer to Chapter 1.
- 49. Chapter 2 – Managing your database environment 49 Figure 2.2 – Database Administration perspective 2.1.1.1 Data Source Explorer view The Data Source Explorer is the main view in the Database Administrative perspective. All the administration tasks are launched from this view. In Data Studio, the Data Source Explorer view can be displayed in two different presentation styles, which you can toggle between using this button: Hierarchical view – In this presentation style, the database objects are arranged n a tree structure reflective of the database structure. You must navigate to the parent object before you can navigate to the object itself. For example, you might have to navigate from the top level of your data source to the Schema folder before you can reach the Tables folder for the schema. In this style, the tree structure is organized in a database-centric rather than instance-centric fashion. The root nodes are the connection objects to various databases. The node Instance is a child node of the connection node. The details
- 50. 50 Getting Started with IBM Data Studio for DB2 about the Instance node will be discussed in the following section along with database operations. In this and the next chapter, we will be using this view to learn administrative activities. Flat view – In this presentation style, database objects are seen in a list format. You can navigate directly form the top level of your data source to the folder that contains a particular data object. After you select a folder in the Data Source Explorer, you can work with the objects that the folder contains by using the Object List Editor. The Object List Editor can be used to easily navigate the various objects in a database catalog. It allows you to customize, sort, and filter the object displayed. At the end of this chapter, we will talk about this layout briefly. 2.2 Working with your DB2 instances A DB2 instance provides an environment to work with the database. During DB2 installation, a default instance called DB2 gets created and started. You can create multiple instances using the command db2icrt. You cannot create and drop instances using the Data Studio tooling. This must be done from other tools such as the DB2 Command Window on Windows, or from a Linux/UNIX shell as described in Appendix B. 2.3 Working with your DB2 databases In this section you will learn how to create a new database, or work with an existing database. You will also learn how to connect to a database, create connection profiles, and explore database objects. 2.3.1 Creating a new database To create a new database using Data Studio tooling: 1. Click on the New Database icon in the Data Source Explorer as illustrated in Figure 2.3.
- 51. Chapter 2 – Managing your database environment 51 Figure 2.3 – Creating a new database 2. The New Database wizard will be launched. You can select the database vendor in the Specify Database Vendor page of the wizard. Select DB2 for Linux, UNIX and Windows and then click on Next. 3. In the New Database - Specify Instance Details page, fill in the required details for the instance where the database will reside. This illustrated in Figure 2.4.
- 52. 52 Getting Started with IBM Data Studio for DB2 Figure 2.4 – Instance details for a new database The instance detail fields are explained in Table 2.1 below. Field Description Instance Name The name of the instance where the database will reside. The default instance is DB2. Host The IP address/ Host name of the system where the DB2 server is installed. Localhost can be specified if it is on the local machine. Port The port number where the instance is listening. By default the DB2 instance uses 50000. User Name The name of the user to create the database Password The password of the specified user. Table 2.1 – Instance detail fields for a new database
- 53. Chapter 2 – Managing your database environment 53 4. After filling in the required details, verify that you can attach to the instance by clicking on Test Instance button to make sure that the details are correct (see Figure 2.4). If you can successfully attach, you will see a “Test Succeeded” message in the New Database - Specify Instance Details page. Note: If you are working on Windows and are using a UNIX simulator such as MKS, you need to disable the simulator for Step 4 to work. Currently Data Studio and UNIX simulators are not compatible. 5. Click Finish. This will open the Create Database wizard in the display panel as shown in Figure 2.5 below. Figure 2.5 – Database creation wizard In Figure 2.5, we used the name NEWDB for the database and the C: drive for the database location. We used the default values for the rest of the options. We will talk more about them in next chapter. You can see the command that will get executed by clicking on the Preview Command link (you may need to scroll down the editor window a bit to see it). 6. Click on the Run button (circled in Figure 2.5). This may take a minute or so to complete. On successful execution of the command, you will be able to see NEWDB database in the Data Source Explorer. This is shown in Figure 2.6.
- 54. 54 Getting Started with IBM Data Studio for DB2 Figure 2.6 – Data Source Explorer with new database 2.3.2 Connecting to a database To connect to a database from Data Studio, such as the NEWDB created above, ensure it is visible in the Data Source Explorer. If it is visible, select it, right-click on it and choose Connect. The window shown in Figure 2.7 will open. Figure 2.7 – Connecting to a database just created from Data Studio The database name and the URL will be filled in by default. Enter the user ID and password and click OK. You can select Save password box to save the password for the future connections.
- 55. Chapter 2 – Managing your database environment 55 Note: If for any reason the window shown in Figure 2.7 above does not come up automatically, but you get an error message, select the database, right-click on it, and choose Properties. From the Properties window, ensure you choose Driver Properties, and pick the IBM Data Server Driver for JDBC and SQLJ (JDBC 4.0) Default option from the drop-down menu. If the database is not visible in the Data Source Explorer, then you may need to manually create a connection to the database. To do this, right click on Database Connections and choose New. Fill in the details for the existing database as shown in Figure 2.8 below, which includes information about the GSDB database you created in Chapter 1. Figure 2.8 – Connection to an existing database As shown in Figure 2.8, select DB2 for Linux, UNIX and Windows in the Select a database manager display box. Choose the JDBC driver in the drop-down menu. The default is the IBM Data Server Driver for JDBC and SQLJ (JDBC 4.0) Type 4 driver. Fill in the database name, host, port number, user name and password for the database connection. Click on the Test Connection button on the bottom left side of the panel to test the connection. If the connection is successful, click Finish.
- 56. 56 Getting Started with IBM Data Studio for DB2 2.3.2.1 Reusing connections using connection profiles A recommended way of handling connection information that you may need to share with others in your group or re-use in other connections is to create a connection profile. With connection profiles, the connection information is saved into a file that can be imported by other users. Connection profiles also allow you to save the password and standardize the JDBC driver for various connections. Note: For more details on exporting and importing connection profiles, see the developerWorks article entitled Exploring What’s New in Data Studio Developer 2.1 at http://www.ibm.com/developerworks/data/library/techarticle/dm-0902casey/index.html. Although the information is from an older release it is still valid with Data Studio 2.2. To create a new profile: 1. Click on the New Connection Profile icon as shown in Figure 2.9. Figure 2.9 – Creating a connection profile
- 57. Chapter 2 – Managing your database environment 2. A new window similar to Figure 2.10 below will appear. Fill in the required information for the profile. Figure 2.10 – Details about a new profile 3. In our example, we want to create a connection profile for DB2 for i5/OS databases, so click on the Edit Jar List icon to change the driver. A new window will appear which will let you change the driver jar files as shown in Figure 2.11. 57
- 58. 58 Getting Started with IBM Data Studio for DB2 Figure 2.11 – Edit JDBC Driver Jar files 4. You can click on the Add Jar Files… button and browse to your jar files to select the new driver jars. 5. Once done, you can click Finish to create the profile. Note: A feature available with the fee-based products, such as Optim Development Studio and Optim Database Administrator, is the ability to create connection repositories, which let you reuse and share connection information without requiring the importing and exporting of files. For more information about this feature, see the developerWorks article entitled Using common connections with Optim solutions by Karen Devlin at http://www.ibm.com/developerworks/data/library/techarticle/dm-0812devlin/. 2.3.3 Stopping and starting instances To view the instance associated with your current database, expand the tree under your database in the Data Source Explorer as shown in Figure 2.12.
- 59. Chapter 2 – Managing your database environment Figure 2.12 – Instance associated with your database To start or stop the instance, select the instance and right click on it. You will see the options to start/stop it as shown in Figure 2.13. 59
- 60. 60 Getting Started with IBM Data Studio for DB2 Figure 2.13 – Performing an action such as stopping or starting an instance You can also perform other operations at the instance level, such as instance configuration, quiescing an instance, and so on. We let you explore these options on your own. 2.4 Creating database objects Once you have a database in place and are able to connect to it successfully, you can create database objects such as tables, views, and indexes. The database objects are grouped under a schema. While some of the schemas are already created by the DB2 installation to store system catalog tables, you can create your own schema to group together objects that you create. To create a schema: 1. Expand the tree under your database (you may need to make sure that you are connected to the database first). Right click on the Schema folder and select Create ->Schema as shown in Figure 2.14.
- 61. Chapter 2 – Managing your database environment Figure 2.14 – Creating a new schema 61
- 62. 62 Getting Started with IBM Data Studio for DB2 2. In the next window, fill in the name for the new schema (we used mySchema) and click on Run DDL as shown in Figure 2.15. Figure 2.15 – Run the DDL for your schema 3. Once the schema is created, you will be able to see it under the Schemas folder in the database tree. Expand the tree under your schema. You will be able to see folders for various database objects you can create under this schema. This is shown in Figure 2.16.
- 63. Chapter 2 – Managing your database environment 63 Figure 2.16 – Various objects under the new schema 4. Close the Data Object Editor before going to the next task. 2.4.1 Creating tables To create a table: 1. Right click on the Tables folder (Under the schema mySchema) and choose Create -> Table. The Data Object Editor will open on the right panel of Data Studio as shown in Figure 2.17.
- 64. 64 Getting Started with IBM Data Studio for DB2 Figure 2.17 – Creating a new table 2. Enter the name of the table in the General tab. 3. Click on the Columns tab to define the columns for this table. Click on the New button ( below. ) to create a new column. This is illustrated in Figure 2.18 Figure 2.18 – Adding columns to a new table in the Data Object Editor
- 65. Chapter 2 – Managing your database environment 65 4. Fill in the details for the column (you may need to resize the object editor window to see all the fields). Table 2.2 below describes each of the fields. Field Description Name Name of the column. Primary Key Click this box if you want this column to be the primary key for the table. Data Type Data type of the column. Click in the field to activate it for editing and then use the pulldown to see all the data types supported in the drop down menu. Length The length of the column. For some of the data types it is fixed and in those cases you cannot edit this. Scale Specify the scale for the column type wherever applicable. Again, if it’s not applicable to this data type, you won’t be able to edit this. Not Null Click the box if the column value cannot be null. Please note that for primary key column, this check box will automatically be checked, because primary keys are not allowed to be null. Generated Click this box if you want the DB2 system to automatically generate the value of this column based on a default value or expression that you provide. Default Value/Generated Expression If the Generated box is checked, you need to specify a default value or an expression that the DB2 system will evaluate to generate the value of this column whenever a value is not specified in the INSERT statement. For example a total salary column can be the sum of basic salary (column name basicSalary) and allowances (column name allowances). You can specify for salaryColumn as Generated expression of basicSalary + allowances Table 2.2 – Column details In the example shown in Figure 2.19, we have added three columns: EmpName of VARCHAR data type and length 5. empID, which is a primary key of INTEGER. Address, of data type XML.
- 66. 66 Getting Started with IBM Data Studio for DB2 5. Once all the columns details are complete, click on Run DDL to create the table, as shown in Figure 2.19 below. Figure 2.19 – Run the DDL to create a new table 6. Go to the Data Source Explorer to see the new columns as shown in Figure 2.20.
- 67. Chapter 2 – Managing your database environment 67 Figure 2.20 – New table in Data Source Explorer 7. Close the object editor before moving to the next task. 2.4.2 Creating indexes To create an index on a column of the table: 1. Expand the tree under the Tables folder, and select the table on which you want to create the index. For this example, select the newly created table (myTable) then right click Indexes and select Create->Index. The Object Editor will open as shown in Figure 2.21.
- 68. 68 Getting Started with IBM Data Studio for DB2 Figure 2.21 – Defining a new index on column(s) of a table 2. On the General tab, enter the name of the index (or take the default). 3. On the Details tab, select the columns that will make up the index. To select the column, click on the ellipses button (…). This is show in Figure 2.22. Figure 2.22 – Choosing columns for an index
- 69. Chapter 2 – Managing your database environment 4. You will see a new window pop up which will allow you to select the columns for the index as shown in Figure 2.23, in which the empName column is selected. Figure 2.23 – Selecting the columns of the index 5. Click on the Run DDL link to create the index. 6. Close the object editor. 2.4.3 Creating views To create a view over columns in a single table or in multiple tables: 1. Right click on the View folder under the newly created schema (mySchema) and select Create-> View. The Object Editor will open as shown in Figure 2.24. 69
- 70. 70 Getting Started with IBM Data Studio for DB2 2.24 – Defining a new view 2. Fill in the name of the view. To define the columns for this view using an SQL query, fill in the SQL in the SQL tab in the Expression text box. As shown in Figure 2.25, the expression is a SELECT statement that selects the empID and Address columns of the table (Select "empID", "Address" from "mySchema"."myTable"). 3. Click on Update to update your view definition. This is shown in Figure 2.25.
- 71. Chapter 2 – Managing your database environment 71 2.25 – Selecting an SQL for a view 4. To create the view click on Run DDL. 5. Close the object editor. 2.5 Managing database security Securing the data for unauthorized access is one of the important tasks for the database administrator. You can secure the data by adding the users and then giving them the required access. This topic will cover these aspects. 2.5.1 Adding users You can add a new user using Data Studio tooling and allow that user to perform different operations on the database. Adding a user using the Data Studio tooling facilitates user security management, because Data Studio will generate the GRANT and REVOKE statements for you. Note: Though the Data Studio menus uses the phrase Create User, this may incorrectly give you the impression that you can create and store users in a DB2 database by default; this is not the case. User creation is left by default to an external facility such as the operating system, LDAP, active directory, and so on. If you would like to create and store users in the DB2 system you can create your own plug-in to accomplish such mechanism as describe in the article Develop a security plug-in for DB2 database
- 72. 72 Getting Started with IBM Data Studio for DB2 authentication which can be found at: http://www.ibm.com/developerworks/db2/library/techarticle/dm0802kligerman/index.html). In this section we use the phrase Add User instead. To add a new user: 1. Select Users folder, right click it and select Create User. You will see a new window opening in the object editor as shown in Figure 2.26. Figure 2.26 – Adding a new user with Create User 2. While adding a new user, you can specify which database objects that user can access. To give a user access to different objects, select the Privileges tab, as shown in Figure 2.27.
- 73. Chapter 2 – Managing your database environment 73 Figure 2.27 – Indicating which objects USER1 can access 3. You can see the different access privileges possible for that object by clicking on the >> button as shown in the above figure. 4. After you have selected the required access permissions, you can add the user to Data Studio by clicking Run DDL. 2.5.2 Assigning privileges Whenever you create an object, you can give the privileges associated with that object to the different users available. Figure 2.28 shows the privileges tab that appears for table creation in Data Studio tooling.
- 74. 74 Getting Started with IBM Data Studio for DB2 Figure 2.28 – Privileges option while creating a table Click on Grant New Privilege. A new window will appear which will allow you to give different privileges to users. This is shown in Figure 2.29.
- 75. Chapter 2 – Managing your database environment 75 Figure 2.29 – Giving privileged to the users You can select the user under the Grantee menu and give it the appropriate privilege by selecting the appropriate check boxes. You can also select WITH GRANT OPTION checkboxes if you want to give the user the power to give the same privilege to other users. For most of the objects that you create in Data Studio, you will find a Privilege tab wherever applicable, and you can use the above method to give appropriate privileges to the different users. You can also find this tab while creating a user, in which case it will allow giving the privileges which are not object-specific but instead apply to the database, such as a set of privileges or authorities, as shown in Figure 2.30.
- 76. 76 Getting Started with IBM Data Studio for DB2 Figure 2.30 – Privileges available while creating a user 2.6 Working with existing tables Figure 2.31 – shows the actions that can be executed on database tables from the Data Source Explorer. The actions we’ll describe in this section are circled.
- 77. Chapter 2 – Managing your database environment 77 Figure 2.31 – Available actions for database tables In this section we describe how to determine what impact changing a table has on other objects and then show how to generate the DDL to recreate the table, alter a table, view its contents, and update its statistics. 2.6.1 Analyze impact Before making changes to a database object, it is wise to verify that no dependent objects will become invalid because of your changes. Data Studio can detect dependencies in database objects, so that you can see a snapshot of the objects affected by the changes. You can find this by right clicking on a table and selecting Analyze Impact. The Model Report view will open and list all the objects dependent on the source database object as shown in Figure 2.32.
- 78. 78 Getting Started with IBM Data Studio for DB2 Figure 2.32 – Impacted objects for table PRODUCT The impact analysis shows that there are several objects impacted by changes in the table PRODUCT, including foreign key objects, tables and views. When altering the table PRODUCT, you should make sure that the changes will not invalidate the dependent objects, or at least make sure you can recreate the impacted objects after altering the table, like generating DDL for those objects so that you can recreate them later, as described in the next section. 2.6.2 Generate DDL When there is the need to duplicate a database table, the simplest way is to generate a DDL script that can be executed on the target database. Data Studio tooling provides a Generate DDL option available in the right click menu for several types of database objects, including tables. The Generate DDL wizard lets you select several options to be included in the generated DDL, including drop statements, fully qualified and delimited names, dependent object, and so forth. After the initial screens where you perform those selections, the generated DDL is displayed and you can select whether to run this DDL against a database server or simply
- 79. Chapter 2 – Managing your database environment 79 save it into a local project for later use. For example, Figure 2.33 – shows the DDL generated for the table PRODUCT. Figure 2.33 – Generating DDL for table PRODUCT Using the Generate DDL feature is a quick and easy way to recreate a database object in a different database or even in a different schema on the same database. You can also use the generated DDL as a template for creating a new table that is different but similar to the existing table. You can save the DDL to a file, edit the file as needed, and create new objects.
- 80. 80 Getting Started with IBM Data Studio for DB2 2.6.3 Altering tables The Data Source Explorer provides an object editor that can be used to create new or alter existing objects, including tables. In order to make changes to an existing table, right click on the table n the database tree and select Alter. The Data Object Editor opens the selected table as shown in Figure 2.34. Figure 2.34 – Data Object Editor for a table The editor lets you alter several properties of a database table, including its name, compression, privileges, distribution key, data partitions and dimensions, table spaces and table columns. It is also possible to view the table’s statistics and relationships using the editor, as well as the list of objects possibly impacted by changes to the table. Once you have made the changes you want to apply to the table, you can create the DDL for your changes by clicking Preview DDL, and you can apply the DDL to the database by clicking Run DDL.
- 81. Chapter 2 – Managing your database environment 81 2.6.4 View sample contents Data Studio provides a quick and effective way for you to get an idea of the data stored in a table. Simply right click on a table and select Data -> Sample Contents to fetch a subset of data from the selected table. The sample contents will be displayed in the SQL Results view, in the same manner as query results are displayed. 2.6.5 Editing table data When developing database applications, you will frequently need to update table data so that you can force a complete exposure of your application’s code path and induce error conditions to test the application’s error handling. With Data Studio, you can edit the table data by right clicking on the table and selecting Data -> Edit: A table data editor will open, containing the existing data in the table.as shown in Figure 2.35. Figure 2.35 – Editing table data You can edit the table’s contents by selecting a cell and changing its value. Once you have changed a value, the editor is marked as “dirty,” identified with an asterisk (*) in the editor title. You can commit changes to database by saving the editor changes, either using the shortcut Ctrl+S or by selecting File -> Save. 2.7 Generating an Entity-Relationship diagram Entity-Relationship (ER) diagrams are a conceptual way to represent data and are commonly used in database modeling. ER diagrams are useful for documenting and analyzing relationships among several entities. For database modeling, it becomes a handy tool to understand the relationships among different tables.
- 82. 82 Getting Started with IBM Data Studio for DB2 To generate an overview ER diagram in Data Studio, right click in a database table and select Add to Overview Diagram, as shown in Figure 2.36. Figure 2.36 – Generating overview ER diagram The Overview Diagram Selection wizard lets you select which tables you want to include in the overview diagram. Select the tables PRODUCT, PRODUCT_BRAND, PRODUCT_LINE, PRODUCT_COLOR_LOOKUP, PRODUCT_SIZE_LOOKUP, PRODUCT_TYPE and PRODUCT_NAME_LOOKUP, as shown in Figure 2.37. Figure 2.37 – Selecting tables to include in overview diagram Once you have selected the tables, click OK and the overview ER diagram will be generated, as shown in Figure 2.38.
- 83. Chapter 2 – Managing your database environment 83 Figure 2.38 – Entity-Relationship diagram for tables that contain product information Using ER diagrams during development can be crucial to understand the database design and increase your productivity. Note: The generation of ER diagrams is to help you visualize an existing database structure. To create logical models using UML or to create physical models that can be used for deployment, you need to extend your environment with a data modeling product such as InfoSphere™ Data Architect. Refer to the ebook Getting started with InfoSphere Data Architect for more details. 2.8 Data Source Explorer flat view In this chapter, all the examples are based in the hierarchical view of the Data Source Explorer. However you can also use the flat view. To switch to this view, click on the icon Show the Data Source Explorer contents in flat view icon as shown in Figure 2.39. Figure 2.39 – Switching to the flat view for the Data Source Explorer
- 84. 84 Getting Started with IBM Data Studio for DB2 Figure 2.40 shows the flat view for the GSDB database. Figure 2.40 – Flat view for the database object under GSDB database
- 85. Chapter 2 – Managing your database environment 85 One of the advantages of the flat view is that it comes along with the Object List Editor, which you can use to explore the content under the database object and launch actions. For example, Figure 2.41 shows that when the Schema object is select, the Object List Editor shows all schemas. You can use the filter (Name Like text box, circled in the figure), to filter the contents. Figure 2.41 – Object List Editor for schema object
- 86. 86 Getting Started with IBM Data Studio for DB2 We will leave up to you to explore this more and try out all the operations learned in this chapter using this view. 2.9 Exercises In this chapter you learned how to start and stop instances, create and connect to databases, create tables, views, and indexes, and how to grant access to users. Here are some exercises to practice what you learned. You can use any of the connection you created in this chapter whenever the name of the database is not mentioned explicitly in the exercise. Exercise 1: We have created a GSDB database in the previous chapter and learned to connect to it using Data Studio in this chapter. Browse the database tree to find out the various schemas in the database and the various objects associated with those schemas. Exercise 2: Try creating a table with various data types and insert some values into it. Try creating an index of single or multiple columns on this table. Exercise 3: Try creating a table with a primary key including single or multiple columns. Does an index automatically get created? What columns does it contain? Exercise 4: Try adding a user and see how many privileges you can give. Browse through all the possible privileges. Exercise 5: Create a table where the value for a specific column will always be generated by the DB2 based on an expression defined by you. 2.10 Summary In this chapter you have learned about instances, how to create a database, get connected to it, and create a connection profile. You have also learned how to create different object once you are connected to the database. At the end you have learned how to add new users and give them the privileges to access the different database objects.
- 87. Chapter 2 – Managing your database environment 87 2.11 Review questions 1. What are the two options for layout of the Data Source Explorer? Briefly describe each one. 2. How can you generate an Entity-Relationship diagram in Data Studio? 3. Related database objects are grouped together in a _________. 4. Why are connection profiles useful? 5. When creating a new user in Data Studio, which tab in the object editor enables you to specify which objects that person has access to? 6. When connecting to a database, which of these is a mandatory parameter? A. Port number B. Hostname/IP Address C. User name/password D. All of the above E. None of the above 7. Which editor can be used to alter table properties? A. SQL Editor B. Data Object Editor C. Routine Editor D. Database table editor E. All of the above 8. Which of these objects is not associated with a schema? A. Table B. View C. Index D. Table space E. Column Hint: Browse through the database tree and see what is not included under the Schema folder
- 88. 88 Getting Started with IBM Data Studio for DB2 9. While creating a table, when is an index automatically created? A. When you define the primary key B. When you define a NOT NULL constraint for the column C. When the column value is defined as auto-generated D. No index gets created automatically E. All of the above 10. You can create a view using: A. A full select on a table B. By selecting a list of columns from the table C. By joining mutliple tables D. All of the above E. None of the above
- 89. 89 3 Chapter 3 – Maintaining the database In the previous chapter, you learned how to connect to a database and create various objects. During the course of this chapter, you will learn more about data placement, data movement, and backup and recovery, all of which are critical DBA activities. In this chapter you will learn: How to manage storage and memory How to move data within the database How to make a backup of a database and restore from it 3.1 Database maintenance: The big picture Data Studio provides most of the maintenance functionalities of Control Center that DBAs need to do many of their day-to-day tasks, as shown in Figure 3.1. Figure 3.1 – DBAs are responsible for storage and availability
- 90. 90 Getting Started with IBM Data Studio for DB2 In the previous chapter, we covered basic DBA tasks related to creating and managing data structures such as tables. In this chapter, we move into operational tasks that are critical to keeping the database up and running efficiently and to help prevent and recover from failures. These tasks become more and more critical as an application moves to a production environmen, when performance and availability become critical success factors for an application. This chapter will teach you how to perform some of these tasks using Data Studio tooling. Note: For real production systems, you will most likely need more advanced capabilities not included with Data Studio, but available with related products in Chapter 8. 3.2 Managing storage and memory for better performance A DB2 data server can use the file system or raw devices to store data. The data storage in a DB2 data server is defined using table spaces. While you can create tables using a default table space, many DBAs need more control over how data is placed in storage and how to manage the characteristics of that storage and will want to explicitly place tables into specific table spaces, depending on their performance and access requirements. While executing a query, the DB2 system fetches the required data into main memory for processing. The memory areas used to fetch the data from storage are called buffer pools. Again, because the performance requirements of tables and applications can differ, you may wish to have more control over memory usage by different tables. This section will define these storage and memory areas and teach you how you can create and work with them. 3.2.1 Creating table spaces A table space is a logical database object that maps the logical objects like tables, indexes etc to the physical storage memory. It consists of containers, which could be an operating system file, directory, or a raw device. In this section we will concentrate on files and containers. Raw devices, although supported, are not used in a typical database due to advances in disk and file system performance. A DB2 data server can have multiple types of table spaces depending on how the memory is managed and how the containers are defined: A system- managed tablespace (SMS) is managed by the operating system and can have directories as its containers. A database- managed tablespace (DMS) are managed by the database manager and can have files and raw devices as its containers. An automatic storage tablespace is the alternative of SMS and DMS in which DB2 itself manages the containers. You just need to specify the path where the
- 91. Chapter 3– Mantaining the database 91 containers should be created and the maximum size that the DB2 server can use for these containers. A table space can also be categorized based on the type of data it stores–regular, large, or temporary. To create a table space using Data Studio: 1. Select the Table Spaces folder under the database tree, right click on it, select Create and select the type of table space you would like to create, as shown in Figure 3.2 below. Figure 3.2 – Creating a new tablespace 2. A new object editor will open. You can provide the basic information in the General tab. In the Management field, you can select the type of the table space (SMS, DMS or automatic storage). In Figure 3.3, we have selected a regular, SMSmanaged table space. You also need to select the buffer pool you would like to associate with this table space. The drop down will list the available buffer pools.
- 92. 92 Getting Started with IBM Data Studio for DB2 Figure 3.3 – Defining the table space properties 3. In the Containers tab, click on the New icon. In the Type field, the pulldown will present you with options for the table space type you chose, as shown in Figure 3.4. Figure 3.4 – Defining the containers
- 93. Chapter 3– Mantaining the database 93 It is important to note here that you must choose the correct container type based on the table space type you chose. In our example, since we have specified the type as SYSTEM_MANAGED (SMS), we must choose DIRECTORY as the container. If you have specified is as DATABASE_MANAGED (DMS), you will be able to define the container as DEVICE or FILE. If you have specified it as AUTOMATIC_STORAGE, there is no need to define the containers. In this case you need to define the Initial size, Increase size and the Maximum size under the Size tab. Initial size will be allocated at the time of creation and will be increased by increase size whenever more storage memory is required until the time maximum size limit is reached. 4. You can move the tables stored in the other table spaces to this new table space by selecting the table names in the Tables tab as shown in Figure 3.5 below. Figure 3.5 – Moving tables to the table space 5. Now you can create the table space by clicking on Run DDL. Figure 3.6 shows the successful execution of the command.
- 94. 94 Getting Started with IBM Data Studio for DB2 Figure 3.6 – Run DDL command for the new tablespace successfully completed When you run the DDL, you may encounter a problem if you have specified an incorrect option for the type of table space you created. For example, specifying a DIRECTORY container is not a valid value for the DMS table space. A DMS table space can have only device or file container type. If you have specified an option that cannot be ignored, you will receive an error message. The output of any DDL statement can be viewed in the SQL Results view on the bottom right corner in the Data Studio Database Administration perspective. Figure 3.7 shows such an output for a failure case when a DIRECTORY container is specified for a DMS tablespace.
- 95. Chapter 3– Mantaining the database 95 Figure 3.7 – Failure of DDL due to wrong container definition 6. Close the object editor before moving to the next task. 3.2.2 Creating and managing buffer pools A buffer pool is database memory cache used to store data and indexes for faster access. This memory cache is where changes made by the application to a database object are performed before persisting it to the database. For any query execution, data is fetched from the table spaces to this memory for processing before giving back the result to the application. To fetch data from a table space, a buffer pool with the same page size must exist. Normally, once the data is fetched into the buffer pool, it remains in the buffer pool until the buffer pool gets full, in which case old data is wiped out to make space for the new. Performance can be greatly improved if the data required by any query exists in the buffer pool instead of having to be retrieved from the data on disk. By default a buffer pool named IBMDEFAULTBP gets created when you create the database, and your objects will use this default buffer pool unless you assign them to another one that you have previously created.
- 96. 96 Getting Started with IBM Data Studio for DB2 3.2.2.1 Creating a buffer pool To create a buffer pool using Data Studio tooling: 1. Select the Buffer Pools folder, right click on it and select Create -> Buffer Pool. This is shown in Figure 3.8 below. Figure 3.8 – Creating a new buffer pool 2. As shown in Figure 3.9 below, use the General tab to provide the information regarding the buffer pool name, its total size and the page size. If you want to create this buffer pool immediately after the execution of the DDL, the Create type field should be set to IMMEDIATE; otherwise you can defer it for the next database
- 97. Chapter 3– Mantaining the database 97 start by selecting the DEFERRED option. Figure 3.9 – Defining the buffer pool properties 3. Create the buffer pool by clicking the Run DDL link. 4. Close the editor before moving to the next task. 3.2.2.2 Use the new buffer pool Now you have a new buffer pool that you can associate with table spaces that you create. Both the table space and buffer pool must be of the same page size. This association tells the DB2 data server to use this buffer pool to fetch the data from this table space. For existing table spaces, you can alter them to associate them with this new buffer pool. 3.2.2.3 Drop a buffer pool You can drop a buffer pool by selecting the buffer pool under the Buffer Pools folder, right clicking on it and selecting Drop. This is shown in Figure 3.10.
- 98. 98 Getting Started with IBM Data Studio for DB2 Figure 3.10 - Dropping a buffer pool If you have associated any table space with this buffer pool, the above drop will fail. To drop a buffer pool in such cases, you need to alter the corresponding table space to disassociate it from this buffer pool (you can associate it with the default or some other buffer pool) and try dropping it again. 3.2.3 Reorganizing data and gathering statistics Normally, data is written to memory in a sequential manner. However, frequent operations on the database objects can fragment the data, which may mean that data is stored nonsequentially and can increase the size of the table as the data spans multiple data pages. Fragmentation of the data may result in multiple I/O operations to fetch the same data that without fragmentation would have taken only a single I/O operation. Reorganization of the tables and indexes will defragment the data and hence improve the I/O cost and in some instances reduce memory usage. To reorganize data using Data Studio tooling: 1. Select the table in the database tree, right click on it and select Reorg Table. (To reorganize the indexes of the table, select Reorg Index.) Figure 3.11 shows the Reorg option for the table ORDER_DETAILS in GOSALES schema.
- 99. Chapter 3– Mantaining the database 99 Figure 3.11 – Reorganization for the table 2. A new editor will appear which lets you configure the Reorg operation. This is shown in Figure 3.12.
- 100. 100 Getting Started with IBM Data Studio for DB2 Figure 3.12 – Reorganization options Here are the details for these options. Reorganization method You can reorganize the table in two ways. In-place reorganization (called incrementally reorganize the table in place in the Options tab shown in Figure 3.12), allows reorganization to occur while the table/index is fully accessible. If you select this option, you can set the table access control to allow read, or read and write access. Offline reorganization (called Rebuild a shadow copy of the table in the Options tab) means that reorganization occurs in offline mode. You can specify whether to allow read access or not during offline reorganization. While offline reorganization is fast and allows perfect clustering of the data, online reorganization lets the table remain online to applications. If the need to write to the table is critical to the application during this period, then an online reorganization is preferred. During online reorganization, you have more control over the process and can pause and restart it; however online reorganization takes more time to complete. You can reorganize the table using an existing index. This will allow the faster access to the data while reorganizing the table. Offline reorganization can use the temporary table space for storing the copy of the reorganized table. You can choose to use this by checking the option Use system
- 101. Chapter 3– Mantaining the database 101 tempspace to temporarily store a copy of the reorganized table. You can also choose to reorganize long fields and large object data. After choosing appropriate options, you can run the command by clicking Run as shown in Figure 3.13. Figure 3.13 – Reorganization of the table Whenever a query is executed by an application, the DB2 optimizer compiles the query and creates an access plan, which describes the sequence of steps to execute the query and fetch the data it returns. Access plans give estimations on the cost/time for executing a query. The sequence of steps created as part of the access plan depends on a number of factors, such as: Size of the database table, indexes and views Distribution of data in the specific columns of the tables Average length and the cardinality of the column values The number of null and the highest and lowest values of the columns As transactions happen on a database, the data grows or shrinks and often changes its distribution. This means the statistics that the optimizer currently knows about are outdated and no longer reflect reality. If the information stored in the catalogs is not up to date, the steps created as part of the access plan may not be accurate and can generate a less than optimal access plan, which may negatively affect performance.
- 102. 102 Getting Started with IBM Data Studio for DB2 Note: Even though it is possible to automate the update of table statistics, in a production environment it is recommended that DBAs manually update the statistics for the most critical tables in order to provide continuous enhanced performance for workloads using those tables. To update the statistics in the catalog so that DB2 optimizer generates optimized and efficient access plans, you should gather statistics regularly. Statistics can be collected on tables, indexes and statistical views. To gather the statistics using Data Studio tools, find the object in the Data Source Explorer, right click on it, and select Update Statistics. This is shown for the table ORDER_DETAILS under GOSALES schema in Figure 3.14. Figure 3.14 – Updating Statistics on a table 3.3 Moving data With Data Studio tooling, you can move your data from the database tables to the file system (Export) and bring back the data from file system to the tables (Import or Load). This operation lets you transfer the data from one table in one database to another table in the same or different database. This can also be useful when you want to import a large volume of data into a table that includes large objects. This section will teach you how to export data into file system and import the data from file system into a table. 3.3.1 Exporting data To export the data from a table to the file system using Data Studio tooling:
- 103. Chapter 3– Mantaining the database 103 1. Browse through the database tree, select the table you would like to export, right click and select Export Table. This is shown in Figure 3.15. Figure 3.15 – Exporting data 2. A new editor will open which will let you select the file name and the format for the exported data. As shown in Figure 3.16, we choose the delimited format. Figure 3.16 - Specifying the format and the file name for the exported data
- 104. 104 Getting Started with IBM Data Studio for DB2 The three file formats supported are Delimited, Worksheet Format and Integrated Exchange Format. • Delimited (DEL) format is generally used when the data need to be exchanged between different database managers and file managers. It stores the data in a delimited text file where row, column and character strings are delimited by delimiters. • Worksheet Format (WSF) is used when the data need to be exchanged with products like Lotus® 1-2-3® and Symphony™. • Integrated Exchange Format (IXF) is a rich format which stores the data in a binary format. It can also store the structural information about the table (DDL) and hence can be used to create the table during an export. 3. You can also specify whether to export large object (LOB) data into a separate file or files. Similarly, XML data can also be exported to a separate file or files. 4. Under the Source tab, you can specify an SQL statement to select the data which you like to export. As shown in Figure 3.17, a full SELECT will automatically be created by default; however you can edit the generated SQL statement to choose only specific columns. Figure 3.17- Source SQL for export data 5. Once you are done providing all necessary options, click on the Run button to export the data into file system. 6. Close the Editor before moving to the next task. 3.3.2 Importing data You can load/import data into a table. To do that you should have the data in your file system in one of the supported format (DEL, WSF or IXF) as described in the previous section. To import the data into a table using Data Studio:
- 105. Chapter 3– Mantaining the database 105 1. Right click on the table you want to load, and select Import Table, as shown in Figure 3.18. Figure 3.18- Importing data 2. A new editor window will appear which will let you specify the name and the format of the data file to import as show in Figure 3.19.
- 106. 106 Getting Started with IBM Data Studio for DB2 Figure 3.19 – Selecting the data files format and the location 3. You can specify the Import mode as INSERT, INSERT_UPDATE and REPLACE. o In Figure 3.19, we selected INSERT, which means the imported data will be appended to the existing data in the table. o The REPLACE option will overwrite the existing data. o INSERT_UPDATE updates the row if a particular row already exists; otherwise it inserts the new row. 4. You can also specify the different options like commit frequency, skipcount, compound SQL size, maximum number or rows to be inserted etc in the Advanced Options Tab. In our example, we go with the default values for these options. For details on these option see the DB2 documentation for IMPORT command here http://publib.boulder.ibm.com/infocenter/db2luw/v9r7/index.jsp?topic=/com.ibm.db2 .luw.admin.cmd.doc/doc/r0008304.html 5. If you have large objects and XML data to be imported, you can specify from where these data can be retrieved in the Columns tab options. 6. Once you are done providing all the necessary options, you can click on the Run button to import the data into the table. 7. Close the Editor before moving to the next task.
- 107. Chapter 3– Mantaining the database 107 Note: You can also use the Load utility to load the data into the table. Load achieves much the same result as Import, but can be faster for large quantities of data. Load is a multi-step process whereas Imports can do most processing in one step. For more information about the Load utility, see the DB2 documentation. Once you understand the Load process, you can try it using Data Studio tooling. 3.4 Planning for recovery: Configuring DB2 logging The DB2 logging facility logs any update done on the database by SQL statements. These logs help in recovering a database state in case of any system failure. DB2 logging can be categorized as follows: Circular Logging – The changes are logged only for those transactions which are not committed. With this kind of logging, you can recover the data from the latest backup only. This is the default when you create a database. Archive logging - All the changes including the committed one are logged here. With this kind of logging, a rollforward can be done after restoring from a backup. The rollforward process applies all the transaction that occurred since the last backup. You can change the logging type by right clicking the database and selecting Configure Database Logging as shown in Figure 3.20 below.
- 108. 108 Getting Started with IBM Data Studio for DB2 Figure 3.20 – Configuring Database logging A new editor will appear which will let you select the kind of logging you want. If you select archive logging, you need to specify the location of the archive logs and take a backup of the database. Backup is required so that in case of failure, a rollforward is possible after restoring the database. You will find more about restore and rollforward in the next section. Figure 3.21 below show the options for configuring logging.
- 109. Chapter 3– Mantaining the database 109 Figure 3.21 – Configuring Archive logging After providing the details, click on Run button on the top of the page to configure the required logging. 3.5 Backing up and recovering databases You can take the backup of a database and recover it in the same or a different compatible system; however, not all system combinations are supported. Backups allow the database to be recovered in case of crash or database failure. Backups also allow you to move complete databases from one location to another. This section will teach you about these concepts. 3.5.1 Backup You can create a backup of your database using Data Studio tooling. The database can be restored at later point in time using this backup. To create a backup of a database using Data Studio: 1. Select the database you want to back up, right click on it and select Backup, as shown Figure 3.22.
- 110. 110 Getting Started with IBM Data Studio for DB2 Figure 3.22 – Back up database 2. A new editor will open. Under the Image tab, you can provide the media type where you want to take the backup and the location of the backup image. This is shown in Figure 3.23.
- 111. Chapter 3– Mantaining the database 111 Figure 3.23 – Taking a backup on a file system 3. Under the Options tab, you can specify more options for backup. These are explained below: Backup Type –Lets you create full, incremental and delta backups. A full backup of the entire database. An incremental backup contains any data that is new or has changed since the last full backup. A delta backup contains any data that is new or has changed since the last backup of any type: full, incremental or delta. Availability – You can specify if you require the database to be online during the backup process. Online backup is possible only when archive logging is being used. Figure 3.24 shows these options.
- 112. 112 Getting Started with IBM Data Studio for DB2 Figure 3.24 – Backup options 4. Finally you can select Run button to take the backup of the database. 5. Close the editor before moving to the next task. 3.5.2 Restore If something happens to your database, you can restore it from the backup. To restore a database from a backup image using Data Studio: 1. Right click on the database to restore, select Restore as show in Figure 3.25 below.
- 113. Chapter 3– Mantaining the database 113 Figure 3.25 - Restoring a database 2. A new editor will appear as shown in the Figure 3.26. You can select to restore to an existing database, create a new database or just restore the history file. A history file contains the information regarding the backups taken in the past. This file helps the recover command to find the appropriate backups to be used for recovering the database. Note: RESTORE and RECOVER are two different commands. RECOVER, as we will see in a later section, performs a RESTORE followed by a ROLLFORWARD command.
- 114. 114 Getting Started with IBM Data Studio for DB2 Figure 3.26 – Selecting the restore type 3. Under the Available Images tab, you can select if you would like to manually enter the backup image location or want to select from the list DB2 has maintained in a history file. If the system where the backup is taken is the same as that to which you are restoring, and you have not moved the backup files manually, you will be able to see the backup images in the list. However if you have moved the image manually to the other system to restore it, you can select the location manually. Figure 3.27 shows the list of the backup images detected by DB2. You can select one of them to restore.
- 115. Chapter 3– Mantaining the database 115 Figure 3.27 – Selecting the backup image for restore 4. Under the Containers tab, you can specify new container for the table spaces in the database to be restored. It is required when the backup image is getting restored to a different system where the container paths don’t exist. In this case, you must give the new paths. 5. Under the Options tab, you can select if you want to replace the history file. You can also select if you want to restore the log files. Log files contain the data regarding each transaction executed on the database. If the backup image is taken online, these logs can be used to apply the transactions in the database which are executed during the backup operation. This operation is called rollforward. 6. Select Run to restore the database. 7. Close the editor before moving to the next task. For more information about using Data Studio for restoring to a point in time, see the developerWorks article entitled Oops! Restoring your database with Data Studio Administrator, at http://www.ibm.com/developerworks/data/library/techarticle/dm0904datastudiorecovery/. (This article uses the Optim Database Administrator product, but the information is the same for Data Studio.) 3.5.3 Rollforward A rollforward operation applies transactions on the restored database which are recorded in the database logs. This way you can make a database reach to a specific point after restoring it. To rollforward a database to a specific point using Data Studio:
- 116. 116 Getting Started with IBM Data Studio for DB2 1. Right click on the database, and select Roll forward... as shown in Figure 3.28. Figure 3.28 – Rollforward Database 2. A new editor will open. From the Type tab, you can select if you want to apply all the logs or up to a specific point in time. This is shown in Figure 3.29.
- 117. Chapter 3– Mantaining the database 117 Figure 3.29 – Choose the type of rollforward operation 3. Under the Options tab, you can select if you want to rollforward the complete database or just a particular table space. 4. Under the Final State tab, you can select if you want to complete the rollforward operation or want the database to remain in rollforward pending state. If you decide to leave the database in the rollforward pending state, you can complete the rollforward at a later point in time by doing right click on the database and selecting Complete roll-forward. This is shown in Figure 3.30.
- 118. 118 Getting Started with IBM Data Studio for DB2 Figure 3.30 – Complete roll-forward 5. Close the editor before moving to the next task. 3.5.4 Recover The Recover option combines the operations done by restore and rollforward into a single operation. It automatically detects the backup image required to complete the operation and then rolls it forward it to the given point in time. To recover a database using Data Studio tooling, right click on the database and select Recover. A new editor will appear which will allow you to select the point where you would like to recover the database. Figure 3.31 shows this recover options.
- 119. Chapter 3– Mantaining the database 119 Figure 3.31 – Recover options 3.6 Exercises To practice what you have learned in this chapter, try out the following exercises. 1. Create a table space Tb1. Now create a table T1 and make sure its stored in table space Tb1. Now create an index on table T1 and store in the default table space (USERSPACE1). 2. Create a table space Tb2 and check what the privileges available are. Give all the possible privileges to another user. 3. Take an online backup of the GSDB database. Do some updates on some of the tables. Now restore the database back and rollforward it until the end of the logs. 3.7 Summary In this chapter, you were introduced to some DB2 concepts such as table spaces, bufferpools, and logging. Using Data Studio, you learned how to create these objects, perform REORG, RUNSTATS, BACKUP, RESTORE, RECOVER and ROLLFORWARD operations. For more detail about these DB2 concepts, refer to the ebook Getting started with DB2 Express-C.
- 120. 120 Getting Started with IBM Data Studio for DB2 3.8 Review questions 1. What are the three types of table spaces in DB2 data servers? 2. What are the file formats supported for exporting data? 3. Which file format allows you to create the table while exporting? 4. Name the two different logging methods supported in DB2 data serveres. 5. What two operations are combined to compose the Recover operation? 6. A system-managed tablespace can have containers of the following type: A. Directory B. File C. Raw Device D. All of the above E. None of the above 7. A buffer pool is used mainly A. To store the intermediate results of queries B. To fetch data from disk to volatile memory/RAM C. To store updates to the data D. To process the data before returning it to the application E. All of the above 8. An online table reorganization is preferred when A. Access to database tables is critical while reorg is occurring B. Data needs to be clustered perfectly C. More storage space is required D. Index rebuild is required E. All of the above 9. When is statistics collection recommended? A. When the data is fragmented B. After many selects on the data C. After many updates on the data D. All of the above
- 121. Chapter 3– Mantaining the database 121 E. None of the above 10. An incremental backup backs up: A. All the data B. Only the modified data after the last full backup C. Only the modified data after the full or incremental backup D. Only the modified data after any kind of backup E. None of the above
- 123. 123 4 Chapter 4 – Creating SQL and XQuery scripts In this chapter, we will describe some basic data development tasks using Data Studio, including: Creating a Data Development project Creating and running an SQL script 4.1 Data development projects and creating scripts: The big picture n a nutshell, data development is the development, testing, and deployment of database objects and routines. These may include SQL and XQuery scripts, which we focus on in this chapter as shown in Figure 4.1. It can also include stored procedures, user-defined functions and Data Web Services, which are described in subsequent chapters. Figure 4.1 – Data development from a single integrated environment In all cases, the work you do for these routines must reside in a Data Development project.
- 124. 124 Getting Started with IBM Data Studio for DB2 4.1.1 Creating a Data Development project In Chapter 1, we described the several perspectives in Data Studio, including the Data perspective. In this chapter, we will use the Data perspective for our data development tasks. The first step is to create a Data Development project. You use Data Development projects to develop and test database artifacts like PL/SQL packages, SQL queries, stored procedures, user-defined functions, Data Web services, and XML documents. Related artifacts such as Web Services Description Language (WSDL) documents, XML schemas, XML style sheets, and XML mappings are all stored in the project. To create a new Data Development project, make sure you are in the Data perspective. Then select File -> New -> Data Development Project, as shown in Figure 4.2. Figure 4.2 –Creating a new Data Development Project The New Data Development Project wizard as shown in Figure 4.3 will come up, guiding you through the steps necessary to create a Data Development project. In this first page of the wizard, insert the project’s name. Call it DataDevProject, as this is the project name we’ll use throughout this chapter. Figure 4.3 –Specifying the name for the new Data Development project The next page on the wizard, depicted in Figure 4.4, lets you select the database connection that will be associated with the project. You can select an existing connection or
- 125. Chapter 4– Creating SQL and XQuery scripts 125 create a new one by clicking the New… button. In our case, we select the GSDB database connection, which you should have created in Chapter 2. Figure 4.4 –Selecting a database connection After a database connection is selected, you can either click Next or Finish. Clicking Next will allow you to specify some application settings like default schema and default path as shown in Figure 4.5. If you decide to click Finish instead, default values will be used for these settings.
- 126. 126 Getting Started with IBM Data Studio for DB2 Figure 4.5 - Default Application Process Settings Below are the descriptions of the fields shown in Figure 4.5: Default schema: this setting is used to set the database CURRENT SCHEMA register when deploying and running database artifacts like SQL scripts, stored procedures and user-defined functions. The CURRENT SCHEMA register is used to resolve unqualified database object references. Default path: this setting is used to set the database CURRENT PATH register when deploying and running database artifacts. The CURRENT PATH register is used to resolve unqualified function names, procedure names, data type names, global variable names and module object names in dynamically prepared SQL statements. Note: The application process settings available on this wizard depend on the database server you are connecting to. The example show lists the settings available for DB2 servers. The default values for schema and path are generated based on the database server and the connection user ID. Since all of the tables we will be using from the GSDB database are in the GOSALES schema, you should change the application settings to include that schema in the path and use it as the default schema, too.
- 127. Chapter 4– Creating SQL and XQuery scripts 127 You can do this by clicking in the drop down list for default schema and selecting GOSALES as shown in Figure 4.6. Figure 4.6 – Selecting a value for Default schema One useful thing about Data Studio is that it provides user assistance in several different contexts. As you’ve just seen, it lists all the existing schemas in the database so that you can just select one from a drop down list for the default schema. User assistance is only available when you have an established connection to the database, either in live or offline mode. You also need to change the current path to account for the GOSALES schema. Data Studio can help you with this as well by providing completion assist for the current path value, as shown in Figure 4.7 – Figure 4.7 – Completion assistance for current path value To trigger the completion assist, add a comma to the end of the text input field and hit Ctrl+Space on your keyboard. A list of possible values will pop up, including all database schemas and keywords accepted as valid values for the default path. Now that you have specified your project’s application settings, click Finish, and the new project will be created in your workspace, showing up in the Data Project Explorer view, as shown in in Figure 4.8.
- 128. 128 Getting Started with IBM Data Studio for DB2 Figure 4.8 – Data Development project Figure 4.8 also shows that Data Development projects contain subfolders that can be used to create and store database artifacts that you develop. The subfolders of a project depend on the database server product and version used. For example, the PL/SQL Packages subfolder is displayed only for projects associated with a DB2 for Linux, UNIX, and Windows server at version 9.7 or above. 4.2. Creating SQL and XQuery scripts Data Studio provides development of SQL scripts for all database servers it supports. In this section, you will learn how to create an SQL script that selects all the product’s number and name information from the GSDB database, querying the information in the table GOSALES.PRODUCT_NAME_LOOKUP. Since the product names are stored in several languages, we will filter only the product names in the English language, based on the information stored in the column PRODUCT_LANGUAGE. To create a new SQL script, right click on the SQL Scripts folder and select New -> SQL or XQuery Script, as shown in Figure 4.9. Figure 4.9 – Creating a new SQL or XQuery Script Note: Development of XQuery scripts is supported by Data Studio when connecting to a server with XQuery support, such as DB2. Clicking on this option will bring up the New SQL or XQuery Script wizard, as shown in Figure 4.10 – in the next section.
- 129. Chapter 4– Creating SQL and XQuery scripts 129 You can create SQL or XQuery scripts in two different ways: by just opening an empty SQL and XQuery editor that provides content assistance (first radio button option in Figure 4.10 – ); or by using the SQL Query Builder. (The SQL Query Builder does not support XQuery.) The recommended way to develop SQL or XQuery scripts in Data Studio is by using the SQL and XQuery Editor. In this book, we describe both approaches, starting first with the editor and then achieving the same result using the SQL Builder. 4.2.1 Using the SQL and XQuery editor to create SQL scripts To create an SQL script using the editor, select the option SQL and XQuery editor in the first page of the New SQL or XQuery Script wizard, as shown in Figure 4.10: Figure 4.10 – Creating a new SQL script using the SQL or XQuery editor Clicking Finish will quickly bring you to the SQL and XQuery editor for the newly created Script1.sql: Figure 4.11 –SQL and XQuery editor for Script1.sql
- 130. 130 Getting Started with IBM Data Studio for DB2 Figure 4.11 shows you the empty editor. Like many other Data Studio features, the editor provides user assistance to create SQL statements. Similar to the Java editor in Eclipse, the user assistance can be triggered by pressing the key combination Ctrl+Space. To create your SQL statement, start by typing the expression select * from and pressing Ctrl+Space. This sequence of steps will bring up the user assistance for selecting database tables. When referencing fully qualified table names, you can get multiple step user assistance, one for the schema name (labeled 1 in Figure 4.12) and the other for the table name (labeled 2 and 3 in that figure). Figure 4.12 – User assistance in the SQL and XQuery editor After you add the required table to the FROM clause of the SQL statement, the user assistance functionality can also help you find columns from that table. You can use this capability to help you complete the SQL statement, adding the columns PRODUCT_NUMBER and PRODUCT_NAME to the SELECT clause of the SQL statement as illustrated in Figure 4.13, and the PRODUCT_LANGUAGEcolumn to the WHERE clause. Figure 4.13 – User assistance to reference table columns Now you are ready to run your SQL script, which is described in section 4.3.
- 131. Chapter 4– Creating SQL and XQuery scripts 131 Statement terminator: You can develop multiple SQL statements in a single SQL Editor window by ending each statement with a statement terminator character. The default terminator is a semi-colon. But you can change that to another character by right-clicking in the contents of the editor and selecting the context menu action Set Statement Terminator. . 4.2.2 Using the SQL builder to create SQL scripts In this section, you will learn how to develop the same query from the previous section using the SQL builder instead of the SQL and XQuery editor. From your Data Development project, right click and select New ->SQL or XQuery Script and choose the radio button for SQL Query Builder, as shown in Figure 4.14. Figure 4.14 – Choose to build an SQL script using Query Builder When using the SQL Query Builder, you can select from several SQL statement types to be created: SELECT, INSERT, UPDATE, DELETE, FULLSELECT, and WITH, as shown in Figure 4.15.
- 132. 132 Getting Started with IBM Data Studio for DB2 Figure 4.15 – Selecting a statement type Once you have selected the statement type, click Finish. In this example, choose the SELECT statement type. Once you click Finish, you will notice the new file Script1.sql in the SQL Scripts folder of your project. The SQL Builder will also automatically open so that you can construct your statements, as shown in Figure 4.16 – . Figure 4.16 – Script1.sql open in the SQL Builder The SQL Builder provides an easy-to-use GUI to create SQL statements. You can specify which tables will be included in the statement and, from those tables, select the columns to be returned or used for filtering. Start by following the instructions in the editor to add a table: 1. Right-click in the middle pane and use the pop-up menu option Add table… to select a table from the database. Choose PRODUCT_NAME_LOOKUP, which then adds this table automatically to your script.
- 133. Chapter 4– Creating SQL and XQuery scripts 133 2. Then select the table columns you want to include in your SQL SELECT statement. You can choose them by selecting them directly from the pane that appears when you selected the table. Select the columns PRODUCT_NUMBER and PRODUCT_NAME, as shown in Figure 4.17, below. 3. In the Conditions tab, add the language filter by selecting the column PRODUCT_LANGUAGE, the operator =, and typing in the value ‘EN’ for the value, as shown in Figure 4.17. When you move your mouse from this input table, this WHERE clause is added to the script. Figure 4.17 – Using the SQL Builder to create a SQL statement The SQL builder is useful when you need to create join queries, because it lets you add several tables, select multiple columns from different tables and specify conditions, grouping and sort order. 4.3 Running an SQL script A common task when developing an SQL script is to run it to verify it returns the expected results. In Data Studio, you can run SQL Scripts by selecting the option Run SQL, available from several launch points, also shown in Figure 4.18: Right click in the editor that shows your script
- 134. 134 Getting Started with IBM Data Studio for DB2 Right click your script object in the Data Project Explorer Open the Run menu Figure 4.18 – Launch points for running an SQL Script When running SQL scripts in Data Studio, you can see the output of those scripts in the SQL Results view. Figure 4.19 – Viewing query result sets in the SQL Results view Figure 4.19 – displays the result of running the SQL query that we created using the SQL Builder. If your SQL script contains multiple SQL statements, each one of those statements will have its own entry in the SQL Results view. Expand the status and select the statement you want to see the results for, as shown in Figure 4.20.
- 135. Chapter 4– Creating SQL and XQuery scripts 135 Figure 4.20- Results of multiple SQL statements in a single script 4.4 Summary In this chapter we described some basic tasks that developers will use frequently, including creating a Data Development project, building queries, and creating SQL and XQuery scripts. With this fundamental background, you are now prepared to do more advanced tasks, such as creating stored procedures, user-defined routines, and Data Web Services, described in subsequent chapters. 4.5 Review questions 1. What is the difference between the Data Project Explorer view and the Data Source Explorer views? 2. List and describe the DB2 application process settings that you can configure when creating a Data Development project. 3. Describe some of the different launch points Data Studio provides you to run SQL scripts. 4. What are the major features that differentiate the SQL builder and SQL editor components? 5. What type of XML artifacts can you have in a Data Development Project? 6. The Data Project Explorer is part of which Data Studio perspective? A. Database Development perspective B. Data perspective C. Database Debug perspective D. Resource E. None of the above. 7. Which objects can be created in a Data Development perspective?
- 136. 136 Getting Started with IBM Data Studio for DB2 A. SQL scripts, SQL stored procedures, COBOL stored procedures, Web services B. SQL scripts, SQL stored procedures, Java stored procedures, COBOL stored procedures C. SQL scripts, SQL stored procedures, Java stored procedures, Data Web Services D. SQL stored procedures, Java stored procedures, COBOL stored procedures, Data Web Services E. All of the above 8. Which tool or tools can be used to create SQL scripts? A. SQL Editor B. SQL and XQuery Editor, SQL Query Builder C. Database Object Editor, SQL Query Builder D. Routine Editor, SQL and XQuery Editor E. None of the above 9. Which of the following represents all types of SQL statements that can be created using the SQL Query Builder? A. SELECT, INSERT, UPDATE, DELETE B. SELECT, INSERT, UPDATE, JOIN, FULLSELECT, WITH C. SELECT, INSERT, UPDATE, DELETE, FULLSELECT, WITH D. SELECT, INSERT, UPDATE, DELETE, JOIN, FULLSELECT, WITH E. None of the above. 10. In which Data Studio view can you see the results of executing your SQL statements? A. Data Source Explorer B. Project Explorer C. SQL Outline D. SQL Results E. None of the above
- 137. 137 5 Chapter 5 – Developing SQL stored procedures Stored procedures provide an efficient way to execute business logic by reducing the overhead of SQL statements and result sets that are passed back and forth through the network. Among the different languages that DB2 supports to write stored procedures, SQL is the language of preference because of its efficiency and simplicity. Moreover, SQL stored procedures are simpler to develop and manage because they have fewer pieces such as JARs or modules. Many people use Data Studio for stored procedure development and debugging. In this chapter you will learn: Why stored procedures are so popular and useful An overview of the steps to develop and debug a stored procedure How to create, test and deploy a sample SQL stored procedure using Data Studio tooling How to edit and debug that sample SQL stored procedure using Data Studio tooling Note: DB2 for Linux, UNIX and Windows supports stored procedures written in SQL (SQL PL), PL/SQL, Java, C/C++, Cobol, and CLR; however, from Data Studio tooling you can only develop stored procedures using SQL, PL/SQL and Java. In this chapter, we focus on writing SQL procedures. More information can be found at: http://publib.boulder.ibm.com/infocenter/db2luw/v9r7/topic/com.ibm.db2.luw.apdv.sqlpl.do c/doc/c0024289.html
- 138. 138 Getting Started with IBM Data Studio for DB2 5.1 Stored procedures: The big picture Stored procedures can help improve application performance and reduce database access traffic. All database access must go across the network, which, in some cases, can result in poor performance. Figure 5.1 illustrates the stored procedure data flow. Figure 5.1 Stored procedure data flow As shown in the figure, for each SQL statement, an application must initiate a separate communication with the DB2 server. So SQL #1, SQL #2, and SQL #3 all require communication traffic. To improve application performance, you can create stored procedures that run on your database server. A client application can then simply call the stored procedures (MYPROC shown in the figure) to obtain results of all the SQL statements that are contained in the procedure. Because the stored procedure runs the SQL statements on the server for you, overall performance is improved. In addition, stored procedures can help to centralize business logic. If you make changes to a stored procedure, the changes are immediately available to all client applications. Stored procedures are also very useful when deleting or updating large numbers of rows. You can specify a cursor in a stored procedure, and then loop through the result and delete or update rows. This reduces locking activity and is useful in an OLTP environment. 5.2 Steps to create a stored procedure As discussed in Chapter 4, you must create a data development project to store routines. Each data development project is associated with a single database connection. In this chapter, we’ll be connecting to the GSDB sample database that has been used in previous chapters. See Chapter 1 for information about downloading and creating the sample and Chapter 2 for information about creating a connection to that database.
- 139. Chapter 5– Developing SQL stored procedures 139 Data Studio provides helpful wizards, editors and views to productively create, deploy, run, view output, edit and debug stored procedures. The overview of the steps to develop a stored procedure in Data Studio is shown in Figure 5.2. Figure 5.2- Steps to develop a SQL procedure 1. The first step is to create the stored procedure. The Data Studio Stored Procedure wizard steps you through the creation of the CREATE PROCEDURE statement, including input and output variables and SQL statements. Data Studio saves the stored procedure’s source code in your project workspace. The stored procedure appears in the Data Project Explorer view in the Stored Procedures folder under the project in which you created it. 2. Next, you deploy the SQL procedure. When you deploy a SQL procedure, Data Studio submits the CREATE PROCEDURE statement to the DB2 server, which compiles it. If it is successfully deployed, the SQL procedure can be found in the database when you drill down from the Data Source Explorer. 3. Next, run the stored procedure for testing purposes.
- 140. 140 Getting Started with IBM Data Studio for DB2 4. View the output or results from your test run. When you run the SQL procedure, you can determine whether the run is successful and whether its result sets are what you expect. You can also test the logic of the routine and the accuracy of output arguments and result sets. When you run a stored procedure from Data Studio, the results of the stored procedure are displayed in the SQL Results view. 5. At this point, you could optionally use the editor to make changes to the stored procedure depending on your business need. The routine editor is a tool to view and edit the source code. 6. Finally, the last step is to optionally debug the stored procedure, which requires that you actually deploy the stored procedure for debugging. In other words, there is an option on deployment that you must specify to enable the integrated debugger. By stepping through your code while you are running in debug mode and viewing the results, you can discover problems with your stored procedure and make the necessary changes. 5.3 Developing a stored procedure: An example The following example walks you through the steps to create, test, deploy, debug and edit a DB2 SQL procedure in Data Studio. In this example we will create the stored procedure illustrated in Listing 5.1. This stored procedure will accept one input parameter and return one output parameter with the objective of testing a conditional IF statement. CREATE PROCEDURE SP1 (IN p_in INT, OUT p_out INT) -- DECLARE an input and output parameter P1: BEGIN -- Code an IF statement IF p_in = 1 THEN SET p_out = 2; ELSEIF p_in = 2 THEN SET p_out = 3; ELSE SET p_out = 4; END IF; END P1 Listing 5.1 - The stored procedure that will be developed in Data Studio 5.3.1 Create a data development project In this example, we use the same workspace and database used in previous chapters.
- 141. Chapter 5– Developing SQL stored procedures 141 1. Start Data Studio and open the GettingStarted workspace. In the Data Source Explorer, connect to the GSDB database then expand Database Connections -> GSDB -> GSDB -> Schemas -> GOSALESCT to view the schema you will use in this chapter. 2. The Data Project Explorer holds data development projects that contain data routines like stored procedures, user-defined functions, web services, XML files and SQL scripts. In the Data Project Explorer view, right-click the white space within the view. Select New -> Data Development Project as shown in Figure 5.3 below. Figure 5.3 – Create a data development project In the Data Development Project window in the Project name text box, type StoredProcedureLab, and then click Next as shown in Figure 5.4. Figure 5.4 – Specify a project name 3. In the Select Connection window, select the GSDB connection. Click Next as shown in Figure 5.5.
- 142. 142 Getting Started with IBM Data Studio for DB2 Figure 5.5 – Select a connection to GSDB 4. In the Default Application Process Settings window, select the GOSALESCT default schema. Click Finish. This is illustrated in Figure 5.6. Note: If you don’t change the schema here, the default will be a schema under the name you logged in as, such as DB2ADMIN.
- 143. Chapter 5– Developing SQL stored procedures 143 Figure 5.6 – Specify a schema for the stored procedure 5. In the Data Project Explorer view, expand the StoredProcedureLab project’s hierarchy tree to view its folders as shown in Figure 5.7. Figure 5.7 – View project resources Now you can move on to the next section to create the stored procedure. 5.3.2 Create a stored procedure Data Studio includes wizards to step you through various tasks. You will create a new stored procedure in the stored procedure wizard. 1. In the Data Project Explorer, right-click the Stored Procedures folder. Select New --> Stored Procedure as shown in Figure 5.8.
- 144. 144 Getting Started with IBM Data Studio for DB2 Figure 5.8 – Create a new stored procedure 2. Data Studio supports creating stored procedures in three languages on DB2 9.7 for Linux, UNIX, and Windows: Java, SQL and PL/SQL. In this example, you will create a SQL stored procedure. As shown in Figure 5.9, in the Name and Language window, type SP1 as the stored procedure name and select SQL as the language. Then click Next. Figure 5.9 – Specify the procedure’s project, name, and language 3. In the SQL Statements window, you can create a new SQL statement, import an SQL statement or start the Create SQL wizard which steps you through the creation of an SQL statement. The SP1 procedure will be based on the default SELECT statement in the Statement details text box shown in Figure 5.10. We’ll use that default statement for this exercise. Click Finish.
- 145. Chapter 5– Developing SQL stored procedures 145 Figure 5.10 – Create an SQL statement 4. The stored procedure resource is now added to the Stored Procedures folder in the Data Project Explorer. Find the new procedure called SP1. Find the new routine editor view called SP1. Your views should resemble Figure 5.11.
- 146. 146 Getting Started with IBM Data Studio for DB2 Figure 5.11 – View the stored procedure folder and the routine editor Move on to the next section to deploy the stored procedure. 5.3.3 Deploy a stored procedure At this point in the stored procedure development process, the stored procedure source code exists as a file in your workspace. Before you can run your stored procedure against your database, you must deploy it which means compiling the source code on the DB2 server. 1. In the Data Project Explorer from the Stored Procedures folder, right-click SP1. Select Deploy as shown in Figure 5.12. Figure 5.12 –Deploy a stored procedure 2. In the Deploy Routines window, make sure the target schema is correct and take the rest of the defaults. Select Finish as illustrated in Figure 5.13.
- 147. Chapter 5– Developing SQL stored procedures 147 Figure 5.13 – Specify deployment options 3. Data Studio provides several views which provide quick access to informational output. Look at the entry for your Deploy GOSALESCT.SP1 operation in the SQL Results view. Wait until the operation completes, then verify that the deploy operation shows “Succeeded” as shown in Figure 5.14.
- 148. 148 Getting Started with IBM Data Studio for DB2 Figure 5.14 – View the deploy status 4. When you deploy a stored procedure in the Data Project Explorer, a stored procedure object will be created in the specified database folder in the Data Source Explorer. In the Data Source Explorer, expand Database Connections -> GSDB -> Schemas -> GOSALESCT -> Stored Procedures to verify the SP1 procedure exists as an object in the GSDB database as shown in Figure 5.15. Figure 5.15 – The stored procedure now appears in the Data Source Explorer. Move on to the next section to run the stored procedure. 5.3.4 Run the stored procedure After you deploy the stored procedure to the database, you can run your stored procedure. From the Data Project Explorer, navigate to the Stored Procedures folder, and right-click SP1, as shown in Figure 5.16. Select Run.
- 149. Chapter 5– Developing SQL stored procedures 149 Figure 5.16 –Run a stored procedure Now move on to the next step to view the output. 5.3.5 View the output View the status of running your stored procedure in the SQL Results view. Verify the Status column has the value Succeeded, and the Operation column has Run GOSALESCT.SP1. The result set for SP1 is shown in the Result1 tab as illustrated in Figure 5.17. Figure 5.17 – View results of your test run Move on to the next section, which describes how to edit an existing stored procedure. 5.3.6 Edit the procedure In Data Studio a SQL stored procedure opens in the Routine Editor, which includes the SQL Editor in its Source tab. You will edit your existing stored procedure to include parameters and a conditional IF statement. 1. In the SP1 editor, delete the SELECT statement. Then add an input parameter, an output parameter and an IF statement as shown in Figure 5.18.
- 150. 150 Getting Started with IBM Data Studio for DB2 Figure 5.18 – Edit a stored procedure 2. In the Data perspective tool bar, click on the File Save button ( ). Move on to the next step to deploy the modified stored procedure for debugging. 5.3.7 Deploy the stored procedure for debugging Data Studio includes an integrated stored procedure debugger which steps you through your stored procedure code to resolve problems. Before you can debug a stored procedure, you must deploy it for debugging. Follow these steps: 1. In the Data Project Explorer, navigate to the Stored Procedures folder, right-click SP1 as shown in Figure 5.19. Select Deploy.
- 151. Chapter 5– Developing SQL stored procedures 151 Figure 5.19 – Deploy a SQL stored procedure 2. In the Deploy Options window, take all the defaults and select Next as shown in Figure 5.20. 1 Figure 5.20 – Choose deployment options in preparation for debugging 3. The Routine Options page lets you enable debugging. To enable debugging, check Enable debugging as shown in Figure 5.21, and select Finish.
- 152. 152 Getting Started with IBM Data Studio for DB2 Figure 5.21 – Enable debugging Move on to the next step to run the stored procedure in debugging mode. 5.3.8 Run the stored procedure in debug mode To start the debugger, you must select the Debug action on the stored procedure. 1. In the Data Project Explorer, navigate to the Stored Procedures folder, right-click SP1. Select Debug… as shown in Figure 5.22. Note: If you have not deployed for debug as described in the previous section, the Debug option on the menu will be grayed out. Go back and deploy the stored procedure with the Enable debugging option checked.
- 153. Chapter 5– Developing SQL stored procedures 153 Figure 5.22 – Debug a stored procedure 2. After successfully deploying for debugging, when you run SP1, a window appears that lets you specify the initial values of input parameters. In the Specify Parameter Values window, enter the value 1 in the parameters text box for P_IN as shown in Figure 5.23. Select OK. Figure 5.23 – Specify parameter values for the procedure 3. In the Confirm Perspective Switch window, select Yes as shown in Figure 5.24 to switch from the Data perspective to the Debug perspective.
- 154. 154 Getting Started with IBM Data Studio for DB2 Figure 5.24 – Confirm perspective switch 4. Set breakpoints. In the Debug perspective there is a Debug task bar, as shown in Figure 5.25. Figure 5.25 – Debug task bar The yellow arrow icons on the Debug task bar provide the Step Into, Step Over and Step Out features in the Debug perspective: The Step Into arrow, similar feature. , positions you inside a condition, loop, or other The Step Over arrow, feature. , positions you after a condition, loop, or other similar The Step Return arrow, similar feature. , positions you outside of a condition, loop, or other In the Debug perspective in the SP1 editor view, double-click in the left vertical margin on the IF, ELSEIF, ELSE and END IF statement code lines to set breakpoints as shown by the circles in the left margin of the screenshot of Figure 5.26.
- 155. Chapter 5– Developing SQL stored procedures 155 Figure 5.26 – Set breakpoints in left margin of the editor 5. Change a variable value. The Variables view in the Debug perspective lets you change the value of your input parameter. In the Variables view for the parameter p_in, left-click the value 1. Enter the value 2 as shown in Figure 5.27. Figure 5.27 –Change input parameter 6. Resume the debugger. In the Debug perspective on the Debug task bar, select the Resume button, , three times until you reach the ELSE statement in the SP1 stored procedure as shown in Figure 5.28. If you set a breakpoint, the resume will progress to the next breakpoint. In the Debug editor, the highlighted line and the blue arrow in the left margin indicate the current line of code being debugged.
- 156. 156 Getting Started with IBM Data Studio for DB2 Figure 5.28 – An arrow highlights the current code line of code being debugged 7. Step Into the code. In the Debug Perspective, select the Step Into icon, , which, as you recall, will step you into a condition or loop. In the SP1 editor view the current line will be the SET statement in the ELSE condition as shown in Figure 5.29. Figure 5.29 – Set current line inside logic 8. Resume the debugger.
- 157. Chapter 5– Developing SQL stored procedures 157 In the Debug perspective on the task bar, select the green Resume icon, finish running the stored procedure. , to 9. View the results. The debug perspective provides the same SQL Results view as in the Data perspective for you to see the status and results of running the stored procedure. You will view your stored procedure input and output parameter values. In the Debug perspective in the Data Output view, select the Parameters tab in the SQL Results view as shown in Figure 5.30. The value of p_in is 1. The value of p_out is 3. Figure 5.30 – View the debug results Congratulations! You’ve learned how to create, deploy, run, edit, and debug a stored procedure. Now you can try it on your own. 5.4 Exercises Now that you have gone through the process of creating, deploying, testing, debugging and running a stored procedure, it is time for you to test this yourself by creating the following procedure. Note the procedure has one intentional bug for you to discover. The output of the procedure should be 2, 3 or 4. CREATE PROCEDURE SP1 (IN p_in INT, OUT p_out INT) P1: BEGIN IF p_in = 1 THEN SET p_in = 2; ELSEIF p_in = 2 THEN SET p_out = 3; ELSE SET p_out 4; END IF; END P1 5.5 Summary In this chapter you learned the value of using SQL stored procedures to improve performance of SQL access by being able to process a set of SQL on the database server rather than sending each request over the wire separately. In addition, by encapsulating
- 158. 158 Getting Started with IBM Data Studio for DB2 the database logic, those stored procedures can be called and used by multiple applications. You also learned about the typical process for developing, deploying, and debugging stored procedures. Using a default stored procedure, you learned that stored procedures are stored in the Stored Procedures folder of a Data Development project, and you also learned how to edit an existing stored procedure using the Routine editor. Before a stored procedure can be run against the database, it must be deployed, which means the source code is compiled on a connected DB2 server. After being deployed to the target schema, the stored procedure will appear in the Data Source Explorer for that database connection. To debug a stored procedure, you must first deploy it for debug, which will activate the debugger. A key fact to remember is that the integrated debugger is only activated when a stored procedure is specifically deployed for debug. Using the Debug perspective, you learned how to set breakpoints and how to resume running a stored procedure after reaching a breakpoint. You also learned how to change the value of a variable using the Variables view of the Debug perspective. 5.6 Review questions 1. What is one likely reason that the Debug option would be inactivated (grayed out when you right click on the stored procedure in the Data Development project)? 2. If you don’t specify a target schema, into which schema will new stored procedures be deployed? 3. Which Data perspective view contains the status of the operation you performed? 4. Which Debug perspective view allows you to change a variable value? 5. Which Debug perspective view lists your breakpoints by line number? 6. Which procedure languages does Data Studio 2.2 support when you connect to DB2 LUW 9.7? A. Java, Cobol and PL/SQL B. Java, SQL and PL/SQL C. Java, C++ and SQL D. Cobol, SQL and PL/SQL E. None of the above 7. Deploying a stored procedure in Data Studio means which one of the following: A. Source code exists as a file on the DB2 server B. Source code exists as a file in your workspace
- 159. Chapter 5– Developing SQL stored procedures 159 C. Compiling the source code in your workspace D. Compiling the source code on the DB2 server E. All of the above 8. Which is the correct order to develop a stored procedure in Data Studio? A. Create a procedure, view the output or results, deploy a procedure, run a procedure, debug a procedure B. Create a procedure, debug a procedure, deploy a procedure, run a procedure, view the output or results, C. Create a procedure, deploy a procedure, run a procedure, view the output or results, debug a procedure D. Create a procedure, deploy a procedure, view the output or results, run a procedure, debug a procedure E. None of the above 9. View the status of running your stored procedure in which view in the Data perspective? A. SQL Results B. Data Source Explorer C. Data Project Explorer D. SQL Editor E. None of the above 10. Which of the following icons enables you to resume running the stored procedure after a breakpoint? A. B. C. D. E. None of the above.
- 160. 160 Getting Started with IBM Data Studio for DB2
- 161. 161 6 Chapter 6 – Developing Data Web Services Data Web Services significantly eases the development, deployment, and management of Web services-based access to DB2 servers and Informix Dynamic Server database servers. Data Web Service provides a tooling and runtime framework that makes it easy to create Web services based on database operations, like SQL statements and stored procedure calls, using a simple drag and drop action. All Web service artifacts are generated by Data Studio tooling. The generated Web services can be directly deployed to an application server and tested with the built-in Web Services Explorer. In this chapter, after an overview of Data Web Services capabilities, you will learn a basic scenario for end-to-end development of a Data Web Service including: How to configure WebSphere Application Server Community Edition (WAS CE) so you can deploy and test the Data Web Service you will create. You will need to have WAS CE installed before you can deploy the Data Web Service. You can download it from here: http://www.ibm.com/developerworks/downloads/ws/wasce/. You do not need to download anything other than the server itself. How to create a new Data Web Service in a Data Development project using existing SQL stored procedures and SQL scripts to provide the business logic. How to deploy the Web service to WAS CE How to use the Web Services Explorer to test the Data Web Service. Appendix E contains information that can help you with different situations, such as options for consuming Web services using different clients, customizing the messages, and much more. 6.1 Data Web Services: The big picture Web services, in general, are standards that allow applications to share information through services on the Web. There are a multitude of materials on the Web about Web services, and you can also refer to the ebook entitled Getting Started with Web 2.0 for more information. In summary, however, Web services are designed to allow for communication between machines in a loosely coupled fashion. This can be accomplished
- 162. 162 Getting Started with IBM Data Studio for DB2 by use of a Web Services Description Language (WSDL) XML document that provides the description required by the invoker to call the service (where is the service, what binding to use, etc) and to understand the messages (in XML) returned by the service. Data Web Services, in particular, refer to the ability to wrap Web services around the logic provide by the database. For example, you might already have a SQL script or stored procedure that provides business logic for returning the current price of a particular item in inventory from the database. Using Data Web Services, you are simply making it much easier for a Web application (or other client) to invoke that capability, perhaps even as simple as putting the HTTP request in a Web browser. This approach to creating a Web service based on existing database operations/business logic is called “bottoms up” as opposed to a to ”top down” approach in which the Web services description is defined first and then logic is provided to map to that particular description. Data Studio (and Optim Development Studio) supports the development and deployment of Data Web Services without you having to write a single line of code. Figure 6.1 provides an overview of data Web services using Data Studio. Figure 6.1 - Developing data Web services with Data Studio On the left side of Figure 6.1, you can see different database operations. For example, there is a query to return all information about an employee when an employee number is provided. There is an update statement to update the first name of an employee based on an employee number; there is a stored procedure that does some bonus calculations, and
- 163. Chapter 6 – Developing Data Web Services 163 there is an XQuery that is retrieving information from an XML document. Using Data Studio, these operations can be converted to data Web services without any coding on your part. A few clicks are all you need to have the Data Web Service created for you. On the right side of the figure, you can see that Data Studio automatically creates the artifacts needed to deploy this Web service, including the WSDL document, and the JAVA EE runtime artifacts such as a configuration file and the runtime package. 6.1.1 Web services development cycle Just like developing a JAVA EE application, the Data Web Service development cycle consists of the following steps, as shown in Figure 6.2: 1. Create the service 2. Deploy the service to a JAVA EE application server 3. Test the service. Figure 6.2 - Development and deployment of a data Web service As shown in the figure, after you drag and drop an operation to create a Web service, Data Studio generates the corresponding Web service definitions that make a Data Web Service. The service runtime artifacts are packaged as a Java EE Web application. The Java EE application is ready to be deployed into a Java EE application server. You can apply additional settings for security, monitoring, logging and so on during the deployment phase. 6.1.2 Summary of Data Web Services capabilities in Data Studio Here is a summary of Data Web services features provided by Data Studio: Using Data Web Services, you can take Data Manipulation Language (DML) statements, such as select, insert, update, delete, and XQuery, and stored
- 164. 164 Getting Started with IBM Data Studio for DB2 procedures, and generate Web service operations by dragging and dropping those operations into a Web services. Data Web Services provide a full Web-service interface, which includes support for SOAP and HTTP(RPC)/REST-styled bindings. Web service artifacts like the WSDL and the runtime application are created automatically. There is no manual coding necessary. Data Web Services supports an integrated test environment that lets you deploy and test the generated services with a few clicks of the mouse. Data Web Services can apply server-side Extensible Style-sheet Language Transformation (XSLT) to generate different formats like HTML. Note: In the Web services world data is represented as XML. IBM Data Studio generates a default XML schema describing the input and output messages for each operation. You can manipulate the XML message format by assigning an XSL script, perhaps if your messages need to follow a particular industry standard format or if you want to generate an HTML document from the contents of the message. Appendix E shows you how to use XSL to transform the output of a Web service operation into an HTML document. Data Web Services support these runtime environments: WebSphere Application Server (version 6.0.2 fix pack 9 and above), WebSphere Application Server Community Edition 2.1 and above, as well as Tomcat 5.5 and above. 6.2 Configure a WAS CE instance in Data Studio Data Studio supports the direct deployment of a Web service to WebSphere Application Server Community Edition (WAS CE). The following steps show the setup required to hook up Data Studio with a WAS CE instance. This procedure assumes that you have already installed WAS CE on your system. See the ebook Getting Started with WAS CE or the WebSphere Community Edition documentation for more information about installing WAS CE. 1. Make sure you are in the Data perspective of Data Studio and then open the Server view by selecting Window -> Show View -> Other…
- 165. Chapter 6 – Developing Data Web Services 165 Expand Server and select Servers as shown in Figure 6.3. Figure 6.3 – Selecting the Server view in the Show View dialog This opens a new tab called Servers in your workspace window. 2. Right-click inside the Servers tab and select New -> Server as shown Figure 6.4. Figure 6.4 – Creating a new server This will bring up the New Server dialog. 3. Accept all preset selections, as shown in Figure 6.5. The server’s host name is set to localhost because WAS CE has been installed on your machine where Data
- 166. 166 Getting Started with IBM Data Studio for DB2 Studio is also installed. Select Next. Figure 6.5 – The New Server dialog 4. If you have not yet configured a WAS CE Runtime, you need to configure it in the next window – as shown in Figure 6.6. You are asked to provide a Java Runtime Environment (JRE™) and the absolute path to the WebSphere Application Server Community Edition installation. We select the default workbench JRE, which comes with Data Studio. You will receive a warning message because this version is a 1.6 JVM™ and WAS CE V2.1 is only certified for the 1.5 JVM, but you can ignore the warning since you will use WAS CE only for testing purposes and it
- 167. Chapter 6 – Developing Data Web Services works fine with the 1.6 JVM. Figure 6.6 – Configuring the Server runtime The next window is already populated for you as shown in Figure 6.7. 167
- 168. 168 Getting Started with IBM Data Studio for DB2 Figure 6.7 – Configuring the server connectivity information The Administrator ID and Administrator Password are the credentials of the WAS CE admin user. By default, the Administrator ID is “system” and the password is “manager”. You might need the Administrator ID and Administrator Password at a later time when you try to log on to the Administration console from within or outside of Data Studio. The Web Connector defines the TC/IP port for the HTTP protocol, which, by default, is 8080.
- 169. Chapter 6 – Developing Data Web Services 169 The Remote Method Invocation (RMI) Naming defines the port that is used by Data Studio to perform administrative tasks at the application server. By default, this port is 1099. Both port values need to match according to the definitions in the WAS CE configuration. 5. Click Finish. You have successfully added the WebSphere Application Server Community Edition instance to your Data Studio, and the server definition also appears in the lower right corner of your Data Studio window as shown Figure 6.8. Figure 6.8 – The new server instance in the servers view 6.3 Create a Data Development project After all the preparation is done you can start creating your first Web service. All you need is an active connection to your DB2 instance and a Data Development project based on that connection. Using the instructions shown in Chapter 2, connect to the GSDB sample database and create a new Data Development project called WebServices. We will be using tables and stored procedures from the GSDB database to create a new Data Web Service. Figure 6.9 shows the new Data Development project and the connection to the GSDB sample database.
- 170. 170 Getting Started with IBM Data Studio for DB2 Figure 6.9 – The WebServices Data Development Project 6.4 Define SQL statements and stored procedures for Web service operations Now it’s time for you to decide what database data and logic should be exposed as Web service operations. Typically a Web service represents a set of operations with business logic which are grouped together because they are related – mainly from a business level perspective, but also for other reasons like security requirements, data structures, quality of service, and so on. In the database world, stored procedures are the prime candidates to become Web service operations since they can contain a significant amount of business logic. However, an SQL statement can also be seen as a set of business logic – for example a SELECT statement that retrieves customer information. The SQL statements and stored procedures used for this example are relatively simple. 6.4.1 Stored procedures used in the Web service Although you usually create Web services using existing database operations, we need to create a couple of stored procedures here so we can show you how to use them in Data
- 171. Chapter 6 – Developing Data Web Services 171 Web Services. If you want to follow along with the steps in the chapter, you will need to create the following procedures as well: • GET_CUSTOMER_NAME, has input and output parameters • PRODUCT_CATALOG returns a result set. The logic is kept simple since we focus on how to add a stored procedure to a Web service rather than the stored procedure programming itself. We use SQL stored procedures here, but you can add procedures written in any language to a Web Service. GET_CUSTOMER_NAME This procedure returns customer information for a given customer ID. It is created under the GOSALESCT schema. It has only input and output parameters. Using the information you learned in Chapter 5, create the following procedure (you can cut and paste the text below into the SQL procedure editor). Be sure to deploy it into the GOSALESCT schema. CREATE PROCEDURE GOSALESCT.GET_CUSTOMER_NAME( IN CUSTOMERID INTEGER, OUT FIRST_NAME VARCHAR(128), OUT LAST_NAME VARCHAR(128), OUT PHONE_NUMBER VARCHAR(128)) SPECIFIC GOSALESCT.GET_CUSTOMER_NAME BEGIN SELECT CUST_FIRST_NAME INTO FIRST_NAME FROM GOSALESCT.CUST_CUSTOMER WHERE CUST_CODE = CUSTOMERID; SELECT CUST_LAST_NAME INTO LAST_NAME FROM GOSALESCT.CUST_CUSTOMER WHERE CUST_CODE = CUSTOMERID; SELECT CUST_PHONE_NUMBER INTO PHONE_NUMBER FROM GOSALESCT.CUST_CUSTOMER WHERE CUST_CODE = CUSTOMERID; END CUST_CODE = CUSTOMERID; END Listing 6.1 – GET_CUSTOMER_NAME procedure PRODUCT_CATALOG This procedure is defined under the GOSALES schema. It returns a result set containing all products from the catalog for a given product type. Using the information you learned in Chapter 5, create the following procedure (you can cut and paste the text below into the SQL procedure editor). Be sure to deploy it into the GOSALES schema.
- 172. 172 Getting Started with IBM Data Studio for DB2 CREATE PROCEDURE GOSALES.PRODUCT_CATALOG (IN PRODUCT_TYPE VARCHAR(50)) DYNAMIC RESULT SETS 1 SPECIFIC GOSALES.PRODUCT_CATALOG ------------------------------------------------------------------------- SQL Stored Procedure -----------------------------------------------------------------------P1: BEGIN -- Declare cursor DECLARE CURSOR1 CURSOR WITH RETURN FOR SELECT P.PRODUCT_NUMBER, Q.PRODUCT_NAME, Q.PRODUCT_DESCRIPTION, P.PRODUCTION_COST, P.PRODUCT_IMAGE FROM GOSALES.PRODUCT AS P, GOSALES.PRODUCT_NAME_LOOKUP AS Q, GOSALES.PRODUCT_TYPE AS R WHERE P.PRODUCT_NUMBER = Q.PRODUCT_NUMBER AND Q.PRODUCT_LANGUAGE = 'EN' AND R.PRODUCT_TYPE_CODE = P.PRODUCT_TYPE_CODE AND R.PRODUCT_TYPE_EN = PRODUCT_TYPE; -- Cursor left open for client application OPEN CURSOR1; END P1 Listing 6.2 – PRODUCT_CATALOG procedure 6.4.2 SQL statements used in the Web service We use two SQL statements for our Web service: • GetBestSellingProductsByMonth • RankEmployee. GetBestSellingProductsByMonth The SQL statement shown in Listing 6.3 returns the top 50 products by shipping numbers for the given month. Using the information in Chapter 4, create a new SQL script with the name GetBestSellingProductsByMonth and copy the below statement into that script.
- 173. Chapter 6 – Developing Data Web Services 173 SELECT PN.PRODUCT_NAME, PB.PRODUCT_BRAND_EN, SUM(IL.QUANTITY_SHIPPED) AS NUMBERS_SHIPPED, PN.PRODUCT_DESCRIPTION FROM GOSALES.INVENTORY_LEVELS AS IL, GOSALES.PRODUCT AS P, GOSALES.PRODUCT_NAME_LOOKUP AS PN, GOSALES.PRODUCT_BRAND AS PB WHERE IL.PRODUCT_NUMBER = PN.PRODUCT_NUMBER AND IL.PRODUCT_NUMBER = P.PRODUCT_NUMBER AND P.PRODUCT_BRAND_CODE = PB.PRODUCT_BRAND_CODE AND IL.INVENTORY_MONTH=:MONTH AND PN.PRODUCT_LANGUAGE = 'EN' GROUP BY PN.PRODUCT_NAME, IL.INVENTORY_MONTH, PB.PRODUCT_BRAND_EN, PN.PRODUCT_NAME, PN.PRODUCT_DESCRIPTION ORDER BY NUMBERS_SHIPPED DESC FETCH FIRST 50 ROWS ONLY Listing 6.3 – SQL SELECT for the GetBestSellingProductsByMonth operation Note: You can define parameter markers in two ways – via the question mark notation (a = ?) or via a named marker using the colon (a = :<name>) notation. For Web services both notations work, but the named parameter markers are preferable since the names will be used for the input parameter names of the resulting Web service operation. If question mark notation is used the parameter names are just a sequence of p1, p2, …, pN. We use the named parameter marker notation in our statement for this reason. RankEmployee This statement inserts a new ranking record for a given employee number and an English ranking value term into the RANKING_RESULTS table of the GOSALESHR schema and returns the new row. Create a new SQL script named RankEmployee, and add the statement text as shown in Listing 6.4. SELECT * FROM FINAL TABLE ( INSERT INTO GOSALESHR.RANKING_RESULTS ( RANKING_DATE, RANKING_YEAR, EMPLOYEE_CODE, RANKING_CODE) VALUES (CURRENT TIMESTAMP, YEAR(CURRENT TIMESTAMP), :EMPLOYEE_CODE, (SELECT RANKING_CODE FROM GOSALESHR.RANKING WHERE UPPER(RANKING_DESCRIPTION_EN) = UPPER(LTRIM(RTRIM(CAST(:RANKING AS VARCHAR(90)))))))) Listing 6.4 – SQL INSERT for the RankEmpoyee operation 6.5 Create a new Web service in your Data Project Explorer At this point you should have all the pieces together to start creating your Web service. The following steps show how to create the Web service. 1. If you’re not there already, switch to the Data perspective. Right-click on the Web Services folder in your Data Development project and select New Web Service…
- 174. 174 Getting Started with IBM Data Studio for DB2 as illustrated in Figure 6.10. Figure 6.10 – Right click Web Services folder to create a new Web service 2. As shown in Figure 6.11, change the name of your service to SimpleService and use http://www.ibm.com/db2/onCampus as the Namespace URI. Note that a namespace URI is just a way to identify a collection of XML elements and attributes and does not need to point to an actual resource. Therefore it does not need to be a URL. Figure 6.11 – Provide the basic Web service information
- 175. Chapter 6 – Developing Data Web Services 175 3. Click on Finish to create the Web service. The Web Services folder now contains the new Web service as shown in Figure 6.12. Figure 6.12 – The new Web service in the Data Development Project The asterisk by the Web service name means that the Web service was not built and deployed since it was created or last changed. 6.6 Add SQL statements and stored procedures as Web Service operations After creating the Web service you can add SQL statements and stored procedures as Web service operations, as follows: 1. Open the GOSALES and GOSALESCT schema in the Data Source Explorer. Select the GET_CUSTOMER_NAME procedure from the GOSALESCT schema and the PRODUCT_CATALOG procedure from the GOSALES schema and drag and drop them into your newly created SimpleService Web service, as shown in Figure 6.13.
- 176. 176 Getting Started with IBM Data Studio for DB2 Figure 6.13 – Drag and drop stored procedures into the Web service 2. Select your SQL statements in the SQL Scripts folder and drag and drop them onto your SimpleService Web service as well, as shown in Figure 6.14. Figure 6.14 – Drag and Drop SQL statements into the Web service
- 177. Chapter 6 – Developing Data Web Services Congratulations! You have finished your first Data Web Service. In your Data Explorer view, review the results. You should now see the two SQL scripts and the two SQL procedures under your Web service name, as shown in Figure 6.15. Figure 6.15 – The finished Web service 6.7 Deploy the Web Service The SimpleService Web service can now be deployed on the prepared WAS CE instance, as follows: 177
- 178. 178 Getting Started with IBM Data Studio for DB2 1. Right-click the SimpleService Web service and select Build and Deploy… as shown in Figure 6.16. This brings up the Deploy Web Service dialog (Figure 6.17). Figure 6.16 – The Build and Deploy option in the Web service context menu 2. As shown in Figure 6.17, select WebSphere Application Server Community Edition version 2 (all releases) as the Web server Type and check the Server radio button to indicate that you want to deploy the Web service directly to an application server. From the Server drop down box, select the WAS CE you configured previously. 3. Check the Register database connection with Web server check box. This selection triggers the automatic creation of a data source configuration for your database with your Web service and eliminates the need to perform this setup step manually.
- 179. Chapter 6 – Developing Data Web Services 179 4. Select REST and SOAP as the Message Protocols. You may notice that JMS is grayed out. You need Optim Development Studio to use the JMS (Java Message Service) binding. 5. Keep the settings in the Parameters section. 6. Check the Launch Web Services Explorer after deployment check box. This starts the Web services Explorer test environment after the deployment, which allows you to test your Web service. Figure 6.17 – The “Deploy Web Service” dialog 7. Click Finish. While Data Studio deploys the Web service to the WAS CE server instance you will see the "Operation in progress..." message shown in Figure 6.18.
- 180. 180 Getting Started with IBM Data Studio for DB2 Figure 6.18 – The Web service is being deployed Under the covers, Data Studio starts up the WAS CE instance (if it’s not started already). If this is the first time you’ve deployed a Data Web Service, you may get asked if Data Studio should update the DB2 JDBC driver at the application server. You should confirm this message to be sure that the latest DB2 JDBC driver is used. In the next step Data Studio generates the Web service runtime artifacts – like the WSDL file, a JAVA EE Web application project (WAR) and deploys all artifacts to the application server. For more information on what those artifacts are and how to locate them, see Appendix E. In addition, because you checked the box to bring up the Web Services Explorer automatically, it will come up automatically for testing. We’ll cover testing in the next section. Note: You can also just build the Web service runtime artifacts without automatically deploying them to the application server by selecting Build deployable files only, do not deploy to a Web server. Data Studio generates the Web application project and *.war file for the Web service. You can now take the *.war file and use the application server administration tools to deploy the application manually. 6.7.1. The location of the generated WSDL The content of a SOAP message is usually described in the WSDL (Web Service Description Language) document. WSDL is based on XML as well. Data Studio generates a WSDL for each Data Web Service. In fact, the Web Services Explorer requires the WSDL file to be able to communicate with the Web service. To locate the WSDL file for your SimpleService Web service, expand the folder XML -> WSDL in your Data Development Project as shown in Figure 6.19.
- 181. Chapter 6 – Developing Data Web Services 181 Figure 6.19 – Locating the WSDL file for the SimpleService You will find a SimpleService.wsdl file that represents the WSDL file for your service. You can also retrieve the WSDL document using a URL after the Web service was deployed on an application server. The URL is: http(s)://<server>:<port>//<contextRoot>/wsdl In the case of the SimpleService, the URL would look like this: http://server:8080/WebServicesBookSimpleService/wsdl Explaining the structure of a WSDL document in detail is beyond the scope of this book. You should know that the WSDL contains all the information a Web service client needs to invoke an operation of your Web service. This includes the operation names, XML schemas for input and output messages and, service endpoint definitions. Note: Data Studio also includes a WSDL editor. You open the editor by double-clicking on the WSDL document.
- 182. 182 Getting Started with IBM Data Studio for DB2 6.8 Test the Web Service with the Web Services Explorer There are many ways to test your new Web service; one easy way is to use the built-in Web Services Explorer of Data Studio. The Web Services Explorer is a dynamic Web services client that uses the WSDL document of the service to initialize itself. Note: The Web Services Explorer can test for invocations over SOAP over HTTP. For other bindings, such as JSON or simple HTTP clients without SOAP, you will need to do a bit more work as explained in Appendix E. The other option is to use Optim Development Studio, which contains an HTML-based test client that supports all the Data Web Services bindings. From the previous deployment step, the Web Services Explorer should already be started. In case it is not, you can start it as follows: 1. Go to the Data Project Explorer view, open your project, and explore your Web service. 2. Click your Web service name and click Launch Web Services Explorer to start the Web Services Explorer in Data Studio, as shown in Figure 6.20.
- 183. Chapter 6 – Developing Data Web Services 183 Figure 6.20 – The Launch Web Services Explorer option in the Web service context menu Figure 6.21 shows a more detailed view of the Web Services Explorer. On the left side, there is a detailed list of all of the components that form your Web service. When expanding the SimpleService node you see three Web service bindings listed: SimpleServiceHTTPGET, SimpleServiceHTTPPOST, SimpleServiceSOAP. The different bindings will be discussed later in this chapter. Under each binding you find the available operations that can be invoked for the binding. In our case, there are two SQL scripts and two stored procedures. The endpoint to which the arrow points is the location of the service endpoint for the selected binding – in this case, it’s the SOAP binding.
- 184. 184 Getting Started with IBM Data Studio for DB2 Figure 6.21 – The Web Services Explorer 6.8.1 Testing the GetBestSellingProductsByMonth operation Now it’s time to actually test your Web service operations and inspect the results. You can start with the GetBestSellingProductsByMonth operation and the SOAP binding. 1. As shown in Figure 6.22, expand the SimpleServiceSOAP node in the Web Services Explorer Navigator pane, and select the GetBestSellingProductByMonth operation. 2. The right-hand frame changes and presents an input field for the month. Remember that this operation is based on an SQL SELECT statement with a named parameter marker called MONTH. Provide any valid numeric month value – in this case we used 4 (for April).
- 185. Chapter 6 – Developing Data Web Services 185 Figure 6.22 – Select the GetBestSellingProductsByMonth operation 3. Select Go to issue the Web service request. The Web Services Explorer generates the appropriate SOAP request message and sends it to your Web service on WAS CE. The Web service invokes the SQL SELECT statement and returns the result set formatted as XML in a SOAP response message back to the Web Services Explorer. The Web Services Explorer parses the SOAP response message and presents the result in the lower right Status window as shown in Figure 6.23. (You may need to expand the view and use the scroll bar to see the results.) This is known as the Form view because it displays the request message parameters in an HTML-like form.
- 186. 186 Getting Started with IBM Data Studio for DB2 Figure 6.23 – The Web service response in the Form view 4. You can examine the raw SOAP request and response messages by clicking Source in the upper right corner of the Status window. The source appears as shown in Figure 6.24 in what is known as the Source view. Figure 6.24 - The source view of the SOAP request and response messages 6.8.2 Testing the PRODUCT_CATALOG operation Let’s try another operation. 1. This time select the PRODUCT_CATALOG operation from the Web Services Explorer Navigator under the SimpleServiceSOAP node.
- 187. Chapter 6 – Developing Data Web Services 187 2. This operation is based on a stored procedure that returns a product catalog excerpt by a given PRODUCT_TYPE. Enter Irons for the PRODUCT_TYPE input parameter and click Go to issue the request. 3. You may notice (Figure 6.25) that the form-based response looks a bit strange. Not all columns for a product catalog item are displayed. Figure 6.25 – A stored procedure response with result set in the Form view 4. But when switching to the SOAP message source view (Figure 6.26) you can see that all the data is present. Figure 6.26 – A stored procedure response with result set in the Source view
- 188. 188 Getting Started with IBM Data Studio for DB2 The reason that you don’t see all the columns in the Form view is because of the fact that the DB2 catalog does not contain metadata for stored procedure result sets. Therefore Data Web Services can only apply a very generic result set schema, which may not contain enough information for Web service clients to handle the data. In Appendix E, we show how you can work around this limitation. You can now try to test the other Web service operations with the Web Services Explorer. Figure 6.27 shows you the result of the GetBestSellingProductsByMonth operation when using HTTP POST, which just displays the results as an XML document. Figure 6.27– HTTP POST response is shown as an XML document 6.9 Exercises 1. Test the RankEmployee operation. All English ranking descriptions can be found in the RANKING_DESCRIPTION_EN column of the GOSALESHR.RANKING table. You can use any of the rankings as an input value for the RANKING parameter while testing. Select an EMPLOYEE_CODE from the GOSALESHR.EMPLOYEE table. Verify that your new ranking has been added by looking in the GOSALESHR.RANKING_RESULTS table.
- 189. Chapter 6 – Developing Data Web Services 189 2. Create a new Web service operation which updates the ranking for a given EMPLOYEE_CODE and a given YEAR to a given RANKING_DESCRIPTION. 3. Invoke the GET_CUSTOMER_NAME operation using a Web browser via the HTTP GET binding. Hint: You can execute the HTTP GET binding from the Web Services Explorer and copy-and-paste the URL into a Web browser. 4. Change the SQL statement which represents the GetBestSellingProductsByMonth operation to allow a user to provide the month name instead of the month number. Hint: You can use the following expression to find the month name for the GOSALES.INVENTORY_LEVELS.INVENTORY_MONTH column: MONTHNAME('2009-' || TRIM(CHAR(INVENTORY_MONTH)) || '-0100.00.00') 5. Check out the behavior for binary data types. Create a new Web service operation called checkBinary with the following statement: SELECT BLOB(CAST(:input AS VARCHAR(255)) FROM SYSIBM.SYSDUMMY1 Deploy the Web service with the new operation. Execute the operation by providing any string value as input. Observe the result. Try to find out the XML data type and explain why binary data is represented in this form. Hint: You can find the XML data type by examining the XML schema section in the WSDL document of the Web service. 6.10 Summary In this chapter, you’ve learned about the architecture of Data Web Services, which provides the ability to wrap Web services around business logic that is provided by SQL statements, XQuery statements, or stored procedures. The services can be bound to either SOAP or REST style bindings, providing the flexibility for a variety of clients to invoke and consume the services. This chapter walked you through the process of creating a Data Web Service that includes two stored procedures and two SQL statements and binding them to both SOAP and simple HTTP protocols. The SOAP binding can easily be tested using the Web Services Explorer. For information about testing other bindings, see Appendix E.
- 190. 190 Getting Started with IBM Data Studio for DB2 6.11 Review questions 1. What are the three bindings supported for testing by the Data Studio Data Web Services explorer? 2. What does it mean when the Data Web Service name in the Data Project Explorer has an asterisk by it? 3. To see the SOAP request and response messages, which view do you need to open from the Web Services Explorer? 4. As a best practice, is it better to use named parameter markers or question mark for the SQL used in Data Web Services? 5. The approach of creating a Data Web Service based on existing database logic is called ________________ development. 6. You create a new Data Web Service in: A. A Data Design project B. A Data Development project C. The Data Source Explorer D. SQL and XQuery Editor E. None of the above 7. Business logic for a Data Web Service can be provided by: A. SQL procedures B. XQuery statements C. SQL statements D. All of the above E. None of the above 8. Which transport protocol is used with a Data Web Service? A. FTP B. RMI C. HTTP D. SMTP E. None of the above
- 191. Chapter 6 – Developing Data Web Services 9. What is the Web Services Explorer used for? A. Browsing the Web B. Editing XML files C. Testing Web services D. Browsing the file system on a remote server E. All of the above 10. What are the three major steps in the development of a Data Web Service? A. Design, develop, deploy B. Create, deploy, test C. Model, develop, test D. Design, model, deploy E. None of the above 191
- 193. 193 7 Chapter 7 – Developing user-defined functions In this chapter you will learn how to develop user-defined functions (UDFs) using Data Studio. 7.1 Developing user-defined functions: The big picture Like stored procedures, UDFs encapsulate reusable code. Because UDFs can be used in SQL statements, it lets you extend the SQL language with your own logic. For example, you might want to create a function that encapsulates the logic to calculate a tax in your country when a value is given as input, or you can create a function that extracts information from an XML document and returns it in a tabular form that can be used to perform a JOIN with another table. As you can see, UDFs provide a very flexible way to extend your application. For scalar UDFs developed in Data Studio, the supported languages are: SQL and PL/SQL. For table UDFs, the supported languages are: SQL and OLE DB. The DB2 server supports other languages for UDFs, such as Java and C++, but those are not supported in Data Studio tooling. Note: Although Data Studio tooling lets you create PL/SQL functions for DB2 projects, PL/SQL support is not available in DB2 Express-C, which is the edition of DB2 used for the examples in this book. If you wish to develop PL/SQL functions, you’ll need to upgrade to a different edition of DB2 that contains PL/SQL support.
- 194. 194 Getting Started with IBM Data Studio for DB2 Figure 7.1 – Supported UDF development languages in Data Studio UDFs developed in Data Studio can have one of the following return types: • Scalar: UDFs that accept one or more scalar values as input parameters and return a scalar value as result. Examples of such functions include the length() and concat() built-in functions. • Table: UDFs that accept individual scalar values as parameters and return a table to the SQL statement which references it. Table functions can be referenced in only the FROM clause of an SELECT SQL statement. Scalar functions are widely used in SQL statements to do processing of individual or aggregate values. UDFs that receive multiple values as input and return a scalar value as result are called aggregate functions. Let’s look at an example of using the scalar function concat(): db2 => values CONCAT('Hello', ' World') 1 ----------Hello World 1 record(s) selected. You can use table functions in several different ways. You can use a table function to operate with SQL language on data that is not stored in a database table, or even to
- 195. Chapter 7 – Developing user-defined functions 195 convert such data into a table. You can use them to read data from files, from the Web, or from Lotus Notes databases, and return a result table. The information resulting from a table function can be joined with information from other tables in the database and from other table functions. 7.2 Creating a user-defined function To create a UDF in Data Studio, follow these steps: 1. From the data development project User-Defined Functions folder, create a new function body (the logic of the UDF) and its expected input parameters and output data types. 2. Review the UDF and make any necessary changes in the Routine editor. 3. Deploy the UDF using the deployment wizard, which registers the UDF in the DB2 catalog, making it available for you and other authorized users to use. Note: Data Studio doesn’t yet support debugging for UDFs, so it is recommended that you perform thorough testing of your UDF before deploying it to a production environment. An exception to this rule is PL/SQL UDFs, which can be debugged if created inside a PL/SQL package. Let's create a table UDF that filters all the products from the table GOSALES.PRODUCT based on their size. To create a UDF in Data Studio, right click your Data Development project’s User-Defined Functions folder and select New -> User-Defined Function, as shown in Figure 7.2. Figure 7.2 - Creating a new user-defined function In the New User-Defined Function wizard shown in Figure 7.3 , specify the function’s project, name and language. The wizard will list the languages supported by the database server associated with the function’s project.
- 196. 196 Getting Started with IBM Data Studio for DB2 Note: Experienced developers normally click on Finish on the Name and Language window, without going through all the steps of the wizard. This will open the routine editor with some default code for a function that can be used as a template, or can be simply replaced by the code you wish to write for your function. Figure 7.3 - New User-Defined Function wizard In the New User-Defined Function wizard, enter the name PRODUCT_BY_SIZE, select SQL as the language and click Next. That will bring you to the SQL Statement or Expression page of the wizard, shown in Figure 7.4.
- 197. Chapter 7 – Developing user-defined functions 197 Figure 7.4 - Creating a user-defined scalar function In this page, you can select the type of result that your function returns, as well as the SQL statement or expression that makes up the function’s body. For this example, you need to create an SQL statement that filters products with a size equal to the value passed as parameter to the function. When the function receives a single parameter as input, you can reference its value by using :param in the UDF’s body. Identifiers preceded by a colon (:) will be treated as input parameters for the UDF you are creating. This lets you use any number of input parameters as long as each identifier has a unique name. In order to create the SQL statement that is part of the UDF’s body, you can either type it into the text box, or click the Create SQL… button. Clicking this button will let you use the SQL editor or the SQL wizard described in Chapter 4 to create the SQL statement. After your SQL statement is created, you can check if it is valid by clicking the Validate button.
- 198. 198 Getting Started with IBM Data Studio for DB2 When you have completed the creation of the function’s body, select Table from the Result Set type combo box. This specifies that the function will return a table as a result, instead of a single scalar value. Then, click Next. This will bring you to the Return Data Type wizard page shown in Figure 7.5. Figure 7.5- Specifying the UDF return type The Return Data Type page lets you review the return data type information for your UDF. The next page is the Parameters page, where you can specify the input parameters for the user-defined function, as shown in Figure 7.6.
- 199. Chapter 7 – Developing user-defined functions 199 Figure 7.6 - UDF input parameters On the Parameters page, you specify the user-defined function input parameters and their data types. You will use the data type INTEGER because that is the same data type as the one used to store the product’s price code in the database. Clicking Next will bring you to the Deploy Options page, as shown in Figure 7.7.
- 200. 200 Getting Started with IBM Data Studio for DB2 Figure 7.7- Specifying the UDF deploy options In the Deploy Options page, you can specify user-defined function deploy options like the specific name. Functions can be overloaded; that is, multiple functions can have the same schema and name but different parameters. The specific name provides a unique name to a function which is helpful when performing operations on the function, like sourcing it, dropping it or commenting on it. The function’s specific name can be the same as the function’s name, as long as it is unique. If not specified, its value will be automatically generated by the database manager. In this page you can also specify if you want the user-defined function to be deployed immediately once you click the wizard’s Finish button. Leave this box unchecked since it is a good idea to review the new function before deploying it. Clicking Next will take you to the Code Fragments page as shown in Figure 7.9 .
- 201. Chapter 7 – Developing user-defined functions 201 Figure 7.8 - Adding code fragments to a UDF If you have pieces of code that you want to use for more than one user-defined function, you can import those pieces in the Code Fragments page. This is also the last user input page on the wizard and clicking Next will bring you to the Summary page, as shown in Figure 7.9 .
- 202. 202 Getting Started with IBM Data Studio for DB2 Figure 7.9 - Create UDF wizard summary page In the Summary page, review all the information you provided in the previous pages, including the user-defined function name, language and parameters. Once you click Finish, Data Studio will open a Routine editor for the user-defined function, and you can view and edit the generated CREATE FUNCTION statement, as shown in Figure 7.10.
- 203. Chapter 7 – Developing user-defined functions 203 Figure 7.10 – Editing UDF in Routine editor After you have verified the SQL create statement, make sure you save any changes you make. You can deploy the user-defined function by right clicking on the function in the data development project and selecting Deploy…, as shown in Figure 7.11. Figure 7.11- Deploying the PRODUCT_BY_SIZE function This will bring you to the deployment wizard, where you can specify deploy options like Target Schema and Default Path, as well as what should be the duplicate handling strategy, as shown in Figure 7.12.
- 204. 204 Getting Started with IBM Data Studio for DB2 Figure 7.12 - Deploying a UDF You can specify your own deploy options and click Finish. The results of the deployment process will be displayed in the SQL Results view, as shown in Figure 7.13.
- 205. Chapter 7 – Developing user-defined functions 205 Figure 7.13 - Verifying the result of deploy operation 7.3 Running user-defined functions Once the UDF has been created, you can run it or use it in SQL statements when you want to filter the products based on their size. A quick way to run the UDF and at the same time verify that the deployment was successful is to browse the User-Defined Functions of your target schema in the Data Source Explorer. There you should find the UDF you just deployed. To run it, just right click on the UDF and select Run as shown in Figure 7.14. Figure 7.14 - Running a UDF from Data Source Explorer A dialog will pop up, asking you to insert the values for the UDF’s input parameters, as shown in Figure 7.15. Figure 7.15 - Specifying parameters to run UDF Once you input a value, click OK and Data Studio will call the UDF with the parameters you have specified. The result of running a UDF can be seen in the SQL results view, as shown in Figure 7.16.
- 206. 206 Getting Started with IBM Data Studio for DB2 Figure 7.16 - Result set for running the PRODUCT_BY_SIZE UDF 7.4 Summary You have covered the most important steps in the creation of user-defined functions in Data Studio. The example we used covered the development of a user-defined table function, but the development of scalar functions in Data Studio follows the exact same steps. 7.5 Exercise As an exercise for this chapter, create a table UDF that returns the name and schema of all functions that have the qualifier equal to the value passed as a parameter to the function. 7.6 Review questions 1. Explain some of the advantages of using UDFs for database application development. 2. What is the difference between a scalar UDF and a table UDF? 3. Describe a scenario where you would use a UDF instead of a stored procedure 4. Describe a scenario where you would use a UDF instead of plain SQL statements. 5. What is an aggregate UDF? 6. What languages are supported for user-defined function development in a Data Development project associated with a DB2 Linux, UNIX and Windows connection? A. SQL, PL/SQL B. SQL, OLE DB, PL/SQL C. SQL, Java, OLE DB, PL/SQL D. SQL, OLE DB E. None of the above 7. What result type or types are supported for SQL user-defined functions in Data Studio?
- 207. Chapter 7 – Developing user-defined functions A. scalar, list B. table, list C. scalar, table D. scalar, table, list E. None of the above 8. Which editor can be used to edit user-defined functions in Data Studio? A. SQL and XQuery Editor B. Data Object Editor C. Routine Editor D. Database Table Editor E. All of the above 9. What type of statement or statements can make up the body of a user-defined function? A. SQL statement B. SQL statement, SQL expression C. SQL expression D. SQL expression, regular expression E. All of the above 10. Where can you see the results of running a UDF? A. Console B. SQL editor C. SQL Results View D. Data Source Explorer E. None of the above 207
- 209. 209 8 Chapter 8 – Getting even more done In this book you’ve learned about how to use Data Studio to perform basic database administration and data development tasks with DB2 servers. But there are a wide variety of tasks and management responsibilities involved in managing data and applications throughout the lifecycle from design until the time that data and applications are retired. This concept of looking at data management from the perspective of the entire lifecycle and providing offerings that support an integrated approach to that lifecycle is called integrated data management. n this chapter, you’ll learn more about some of tools and solutions from IBM that can you can use to address the bigger challenges of managing data, databases, and database applications. We encourage you to try these products. You may have access to some of the software as part of the IBM Academic Initiative program at www.ibm.com/developerworks/university/data/, or you can download the 30-day trial versions where available. In this chapter you will learn about: The major phases in the data lifecycle and key tasks for each of those lifecycle phases. Why an integrated data management approach to those lifecycle phases is important. Some of the products that address the challenges of data management and a summary of their capabilities. How these products can extend the Rational® Software Delivery Platform for datadriven applications. 8.1 Integrated data management: The big picture Figure 8.1 illustrates the data management lifecycle phases and key value that an integrated data management approach can bring to those phases.
- 210. 210 Getting Started with IBM Data Studio for DB2 Figure 8.1 -- An integrated data management approach can enhance value and productivity from requirements through retirement As you can see in Figure 8.1, there are many considerations for effective management of data, databases, and data applications. As described by Holly Hayes in her developerWorks article entitled “Integrated Data Management: Managing data across its lifecycle”, the main steps involved in the complete data lifecycle include: • Design -- Discover, harvest, model, and relate information to drive a common semantic understanding of the business. You may need to interact with business users to track and gather requirements and translate those requirements into a logical design to share with application architects. A physical database model is generally used as the way to convert a logical design to a physical implementation that can be deployed into a database management system. If you are working with existing data assets (databases), you need to understand what tables already exist, and how they may relate to other tables or new tables you may want to create. In addition, you may wish to conform to a naming standard or enforce certain rules about what kind of data can be stored in a field or whether data stored in a field must be masked for privacy. All of these considerations happen during the design phase of the lifecycle. • Develop -- Code, generate, test, tune, and package data access layers, database routines, and data services. This step is where the data access application is built. The data access may be part of a larger application development process, so it’s important to collaborate closely with business developers and to ensure that
- 211. Chapter 8 – Getting even more done 211 application requirement changes are reflected back to the data architect or DBA for changes. In addition, developers may be responsible for ensuring that the data access they create (SQL, XQuery, Java, Data Web Services, etc.) not only returns the correct result but also performs efficiently. Use of representative test data and test databases is often used. Because of regulations around how personally identifiable information such as social security numbers and credit card numbers can be handled, it’s critical that developers who need test data are compliant with those regulations while still having representative test data. • Deploy -- Install, configure, change, and promote applications, services, and databases into production. This phase includes a well-planned strategy for migrating databases (or database schema changes), data and applications into production. The goal is to do this as swiftly as possible and with the least amount of disruption to existing applications and databases to avoid affecting other applications and to do it without error. Deployment can also mean deploying changes. • Operate -- Administer databases to meet service level agreements and security requirements while providing responsive service to emergent issues. This phase of the lifecycle is the bread and butter of a typical DBA’s day. They authorize (or remove authorizations) for data access. They not only have to prepare for possible failures by ensuring timely backups, but they must also ensure that the database is performing well and they must be able to respond to issues as they arise. Because many failures can be difficult to isolate (that is, is a failure occurring in the database, the application server, the network, the hardware?), it’s critical that all members of the IT staff have information to help them isolate the problem as quickly as possible so that the right person can fix the problem, whether it’s the DBA,the network administrator, the application administrator or someone else. • Optimize -- Provide pro-active planning and optimization for applications and workloads including trend analysis, capacity and growth planning, and application retirement including executing strategies to meet future requirements. This phase is where DBAs can really bring value to the business. It may take a backseat to the constant interrupt-driven needs of day to day operations, but it is a critical phase to ensure that costs are kept down and performance remains acceptable as the business grows and as more applications drive more users against the databases. It’s critical that performance trends and data growth trends are analyzed and accommodated for. A strategy for archiving old data is required for two reasons: 1) to restrain data growth to ensure performance is not adversely affected and 2) to comply with regulations for data records. • Govern -- Establish, communicate, execute, and audit policies and practices to standardize, protect and retain data in compliance with government, industry, or organizational requirements and regulations. Not limited to a single phase, governance is a practice that must infuse the entire lifecycle. Governance can include the data privacy regulations mentioned previously as well as using
- 212. 212 Getting Started with IBM Data Studio for DB2 techniques such as data encryption to guard against data breach or accidental loss. [1] Although many products and technologies exist today to help with the phases of the data lifecycle, IBM is focusing on creating an infrastructure in which specifications made in one phase can be disseminated through other phases of the lifecycle and automatically maintained. Why is this important? Although you may be in school or in a small development shop where there are very few people other than yourself managing data and applications, there are real problems as organizations grow and responsibilities become dispersed among different people and in different locations. For example, data privacy requirements identified in the design phase may get lost or forgotten as developers start pulling down data from production for testing purposes. It becomes more and more difficult to identify how a database schema change will affect the many applications that may be using the database. And not identifying dependencies properly can result in serious outages. With an integrated data management approach, the tools can actually help facilitate collaboration among roles, enforce rules, automate changes while identifying dependencies, and in general speed up and reduce risk across the lifecycle. This integrated approach cannot be achieved by unrelated tools. It requires common infrastructure and shared metadata such that actions in one tool are reflected down the line when another person uses their tool to support their particular responsibilities. So, as an example, if the Data Architect defines a column as containing private data (such as credit card numbers or social security numbers), a developer who is viewing this table in their development tool should see the column marked as ‘private’ and be able to invoke proper masking algorithms should data be required for testing. 8.2 Optim solutions for Integrated Data Management Let’s look at some of the integrated data management solutions from IBM, many of which are offered under the family name “Optim.”
- 213. Chapter 8 – Getting even more done 213 Figure 8.2 – Optim solutions for Integrated Data Management Figure 8.2 shows some of the key products that help IT staff manage the various phases of the data lifecycle. We won’t cover all the products in great detail here, but will cover a few key ones that you may wish to download and use to expand the capabilities of Data Studio as you learn more about working with DB2 Express-C and other databases. 8.2.1 Design: InfoSphere Data Architect The data architect’s key tool is InfoSphere Data Architect, used for discovering, modeling, relating, and standardizing data. Like any good data modeling offering, it supports logical and physical modeling and automation features for diverse databases that simplify tasks such as reverse engineering from existing databases, generating physical models from logical models, generating DDL from physical models, and visualizing the impact of changes. Figure 8.3 shows a screenshot of a model in InfoSphere Data Architect.
- 214. 214 Getting Started with IBM Data Studio for DB2 Figure 8.3 – InfoSphere Data Architect for data modeling For more information about InfoSphere Data Architect, see the ebook Getting Started with InfoSphere Data Architect which is part of this book series. 8.2.2 Develop: Optim Development Studio & Optim pureQuery Runtime For data-oriented developers or DBAs, Optim Development Studio is the next “step up” from Data Studio. It contains all the basic database administration and data development capabilities that Data Studio has, but it has much more capability, particularly around Java development in heterogeneous database environments, including Oracle databases, DB2 data servers, and IDS. It provides an Eclipse-based integrated development environment, to speed data-centric development targeting DB2, Informix, and Oracle databases. For example, Optim Development Studio delivers stored procedure development and debugging for Oracle native databases (PL/SQL support is included in Data Studio only when developing against DB2 9.7 in compatibility mode). In addition, Optim Development Studio ramps up Java development to new levels for heterogeneous databases. The data access layer generation includes support for the standard Data Access Object (DAO) pattern and leverages the pureQuery API, an intuitive and simple API that balances the productivity boost from object-relational mapping with the control of customized SQL generation. It also simplifies the use of best practices for
- 215. Chapter 8 – Getting even more done 215 enhanced database performance. Optim pureQuery Runtime (formerly Data Studio pureQuery Runtime) is used with pureQuery data access layers. For both pureQuery and other Java applications that might be using Hibernate, JPA, or some other framework, you can take advantage of the great features in Optim Development Studio, as shown in Figure 8.4. Figure 8.4– Optim Development Studio has advanced features for Java database development and tuning As shown in Figure 8.4, one great feature is the ability to correlate SQL with the particular line in the Java source code, even if the SQL is generated from a framework. This can really help you understand the impact of changes to the schema or the application, and can also aid DBAs and developers in identifying and tuning SQL when using output from the DB2 package cache during QA or production. You can start learning about SQL performance issues by visualizing SQL “hot spots” within the application during development by seeing execution metrics around how many times a statement is executed and the elapsed times. Adding Optim Query Tuner to your environment can help you learn more about tuning SQL by providing expert guidance.
- 216. 216 Getting Started with IBM Data Studio for DB2 In addition, because of the integration with other products, Optim Development Studio helps developers be cognizant of sensitive data. For example, developers can readily identify sensitive data based on the privacy metadata captured in InfoSphere Data Architect. They can create test databases directly from fictional data or can generate extract definitions for Optim Test Data Management and Data Privacy to create customized test databases. Developers can spend considerable time isolating performance issues: first to a specific SQL statement, then to the source application, then to the originating code. Three-tier architectures and popular frameworks make this isolation more difficult as the developer may never see the SQL generated by the framework. Optim Development Studio makes it easier to isolate problems by providing an outline that traces SQL statements back to the originating line in the source application, even when using Java frameworks like Hibernate, OpenJPA, Spring, and others. . Be sure to read the Getting Started with pureQuery book of this series to read about the capabilities of Optim Development Studio and pureQuery Runtime. 8.2.3 Develop and Optimize: Optim Query Tuning Solutions Optim query tuning solutions are comprised of two products: Optim Query Tuner and Optim Query Workload Tuner. Optim Query Tuner, as mentioned previously, is focused on enabling developers to tune single queries by providing them with advice on how to achieve better query performance [2]. See Figure 8.5 for a screenshot.
- 217. Chapter 8 – Getting even more done 217 Figure 8.5 – Optim Query Tuner provides help for tuning single queries in a development environment Figure 8.5 shows that Optim Query Tuner provides such capabilities as formatting SQL queries for easy reading and with associated cost information, an access plan graph, an advisor overview dashboard, and more detailed explanations of recommended actions. Optim Query Workload Tuner (available only for DB2 for z/OS databases at this writing and previously known as DB2 Optimization Expert for z/OS) provides similar advice but can take as input an entire SQL workload (such as all SQL used in an order processing application), which enables DBAs to determine for example what indexes might provide the most benefit for the overall performance of the workload rather than focusing on singlequery performance.
- 218. 218 Getting Started with IBM Data Studio for DB2 8.2.4 Deploy and Operate: Optim Database Administrator Optim Database Administrator is the next “step up” for DBAs from Data Studio. The main additional value from Optim Database Administrator is its ability to increase productivity and reduce application outages through task automation of database changes. Figure 8.6 shows a screenshot of Optim Database Administrator. Figure 8.6 – Optim Database Administrator helps you understand impacts of changing a database object As Figure 8.6 shows, Optim Database Administrator can help you see dependencies on a particular object. It also generates customizable deployment scripts to automate and accelerate changes. Because it is integrated with InfoSphere Data Architect, changes that are created in InfoSphere Data Architect can be used in Optim Database Administrator for creation of deployment scripts. Optim Database Administrator also supports object, data, and authorization migration in support of database migration scenarios. It integrates with Optim High Performance Unload if you need faster data migration capabilities for large amounts of data.
- 219. Chapter 8 – Getting even more done 219 8.2.5 Summary of capabilities The following table lists product capabilities and whether they are included with the Optim products described in this section. For more detail, you’ll want to look at the Features and Benefits section of each product Web page. Function Data Studio Optim Development Studio Optim Database Administrator InfoSphere Data Architect Optim Query Tuner Create overview diagram Yes Yes Yes Yes Yes Create and view physical models No Yes Yes Yes No Compare and sync physical models No No Yes Yes No Create logical models, compare and sync logical models. Create privacy attributes. Create glossary models. Volumetric modeling for capacity planning. No No No Yes No Basic database object management (create, drop, alter) Yes Yes Yes No No Command support, and task assistants for utilities Yes No Yes No No Script creation, dependency analysis for complex schema changes No No Yes No No
- 220. 220 Getting Started with IBM Data Studio for DB2 Function Data Studio Optim Development Studio Optim Database Administrator InfoSphere Data Architect Optim Query Tuner Basic data development (SQL procedures and UDFs query building) Yes Yes Yes Yes Yes Data Web Services development* Yes Yes No No No XML development* Yes Yes No Yes No Visual Explain (visual diagram of data access path) Yes Yes Yes Yes Yes Advanced Java database development: pureQuery APIs, advanced tooling for dependency analysis and hot spot analysis No Yes No No No Advanced Web services (deploy on WebSphere DataPower, JMS, support) No Yes No No No Query tuning advisors, tools and configuration. No** No No No Yes Table 8.1 – Capabilities in some Optim products. * Indicates that capability is not included in Data Studio stand-alone package. ** As of Version 2.2.0.1, Data Studio stand-alone does include single-query index advisor.
- 221. Chapter 8 – Getting even more done 221 8.2.6 Job responsibilities and associated products In Chapter 1, we mentioned that Data Studio can provide a way to grow your skills horizontally across different database platforms. Data Studio can also serve as a stepping stone for the rest of the integrated data management products. Because integrated data management focuses on collaboration among different roles, these products can help you work with and learn tasks that can help you become a production DBA, a high performance Java developer, a Data Architect, or even a Data Governance officer. Table 8.1 includes some job roles and appropriate products that can help with those roles. Job Related products Developer (data access) Data Studio, Optim Development Studio, Optim Query Tuner (Also helpful to learn Rational Application Developer for WebSphere Software) Database Administrator (applicationfocused) Data Studio, Optim Development Studio, Optim Database Administrator, Optim Test Data Management Solution and Optim Data Privacy Solution Database Administrator (including data governance responsibilities) Data Studio, InfoSphere Data Architect, Optim Database Administrator, DB2 Performance Expert, Optim High Performance Unload, Optim Data Growth Solution, Optim Data Privacy Solution Data Architect InfoSphere Data Architect (also helpful to learn Rational Software Architect) Table 8.1– Job roles and suggested software 8.3 Data Studio, Optim and integration with Rational Software This section outlines how some of the key Optim products integrate with and extend the Rational Software Delivery Platform. The goal of Optim solutions for Integrated Data Management is to create an integrated lifecycle approach to data management similar to what the Rational Software Delivery Platform does for the application lifecycle. Therefore, the Optim solutions in general provide data-centric capabilities that can be used alone or installed with existing Rational products (assuming they are on the same Eclipse level). Note: Data Studio Version 2.2 is built on Eclipse 3.4. For more information about which products can shell share together, scroll to the Eclipse 3.4 section of the technote here: http://www.ibm.com/support/docview.wss?rs=2042&uid=swg21279139
- 222. 222 Getting Started with IBM Data Studio for DB2 For known shell-sharing issues, see this technote: http://www.ibm.com/support/docview.wss?rs=3360&uid=swg27014124 This ability to install together and share artifacts enables better collaboration among various roles in the organization, as shown in Figure 8.7. Figure 8.7– Optim Solutions extend Rational for data-driven applications Let’s look at one particular example shown in the above figure of how Optim solutions can help developers who are ‘data-centric’ extend the capabilities of Rational Application Developer for WebSphere Software (RAD). Many developers have RAD on their desktops. RAD extends base Eclipse with visual development capabilities to help Java developers rapidly design, develop, assemble, test, profile and deploy Java/J2EE™, Portal, Web/Web 2.0, Web services and SOA applications. By extending RAD with Optim Development Studio, you get additional capabilities to help you manage your database, which you may need for your development environment. You also get Visual Explain, to visualize the database access paths, and you also get the ability to right click on an SQL statement and run it – you don’t have to wait until the whole program is complete to find errors. Adding Optim Development Studio also takes your Java persistence layer development capabilities into high gear. Your Java editor will be enhanced with SQL Content Assist,
- 223. Chapter 8 – Getting even more done 223 which means that you can use CTRL-Space to see available tables or columns when building your SQL statements in Java. You can use all the other capabilities in Optim Development Studio that can significantly reduce development and troubleshooting time, such as: Correlating a particular SQL statement with a particular line of Java source code. This can help you narrow in on problem SQL statements. Seeing which tables and columns are being used in the Java program and where, making it much easier to see if a schema change will impact the Java program. Searching through SQL statements for particular strings Gathering performance statistics on individual SQL statements in your Java program and even compare performance with an earlier performance run. In addition, by extending the development environment with Optim Query Tuner, you can get query tuning advice, a task which often falls to the DBA or to a specialized performance management role. Optim Query Tuner can help you avoid simple mistakes when writing queries so that the code is of higher quality and performance before moving into a test environment. And even developers may find Optim Database Administrator a useful addition to their desktops, because it can automate database changes. You may need to modify their local development databases to reflect changing requirements, and being able to automate this process as well as back out those changes, without requiring the assistance of a DBA can be a great timesaver. No two organizations are exactly alike and the responsibilities of people working in those organizations can vary significantly, even if they have the same job title. Thus, the modular nature of these capabilities and products make it easy for people to customize their desktops with the capability they need. 8.4 Community and resources A great resource for learning more about Optim and its solutions is the Integrated Data Management community space that aggregates links to downloads, forums, blogs (such as the Integrated Data Management experts blog), technical articles, videos, and more, in a single location at www.ibm.com/developerworks/spaces/optim. You can also join the Optim fan page on Facebook to connect with others interested in Optim solutions and to get the latest announcements, at: www.facebook.com/pages/IBMOptim/37213992975 or follow Optim on Twitter at www.twitter.com/IBM_Optim, When you go to the community space, you will see a variety of portlets that contain links to forums, videos, and more. There is a tab on the space that includes links to all downloads, including Data Studio. And there is a tab with links to many existing articles and tutorials on using the integrated data management products.
- 224. 224 Getting Started with IBM Data Studio for DB2 8.5 Exercises 1. Read the article entitled Integrated Data Management: Managing the data lifecycle at www.ibm.com/developerworks/data/library/techarticle/dm-0807hayes/. This article is organized mostly by role. 2. Learn more about IBM Optim solutions for Integrated Data Management by visiting the Web page at: www.ibm.com/software/data/optim/ which is organized by solution. Click through at least two of the solutions listed on this page to see which products are used to accelerate solution delivery and facilitate integrated database administration. 3. View the demo A Day in the Life of a DBA at www.ibm.com/developerworks/offers/lp/demos/summary/im-lifeofdba.html. Here’s a look at some of the capabilities that can help DBAs get through a typical hectic day. 4. For a good introduction to InfoSphere Data Architect, see the video entitled Introduction to InfoSphere Data Architect on developerWorks at: www.ibm.com/developerworks/offers/lp/demos/summary/im-idaintro.html 5. Read the article What’s new and cool in Optim Development Studio 2.2 (www.ibm.com/developerworks/data/library/techarticle/dm-0906optimdeveloper/ and optionally view the related videos. The first of the video series is at www.channeldb2.com/video/whats-new-in-optim-development-1. 6. Learn more about pureQuery by reading the information at the following Web page: www.ibm.com/software/data/optim/purequery-platform/ 8.6 Summary In this chapter, we reviewed the concept of a data and data application lifecycle and some of the key tasks associated with the phases of that lifecycle. We described how an integrated approach to data management can make these tasks more efficient and less risky by facilitating collaboration among roles and automatically enforcing rules from one lifecycle phase to the next. We reviewed some of the IBM offerings for integrated data management and their key capabilities. Finally, we closed with a description of how the Optim solutions can extend the capabilities in Rational for data-centric application development.
- 225. Chapter 8 – Getting even more done 225 8.7 Review questions 1. What are the five phases of the data lifecycle as defined by IBM? What aspect of the data lifecycle is subsumed in all phases? 2. Which phase of the data lifecycle is most concerned with translating business requirements into a physical database representation? Which IBM product is primarily used in this phase? 3. In which phase of the data lifecycle are data access layers, database routines, and data services created, tested, and tuned? Which IBM products are associated with this phase? 4. Which IBM Optim product is designed to help with managing and automating complex schema changes? 5. Which IBM Optim product is designed to help DBAs and developers improve SQL queries so that they can perform faster? 6. Which of the following is not a primary goal of an integrated approach to data management: A. Reduce risk B. Improve collaboration among roles C. Exchange metadata D. Improve efficiency of development and deployment E. Create test databases 7. Which of the following products includes the ability to create and debug SQL procedures? A. Data Studio B. Optim Query Tuner C. Optim Development Studio D. Optim Database Administrator E. All of the above 8. The integration of data-centric capabilities with the Rational Software Develivery Platform is important because (select all that apply): A. It improves collaboration among people involved in application development lifecycle B. It enhances application development with data-centric expertise and capabilities to improve productivity for data-centric development C. It’s important to install as many tools as possible into your Eclipse workbench
- 226. 226 Getting Started with IBM Data Studio for DB2 D. The similar look and feel can help grow skills across roles E. None of the above 9. Which one of the following tasks is least likely to occur in the Optimize phase of the data lifecycle? A. Capacity planning B. Planning for application retirement C. Controlling the growth of data by archiving data appropriately D. Creating a Java data access layer E. Modeling a new database 10. If you’re a Java developer who needs to access the database, the best way to extend your Java development environment is with: A. Data Studio B. InfoSphere Data Architect C. Optim Database Administrator D. Optim Development Studio E. None of the above
- 227. 227 A Appendix A – Solutions to the review questions Chapter 1 1. Data Studio is built on Eclipse, which is an open source platform for building integrated development environments. 2. DB2 (all platforms) and Informix Dynamic Server. 3. In Eclipse, perspectives are a grouping of views and tools based on a particular role or task. Integrated data management. 4. If you install the IDE package, the default perspective is the Data perspective. FYI, for the stand-alone package, the default perspective is the Database Administration perspective (see Appendix C for more information on installing the stand-alone package). 5. True, Data Studio can be used at no additional charge with your DB2 server or Informix Dynamic Server database. 6. C. If you want to do .NET development, you must use the Visual Studio add-ins for DB2. (See http://www.ibm.com/software/data/db2/ad/dotnet.html for more information) 7. E 8. B 9. C 10. B, the results appear in a separate tab in the Properties view.
- 228. 228 Getting Started with IBM Data Studio for DB2 Chapter 2 1. The hierarchical view and the flat view. The hierarchical view reflects the schema database structure, and you traverse down through the tree structure to find the object you want. The flat view is arranged by object type, and you can use a filter to find an object. 2. Select Add to Overview Diagram, and then select the list of tables you want to be shown in the diagram and click OK. 3. Schema 4. Sharing connection information with others by the ability to export and import connection information into a workspace. 5. Privileges tab. 6. D 7. B 8. D 9. A 10. D Chapter 3 1. System-managed (SMS), database-managed (DMS), automatic storage. 2. Delimited (DEL), Worksheet format (WSF), and Integrated Exchange Format (IXF) 3. IXF, because structural information about the table is included with the export. 4. The two types of logging are circular and archive. Circular logging is only for uncommitted changes. To restore, you need to go to the last backup image. Archive logging logs all changes, committed and uncommitted and thus recovery can include changes made up to a specified point in time. 5. Recover is a combination of Restore and Rollforward. 6. A 7. B 8. A
- 229. Appendix A – Solutions to the review questions 229 9. C 10. B Chapter 4 1. Data Project Explorer is used for database development. Data Source Explorer can be used for database browsing and administration. 2. Default schema, used to set the database CURRENT SCHEMA register. Default path, used to set the database CURRENT PATH register. 3. Right click in the editor that shows your script; Right click your script object in the Data Project Explorer; Open the Run menu action when editing an SQL script 4. The SQL and XQuery Editor provides content assist and lets you develop multiple statements in a single editor window. It also supports XQueries. The SQL Builder provides GUI- guided creation of each part of a single SQL statement, including selected columns, conditions and sorting and order by clauses. It does not support XQuery. 5. XML documents, XML schemas, XSLT stylesheets, XML mappings, and WSDL documents. 6. B 7. C 8. B 9. C 10. D Chapter 5 1. B 2. D 3. C 4. A 5. A 6. You forgot to first Deploy the stored procedure with the Enable debugging option checked. 7. The default schema, which is administrator ID (such as db2admin). 8. SQL Results
- 230. 230 Getting Started with IBM Data Studio for DB2 9. Variable 10. Breakpoints The answer to the exercise is that the line SET p_in = 2; should be SET p_out = 2 Chapter 6 1. HTTPGET, HTTPPOST, SOAP 2. The Data Web Service has been modified but not yet deployed. 3. Source view. 4. Named parameter markers 5. Bottoms up 6. B. 7. D One in which the result of the routine needs to be joined with an existing table 8. C 9. C. 10. B. Chapter 7 1. Some advantages of using UDFs include: 1) Encapsulate reusable code and 2) extend the SQL language with user-defined logic. 2. Scalar UDFs return a scalar value as a result. Table UDFs return a relational table as a result. 3. One in which the result of the routine needs to be joined with an existing table 4. To encapsulate commonly used logic. 5. UDF that receives multiple values as input and returns a scalar value as a result. 6. B 7. C 8. C 9. B 10. C
- 231. Appendix A – Solutions to the review questions 231 Chapter 8 1. The five phases of the data lifecycle are: design, develop, deploy, operate, optimize and govern. Governance is the aspect that needs to be considered across all phases of the lifecycle. 2. The design phase is most is most concerned with translating business requirements into a physical database representation? The main product for doing this is InfoSphere Data Architect, perhaps in conjunction with other modeling tools such as Rational Software Architect. 3. The develop lifecycle is when data access layers, database routines, and data services created, tested, and tuned. The primary products associated with this phase are Optim Development Studio, Optim Query Tuner and Optim Test Data Management. 4. Optim Database Administrator contains change management capabilities. 5. Optim Query Tuner helps DBAs and developers improve SQL queries so that they can perform faster. 6. The answer is C. Although metadata exchange is a key implementation approach to integrated tooling, it is not a goal of using the integrated data management approach. The goals are to reduce risk, improve collaboration among roles, and to improve efficiency of development and deployment. 7. The answer is E. All of the listed products include the ability to create and debug SQL procedures. 8. The answer is A, B, and D. 9. The answer is D. Although Java data access should be developed with efficiency and performance in mind, the optimize phase of the lifecycle generally reflects activities around optimizing existing applications and resources. 11. The answer is D. Optim Development Studio provides developers with capabilities that help them create high performance data access layers for Java applications
- 233. 233 B Appendix B – Up and running with DB2 This appendix is a good foundation for learning about DB2. This appendix is streamlined to help you get up and running with DB2 quickly and easily. In this appendix you will learn about: DB2 packaging DB2 installation DB2 Tools The DB2 environment DB2 configuration Connecting to a database Basic sample programs DB2 documentation Note: For more information about DB2, refer to the free ebook Getting Started with DB2 ExpressC that is part of this book series. B.1 DB2: The big picture DB2 is a data server that enables you to safely store and retrieve data. DB2 commands, XQuery statements, and SQL statements are used to interact with the DB2 server allowing you to create objects, and manipulate data in a secure environment. Different tools can be used to input these commands and statements as shown in Figure B.1. This figure provides an overview of DB2 and has been extracted from the Getting Started with DB2 Express-C ebook.
- 234. 234 Getting Started with IBM Data Studio for DB2 Figure B.1 - DB2 - The big picture On the left-hand side of the figure, we provide examples of different commands and statements that users can issue. In the center of the figure, we list some of the tools where you can input these commands and statements, and on the right-hand side of the figure you can see the DB2 environment; where your databases are stored. In subsequent sections, we discuss some of the elements of this figure in more detail. B.2 DB2 Packaging DB2 servers, clients and drivers are created using the same core components, and then are packaged in a way that allows users to choose the functions they need for the right price. This section describes the different DB2 editions or product packages available.
- 235. Appendix B – Up and running with DB2 235 B.2.1 DB2 servers Figure B.2 provides an overview of the different DB2 data server editions that are available. DB2 Enterprise Edition DB2 Workgroup Edition DB2 Express Edition DB2 Express-C + Extra functionality + Extra functionality + Extra functionality Figure B.2 - DB2 Server Packaging As shown in Figure B.2, all DB2 server editions are built one on top of the other. DB2 Express-C is a free version of DB2, and it is the core component of all DB2 products. When additional functionality is added to DB2 Express-C, it becomes DB2 Express. Additional functionality added to DB2 Express, becomes DB2 Workgroup, and so on. Figure B.2 illustrates why it is so easy to upgrade from DB2 Express-C to any other DB2 server should you need to in the future: All DB2 servers editions are built based on DB2 Express-C. Also applications built for DB2 Express-C are applicable on other DB2 Editions as well. Your applications will function without any modifications required! B.2.2 DB2 Clients and Drivers When you install a DB2 server, a DB2 client component is also installed. If you only need to install a client, you can install either the IBM Data Server Client, or the IBM Data Server Runtime Client. Figure B.3 illustrates these two clients.
- 236. 236 Getting Started with IBM Data Studio for DB2 Figure B.3 - DB2 Clients From the above figure, you can see the IBM Data Server Runtime client has all the components you need (driver and network support) to connect and work with a DB2 Data Server. The IBM Data Server client has this same support and also includes GUI Tools and libraries for application development. In addition to these clients, provided are these other clients and drivers: DB2 Runtime Client Merge Modules for Windows: mainly used to embed a DB2 runtime client as part of a Windows application installation IBM Data Server Driver for JDBC and SQLJ: allows Java applications to connect to DB2 servers without having to install a client IBM Data Server Driver for ODBC and CLI: allows ODBC and CLI applications to connect to a DB2 server without having to install a client IBM Data Server Driver Package: includes a Windows-specific driver with support for .NET environments in addition to ODBC, CLI and open source. This driver was previously known as the IBM Data Server Driver for ODBC, CLI and .NET. There is no charge to use DB2 clients or drivers. B.3 Installing DB2 In this section we explain how to install DB2 using the DB2 setup wizard. B.3.1 Installation on Windows DB2 installation on Windows is straight-forward and requires the following basic steps: 11. Ensure you are using a local or domain user that is part of the Administrator group on the server where you are installing DB2. 12. After downloading and unzipping DB2 Express-C for Windows from this link, look for the file setup.exe, and double-click on it.
- 237. Appendix B – Up and running with DB2 237 13. Follow the self- explanatory instructions from the wizard. Choosing default values is normally sufficient. 14. The following is performed by default during the installation: - DB2 is installed in C:Program FilesIBMSQLLIB - The DB2ADMNS and DB2USERS Windows operating system groups are created. - The instance DB2 is created under C:Program FilesIBMSQLLIBDB2 - The DB2 Administration Server (DAS) is created - Installation logs are stored in: My DocumentsDB2LOGdb2.log My DocumentsDB2LOGdb2wi.log - Several Windows services are created. B.3.2 Installation on Linux DB2 installation on Linux is straight-forward and requires the following basic steps: 15. Log on as the Root user to install DB2. 16. After downloading DB2 Express-C for Linux from this link, look for the file db2setup, and execute it: ./db2setup 17. Follow the self-explanatory instructions from the wizard. Choosing default values is normally sufficient. 18. The following is performed by default during installation: - DB2 is installed in /opt/ibm/db2/V9.7 - Three user IDs are created. The default values are listed below: db2inst1 (instance owner) db2fenc1 (Fenced user for fenced routines) dasusr1 (DAS user) - Three user groups are created corresponding to the above user IDs: db2iadm1 db2fadm1 dasadm1 - Instance db2inst1 is created - The DAS dasusr1 is created - Installation logs are stored in: /tmp/db2setup.his
- 238. 238 Getting Started with IBM Data Studio for DB2 /tmp/db2setup.log /tmp/db2setup.err B.4 DB2 Tools There are several tools that are included with a DB2 data server such as the DB2 Control Center, the DB2 Command Editor, and so on. Starting with DB2 version 9.7 however; most of these tools are deprecated (that is, they are still supported but no longer enhanced) in favor of IBM Data Studio. IBM Data Studio is provided as a separate package not included with DB2 and is the subject of this book. B.4.1 Control Center Prior to DB2 9.7, the primary DB2 tool for database administration was the Control Center, as illustrated in Figure B.4. This tool is now deprecated, but still included with DB2 servers. Figure B.4 - The DB2 Control Center To start the Control Center on Windows use Start -> Programs -> IBM DB2 -> DB2COPY1 (Default) -> General Administration Tools -> Control Center or alternatively, type the command db2cc from a Windows Command Prompt or Linux shell.
- 239. Appendix B – Up and running with DB2 239 The Control Center is a centralized administration tool that allows you to: View your systems, instances, databases and database objects; Create, modify and manage databases and database objects; Launch other DB2 graphical tools The pane on the left-hand side provides a visual hierarchy of the database objects on your system(s), providing a folder for Tables, Views, etc. When you double-click a folder (for example, the Tables folder, as shown in Figure B.5), the pane on the top right will list all of the related objects, in this case, all the tables associated with the SAMPLE database. If you select a given table in the top right pane, the bottom right pane provides more specific information about that table. Right-clicking on the different folders or objects in the Object tree will bring up menus applicable to the given folder or object. For example, right-clicking on an instance and choosing Configure parameters would allow you to view and update the parameters at the instance level. Similarly, if you right-click on a database and choose Configure parameters, you would be able to view and update parameters at the database level. B.4.2 Command Line Tools There are three types of Command Line tools: DB2 Command Window (only on Windows) DB2 Command Line Processor (DB2 CLP) DB2 Command Editor (GUI-based, and deprecated) These tools are explained in more detail in the next sections. B.4.2.1 DB2 Command Window The DB2 Command Window is only available on Windows operating systems; it is often confused with Windows Command Prompt. Though they look the same, the DB2 Command Window, however, initializes the environment for you to work with DB2. To start this tool, use Start -> Programs -> IBM DB2 -> DB2COPY1 (Default) -> Command Line Tools -> Command Window or alternatively, type the command db2cmd from a Windows Command Prompt to launch it on another window. Figure B.5 shows the DB2 Command Window.
- 240. 240 Getting Started with IBM Data Studio for DB2 Figure B.5 - The DB2 Command Window You can easily identify you are working in the DB2 Command Window by looking at the window title which always includes the words DB2 CLP as highlighted in the figure. From the DB2 Command Window, all commands must be prefixed with db2. For example, in the above figure, two statements are issued: db2 connect to sample db2 select * from staff For Linux, the equivalent of the DB2 Command Window is simply the Linux shell (or terminal) where the DB2 environment has been set up by executing the db2profile file. This file is created by default and added to the .login file for the DB2 instance owner. By default the DB2 instance owner is db2inst1. B.4.2.2 DB2 Command Line Processor The DB2 Command Line Processor (CLP) is the same as the DB2 Command Window, with one exception that the prompt is db2=> rather than an operating system prompt. To start the DB2 Command Line Processor on Windows, use Start -> Programs -> IBM DB2 -> DB2COPY1 (Default) -> Command Line Tools -> Command Line Processor or alternatively from a DB2 Command Window or Linux shell type db2 and press Enter. The prompt will change to db2 as shown in Figure B.6.
- 241. Appendix B – Up and running with DB2 241 Figure B.6 - The DB2 Command Line Processor (CLP) Note that Figure B.6 also illustrates that when working in the CLP, you do not need to prefix commands with DB2. To exit from the CLP, type quit. B.4.2.3 DB2 Command Editor The DB2 Command Editor is the GUI version of the DB2 Command Window or DB2 Command Line Processor as shown in Figure B.7. This tool is deprecated for DB2 version 9.7.
- 242. 242 Getting Started with IBM Data Studio for DB2 Figure B.7 - The DB2 Command Editor B.5 The DB2 environment Figure B.8 provides a quick overview of the DB2 environment.
- 243. Appendix B – Up and running with DB2 243 Figure B.8 - The DB2 Environment The figure illustrates a server where DB2 Express-C has been installed. The smaller boxes in light green (Environment Variables, Database Manager Configuration File, Database Configuration File, DB2 Profile Registry) are the different areas where a DB2 server can be configured, and they will be explained in more detail in the next section. The larger dark green box represents an instance which in this example has the name myinst. An instance is an environment where database objects can be created. On the same server, you can create several instances, each of which is treated independently. For example, you can use an instance for development, another one for test, and another one for production. Table B.1 shows some useful commands you can use at the instance level. Note that the commands shown in this section can also be performed from DB2 GUI Tools. Command Description db2start Starts the current instance db2stop Stops the current instance db2icrt <instance_name> Creates a new instance db2idrop <instance_name> Drops an instance db2ilist Lists the instances you have on your system db2 get instance Lists the current active instance
- 244. 244 Getting Started with IBM Data Studio for DB2 Table B.1 - Useful instance-level DB2 commands Within an instance you can create many databases. A database is a collection of objects such as tables, views, indexes, and so on. For example, in Figure B.8, the database MYDB1 has been created within instance myinst. Table B.2 shows some commands you can use at the database level. Command/SQL statement Description create database <database_name> Creates a new database drop database <database_name> Drops a database connect to <database_name> Connects to a database create table/create view/create index SQL statements to create table, views, and indexes respectively Table B.2 - Commands and SQL Statements at the database level B.6 DB2 configuration DB2 parameters can be configured using the Configuration Advisor GUI tool. The Configuration Advisor can be accessed through the Control Center by right clicking on a database and choosing Configuration Advisor. Based on your answers to some questions about your system resources and workload, the configuration advisor will provide a list of DB2 parameters that would operate optimally using the suggested values. If you would like more detail about DB2 configuration, keep reading. Otherwise, use the Configuration Advisor and you are ready to work with DB2! A DB2 server can be configured at four different levels as shown earlier in Figure B.8: Environment variables are variables set at the operating system level. The main environment variable to be concerned about is DB2INSTANCE. This variable indicates the current instance you are working on, and for which your DB2 commands will apply. Database Manager Configuration File (dbm cfg) includes parameters that affect the instance and all the databases it contains. Table B.3 shows some useful commands to manage the dbm cfg. Command Description
- 245. Appendix B – Up and running with DB2 245 get dbm cfg Retrieves information about the dbm cfg update dbm cfg using <parameter_name> <value> Updates the value of a dbm cfg parameter Table B.3 - Commands to manipulate the dbm cfg Database Configuration File (db cfg) includes parameters that affect the particular database in question. Table B.4 shows some useful commands to manage the db cfg. Command Description get db cfg for <database_name> Retrieves information about the db cfg for a given database update db cfg for <database_name> Updates the value of a db cfg parameter using <parameter_name> <value> Table B.4 - Commands to manipulate the db cfg DB2 Profile Registry variables includes parameters that may be platform specific and can be set globally (affecting all instances), or at the instance level (affecting one particular instance). Table B.5 shows some useful commands to manipulate the DB2 profile registry. Command Description db2set -all Lists all the DB2 profile registry variables that are set db2set <parameter>=<value> Sets a given parameter with a value Table B.5 - Commands to manipulate the DB2 profile registry B.7 Connecting to a database If your database is local, that is, it resides on the same system where you are performing your database operation; the connection setup is performed automatically when the database is created. You can simply issue a connect to database_name statement to connect to the database. If your database is remote, the simplest method to set up database connectivity is by using the Configuration Assistant GUI tool following these steps:
- 246. 246 Getting Started with IBM Data Studio for DB2 1. Start the Configuration Assistant from the system where you want to connect to the database. To start this tool, use the command db2ca from a Windows command prompt or Linux shell. Figure B.9 shows the Configuration Assistant. Figure B.9 - The DB2 Configuration Assistant 2. From the Configuration Assistant, click on the Selected --> Add database using Wizard menu 3. From the Select how you want to set up a connection window, you can use Search the network if your network is small without many hubs. If you know the name of the server where DB2 resides, choose Known systems and drill down all the way to the database you want to connect. Proceed with the wizard using default values. If you do not know the name of your system, choose Other systems (Search the network). Note that this may take a long time if your network is large. 4. If Search the network does not work, go back to the Select how you want to set up a connection window, and choose Manually configure a connection to a database. Choose TCP/IP and click next. Input the hostname or IP address where your DB2 server resides. Input either the service name or the port number. 5. Continue with the wizard prompts and leave the default values. 6. After you finish your set up, a window will pop up asking you if you want to test your connection. You can also test the connection after the setup is finished by right-clicking on the database, and choosing Test Connection.
- 247. Appendix B – Up and running with DB2 247 B.8 Basic sample programs Depending on the programming language used, different syntax is required to connect to a DB2 database and perform operations. Below are links to basic sample programs which connect to a database, and retrieve one record. We suggest you first download all the sample programs in this section: CLI program ODBC program C program with embedded SQL JDBC program using Type 2 Universal (JCC) driver JDBC program using Type 4 Universal (JCC) driver Visual Basic and C++ ADO program - Using the IBM OLE DB provider for DB2 (IBMDADB2) Visual Basic and C++ ADO program - Using the Microsoft OLE DB Provider for ODBC (MSDASQL) Visual Basic and C# ADO.Net using the IBM DB2 .NET Data Provider Visual Basic and C# ADO.Net using the Microsoft OLE DB .NET Data Provider Visual Basic and C# ADO.Net using the Microsoft ODBC .NET Data Provider B.9 DB2 documentation The DB2 Information Center provides the most up-to-date online DB2 documentation. The DB2 Information Center is a web application. You can access the DB2 Information Center online, or you can download and install the DB2 Information Center to your local computer. Links to the online DB2 Information Center as well as downloadable versions are available using this link.
- 248. 248 Getting Started with IBM Data Studio for DB2
- 249. 249 C Appendix C – Installing the Data Studio stand-alone package This Appendix is included for those people who would like to use the Data Studio standalone package. As described in Chapter 1, the stand-alone package is designed for DBAs who have no need for Java, Web services, or XML development capabilities and who like the smaller footprint provided by this package. Table C.1 compares features in the IDE package and the stand-alone package. Capability Details Data Studio standalone Data Studio IDE Architecture Shell sharing with other Rational or Optim products Data Modeling Database overview diagrams X X Application Development SQL and XQuery editor X X SQL Builder X X Visual Explain X X SQL routine editor and debugger X X X Java routine editor and debugger SQLJ development X XML editor and annotated XSD mapping editor X Data Web Services Object Management X X Create alter, and drop IBM Data server objects X X View and edit privileges for IBM Data Server objects and authorization IDS X X
- 250. 250 Getting Started with IBM Data Studio for DB2 Impact analysis – report on dependencies X Generate DDL X X Generate commands – start, stop, quiesce, etc X X Generate utilities- backup, restore, reorg, etc X X Data distribution X X Export and import table X X Extract, extract as XML X X Sample contents X X Load data X X Edit data Data Management X X X Unload using High Performance X Unload (separate purchase) Table C.1 Comparing capabilities in Data Studio stand-alone and IDE X C.1 Before you begin Please remember to read the system requirements before you download. It references important information like Java Runtime versions, Linux download tips, etc. For example, for machines that have never run Java, you will need a JRE of 1.6 or higher for the installer, which is InstallAnywhere (ISMP)-based. This allows the installer to launch. Also, you can check out the discussion forum if you have questions. To download the Data Studio stand-alone package, find the link to the Data Studio download registration page on the IDM Community Space downloads tab here: http://www.ibm.com/developerworks/spaces/optim?pageid=649 After you register, you will see the page that lets you choose your platform – Windows or Linux, as shown in Figure C.1.
- 251. Appendix C – Installing the Data Studio stand-alone package 251 Figure C.1 – Choose your platform from the download site Choose your platform, register, accept the license, and download the package. C.2 Installation procedure 1. Double click on ibm_data_studio_standalone_win.exe. The screen shown in Figure C.2 appears. Accept the license and click Next.
- 252. 252 Getting Started with IBM Data Studio for DB2 Figure C.2 – Accept the license agreement 2. Choose the installation directory or accept the default C:Program FilesIBMIBM Data Studio stand-alone as shown in Figure C.3 and click Next.
- 253. Appendix C – Installing the Data Studio stand-alone package 253 Figure C.3 – Choose an installation directory 3. If all goes well, you will see the screen shown in Figure C.4 below, and you simply need to click Done to start Data Studio. (If you would rather start Data Studio later from the Start menu, simply uncheck the Start IBM Data Studio box.)
- 254. 254 Getting Started with IBM Data Studio for DB2 Figure C.4 – Choose your platform from the download site 4. The Welcome screen is shown below in Figure C.5. Click on the X on the Welcome tab to close that screen.
- 255. Appendix C – Installing the Data Studio stand-alone package 255 Figure C.5 – Welcome screen for Data Studio (stand-alone) After you close the Welcome screen you are immediately launched into the Database Administration perspective in a default Workspace in the …/IBM/Data Studio 2.2 stand-alone directory, as shown in Figure C.6. (Note, you can use File->Switch Workspace if you have an existing project and workspace you want to use.)
- 256. 256 Getting Started with IBM Data Studio for DB2 Figure C.6 – Default workspace for Data Studio stand-alone Congratulations, you’ve successfully installed Data Studio stand-alone and are ready to get to work!
- 257. 257 D Appendix D – Great Outdoors sample database The Great Outdoors Company is a fictional company used to help illustrate real-world scenarios and examples for product documentation, product demos, and technical articles. The sample database for Great Outdoors is used to illustrate many different use cases, including data warehousing use cases. This book uses only a subset of that database. This appendix provides an overview of the schemas and tables that are used in many of the examples and exercises used in this book. Note: The sample database can be downloaded from the Integrated Data Management Information Center: http://publib.boulder.ibm.com/infocenter/idm/v2r2/topic/com.ibm.sampledata.go.doc/topics /download.html D.1 Great Outdoors database data model (partial) Figure D.1 shows the relationship among the tables used in the examples in this book.
- 258. 258 Getting Started with IBM Data Studio for DB2 Figure D.1- Great Outdoors data model
- 259. Appendix D – The Great Outdoors sample database 259 D.2 Table descriptions D.2.1 GOSALES schema The GOSALES schema includes information about products and inventory. D.2.1.1 GOSALES.BRANCH table Row count: 29 The BRANCH table contains address information of each branch. Each branch has a collection of employees with different roles, including sales representatives operating from a regional base. Not all branches have warehouses. The warehouse branch code is a repeating value of the branch code, identifying the regions covered by a particular warehouse. D.2.1.2 GOSALES.INVENTORY_LEVELS table Row count: 53730 This table shows inventory for all warehouses. Only 11 of the 29 branches have warehouses that maintain inventory. D.2.1.3 GOSALES.PRODUCT table Row count: 274 The company supplies sport gear for camping, climbing, and golfing. There are five product lines, further subdivided into 21 product types. There are a total of 144 unique products, or 274 products when including color and size. D.2.1.4 GOSALES.PRODUCT_BRAND table Row count: 28 Products of the same brand are associated by a style or price point. The lookup tables associated with SLS_PRODUCT_DIM exist to avoid row width errors.
- 260. 260 Getting Started with IBM Data Studio for DB2 D.2.1.5 GOSALES.PRODUCT_COLOR_LOOKUP table Row count: 27 Product colors provide analysis by attribute. GO Accessories is the richest data source for attribute analysis including color and size. The lookup tables associated with PRODUCT exist to avoid row width errors. D.2.1.6 GOSALES.PRODUCT_LINE table Row count: 5 There are five product lines, with each covering a different aspect of outdoor activity. Each line is further subdivided into product types and products: Camping Equipment Mountaineering Equipment Personal Accessories Outdoor Protection Golf Equipment D.2.1.7GOSALES.PRODUCT_NAME_LOOKUP table Row count: 6302 This lookup table contains the name of each product. The lookup tables associated with PRODUCT exist to avoid row width errors. D.2.1.8 GOSALES.PRODUCT_SIZE_LOOKUP table Row count: 55 Product sizes provide analysis by attribute. The GO Accessories company is the richest data source for attribute analysis including color and size. The lookup tables associated with PRODUCT exist to avoid row width errors. D.2.1.9 GOSALES.PRODUCT_TYPE table Row count: 21 Each product line has a set of product types that define a functional area for outdoor equipment. The product type lookup table contains the names of 21 product types. The lookup tables associated with PRODUCT exist to avoid row width errors.
- 261. Appendix D – The Great Outdoors sample database 261 D.2.2 GOSALESCT schema The GOSALESCT schema contains customer information. D.2.2.1 GOSALESCT.CUST_COUNTRY table Row count: 23 This table defines the geography for the online sales channel to consumers. The addition of Russia and India make it different from the country table in the GOSALES schema. There are no sales regions for India or Russia. D.2.2.2 GOSALESCT.CUST_CRDT_CHECK table Row count: 900 The customer credit check table contains the credit scores of consumers that make online purchases. D.2.2.3 GOSALESCT.CUST_CUSTOMER table Row count: 31255 The customer table contains the name, address, and contact information of each customer. All customers in this table are online shoppers paying the retail price for items sold by the company or one of its partners. D.2.2.4 GOSALESCT.GO_SALES_TAX table Row count: 94 The Great Outdoors sales tax table contains sales tax rates at a country level, or state level if applicable. Tax rates are for example only. D.2.3 GOSALESHR schema The GOSALESHR schema includes information used by the Great Outdoors company Human Resources department.
- 262. 262 Getting Started with IBM Data Studio for DB2 D.2.3.1 GOSALESHR.EMPLOYEE table Row count: 766 The employee table contains the static information that repeats for each detail in the employee history table. D.2.3.2 GOSALESHR.RANKING table Row count: 5 The ranking dimension contains text descriptions of an employee's ranking. Ranking is done annually and is one of the following values: Poor Satisfactory Good Very good Excellent D.2.3.3 GOSALESHR.RANKING_RESULTS table Row count: 1898 This fact table maintains ranking data for each employee. Rankings are published in the month of March based on the previous year.
- 263. 263 E Appendix E – Advanced topics for developing Data Web Services This appendix shows you how to take advantage of more capabilities with Data Web Services, including the following topics: Consuming Web services – using different bindings Simplifying access for single row results Handling stored procedure result sets Using XSL to transform input and output results Understanding Data Web Services artifacts Selecting a different SOAP engine framework E.1 Testing additional Web service bindings You may have clients that require a different binding in order to consume the Web service response and which are not supported for testing in the Web Services Explorer. In this section, we’ll review a couple of basic items you need to understand for using and testing these additional bindings, including more detail on the location of the WSDL and the default message XML schema. Then we’ll explain how to use each of the following bindings: • SOAP over HTTP: This is the binding described in Chapter 6. It is used with WSDL-based clients like SOAP frameworks, Enterprise SOA environments, and with service registries such as the WebSphere Service Registry and Repository. We include it here for completeness. • Web Access: HTTP GET: This is used for quick access from Web 2.0 clients and for direct access from Web browsers. • Web Access: HTTP POST URL-encoded: Used with more “traditional” HTML, such as for submitting HTML forms. • Web Access: HTTP POST XML: Web 2.0, used by AJAX clients and JavaScript frameworks using the asynchronous HTTPXMLRequest JavaScript method from a Web browser.
- 264. 264 Getting Started with IBM Data Studio for DB2 • Web Access: HTTP POST JSON: Web 2.0, provides a direct way to parse messages into JavaScript objects. All service bindings are based on HTTP and, for demonstration purposes, we use cURL as a lightweight, simple to use HTTP client. Note: cURL is a command-line tool for transferring files with URL syntax. Using the cURL command line, a URL must be used to define where to get or send the file that is specified in the command line. cURL is free software that is distributed under the MIT License and supports several data transfer protocols. cURL compiles and runs under a wide variety of operating systems. cURL uses a portable library and programming interface named libcurl, which provides an interface to the most common Internet protocols, such as HTTP(s), FTP(s), LDAP, DICT, TELNET, and FILE. Consult and download all documentation and binaries from the cURL Website at the URL address: http://curl.haxx.se/ E.1.1 Default XML message schemas To test the SOAP over HTTP and HTTP POST (XML) binding you need to know the structure (XML schema) of the request message. This information is contained in the WSDL file, but you can also separately generate the XML schema for every operation in the Web service, as follows: 1. Right-click on the Web service operation from within the Data Project Explorer and select Manage XSLT…. Figure E.1 shows this for the RankEmployee operation used in Chapter 6.
- 265. Appendix E – Advanced topics in developing Data Web Services 265 Figure E.1 – Selecting the Manage XSLT option 2. From the Configure XSL Transformations dialog, click on the Generate Default button. You will be asked for a location to store the XML schema file as shown in Figure E.2. Keep the default location, which points to your Data Development project folder. Keep the proposed name SimpleService.RankEmployee.default.xsd.
- 266. 266 Getting Started with IBM Data Studio for DB2 Figure E.2 – Saving the generated XML schema 3. Click Save. Data Studio generates the XML schema for the selected operation. Exit the dialog and refresh the Data Development Project (right-clicking the project and selecting Refresh…). Now a generated XSD file appears under the project's XML -> XML Schema folder. The XSD extension may not be displayed. 4. Now you can use the Data Studio XML tooling to create an XML instance document from the XML schema using the XML instance generator. Locate the generated XSD file in the XML -> XML Schema folder. Right-click the XSD file and select Generate -> XML File … 5. From the New XML File dialog select a name and destination for the XML file instance. In Figure E.3, we select SimpleService.RankEmployee.default.xml as the file name, since we want to create the XML request message for the RankEmployee operation.
- 267. Appendix E – Advanced topics in developing Data Web Services 267 Figure E.3 – Selecting an XML file name and location 6. Click Next. In the next dialog shown in Figure E.4, you need to select the Root element for your XML message from the XML schema. In this case, there are two root elements available – RankEmployee and RankEmployeeResponse. Select RankEmployee as the root element name, since this represents the element for the
- 268. 268 Getting Started with IBM Data Studio for DB2 request message. Click Finish. Figure E.4 – Select the root element from the XML schema Note: Data Studio always uses the operation name as the root element for the request message and the operation name with “Response” as the suffix for the response message. 7. Data Studio generates the XML instance document and opens it in the XML editor. As shown in Figure E.5, switch to the Source view by clicking the Source tab in the middle of the panel, and change the value of the EMPLOYEE_CODE tag to 10004 and the RANKING value to Excellent.
- 269. Appendix E – Advanced topics in developing Data Web Services 269 Figure E.5 – The generated XML instance document 8. Save the file. It appears in the XML -> XML documents folder after refreshing your Data Development project. When executing the SOAP binding for the RankEmployee operation with the Web Services Explorer, you can see that the generated SOAP request message content looks very similar, since both match the same XML schema. Repeat these steps for all operations you want to test using cURL. E.1.2 SOAP over HTTP Binding The first service binding we look at is SOAP over HTTP. We described how to test this binding in Chapter 6 using the Web Services Explorer. In this section, we show you how to re-create what the Web services Explorer did for you before. Start by assembling the SOAP request message by creating a new XML file called RankEmployeeSOAP.xml. Into that file, copy and paste the SOAP request message from the source view of the Web Services Explorer (as shown in Listing E.1.) <soapenv:Envelope xmlns:soapenv="http://schemas.xmlsoap.org/soap/envelope/" xmlns:q0="http://www.ibm.com/db2/onCampus" xmlns:xsd="http://www.w3.org/2001/XMLSchema" xmlns:xsi="http://www.w3.org/2001/XMLSchema-instance"> <soapenv:Body> <q0:RankEmployee> <EMPLOYEE_CODE>10004</EMPLOYEE_CODE> <RANKING>Excellent</RANKING> </q0:RankEmployee> </soapenv:Body> </soapenv:Envelope> Listing E.1 - The SOAP request message Invoke the SOAP binding using the cURL command. To do this, you need to know the SOAP over HTTP endpoint URL. Data Web Services (DWS) has the following rules to get to the SOAP endpoint URL: http(s)://<server>:<port>/<contextRoot>/services/<ServiceName> For the SimpleService example, the endpoint URL is: http://server:8080/WebServicesSimpleService/services/SimpleServi ce
- 270. 270 Getting Started with IBM Data Studio for DB2 The cURL command to send the request to the Web service should look like this:. curl.exe -d @RankEmployeeSOAP.xml -H "Content-Type: text/xml" -H "SOAP-Action: "http://www.ibm.com/db2/onCampus/RankEmployee"" -v http://localhost:8080/WebServicesSimpleService/services/SimpleService Note: Argument used: -d @<filename> Name of the file with the SOAP request message. This also forces cURL to use HTTP POST for the request. -H Additional header fields need to be specified for the request. The server needs to know the Content-Type, which is XML and the SOAPAction header, which can be found in the in the binding section for the SOAP endpoint in the WSDL document. Note: The SOAPAction String needs to be included in double quotes. -v The verbose switch to show detailed messages. <url> The URL to send the request to. This needs to be the SOAP over HTTP endpoint URL of your Web service. It can be found in the WSDL document or by using the Web Services Explorer. The output of the command should look similar to what is shown in Listing E.2: * About to connect() to localhost port 8080 (#0) * Trying 127.0.0.1... connected * Connected to localhost (127.0.0.1) port 8080 (#0) > POST /WebServicesSimpleService/services/SimpleService HTTP/1.1 > User-Agent: curl/7.18.2 (i386-pc-win32) libcurl/7.18.2 OpenSSL/0.9.8h libssh2/0.18 > Host: localhost:8080 > Accept: */* > Content-Type: text/xml > SOAPAction:"http://www.ibm.com/db2/onCampus/RankEmployee" > Content-Length: 389 > < HTTP/1.1 200 OK
- 271. Appendix E – Advanced topics in developing Data Web Services 271 < Server: Apache-Coyote/1.1 < Content-Type: text/xml;charset=utf-8 < Transfer-Encoding: chunked < Date: Sun, 28 Jun 2009 04:21:21 GMT < <?xml version="1.0" encoding="UTF-8"?><soapenv:Envelope xmlns:soapenv="http://sc hemas.xmlsoap.org/soap/envelope/" xmlns:xsd="http://www.w3.org/2001/XMLSchema" x mlns:xsi="http://www.w3.org/2001/XMLSchema-instance"><soapenv:Body><ns1:RankEmpl oyeeResponse xmlns:ns1="http://www.ibm.com/db2/onCampus" xmlns:xsi="http://www.w 3.org/2001/XMLSchema-instance"><row><RANKING_DATE>2009-06-27T21:21:21.312Z</RANK ING_DATE><RANKING_YEAR>2009</RANKING_YEAR><EMPLOYEE_CODE>10004</EMPLOYEE_CODE><R ANKING_CODE>5</RANKING_CODE></row></ns1:RankEmployeeResponse></soapenv:Body></so apenv:Envelope> Listing E.2 – The service response If successful, the SOAP response message is displayed together with the HTTP header fields for the request and response. Note: SQL NULL values are represented via the xsi:nil attribute; that is, xsi:nil=”true” indicates an SQL NULL value. When using the SOAP binding, your request gets routed through the SOAP framework at the application server. Depending on the framework used, you can add additional configuration artifacts – like SOAP handlers or WS-* configurations – to your Web service. But you can also use one of the more “simple” HTTP RPC (remote procedure call) bindings described in the following sections. E.1.3 HTTP POST (XML) Binding The HTTP POST (XML) binding is similar to the SOAP binding. The difference from the SOAP binding is that it does not get routed through a SOAP framework on the server side, and the messages are not following the SOAP specification. Only the “plain” XML payload is exchanged without the SOAP Envelope and SOAP Body tags. A simple HTTP POST request is used to send the XML request to the server. You can reuse the SimpleService.RankEmployee.default.xml file you created before as the request message document. You also need to know the REST endpoint URL in order to send your request. Data Web Services (DWS) has the following rules to get to the SOAP endpoint URL: http(s)://<server>:<port>/<contextRoot>/rest/<ServiceName>/<Operati onName> To invoke the RankEmployee operation of the SimpleService example, your endpoint URL looks like this:
- 272. 272 Getting Started with IBM Data Studio for DB2 http://server:8080/WebServicesSimpleService/rest/SimpleService/Rank Employee Note: The REST endpoint URL is used for all HTTP RPC bindings: - HTTP POST (XML) - HTTP POST (application/x-www-form-urlencoded) - HTTP POST (JSON) - HTTP GET You can enable or disable all HTTP Bindings for a Web service by checking or unchecking the REST (Web access) option in the Deploy Web Service dialog described in Chapter 6. The cURL command to send the request to the Web service should look like this: curl.exe -d @ SimpleService.RankEmployee.default.xml -H "Content-Type:text/xml;charset=utf-8" -v http://localhost:8080/WebServicesSimpleService/rest/SimpleService/RankEmployee E.1.4 HTTP POST (application/x-www-form-urlencoded) Binding This binding can be used with HTML forms using the POST action. In this case, the parameters are sent as key/value pairs, where each pair is separated by an ampersand (‘&”). You can also use cURL to test this binding. Create a new text file called RankEmployeeUrlEncoded.txt. The content of your file should look like this: EMPLOYEE_CODE=10004&RANKING=Excellent The cURL command to send the request to the Web service should look like this: curl.exe -d @"RankEmployeeUrlEncoded.txt" -H "Content-Type:application/x-www-form-urlencoded" -v http://localhost:8080/WebServicesSimpleService/rest/SimpleService/RankEmployee The response message is the same as for the HTTP POST (XML) binding. Note: The HTTP POST (application/x-www-form-urlencoded) binding is listed in the WSDL file and can be tested using the Web Services Explorer as well. In case of the SimpleService
- 273. Appendix E – Advanced topics in developing Data Web Services 273 the binding is called SimpleServiceHTTPPOST. Note: SQL NULL values are treated as absent. This means parameter values that are not present in the key/value string are set to SQL NULL. A parameter with an empty value is treated as an empty string. E.1.5 HTTP GET Binding This binding uses the HTTP GET verb with a URL to invoke the Web service operation. Since there is no content sent to the server, all input parameters must become part of the URL. This is done using the URL query string. Everything that follows the question mark “?’ sign in a URL is specified as the query string. A query string consists of key/value pairs which are concatenated using the ampersand ‘&’ character. The cURL command that sends the request to the Web service should look like this: curl.exe -v http://localhost:8080/WebServicesSimpleService/rest/SimpleService/RankEmployee? EMPLOYEE_CODE=10004&RANKING=Excellent Note: The HTTP GET binding is listed in the WSDL file and can be tested using the Web Services Explorer as well. In the case of the SimpleService, the binding is called SimpleServiceHTTPGET. Note: Multi-byte characters in URL strings: If your data contains multi-byte characters, you need to consider the following: • Multi-byte characters need to be provided in UTF-8 • The UTF-8 bytes need be URL-encoded to follow the URI/URL specification. For example, if you have a parameter value in Chinese like 日本語 your URL must look like this: http://localhost:8080/JmaWebService/rest/WebService/Test?p1=% E6%97%A5%E6%9C%AC%E8%AA%9E Application Servers and multi-byte UTF-8 characters in URLs: You may have to perform some additional configuration steps at your application server to
- 274. 274 Getting Started with IBM Data Studio for DB2 treat multibyte UTF-8 characters in URLs correctly. Tomcat With Tomcat, you need to add the attribute URIEncoding="UTF-8" to your <Connector> configurations in the server.xml file. More details can be found here: http://wiki.apache.org/tomcat/FAQ/Connectors WebSphere Application Server Community Edition (WAS CE): WAS CE ships Tomcat as its Web container - but there is no server.xml file. Instead, there is a Tomcat configuration section in the $WASCE_HOME/var/config/config.xml file. You need to add <attribute name="uriEncoding">UTF-8</attribute> to the <gbean name="TomcatWebConnector"> section. More details can be found here: http://publib.boulder.ibm.com/wasce/V2.1.1/en/tomcat-configuration.html Note: SQL NULL values are treated as absent. This means parameter values that are not present in the key/value string are set to SQL NULL. A parameter with an empty value is treated as an empty string. You can also easily test the HTTP GET binding with your Web Browser. Simply enter the URL into your browser to invoke the Web service operation. Figure E.6 shows what the RankEmployee operation looks like when invoked with Firefox. Figure E.6 – The service response in a Web browser window
- 275. Appendix E – Advanced topics in developing Data Web Services 275 E.1.6 HTTP POST (JSON) Binding Finally, Data Web Services provides you with a simple JSON binding that can be leveraged from JavaScript applications –for example, when using AJAX with the XMLHttpRequest object. In order to test the JSON binding with cURL you need to create the JSON request message first. The building rules for a Data Web Services JSON request message are as follows: {"<operationName>":{"<parameter1>":<value1>,"<parameter1>":<value1>,…}} Note: JSON data type formatting: The data type formats follow the JSON specification. Date, time and timestamp types are expected to be provided in XSD format: xs:date, xs:time and xs:dateTime. Binary data types are expected as base64 encoded strings. SQL NULL values are represented as JSON null. Create a new file called RankEmployeeJSON.txt. The content of the file should look like this: {"RankEmployee": {"EMPLOYEE_CODE":10004,"RANKING":"Excellent"} } The cURL command to send the request to the Web service should look this: curl.exe -d @"GetBestSellingProductsByMonthJSON.txt" -H "Content-Type:application/json;charset=utf-8" -v http://localhost:8080/WebServicesSimpleService/rest/SimpleService/RankEmployee The output of the command should look similar to what is shown in Listing E.3. ... < HTTP/1.1 200 OK < Server: Apache-Coyote/1.1 < Cache-Control: no-cache, no-store, max-age=0 < Expires: Thu, 01 Jan 1970 00:00:01 GMT < Content-Type: application/json;charset=UTF-8 < Content-Length: 129 < Date: Sun, 28 Jun 2009 04:48:26 GMT < {"RankEmployeeResponse":[{"RANKING_DATE":"2009-06-27T21:48:26.203Z","RANKING_YEA R":2009,"EMPLOYEE_CODE":10004,"RANKING_CODE":5}]} Listing E.3 – The service response The response is also formatted as JSON.
- 276. 276 Getting Started with IBM Data Studio for DB2 Note: Switching output format from XML to JSON: For all HTTP RPC bindings, if the response should be returned as XML or JSON, you can specify the _outputFormat control parameter (the initial underscore character marks it as a control parameter) in the URL to define. For all bindings except HTTP POST (JSON), the output format is XML by default. Example (HTTP GET with JSON response): http://localhost:8080/WebServicesSimpleService/rest/SimpleService/RankEmployee?EMPLY EE_CODE=10004&RANKING=Poor&_outputFormat=JSON E.2 Simplify access for single-row results You can use an option called Fetch only single row for queries for query operations that you know will return only a single row to reduce the complexity of the service response data structure. It simplifies the message response by removing the <row> tag around the single row result. Since it’s known that the query operation only returns one result row, the Data Web Services runtime can skip the row delimiter tag in the response. The RankEmployee operation for example always returns a single row only. To remove the <row> tag: 1. From the Data Project Explorer, right-click the operation in your Web service and select Edit. The Edit Operation dialog opens as shown in Figure E.7. Figure E.7 – Select the Edit option for an operation 2. Check the Fetch only single row for queries option and click Finish as shown in Figure E.8.
- 277. Appendix E – Advanced topics in developing Data Web Services 277 Figure E.8 – Check the Fetch only single row option 3. Re-deploy the Web service to propagate your changes to the application server, as described in Chapter 6. When invoking the RankEmployee operation, you will see that there is no <row> tag, as shown in Listing E.4. <?xml version="1.0" encoding="UTF-8"?> <ns1:RankEmployeeResponse xmlns:ns1="http://www.ibm.com/db2/onCampus" xmlns:xsi="http://www.w3.org/2001/XMLSchema-instance"> <RANKING_DATE>2009-06-27T21:57:08.109Z</RANKING_DATE> <RANKING_YEAR>2009</RANKING_YEAR> <EMPLOYEE_CODE>10004</EMPLOYEE_CODE> <RANKING_CODE>5</RANKING_CODE> </ns1:RankEmployeeResponse> Listing E.4 – The RankEmployee response message without a <row> tag Data Web Services also changes the XML schema for the response message in the WSDL accordingly. E.3 Processing stored procedures result sets As was discussed in Chapter 6, there are some special considerations for stored procedures that return result sets. Data Studio uses DB2 catalog information to generate the XML schema file for the operation’s input and output messages. But the DB2 catalog
- 278. 278 Getting Started with IBM Data Studio for DB2 does not contain metadata information about result sets returned by stored procedures. Only the maximum number of result sets returned is known, which forces Data Studio to assign a very generic result set definition represented by the anonymousResultSetType, as shown in Listing E.6. <complexType name="anonymousResultSetType"> <sequence> <element maxOccurs="unbounded" minOccurs="0" name="row"> <complexType> <sequence maxOccurs="unbounded" minOccurs="0"> <any processContents="skip"/> </sequence> </complexType> </element> </sequence> </complexType> Listing E.6 – The anonymousResultSetType You can see the reference to the anonymousResultSetType in the XML schema definition for the PRODUCT_CATALOG stored procedure response message, as shown in Listing E.5. <element name="PRODUCT_CATALOGResponse"> <complexType> <sequence> <element maxOccurs="1" minOccurs="0" name="rowset" type="tns:anonymousResultSetType"/> </sequence> </complexType> </element> Listing E.5 – Reference to the anonymousResultSetType The generic result set information can cause problems with Web service clients that rely on the message schema provided with the WSDL file – as you could see in Chapter 6with the Web Services Explorer, where the result set content was not displayed correctly (Figure 6.25). Data Studio provides a way to circumvent this problem, but your stored procedure must match the criteria that it always returns the same number of result sets with the same metadata information for every possible invocation. If this is the case, you can add a more detailed result set XML schema. Follow these steps to add the additional result set information for the PRODUCT_CATALOG procedure: 1. From the Data Project Explorer, right-click the PRODUCT_CATALOG operation and select Edit ... to open the Edit Operation dialog. 2. Click Next to get to the Generate XML Schema for Stored procedure dialog and click the Generate button as shown in Figure E.9.
- 279. Appendix E – Advanced topics in developing Data Web Services 279 Figure E.9 – Generate XML schema for stored procedure 3. You will be prompted for input parameters in case the procedure has one or more input parameters defined. Use Irons as the value for the PRODUCT_TYPE parameter, as shown in Figure E.10. Figure E.10 – Provide stored procedure input parameter 4. Click Finish and re-deploy your Web service. If compare the result from the Web Services Explorer shown in Figure E.11 with that shown in Figure 8.25, you can see that the response is now displayed correctly.
- 280. 280 Getting Started with IBM Data Studio for DB2 Figure E.11 – Stored procedure results now accurately mapped in the response Note The result set XML message did not change. The only difference is the more verbose XML schema for the operation response message. If you look at the XML schema for the PRODUCT_CATALOG response message as shown in Listing E.6, you can see that the reference to the anonymousResultSetType is gone. Instead, there is now the actual column information for the result set.
- 281. Appendix E – Advanced topics in developing Data Web Services 281 <element name="PRODUCT_CATALOGResponse"> <complexType> <sequence> <element name="rowset"> <complexType> <sequence> <element maxOccurs="unbounded" minOccurs="0" name="row"> <complexType> <sequence> <element name="PRODUCT_NUMBER" nillable="true" type="xsd:int"/> <element name="PRODUCT_NAME" nillable="true" type="xsd:string"/> <element name="PRODUCT_DESCRIPTION" nillable="true" type="xsd:string"/> <element name="PRODUCTION_COST" nillable="true" type="xsd:decimal"/> <element name="PRODUCT_IMAGE" nillable="true" type="xsd:string"/> </sequence> </complexType> </element> </sequence> </complexType> </element> </sequence> </complexType> </element> Listing E.6 – Schema with verbose result set information E.4 Transform input and output messages using XSL You can assign an Extensible Stylesheet Language Transformation (XSLT) to one or more of your operations to change the default XML input and output message format. This feature allows you to customize the format of the messages that the client sees; for example, to support industry standards or to changing or hiding default tag names in the request and response messages. You can even generate non-XML outputs – like HTML pages. To give you some hands-on experience about stylesheets and what they can do for you, we show you an easy way to transform your Web service response into a service message that is written in HTML format. All Web browsers can interpret HTML code. As a result, you can invoke your Web service directly through a Web browser and receive a formatted response. We use the GetBestSellingProductsByMonth operation and change its output into HTML. You can simply use the HTTP GET binding to invoke the operation from a Web browser and verify the HTML response. E.4.1 Creating an XSL stylesheet Data Studio provides an XSL editor as well as functionality to test your XSL script. To create a new XSL file: 1. Select File -> New -> Other … -> XML. 2. Select your Data Development Project as the parent folder and use the name GetBestSellingProductsByMonthToHTML.xsl.
- 282. 282 Getting Started with IBM Data Studio for DB2 3. Click Finish to create the XSL file. The new XSL file should appear in the XML -> XSLT folder of your project as shown in Figure E.12. Figure E.12 – XSL document in Data Development project 4. Double-click the file to open it with the XSL Editor. For testing purposes we use a rather simple XSL script shown in Listing E.7. Save the file.
- 283. Appendix E – Advanced topics in developing Data Web Services 283 <?xml version="1.0" encoding="UTF-8" ?> <xsl:stylesheet xmlns:xsl="http://www.w3.org/1999/XSL/Transform" version="1.0"> <!-- use html as method to indicate that we generate HTML --> <xsl:output method="html" encoding="UTF-8" media-type="text/html" /> <xsl:template match="/*"> <html> <head> <title>Best Selling Products</title> </head> <body> <table border="1"> <tr bgcolor="#9acd32"> <!-- use XML tag names of the first row as table header --> <xsl:if test="//row"> <xsl:for-each select="//row[1]/*"> <td style="width:150px"> <b> <xsl:value-of select="local-name()" /> </b> </td> </xsl:for-each> </xsl:if> </tr> <!-- iterate over all rows and fill the table --> <xsl:for-each select="//row"> <tr> <xsl:for-each select="*"> <td style="width:150px"> <xsl:value-of select="text()" /> </td> </xsl:for-each> </tr> </xsl:for-each> </table> </body> </html> </xsl:template> </xsl:stylesheet> Listing E.7 – XSL script transforming GetBestSellingProductsByMonth response 5. To assign the XSL stylesheet, right-click at the GetBestSellingProductsByMonth operation and select Manage XSLT… as shown in Figure E 13.
- 284. 284 Getting Started with IBM Data Studio for DB2 Figure E.13 – Select the “Manage XSLT…” option 6. Click the Browse button under Transformation of Output Messages and point to your XSL stylesheet, as shown in Figure E.14.
- 285. Appendix E – Advanced topics in developing Data Web Services 285 Figure E.14 – Configure XSL Transformation dialog 7. Click Finish and re-deploy your Web service. When invoking the GetBestSellingProductsByMonth operation now from a browser, you can see that the response is formatted as HTML. The URL to get the best selling products for April looks like this: http://server:8080/WebServicesSimpleService/rest/SimpleService/GetBestSell ingProductsByMonth?MONTH=4 The response is shown in Figure E.15.
- 286. 286 Getting Started with IBM Data Studio for DB2 Figure E.15 – Response transformed as HTML Note: When looking at the WSDL file you will recognize that the GetBestSellingProductsByMonth are missing in the SOAP binding. This is due to the fact that now HTML is produced, but a SOAP message needs to be XML. E.4.2 Data Web Services XSL Extensions The Data Web services runtime provides a few XSL extension functions that allow you to access the request URL, the request HTTP header fields, and set the HTTP response header fields, shown in Table E.1. Extension function Description getHTTPRequestHeader(header) Returns the value for a given HTTP request header getHTTPRequestURL() Returns the request URL
- 287. Appendix E – Advanced topics in developing Data Web Services 287 getHTTPRequestQueryString() Returns the query string of the URL setHTTPResponseHeader(header, value) Sets the value for a given HTTP response header field encodeJSON(value) Encodes the string as JSON string – can be used to generate custom JSON output Table E.1 – Available XSL Extension functions The XSL stylesheet shown in Listing E.8 demonstrates some of the extension functions. <?xml version="1.0" encoding="UTF-8" ?> <xsl:stylesheet xmlns:xsl="http://www.w3.org/1999/XSL/Transform" version="1.0" xmlns:xalan="http://xml.apache.org/xslt" xmlns:java="http://xml.apache.org/xalan/java" exclude-result-prefixes="xalan java"> <xsl:output method="html" encoding="UTF-8" media-type="text/html" /> <xsl:template match="/*"> <html> <head><title>XSL Extension Test</title></head> <body> <table border="1"> <tr bgcolor="#9acd32"> <td colspan="2"><h2>Request URL</h2></td> </tr> <tr> <td colspan="2"><xsl:value-of select="java:com.ibm.datatools.dsws.rt.common.XSLExtensions.getHTTPRequestURL()"/></td> </tr> <tr bgcolor="#9acd32"> <td colspan="2"><h2>Request URL Query String</h2></td> </tr> <tr> <td colspan="2"><xsl:value-of select="java:com.ibm.datatools.dsws.rt.common.XSLExtensions.getHTTPRequestQueryString()"/></td> </tr> <tr bgcolor="#9acd32"> <td colspan="2"><h2>Request HTTP Header</h2></td> </tr> <tr> <td>Content-Type</td> <td><xsl:value-of select="java:com.ibm.datatools.dsws.rt.common.XSLExtensions.getHTTPRequestHeader('ContentType')"/></td> </tr> <tr> <td>User-Agent</td> <td><xsl:value-of select="java:com.ibm.datatools.dsws.rt.common.XSLExtensions.getHTTPRequestHeader('UserAgent')"/></td> </tr> <tr> <td>Host</td> <td><xsl:value-of select="java:com.ibm.datatools.dsws.rt.common.XSLExtensions.getHTTPRequestHeader('Host')"/></td> </tr> <tr>
- 288. 288 Getting Started with IBM Data Studio for DB2 <td>Accept</td> <td><xsl:value-of select="java:com.ibm.datatools.dsws.rt.common.XSLExtensions.getHTTPRequestHeader('Accept')"/></td> </tr> <tr> <td>Content-Length</td> <td><xsl:value-of select="java:com.ibm.datatools.dsws.rt.common.XSLExtensions.getHTTPRequestHeader('ContentLength')"/></td> </tr> </table> <table border="1"> <tr bgcolor="#ffff44"> <td colspan="2"><h2>GET_CUSTOMER_NAME RESPONSE</h2></td> </tr> <tr> <td>First Name:</td> <td><xsl:value-of select="//FIRST_NAME/text()"/></td> </tr> <tr> <td>Last Name:</td> <td><xsl:value-of select="//LAST_NAME/text()"/></td> </tr> <tr> <td>Phone Number:</td> <td><xsl:value-of select="//PHONE_NUMBER/text()"/></td> </tr> </table> </body> </html> </xsl:template> </xsl:stylesheet> Listing E.8 – XSL script to test extension functions 1. Using the steps described in the previous section, create a new XSL file with the name TestXSLExtensions.xsl and copy the information in Figure E8 into that script. 2. Assign the TestXSLExtensions.xsl to transform the output message of the GET_CUSTOMER_NAME operation and re-deploy the Web service. 3. Now, you can execute the GET_CUSTOMER_NAME operation with HTTP GET using a Web browser. A URL to retrieve the information for a customer with the ID 126911 looks similar to this: http://localhost:8080/WebServicesSimpleService/rest/SimpleService/GET_CUST OMER_NAME?CUSTOMERID=126911 As you can see in Figure E.16, the response contains some information from the HTTP request – like the request URL, some HTTP request headers, and the result of the GET_CUSTOMER_NAME operation.
- 289. Appendix E – Advanced topics in developing Data Web Services 289 Figure E.16 – XSL extension functions provide additional information to the result E.5 A closer look at the generated runtime artifacts Explaining all artifacts in detail is beyond the scope of this book. Here is a brief glimpse at the files and structures. More information can be found in the documentation for JAVA EE, WTP, Servlets, WebSphere Application Server Community Edition, and the SOAP frameworks. The Data Web services tooling hooks into the Web Tools Platform (WTP) framework, which is an Eclipse-based JAVA EE development environment. Data Studio contains WTP. The JAVA EE perspective is part of WTP. http://www.eclipse.org/webtools/
- 290. 290 Getting Started with IBM Data Studio for DB2 Switch to the JAVA EE perspective to take a closer look at the generated runtime artifacts. As shown in Figure E.17, the Project Explorer shows three projects. One is your WebServices Data Development Project whereas the other two are JAVA EE projects representing the runtime artifacts for your SimpleService. Figure E.17 – The generated Web service project in the JAVA EE perspective Let’s take a brief look at those two generated projects for the SimpleService Web service:
- 291. Appendix E – Advanced topics in developing Data Web Services 291 WebServiceSimpleServiceEAR This project represents an “Enterprise Application Archive” (EAR). It can be seen as a container project for the actual Web service. You can see that the WebServiceSimpleServiceWeb is referenced under Modules. In addition, you can find configuration files to define settings like context root or data source definitions. WebServiceSimpleServiceWeb This “Web Application Archive” (WAR) project contains the actual Web service logic and configuration. The structure of the project follows the Servlet specification. E.5.1 JAVA EE artifacts File name Description WebServiceSimpleServiceEAR/EarCont ent/META-INF/application.xml Contains configuration information about the contained modules, like the context root. WebServiceSimpleServiceWeb/WebCon tent/WEB-INF/web.xml Contains configuration information about the Web Application, including Servlet class names, URL mappings, resource references, security settings, etc. Table E.2 – JAVA EE artifacts E.5.2 SOAP framework artifacts The configuration files for the SOAP engine vary depending on the selected SOAP framework. File name Description WebServiceSimpleServiceWeb//WebCo ntent/WEB-INF/server-config.wsdd Deployment descriptor file for the Apache Axis 1.4 SOAP engine. Table E.3 – Apache Axis 1.4 deployment descriptor file E.5.3 WAS CE artifacts The configuration files for the application server may vary depending on the selected application server. The WebSphere Application Server Community Edition Documentation can be found here: http://publib.boulder.ibm.com/wasce
- 292. 292 Getting Started with IBM Data Studio for DB2 File name Description WebServiceSimpleServiceEAR /EarContent/META-INF/geronimoapplication.xml WAS CE extension configuration file for Enterprise applications. It contains metadata about the data source configuration, required Java libraries, and other information. WebServiceSimpleServiceWeb//WebCo ntent/WEB-INF/geronimo-web.xml WAS CE extension file for Web applications. It contains metadata about data source references, required Java libraries, and other information. Table E.4 – WAS CE deployment descriptor files E.5.4 Data Web Services artifacts File name Description WebServiceSimpleServiceWeb//WebCo ntent/WEB-INF/config.xml DWS configuration file. You can find the mapping between operation names and SQL statements as well as references to XSL scripts and namespace declarations in here. WebServiceSimpleServiceWeb//WebCo ntent/WEB-INF/lib/dswsRuntime.jar The generic DWS Java runtime library. WebServiceSimpleServiceWeb//WebCo ntent/WEB-INF/wsdl/SimpleService.wsdl The generated WSDL file for your Web service. WebServiceSimpleServiceWeb /WEB/WebContent/WEB-INF/xslt A folder which holds the XSL stylesheet you assigned to your operations for input/output message transformation. Table E.5 – Data Web Services artifacts If you are familiar with the generated artifacts you can start to do some customization –for example, adding Servlets, JSPs, HTML pages, and advanced configuration like setting up authentication/authorization, security, etc.
- 293. Appendix E – Advanced topics in developing Data Web Services 293 E.6. Selecting a different SOAP framework The supported SOAP framework depends on the selected application server. You may have the choice between multiple SOAP frameworks. For WAS CE, the following SOAP frameworks are supported: Apache Axis 1.4 (default) (http://ws.apache.org/axis/) Apache Axis 2 (http://ws.apache.org/axis2/) JAX-WS (http://jcp.org/en/jsr/detail?id=224) You can select the SOAP framework by clicking the artifact.soapEngine property in the Parameters table of the Deploy Web Service dialog, as shown in Figure E.18. Figure E.18 – Selecting a SOAP framework in the Deploy Web Service dialog The Data Web Services tooling does not add any SOAP framework libraries to the Web application. It is expected that the SOAP engine libraries are present at the application server.
- 294. 294 Getting Started with IBM Data Studio for DB2
- 295. 295 References [1] HAYES, H. Integrated Data Management: Managing data throughout its lifecycle, developerWorks article, 2008; updated 2009. Originally published by IBM developerWorks at http://www.ibm.com/developerworks/data/library/techarticle/dm-0807hayes/. Reprinted by permission. [2] LEUNG, C. et. al. SQL Tuning: Not just for hardcore DBAs anymore, IBM Database Magazine article, Issue 2, 2009. Resources Web sites 1. Integrated Data Management (Optim and Data Studio) Community Space: http://www.ibm.com/developerworks/spaces/optim Use this web site to find links to downloads, technical articles and tutorials, discussion forums, blogs, videos and demos. 2. Integrated Data Management solutions web site: www.ibm.com/software/data/optim/ Use this web site to get an understanding of the solutions that are available from IBM for Integrated Data Management. 3. Team blog: Managing the data lifecycle: http://www-ibm.com/developerworks/mydeveloperworks/blogs/idm/ Experts from IBM blog on subjects related to Integrated Data Management. Includes everything from latest news to technical tips 4. Data Studio forum: http://www.ibm.com/developerworks/forums/forum.jspa?forumID=1086&categoryID=19 Use the forum to post technical questions when you cannot find the answers in the manuals yourself. 5. Integrated Data Management Information Center: http://publib.boulder.ibm.com/infocenter/idm/v2r2/index.jsp The information center provides access to the online manuals. It is the most up-to-date source of information.
- 296. 6. IBM Redbooks site: http://www.redbooks.ibm.com/ IBM Redbooks are no-charge and are written by teams of people in intense, hands-on residencies on a wide variety of technical products and technologies. 7. developerWorks http://www.ibm.com/developerworks/data/products/optim/ This Web site is an excellent resource for developers and DBAs providing access to current articles, tutorials, etc. for free. 8. alpha Works http://www.alphaworks.ibm.com/ This Web site provides direct access to IBM's emerging technology. It is a place where one can find the latest technologies from IBM Research. 9. planetDB2 www.planetDB2.com This is a blog aggregator from many contributors who blog about DB2 and related technologies. 10. Data Studio Technical Support If you have an active license from IBM for DB2 or Informix Dynamc server, you can use this site to open a service request. http://www-01.ibm.com/software/data/studio/support.html 11. ChannelDB2 ChannelDB2 is a social network for the DB2 community. It features content such as DB2 related videos, demos, podcasts, blogs, discussions, resources, etc. for Linux, UNIX, Windows, z/OS, and i5/OS. http://www.ChannelDB2.com/
- 297. 297 Books and articles 1. ALLEN, G. Beginning DB2: From Novice to Professional. Copyright 2008 by Grant Allen. ISBN-13: 978-1-59059-942-6 ISBN-10: 1-59059-942-X 2. BANDLAMOORI, S, et al. Oops! Restoring your database with Data Studio Administrator, developerWorks article, April 2009. http://www.ibm.com/developerworks/data/library/techarticle/dm-0904datastudiorecovery/ 3. BOMMIREDDIPALLI, V. Data Web Services: Build Web services the new way to access IBM database servers, developerWorks article. December 2007. http://www.ibm.com/developerworks/db2/library/techarticle/dm-0712bommireddipalli/ 4. BRUNI, P. et al. DB2 9 for z/OS: Deploying SOA Solutions, IBM Redbook. January, 2009. http://www.redbooks.ibm.com/abstracts/sg247663.html?Open 5. BRUNI, P. et al. IBM Data Studio V2.1: Getting Started with Web Services on DB2 for z/OS. IBM Redpaper. April 2009. http://www.redbooks.ibm.com/abstracts/redp4510.html?Open 6. CASEY, M. et al. Exploring What’s New in Data Studio Developer 2.1, developerWorks article, February 2009. http://www.ibm.com/developerworks/data/library/techarticle/dm-0902casey/ 7. CHEN, W., et al. Using Integrated Data Management To Meet Service Level Objectives. IBM Redbook. November 2009. http://www.redbooks.ibm.com/redbooks.nsf/RedpieceAbstracts/sg247769.html 8. DEVLIN, K. Using common connections with Optim solutions, developerWorks article, published December 2008, updated July 2009. http://www.ibm.com/developerworks/data/library/techarticle/dm-0812devlin/ 9. PAUSER, M. IBM Data Studio: Get started with Data Web Services, developerWorks tutorial. Originally published November 2007, updated December 2008. http://www.ibm.com/developerworks/edu/dm-dw-dm-0711pauser-i.html 10. PAUSER, M. et al. Deploy Data Web Services to a WebSphere Community Edition Web Server, developerWorks tutorial. Originally published March 2008, updated January 2009. http://www.ibm.com/developerworks/edu/dm-dw-dm-0803pauser-i.html 11. PULLELA, K. et al. Transform Data Web Services messages using XSLT in IBM Data Studio Developer, developerWorks tutorial, July 2008. http://www.ibm.com/developerworks/edu/dm-dw-dm-0807pullela-i.html
- 298. Contact emails General DB2 Express-C mailbox: db2x@ca.ibm.com General DB2 on Campus program mailbox: db2univ@ca.ibm.com General Data Studio and Optim mailbox: dstudio@us.ibm.com
- 299. 299
- 300. Getting started with IBM Data Studio couldn't be easier. Read this book to: Find out what IBM Data Studio can do for you Learn everyday database management tasks Back up and recover DB2 databases Write and debug SQL stored procedures and routines Convert existing SQL or procedures to Web services Learn more about integrated data management Practice using hands-on exercises IBM Data Studio is an Eclipse-based tool that is the replacement of the DB2® Control Center and other tools for DB2. It is ideal for DBAs, developers, students, ISVs, or consultants because it’s easy and free to use. IBM Data Studio can also be used with other data servers such as Informix® Dynamic Server, and you can extend Data Studio with additional robust management and development capabilities from IBM to help accelerate solution delivery, optimize performance, protect data privacy, manage data growth, and more. IBM Data Studio is part of the Integrated Data Management solutions from IBM can help reduce the costs of managing data throughout its lifecycle while enabling innovative and high performing new development. Get started with IBM Data Studio, and grow from there! To learn more or download Data Studio, visit ibm.com/software/data/optim/data-studio/ To learn more or download DB2 Express-C, visit ibm.com/db2/express To socialize and watch IBM Data Studio and DB2 videos, visit ChannelDB2.com This book is part of the DB2 on Campus book series, free ebooks for the community. Learn more at ibm.com/db2/books