How to code Radio
Buttons in HTML5
and CSS Styling
Introduction
• This slide show is designed to explain how to use the <input
  type=“radio”> tag in HTML, how to use CSS to format the
  radio button and how to use both CSS and HTML together to
  achieve a desired look.
Hints
There are 2 important hints that we need to remember:
• To open and close each tag
• To indent 3 spaces
What are Radio Buttons?
• Radio Buttons are used to represent one of a set of options,
  only one of which can be selected at any time. Example is the
  quiz we are about to make.
Creating the form
 We need to define the document type. You do this at the top of
the page by using

<!DOCTYPE html>
<html>
       <head>
              <title> Radio Buttons</title>
       </head>
       <body>
       <h1> Animals Quiz</h1>
       </body>
</html>
We need to declare it’s a form. Underneath <body> we insert
 <h1>Animals Quiz</h1>
  <form>
  <fieldset>
       <legend> What is your favourite animal?</legend>


  </fieldset>
  <br>
  </form>
The Radio button
We will create a radio button group. Below is the question and
the set of options that we are going to code.

What is your favourite animal?
• Tiger
• Monkey
• Eagle
Radio Button in HTML
To achieve the function of the radio button, we have the input
type which indicates what the element will be, for ours we put
“radio”
• <input type=“radio”
The name is the group of buttons. In this case it will be
• name=“animal”
We are going to add a value= usually defines something that’s
going to be written.
• value=“Tiger”
The id is the same name as the value
• id=“Tiger”/>
We are going to put a label on the button so they know which
one to pick.
• <label for=“Tiger”>Tiger</label><br/>
What our form should look like
<form>
         <fieldset>
                   <legend> What is your favourite animal?</legend>

                   <input type="radio" name="animal" value="Tiger" id="Tiger"/>
                   <label for="Tiger">Tiger</label><br/>
                   <input type="radio" name="animal" value="Bear" id="Bear"/>
                   <label for="Bear">Bear</label><br/>
                   <input type="radio" name="animal" value=“Eagle id=“Eagle"/>
                   <label for=“Eagle">Eagle</label><br/>
         </fieldset>
         <br>
<form>
Form Controls
We are going to put in Form Controls. This allows the user to
Reset and Submit the form. We write
<p> Form Controls</p>
<input type=“submit” value=“Submit” /><br>
<input type=“reset” value=“Reset”/>
Footer
We can enter a <div> tag, this defines a section in the page. This
goes just after the close of the form and before the closing of the
body as shown below.

<div id="footer">
         <p> Made by AimeeKyra</p>
        </div>
        </body>
</html>
What your code should look
like
<!DOCTYPE html>
<html>

     <head>
           <title> Radio Buttons </title>
     </head>
     <body>
                 <h1> Animals Quiz </h1>
     <form>
                 <fieldset>
                          <legend> What is your favourite animal?</legend>

                                     <input type="radio" name=“animal" value=“Tiger id=“Tiger” />
                                     <label for=“Tiger” >Tiger </label><br />
                                     <input type="radio" name=“animal” value="Monkey" id=“Monkey" />
                                     <label for=“Monkey”>Monkey</label><br />
                                     <input type="radio" name=“animal" value=“Eagle id=“Eagle
                                     <label for=“Eagle” >Eagle</label><br />
                  </fieldset>
                  </br>

                  <p>Form controls </p>
                  <input type="submit" value="Submit"/> <br>
                  <input type="reset" value="Reset"/>
     </form>

     <div id="footer">
     <p> Made by AimeeKyra</p>
     </div>
     </body>

</html>
Validating the HTML code
• We need to validate our code to check for any errors.
• I am going to use http://validator.w3.org/
• If the banner is green, it means there are no errors and it was
  passed. If it is a different colour (red/orange) it means there
  are errors.
Lets have a look
• So at this point, lets have a look at our form. Save the file.
• If you notice, if you select one or the other the radio button
  becomes deactivated
CSS Styling
In our html document you need to link the two notepad
documents together. By adding in the following code under our
<title> Radio Buttons</title>

<link rel="stylesheet" type="text/css" href="css.css"
media="all"/>
Style
In our CSS document we are going to make our back ground of
the form a Dark Grey and the text White.

The heading will be a Blue colour.

Our footer is going to be a White back ground with Black text.

Hint: Colour is spelt color.
I'm using Hex colour numbers
CSS Elements
body
{
background:#696969;
color:#FFFFFF;
width: 300px;
}

h1
{
color:#000080;
}
Continued…
legend
{
color:#FFFFFF;
}

fieldset
{
color:#FFFFFF;
}

#Footer
{
background-color:#FFFFFF;
color:#000000;
}
Viewing it in a webpage
Now that your code has got some style, you can view your
website. In Notepad++, go to Run in the toolbar and select the
correct Browser.
Once you have done this try and open it in a verity of different
web browsers.
Testing the form in 3 web browsers


            Internet
            Explorer 9
                                     Opera


              Google
              Chrome
The End
• Hope this tutorial has given you an idea on how to create
  Radio Buttons and style using CSS.

More Related Content

PPTX
Creating a radiobutton
PPT
Introduction html
PDF
Basic tags
PPTX
Css colors
PPTX
Css pseudo classes
PPTX
CSS Selector
PPT
webDen Hi-Fi
PPTX
Html presentation
Creating a radiobutton
Introduction html
Basic tags
Css colors
Css pseudo classes
CSS Selector
webDen Hi-Fi
Html presentation

What's hot (17)

PPTX
Html coding
PPTX
PPTX
HTML Lesson 5
PPT
Google plus chapter 1 - introduction
PPT
iGoogle Gadgets @ Your Library
PDF
September 2018 calendar
DOC
Handout2 formatting tags
PPTX
Demo lecture ppt
PPTX
HyperText Markup Language - HTML
PDF
Anadhikar-probesh-Robindranath_Thakur
PPT
Html presentation
PPTX
DOC
Handout1 intro to html
PPTX
3 php forms
PPTX
Lecture 2 introduction to html
PDF
UrbanScouts | Global Service Jam Berlin 2011
Html coding
HTML Lesson 5
Google plus chapter 1 - introduction
iGoogle Gadgets @ Your Library
September 2018 calendar
Handout2 formatting tags
Demo lecture ppt
HyperText Markup Language - HTML
Anadhikar-probesh-Robindranath_Thakur
Html presentation
Handout1 intro to html
3 php forms
Lecture 2 introduction to html
UrbanScouts | Global Service Jam Berlin 2011
Ad

Viewers also liked (6)

PDF
8051 tutorial
PPTX
8051 microcontroller by K. Vijay Kumar
PPT
8051 instruction set
PPT
Architecture of 8051 microcontroller))
PPT
Signal & systems
PPT
Microcontroller 8051
8051 tutorial
8051 microcontroller by K. Vijay Kumar
8051 instruction set
Architecture of 8051 microcontroller))
Signal & systems
Microcontroller 8051
Ad

Similar to How to code radio buttons in HTML5 and CSS Styling (20)

PPT
Html class-04
PPTX
unit2_HTML_Forms fundamentals of html and crore concepts.pptx
PPTX
uptu web technology unit 2 html
PPTX
Forms
PPTX
HTML FORMS.pptx
PPTX
Building and styling forms
DOC
Html basics 10 form
 
PPTX
HTML - FORMS.pptx
PPTX
Forms Part 1
PPSX
HTML5 - Forms
PPTX
Designing web pages html forms and input
PPTX
Lecture-5.pptx
PPTX
Html Forms for lecture BSIT SSC HCI LECTURE
PPT
Html Forms for creating frames and frameset
PDF
COMP-10-ONLINE-FORMS Powerpoint Presentation
PPT
05 html-forms
PPT
Html,Css and Javascript Forms using different tags
Html class-04
unit2_HTML_Forms fundamentals of html and crore concepts.pptx
uptu web technology unit 2 html
Forms
HTML FORMS.pptx
Building and styling forms
Html basics 10 form
 
HTML - FORMS.pptx
Forms Part 1
HTML5 - Forms
Designing web pages html forms and input
Lecture-5.pptx
Html Forms for lecture BSIT SSC HCI LECTURE
Html Forms for creating frames and frameset
COMP-10-ONLINE-FORMS Powerpoint Presentation
05 html-forms
Html,Css and Javascript Forms using different tags

Recently uploaded (20)

PDF
FORM 1 BIOLOGY MIND MAPS and their schemes
PPTX
ELIAS-SEZIURE AND EPilepsy semmioan session.pptx
PDF
semiconductor packaging in vlsi design fab
PDF
LIFE & LIVING TRILOGY - PART (3) REALITY & MYSTERY.pdf
PDF
LEARNERS WITH ADDITIONAL NEEDS ProfEd Topic
PDF
FOISHS ANNUAL IMPLEMENTATION PLAN 2025.pdf
PDF
Environmental Education MCQ BD2EE - Share Source.pdf
PDF
My India Quiz Book_20210205121199924.pdf
DOCX
Cambridge-Practice-Tests-for-IELTS-12.docx
PPTX
Computer Architecture Input Output Memory.pptx
PPTX
B.Sc. DS Unit 2 Software Engineering.pptx
PPTX
A powerpoint presentation on the Revised K-10 Science Shaping Paper
PDF
MICROENCAPSULATION_NDDS_BPHARMACY__SEM VII_PCI .pdf
PDF
Journal of Dental Science - UDMY (2021).pdf
PDF
Mucosal Drug Delivery system_NDDS_BPHARMACY__SEM VII_PCI.pdf
PPTX
Unit 4 Computer Architecture Multicore Processor.pptx
PDF
BP 505 T. PHARMACEUTICAL JURISPRUDENCE (UNIT 2).pdf
PDF
medical_surgical_nursing_10th_edition_ignatavicius_TEST_BANK_pdf.pdf
PPTX
Education and Perspectives of Education.pptx
PDF
David L Page_DCI Research Study Journey_how Methodology can inform one's prac...
FORM 1 BIOLOGY MIND MAPS and their schemes
ELIAS-SEZIURE AND EPilepsy semmioan session.pptx
semiconductor packaging in vlsi design fab
LIFE & LIVING TRILOGY - PART (3) REALITY & MYSTERY.pdf
LEARNERS WITH ADDITIONAL NEEDS ProfEd Topic
FOISHS ANNUAL IMPLEMENTATION PLAN 2025.pdf
Environmental Education MCQ BD2EE - Share Source.pdf
My India Quiz Book_20210205121199924.pdf
Cambridge-Practice-Tests-for-IELTS-12.docx
Computer Architecture Input Output Memory.pptx
B.Sc. DS Unit 2 Software Engineering.pptx
A powerpoint presentation on the Revised K-10 Science Shaping Paper
MICROENCAPSULATION_NDDS_BPHARMACY__SEM VII_PCI .pdf
Journal of Dental Science - UDMY (2021).pdf
Mucosal Drug Delivery system_NDDS_BPHARMACY__SEM VII_PCI.pdf
Unit 4 Computer Architecture Multicore Processor.pptx
BP 505 T. PHARMACEUTICAL JURISPRUDENCE (UNIT 2).pdf
medical_surgical_nursing_10th_edition_ignatavicius_TEST_BANK_pdf.pdf
Education and Perspectives of Education.pptx
David L Page_DCI Research Study Journey_how Methodology can inform one's prac...

How to code radio buttons in HTML5 and CSS Styling

  • 1. How to code Radio Buttons in HTML5 and CSS Styling
  • 2. Introduction • This slide show is designed to explain how to use the <input type=“radio”> tag in HTML, how to use CSS to format the radio button and how to use both CSS and HTML together to achieve a desired look.
  • 3. Hints There are 2 important hints that we need to remember: • To open and close each tag • To indent 3 spaces
  • 4. What are Radio Buttons? • Radio Buttons are used to represent one of a set of options, only one of which can be selected at any time. Example is the quiz we are about to make.
  • 5. Creating the form We need to define the document type. You do this at the top of the page by using <!DOCTYPE html> <html> <head> <title> Radio Buttons</title> </head> <body> <h1> Animals Quiz</h1> </body> </html>
  • 6. We need to declare it’s a form. Underneath <body> we insert <h1>Animals Quiz</h1> <form> <fieldset> <legend> What is your favourite animal?</legend> </fieldset> <br> </form>
  • 7. The Radio button We will create a radio button group. Below is the question and the set of options that we are going to code. What is your favourite animal? • Tiger • Monkey • Eagle
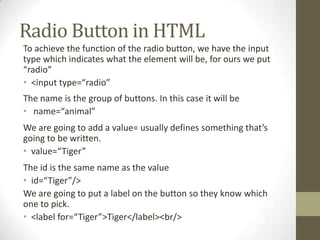
  • 8. Radio Button in HTML To achieve the function of the radio button, we have the input type which indicates what the element will be, for ours we put “radio” • <input type=“radio” The name is the group of buttons. In this case it will be • name=“animal” We are going to add a value= usually defines something that’s going to be written. • value=“Tiger” The id is the same name as the value • id=“Tiger”/> We are going to put a label on the button so they know which one to pick. • <label for=“Tiger”>Tiger</label><br/>
  • 9. What our form should look like <form> <fieldset> <legend> What is your favourite animal?</legend> <input type="radio" name="animal" value="Tiger" id="Tiger"/> <label for="Tiger">Tiger</label><br/> <input type="radio" name="animal" value="Bear" id="Bear"/> <label for="Bear">Bear</label><br/> <input type="radio" name="animal" value=“Eagle id=“Eagle"/> <label for=“Eagle">Eagle</label><br/> </fieldset> <br> <form>
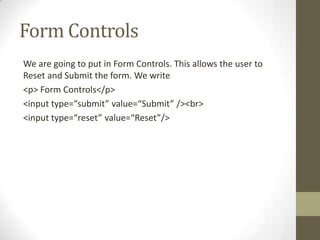
  • 10. Form Controls We are going to put in Form Controls. This allows the user to Reset and Submit the form. We write <p> Form Controls</p> <input type=“submit” value=“Submit” /><br> <input type=“reset” value=“Reset”/>
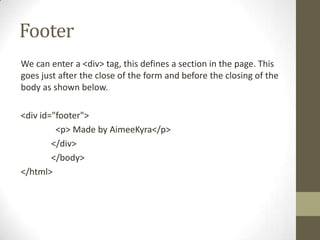
  • 11. Footer We can enter a <div> tag, this defines a section in the page. This goes just after the close of the form and before the closing of the body as shown below. <div id="footer"> <p> Made by AimeeKyra</p> </div> </body> </html>
  • 12. What your code should look like <!DOCTYPE html> <html> <head> <title> Radio Buttons </title> </head> <body> <h1> Animals Quiz </h1> <form> <fieldset> <legend> What is your favourite animal?</legend> <input type="radio" name=“animal" value=“Tiger id=“Tiger” /> <label for=“Tiger” >Tiger </label><br /> <input type="radio" name=“animal” value="Monkey" id=“Monkey" /> <label for=“Monkey”>Monkey</label><br /> <input type="radio" name=“animal" value=“Eagle id=“Eagle <label for=“Eagle” >Eagle</label><br /> </fieldset> </br> <p>Form controls </p> <input type="submit" value="Submit"/> <br> <input type="reset" value="Reset"/> </form> <div id="footer"> <p> Made by AimeeKyra</p> </div> </body> </html>
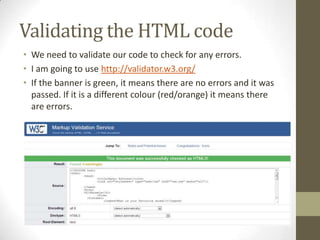
  • 13. Validating the HTML code • We need to validate our code to check for any errors. • I am going to use http://validator.w3.org/ • If the banner is green, it means there are no errors and it was passed. If it is a different colour (red/orange) it means there are errors.
  • 14. Lets have a look • So at this point, lets have a look at our form. Save the file. • If you notice, if you select one or the other the radio button becomes deactivated
  • 15. CSS Styling In our html document you need to link the two notepad documents together. By adding in the following code under our <title> Radio Buttons</title> <link rel="stylesheet" type="text/css" href="css.css" media="all"/>
  • 16. Style In our CSS document we are going to make our back ground of the form a Dark Grey and the text White. The heading will be a Blue colour. Our footer is going to be a White back ground with Black text. Hint: Colour is spelt color. I'm using Hex colour numbers
  • 19. Viewing it in a webpage Now that your code has got some style, you can view your website. In Notepad++, go to Run in the toolbar and select the correct Browser. Once you have done this try and open it in a verity of different web browsers.
  • 20. Testing the form in 3 web browsers Internet Explorer 9 Opera Google Chrome
  • 21. The End • Hope this tutorial has given you an idea on how to create Radio Buttons and style using CSS.