SlideShare a Scribd company logo
HP - LoadRunner Tutorial - 1: How do we record an application using LoadRunner?

First of all let us try to quickly understand the Load Testing: While aiming to perform a load
test of an application; we use LoadRunner to replace the human users with virtual users (called
“Vusers”) on the actual machines. These Vusers impose artificially created load on the system by
emulating actions of actual human users in a repeatable and predictable manner.

Virtual User Generator module of LoadRunner commonly known as VuGen creates artificial users
for us and records our all actions in the form of automated scripts. VuGen works on the principle
of record and playback.

Systematic steps to record an application using VuGen Module of LoadRunner are as
under:

Step – 1: Starting of the LoadRunner: Select “Start” > “Programs” > “LoadRunner” >
“LoadRunner”. Following LoadRunner launcher window pops up.


Step – 2: Starting of the VuGen Module of LoadRunner: Click the “Load Testing” tab, In the
Launcher window.

Further, click on the very first option “Create/Edit Scripts” to launch the following Start Page of
VuGen module.


Step – 3: Creation of a new Script: Under the “Scripts” tab in the VuGen Start Page, click
“New Vuser Script” to open the following “New Virtual User” dialog box.
Step – 4: Making a choice out of single protocol script or Multiple protocol script from the left
pane of the dialog box:

a) Select single protocol script - make a selection from the Category list and select one of the
protocols.

b) Select multiple protocol script - to record more than one protocols in a single recording
session. Select the desired protocol from the Available Protocols list. Click the right-pointing
arrow to move the selection into the Selected Protocols list. Repeat the step to select all the
desired protocols.

Step – 5: Close the “New Virtual User” dialog box by Clicking “OK”.

Step – 6: Start the process of recording various events into the Vuser script.

a) Generally VuGen automatically opens the “Start Recording” dialog box when a new script is
created.

b) Alternately click the “Start Record” button in the Toolbar at the top of the page to open the
“Start Recording” dialog box. The “Start Recording” dialog box may appear differently a little
bit for different protocols.

Step – 7: Filling up the information pertaining to Non Internet Applications in the following
Dialog Box
a) For “Application type”: Select Win32 Applications or Internet Applications, e.g. Web and
Oracle NCA scripts record Internet Applications, while Windows Socket Vusers records a Win32
application.

b) For “Program to record”: Enter the Win 32 application to record.

c) For “Program Arguments”: Enter the command line arguments for the EXE file specified
above; e.g. if we specify “abc32.exe” with the command line options “genius@xyz”, it connects
the user Genius to the server “xyz” when starting “abc32.exe”.

d) For “Working Directory”: This information is needed for some specific applications requiring
us to specify a working directory.

Step – 8: Filling up the information pertaining to Internet Applications in the following
Dialog Box


a) For “Application type”: Select Internet Applications.

b) For “Program to record”: Select the browser or Internet application to record.

c) For “URL Address”: Specify the starting URL address.

d) For “Working Directory”: This information is needed for some specific applications requiring
us to specify a working directory. This information may differ among different types of Vuser
scripts.

Fill up the information of program to record, the working directory, the Action & set the recording
options by clicking “Options”.

Step – 9: Filling up the information pertaining to “Record into Action” box: Here we need to
select the section where we want to record.

Sections available here by default are: vuser_init, Action, and vuser_end. However we can add a
new section by clicking “Actions” > “Create New Action” and describe a new action name.

Step – 10: Recording the application startup: This step is not recommended under the
following situations:

a) When recording multiple actions, needing performing the startup in one action only.

b) When we want to navigate to a specific point in the application before starting to record.

c) While recording into an existing script.

d) This step is not applicable to Java type Vuser scripts.

However when there is a need to record the application startup; Click “Record the application
startup”. When we do not want VuGen to record the application startup, clear the check box.

Step – 11: Filling up the information pertaining to Recording Options: C lic k “Options”
button or the Recording Options button to open the “Recording options” dialog box and define the
recording options. According to the recorded protocol the available options may differ.


Step – 12: Defining the scripting options: Click the “Script” tab for selecting the language for code
generation and for setting the scripting options.


Step – 13: Defining the port information: Needed when recording SSL applications on a non-
standard port. Review the list of ports. If the port we are using is not in the list, we can specify the
information using the Port Mapping options.


Click the “Port Mapping” tab for setting the port related information.


Step – 14: Manage Protocols in case of multi-protocol recording: For editing the list of protocols
needed to be recorded; click “Protocol” tab. Expand the node and select the desired protocols.
Step – 15: Click “OK” to close the dialog box and start the recording. VuGen starts the application and
the Recording toolbar opens.


Perform the desired actions within the application, which need to be recorded. VuGen automatically fills
in the selected action section of the Vuser script.


For switching between sections during the recording we can use the floating toolbar.


In case of recording a password-protected application, VuGen will prompt us to enter a user name and
password.


Step – 16: Completing the recording session:

a) Switch to the vuser_end section in the floating toolbar.

b) Click the “Stop Recording” button on the Recording toolbar.

c) Click “Save” to save the recorded session.


Tutorial by :
http://www.softwaretestinggenius.com

More Related Content

PDF
LoadRunner walkthrough
PDF
Stresstimulus Load Testing Tool Getting Started
PDF
Jmeter Walkthrough
PPT
Hp Loadrunner
PPTX
Load Runner
PPT
Advanced Load Runner
PPT
Performance Testing With Loadrunner
PDF
Fundamentals Performance Testing
LoadRunner walkthrough
Stresstimulus Load Testing Tool Getting Started
Jmeter Walkthrough
Hp Loadrunner
Load Runner
Advanced Load Runner
Performance Testing With Loadrunner
Fundamentals Performance Testing

What's hot (20)

PPTX
Loadrunner Interview quetion & answers
PPT
Quick guide to plan and execute a load test
PDF
PPTX
JMeter Database Performace Testing - Keytorc Approach
PPTX
Testing Soap/Rest Web Services with JMeter
PDF
Automated Performance Testing With J Meter And Maven
PPTX
Using Jenkins and Jmeter to build a scalable Load Testing solution
PPTX
Performance testing by optimus information inc
PPTX
J meter introduction
PPTX
Cloud Performance Testing with LoadRunner
PDF
Learning j meter in 60 minutes
PDF
Visual studio performance testing quick reference guide 3 6
PPT
Qtp With Descriptive Programming
PPTX
Web service testing using QTP (UFT)
PPTX
Performance testing with Apache JMeter
PPTX
J Meter Intro
PDF
How to Record Scripts in JMeter? JMeter Script Recording Tutorial | Edureka
DOCX
Jenkins/Jmeter Configuration - Colombo Performance Test Meetup - 2016 April
PDF
O - Oracle application testing suite test starter kits for oracle e business ...
PDF
Gatling & LoadUI - Open Source Tools For Preformance Testing
Loadrunner Interview quetion & answers
Quick guide to plan and execute a load test
JMeter Database Performace Testing - Keytorc Approach
Testing Soap/Rest Web Services with JMeter
Automated Performance Testing With J Meter And Maven
Using Jenkins and Jmeter to build a scalable Load Testing solution
Performance testing by optimus information inc
J meter introduction
Cloud Performance Testing with LoadRunner
Learning j meter in 60 minutes
Visual studio performance testing quick reference guide 3 6
Qtp With Descriptive Programming
Web service testing using QTP (UFT)
Performance testing with Apache JMeter
J Meter Intro
How to Record Scripts in JMeter? JMeter Script Recording Tutorial | Edureka
Jenkins/Jmeter Configuration - Colombo Performance Test Meetup - 2016 April
O - Oracle application testing suite test starter kits for oracle e business ...
Gatling & LoadUI - Open Source Tools For Preformance Testing
Ad

Similar to Hp Load Runner Tutorial 1 How Do We Record An Application Using Load Runner (20)

PDF
Details Description of Load Runner Recording option
PPTX
QSpiders - Simple Recording and Configuration of recording options for HP Loa...
PDF
Load runner generator
PPT
Performance testing with loadrunner by kc
PPT
Performance testing using hp load runner
PPTX
PERFORMANCE TESTING USING LOAD RUNNER
PDF
LoadRunner Performance Testing
DOCX
Loadrunner interview questions and answers
PPT
Performance Teting - VU Scripting Using Rational (http://www.geektester.blogs...
PPTX
Load testing checks how a system performs under expected user traffic
PPTX
QSpiders - Simple replay and run time settings Loadrunner
PPT
loadrunner
PPT
Testing using load runner performance testing
PPT
Loadrunner presentation
PPT
Performance Testing
PDF
Loadrunner Onloine Training
PPTX
Sequence Like a Boss - BriForum 2015 Denver
PDF
Load runner12.00 tutorial
PPT
PDF
Part 5 running java applications
Details Description of Load Runner Recording option
QSpiders - Simple Recording and Configuration of recording options for HP Loa...
Load runner generator
Performance testing with loadrunner by kc
Performance testing using hp load runner
PERFORMANCE TESTING USING LOAD RUNNER
LoadRunner Performance Testing
Loadrunner interview questions and answers
Performance Teting - VU Scripting Using Rational (http://www.geektester.blogs...
Load testing checks how a system performs under expected user traffic
QSpiders - Simple replay and run time settings Loadrunner
loadrunner
Testing using load runner performance testing
Loadrunner presentation
Performance Testing
Loadrunner Onloine Training
Sequence Like a Boss - BriForum 2015 Denver
Load runner12.00 tutorial
Part 5 running java applications
Ad

More from Yogindernath Gupta (20)

PPT
Introduction to ISTQB & ISEB Certifications
PPT
Learn Software Testing for ISTQB Foundation Exam
PPT
ISTQB / ISEB Foundation Exam Practice - 6
PPT
ISTQB / ISEB Foundation Exam Practice - 5
PPT
ISTQB / ISEB Foundation Exam Practice - 4
PPT
ISTQB / ISEB Foundation Exam Practice
PPT
ISTQB / ISEB Foundation Exam Practice - 2
PPT
ISTQB / ISEB Foundation Exam Practice -1
DOC
ISTQB Advanced Study Guide - 8
DOC
ISTQB Advanced Study Guide - 7
DOC
ISTQB Advanced Study Guide - 6
DOC
ISTQB Advanced Study Guide - 5
DOC
ISTQB Advanced Study Guide - 4
DOC
ISTQB Advanced Study Guide - 3
DOC
ISTQB Advanced Study Guide - 2
DOC
ISTQB Advanced – Study Guide -1
DOC
Introduction to specification based test design techniques
DOC
Knowledge Levels In Certifications
PPT
Design Review & Software Testing
PPT
Software Development Life Cycle - SDLC
Introduction to ISTQB & ISEB Certifications
Learn Software Testing for ISTQB Foundation Exam
ISTQB / ISEB Foundation Exam Practice - 6
ISTQB / ISEB Foundation Exam Practice - 5
ISTQB / ISEB Foundation Exam Practice - 4
ISTQB / ISEB Foundation Exam Practice
ISTQB / ISEB Foundation Exam Practice - 2
ISTQB / ISEB Foundation Exam Practice -1
ISTQB Advanced Study Guide - 8
ISTQB Advanced Study Guide - 7
ISTQB Advanced Study Guide - 6
ISTQB Advanced Study Guide - 5
ISTQB Advanced Study Guide - 4
ISTQB Advanced Study Guide - 3
ISTQB Advanced Study Guide - 2
ISTQB Advanced – Study Guide -1
Introduction to specification based test design techniques
Knowledge Levels In Certifications
Design Review & Software Testing
Software Development Life Cycle - SDLC

Recently uploaded (20)

PPTX
A Presentation on Artificial Intelligence
PDF
Shreyas Phanse Resume: Experienced Backend Engineer | Java • Spring Boot • Ka...
PDF
The Rise and Fall of 3GPP – Time for a Sabbatical?
PPTX
Big Data Technologies - Introduction.pptx
PDF
NewMind AI Monthly Chronicles - July 2025
DOCX
The AUB Centre for AI in Media Proposal.docx
PDF
Machine learning based COVID-19 study performance prediction
PDF
Encapsulation_ Review paper, used for researhc scholars
PPTX
20250228 LYD VKU AI Blended-Learning.pptx
PPTX
KOM of Painting work and Equipment Insulation REV00 update 25-dec.pptx
PPTX
MYSQL Presentation for SQL database connectivity
PDF
How UI/UX Design Impacts User Retention in Mobile Apps.pdf
PDF
Blue Purple Modern Animated Computer Science Presentation.pdf.pdf
PDF
Advanced methodologies resolving dimensionality complications for autism neur...
PDF
Peak of Data & AI Encore- AI for Metadata and Smarter Workflows
PDF
Mobile App Security Testing_ A Comprehensive Guide.pdf
PPTX
Cloud computing and distributed systems.
PPT
“AI and Expert System Decision Support & Business Intelligence Systems”
PDF
TokAI - TikTok AI Agent : The First AI Application That Analyzes 10,000+ Vira...
PDF
Review of recent advances in non-invasive hemoglobin estimation
A Presentation on Artificial Intelligence
Shreyas Phanse Resume: Experienced Backend Engineer | Java • Spring Boot • Ka...
The Rise and Fall of 3GPP – Time for a Sabbatical?
Big Data Technologies - Introduction.pptx
NewMind AI Monthly Chronicles - July 2025
The AUB Centre for AI in Media Proposal.docx
Machine learning based COVID-19 study performance prediction
Encapsulation_ Review paper, used for researhc scholars
20250228 LYD VKU AI Blended-Learning.pptx
KOM of Painting work and Equipment Insulation REV00 update 25-dec.pptx
MYSQL Presentation for SQL database connectivity
How UI/UX Design Impacts User Retention in Mobile Apps.pdf
Blue Purple Modern Animated Computer Science Presentation.pdf.pdf
Advanced methodologies resolving dimensionality complications for autism neur...
Peak of Data & AI Encore- AI for Metadata and Smarter Workflows
Mobile App Security Testing_ A Comprehensive Guide.pdf
Cloud computing and distributed systems.
“AI and Expert System Decision Support & Business Intelligence Systems”
TokAI - TikTok AI Agent : The First AI Application That Analyzes 10,000+ Vira...
Review of recent advances in non-invasive hemoglobin estimation

Hp Load Runner Tutorial 1 How Do We Record An Application Using Load Runner

  • 1. HP - LoadRunner Tutorial - 1: How do we record an application using LoadRunner? First of all let us try to quickly understand the Load Testing: While aiming to perform a load test of an application; we use LoadRunner to replace the human users with virtual users (called “Vusers”) on the actual machines. These Vusers impose artificially created load on the system by emulating actions of actual human users in a repeatable and predictable manner. Virtual User Generator module of LoadRunner commonly known as VuGen creates artificial users for us and records our all actions in the form of automated scripts. VuGen works on the principle of record and playback. Systematic steps to record an application using VuGen Module of LoadRunner are as under: Step – 1: Starting of the LoadRunner: Select “Start” > “Programs” > “LoadRunner” > “LoadRunner”. Following LoadRunner launcher window pops up. Step – 2: Starting of the VuGen Module of LoadRunner: Click the “Load Testing” tab, In the Launcher window. Further, click on the very first option “Create/Edit Scripts” to launch the following Start Page of VuGen module. Step – 3: Creation of a new Script: Under the “Scripts” tab in the VuGen Start Page, click “New Vuser Script” to open the following “New Virtual User” dialog box.
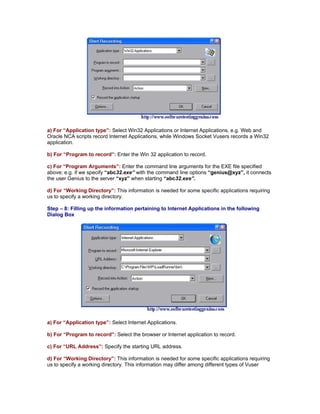
  • 2. Step – 4: Making a choice out of single protocol script or Multiple protocol script from the left pane of the dialog box: a) Select single protocol script - make a selection from the Category list and select one of the protocols. b) Select multiple protocol script - to record more than one protocols in a single recording session. Select the desired protocol from the Available Protocols list. Click the right-pointing arrow to move the selection into the Selected Protocols list. Repeat the step to select all the desired protocols. Step – 5: Close the “New Virtual User” dialog box by Clicking “OK”. Step – 6: Start the process of recording various events into the Vuser script. a) Generally VuGen automatically opens the “Start Recording” dialog box when a new script is created. b) Alternately click the “Start Record” button in the Toolbar at the top of the page to open the “Start Recording” dialog box. The “Start Recording” dialog box may appear differently a little bit for different protocols. Step – 7: Filling up the information pertaining to Non Internet Applications in the following Dialog Box
  • 3. a) For “Application type”: Select Win32 Applications or Internet Applications, e.g. Web and Oracle NCA scripts record Internet Applications, while Windows Socket Vusers records a Win32 application. b) For “Program to record”: Enter the Win 32 application to record. c) For “Program Arguments”: Enter the command line arguments for the EXE file specified above; e.g. if we specify “abc32.exe” with the command line options “genius@xyz”, it connects the user Genius to the server “xyz” when starting “abc32.exe”. d) For “Working Directory”: This information is needed for some specific applications requiring us to specify a working directory. Step – 8: Filling up the information pertaining to Internet Applications in the following Dialog Box a) For “Application type”: Select Internet Applications. b) For “Program to record”: Select the browser or Internet application to record. c) For “URL Address”: Specify the starting URL address. d) For “Working Directory”: This information is needed for some specific applications requiring us to specify a working directory. This information may differ among different types of Vuser
  • 4. scripts. Fill up the information of program to record, the working directory, the Action & set the recording options by clicking “Options”. Step – 9: Filling up the information pertaining to “Record into Action” box: Here we need to select the section where we want to record. Sections available here by default are: vuser_init, Action, and vuser_end. However we can add a new section by clicking “Actions” > “Create New Action” and describe a new action name. Step – 10: Recording the application startup: This step is not recommended under the following situations: a) When recording multiple actions, needing performing the startup in one action only. b) When we want to navigate to a specific point in the application before starting to record. c) While recording into an existing script. d) This step is not applicable to Java type Vuser scripts. However when there is a need to record the application startup; Click “Record the application startup”. When we do not want VuGen to record the application startup, clear the check box. Step – 11: Filling up the information pertaining to Recording Options: C lic k “Options” button or the Recording Options button to open the “Recording options” dialog box and define the recording options. According to the recorded protocol the available options may differ. Step – 12: Defining the scripting options: Click the “Script” tab for selecting the language for code generation and for setting the scripting options. Step – 13: Defining the port information: Needed when recording SSL applications on a non- standard port. Review the list of ports. If the port we are using is not in the list, we can specify the information using the Port Mapping options. Click the “Port Mapping” tab for setting the port related information. Step – 14: Manage Protocols in case of multi-protocol recording: For editing the list of protocols needed to be recorded; click “Protocol” tab. Expand the node and select the desired protocols.
  • 5. Step – 15: Click “OK” to close the dialog box and start the recording. VuGen starts the application and the Recording toolbar opens. Perform the desired actions within the application, which need to be recorded. VuGen automatically fills in the selected action section of the Vuser script. For switching between sections during the recording we can use the floating toolbar. In case of recording a password-protected application, VuGen will prompt us to enter a user name and password. Step – 16: Completing the recording session: a) Switch to the vuser_end section in the floating toolbar. b) Click the “Stop Recording” button on the Recording toolbar. c) Click “Save” to save the recorded session. Tutorial by : http://www.softwaretestinggenius.com