SlideShare a Scribd company logo
Text BasicsLesson 3 ( Powerpoint )
It is important to know how to perform basic tasks with text when working in PowerPoint. In this lesson you will learn the basics of working with text including how to insert, delete, select, and move text, as well as how to work with text boxes.
In PowerPoint, you can insert text into placeholders or text boxes. Text in both can be formatted using the same commands.
To Insert Text:Click the placeholder or text box where you wish to insert text. The insertion point will appear. If you are working with a placeholder, placeholder text will disappear.Type the text you wish to appear.
To Delete Text:Place your cursor next to the text you wish to delete.Press the Backspace key on your keyboard to delete text to the left of the cursor.Press the Delete key on your keyboard to delete text to the right of the cursor.
To Select Text:Place the insertion point next to the text you wish to select.Click and drag your mouse over the text to select it.Release the mouse button. You have selected the text. A highlighted box will appear over the selected text.When you select text or images in PowerPoint, a hover toolbar with formatting options appears. This makes formatting commands easily accessible, which may save you time.
To Format Font Size:Select the text you wish to modify.Click the drop-down arrow next to the font size box on the Home tab. The font size drop-down menu appears.Move your cursor over the various font sizes. A live preview of the font size will appear in the document.Click the font size you wish to use. The font size will change in the document.
Lesson 3   text basics ( powerpoint)
To Format Font Style:Select the text you wish to modify.Click the drop-down arrow next to the font style box on the Home tab. The font style drop-down menu appears.Move your cursor over the various font styles. A live preview of the font will appear in the document.Click the font style you wish to use. The font style will change in the document.
Lesson 3   text basics ( powerpoint)
To Format Font Color:Select the text you wish to modify.Click the drop-down arrow next to the font color box on the Home tab. The font color menu appears.Move your cursor over the various font colors. A live preview of the color will appear in the document.Click the font color you wish to use. The font color will change in the slide.Your color choices aren't limited to the drop-down menu that appears. Select More Colors at the bottom of the list to access more color choices.To Use the Bold, Italic, and Underline Commands:Select the text you wish to modify.Click the Bold, Italic, or Underline command in the Font group on the Home tab.Click the command again to remove the formatting.Other Font CommandsIncrease Font Size command increases the font size of the selected text to the next standard font size.Decrease Font Size command decreases the font size of the selected text to the next standard font size.Clear All Formatting command removes your recent formatting changes.Strikethrough command makes a line through the text.Text Shadow command adds a drop shadow to text.Change Case commands lets you try different capitalization options without having to delete and retype letters or words.
Lesson 3   text basics ( powerpoint)
To Change Text Alignment:Select the text you wish to modify.Select one of the four alignment options from the Paragraph group on the Home tab.Align Text Left: Aligns all the selected text to the left margin.Center: Aligns text an equal distance from the left and right margins.Align Text Right: Aligns all the selected text to the right margin.Justify: Justified text is equal on both sides and lines up equally to the right and left margins.
Lesson 3   text basics ( powerpoint)
Text boxesIn addition to inserting text in placeholders, you can also insert text into text boxes. Text boxes allow you to add to the predefined layouts so that you can place text wherever you want on a slide.
To Insert a Text box:Select the Insert tab on the Ribbon.Click the Text Box command in the Text group.Click and drag the cursor until the text box is the desired width.Release the mouse button.
To Move a Text Box:Click the text box. Your cursor becomes a cross with arrows on each end.While holding the mouse button, drag the text box to the desired location on the page.Release the mouse button.
To Resize a Text Box:Select the text box.Click one of the square sizing handles on the left or right sides, or a circular handle on one of the four corners.While holding down the mouse button, drag the sizing handle until the text box is the desired width.Click and drag the green circle to rotate the text box.
Moving Text
To Copy and Paste Text:Select the text you wish to copy.Click the Copy command on the Home tab.Place your insertion point where you wish the text to appear.Click the Paste command on the Home tab. The text will appear.
To Cut and Paste Text:Select the text you wish to cut.Click the Cut command on the Home tab.Place your insertion point where you wish the text to appear.Click the Paste command on the Home tab. The text will appear.
To Drag and Drop Text:Select the text you wish to copy.Click your mouse and drag the text to the location you wish it to appear. The cursor will have a text box beneath it to indicate that you are moving text.Release the mouse button and the text will appear.
ChallengeUse the Workshop presentation or any other PowerPoint presentation you choose to complete this challenge.Insert text on a slide.Practice using the bold, italic, and underline commands.Change the font style of the title.Change the font size of the title.Change the color of the subtitle.Use the Change Case command on a slide title.Practice using the Increase Font Size and Decrease Font Size commands.Insert a text box and add text.
Lesson 3   text basics ( powerpoint)

More Related Content

PPT
PPTX
Les2 Text Basics
PPT
Formatting Paragraphs
PPT
Word Chapter 3 - Formatting Paragraphs
 
PPTX
Beginners: Microsoft Office Word 2007 Lesson 2
PPT
Lecture three
PPT
Presentation1adri
PPTX
Microsoft Office Word 2007 - Lesson 2
Les2 Text Basics
Formatting Paragraphs
Word Chapter 3 - Formatting Paragraphs
 
Beginners: Microsoft Office Word 2007 Lesson 2
Lecture three
Presentation1adri
Microsoft Office Word 2007 - Lesson 2

What's hot (18)

PPT
Lecture four
PPTX
Microsoft Office Word 2007 - Lesson 4
PPTX
Beginners: Microsoft Office Word 2007 Lesson 2
PPTX
Lesson 9 working with text boxes
PPTX
05 formatting paragraphs
PPTX
Ms word
PPTX
Text formatting in ms w ord
PPTX
Microsoft Office Word 2007 - Lesson 1
PPTX
Second lesson for first year
DOCX
Word07 session
PPT
Word Chapter 2 - Formatting Characters and Paragraphs
 
DOC
Practical File Itm
PPT
Powerpoint class 1
PPTX
Microsoft Office Word 2007 - Lesson 7
PPTX
Microsoft Office
PPT
Formatting Text
PPT
Word 2007-Edit Text And Revise Your Documents
DOCX
Word 07 learn session
Lecture four
Microsoft Office Word 2007 - Lesson 4
Beginners: Microsoft Office Word 2007 Lesson 2
Lesson 9 working with text boxes
05 formatting paragraphs
Ms word
Text formatting in ms w ord
Microsoft Office Word 2007 - Lesson 1
Second lesson for first year
Word07 session
Word Chapter 2 - Formatting Characters and Paragraphs
 
Practical File Itm
Powerpoint class 1
Microsoft Office Word 2007 - Lesson 7
Microsoft Office
Formatting Text
Word 2007-Edit Text And Revise Your Documents
Word 07 learn session
Ad

Viewers also liked (10)

PPTX
Lesson3
PPTX
Why You Should Think Like A Mustard Seed
PPTX
Lesson 3
PPTX
Lesson 6 managing my personal growth
PPTX
Lesson 5
PPTX
PDF
03-07-10: Cultivate 10 (All around us)
PDF
We Are to Grow Up
PPTX
Personal growth
PDF
Start Your Journey Of Personal Growth
Lesson3
Why You Should Think Like A Mustard Seed
Lesson 3
Lesson 6 managing my personal growth
Lesson 5
03-07-10: Cultivate 10 (All around us)
We Are to Grow Up
Personal growth
Start Your Journey Of Personal Growth
Ad

Similar to Lesson 3 text basics ( powerpoint) (20)

PPTX
Making presentations[1]
PPTX
PowerPoint Presentation Part 1
PPT
Power Point 2000 Basics
PDF
Pc Fundamentalspart 2 Word
PPTX
power point.pptx
PPTX
Microsoft word 2010
PPTX
Libre Office Impress Lesson 2: Creating a Slide Show
PDF
Microsoft word 2007_tutorial
PPTX
computer education 2nd year College BSHM.pptx
PPTX
Power Point Presentation on MS Word 2010
PPTX
Powerpoint 2.pptx
PPTX
Technologies work
PPTX
Microsoft Word. Typing Feature.PPT.pptx
PPTX
Working with text
PPTX
Basic formatting sofi
PPTX
Microsoft powerpoint´s basic text formatting tools
PDF
Ms word2013 complete
PPTX
Pg.41 to pg.54 bianca gutiérrez vargas
PPTX
Power Point
PPTX
Power Point
Making presentations[1]
PowerPoint Presentation Part 1
Power Point 2000 Basics
Pc Fundamentalspart 2 Word
power point.pptx
Microsoft word 2010
Libre Office Impress Lesson 2: Creating a Slide Show
Microsoft word 2007_tutorial
computer education 2nd year College BSHM.pptx
Power Point Presentation on MS Word 2010
Powerpoint 2.pptx
Technologies work
Microsoft Word. Typing Feature.PPT.pptx
Working with text
Basic formatting sofi
Microsoft powerpoint´s basic text formatting tools
Ms word2013 complete
Pg.41 to pg.54 bianca gutiérrez vargas
Power Point
Power Point

More from guevarra_2000 (20)

PDF
School personnel sheet2
PPTX
Ting's report on training of spa
PDF
Personnel admin
PPTX
Personnel administration
PDF
Supervisor's role
PPTX
Filipino values and culture
PDF
Format for the action research project
DOCX
Course outline
PDF
Course outline
PDF
Action research format
PPT
Recruitment
PPT
Recruitmentcompatible 1222798911739370-9
PPTX
Filipino culture report
PPTX
Personnel administration report
PPT
Leader&cultural diversity
PPT
Leader&cultural diversity
PPT
Edleadership
PPTX
Principles of getting job done
PPTX
Leading different personalities
PPTX
Success2012
School personnel sheet2
Ting's report on training of spa
Personnel admin
Personnel administration
Supervisor's role
Filipino values and culture
Format for the action research project
Course outline
Course outline
Action research format
Recruitment
Recruitmentcompatible 1222798911739370-9
Filipino culture report
Personnel administration report
Leader&cultural diversity
Edleadership
Principles of getting job done
Leading different personalities
Success2012

Lesson 3 text basics ( powerpoint)

  • 1. Text BasicsLesson 3 ( Powerpoint )
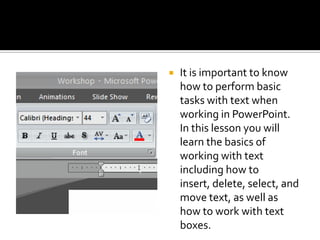
  • 2. It is important to know how to perform basic tasks with text when working in PowerPoint. In this lesson you will learn the basics of working with text including how to insert, delete, select, and move text, as well as how to work with text boxes.
  • 3. In PowerPoint, you can insert text into placeholders or text boxes. Text in both can be formatted using the same commands.
  • 4. To Insert Text:Click the placeholder or text box where you wish to insert text. The insertion point will appear. If you are working with a placeholder, placeholder text will disappear.Type the text you wish to appear.
  • 5. To Delete Text:Place your cursor next to the text you wish to delete.Press the Backspace key on your keyboard to delete text to the left of the cursor.Press the Delete key on your keyboard to delete text to the right of the cursor.
  • 6. To Select Text:Place the insertion point next to the text you wish to select.Click and drag your mouse over the text to select it.Release the mouse button. You have selected the text. A highlighted box will appear over the selected text.When you select text or images in PowerPoint, a hover toolbar with formatting options appears. This makes formatting commands easily accessible, which may save you time.
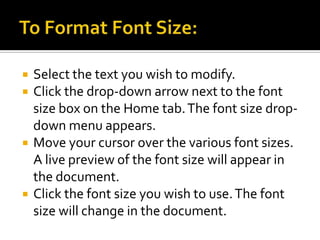
  • 7. To Format Font Size:Select the text you wish to modify.Click the drop-down arrow next to the font size box on the Home tab. The font size drop-down menu appears.Move your cursor over the various font sizes. A live preview of the font size will appear in the document.Click the font size you wish to use. The font size will change in the document.
  • 9. To Format Font Style:Select the text you wish to modify.Click the drop-down arrow next to the font style box on the Home tab. The font style drop-down menu appears.Move your cursor over the various font styles. A live preview of the font will appear in the document.Click the font style you wish to use. The font style will change in the document.
  • 11. To Format Font Color:Select the text you wish to modify.Click the drop-down arrow next to the font color box on the Home tab. The font color menu appears.Move your cursor over the various font colors. A live preview of the color will appear in the document.Click the font color you wish to use. The font color will change in the slide.Your color choices aren't limited to the drop-down menu that appears. Select More Colors at the bottom of the list to access more color choices.To Use the Bold, Italic, and Underline Commands:Select the text you wish to modify.Click the Bold, Italic, or Underline command in the Font group on the Home tab.Click the command again to remove the formatting.Other Font CommandsIncrease Font Size command increases the font size of the selected text to the next standard font size.Decrease Font Size command decreases the font size of the selected text to the next standard font size.Clear All Formatting command removes your recent formatting changes.Strikethrough command makes a line through the text.Text Shadow command adds a drop shadow to text.Change Case commands lets you try different capitalization options without having to delete and retype letters or words.
  • 13. To Change Text Alignment:Select the text you wish to modify.Select one of the four alignment options from the Paragraph group on the Home tab.Align Text Left: Aligns all the selected text to the left margin.Center: Aligns text an equal distance from the left and right margins.Align Text Right: Aligns all the selected text to the right margin.Justify: Justified text is equal on both sides and lines up equally to the right and left margins.
  • 15. Text boxesIn addition to inserting text in placeholders, you can also insert text into text boxes. Text boxes allow you to add to the predefined layouts so that you can place text wherever you want on a slide.
  • 16. To Insert a Text box:Select the Insert tab on the Ribbon.Click the Text Box command in the Text group.Click and drag the cursor until the text box is the desired width.Release the mouse button.
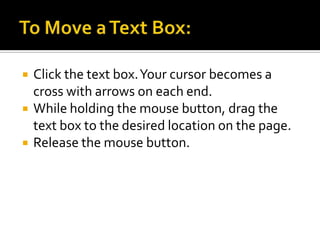
  • 17. To Move a Text Box:Click the text box. Your cursor becomes a cross with arrows on each end.While holding the mouse button, drag the text box to the desired location on the page.Release the mouse button.
  • 18. To Resize a Text Box:Select the text box.Click one of the square sizing handles on the left or right sides, or a circular handle on one of the four corners.While holding down the mouse button, drag the sizing handle until the text box is the desired width.Click and drag the green circle to rotate the text box.
  • 20. To Copy and Paste Text:Select the text you wish to copy.Click the Copy command on the Home tab.Place your insertion point where you wish the text to appear.Click the Paste command on the Home tab. The text will appear.
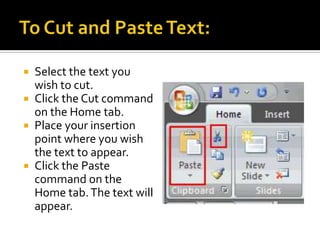
  • 21. To Cut and Paste Text:Select the text you wish to cut.Click the Cut command on the Home tab.Place your insertion point where you wish the text to appear.Click the Paste command on the Home tab. The text will appear.
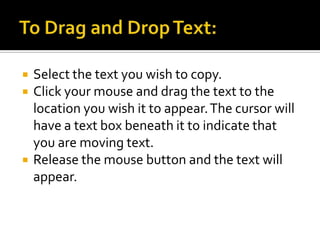
  • 22. To Drag and Drop Text:Select the text you wish to copy.Click your mouse and drag the text to the location you wish it to appear. The cursor will have a text box beneath it to indicate that you are moving text.Release the mouse button and the text will appear.
  • 23. ChallengeUse the Workshop presentation or any other PowerPoint presentation you choose to complete this challenge.Insert text on a slide.Practice using the bold, italic, and underline commands.Change the font style of the title.Change the font size of the title.Change the color of the subtitle.Use the Change Case command on a slide title.Practice using the Increase Font Size and Decrease Font Size commands.Insert a text box and add text.