


LSMW.pdf LLLLLLLLLLLLLLLLLLLLLLLLLLLLLLLLLLLLLLLLLLLLLLLLLLLLLLLLLLLLLLLLLLLLLLLLLLLLLLLLLLLLLLLLLLLLLLLLLLLLLLLLLLLLLLLLLLLLLLLLLLLLLLLLLLLLLLLLLLLLLLLLLLLLLLLLLLLLLLLLLLLLLLLLLLLLLLLLLLLLLLLLLLLLLLLLLLLLLLLLLLLLLLLLLLLLLL
- 2. Significance of Data Migration • Data migration comes in the end of R/3 implementation. • To start with Data Migration first configuration should be fully completed. • Data migration is about 20% to 40% of the total implementation expenses. . 2
- 3. LSM Workbench: What is it? The LSM Workbench is an R/3-based tool that supports you when transferring data from • Non-SAP systems ("Legacy Systems") to R/3 • Once or Periodically. The tool supports conversion of data The data can be imported into the R/3 system via • Batch Input • Direct Input • BAPI’s • IDocs. . 3
- 4. LSM Workbench Versions Version 1.0 of the LSM Workbench was made available to about 350 interested customers and partners in the frame of the First Customer Shipment between March 1998 (CeBIT) and middle of August 1998. In August 1998, version 1.0 of the LSM Workbench was made available to the public. Until today, LSMW has been requested more than 1,000 times. In June 1999, version 1.5 of the LSM Workbench has been released. Since July 1999, version 1.6 of the LSM Workbench has been available. Presently we are using version 1.7 . 4
- 5. Basic Principles of the LSM Workbench The LSM Workbench was developed on the basis of the following principles: • Most of the functions should reside in R/3. No collection of individual programs on different platforms. • The quality and consistence of the data imported into R/3 should be more important than speed and performance of data migration. • Existing knowledge and coding should be used. • The developed ”mapping" and rules should be reusable and thus be used repeatedly in projects. . 5
- 6. R/3 Standard LSMW Concept – Graphical Representation Accelerating Data Migration: LSM Workbench How LSM Workbench works One or several files Structure relations Field mapping Conversion rules Read data Convert data Converted data Read data Batch Input processing Direct Input processing Legacy dat a on PC Lega cy data on a ppl ication se rve r IDoc inbound processing . 6
- 7. Advantages of the LSM Workbench • Part of R/3 and thus independent of individual platforms • A variety of technical possibilities of data conversion: • Data consistency due to standard import techniques: Batch input Direct input BAPIs (Business Application Programming Interfaces) IDocs (Intermediate Documents) • Generation of the conversion program on the basis of defined rules • Clear interactive process guide • Interface for data in spreadsheet format • Creation of data migration objects on the basis of recorded transactions . 7
- 8. Functions of LSMW The LSM Workbench is a tool that supports data transfer from non-SAP systems to R/3. The main functions of the LSM Workbench are: • Import data (legacy data in spreadsheet tables and/or sequential files) • Convert data (from source format to target format) • Import data (into the database of the R/3 application) . 8
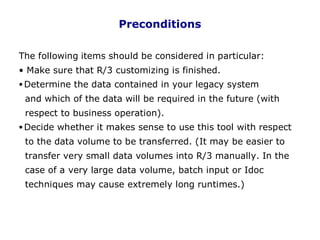
- 9. Preconditions The following items should be considered in particular: • Make sure that R/3 customizing is finished. •Determine the data contained in your legacy system and which of the data will be required in the future (with respect to business operation). •Decide whether it makes sense to use this tool with respect to the data volume to be transferred. (It may be easier to transfer very small data volumes into R/3 manually. In the case of a very large data volume, batch input or Idoc techniques may cause extremely long runtimes.) . 9
- 10. •Identify the transaction(s) in R/3 via which you want to import the data into your SAP system. •Run the relevant transaction in R/3 manually with test data from the legacy system and see which fields must be filled. There may be required fields that do not correspond to data fields in the legacy system. In such a case, you should better assign a fixed value or establish an optional field for data transfer. • Map the fields in advance in written form: Assign the source fields to the target fields. • Determine the form in which non-SAP data will be transferred into the SAP system. . 10
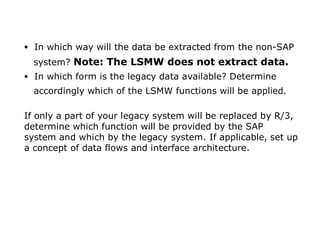
- 11. • In which way will the data be extracted from the non-SAP system? Note: The LSMW does not extract data. • In which form is the legacy data available? Determine accordingly which of the LSMW functions will be applied. If only a part of your legacy system will be replaced by R/3, determine which function will be provided by the SAP system and which by the legacy system. If applicable, set up a concept of data flows and interface architecture. . 11
- 12. Data Migration – Step by Step Initial Transaction To start working with the LSM Workbench, use transaction LSMW. . 12
- 13. Project, SubProject and Object On the initial screen, you can create a new project, corresponding subprojects and objects via Edit -> Create new entry. • Project: An ID to name your data transfer project. • SubProject: An ID that is used as further structuring attribute. • Object: An ID characters to name the business object. All objects provides a list of all projects created already. My objects displays a list of all objects created by logged in user personally. . 13
- 15. . 14
- 16. Personal Menu: All Processing Steps Available LSMW->EXTRAS->PERSONAL MENU . 15
- 17. Maintain Object Attributes . 16
- 18. In this step, object type and import technique are selected • Name your object. By entering data into field Owner, add the project to the list of all projects you created. You can display it afterwards in the initial screen under My objects. • Choose whether data transfer is one-time or periodic. In the case of periodic transfer, files cannot be read from the PC. This adds processing step Frame program for the periodic data transfer. • Select the object type and import technique. Here, an F4 help is available for the input field. This help displays the relevant lists from which you can select the objects. 17
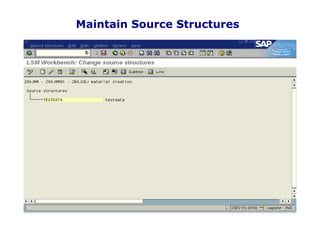
- 19. Maintain Source Structures . 18
- 20. In this step you define the structures of the object with name, description and the hierarchical relationships: In the popup, click Change. You can now define, change, relink or remove structures. All these functions are available via pushbuttons. When you define more than one structure, a popup is displayed querying the relations between the structures: equal/subordinate? Caution: For migration objects created via transaction recording, you may only define one structure per recording here, since only one flat target structure per recording is available. . 19
- 22. Create Individual Source Fields In this section, fields are created and maintained for the structures defined in the preceding step. Identifying field value: Value is used to identify different record types in an input file . 21
- 23. Copy Source Fields from Other Sources Make sure that you are in change mode and the cursor is positioned on a source structure or an existing source field. Selecting Copy Source Fields displays the following popup: . 22
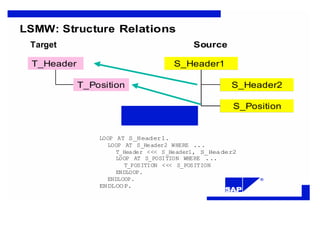
- 24. Maintain Structural Relationships Structural relationships define the relationships between source and target structures. . 23
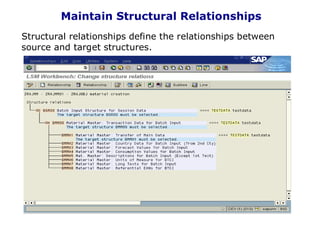
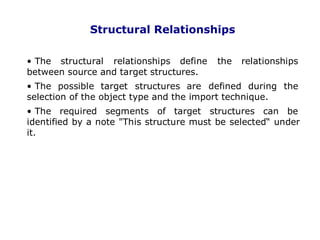
- 25. Structural Relationships • The structural relationships define the relationships between source and target structures. • The possible target structures are defined during the selection of the object type and the import technique. • The required segments of target structures can be identified by a note "This structure must be selected“ under it. . 24
- 26. LSMW: Structure Relations Target Source T_Header S_Header1 T_Position S_Header2 S_Position LOOP AT S_Header1. LOOP AT S_Header2 WHERE ... T_Header <<< S_Header1, S_Header2 LOOP AT S_POSITION WHERE ... T_POSITION <<< S_POSITION ENDLOOP. ENDLOOP. ® ENDLOOP. . 25
- 27. Maintain Field Mapping and Conversion Rules . 26
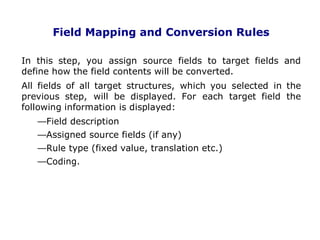
- 28. Field Mapping and Conversion Rules In this step, you assign source fields to target fields and define how the field contents will be converted. All fields of all target structures, which you selected in the previous step, will be displayed. For each target field the following information is displayed: Field description Assigned source fields (if any) Rule type (fixed value, translation etc.) Coding. . 27
- 29. Field documentation : Displays a short documentation for the target field the cursor is positioned on. The documentation may branch off to further information. Possible values : Displays a selection list of all values possible for this target field. Assign a source field: To assign a source field, position the cursor on a target field in the tree structure and select Assign source field. This displays a list of all available source fields for selection. You can assign the fields by double-clicking on them. Note: If you choose Extras Æ Auto-Fieldmapping, LSMW will give suggestions for assigning source fields to target fields. Remove the assignment of a source field: To remove a source field assigned before, position the cursor on a target field in the tree structure and select Remove source field. If one source field has been assigned only, this field is removed. If several source fields have been assigned, a list of all source fields assigned is displayed for selection. The corresponding source field can then be selected by double-clicking on it. . 28
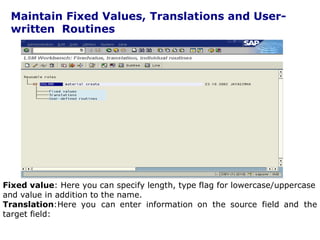
- 30. Maintain Fixed Values, Translations and User- written Routines Fixed value: Here you can specify length, type flag for lowercase/uppercase and value in addition to the name. Translation:Here you can enter information on the source field and the target field: . 29
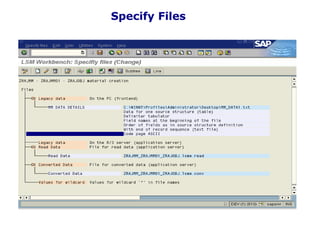
- 31. Specify Files 30
- 33. Read Data . 32
- 34. Display Read Data . 33
- 36. Display Converted Data . 35
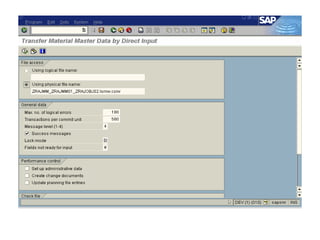
- 37. Import Data Batch Input Generate Batch Input Session In this step, the standard batch input program belonging to the object is directly called. The name of the file with the converted data is already proposed. The batch input sessions to be generated are named after the LSMW object. Run Batch Input Session The program goes to R/3 standard transaction SM35. However, only the batch input sessions for the selected object are displayed. Direct Input Start Direct Input Session Depending on the object type, either the standard direct input program belonging to the object is called or you can select a direct input program or a direct input transaction. . 36
- 38. . 37
- 39. Recordings Recording of the transaction can be done which can be used as import technique. Post process recording: Assign field names, field texts and default values Save recording: This generates the above structure in the Data Repository. When recording is used, the target structure will be generated from the recording itself. Caution: In Attributes for an object you can assign any number of recordings to an object. This way you can run various transactions in succession for one data record.
- 40. . 39