SlideShare a Scribd company logo
http://odinetwork.blogspot.com/


                  Oracle Data Integrator 11g (11.1.1)
          Oracle Data Integrator Project Document Part I


This is one of our documents from ODI learning series. This document
is created for new bees in ODI. The object of the document is to assist
new bees with step by step approach to perform various tasks.


History:
  Version           Description Change                     Author                Publish Date
    0.1                    Initial Draft                Gourav Atalkar           30-June-2011

    0.1                    Review 1st                    Amit Sharma              01-Jul-2011


     Business Intelligence Solution Providers   |   learnhyperion.wordpres.com                  1
http://odinetwork.blogspot.com/


                                 Table of Contents
1)   Introduction                                                                            3
       a. Objective
       b. Business-Rules Driven Approach
       c. Traditional ETL versus E-LT Approach
       d. Understanding Oracle Data Integrator Interfaces
2)   Using ODI in your Data Warehouse Project                                                9
       a. Introduction
       b. Organizing the Teams
3)   Creating an ODI Project and Interface: Exporting a Flat File to a Flat File             11
       a. Purpose
       b. Overview
       c. Creating a New Physical Schema for the Flat File Model
       d. Creating a New ODI Model for the Flat File Source
       e. Creating a New ODI Source Datastore for use with ODI Interface
       f. Creating a New ODI Target Datastore for use with ODI Interface
       g. Creating a New ODI Interface for Flat File to Flat File Transformations
4)   Creating an ODI Project and Interface: Exporting a Relational Table to a Flat File      21
       a. Purpose
       b. Creating Interface
5)   Creating ODI Interface: Exporting a Flat File to a Relational Table                     25

       a. Create a new physical schema for the source flat-file model.
       b. Create the new project in ODI.
       c. Create a new model folder for the flat-file source data store
       d. Create a new ODI Interface to perform a flat-file-to-RDBMS-table transformation.

6)   Create new Project and Procedure                                                        46

       a. Create new Project
       b. Create Procedure


     Business Intelligence Solution Providers     |     learnhyperion.wordpres.com           2
http://odinetwork.blogspot.com/

   1) Introduction

Objective

• Introduce the key concepts of a business-rule driven architecture

• Introduce the key concepts of E-LT

• Understand what an Oracle Data Integrator (ODI) interface is

• Through a business problem case study, understand and evaluate some different
development approaches including:

   •   Manual coding

   •   Traditional ETL

   •   ODI’s business-rule driven approach combined with E-LT

Business-Rules Driven Approach

Introduction to Business rules: - Business rules specify mappings, filters, joins and
constraints. They often apply to metadata to transform data and are usually described in
natural language by business users. In a typical data integration project (such as a Data
Warehouse project), these rules are defined during the specification phase in documents
written by business analysts in conjunction with project managers.

Business Rules usually define “What” to do rather than “How” to do it. They can very often be
implemented using SQL expressions, provided that the metadata they refer to is known and
qualified in a metadata repository.

Examples of business rules are given in the table below:

      Business Rule               Type                      SQL Expression
Sum of all amounts of items      Mapping      SUM(CASE WHEN SALES.YEARMONTH=2010/05
sold during May 2010                          THEN SALES.AMOUNT * PRODUCT.ITEM_PRICE
multiplied by the item price                   ELSE 0 END )
Products that start with           Filter     Upper(PRODUCT.PRODUCT_NAME) like ‘CPU%’
‘CPU’ and that belong to the                  And PRODUCT.CATEGORY = ‘HARDWARE’
hardware category
Customers with their orders         Join      CUSTOMER.CUSTOMER_ID = ORDER.ORDER_ID
and order lines                               And ORDER.ORDER_ID = ORDER_LINE.ORDER_ID
Reject duplicate Customer        Unique       CONSTRAINT CUST_NAME_PK
names                              Key        PRIMARY KEY (CUSTOMER_NAME)
                                Constraint


       Business Intelligence Solution Providers   |   learnhyperion.wordpres.com         3
http://odinetwork.blogspot.com/
Reject orders with a link to    Reference     CONSTRAINT CUSTOMER_FK
an non-existent customer        Constraint    FOREIGN KEY (CUSTOMER_ID)
                                              REFERENCES CUSTOMER(CUSTOMER_ID)


Mappings: A mapping is a business rule implemented as a SQL expression. It is a
transformation rule that maps source columns (or fields) onto one of the target columns. It
can be executed by a relational database server at run-time. This server can be the source
server (when possible), a middle tier server or the target server.

Joins: A join operation links records in several data sets, such as tables or files. Joins are used
to link multiple sources. A join is implemented as a SQL expression linking the columns
(fields) of two or more data sets.

Joins can be defined regardless of the physical location of the source data sets involved. For
example, a JMS queue can be joined to a relational table.

Depending on the technology performing the join, it can be expressed as an inner join, right
outer join, left outer join and full outer join.

Filters: A filter is an expression applied to source data sets columns. Only the records
matching this filter are processed by the data flow.

Constraints: A constraint is an object that defines the rules enforced on data sets’ data. A
constraint ensures the validity of the data in a given data set and the integrity of the data of a
model. Constraints on the target are used to check the validity of the data before integration
in the target.

Traditional ETL versus E-LT Approach: Traditional ETL tools operate by first Extracting
the data from various sources, Transforming the data on a proprietary, middle-tier ETL
engine, and then Loading the transformed data onto the target data warehouse or integration
server. Hence the term “ETL” represents both the names and the order of the operations
performed, as shown in Figure below.


Understanding Oracle Data Integrator Interfaces : An interface is an ODI object stored in the
ODI Repository that enables the loading of one target datastore with data transformed from


       Business Intelligence Solution Providers   |   learnhyperion.wordpres.com               4
http://odinetwork.blogspot.com/
one or more source datastores, based on business rules implemented as mappings, joins,
filters and constraints.

A data stores can be:

• A table stored in a relational database

• An ASCII or EBCDIC file (delimited, or fixed length)

• A node from a XML file

• A JMS topic or queue from a Message Oriented

• A node from a LDAP directory

• An API that returns data in the form of an array of records


Figure shows a screenshot of an ODI interface that loads data into the FACT_SALES target
table. Source Data is defined as a heterogeneous query on the CORRECTIONS file, the Store
and Region tables.


A Business Problem case study: Figure describes an example of a business problem to extract,
transform and load data from a Microsoft SQL Server database and a file into a target Oracle
table.

Data is coming from two Microsoft SQL Server tables (Store joined to Region) and. The target
SALES Oracle table must match some constraints such as the uniqueness of the ID column and
valid reference to the SALES_REP table.

Data must be transformed and aggregated according to some mappings as shown in Figure


       Business Intelligence Solution Providers   |   learnhyperion.wordpres.com        5
http://odinetwork.blogspot.com/


Translating these business rules from natural language to SQL expressions is usually
straightforward. In our example, the rules that appear in the figure could be translated as
follows:

   TYPE                             RULE                       SQLEXPRESSION/ CONSTRAINT
Filter          Only Store marked as Books                     STORE.store_type=’Books’
Join            A row from LINES has a matching                ORDERS.ORDER_ID= LINES.ORDER_ID
                ORDER_ID in
                ORDERS
Mapping         Target’s SALE is the sum of the order lines’   SUM(LINES.AMOUNT+
                AMOUNT grouped by sales rep., with the         CORRECTIONS.VALUE)
                corrections applied.
Mapping         Sales Rep = Sales Rep ID from ORDERS           ORDERS.SALES_REP_ID

Constraint      ID must not be null                            ID is set to “not null” in the data model

Constraint      ID must be unique                              A Primary Key is added to the data
                                                               model with (ID) as set of columns
Constraint      The Sales Rep. ID should exist in the Target   A Reference (Foreign Key) is added in
                sales Rep table                                the data model on SALES.SALES_REP =
                                                               SALES_REP.SALES_REP_ID


We will be looking at an organization that wishes to track sales from various heterogeneous data
sources issued from the production systems. The following data sources will be used:

The Repository: The Repository contains all of the metadata required for the training examples. It
is hosted, for these evaluation purposes, in a supplied database.

Orders Application: An application for tracking customer orders, hosted in a supplied database
(the "src_sales" sample database).

Sales Administration: The administration or tracking of sales, hosted in another supplied database
(the "trg_sales" sample database). We will populate this data warehouse with our transformations


         Business Intelligence Solution Providers   |    learnhyperion.wordpres.com                        6
http://odinetwork.blogspot.com/


The schema diagrams below define the supplied data models that we will be using throughout this
guide:

Orders Application

1) Store_table


                                            Region_table


2) Dim Reason


       Business Intelligence Solution Providers   |   learnhyperion.wordpres.com           7
http://odinetwork.blogspot.com/


Product_Table


Period_Table


Fact_table


     Business Intelligence Solution Providers   |   learnhyperion.wordpres.com   8
http://odinetwork.blogspot.com/

   2) Using ODI in your Data Warehouse Project
Introduction The main goal of a Data Warehouse is to consolidate and deliver accurate
indicators to business users to help them make decisions regarding their everyday business. A
typical project is composed of several steps and milestones. Some of these are:

       • Defining business needs (Key Indicators)

       • Identifying source data that concerns key indicators; specifying business rules to
       transform source information into key indicators

       • Modeling the data structure of the target warehouse to store the key indicators

       • Populating the indicators by implementing business rules

       • Measuring the overall accuracy of the data by setting up data quality rules

       • Developing reports on key indicators

       • Making key indicators and metadata available to business users through ad-hoc
       query tools or predefined reports

       • Measuring business users’ satisfaction and adding/modifying key indicators.

Organizing the Teams: As Oracle Data Integrator relies on a centralized repository,
different types of users may need to access it. The list below describes how ODI may be used
by your teams.

   1) PROFILE: Business User
DESCRIPTION: Business users have access to the final calculated key indicators through
reports or ad-hoc queries. In some cases, they need to understand what the definition of the
indicators is, how they are calculated and when they were updated. Alternatively, they need
to be aware of any data quality issue regarding the accuracy of their indicators.

ODI MODULES USED: ODI Console

   2) PROFILE: Business Analyst
DESCRIPTION: Business Analysts define key indicators.

They know the source applications and specify business rules to transform source data into
meaningful target indicators. They are in charge of maintaining translation data from operational
semantics to the unified data warehouse semantic.

ODI MODULES USED: Designer Navigator (limited access) ,ODI Console


       Business Intelligence Solution Providers   |   learnhyperion.wordpres.com             9
http://odinetwork.blogspot.com/
   3) PROFILE: Developer
DESCRIPTION: Developers are in charge of implementing the business rules in respect to the
specifications described by the Business Analysts. They release their work by providing
executable scenarios to the production team. Developers must have both technical skills
regarding the infrastructure and business knowledge of the source applications.

ODI MODULES USED: Limited access to Models Full access to Projects Operator Navigator ODI
Console

   4) PROFILE: Metadata Administrator
DESCRIPTION: Metadata Administrators are in charge of reverse-engineering source and
target applications. They guarantee the overall consistency of Metadata in the ODI Repository.
They have an excellent knowledge of the structure of the sources and targets and they have
participated in the data modeling of key indicators. In conjunction with Business Analysts,
they enrich the metadata by adding comments, descriptions and even integrity rules (such as
constraints). Metadata Administrators are responsible for version management.

ODI MODULES USED: Topology Navigator (limited access), Designer Navigator: Full access to
Models Restore access to Projects, ODI Console

   5) PROFILE: Database Administrator
DESCRIPTION: Database Administrators are in charge of defining the technical database
infrastructure that supports ODI. They create the database profiles to let ODI access the data.
They create separate schemas and databases to store the Staging Areas. They make the
environments accessible by describing them in the Topology

ODI MODULES USED: Topology Navigator (full access), Designer Navigator (full access), Operator
Navigator (full access), ODI Console

   6) PROFILE: System Administrator
DESCRIPTION: System Administrators are in charge of maintaining technical resources and
infrastructure for the project. For example, they may install and monitor Scheduler Agents backup
/ restore Repositories install and monitor ODI Console Setup environments (development, test,
maintenance etc.)

ODI MODULES USED: Agents, Topology Navigator (limited access), ODI Console

   7) PROFILE: Security Administrator


       Business Intelligence Solution Providers   |   learnhyperion.wordpres.com             10
http://odinetwork.blogspot.com/
DESCRIPTION: The Security Administrator is in charge of defining the security policy for the
ODI Repository. He or she creates ODI users and grants them rights on models, projects and
contexts.

ODI MODULES USED: Security Navigator (full access), Designer Navigator (read access), Topology
Navigator (read access), ODI Console

    8) PROFILE: Operator
DESCRIPTION: Operators are in charge of importing released and tested scenarios into the
production environment. They schedule the execution of these scenarios. They monitor execution
logs and restart failed sessions when needed.

ODI MODULES USED: Operator Navigator ODI Console Oracle Enterprise Manager Plug-in For ODI

The ODI Master Repository contains built-in default profiles that can be assigned to users. The
following table suggests how to use these built-in profiles:

            PROFILE                     BUILT-IN PROFILE IN ORACLE DATA INTEGRATOR
Business User                        CONNECT, NG REPOSITORY EXPLORER
Business Analyst                     CONNECT, NG REPOSITORY EXPLORER, NG DESIGNER
Developer                            CONNECT, DESIGNER
Metadata Administrator               CONNECT, METDATA ADMIN, VERSION ADMIN
Database Administrator               CONNECT, DESIGNER, METADATA ADMIN, TOPOLOGY ADMIN
System Administrator                 CONNECT, OPERATOR
Security Administrator               CONNECT, SECURITY ADMIN
Operator                             CONNECT, OPERATOR


    3) CREATING AN ODI PROJECT AND INTERFACE:
       EXPORTING A FLAT FILE TO A FLAT FILE
PURPOSE

This tutorial walks you through the steps that are needed to create a project and an interface
in Oracle Data Integrator (ODI) to export a flat file to another flat file.

OVERVIEW

A common task that is performed using ODI is to export data from a flat file and load this data
into another flat file. This tutorial walks you through the steps that are needed to create a
project and an interface that will import a file to a staging area, perform some minor
transformations, and then write the data to a file. You also execute the interface and verify the
execution using ODI Operator.

        Business Intelligence Solution Providers   |     learnhyperion.wordpres.com          11
http://odinetwork.blogspot.com/
CREATING A NEW PHYSICAL SCHEMA FOR THE FLAT FILE MODEL

Step: 1) Click Topology tab. In Topology navigator, click the Physical Architecture tab, select
Technologies > File. Right-click FILE_GENERIC, and then select New Physical Schema.


                                     Step: 2) For the Directory (Schema) and Directory (Work
                                     Schema) fields, enter the path to the directory, where your
                                     input flat files are located ( C:Demonstration ). Select
                                     Default check box, and then click save button. Close editing
                                     window for your new physical schema. On the Information
                                     window that follows, click OK.


Step: 3) Open Logical Architecture, navigate to Technologies > File, right-click File and select New Logical
Schema. Enter the Logical Schema name: SRC_Text_file, select the recently created physical schema in
Global context as shown below. Click Save and close the editing windows.


       Business Intelligence Solution Providers     |    learnhyperion.wordpres.com                     12
http://odinetwork.blogspot.com/
CREATING A NEW ODI MODEL FOR THE FLAT FILE SOURCE

 Step: 1) Click the Models tab in the left panel of ODI Designer. Click the Insert Model Folder
 icon, and then select New Model Folder. On the screen that appears, set the Name to Files.
 Click Save icon


 Step: 2) Save.

 Right-click the Text model folder and select New Model. On the screen that appears, enter the
 values provided in the following image. Select Reverse Engineer tab.


   Step: 3) On the screen that appears, verify settings and click Save icon to save your model.


 CREATING A NEW ODI SOURCE DATASTORE FOR USE WITH ODI INTERFACE
 Step:1) Expand the Flat Files folder, right-click the newly created file data model, and then
 select New Datastore. On the screen that appears, set Name to SRC_STORE. Click the button
 next to the Resource Name field. Select the STORES.txt file and click Open.


        Business Intelligence Solution Providers   |   learnhyperion.wordpres.com            13
http://odinetwork.blogspot.com/


Step: 2) Click the Files tab. Set the File Format to Fixed, and then click the Columns tab.


Step: 3) On the Columns tab, click the Reverse Engineer button. The following screen
appears. Click Yes.


       Business Intelligence Solution Providers   |   learnhyperion.wordpres.com              14
http://odinetwork.blogspot.com/


                                       Step: 4) In the FILE DATA MODEL, right-click Stores
                                       datastore, and then select View Data option. Close all tabs


Business Intelligence Solution Providers   |     learnhyperion.wordpres.com                   15
http://odinetwork.blogspot.com/
  CREATING A NEW ODI TARGET DATASTORE FOR USE WITH ODI INTERFACE
Step:1) Browse to the H:Demonstration directory . Make a copy of the STORES.txt file and
name the copy TRG_STORES.txt as shown in the example in the following screenshots.


Step:2) In ODI Designer, right-click the newly created source datastore STORES and select Duplicate.
On the screen that follows, click Yes. The new Copy of STORES.txt appears in the tree view.


Step:3) Right-click the newly created duplicate Copy of STORES.txt and select Edit. On the
screen that appears, set the Name to TRG_STORES. Click the button next to the Resource
Name field.


       Business Intelligence Solution Providers   |   learnhyperion.wordpres.com                16
http://odinetwork.blogspot.com/


Step: 4) Select the TRG_STORES.txt file and click Open. Click Save icon. The data stores for
the source and target files have now been successfully created in the same model and can be
used in an ODI interface. Close editing tabs.


 CREATING A NEW ODI INTERFACE FOR FLAT FILE TO FLAT FILE TRANSFORMATIONS


Step: 1) In ODI Designer, click the Projects tab. Expand your project, and then expand First
Folder. Right-click Interfaces and select Insert Interface.


      Business Intelligence Solution Providers   |   learnhyperion.wordpres.com         17
http://odinetwork.blogspot.com/


Step: 2) On the screen that follows, enter the interface name as INT_text_file to text_file.
Select In-Memory Engine: SUNOPSIS_MEMORY_ENGINE from drop-down list. Click the
Mapping tab.


Step: 3) Click the Models tab to drag the source and target to Designer. Expand Text File
model > Flat File Model and drag the Stores datastore from the Text File model folder into
the Sources container. Drag the TRG_Stores.txt datastore from Text File model into the
Target Datastore container. When Designer asks "Do you want to perform an Automatic
Mapping?" click Yes.


Step: 4) Go to the Flow Tab Click the Srs_Set0(FILE_GENERIC) source datastore. This makes the
properties for the source appear below. In the LKM Selector section, select LKM File to SQL from the
LKM drop-down list if not already selected.


       Business Intelligence Solution Providers   |   learnhyperion.wordpres.com                18
http://odinetwork.blogspot.com/


Step: 5) Click Target (FILE_GENERIC). This makes the properties for the target appear
below. For IKM, select IKM SQL to File Append from the IKM drop-down list if not already
selected. Set the IKM options TRUNCATE to True and GENERATE_HEADER to False as
shown below. Click Save icon to save your interface.


Step: 6) To test your interface, click Execute icon. The following screen appears. Retain the
defaults and click OK. On the screen that follows, click OK.


Step: 7) To verify that your interface was executed successfully; you need to open ODI
Operator. Click the ODI Operator tab. In ODI Operator, click Hierarchical Sessions. Expand All
Execution > INT_text_file to text_file > Steps > INT_text_file to text_file, and view the
execution results for each step.

      Business Intelligence Solution Providers   |   learnhyperion.wordpres.com           19
http://odinetwork.blogspot.com/


Business Intelligence Solution Providers   |   learnhyperion.wordpres.com   20
http://odinetwork.blogspot.com/

   4) CREATING AN ODI PROJECT AND INTERFACE:
      EXPORTING A RELATIONAL TABLE TO A FLAT FILE
PURPOSE In this practice, you create interfaces. First, you create an interface called
INT_Oracle_to_file, loading the TRG_Region datastore in the Oracle Sales Application model
with the content of the SRC_Country table from the Oracle Go outdoors sales model.
Creating Interface
Step: 1) In Designer, click the Projects tab, and expand the Oracle_Project project. Expand the
folder. Select the Interfaces node, right-click, and select the New Interface option.


Step: 2) In the Designer Navigator to the left, click the Models tab. In the tree view, expand
the File Model. Drag the TRG_Region datastore from the tree view to the Target Datastore
zone .The datastore appears in this zone.


Step: 3) Expand the Oracle Application Model Go outdoors sales and drag the SRC_REGION
datastore from the model tree to the Sources zone of your diagram (the panel to the left of the
target panel). An Automap dialog box appears. Click Yes. Now the system automatically maps
fields in the source and target datastores.


       Business Intelligence Solution Providers   |   learnhyperion.wordpres.com             21
http://odinetwork.blogspot.com/


Step: 4) Click the Flow tab. Select the Distinct Rows check box.


Step: 5) Click the Save button to save your interface. If the Locking Object window appears,
select “Don’t show this window next time,” and click Yes.


      Business Intelligence Solution Providers   |   learnhyperion.wordpres.com         22
http://odinetwork.blogspot.com/


Step: 6) Run this interface, and check the content of the TRG_Region table.


Step: 7) Click OK in the Execution window, and then click OK when the Session Started
message appears.


       Business Intelligence Solution Providers   |   learnhyperion.wordpres.com   23
http://odinetwork.blogspot.com/
Step: 8) Click the Operator tab to open the ODI Operator Navigator. The Operator window
appears. In the Session List tab, expand the All Executions node. The session called
“INT_Oracle_to_file” should appear complete. Expand this session in the tree view as shown:


Step: 9) Go to the model tab select file model expand it and select TRG_Region data store
Right click select View Data.


Verify your data and close this window.


      Business Intelligence Solution Providers   |   learnhyperion.wordpres.com        24
http://odinetwork.blogspot.com/
   5) CREATING ODI INTERFACE: EXPORTING A FLAT FILE
      TO A RELATIONAL TABLE
Create a new physical schema for the source flat-file model.
Step: 1) If not connected, connect to the Work repository.


Step: 2) Click Topology navigator. In Topology navigator, click the Physical Architecture tab,
select Technologies > File. Right-click and then select New Data Server.


In Definition tab specify the Name for the Data Server and go to JDBC tab. specify the JDBC
Driver and JDBC Url by selecting browse button.


      Business Intelligence Solution Providers   |   learnhyperion.wordpres.com           25
http://odinetwork.blogspot.com/


       Step: 3) Save the Data Server


Step: 4) Now in Topology navigator, click the Physical Architecture tab, select Technologies >
File. Right-click, Demonstration and then select New Physical Schema.


Step: 5) For the Directory (Schema) and Directory (Work Schema) fields, enter the path to
the     directory     where      your      input     flat    files       are      located


      Business Intelligence Solution Providers   |   learnhyperion.wordpres.com           26
http://odinetwork.blogspot.com/
(C:oracleMiddlewareOracle_ODI1oraclediDemoDemonstration). Select the Default
check box and click Yes in the Confirmation window, and then click the Save button. Close the
editing window for your new physical schema. On the Information window that follows, click
OK. Close the editing tab.


Step: 6) Verify that your new Physical schema was added under the Demonstration data
server in the Technologies tree view.


Step: 7) Open Logical Architecture, navigate to Technologies > File, right-click File, and
select New Logical Schema.


      Business Intelligence Solution Providers   |   learnhyperion.wordpres.com          27
http://odinetwork.blogspot.com/


Step: 8) Enter the Logical Schema name: Demonstration Integration, and select the Physical
schema Demonstration in all three contexts as shown here. Click Save and close the editing
Window.


Step: 9) Verify that your new Logical schema was added under the File node in the
Technologies tree view.


Create the new project in ODI.


      Business Intelligence Solution Providers   |   learnhyperion.wordpres.com       28
http://odinetwork.blogspot.com/


Step: 11) On the screen that appears, set the Name of the project to Flat file to Relation
Table in the Name field. The Code field is filled in automatically. Click Save, and then close the
tab. The newly created Flat file to Relation Table project now appears in the Projects pane.


Create a new model folder for the flat-file source data store.


Step: 13) In ODI Designer, click the Models tab, and then click the New Model. Then select the
New Model option to insert a new model.


       Business Intelligence Solution Providers   |   learnhyperion.wordpres.com              29
http://odinetwork.blogspot.com/


Step: 14) Create a new ODI source data store. On the screen that appears, set the Name to
Sales Region. Click the button next to the Resource Name field. Navigate to the
C:oracleMiddlewareOracle_ODI1oraclediDemoDemonstration folder, and then select
the SRC Sales Region.txt file. Click Open.


      Business Intelligence Solution Providers   |   learnhyperion.wordpres.com         30
http://odinetwork.blogspot.com/


Step: 15) Click the Files tab. Set the File Format to Fixed, and then click the Columns tab.


Step: 16) On the Columns tab, click the Reverse Engineer button. The following Confirmation
screen appears. Click Yes. The Column Setup Wizard appears.


       Business Intelligence Solution Providers   |   learnhyperion.wordpres.com               31
http://odinetwork.blogspot.com/


Step: 17) Place the cursor, and then click the ruler at the beginning of each column as shown
next. The wizard marks each column as shown in the following screens.


      Business Intelligence Solution Providers   |   learnhyperion.wordpres.com          32
http://odinetwork.blogspot.com/


Business Intelligence Solution Providers   |   learnhyperion.wordpres.com   33
http://odinetwork.blogspot.com/
Step: 18) After the columns are marked, click each column data to select a column, and then
set the name and data type for each column in the Definition panel to the right, as shown in
the following screens.


      Business Intelligence Solution Providers   |   learnhyperion.wordpres.com         34
http://odinetwork.blogspot.com/
Step: 19) The columns should look as follows. Click Save to save the model. If the Unlocking
Object window appears, select the check box and click OK. Expand Flat file Model > Sales
Region > Columns and view the newly created columns.


Step: 20) You must create a schema to host the ODI target datastore. To create a new RDBMS
schema for the ODI datastore, perform the following steps:


      Business Intelligence Solution Providers   |   learnhyperion.wordpres.com         35
http://odinetwork.blogspot.com/
Open the Oracle 10g SQL Plus window .You will create the schema by executing the following
SQL commands:

create user <MY_SCHEMA> identified by <MY_PASS> ;

To create a user, enter the following command. Verify that user odi_demo is created
successfully.

create user odi_demo identified by odi_demo;


Grant connects privileges to the newly created user by executing the following SQL command:

grant connect, resource, create trigger, create view to odi_demo;


Step: 21) Now you need to create a new ODI datastore for the target model. This datastore
will be used within the ODI Interface. To create a new ODI target datastore, perform the
following steps:

Enter the username as odi_demo with the password odi_demo. For SID enter ORCL.


Create your target table by executing the following SQL commands.

CREATE table "trg_sales_region"( "Region_Key" NUMBER(8,0) NOT NULL, "Region"
VARCHAR2(80), "Territory" VARCHAR2(80), "Country" VARCHAR2(80), primary
key("Region_Key") ) ;

       Business Intelligence Solution Providers   |   learnhyperion.wordpres.com        36
http://odinetwork.blogspot.com/


Step: 22) After you have created the new database target datastore, you need to create a new
ODI target data server and the physical schema. To create the ODI target data server and
physical schema, perform the following steps:

In ODI, open ODI Topology Navigator and then select the Physical Architecture tab. Expand
Technologies, right-click Oracle, and select New Data Server. In the Data Server: New window,
enter the values provided in the following image. Click the JDBC tab.


Step: 23) Click for JDBC Driver. Select Oracle JDBC Driver. Click OK. Click for JDBC Url, select
jdbc:oracle:thin:@<host>:<port>:<sid>, and then click OK. Edit the Url to read:
jdbc:oracle:thin:@localhost:1521:ORCL for Oracle Database.


       Business Intelligence Solution Providers   |   learnhyperion.wordpres.com            37
http://odinetwork.blogspot.com/


Step: 24) Click Test Connection. In the window that opens, click Yes to save your data. In the
Information window, click OK. Click Test to verify a successful connection. Click OK.


      Business Intelligence Solution Providers   |   learnhyperion.wordpres.com           38
http://odinetwork.blogspot.com/


Step: 25) Expand Oracle technology node, right-click Oracle Data Server, and then select New
Physical Schema.

In the Schema (Schema) and Schema (Work Schema) field, enter your ODI_Demo schema.
Click the Save button. Close the ODI_Demo.ODI_Demo physical schema window. In the
Information window, click OK.


Step: 26) Open the Logical Architecture tab, expand Technologies > Oracle. Right-click Oracle
technology and then select New Logical Schema.

Name logical schema ODI_Demo. In all three contexts, connect this logical schema to the
ODI_Demo physical schema as shown here. Click the Save button and then close the tabs.


      Business Intelligence Solution Providers   |   learnhyperion.wordpres.com           39
http://odinetwork.blogspot.com/


Step: 27) Create a new ODI target model that will be used within your ODI Interface. To
create a new ODI target model, perform the following steps:

Open ODI Designer. Click the Models tab and select New Model. On the screen that appears,
enter the values provided in the following image. Click the Reverse Engineer tab.


Step: 28) On the Reverse Engineer tab, set the Context to Development. Click the Save button
and then close the RDBMS tab.


      Business Intelligence Solution Providers   |   learnhyperion.wordpres.com           40
http://odinetwork.blogspot.com/
   Step: 29) In the Models tab, right-click the RDBMS model. Select Reverse Engineer. To verify
   that the TRG_SALES_PERSON data store is successfully reversed, expand the model as shown
   here.


Create a new ODI Interface to perform a flat-file-to-RDBMS-table transformation: In
ODI Designer, click the Projects tab. Expand your project Flat file to Relation Table, and then
expand First Folder. Right-click Interface and select New Interface. In the Optimization Context
field, select Development.

   On the screen that follows, enter the interface name as INT Flat file to RDBMS. If selected,
   deselect the Staging Area Different From Target check box. Click the Mapping tab.


   Step: 31) Click the Models tab to drag the source and target to the diagram. Drag the Sales
   Region.txt datastore from the Flat_File model into the Sources container. Drag the
   TRG_Sales_Region datastore from the RDBMS model into the Target Datastore container.
   When Designer asks “Do you want to perform an Automatic Mapping?” click Yes.


          Business Intelligence Solution Providers   |   learnhyperion.wordpres.com               41
http://odinetwork.blogspot.com/


Business Intelligence Solution Providers   |   learnhyperion.wordpres.com   42
http://odinetwork.blogspot.com/


Step: 32) Click the Flow tab. Click the SrcSet_0 (Demonstration) datastore. The properties for
the source appear in the following screen. For LKM, select LKM File to SQL from the LKM
drop-down list if not selected. Now you need to ensure that the temporary objects created
during the transformation are deleted. Set the LKM option DELETE_TEMPORARY_OBJECTS to
<Default>:true as shown here.


Step: 33) Click the Target datastore. Select IKM SQL Incremental Update. Set the IKM option
Flow_Control to False. Set the IKM option DELETE_ALL to True. Click Save


      Business Intelligence Solution Providers   |   learnhyperion.wordpres.com           43
http://odinetwork.blogspot.com/


Step: 34) To test your interface, click the Execute button. The following screen appears.
Retain the defaults and click OK. On the next screen, click OK.


Open ODI Operator and verify that your interface was executed successfully


      Business Intelligence Solution Providers   |   learnhyperion.wordpres.com      44
http://odinetwork.blogspot.com/


Double-click Step 12 and click the Execution tab. View the number of rows inserted into the
target table


      Business Intelligence Solution Providers   |   learnhyperion.wordpres.com        45
http://odinetwork.blogspot.com/
   6) CREATE NEW PROJECT AND PROCEDURE IN ODI
      DESIGNER
Create New Project
Step: 1) Switch to the Designer Navigator. Click the Designer tab. Select the Projects tab, click
the New Project icon, and select New Project.


Step: 2) Enter the name of the project: Procedure-demo. Click the Save button to create the
project and close the tab. The project appears in the tree view. Expand the Procedure-demo
project node.


Create Procedure
Step: 3) Open ODI Designer. In the Projects tab, select Procedure-Demo --> First Folder.
Right-click Procedures and select New Procedure.


Step: 4) Enter the procedure name as Procedure-Create-populate. Set Target Technology to
Oracle. Click the Details tab. Click the icon to add a step in the procedure.


       Business Intelligence Solution Providers   |   learnhyperion.wordpres.com             46
http://odinetwork.blogspot.com/


Step: 5) In the Command: New window, enter the parameters of the procedure and the
command on the target provided in the following details shown in the image. You need this
command to drop the table in case a table with this name exists. Select the Ignore Errors
check box.


Step: 6) Select the Details tab, and then click the icon to add another step in the procedure. In
the Command: New screen, if not selected, click the Command on Target tab. Enter the
parameters of the procedure and the command provided below.


CREATE TABLE "ODI_DEMO"."TRG_SALES_REGION"

 (     "Region_Key" NUMBER(8,0) NOT NULL ENABLE,

       "Region" VARCHAR2(80 BYTE),


       Business Intelligence Solution Providers   |   learnhyperion.wordpres.com             47
http://odinetwork.blogspot.com/
        "Territory" VARCHAR2(80 BYTE),

        "Country" VARCHAR2(80 BYTE), primary key("Region_Key")

 )


Step: 7) Click the Details tab. Click the icon to enter the step to populate the
TRG_SALES_REGION table.


Step: 8) In the Command: New screen, click the Command on Target tab. Enter the
parameters and the command shown below in the image. Click the Details tab to view your
steps.

begin

Insert into TRG_SALES_REGION ("Region_Key","Region","Territory","Country") values
(1,'Americas','North America','USA');

Insert into TRG_SALES_REGION ("Region_Key","Region","Territory","Country") values
(2,'Americas','North America','Canada');

Insert into TRG_SALES_REGION ("Region_Key","Region","Territory","Country") values
(3,'Americas','South America','Brazil');

Insert into TRG_SALES_REGION ("Region_Key","Region","Territory","Country") values
(4,'Americas','South America','Argentina');

Insert into TRG_SALES_REGION ("Region_Key","Region","Territory","Country") values (5,'Europe','British
Isles','United Kingdom');


        Business Intelligence Solution Providers   |   learnhyperion.wordpres.com                 48
http://odinetwork.blogspot.com/
Insert into TRG_SALES_REGION ("Region_Key","Region","Territory","Country") values (6,'Europe','British
Isles','Ireland');

Insert into TRG_SALES_REGION ("Region_Key","Region","Territory","Country") values
(7,'Europe','Scandinavia','Sweden');

Insert into TRG_SALES_REGION ("Region_Key","Region","Territory","Country") values
(8,'Europe','Scandinavia','Norway');

Insert into TRG_SALES_REGION ("Region_Key","Region","Territory","Country") values
(9,'Europe','Western','France');

Insert into TRG_SALES_REGION ("Region_Key","Region","Territory","Country") values
(10,'Europe','Western','Germany');

Insert into TRG_SALES_REGION ("Region_Key","Region","Territory","Country") values (11,'Asia
Pacific','Pacific Rim','Australia');

Insert into TRG_SALES_REGION ("Region_Key","Region","Territory","Country") values(12,'Asia
Pacific','Asia','Japan')

end;


Step: 9) Click Save and close the tab.


       Business Intelligence Solution Providers   |   learnhyperion.wordpres.com                  49
http://odinetwork.blogspot.com/
Execute your newly created procedure and verify the results.


Step: 10) Open ODI Operator. In ODI Operator, click the All Executions node, click
the Refresh icon, find your session, and verify that your procedure executed
successfully.


Step: 11) Open the Oracle SQL developer and expand the ODI_Demo connection. Select Tables
node and click the Refresh button. Double–click the newly created table TRG_SALES_REGION,
click the Data tab, and verify that your table TRG_SALES_REGION was successfully created and
populated with records as shown in the following screen.


      Business Intelligence Solution Providers   |   learnhyperion.wordpres.com         50
http://odinetwork.blogspot.com/


Business Intelligence Solution Providers   |   learnhyperion.wordpres.com   51

More Related Content

PPT
The MEAN Stack: MongoDB, ExpressJS, AngularJS and Node.js
PPTX
ATG Advanced RQL
PPT
Spring Framework
PDF
Odi 12c-getting-started-guide-2032250
PDF
Rediscovering Spring with Spring Boot(1)
PDF
React JS & Functional Programming Principles
PDF
SQL大量発行処理をいかにして高速化するか
PPT
Oracle WebLogic Server Basic Concepts
The MEAN Stack: MongoDB, ExpressJS, AngularJS and Node.js
ATG Advanced RQL
Spring Framework
Odi 12c-getting-started-guide-2032250
Rediscovering Spring with Spring Boot(1)
React JS & Functional Programming Principles
SQL大量発行処理をいかにして高速化するか
Oracle WebLogic Server Basic Concepts

What's hot (20)

PDF
Gephi Toolkit Tutorial
ODP
Java 9 Features
PPTX
Introduction to Spring Framework
PPTX
Angular 2.0 forms
PDF
Inside Flutter: Widgets, Elements, and RenderObjects
PPTX
Oracle application express ppt
PDF
ブレソルでテラバイト級データのALTERを短時間で終わらせる
PPTX
AWS RDSでの冗長化
PDF
Oracle Fleet Patching and Provisioning Deep Dive Webcast Slides
PDF
Oracle Data Guard による高可用性
PPT
Une (simple) présentation de Apache Maven 2
PPTX
React js for beginners
PDF
Spring annotation
PDF
Basic concepts and terminology for the Requirements Management application
PPT
Angular 8
PDF
React Js Simplified
PDF
PostgreSQL 15の新機能を徹底解説
PDF
Spring Framework - Core
PDF
第18回しゃちほこオラクル俱楽部
PDF
Oracle Analytics Cloud のご紹介【2021年3月版】
Gephi Toolkit Tutorial
Java 9 Features
Introduction to Spring Framework
Angular 2.0 forms
Inside Flutter: Widgets, Elements, and RenderObjects
Oracle application express ppt
ブレソルでテラバイト級データのALTERを短時間で終わらせる
AWS RDSでの冗長化
Oracle Fleet Patching and Provisioning Deep Dive Webcast Slides
Oracle Data Guard による高可用性
Une (simple) présentation de Apache Maven 2
React js for beginners
Spring annotation
Basic concepts and terminology for the Requirements Management application
Angular 8
React Js Simplified
PostgreSQL 15の新機能を徹底解説
Spring Framework - Core
第18回しゃちほこオラクル俱楽部
Oracle Analytics Cloud のご紹介【2021年3月版】
Ad

Viewers also liked (20)

PPTX
Oracle Data integrator 11g (ODI) - Online Training Course
PDF
Odi best-practice-data-warehouse-168255
PPTX
Oracle Data Integration Presentation
PPT
oracle data integrator training | oracle data integrator training videos | or...
PPTX
How to Handle DEV&TEST&PROD for Oracle Data Integrator
DOCX
Odi interview questions
PDF
Tableau Best Practices for OBIEE
PDF
Integrating Oracle Data Integrator with Oracle GoldenGate 12c
PPT
ODI 11g in the Enterprise - BIWA 2013
PPTX
Best Practices with ODI : Flexibility
PDF
Introduction to ETL and Data Integration
PDF
Getting started with odi
DOCX
Obia with odi
PDF
Developer’s guide for oracle data integrator
PPTX
Oracle Data Integrator
PPTX
Oracle data integrator (odi) online training
PPT
Fusion Middleware Oracle Data Integrator
PDF
alphorm.com - Formation Oracle Database 11g DBA 1 (1Z0-052)
PDF
Obia Online Training
PDF
Oracle Business Intelligence Applications Migration With Oracle Data Integrat...
Oracle Data integrator 11g (ODI) - Online Training Course
Odi best-practice-data-warehouse-168255
Oracle Data Integration Presentation
oracle data integrator training | oracle data integrator training videos | or...
How to Handle DEV&TEST&PROD for Oracle Data Integrator
Odi interview questions
Tableau Best Practices for OBIEE
Integrating Oracle Data Integrator with Oracle GoldenGate 12c
ODI 11g in the Enterprise - BIWA 2013
Best Practices with ODI : Flexibility
Introduction to ETL and Data Integration
Getting started with odi
Obia with odi
Developer’s guide for oracle data integrator
Oracle Data Integrator
Oracle data integrator (odi) online training
Fusion Middleware Oracle Data Integrator
alphorm.com - Formation Oracle Database 11g DBA 1 (1Z0-052)
Obia Online Training
Oracle Business Intelligence Applications Migration With Oracle Data Integrat...
Ad

Similar to Oracle data integrator project (20)

PPT
3._DWH_Architecture__Components.ppt
PPTX
Database Basics
PPTX
Recipes 8 of Data Warehouse and Business Intelligence - Naming convention tec...
PPT
Datawarehousing & DSS
PPTX
Microsoft dynamics ax 2012 development introduction part 1/3
PDF
Creating Your Data Governance Dashboard
DOCX
UNIT-5 DATA WAREHOUSING.docx
PPTX
Unit 2- Data Warehouse Logical Design.pptx
PPT
Informatica session
PDF
黑豹 ch4 ddd pattern practice (2)
PPT
mdmodel multidimensional (MD) modeling approach to represent more complex da...
PPTX
UNIT - 1 Part 2: Data Warehousing and Data Mining
DOCX
How to design a database that include planning
PPTX
Colin\'s BI Portfolio
PDF
Cis 555 Week 4 Assignment 2 Automated Teller Machine (Atm)...
PPT
Orm and hibernate
PPT
Metadata Creation In OBIEE
DOC
Dwh faqs
PPTX
Design patterns fast track
PDF
Using obi apps to consolidate data for taleo, salesforce and net suite apps_ppt
3._DWH_Architecture__Components.ppt
Database Basics
Recipes 8 of Data Warehouse and Business Intelligence - Naming convention tec...
Datawarehousing & DSS
Microsoft dynamics ax 2012 development introduction part 1/3
Creating Your Data Governance Dashboard
UNIT-5 DATA WAREHOUSING.docx
Unit 2- Data Warehouse Logical Design.pptx
Informatica session
黑豹 ch4 ddd pattern practice (2)
mdmodel multidimensional (MD) modeling approach to represent more complex da...
UNIT - 1 Part 2: Data Warehousing and Data Mining
How to design a database that include planning
Colin\'s BI Portfolio
Cis 555 Week 4 Assignment 2 Automated Teller Machine (Atm)...
Orm and hibernate
Metadata Creation In OBIEE
Dwh faqs
Design patterns fast track
Using obi apps to consolidate data for taleo, salesforce and net suite apps_ppt

More from Amit Sharma (20)

PDF
Oracle enteprise pbcs drivers and assumptions
PDF
Oracle EPBCS Driver
PDF
Oracle Sales Quotation Planning
PDF
Oracle strategic workforce planning cloud hcmswp converted
PDF
Basics of fdmee
PDF
FDMEE script examples
PDF
Oracle PBCS creating standard application
PPT
Hfm rule custom consolidation
PPT
Hfm calculating RoA
PPT
Adding metadata using smartview
PPT
Hyperion planning weekly distribution
PPT
Hyperion planning scheduling data import
PPT
Hyperion planning new features
TXT
Microsoft dynamics crm videos
PDF
Oracle apex-hands-on-guide lab#1
PDF
Oracle apex hands on lab#2
PDF
Security and-data-access-document
PDF
Sales force managing-data
PDF
Salesforce interview-preparation-toolkit-formula-and-validation-rules-in-sale...
PDF
Sales force certification-lab-ii
Oracle enteprise pbcs drivers and assumptions
Oracle EPBCS Driver
Oracle Sales Quotation Planning
Oracle strategic workforce planning cloud hcmswp converted
Basics of fdmee
FDMEE script examples
Oracle PBCS creating standard application
Hfm rule custom consolidation
Hfm calculating RoA
Adding metadata using smartview
Hyperion planning weekly distribution
Hyperion planning scheduling data import
Hyperion planning new features
Microsoft dynamics crm videos
Oracle apex-hands-on-guide lab#1
Oracle apex hands on lab#2
Security and-data-access-document
Sales force managing-data
Salesforce interview-preparation-toolkit-formula-and-validation-rules-in-sale...
Sales force certification-lab-ii

Recently uploaded (20)

PPTX
Detection-First SIEM: Rule Types, Dashboards, and Threat-Informed Strategy
PPTX
Cloud computing and distributed systems.
PDF
Chapter 3 Spatial Domain Image Processing.pdf
PPTX
Understanding_Digital_Forensics_Presentation.pptx
PDF
Architecting across the Boundaries of two Complex Domains - Healthcare & Tech...
PDF
CIFDAQ's Market Insight: SEC Turns Pro Crypto
PPTX
Digital-Transformation-Roadmap-for-Companies.pptx
PDF
Per capita expenditure prediction using model stacking based on satellite ima...
PDF
Electronic commerce courselecture one. Pdf
PDF
Dropbox Q2 2025 Financial Results & Investor Presentation
PDF
cuic standard and advanced reporting.pdf
PDF
Build a system with the filesystem maintained by OSTree @ COSCUP 2025
PPTX
VMware vSphere Foundation How to Sell Presentation-Ver1.4-2-14-2024.pptx
DOCX
The AUB Centre for AI in Media Proposal.docx
PDF
TokAI - TikTok AI Agent : The First AI Application That Analyzes 10,000+ Vira...
PDF
Building Integrated photovoltaic BIPV_UPV.pdf
PDF
Diabetes mellitus diagnosis method based random forest with bat algorithm
PDF
Agricultural_Statistics_at_a_Glance_2022_0.pdf
PDF
NewMind AI Weekly Chronicles - August'25 Week I
PDF
Shreyas Phanse Resume: Experienced Backend Engineer | Java • Spring Boot • Ka...
Detection-First SIEM: Rule Types, Dashboards, and Threat-Informed Strategy
Cloud computing and distributed systems.
Chapter 3 Spatial Domain Image Processing.pdf
Understanding_Digital_Forensics_Presentation.pptx
Architecting across the Boundaries of two Complex Domains - Healthcare & Tech...
CIFDAQ's Market Insight: SEC Turns Pro Crypto
Digital-Transformation-Roadmap-for-Companies.pptx
Per capita expenditure prediction using model stacking based on satellite ima...
Electronic commerce courselecture one. Pdf
Dropbox Q2 2025 Financial Results & Investor Presentation
cuic standard and advanced reporting.pdf
Build a system with the filesystem maintained by OSTree @ COSCUP 2025
VMware vSphere Foundation How to Sell Presentation-Ver1.4-2-14-2024.pptx
The AUB Centre for AI in Media Proposal.docx
TokAI - TikTok AI Agent : The First AI Application That Analyzes 10,000+ Vira...
Building Integrated photovoltaic BIPV_UPV.pdf
Diabetes mellitus diagnosis method based random forest with bat algorithm
Agricultural_Statistics_at_a_Glance_2022_0.pdf
NewMind AI Weekly Chronicles - August'25 Week I
Shreyas Phanse Resume: Experienced Backend Engineer | Java • Spring Boot • Ka...

Oracle data integrator project

  • 1. http://odinetwork.blogspot.com/ Oracle Data Integrator 11g (11.1.1) Oracle Data Integrator Project Document Part I This is one of our documents from ODI learning series. This document is created for new bees in ODI. The object of the document is to assist new bees with step by step approach to perform various tasks. History: Version Description Change Author Publish Date 0.1 Initial Draft Gourav Atalkar 30-June-2011 0.1 Review 1st Amit Sharma 01-Jul-2011 Business Intelligence Solution Providers | learnhyperion.wordpres.com 1
  • 2. http://odinetwork.blogspot.com/ Table of Contents 1) Introduction 3 a. Objective b. Business-Rules Driven Approach c. Traditional ETL versus E-LT Approach d. Understanding Oracle Data Integrator Interfaces 2) Using ODI in your Data Warehouse Project 9 a. Introduction b. Organizing the Teams 3) Creating an ODI Project and Interface: Exporting a Flat File to a Flat File 11 a. Purpose b. Overview c. Creating a New Physical Schema for the Flat File Model d. Creating a New ODI Model for the Flat File Source e. Creating a New ODI Source Datastore for use with ODI Interface f. Creating a New ODI Target Datastore for use with ODI Interface g. Creating a New ODI Interface for Flat File to Flat File Transformations 4) Creating an ODI Project and Interface: Exporting a Relational Table to a Flat File 21 a. Purpose b. Creating Interface 5) Creating ODI Interface: Exporting a Flat File to a Relational Table 25 a. Create a new physical schema for the source flat-file model. b. Create the new project in ODI. c. Create a new model folder for the flat-file source data store d. Create a new ODI Interface to perform a flat-file-to-RDBMS-table transformation. 6) Create new Project and Procedure 46 a. Create new Project b. Create Procedure Business Intelligence Solution Providers | learnhyperion.wordpres.com 2
  • 3. http://odinetwork.blogspot.com/ 1) Introduction Objective • Introduce the key concepts of a business-rule driven architecture • Introduce the key concepts of E-LT • Understand what an Oracle Data Integrator (ODI) interface is • Through a business problem case study, understand and evaluate some different development approaches including: • Manual coding • Traditional ETL • ODI’s business-rule driven approach combined with E-LT Business-Rules Driven Approach Introduction to Business rules: - Business rules specify mappings, filters, joins and constraints. They often apply to metadata to transform data and are usually described in natural language by business users. In a typical data integration project (such as a Data Warehouse project), these rules are defined during the specification phase in documents written by business analysts in conjunction with project managers. Business Rules usually define “What” to do rather than “How” to do it. They can very often be implemented using SQL expressions, provided that the metadata they refer to is known and qualified in a metadata repository. Examples of business rules are given in the table below: Business Rule Type SQL Expression Sum of all amounts of items Mapping SUM(CASE WHEN SALES.YEARMONTH=2010/05 sold during May 2010 THEN SALES.AMOUNT * PRODUCT.ITEM_PRICE multiplied by the item price ELSE 0 END ) Products that start with Filter Upper(PRODUCT.PRODUCT_NAME) like ‘CPU%’ ‘CPU’ and that belong to the And PRODUCT.CATEGORY = ‘HARDWARE’ hardware category Customers with their orders Join CUSTOMER.CUSTOMER_ID = ORDER.ORDER_ID and order lines And ORDER.ORDER_ID = ORDER_LINE.ORDER_ID Reject duplicate Customer Unique CONSTRAINT CUST_NAME_PK names Key PRIMARY KEY (CUSTOMER_NAME) Constraint Business Intelligence Solution Providers | learnhyperion.wordpres.com 3
  • 4. http://odinetwork.blogspot.com/ Reject orders with a link to Reference CONSTRAINT CUSTOMER_FK an non-existent customer Constraint FOREIGN KEY (CUSTOMER_ID) REFERENCES CUSTOMER(CUSTOMER_ID) Mappings: A mapping is a business rule implemented as a SQL expression. It is a transformation rule that maps source columns (or fields) onto one of the target columns. It can be executed by a relational database server at run-time. This server can be the source server (when possible), a middle tier server or the target server. Joins: A join operation links records in several data sets, such as tables or files. Joins are used to link multiple sources. A join is implemented as a SQL expression linking the columns (fields) of two or more data sets. Joins can be defined regardless of the physical location of the source data sets involved. For example, a JMS queue can be joined to a relational table. Depending on the technology performing the join, it can be expressed as an inner join, right outer join, left outer join and full outer join. Filters: A filter is an expression applied to source data sets columns. Only the records matching this filter are processed by the data flow. Constraints: A constraint is an object that defines the rules enforced on data sets’ data. A constraint ensures the validity of the data in a given data set and the integrity of the data of a model. Constraints on the target are used to check the validity of the data before integration in the target. Traditional ETL versus E-LT Approach: Traditional ETL tools operate by first Extracting the data from various sources, Transforming the data on a proprietary, middle-tier ETL engine, and then Loading the transformed data onto the target data warehouse or integration server. Hence the term “ETL” represents both the names and the order of the operations performed, as shown in Figure below. Understanding Oracle Data Integrator Interfaces : An interface is an ODI object stored in the ODI Repository that enables the loading of one target datastore with data transformed from Business Intelligence Solution Providers | learnhyperion.wordpres.com 4
  • 5. http://odinetwork.blogspot.com/ one or more source datastores, based on business rules implemented as mappings, joins, filters and constraints. A data stores can be: • A table stored in a relational database • An ASCII or EBCDIC file (delimited, or fixed length) • A node from a XML file • A JMS topic or queue from a Message Oriented • A node from a LDAP directory • An API that returns data in the form of an array of records Figure shows a screenshot of an ODI interface that loads data into the FACT_SALES target table. Source Data is defined as a heterogeneous query on the CORRECTIONS file, the Store and Region tables. A Business Problem case study: Figure describes an example of a business problem to extract, transform and load data from a Microsoft SQL Server database and a file into a target Oracle table. Data is coming from two Microsoft SQL Server tables (Store joined to Region) and. The target SALES Oracle table must match some constraints such as the uniqueness of the ID column and valid reference to the SALES_REP table. Data must be transformed and aggregated according to some mappings as shown in Figure Business Intelligence Solution Providers | learnhyperion.wordpres.com 5
  • 6. http://odinetwork.blogspot.com/ Translating these business rules from natural language to SQL expressions is usually straightforward. In our example, the rules that appear in the figure could be translated as follows: TYPE RULE SQLEXPRESSION/ CONSTRAINT Filter Only Store marked as Books STORE.store_type=’Books’ Join A row from LINES has a matching ORDERS.ORDER_ID= LINES.ORDER_ID ORDER_ID in ORDERS Mapping Target’s SALE is the sum of the order lines’ SUM(LINES.AMOUNT+ AMOUNT grouped by sales rep., with the CORRECTIONS.VALUE) corrections applied. Mapping Sales Rep = Sales Rep ID from ORDERS ORDERS.SALES_REP_ID Constraint ID must not be null ID is set to “not null” in the data model Constraint ID must be unique A Primary Key is added to the data model with (ID) as set of columns Constraint The Sales Rep. ID should exist in the Target A Reference (Foreign Key) is added in sales Rep table the data model on SALES.SALES_REP = SALES_REP.SALES_REP_ID We will be looking at an organization that wishes to track sales from various heterogeneous data sources issued from the production systems. The following data sources will be used: The Repository: The Repository contains all of the metadata required for the training examples. It is hosted, for these evaluation purposes, in a supplied database. Orders Application: An application for tracking customer orders, hosted in a supplied database (the "src_sales" sample database). Sales Administration: The administration or tracking of sales, hosted in another supplied database (the "trg_sales" sample database). We will populate this data warehouse with our transformations Business Intelligence Solution Providers | learnhyperion.wordpres.com 6
  • 7. http://odinetwork.blogspot.com/ The schema diagrams below define the supplied data models that we will be using throughout this guide: Orders Application 1) Store_table Region_table 2) Dim Reason Business Intelligence Solution Providers | learnhyperion.wordpres.com 7
  • 8. http://odinetwork.blogspot.com/ Product_Table Period_Table Fact_table Business Intelligence Solution Providers | learnhyperion.wordpres.com 8
  • 9. http://odinetwork.blogspot.com/ 2) Using ODI in your Data Warehouse Project Introduction The main goal of a Data Warehouse is to consolidate and deliver accurate indicators to business users to help them make decisions regarding their everyday business. A typical project is composed of several steps and milestones. Some of these are: • Defining business needs (Key Indicators) • Identifying source data that concerns key indicators; specifying business rules to transform source information into key indicators • Modeling the data structure of the target warehouse to store the key indicators • Populating the indicators by implementing business rules • Measuring the overall accuracy of the data by setting up data quality rules • Developing reports on key indicators • Making key indicators and metadata available to business users through ad-hoc query tools or predefined reports • Measuring business users’ satisfaction and adding/modifying key indicators. Organizing the Teams: As Oracle Data Integrator relies on a centralized repository, different types of users may need to access it. The list below describes how ODI may be used by your teams. 1) PROFILE: Business User DESCRIPTION: Business users have access to the final calculated key indicators through reports or ad-hoc queries. In some cases, they need to understand what the definition of the indicators is, how they are calculated and when they were updated. Alternatively, they need to be aware of any data quality issue regarding the accuracy of their indicators. ODI MODULES USED: ODI Console 2) PROFILE: Business Analyst DESCRIPTION: Business Analysts define key indicators. They know the source applications and specify business rules to transform source data into meaningful target indicators. They are in charge of maintaining translation data from operational semantics to the unified data warehouse semantic. ODI MODULES USED: Designer Navigator (limited access) ,ODI Console Business Intelligence Solution Providers | learnhyperion.wordpres.com 9
  • 10. http://odinetwork.blogspot.com/ 3) PROFILE: Developer DESCRIPTION: Developers are in charge of implementing the business rules in respect to the specifications described by the Business Analysts. They release their work by providing executable scenarios to the production team. Developers must have both technical skills regarding the infrastructure and business knowledge of the source applications. ODI MODULES USED: Limited access to Models Full access to Projects Operator Navigator ODI Console 4) PROFILE: Metadata Administrator DESCRIPTION: Metadata Administrators are in charge of reverse-engineering source and target applications. They guarantee the overall consistency of Metadata in the ODI Repository. They have an excellent knowledge of the structure of the sources and targets and they have participated in the data modeling of key indicators. In conjunction with Business Analysts, they enrich the metadata by adding comments, descriptions and even integrity rules (such as constraints). Metadata Administrators are responsible for version management. ODI MODULES USED: Topology Navigator (limited access), Designer Navigator: Full access to Models Restore access to Projects, ODI Console 5) PROFILE: Database Administrator DESCRIPTION: Database Administrators are in charge of defining the technical database infrastructure that supports ODI. They create the database profiles to let ODI access the data. They create separate schemas and databases to store the Staging Areas. They make the environments accessible by describing them in the Topology ODI MODULES USED: Topology Navigator (full access), Designer Navigator (full access), Operator Navigator (full access), ODI Console 6) PROFILE: System Administrator DESCRIPTION: System Administrators are in charge of maintaining technical resources and infrastructure for the project. For example, they may install and monitor Scheduler Agents backup / restore Repositories install and monitor ODI Console Setup environments (development, test, maintenance etc.) ODI MODULES USED: Agents, Topology Navigator (limited access), ODI Console 7) PROFILE: Security Administrator Business Intelligence Solution Providers | learnhyperion.wordpres.com 10
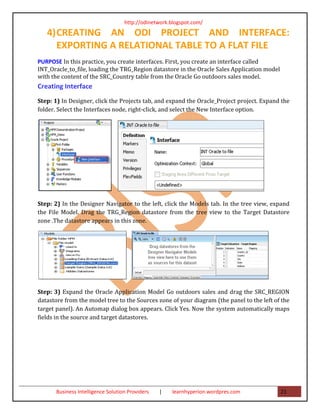
  • 11. http://odinetwork.blogspot.com/ DESCRIPTION: The Security Administrator is in charge of defining the security policy for the ODI Repository. He or she creates ODI users and grants them rights on models, projects and contexts. ODI MODULES USED: Security Navigator (full access), Designer Navigator (read access), Topology Navigator (read access), ODI Console 8) PROFILE: Operator DESCRIPTION: Operators are in charge of importing released and tested scenarios into the production environment. They schedule the execution of these scenarios. They monitor execution logs and restart failed sessions when needed. ODI MODULES USED: Operator Navigator ODI Console Oracle Enterprise Manager Plug-in For ODI The ODI Master Repository contains built-in default profiles that can be assigned to users. The following table suggests how to use these built-in profiles: PROFILE BUILT-IN PROFILE IN ORACLE DATA INTEGRATOR Business User CONNECT, NG REPOSITORY EXPLORER Business Analyst CONNECT, NG REPOSITORY EXPLORER, NG DESIGNER Developer CONNECT, DESIGNER Metadata Administrator CONNECT, METDATA ADMIN, VERSION ADMIN Database Administrator CONNECT, DESIGNER, METADATA ADMIN, TOPOLOGY ADMIN System Administrator CONNECT, OPERATOR Security Administrator CONNECT, SECURITY ADMIN Operator CONNECT, OPERATOR 3) CREATING AN ODI PROJECT AND INTERFACE: EXPORTING A FLAT FILE TO A FLAT FILE PURPOSE This tutorial walks you through the steps that are needed to create a project and an interface in Oracle Data Integrator (ODI) to export a flat file to another flat file. OVERVIEW A common task that is performed using ODI is to export data from a flat file and load this data into another flat file. This tutorial walks you through the steps that are needed to create a project and an interface that will import a file to a staging area, perform some minor transformations, and then write the data to a file. You also execute the interface and verify the execution using ODI Operator. Business Intelligence Solution Providers | learnhyperion.wordpres.com 11
  • 12. http://odinetwork.blogspot.com/ CREATING A NEW PHYSICAL SCHEMA FOR THE FLAT FILE MODEL Step: 1) Click Topology tab. In Topology navigator, click the Physical Architecture tab, select Technologies > File. Right-click FILE_GENERIC, and then select New Physical Schema. Step: 2) For the Directory (Schema) and Directory (Work Schema) fields, enter the path to the directory, where your input flat files are located ( C:Demonstration ). Select Default check box, and then click save button. Close editing window for your new physical schema. On the Information window that follows, click OK. Step: 3) Open Logical Architecture, navigate to Technologies > File, right-click File and select New Logical Schema. Enter the Logical Schema name: SRC_Text_file, select the recently created physical schema in Global context as shown below. Click Save and close the editing windows. Business Intelligence Solution Providers | learnhyperion.wordpres.com 12
  • 13. http://odinetwork.blogspot.com/ CREATING A NEW ODI MODEL FOR THE FLAT FILE SOURCE Step: 1) Click the Models tab in the left panel of ODI Designer. Click the Insert Model Folder icon, and then select New Model Folder. On the screen that appears, set the Name to Files. Click Save icon Step: 2) Save. Right-click the Text model folder and select New Model. On the screen that appears, enter the values provided in the following image. Select Reverse Engineer tab. Step: 3) On the screen that appears, verify settings and click Save icon to save your model. CREATING A NEW ODI SOURCE DATASTORE FOR USE WITH ODI INTERFACE Step:1) Expand the Flat Files folder, right-click the newly created file data model, and then select New Datastore. On the screen that appears, set Name to SRC_STORE. Click the button next to the Resource Name field. Select the STORES.txt file and click Open. Business Intelligence Solution Providers | learnhyperion.wordpres.com 13
  • 14. http://odinetwork.blogspot.com/ Step: 2) Click the Files tab. Set the File Format to Fixed, and then click the Columns tab. Step: 3) On the Columns tab, click the Reverse Engineer button. The following screen appears. Click Yes. Business Intelligence Solution Providers | learnhyperion.wordpres.com 14
  • 15. http://odinetwork.blogspot.com/ Step: 4) In the FILE DATA MODEL, right-click Stores datastore, and then select View Data option. Close all tabs Business Intelligence Solution Providers | learnhyperion.wordpres.com 15
  • 16. http://odinetwork.blogspot.com/ CREATING A NEW ODI TARGET DATASTORE FOR USE WITH ODI INTERFACE Step:1) Browse to the H:Demonstration directory . Make a copy of the STORES.txt file and name the copy TRG_STORES.txt as shown in the example in the following screenshots. Step:2) In ODI Designer, right-click the newly created source datastore STORES and select Duplicate. On the screen that follows, click Yes. The new Copy of STORES.txt appears in the tree view. Step:3) Right-click the newly created duplicate Copy of STORES.txt and select Edit. On the screen that appears, set the Name to TRG_STORES. Click the button next to the Resource Name field. Business Intelligence Solution Providers | learnhyperion.wordpres.com 16
  • 17. http://odinetwork.blogspot.com/ Step: 4) Select the TRG_STORES.txt file and click Open. Click Save icon. The data stores for the source and target files have now been successfully created in the same model and can be used in an ODI interface. Close editing tabs. CREATING A NEW ODI INTERFACE FOR FLAT FILE TO FLAT FILE TRANSFORMATIONS Step: 1) In ODI Designer, click the Projects tab. Expand your project, and then expand First Folder. Right-click Interfaces and select Insert Interface. Business Intelligence Solution Providers | learnhyperion.wordpres.com 17
  • 18. http://odinetwork.blogspot.com/ Step: 2) On the screen that follows, enter the interface name as INT_text_file to text_file. Select In-Memory Engine: SUNOPSIS_MEMORY_ENGINE from drop-down list. Click the Mapping tab. Step: 3) Click the Models tab to drag the source and target to Designer. Expand Text File model > Flat File Model and drag the Stores datastore from the Text File model folder into the Sources container. Drag the TRG_Stores.txt datastore from Text File model into the Target Datastore container. When Designer asks "Do you want to perform an Automatic Mapping?" click Yes. Step: 4) Go to the Flow Tab Click the Srs_Set0(FILE_GENERIC) source datastore. This makes the properties for the source appear below. In the LKM Selector section, select LKM File to SQL from the LKM drop-down list if not already selected. Business Intelligence Solution Providers | learnhyperion.wordpres.com 18
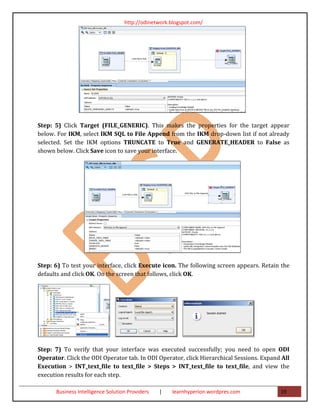
  • 19. http://odinetwork.blogspot.com/ Step: 5) Click Target (FILE_GENERIC). This makes the properties for the target appear below. For IKM, select IKM SQL to File Append from the IKM drop-down list if not already selected. Set the IKM options TRUNCATE to True and GENERATE_HEADER to False as shown below. Click Save icon to save your interface. Step: 6) To test your interface, click Execute icon. The following screen appears. Retain the defaults and click OK. On the screen that follows, click OK. Step: 7) To verify that your interface was executed successfully; you need to open ODI Operator. Click the ODI Operator tab. In ODI Operator, click Hierarchical Sessions. Expand All Execution > INT_text_file to text_file > Steps > INT_text_file to text_file, and view the execution results for each step. Business Intelligence Solution Providers | learnhyperion.wordpres.com 19
  • 21. http://odinetwork.blogspot.com/ 4) CREATING AN ODI PROJECT AND INTERFACE: EXPORTING A RELATIONAL TABLE TO A FLAT FILE PURPOSE In this practice, you create interfaces. First, you create an interface called INT_Oracle_to_file, loading the TRG_Region datastore in the Oracle Sales Application model with the content of the SRC_Country table from the Oracle Go outdoors sales model. Creating Interface Step: 1) In Designer, click the Projects tab, and expand the Oracle_Project project. Expand the folder. Select the Interfaces node, right-click, and select the New Interface option. Step: 2) In the Designer Navigator to the left, click the Models tab. In the tree view, expand the File Model. Drag the TRG_Region datastore from the tree view to the Target Datastore zone .The datastore appears in this zone. Step: 3) Expand the Oracle Application Model Go outdoors sales and drag the SRC_REGION datastore from the model tree to the Sources zone of your diagram (the panel to the left of the target panel). An Automap dialog box appears. Click Yes. Now the system automatically maps fields in the source and target datastores. Business Intelligence Solution Providers | learnhyperion.wordpres.com 21
  • 22. http://odinetwork.blogspot.com/ Step: 4) Click the Flow tab. Select the Distinct Rows check box. Step: 5) Click the Save button to save your interface. If the Locking Object window appears, select “Don’t show this window next time,” and click Yes. Business Intelligence Solution Providers | learnhyperion.wordpres.com 22
  • 23. http://odinetwork.blogspot.com/ Step: 6) Run this interface, and check the content of the TRG_Region table. Step: 7) Click OK in the Execution window, and then click OK when the Session Started message appears. Business Intelligence Solution Providers | learnhyperion.wordpres.com 23
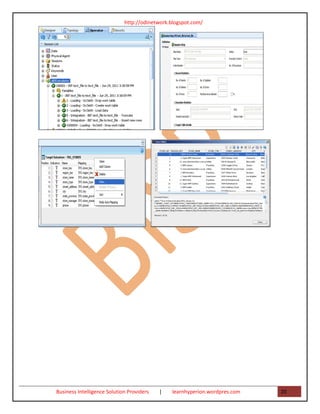
  • 24. http://odinetwork.blogspot.com/ Step: 8) Click the Operator tab to open the ODI Operator Navigator. The Operator window appears. In the Session List tab, expand the All Executions node. The session called “INT_Oracle_to_file” should appear complete. Expand this session in the tree view as shown: Step: 9) Go to the model tab select file model expand it and select TRG_Region data store Right click select View Data. Verify your data and close this window. Business Intelligence Solution Providers | learnhyperion.wordpres.com 24
  • 25. http://odinetwork.blogspot.com/ 5) CREATING ODI INTERFACE: EXPORTING A FLAT FILE TO A RELATIONAL TABLE Create a new physical schema for the source flat-file model. Step: 1) If not connected, connect to the Work repository. Step: 2) Click Topology navigator. In Topology navigator, click the Physical Architecture tab, select Technologies > File. Right-click and then select New Data Server. In Definition tab specify the Name for the Data Server and go to JDBC tab. specify the JDBC Driver and JDBC Url by selecting browse button. Business Intelligence Solution Providers | learnhyperion.wordpres.com 25
  • 26. http://odinetwork.blogspot.com/ Step: 3) Save the Data Server Step: 4) Now in Topology navigator, click the Physical Architecture tab, select Technologies > File. Right-click, Demonstration and then select New Physical Schema. Step: 5) For the Directory (Schema) and Directory (Work Schema) fields, enter the path to the directory where your input flat files are located Business Intelligence Solution Providers | learnhyperion.wordpres.com 26
  • 27. http://odinetwork.blogspot.com/ (C:oracleMiddlewareOracle_ODI1oraclediDemoDemonstration). Select the Default check box and click Yes in the Confirmation window, and then click the Save button. Close the editing window for your new physical schema. On the Information window that follows, click OK. Close the editing tab. Step: 6) Verify that your new Physical schema was added under the Demonstration data server in the Technologies tree view. Step: 7) Open Logical Architecture, navigate to Technologies > File, right-click File, and select New Logical Schema. Business Intelligence Solution Providers | learnhyperion.wordpres.com 27
  • 28. http://odinetwork.blogspot.com/ Step: 8) Enter the Logical Schema name: Demonstration Integration, and select the Physical schema Demonstration in all three contexts as shown here. Click Save and close the editing Window. Step: 9) Verify that your new Logical schema was added under the File node in the Technologies tree view. Create the new project in ODI. Business Intelligence Solution Providers | learnhyperion.wordpres.com 28
  • 29. http://odinetwork.blogspot.com/ Step: 11) On the screen that appears, set the Name of the project to Flat file to Relation Table in the Name field. The Code field is filled in automatically. Click Save, and then close the tab. The newly created Flat file to Relation Table project now appears in the Projects pane. Create a new model folder for the flat-file source data store. Step: 13) In ODI Designer, click the Models tab, and then click the New Model. Then select the New Model option to insert a new model. Business Intelligence Solution Providers | learnhyperion.wordpres.com 29
  • 30. http://odinetwork.blogspot.com/ Step: 14) Create a new ODI source data store. On the screen that appears, set the Name to Sales Region. Click the button next to the Resource Name field. Navigate to the C:oracleMiddlewareOracle_ODI1oraclediDemoDemonstration folder, and then select the SRC Sales Region.txt file. Click Open. Business Intelligence Solution Providers | learnhyperion.wordpres.com 30
  • 31. http://odinetwork.blogspot.com/ Step: 15) Click the Files tab. Set the File Format to Fixed, and then click the Columns tab. Step: 16) On the Columns tab, click the Reverse Engineer button. The following Confirmation screen appears. Click Yes. The Column Setup Wizard appears. Business Intelligence Solution Providers | learnhyperion.wordpres.com 31
  • 32. http://odinetwork.blogspot.com/ Step: 17) Place the cursor, and then click the ruler at the beginning of each column as shown next. The wizard marks each column as shown in the following screens. Business Intelligence Solution Providers | learnhyperion.wordpres.com 32
  • 34. http://odinetwork.blogspot.com/ Step: 18) After the columns are marked, click each column data to select a column, and then set the name and data type for each column in the Definition panel to the right, as shown in the following screens. Business Intelligence Solution Providers | learnhyperion.wordpres.com 34
  • 35. http://odinetwork.blogspot.com/ Step: 19) The columns should look as follows. Click Save to save the model. If the Unlocking Object window appears, select the check box and click OK. Expand Flat file Model > Sales Region > Columns and view the newly created columns. Step: 20) You must create a schema to host the ODI target datastore. To create a new RDBMS schema for the ODI datastore, perform the following steps: Business Intelligence Solution Providers | learnhyperion.wordpres.com 35
  • 36. http://odinetwork.blogspot.com/ Open the Oracle 10g SQL Plus window .You will create the schema by executing the following SQL commands: create user <MY_SCHEMA> identified by <MY_PASS> ; To create a user, enter the following command. Verify that user odi_demo is created successfully. create user odi_demo identified by odi_demo; Grant connects privileges to the newly created user by executing the following SQL command: grant connect, resource, create trigger, create view to odi_demo; Step: 21) Now you need to create a new ODI datastore for the target model. This datastore will be used within the ODI Interface. To create a new ODI target datastore, perform the following steps: Enter the username as odi_demo with the password odi_demo. For SID enter ORCL. Create your target table by executing the following SQL commands. CREATE table "trg_sales_region"( "Region_Key" NUMBER(8,0) NOT NULL, "Region" VARCHAR2(80), "Territory" VARCHAR2(80), "Country" VARCHAR2(80), primary key("Region_Key") ) ; Business Intelligence Solution Providers | learnhyperion.wordpres.com 36
  • 37. http://odinetwork.blogspot.com/ Step: 22) After you have created the new database target datastore, you need to create a new ODI target data server and the physical schema. To create the ODI target data server and physical schema, perform the following steps: In ODI, open ODI Topology Navigator and then select the Physical Architecture tab. Expand Technologies, right-click Oracle, and select New Data Server. In the Data Server: New window, enter the values provided in the following image. Click the JDBC tab. Step: 23) Click for JDBC Driver. Select Oracle JDBC Driver. Click OK. Click for JDBC Url, select jdbc:oracle:thin:@<host>:<port>:<sid>, and then click OK. Edit the Url to read: jdbc:oracle:thin:@localhost:1521:ORCL for Oracle Database. Business Intelligence Solution Providers | learnhyperion.wordpres.com 37
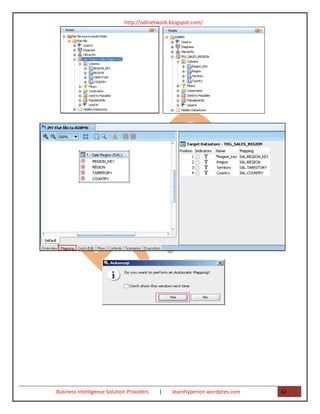
  • 38. http://odinetwork.blogspot.com/ Step: 24) Click Test Connection. In the window that opens, click Yes to save your data. In the Information window, click OK. Click Test to verify a successful connection. Click OK. Business Intelligence Solution Providers | learnhyperion.wordpres.com 38
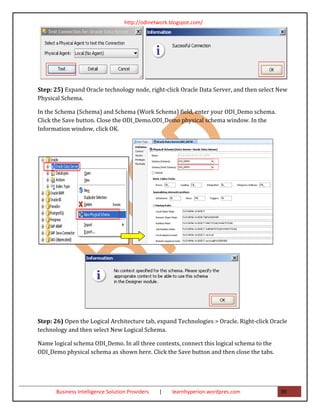
  • 39. http://odinetwork.blogspot.com/ Step: 25) Expand Oracle technology node, right-click Oracle Data Server, and then select New Physical Schema. In the Schema (Schema) and Schema (Work Schema) field, enter your ODI_Demo schema. Click the Save button. Close the ODI_Demo.ODI_Demo physical schema window. In the Information window, click OK. Step: 26) Open the Logical Architecture tab, expand Technologies > Oracle. Right-click Oracle technology and then select New Logical Schema. Name logical schema ODI_Demo. In all three contexts, connect this logical schema to the ODI_Demo physical schema as shown here. Click the Save button and then close the tabs. Business Intelligence Solution Providers | learnhyperion.wordpres.com 39
  • 40. http://odinetwork.blogspot.com/ Step: 27) Create a new ODI target model that will be used within your ODI Interface. To create a new ODI target model, perform the following steps: Open ODI Designer. Click the Models tab and select New Model. On the screen that appears, enter the values provided in the following image. Click the Reverse Engineer tab. Step: 28) On the Reverse Engineer tab, set the Context to Development. Click the Save button and then close the RDBMS tab. Business Intelligence Solution Providers | learnhyperion.wordpres.com 40
  • 41. http://odinetwork.blogspot.com/ Step: 29) In the Models tab, right-click the RDBMS model. Select Reverse Engineer. To verify that the TRG_SALES_PERSON data store is successfully reversed, expand the model as shown here. Create a new ODI Interface to perform a flat-file-to-RDBMS-table transformation: In ODI Designer, click the Projects tab. Expand your project Flat file to Relation Table, and then expand First Folder. Right-click Interface and select New Interface. In the Optimization Context field, select Development. On the screen that follows, enter the interface name as INT Flat file to RDBMS. If selected, deselect the Staging Area Different From Target check box. Click the Mapping tab. Step: 31) Click the Models tab to drag the source and target to the diagram. Drag the Sales Region.txt datastore from the Flat_File model into the Sources container. Drag the TRG_Sales_Region datastore from the RDBMS model into the Target Datastore container. When Designer asks “Do you want to perform an Automatic Mapping?” click Yes. Business Intelligence Solution Providers | learnhyperion.wordpres.com 41
  • 43. http://odinetwork.blogspot.com/ Step: 32) Click the Flow tab. Click the SrcSet_0 (Demonstration) datastore. The properties for the source appear in the following screen. For LKM, select LKM File to SQL from the LKM drop-down list if not selected. Now you need to ensure that the temporary objects created during the transformation are deleted. Set the LKM option DELETE_TEMPORARY_OBJECTS to <Default>:true as shown here. Step: 33) Click the Target datastore. Select IKM SQL Incremental Update. Set the IKM option Flow_Control to False. Set the IKM option DELETE_ALL to True. Click Save Business Intelligence Solution Providers | learnhyperion.wordpres.com 43
  • 44. http://odinetwork.blogspot.com/ Step: 34) To test your interface, click the Execute button. The following screen appears. Retain the defaults and click OK. On the next screen, click OK. Open ODI Operator and verify that your interface was executed successfully Business Intelligence Solution Providers | learnhyperion.wordpres.com 44
  • 45. http://odinetwork.blogspot.com/ Double-click Step 12 and click the Execution tab. View the number of rows inserted into the target table Business Intelligence Solution Providers | learnhyperion.wordpres.com 45
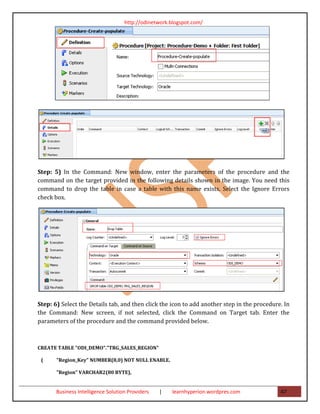
  • 46. http://odinetwork.blogspot.com/ 6) CREATE NEW PROJECT AND PROCEDURE IN ODI DESIGNER Create New Project Step: 1) Switch to the Designer Navigator. Click the Designer tab. Select the Projects tab, click the New Project icon, and select New Project. Step: 2) Enter the name of the project: Procedure-demo. Click the Save button to create the project and close the tab. The project appears in the tree view. Expand the Procedure-demo project node. Create Procedure Step: 3) Open ODI Designer. In the Projects tab, select Procedure-Demo --> First Folder. Right-click Procedures and select New Procedure. Step: 4) Enter the procedure name as Procedure-Create-populate. Set Target Technology to Oracle. Click the Details tab. Click the icon to add a step in the procedure. Business Intelligence Solution Providers | learnhyperion.wordpres.com 46
  • 47. http://odinetwork.blogspot.com/ Step: 5) In the Command: New window, enter the parameters of the procedure and the command on the target provided in the following details shown in the image. You need this command to drop the table in case a table with this name exists. Select the Ignore Errors check box. Step: 6) Select the Details tab, and then click the icon to add another step in the procedure. In the Command: New screen, if not selected, click the Command on Target tab. Enter the parameters of the procedure and the command provided below. CREATE TABLE "ODI_DEMO"."TRG_SALES_REGION" ( "Region_Key" NUMBER(8,0) NOT NULL ENABLE, "Region" VARCHAR2(80 BYTE), Business Intelligence Solution Providers | learnhyperion.wordpres.com 47
  • 48. http://odinetwork.blogspot.com/ "Territory" VARCHAR2(80 BYTE), "Country" VARCHAR2(80 BYTE), primary key("Region_Key") ) Step: 7) Click the Details tab. Click the icon to enter the step to populate the TRG_SALES_REGION table. Step: 8) In the Command: New screen, click the Command on Target tab. Enter the parameters and the command shown below in the image. Click the Details tab to view your steps. begin Insert into TRG_SALES_REGION ("Region_Key","Region","Territory","Country") values (1,'Americas','North America','USA'); Insert into TRG_SALES_REGION ("Region_Key","Region","Territory","Country") values (2,'Americas','North America','Canada'); Insert into TRG_SALES_REGION ("Region_Key","Region","Territory","Country") values (3,'Americas','South America','Brazil'); Insert into TRG_SALES_REGION ("Region_Key","Region","Territory","Country") values (4,'Americas','South America','Argentina'); Insert into TRG_SALES_REGION ("Region_Key","Region","Territory","Country") values (5,'Europe','British Isles','United Kingdom'); Business Intelligence Solution Providers | learnhyperion.wordpres.com 48
  • 49. http://odinetwork.blogspot.com/ Insert into TRG_SALES_REGION ("Region_Key","Region","Territory","Country") values (6,'Europe','British Isles','Ireland'); Insert into TRG_SALES_REGION ("Region_Key","Region","Territory","Country") values (7,'Europe','Scandinavia','Sweden'); Insert into TRG_SALES_REGION ("Region_Key","Region","Territory","Country") values (8,'Europe','Scandinavia','Norway'); Insert into TRG_SALES_REGION ("Region_Key","Region","Territory","Country") values (9,'Europe','Western','France'); Insert into TRG_SALES_REGION ("Region_Key","Region","Territory","Country") values (10,'Europe','Western','Germany'); Insert into TRG_SALES_REGION ("Region_Key","Region","Territory","Country") values (11,'Asia Pacific','Pacific Rim','Australia'); Insert into TRG_SALES_REGION ("Region_Key","Region","Territory","Country") values(12,'Asia Pacific','Asia','Japan') end; Step: 9) Click Save and close the tab. Business Intelligence Solution Providers | learnhyperion.wordpres.com 49
  • 50. http://odinetwork.blogspot.com/ Execute your newly created procedure and verify the results. Step: 10) Open ODI Operator. In ODI Operator, click the All Executions node, click the Refresh icon, find your session, and verify that your procedure executed successfully. Step: 11) Open the Oracle SQL developer and expand the ODI_Demo connection. Select Tables node and click the Refresh button. Double–click the newly created table TRG_SALES_REGION, click the Data tab, and verify that your table TRG_SALES_REGION was successfully created and populated with records as shown in the following screen. Business Intelligence Solution Providers | learnhyperion.wordpres.com 50