Adding web content display - Tutorial
Download as POTX, PDF0 likes284 views

This document provides instructions for adding different types of content to a Web Content Display portlet, including text, images, files, hyperlinks, and YouTube videos. It outlines the steps to take the Ed. Portal to create a new page, add a Web Content Display, and then insert various types of content. The goals are to learn how to utilize this tool to share materials with students and provide multiple formats of content on a single page. Practice and patience are advised as the skills develop over time.
![Web
Content
Display
- Text [font style, colour size etc]
- Images
- Hyperlinks
- YouTube](https://image.slidesharecdn.com/addingwebcontentdisplaytutorial-130410135601-phpapp01/85/Adding-web-content-display-Tutorial-1-320.jpg)


Adding web content display - Tutorial
- 1. Web Content Display - Text [font style, colour size etc] - Images - Hyperlinks - YouTube
- 2. In this session we will: 1. Learn about what a Web Content display is. 2. Learn how to add text, images, files and youtube videos to a webcontent display. 3. Get time to create all of these things for yourselves. A lot is covered in this session. If you forget anything, the slide show that I am using can be found on the ICT’s in the classroom page on the Ed. Portal. Feel free to access this at any time to help you if you get stuck. It would be helpful, if you a. Don’t go ahead of what I am doing. If you do decide to go ahead on your own, please do not ask me questions as this will only make the session unmanageable for the rest of us. b. didn’t talk to your colleague/s while I am talking to the group as this will inevitably cause problems. If your colleague gets stuck, ask him/her to ask me the question, and if I can’t answer it we will get someone from the ICT to answer the question at the end of the session.
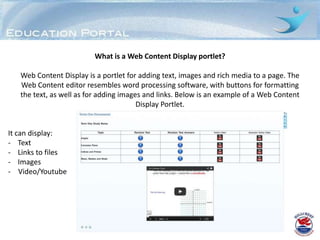
- 3. What is a Web Content Display portlet? Web Content Display is a portlet for adding text, images and rich media to a page. The Web Content editor resembles word processing software, with buttons for formatting the text, as well as for adding images and links. Below is an example of a Web Content Display Portlet. It can display: - Text - Links to files - Images - Video/Youtube
- 4. Let’s get started! 1. Turn on your computers (if you haven’t already done so). 2. Open Mozilla Firefox
- 5. Step 1: Go to the Education Portal by clicking on the link on the Staff Portal. Step 2: Login. You always use your username and password that you use to login to school devices. Step 3: Click on the classes page. Step 4: Click on
- 6. 5. From the list of classes, click on the class you are going to add a Web Content Display to. It doesn’t matter which class you use. That class site will now open. It may already have content on it, or it might be blank. Let’s not worry about this for now.
- 7. To add a new page to this class, follow these steps: 1. Click on the sign (which is found at the top left hand side of your page). 1. Click here where it reads “Documents and Media Display”.
- 8. Add Web Content Display 1. Go to Green Plus 2. Click on Web Content Display
- 9. Change the name of the Portlet 1. Click on Web Content Display 2. Type in new name 3. Click on green tick
- 10. Add content to Web Content Display 1. Click on the page with the green plus © ict@hillcrest.qld.edu.au
- 11. 1. Add a file name/title to your content 2. For now, just call this “Practice Web Content Display”. 3. This is simple the file name you are giving to your portlet and it will not show up anywhere on any page. Practice web content display
- 12. 2. Adding Text
- 13. 1. Adding Text Hi Students, This is a test web content display. To add Text, simply click inside the Be patient as I am learning too. box here and start typing. Please type something now.
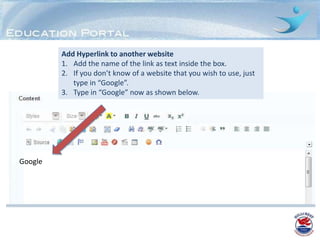
- 14. Add Hyperlink to another website 1. Add the name of the link as text inside the box. 2. If you don’t know of a website that you wish to use, just type in “Google”. 3. Type in “Google” now as shown below. Google
- 15. Add Hyperlink to another website Highlight text or image that you will add a hyperlink to Google
- 16. Now click here on the little aqua coloured “link” icon. Google
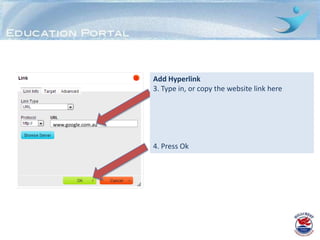
- 17. Add Hyperlink 3. Type in, or copy the website link here www.google.com.au 4. Press Ok
- 18. Click “Publish”
- 19. Your link will now be able to be accessed by your students in your class.
- 20. Adding a picture to your web content display
- 21. 1. Click here on the little yellow pencil icon. This is the button you click on when you want to add or edit something In your web content display.
- 22. Click on a space below your link that you put in before, or press enter after your link.
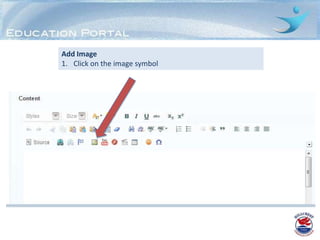
- 23. Add Image 1. Click on the image symbol
- 24. Add Image 2. Click on Browse Server
- 25. Add Image 2. Select the class/folder you are working with by clicking ONCE on the class/folder name. E.g. Year 9 Mathematics B
- 26. Click “Browse”
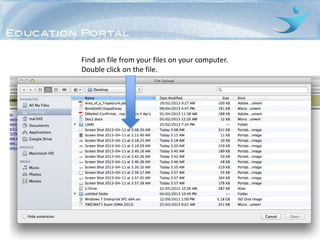
- 27. Find an image from your files on your computer. Double click on the image file.
- 28. Click “Upload” and wait for your image to upload. This may take a while depending on the size of your image.
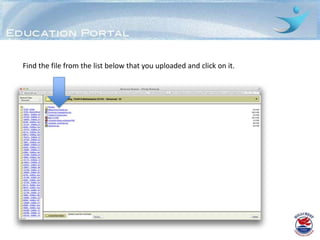
- 29. Find the image from the list below that you uploaded and click on it.
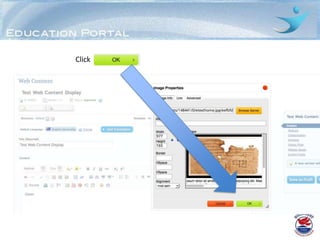
- 30. Click
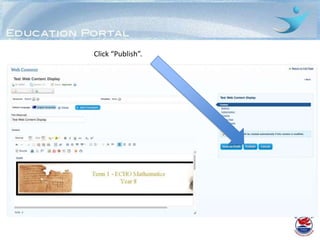
- 31. Click “Publish”.
- 32. You will now notice on your page that you have a link to a website and an image. An example of what your page will look like is given below. Obviously your image will look different to this one.
- 33. Adding a link to a document inside a Web Content Display To add a link to a document, you follow nearly all the same steps you Used to add an image. The only difference is at the very start.
- 34. Click on the little yellow pencil icon
- 35. 1. Click anywhere inside the space where you want your link to your file to go. 2. Type in the name of the file. E.g. Week 1 Homework 3. Highlight the text.
- 36. 4. Click on the aqua coloured icon here after you have highlighted the text.
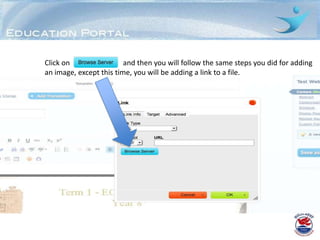
- 37. Click on and then you will follow the same steps you did for adding an image, except this time, you will be adding a link to a file.
- 38. Click “Browse”
- 39. Find an file from your files on your computer. Double click on the file.
- 40. Click “Upload” and wait for your file to upload. This may take a while depending on the size of your file.
- 41. Find the file from the list below that you uploaded and click on it.
- 42. Click
- 43. Click “Publish”.
- 44. The link to the file will now be on your page. Students will be able to click on this link to easily and quickly download the file from home, school, or anywhere.
- 45. Adding a YouTube Video to your Page
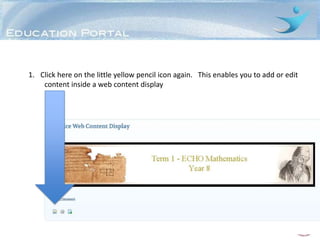
- 47. 1. Click here on the little yellow pencil icon again. This enables you to add or edit content inside a web content display
- 48. Add YouTube Clip 1. Click on YouTube link
- 49. Add YouTube Clip 3. Copy URL from website 4. Press Ok
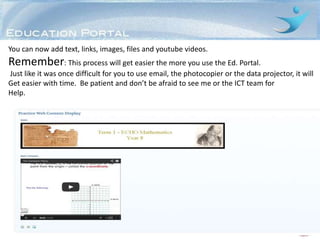
- 50. You can now add text, links, images, files and youtube videos. Remember: This process will get easier the more you use the Ed. Portal. Just like it was once difficult for you to use email, the photocopier or the data projector, it will Get easier with time. Be patient and don’t be afraid to see me or the ICT team for Help.