SlideShare a Scribd company logo
GCE AS
Advanced
Subsidiary Art
and Design
Component 2
Standardisation
samples 2016
Photography
Total Mark 62
As component 2 py_62_sample 24
To start off
investigating
relationships I took
an idea from my
visual stimulus –
doors and windows.
To find inspiration for
different techniques
within this still life
photography I
investigated Steve
McCurry who takes a
range of still life
images in different
countries showing the
colour, texture and
tradition within each
image. They all tell
their own story of
who once lived there
and what has
happened around
them.
Above are two
images in red
boxes, this is
because they are
not Steve
McCurry’s work
and I don’t know
who took them.
They are on this
page because I
also like their
composition,
colour and texture
as well as the
photographers use
of rule of thirds to
draw the viewers
attention to the
door.
To respond to the work
of Steve McCurry I took
photos while in Sri Lanka
of doors and windows,
these images all show
colour, texture, tradition
and life. I took these
photos in a fort in Galle,
after the 2004 Tsunami
this was all that was left
in the area because of
the high solid. Some of
the buildings were still
full of character from
before the Tsunami but
other places got affected
and have been rebuilt
since then.
As component 2 py_62_sample 24
I decided to make this image a
full page because of the
composition, colour and
texture on the wall. I
purposely positioned the
window in the center of the
image to draw the audiences
eye straight to the closed
window. The layers of paint
which have peeled off over
the years create colour and
texture which make the image
exciting as well as tell a story.
As component 2 py_62_sample 24
Recording Natural
Framing;
AS Exam; Relationships
I walked around my area to
look for Natural Framing,
this occurs everywhere –
doors, windows, paths,
broken windows, fences –
everywhere. This took a
while for me to get the hang
of but eventually I managed
to capture natural frames.
Matthias Heiderich does this
extremely well capturing
simplicity and colour in the
image as well. Although his
work is much more
geometrical and creates a
positive scene from the
negative space.
As component 2 py_62_sample 24
Developing ideas
AS Exam; Relationships
To develop my ideas I took
pictures of a friend around Sri
Lanka in an abandoned house
to get the empty windows and
empty door ways with texture,
which links too my response to
Steve McCurry’s work.
This is my favorable
image in the set. I took
the model into an
abandoned house in Sri
Lanka where it was
quite damp and dirty, I
positioned the model in
the bottom half but
center of the frame. I
got her to crouch down
into a fetal position to
show she’s vulnerable
and protecting herself.
The peeling and textured
walls as well as the
ground being dirty
contrasts with her bright
dress which shows quite
a lot of skin.
As component 2 py_62_sample 24
Responding to Franz Jeofee;
AS Exam; Relationships
To respond to the Franz Jeofee I
took a person into a location
with doorways and natural
framing and blacked out the
face, for the first image I used
black and white but for the
others I changed the colours. By
blacking out the face it leave a
sense of worry and unkindness.
It makes you feel uncomfortable
and opens up an idea of the
unknown. The central
positioning of the subject draws
your eye straight to it rather than
drifting off, but the natural door
framing and texture makes it
more pleasant to look at..
As component 2 py_62_sample 24
Investigating the work of John
Copeland and Piet Mondrian;
AS Exam; Relationships
Piet Mondrian did paintings of the
relationships between colours in an
arrangement of rectangles and
squares. It is put together in a
mosaic composition where the
shapes aren’t evenly spaced. His
work links to my set of doorways
and windows because of the shapes,
colour and composition. John
Copeland does portraits of body
which I am going to combine with
Piet Mondrians by taking pictures of
body parts painted and organising
them into a mosaic
Responding to John Copeland;
AS Exam; Relationships
To respond to John Copeland I
investigating hand positions, the
creases and different movement
you can do to create the same
effect as him. In photoshop i
changed the colours to Black and
White to create a more
meaningful feeling rather than in
colour which doesn’t show the
detail and dark shadows in as
much depth.
As component 2 py_62_sample 24
Macro lens; Investigating hands
AS Exam; Relationships
To look at hands in a more
detailed way I took images of
plain hands using a macro lens
where you can see the details of
wrinkles, colour, lines and
shapes. The use of macro distorts
a normal image and makes it
more difficult to properly visualise
the subject, but it also captures
maximum detail with a shallow
depth of field.
As component 2 py_62_sample 24
Developing ideas
linking to the work of
John Copeland and
Piet Mondrian;
To develop my ideas
linking to John Copeland
I’m also bringing in the
work of Piet Mondrian
who creates different
block patters with colour,
to be more creative I
brought in the hands and
painted them.
As component 2 py_62_sample 24
Experimenting;
AS Exam;
Relationships
To experiment I took
photos of normal body
parts and edited shapes
onto them using
lightroom and
photoshop. By taking
shapes and adding
them to the image it
creates an internal yet
external shape and
frame to a smaller more
focused area that is in
black and white, by
putting it in black and
white it makes that area
drawn to more.
As component 2 py_62_sample 24
Developing ideas
using the human
body
AS Exam;
Relationships
To develop from just
the hands I took
photos using the
whole human body
that create internal
and external shapes
that create a negative
and positive space
that is balanced in the
image. The positive
and negative space
can also be created
through shapes on
top of the body, not
using background.
Developing and Experimenting
AS Exam; Relationships
To develop as well as experiment I took one
of the images from my set and experimented
with it in different ways. Using a simple
triangle I designed on photoshop i tried
different things out with it to manipulate the
photograph. In the first picture I made the
triangle transparent but black and white, it
drew out the texture in my skin and the
different colours and shadows in the image
from the natural lighting. In image 2,3 and 4 I
took the texture from the background onto the
triangle and creates and made them different
sizes and angles – this makes the image look
very geometric and interesting for the viewer.
For the large image I took part of my body
into the triangle and repeated it, this is more
subtle but my favourite out of all of them, it
creates a satisfying illusion to the audience
and emphasizes the shadow and individual
shape of just the collarbone itself.
Developing ideas;
AS Exam; Relationships
To develop my ideas I brought a real
frame into each image which draws
your attention to that part of the
image. For my initial idea I just took
the frame on its own and placed it
around just empty. It looks lonely and
out of place but sometimes it fits in
since there is natural framing all
around it.
As component 2 py_62_sample 24
Developing ideas;
AS Exam; Relationships
To develop ideas using a frame I
took it behind a slightly opaque
material and blurred it in photoshop,
it creates a illusion of what's behind
the frame and why it’s there.
As component 2 py_62_sample 24
Developing and
experimenting ideas;
AS Exam; Relationships
To develop my ideas and
experiment with photoshop I
used a frame and arms to
create an image of being
trapped, and a concept of
trying to escape. I also
combined different images
together to create a collage
but in a realistic more
professional way still using the
framing concept.
To create these images I had to
add the image of the body part
on top of a plain background
shot. Then I had to add a mask to
get rid of the side part of my arm
which would ruin the effect of it
looking like it is detached and
floating. I then edited the images
once they were together. To
change if I was adding back or
removing the foreground I
switched between black and
white
As component 2 py_62_sample 24
1Add both files into
photoshop;
the mask tool it will automatically fit it to
where the part was removed previously;
3 Move other image ontop of the
background and select
making it black this allows you to bring back any part of the
image you want. Press one corner and go to the other while
holding shift, this will create a straight line;
4Fix lines by selecting the brush tool on the mask and
2Select inside the frame with quick selection tool and mask out inside;
6Add a Gaussian blur to the first layer (which is now
black and white) so that it doesn’t take the
attention away from the main frame image;
5Make the image black and white and then mask
the layer and use the paint brush and black paint
to colour in only inside the frame;
As component 2 py_62_sample 24
Investigating the work of Rebecca
Reeves;
AS Exam; Relationships
Rebecca Reeves creates frames with
curtains and takes them into different
landscapes to capture it in a different way.
By using the curtains to create the frame it
looks like a daily view which makes it look
more breathtaking than if it was a single
landscape image.
Responding to the work of Rebecca
Reeves;
AS Exam; Relationships
Rebecca Reeves creates frames with
curtains and takes them into different
landscapes to capture it in a different
way. By using the curtains to create
the frame it looks like a daily view
which makes it look more breathtaking
than if it was a single landscape
image. To respond I took fabric into
different environments and captured it
as if it was a window as well. But mine
turned out differently due to the
different landscapes available.
Developing my ideas;
AS Exam; Relationships
To further develop my own ideas and
create images that link to my previous
work I took a male model into two different
environments and involved different artists
that I took inspiration from like Kyle
Thompson, Rebecca Reeves and taking
the work from my previous developments. I
experimented with different effects and
filters on photoshop to give each image a
different mood and meaning alone to then
suit the image and tell a story.
In the first image I used a 50mm L1.2 lens which created an
extremely shallow depth of field and managed to create an
illusion that the person is small and insignificant. The body
position that I used for this image was a in a fetal position so
that the audience can see that he is scared and unwanted. The
shear material covering the model is used as a shield to the
person, making it seem like he is in need of protection, and
him being shirtless makes him look vulnerable as well as the
environment he is in makes him look more neglected.
The position of him is along the rule of thirds as well as the
tree and stick creating a natural frame around him. The
editing I used also created a softer feel to the background
making things that would over power the main subject less
noticeable, they were darkened and also I added a blur to
make them less obvious to the audience. I also added a subtle
vingnetting which helps to draw the audience’s eyes to the
main subject.On top of the subject I added a layer of white
paint which I then changed the opacity of so that it made the
subject still look bright compared to when the filter was
added and the life and colour was taken out of the material
As component 2 py_62_sample 24
For this image the editing
was very important. When
looking at the original image
there is texture but it is
difficult to see because of the
first frame, it takes away the
views attention from the
main subject. To edit it I put
on a sepia and then
sharpened the 2nd frame, but
then blurred the closest wall.
I took it in the centre so that
your eye is automatically
drawn towards the image.
By sharpening the closest
wall it brought out lots of
shadows and textures which
makes it more interesting yet
makes it look vintage.
I used a vignetting to help
draw attention to the middle
as it makes the wall look like
it stands out more rather
than it being flat like it looks
in the original image below.
Dull colour of
skyDistracting rubbish
Too soft of a edge
separating the sky and
dune
Dirty unappealing
sand colour
As component 2 py_62_sample 24
(The image below) The way the material
flows and the detail of the movement looks
like a still from a movie rather than an
image. This is one of my favourite images
from the set because of the simplistic
beauty and the way it looks in black and
white is aesthetically pleasing for any viewer.
As component 2 py_62_sample 24
My intentions;
AS Exam; Relationships
My intentions for my Relationships
final pieces is to bring the different
aspects of my project together and
develop them further. I’m going to
take the best images from my last
set and develop and experiment
with them to find the best outcome.
This will link to my whole project
because of the different sets I have
done in the past that will link my
developments together.
Below are the different images that
will allow my final piece
developments to be the final
outcome of the whole project.
These consist of the fetal position,
hidden faces and material and the
curtain frames by Rebecca Reeves.
In the image the subject is standing in the
middle of the road, because the materials
quite wide it covers the thinner part of the
road so you can just see the road leading
up to the subject. The deserted road and
surrounding make the subject look lost
and desperate. Looking for a road to
follow.
For this image I edited it with a sepia filter
to create a more cinematic effect. I think
added curtains in photoshop which link to
the work I studied before of Rebecca
Reeves.
To create the curtains I had to remove the
blue background and then add them on
top in a way that they fitted into the
image. I had to add them then change the
blending mode to screen and change the
opacity, this left them looking more
realistic but still too sharp meaning I had
to add a Gaussian blur to them.
After it was finished I decided that it
looked like it was a still from a movie so I
changed the ratio of the image to make it
look more cinematic and effective.
Final outcome creation 1;
AS Exam; Relationships
For my second final outcome I put 3 images
that I took in the desert together to create a
whole different much bigger image. I did this
all on photoshop where I used different tools
like the mask tool, distortion of the image and
stamp tool. These were all for different
reasons. The mask tool was used to remove
the material from the background (Image 3) so
that I could add it on top of the material my
model is wearing. The distortion tool is to line
up the extra material so it looks like it is
continuing. Finally the stamp tool was so I
could blend the 3 different images together
and make it look natural since they are all
different colors.
3
bigger. I also decided that I wanted my model facing the opposite direction since it looks like the wind should naturally be coming from the
right.
1 I took my main image and added into photoshop where I then moved it to the corner and cropped the canvas to make it
2 Next I added the material on top and positioned it so that it
was flowing off the models material. I had to flip this as well
so that it flowed the same way as the models material did.
3 I then used the quick select tool to highlight the
background of behind the material and the mask tool to
remove it.
4 It was then ready for when I needed to use it later on in the editing stage.
5 I then added in the third image and flipped it to fit
the other 2 images.
6 I positioned it to line up with the dune line
behind the model.
7 I then had to make both desert images the same and expand the sand so it was lower than the
material and model as well as make sure that they fit together to look realistic.
8 After some readjusting and time I managed to get this, I did a basic
shadow outline so that I knew I needed to do that after I finished
editing the material in realistically. .
9 I decided that I didn’t like the added on material
because it was too fake so I decided to remove it and
bring the model layer to the top to then mask out the
background. I then moved the model further to the left
so I could add on curtains linking to Rebecca Reeves.
Final outcome 1;
AS Exam;
Relationships
Final outcome creation 2;
AS Exam; Relationships
1 Original image;
2 Stock photos to make
curtains out of;
3 Colour efex pro selecting a
filter;
4 Selected filter “Colour stylizer” then editing
to my preference;
5Fixing the background
detail;
6 Select the background of the
stock photo using quick select tool;
7 Put a mask on the image, use the
quick select tool to go round the curtain
and then the black mask paint brush to
Remove the white around the curtain
itself.;
8 Duplicate the curtain and put it on
the opposite size;
9 Add motion blur to create a realistic effect that adds
depth of field to the image;
10 Add final adjustments like colour tone,
curves, repositioning;
Final outcome 2;
AS Exam; Relationships
Evaluation; AS Exam; Relationships
Throughout my project I have investigated lots of different photographers that make their work
out of different variables including; framing, colour, body parts and material, within my final
outcome it brings out the different work that I investigating and then also developed with my
own ideas and opportunities. The photographers and artists that I used allowed me to get to my
final piece, influencing me with different ideas every time I wanted to develop more. My work is
conceptual, the reason for this is because I enjoy putting my thoughts to photographs,
expressing different meanings in different ways, but I also enjoy other people working out what
my images mean, and other peoples interpretation of them. During my exam project I would
have liked to experiment with reflections and tried out other ideas I had, but they didn’t follow
the path I was on.
For my final outcome I used a 5D mark 3 and a 50 1.2 L lens, this allowed me to capture sharp
images with a shallow depth of field. At the time of the shooting in the desert it was windy and
there was sand blowing everywhere, which helped me to take pictures of the material flying well
but it made it more difficult to capture the sharpness of the image and the true colours, making
everything more dull than it should have been. I focused heavily on the composition and what
the model was expressing through his actions to be able to portray what I wanted in the image.
After I had taken the photos I had to learn different skills on photoshop which I didn’t know
before hand to be able to make my final pieces successful in the end.
As component 2 py_62_sample 24
AO1
Develop
AO2
Explore
AO3
Record
AO4
Realise
15 16 16 15
Total
out of
72
62
Total
out
of 18

More Related Content

PPTX
On going evaluations
DOCX
A level Photography Essay
PPTX
On going evaluations
PPTX
Self Portraits presentation
PPTX
Task 6 evaluations rotation
PPTX
Case studies - Experimental Photography (work 2)
PPTX
Evaluation
PPTX
Evaluation
On going evaluations
A level Photography Essay
On going evaluations
Self Portraits presentation
Task 6 evaluations rotation
Case studies - Experimental Photography (work 2)
Evaluation
Evaluation

What's hot (19)

PPTX
On going evaluation
PPTX
D.e evaluation 2
PPTX
Mind Map and Mood Board
PPTX
On going evaluations.pptx3.
PPTX
On going evaluations
PPTX
6. project pro forma(1)
PPTX
Development
PPTX
PPT
Hannahs evaluation photography
PPT
Finished evaluation
PPTX
On going evaluations
PPTX
Current Progress
PPTX
On going evaluation (new)
PPTX
Jamara royle ppw
PPTX
Development pro forma
DOCX
Proposal
PPTX
On going evaluations ask (1)
PDF
Final Project
DOCX
Evaluation
On going evaluation
D.e evaluation 2
Mind Map and Mood Board
On going evaluations.pptx3.
On going evaluations
6. project pro forma(1)
Development
Hannahs evaluation photography
Finished evaluation
On going evaluations
Current Progress
On going evaluation (new)
Jamara royle ppw
Development pro forma
Proposal
On going evaluations ask (1)
Final Project
Evaluation
Ad

Viewers also liked (20)

PPT
A level component 2 fa_14_sample 7_ full ppt
PPT
A level component 1 fa_36
PPTX
As component 2 fa_43_sample 14
PPT
A level component 2 fa_68
PPTX
As component 1 py_60_sample 21
PPT
A level component 1 py_53_sample_10_practical
PPTX
As component 1 py_12_sample 11
PPTX
As component ad_10_sample 10
PPT
A level component 1 fa_68
PPT
A level component 2 fa_29
PPT
A level component 1 py_10_sample 5_practical
PPTX
As component 1 fa_34_sample 13
PPT
A level component 1 py_13
PPTX
As component 2 py_ 58_sample 23
PPTX
As component 1 fa_55_sample 18
PPT
A level component 2 py_17
PPT
A level component 1 py_33
PPTX
As component 1 fa_8_sample 1
PPTX
As component 1 py_5_sample 4
PPTX
As component 1 py_42_sample 16
A level component 2 fa_14_sample 7_ full ppt
A level component 1 fa_36
As component 2 fa_43_sample 14
A level component 2 fa_68
As component 1 py_60_sample 21
A level component 1 py_53_sample_10_practical
As component 1 py_12_sample 11
As component ad_10_sample 10
A level component 1 fa_68
A level component 2 fa_29
A level component 1 py_10_sample 5_practical
As component 1 fa_34_sample 13
A level component 1 py_13
As component 2 py_ 58_sample 23
As component 1 fa_55_sample 18
A level component 2 py_17
A level component 1 py_33
As component 1 fa_8_sample 1
As component 1 py_5_sample 4
As component 1 py_42_sample 16
Ad

Similar to As component 2 py_62_sample 24 (20)

PPTX
Unit 2 jamara royle
PPTX
Experiments evidence template
PPTX
BishopLuffa GCSE photography exam support 2014
PPTX
Experiments
PPTX
76 jamie kelly unit 1
PPTX
On Going Evaluations
PPTX
A2 2013 inside outside in between
DOCX
Written Essay - A2 Photography Proposal
PPTX
Photography powerpoint final edit
PPTX
Secondary photography project powerpoint
PPTX
Year 11 exam 2015 tasks
PPTX
Experiments Evidence Template
PPTX
Techniques task 2&3
PPTX
A2 truth--fantasy-or-fiction-2016
PPTX
Experiments evidence template
PPTX
Double exposure evaluation
PPTX
Experiments evidence template
PPTX
Experiments evidence template 1
ODP
On going evaluations
PPTX
Task 2 completed!
Unit 2 jamara royle
Experiments evidence template
BishopLuffa GCSE photography exam support 2014
Experiments
76 jamie kelly unit 1
On Going Evaluations
A2 2013 inside outside in between
Written Essay - A2 Photography Proposal
Photography powerpoint final edit
Secondary photography project powerpoint
Year 11 exam 2015 tasks
Experiments Evidence Template
Techniques task 2&3
A2 truth--fantasy-or-fiction-2016
Experiments evidence template
Double exposure evaluation
Experiments evidence template
Experiments evidence template 1
On going evaluations
Task 2 completed!

More from Melanie Powell (20)

PPTX
Pictorialism- f64.pptx
PPTX
Aliens SoW 2022.pptx .pptx
PPT
Aliens so w.pptx (1)
PPTX
Easter holiday challenge 3 loo roll
PPTX
Homework 1: Research an issue
PPTX
Royal Academy W/Sheet 202
PPTX
Year 11 ESA lessons 2020
PPTX
Selfie Cover Lesson
PPTX
Modernism and Photography
PPTX
Lino step by step
PPTX
Early Photography
PPTX
Past, Present & Future SoW
PPTX
History of Photography, The Early Years
PPTX
Drawing machine
PPTX
Year 12 abstraction 2
PPTX
How do we read a photograph?
PPTX
KS3_First Lesson 2019
PPTX
Year 12 abstraction 1
PPT
A level first lesson 2019
PPTX
Blind drawing
Pictorialism- f64.pptx
Aliens SoW 2022.pptx .pptx
Aliens so w.pptx (1)
Easter holiday challenge 3 loo roll
Homework 1: Research an issue
Royal Academy W/Sheet 202
Year 11 ESA lessons 2020
Selfie Cover Lesson
Modernism and Photography
Lino step by step
Early Photography
Past, Present & Future SoW
History of Photography, The Early Years
Drawing machine
Year 12 abstraction 2
How do we read a photograph?
KS3_First Lesson 2019
Year 12 abstraction 1
A level first lesson 2019
Blind drawing

Recently uploaded (20)

PPTX
This is about the usage of color in universities design
PDF
Arts and Crats of Cagayan and Central Luzon.pdf
PPTX
Review1_Bollywood_Project analysis of bolywood trends from 1950s to 2025
PDF
Triangle of photography : aperture, exposure and ISO
PPTX
Presentation on tradtional textiles of kutch
PPTX
National_Artists_for_Dance_with_Examples-1.pptx
PPTX
Understanding-Philippine-Popular-Culture (1).pptx
PPTX
Lc 10hhjkhhjjkkkkjhhuiooopojjjoookjji.pptx
PDF
The-Art-of-Storytelling-in-Cinema (1).pdf
PPTX
Contemporary Arts and the Potter of Thep
PPTX
Cloud Computing ppt.ppt1QU4FFIWEKWEIFRRGx
PPTX
400kV_Switchyardasdsfesfewffwefrrwewew_Training_Module.pptx
PPTX
WEEEEEEEEEEEEEEEEEEEEEEEEEEEEEEEEEEEEEEK
PPTX
CMU-WEEK-2_TOPIC_Photography_Its_Definition_Historical_Background_and_Princi ...
PPTX
Copy of Executive Design Pitch Deck by Slidesgo.pptx.pptx
PDF
lebo101.pdf biology chapter important .....
PPTX
Q1_TLE_8_Week_2asfsdgsgsdgdsgfasdgwrgrgqrweg
PPTX
Nationalism in India Ch-2.pptx ssssss classs 10
PPTX
Copy of liver-cancer-case-study.pptx.pptx
PPTX
mineralsshow-160112142010.pptxkuygyu buybub
This is about the usage of color in universities design
Arts and Crats of Cagayan and Central Luzon.pdf
Review1_Bollywood_Project analysis of bolywood trends from 1950s to 2025
Triangle of photography : aperture, exposure and ISO
Presentation on tradtional textiles of kutch
National_Artists_for_Dance_with_Examples-1.pptx
Understanding-Philippine-Popular-Culture (1).pptx
Lc 10hhjkhhjjkkkkjhhuiooopojjjoookjji.pptx
The-Art-of-Storytelling-in-Cinema (1).pdf
Contemporary Arts and the Potter of Thep
Cloud Computing ppt.ppt1QU4FFIWEKWEIFRRGx
400kV_Switchyardasdsfesfewffwefrrwewew_Training_Module.pptx
WEEEEEEEEEEEEEEEEEEEEEEEEEEEEEEEEEEEEEEK
CMU-WEEK-2_TOPIC_Photography_Its_Definition_Historical_Background_and_Princi ...
Copy of Executive Design Pitch Deck by Slidesgo.pptx.pptx
lebo101.pdf biology chapter important .....
Q1_TLE_8_Week_2asfsdgsgsdgdsgfasdgwrgrgqrweg
Nationalism in India Ch-2.pptx ssssss classs 10
Copy of liver-cancer-case-study.pptx.pptx
mineralsshow-160112142010.pptxkuygyu buybub

As component 2 py_62_sample 24

  • 1. GCE AS Advanced Subsidiary Art and Design Component 2 Standardisation samples 2016 Photography Total Mark 62
  • 7. To start off investigating relationships I took an idea from my visual stimulus – doors and windows. To find inspiration for different techniques within this still life photography I investigated Steve McCurry who takes a range of still life images in different countries showing the colour, texture and tradition within each image. They all tell their own story of who once lived there and what has happened around them. Above are two images in red boxes, this is because they are not Steve McCurry’s work and I don’t know who took them. They are on this page because I also like their composition, colour and texture as well as the photographers use of rule of thirds to draw the viewers attention to the door.
  • 8. To respond to the work of Steve McCurry I took photos while in Sri Lanka of doors and windows, these images all show colour, texture, tradition and life. I took these photos in a fort in Galle, after the 2004 Tsunami this was all that was left in the area because of the high solid. Some of the buildings were still full of character from before the Tsunami but other places got affected and have been rebuilt since then.
  • 11. I decided to make this image a full page because of the composition, colour and texture on the wall. I purposely positioned the window in the center of the image to draw the audiences eye straight to the closed window. The layers of paint which have peeled off over the years create colour and texture which make the image exciting as well as tell a story.
  • 19. Recording Natural Framing; AS Exam; Relationships I walked around my area to look for Natural Framing, this occurs everywhere – doors, windows, paths, broken windows, fences – everywhere. This took a while for me to get the hang of but eventually I managed to capture natural frames. Matthias Heiderich does this extremely well capturing simplicity and colour in the image as well. Although his work is much more geometrical and creates a positive scene from the negative space.
  • 30. Developing ideas AS Exam; Relationships To develop my ideas I took pictures of a friend around Sri Lanka in an abandoned house to get the empty windows and empty door ways with texture, which links too my response to Steve McCurry’s work.
  • 31. This is my favorable image in the set. I took the model into an abandoned house in Sri Lanka where it was quite damp and dirty, I positioned the model in the bottom half but center of the frame. I got her to crouch down into a fetal position to show she’s vulnerable and protecting herself. The peeling and textured walls as well as the ground being dirty contrasts with her bright dress which shows quite a lot of skin.
  • 34. Responding to Franz Jeofee; AS Exam; Relationships To respond to the Franz Jeofee I took a person into a location with doorways and natural framing and blacked out the face, for the first image I used black and white but for the others I changed the colours. By blacking out the face it leave a sense of worry and unkindness. It makes you feel uncomfortable and opens up an idea of the unknown. The central positioning of the subject draws your eye straight to it rather than drifting off, but the natural door framing and texture makes it more pleasant to look at..
  • 37. Investigating the work of John Copeland and Piet Mondrian; AS Exam; Relationships Piet Mondrian did paintings of the relationships between colours in an arrangement of rectangles and squares. It is put together in a mosaic composition where the shapes aren’t evenly spaced. His work links to my set of doorways and windows because of the shapes, colour and composition. John Copeland does portraits of body which I am going to combine with Piet Mondrians by taking pictures of body parts painted and organising them into a mosaic
  • 38. Responding to John Copeland; AS Exam; Relationships To respond to John Copeland I investigating hand positions, the creases and different movement you can do to create the same effect as him. In photoshop i changed the colours to Black and White to create a more meaningful feeling rather than in colour which doesn’t show the detail and dark shadows in as much depth.
  • 42. Macro lens; Investigating hands AS Exam; Relationships To look at hands in a more detailed way I took images of plain hands using a macro lens where you can see the details of wrinkles, colour, lines and shapes. The use of macro distorts a normal image and makes it more difficult to properly visualise the subject, but it also captures maximum detail with a shallow depth of field.
  • 45. Developing ideas linking to the work of John Copeland and Piet Mondrian; To develop my ideas linking to John Copeland I’m also bringing in the work of Piet Mondrian who creates different block patters with colour, to be more creative I brought in the hands and painted them.
  • 47. Experimenting; AS Exam; Relationships To experiment I took photos of normal body parts and edited shapes onto them using lightroom and photoshop. By taking shapes and adding them to the image it creates an internal yet external shape and frame to a smaller more focused area that is in black and white, by putting it in black and white it makes that area drawn to more.
  • 49. Developing ideas using the human body AS Exam; Relationships To develop from just the hands I took photos using the whole human body that create internal and external shapes that create a negative and positive space that is balanced in the image. The positive and negative space can also be created through shapes on top of the body, not using background.
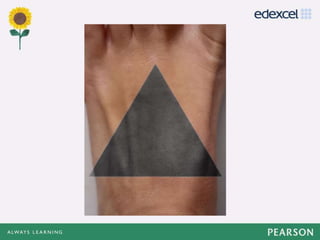
  • 50. Developing and Experimenting AS Exam; Relationships To develop as well as experiment I took one of the images from my set and experimented with it in different ways. Using a simple triangle I designed on photoshop i tried different things out with it to manipulate the photograph. In the first picture I made the triangle transparent but black and white, it drew out the texture in my skin and the different colours and shadows in the image from the natural lighting. In image 2,3 and 4 I took the texture from the background onto the triangle and creates and made them different sizes and angles – this makes the image look very geometric and interesting for the viewer. For the large image I took part of my body into the triangle and repeated it, this is more subtle but my favourite out of all of them, it creates a satisfying illusion to the audience and emphasizes the shadow and individual shape of just the collarbone itself.
  • 51. Developing ideas; AS Exam; Relationships To develop my ideas I brought a real frame into each image which draws your attention to that part of the image. For my initial idea I just took the frame on its own and placed it around just empty. It looks lonely and out of place but sometimes it fits in since there is natural framing all around it.
  • 58. Developing ideas; AS Exam; Relationships To develop ideas using a frame I took it behind a slightly opaque material and blurred it in photoshop, it creates a illusion of what's behind the frame and why it’s there.
  • 61. Developing and experimenting ideas; AS Exam; Relationships To develop my ideas and experiment with photoshop I used a frame and arms to create an image of being trapped, and a concept of trying to escape. I also combined different images together to create a collage but in a realistic more professional way still using the framing concept. To create these images I had to add the image of the body part on top of a plain background shot. Then I had to add a mask to get rid of the side part of my arm which would ruin the effect of it looking like it is detached and floating. I then edited the images once they were together. To change if I was adding back or removing the foreground I switched between black and white
  • 63. 1Add both files into photoshop; the mask tool it will automatically fit it to where the part was removed previously; 3 Move other image ontop of the background and select making it black this allows you to bring back any part of the image you want. Press one corner and go to the other while holding shift, this will create a straight line; 4Fix lines by selecting the brush tool on the mask and 2Select inside the frame with quick selection tool and mask out inside; 6Add a Gaussian blur to the first layer (which is now black and white) so that it doesn’t take the attention away from the main frame image; 5Make the image black and white and then mask the layer and use the paint brush and black paint to colour in only inside the frame;
  • 65. Investigating the work of Rebecca Reeves; AS Exam; Relationships Rebecca Reeves creates frames with curtains and takes them into different landscapes to capture it in a different way. By using the curtains to create the frame it looks like a daily view which makes it look more breathtaking than if it was a single landscape image.
  • 66. Responding to the work of Rebecca Reeves; AS Exam; Relationships Rebecca Reeves creates frames with curtains and takes them into different landscapes to capture it in a different way. By using the curtains to create the frame it looks like a daily view which makes it look more breathtaking than if it was a single landscape image. To respond I took fabric into different environments and captured it as if it was a window as well. But mine turned out differently due to the different landscapes available.
  • 67. Developing my ideas; AS Exam; Relationships To further develop my own ideas and create images that link to my previous work I took a male model into two different environments and involved different artists that I took inspiration from like Kyle Thompson, Rebecca Reeves and taking the work from my previous developments. I experimented with different effects and filters on photoshop to give each image a different mood and meaning alone to then suit the image and tell a story. In the first image I used a 50mm L1.2 lens which created an extremely shallow depth of field and managed to create an illusion that the person is small and insignificant. The body position that I used for this image was a in a fetal position so that the audience can see that he is scared and unwanted. The shear material covering the model is used as a shield to the person, making it seem like he is in need of protection, and him being shirtless makes him look vulnerable as well as the environment he is in makes him look more neglected. The position of him is along the rule of thirds as well as the tree and stick creating a natural frame around him. The editing I used also created a softer feel to the background making things that would over power the main subject less noticeable, they were darkened and also I added a blur to make them less obvious to the audience. I also added a subtle vingnetting which helps to draw the audience’s eyes to the main subject.On top of the subject I added a layer of white paint which I then changed the opacity of so that it made the subject still look bright compared to when the filter was added and the life and colour was taken out of the material
  • 73. For this image the editing was very important. When looking at the original image there is texture but it is difficult to see because of the first frame, it takes away the views attention from the main subject. To edit it I put on a sepia and then sharpened the 2nd frame, but then blurred the closest wall. I took it in the centre so that your eye is automatically drawn towards the image. By sharpening the closest wall it brought out lots of shadows and textures which makes it more interesting yet makes it look vintage. I used a vignetting to help draw attention to the middle as it makes the wall look like it stands out more rather than it being flat like it looks in the original image below.
  • 74. Dull colour of skyDistracting rubbish Too soft of a edge separating the sky and dune Dirty unappealing sand colour
  • 76. (The image below) The way the material flows and the detail of the movement looks like a still from a movie rather than an image. This is one of my favourite images from the set because of the simplistic beauty and the way it looks in black and white is aesthetically pleasing for any viewer.
  • 78. My intentions; AS Exam; Relationships My intentions for my Relationships final pieces is to bring the different aspects of my project together and develop them further. I’m going to take the best images from my last set and develop and experiment with them to find the best outcome. This will link to my whole project because of the different sets I have done in the past that will link my developments together. Below are the different images that will allow my final piece developments to be the final outcome of the whole project. These consist of the fetal position, hidden faces and material and the curtain frames by Rebecca Reeves.
  • 79. In the image the subject is standing in the middle of the road, because the materials quite wide it covers the thinner part of the road so you can just see the road leading up to the subject. The deserted road and surrounding make the subject look lost and desperate. Looking for a road to follow. For this image I edited it with a sepia filter to create a more cinematic effect. I think added curtains in photoshop which link to the work I studied before of Rebecca Reeves. To create the curtains I had to remove the blue background and then add them on top in a way that they fitted into the image. I had to add them then change the blending mode to screen and change the opacity, this left them looking more realistic but still too sharp meaning I had to add a Gaussian blur to them. After it was finished I decided that it looked like it was a still from a movie so I changed the ratio of the image to make it look more cinematic and effective.
  • 80. Final outcome creation 1; AS Exam; Relationships For my second final outcome I put 3 images that I took in the desert together to create a whole different much bigger image. I did this all on photoshop where I used different tools like the mask tool, distortion of the image and stamp tool. These were all for different reasons. The mask tool was used to remove the material from the background (Image 3) so that I could add it on top of the material my model is wearing. The distortion tool is to line up the extra material so it looks like it is continuing. Finally the stamp tool was so I could blend the 3 different images together and make it look natural since they are all different colors. 3 bigger. I also decided that I wanted my model facing the opposite direction since it looks like the wind should naturally be coming from the right. 1 I took my main image and added into photoshop where I then moved it to the corner and cropped the canvas to make it
  • 81. 2 Next I added the material on top and positioned it so that it was flowing off the models material. I had to flip this as well so that it flowed the same way as the models material did. 3 I then used the quick select tool to highlight the background of behind the material and the mask tool to remove it. 4 It was then ready for when I needed to use it later on in the editing stage.
  • 82. 5 I then added in the third image and flipped it to fit the other 2 images. 6 I positioned it to line up with the dune line behind the model. 7 I then had to make both desert images the same and expand the sand so it was lower than the material and model as well as make sure that they fit together to look realistic.
  • 83. 8 After some readjusting and time I managed to get this, I did a basic shadow outline so that I knew I needed to do that after I finished editing the material in realistically. . 9 I decided that I didn’t like the added on material because it was too fake so I decided to remove it and bring the model layer to the top to then mask out the background. I then moved the model further to the left so I could add on curtains linking to Rebecca Reeves.
  • 84. Final outcome 1; AS Exam; Relationships
  • 85. Final outcome creation 2; AS Exam; Relationships 1 Original image; 2 Stock photos to make curtains out of; 3 Colour efex pro selecting a filter; 4 Selected filter “Colour stylizer” then editing to my preference; 5Fixing the background detail;
  • 86. 6 Select the background of the stock photo using quick select tool; 7 Put a mask on the image, use the quick select tool to go round the curtain and then the black mask paint brush to Remove the white around the curtain itself.; 8 Duplicate the curtain and put it on the opposite size;
  • 87. 9 Add motion blur to create a realistic effect that adds depth of field to the image; 10 Add final adjustments like colour tone, curves, repositioning;
  • 88. Final outcome 2; AS Exam; Relationships
  • 89. Evaluation; AS Exam; Relationships Throughout my project I have investigated lots of different photographers that make their work out of different variables including; framing, colour, body parts and material, within my final outcome it brings out the different work that I investigating and then also developed with my own ideas and opportunities. The photographers and artists that I used allowed me to get to my final piece, influencing me with different ideas every time I wanted to develop more. My work is conceptual, the reason for this is because I enjoy putting my thoughts to photographs, expressing different meanings in different ways, but I also enjoy other people working out what my images mean, and other peoples interpretation of them. During my exam project I would have liked to experiment with reflections and tried out other ideas I had, but they didn’t follow the path I was on. For my final outcome I used a 5D mark 3 and a 50 1.2 L lens, this allowed me to capture sharp images with a shallow depth of field. At the time of the shooting in the desert it was windy and there was sand blowing everywhere, which helped me to take pictures of the material flying well but it made it more difficult to capture the sharpness of the image and the true colours, making everything more dull than it should have been. I focused heavily on the composition and what the model was expressing through his actions to be able to portray what I wanted in the image. After I had taken the photos I had to learn different skills on photoshop which I didn’t know before hand to be able to make my final pieces successful in the end.
  • 98. AO1 Develop AO2 Explore AO3 Record AO4 Realise 15 16 16 15 Total out of 72 62 Total out of 18