B4X Programming Gettings Started v1.9
0 likes459 views

The document provides instructions for getting started with various B4X platforms: - Sections cover installing and configuring B4A, B4i, B4J, and B4R, including installing required software, configuring IDE paths, connecting devices, and creating basic "Hello World" programs. - Examples of first programs are provided for each platform to demonstrate basic usage. The code and files for all example programs are included in a SourceCode folder. - Platforms covered include Android via B4A, iOS via B4i, Java via B4J, and Arduino via B4R. The setup and initial program instructions are similar across platforms.


![Table of contents 4 B4X Getting started
Main contributors: Klaus Christl (klaus), Erel Uziel (Erel)
To search for a given word or sentence use the Search function in the Edit menu.
All the source code and files needed (layouts, images etc.) of the example projects in this booklet
are included in the SourceCode folder.
For each program there are three folders.
SourceCode
MyFirstProgram
B4A
MyFirstProgram.b4a
B4i
MyFirstProgram.b4i
B4J
MyFirstProgram.b4j
Both programs MyFirstProgram and SecondProgram are almost the same for B4A, B4i and B4J.
Updated for following versions:
B4A version 10.2
B4i version 6.50
B4J version 8.10
B4R version 3.31
B4X Booklets:
B4X Getting Started
B4X Basic Language
B4X IDE Integrated Development Environment
B4X Visual Designer
B4X Help tools
B4XPages Cross-platform projects
B4X CustomViews
B4X Graphics
B4X XUI B4X User Interface
B4X SQLite Database
B4X JavaObject NativeObject
B4R Example Projects
You can consult these booklets online in this link [B4X] Documentation Booklets.
Be aware that external links don’t work in the online display.](https://image.slidesharecdn.com/b4xgettingstarted-200922075044/85/B4X-Programming-Gettings-Started-v1-9-4-320.jpg)


![2.5 My first B4A program 17 B4X Getting started
Run the IDE
When you open the IDE everything is empty.
Click on the New button or click on New in the Files menu.
You are shown four possibilities.
• B4XPages B4X cross-platform project.
These are explained in detail in the B4XPages Cross-platfor Booklet.
• B4XTurtle B4X Turtle project, a specific library.
These are explained in the forum
B4XTurtle - Library for teachers and parents.
• Default B4A ‘standard’ project
• X2 Game X2 Game project.
X2 Games are explained in the forum.
[B4X] X2 / XUI2D (Box2D) - Game engine.
For our project we could select either B4XPages or Default.
B4XPages projects are explained in the
B4XPages Cross-platform projects booklet.
We want to develop a B4A standard project therefore we select Default.](https://image.slidesharecdn.com/b4xgettingstarted-200922075044/85/B4X-Programming-Gettings-Started-v1-9-17-320.jpg)


![3.7 My first B4i program 67 B4X Getting started
Run the IDE
When you open the IDE everything is empty.
Click on the New button or click on New in the Files menu.
You are shown four possibilities.
• B4XPages B4X cross-platform project.
These are explained in detail in the B4XPages Cross-platfor Booklet.
• B4XTurtle B4X Turtle project, a specific library.
These are explained in the forum
B4XTurtle - Library for teachers and parents.
• Default B4A ‘standard’ project
• X2 Game X2 Game project.
X2 Games are explained in the forum.
[B4X] X2 / XUI2D (Box2D) - Game engine.
For our project we could select either B4XPages or Default.
B4XPages projects are explained in the
B4XPages Cross-platform projects booklet.
We want to develop a B4i standard project therefore we select Default.](https://image.slidesharecdn.com/b4xgettingstarted-200922075044/85/B4X-Programming-Gettings-Started-v1-9-67-320.jpg)


![4.3 My first B4J program 110 B4X Getting started
Run the IDE
When you open the IDE everything is empty.
Click on the New button or click on New in the Files menu.
You are shown six possibilities.
• B4XPages B4X cross-platform project.
These are explained in detail in the B4XPages Cross-platfor Booklet.
• B4XTurtle B4X Turtle project, a specific library.
These are explained in the forum
B4XTurtle - Library for teachers and parents.
• Console (Non-UI) Non user interface project.
• Server Server project
• UI B4J ‘standard’ user interface project.
• X2 Game X2 Game project.
X2 Games are explained in the forum.
[B4X] X2 / XUI2D (Box2D) - Game engine.](https://image.slidesharecdn.com/b4xgettingstarted-200922075044/85/B4X-Programming-Gettings-Started-v1-9-110-320.jpg)


B4X Programming Gettings Started v1.9
- 1. B4X Booklets B4X Getting started Copyright: © 2020 Anywhere Software Edition 1.9 Last update : 2020.09.21
- 2. Table of contents 2 B4X Getting started 1 B4X platforms..............................................................................................................................5 2 Getting started B4A.....................................................................................................................6 2.1 Installing B4A and Android SDK........................................................................................7 2.2 B4A Configure Paths in the IDE..........................................................................................8 2.2.1 Configure Additional libraries folder...............................................................................9 2.3 B4A Choice of the language ..............................................................................................10 2.4 B4A Connecting a real device............................................................................................11 2.4.1 Connection via USB.......................................................................................................11 2.4.2 Conneting via B4A-Bridge ............................................................................................12 2.4.2.1 Getting started with B4A-Bridge ...........................................................................12 2.4.2.2 Run B4A-Bridge on your device............................................................................13 2.4.2.3 Wireless connection ...............................................................................................14 2.5 My first B4A program (MyFirstProgram.b4a)..................................................................16 2.6 Second B4A program (SecondProgram.b4a)....................................................................40 3 Getting started B4i ....................................................................................................................55 3.1 Installing B4i......................................................................................................................56 3.1.1 Installing B4i..................................................................................................................56 3.1.2 Mac Builder installation.................................................................................................57 3.1.3 Hosted Mac builder service (optional)...........................................................................58 3.2 Configure Paths in the IDE ................................................................................................59 3.2.1 Configure Additional libraries folder.............................................................................60 3.3 Creating a certificate and provisioning profile...................................................................61 3.3.1 UDID..............................................................................................................................61 3.3.2 Certificate and Provisioning Profile...............................................................................62 3.4 Installing B4i-Bridge and debugging first app...................................................................63 3.5 Install the B4I certificate....................................................................................................63 3.6 Set the package name based on the provision app id.........................................................63 3.6.1 Install Build B4i-Bridge.................................................................................................64 3.6.2 Load B4i-Bridge.............................................................................................................65 3.6.3 Install B4i-Bridge and run it ..........................................................................................65 3.7 My first B4i program (MyFirstProgram.b4i).....................................................................66 3.8 Second B4i program (SecondProgram.b4i) ......................................................................90 4 Getting started B4J..................................................................................................................105 4.1 Installing B4J ...................................................................................................................106 4.1.1 Installing B4J ...............................................................................................................106 4.1.2 B4JPackager11.............................................................................................................106 4.2 Configure Paths in the IDE ..............................................................................................107 4.2.1 Configure Additional libraries folder...........................................................................108 4.3 My first program (MyFirstProgram.b4j)..........................................................................109 4.4 Second B4J program (SecondProgram.b4j)....................................................................133 5 Getting started B4R.................................................................................................................149 5.1 Installing Arduino IDE.....................................................................................................149 5.2 Install Microsoft .Net Framework....................................................................................149 5.3 Install and configure B4R ................................................................................................150 5.4 Connecting a board ..........................................................................................................152 5.5 Select a Board ..................................................................................................................152 5.6 Arduino UNO board.........................................................................................................154 5.6.1 Power supply................................................................................................................155 5.6.2 Pins...............................................................................................................................155 5.6.3 Power pins....................................................................................................................155 5.6.3.1 Digital Input / Output pins ...................................................................................156 5.6.3.2 Analog input pins.................................................................................................156 5.6.4 Input modes INPUT / INPUT_PULLUP....................................................................156
- 3. Table of contents 3 B4X Getting started 5.6.5 Basic Pin functions.......................................................................................................157 5.6.5.1 Initialize................................................................................................................157 5.6.5.2 DigitalRead ..........................................................................................................158 5.6.5.3 DigitalWrite..........................................................................................................158 5.6.5.4 AnalogRead..........................................................................................................158 5.6.5.5 AnalogWrite.........................................................................................................159 5.7 First example programs....................................................................................................160 5.7.1 Button.b4r ....................................................................................................................161 5.7.1.1 Sketch...................................................................................................................161 5.7.1.2 Code .....................................................................................................................162 5.7.2 LedGreen.b4r ...............................................................................................................163 5.7.2.1 Sketch...................................................................................................................163 5.7.2.2 Code .....................................................................................................................164 5.7.3 LedGreenNoSwitchBounce.b4r ...................................................................................165 5.7.3.1 Sketch...................................................................................................................166 5.7.3.2 Code .....................................................................................................................167 5.7.4 TraficLight.b4r.............................................................................................................168 5.7.4.1 Sketch...................................................................................................................168 5.7.4.2 Code .....................................................................................................................169
- 4. Table of contents 4 B4X Getting started Main contributors: Klaus Christl (klaus), Erel Uziel (Erel) To search for a given word or sentence use the Search function in the Edit menu. All the source code and files needed (layouts, images etc.) of the example projects in this booklet are included in the SourceCode folder. For each program there are three folders. SourceCode MyFirstProgram B4A MyFirstProgram.b4a B4i MyFirstProgram.b4i B4J MyFirstProgram.b4j Both programs MyFirstProgram and SecondProgram are almost the same for B4A, B4i and B4J. Updated for following versions: B4A version 10.2 B4i version 6.50 B4J version 8.10 B4R version 3.31 B4X Booklets: B4X Getting Started B4X Basic Language B4X IDE Integrated Development Environment B4X Visual Designer B4X Help tools B4XPages Cross-platform projects B4X CustomViews B4X Graphics B4X XUI B4X User Interface B4X SQLite Database B4X JavaObject NativeObject B4R Example Projects You can consult these booklets online in this link [B4X] Documentation Booklets. Be aware that external links don’t work in the online display.
- 5. 1 B4X platforms 5 B4X Getting started 1 B4X platforms B4X is a suite of BASIC programming languages for different platforms. B4X suite supports more platforms than any other tool ANDROID | IOS | WINDOWS | MAC | LINUX | ARDUINO | RASPBERRY PI | ESP8266 | AND MORE... • B4A Android B4A is a 100% free development tool for Android applications, it includes all the features needed to quickly develop any type of Android app. • B4i iOS B4i is a development tool for native iOS applications. B4i follows the same concepts as B4A, allowing you to reuse most of the code and build apps for both Android and iOS. • B4J Java / Windows / Mac / Linux / Raspberry PI B4J is a 100% free development tool for desktop, server and IoT solutions. With B4J you can easily create desktop applications (UI), console programs (non-UI) and server solutions. The compiled apps can run on Windows, Mac, Linux and ARM boards (such as Raspberry Pi). • B4R Arduino / ESP8266 B4R is a 100% free development tool for native Arduino and ESP8266 programs. B4R follows the same concepts of the other B4X tools, providing a simple and powerful development tool. B4R, B4A, B4J and B4i together make the best development solution for the Internet of Things (IoT). • B4XPages B4XPages is an internal library for B4A, B4i and B4J allowing to develop easily cross- platform programs. B4XPages is explained in detail in the B4XPages Cross-platform projects booklet. Even, if you want to develop only in one platform it is interesting to use the B4XPages library it makes the program flow simpler especially for B4A.
- 6. 2 Getting started B4A 6 B4X Getting started 2 Getting started B4A B4A (Basic for Android) is a simple yet powerful development environment that targets Android devices. B4A language is similar to Visual Basic language with additional support for objects. B4A compiled applications are native Android applications; there are no extra runtimes or dependencies. Unlike other IDE’s, B4A is 100% focused on Android development. B4A includes a powerful GUI designer with built-in support for multiple screens and orientations. No XML writing is required. You can develop and debug with: - a real device connected via B4A Bridge - a real device connected via USB cable - or an Android emulator. B4A has a rich set of libraries that make it easy to develop advanced applications. This includes: SQL databases, GPS, Serial ports (Bluetooth), Camera, XML parsing, Web services (HTTP), Services (background tasks), JSON, Animations, Network (TCP and UDP), Text To Speech (TTS), Voice Recognition, WebView, AdMob (ads), Charts, OpenGL, Graphics and more. Android 1.6 and above are supported (including tablets).
- 7. 2.1 Installing B4A and Android SDK 7 B4X Getting started 2.1 Installing B4A and Android SDK B4A depends on two additional (free) components: - Java JDK - Android SDK The most up to date installation instructions are in the forum at this link: www.b4x.com/b4a.html. Please, follow the instructions there!
- 8. 2.2 B4A Configure Paths in the IDE 8 B4X Getting started 2.2 B4A Configure Paths in the IDE - Open B4A. - Click on in the menu. The window below will be displayed. The path for “java.exe” is already set. Set the path for “android.jar”: C:Androidplatformsandroid-28android.jar.
- 9. 2.2 B4A Configure Paths in the IDE 9 B4X Getting started 2.2.1 Configure Additional libraries folder It is recommended to create a specific folder for Additional libraries. B4A utilizes two types of libraries: • Standard libraries, which come with B4A and are located in the Libraries folder of B4A. These libraries are automatically updated when you install a new version of B4A. • Additional libraries, which are not part of B4A, and are mostly written by members. These libraries should be saved in a specific folder different from the standard libraries folder. For the additional libraries it is necessary to setup a special folder to save them somewhere else. This folder must have following structure: Folder for B4A additional libraries. Folder for B4i additional libraries. Folder for B4J additional libraries. Folder for B4R additional libraries. Folder for B4X libraries. Folder for B4X libraries XML files. One subfolder for each product: B4A, B4i, B4J, B4R and another B4X for B4X libraries. When you install a new version of a B4X product, all standard libraries are automatically updated, but the additional libraries are not included. The advantage of the special folder is that you don't need to care about them because this folder is not affected when you install the new version of B4X. The additional libraries are not systematically updated with new version of B4X. When the IDE starts, it looks first for the available libraries in the Libraries folder of B4X and then in the additional libraries folders. In my system, I added a B4XlibXMLFiles folder for XML help files. The standard and additional libraries have an XML file. B4X Libraies not. But, if you use the B4X Help Viewer you would be interested in having these help files if they are available. Shared modules: Create a specific folder for shared modules, for example C:B4JSharedModules. Module files can be shared between different projects and must therefore be saved in a specific folder. Libraries and modules are explained in the B4X Basic Language booklet.
- 10. 2.3 B4A Choice of the language 10 B4X Getting started 2.3 B4A Choice of the language You can select a language of your choice, if it is available. In the IDE menu Tools / IDE Options / Language select the language of your choice.
- 11. 2.4 B4A Connecing a real device 11 B4X Getting started 2.4 B4A Connecting a real device There are different means to connect a real device: • USB Needs that the device supports ADB debugging. Need to activate USB Debugging on the device. • B4A Bridge, via WiFi. 2.4.1 Connection via USB If you followed the previous steps, the Google USB driver is already download by default. If this driver doesn’t work you must look for a specific one for your device. To be able to connect a device via USB you must activate USB debugging on the device. This is also needed if you use an Emulator. On the device, execute Settings Scroll the screen until you see Developper options. Scroll the screen until you see USB debugging. Activate it. The device will automatically be recognized by the IDE. In this case, on some older devices, it was no more possible to access the SD card from the PC. If you want to access the SD card you must deactivate USB debugging.
- 12. 2.4 B4A Connecing a real device 12 B4X Getting started 2.4.2 Conneting via B4A-Bridge It is always recommended to use a real device instead of an Android emulator which is very slow compared to a real device (especially with applications installation). However not all devices support ADB debugging. This is the reason for the B4A-Bridge tool. B4A-Bridge is made of two components. One component runs on the device and allows the second component which is part of the IDE to connect and communicate with the device. The connection is done over a network (B4A-Bridge cannot work if there is no network available). Once connected, B4A-Bridge supports all of the IDE features which include: installing applications, viewing LogCat and the visual designer. Android doesn't allow applications to quietly install other applications, therefore when you run your application using B4A-Bridge you will see a dialog asking for your approval. 2.4.2.1 Getting started with B4A-Bridge First you need to install B4A-Bridge on your device. B4A-Bridge can be downloaded here: http://www.basic4ppc.com/android/files/b4a_bridge.apk. B4A-Bridge is also available on Play Store. Search for: B4A Bridge. Note that you need to allow install of applications from "Unknown sources". On the device, execute Settings Scroll the screen until you see Lock screen and security. Select it. Scroll the screen until you see Unknown sources. Activate it. B4A-Bridge requires writable storage card. It is not possible to install applications without it.
- 13. 2.4 B4A Connecing a real device 13 B4X Getting started 2.4.2.2 Run B4A-Bridge on your device Run B4A-Bridge on your device, it will display a screen similar to the picture below. Status will be: Press for connection. Status will change to: Note that B4A-Bridge was written with B4A.
- 14. 2.4 B4A Connecing a real device 14 B4X Getting started 2.4.2.3 Wireless connection In the IDE menu Tools select . If the address already exists click directly on this address. If this device was already connected before you can simply press F2 to connect it. Enter the IP of the device, you find it on top of the B4A-Bridge screen on the device. Click on , the device is connected to the IDE. You see that the status changed on both, the device and the IDE in the lower left corner. . B4A-Bridge keeps running as a service until you press on the Stop button. You can always reach it by opening the notifications screen. You see B4A-Bridge with the current status. Note that the Internet permission are automatically added in debug mode.
- 15. 2.4 B4A Connecing a real device 15 B4X Getting started When you run an application you are required to approve the installation. You will usually see a screens like the picture. Press on to install the program. If you pressed on you will see a screen like in picture. On this screen you should choose to start the application. If you try to install an existing application signed with a different key, the install will fail (without any meaningful message). You should first uninstall the existing application. Go to the home screen - Settings - Applications - Manage applications - choose the application - Uninstall. Once you finished developing you should press on the Stop button in B4A-Bridge in order to save battery.
- 16. 2.5 My first B4A program 16 B4X Getting started 2.5 My first B4A program (MyFirstProgram.b4a) Let us write our first program. The suggested program is a math trainer for kids. The project is available in the SourceCode folder shipped with this booklet: SourceCodeMyFirstProgram B4AMyFirstProgram.b4a The look of the screen is different depending on the Android version of the devices, also with Emulators. Samsung Galaxy S10 Sony xperia z1 Emulator Android version 4.2 On the screen, we will have: - 2 Labels displaying randomly generated numbers (between 1 and 9). - 1 Label with the math sign (+). - 1 EditText view where the user must enter the result. - 1 Button, used to either confirm when the user has finished entering the result or generate a new calculation. - 1 Label with a comment about the result. In Android: - Label is an object to show text. - EditText is an object allowing the user to enter text. - Button is an object allowing user actions. We will design the layout of the user interface with the VisualDesigner and go step by step through the whole process.
- 17. 2.5 My first B4A program 17 B4X Getting started Run the IDE When you open the IDE everything is empty. Click on the New button or click on New in the Files menu. You are shown four possibilities. • B4XPages B4X cross-platform project. These are explained in detail in the B4XPages Cross-platfor Booklet. • B4XTurtle B4X Turtle project, a specific library. These are explained in the forum B4XTurtle - Library for teachers and parents. • Default B4A ‘standard’ project • X2 Game X2 Game project. X2 Games are explained in the forum. [B4X] X2 / XUI2D (Box2D) - Game engine. For our project we could select either B4XPages or Default. B4XPages projects are explained in the B4XPages Cross-platform projects booklet. We want to develop a B4A standard project therefore we select Default.
- 18. 2.5 My first B4A program 18 B4X Getting started You are asket to save the project. Enter MyFirstProgram in the Project Name field. Enter the Project Folder name. You can enter any folder for that. I use D:B4A as the generic folder for B4A projects. Check to create a new folder. Click on . Now you see the template for a new B4A project.
- 19. 2.5 My first B4A program 19 B4X Getting started You may also have a look in the Files Explorer. And you will see that the project is saved in the D:B4AMyFirstProgram folder. You will see on the top left two Tabs Main and Starter. • Is the Main module for B4A which is the normal starting module. Its name cannot be changed. • Is a Service, which is startet when the program is lauched. It is the entry point of the program. For our first program we do not use this Starter service, but we leave it.
- 20. 2.5 My first B4A program 20 B4X Getting started Set the Package Name. Each program needs a package name. In the menu click on . This window appears: The default name is b4a.example. We will change it to b4a.MyFirstProgram. And click on .
- 21. 2.5 My first B4A program 21 B4X Getting started Set the Application Label. The Application label is the name of the program that will be shown on the device. On top of the code screen you see these two lines showing two 'regions'. Regions are code parts which can be collapsed or extended. Clicking on will expand the Region. Clicking on will collapse the Region. Regions are explained in chapter #Regions in the B4X IDE booklet. #Region Project Attributes #ApplicationLabel: B4A Example #VersionCode: 1 #VersionName: 'SupportedOrientations possible values: unspecified, landscape or portrait. #SupportedOrientations: unspecified #CanInstallToExternalStorage: False #End Region #Region Activity Attributes #FullScreen: False #IncludeTitle: True #End Region The default name is B4A Example, but we will change it to MyFirstProgram for naming consistency. Change this line: #ApplicationLabel: B4A Example to #ApplicationLabel: MyFirstProgram The other lines are explained in Chapter Code header Project Attributes / Activity Attributes in the B4X IDE Booklet. Then remove this code, it is only an example. Sub Button1_Click xui.MsgboxAsync("Hello world!", "B4X") End Sub
- 22. 2.5 My first B4A program 22 B4X Getting started Connect a device To test the program you should connect a device to the IDE. The best connection is via B4A-Bridge. You can connect the IDE to a device via (see previous chapter): • B4A-Bridge • USB cable It is also possible to connect an Emulator, not advised, too slow. In the IDE run the Designer. Click on . The Visual Designer looks like this. There are different windows: • Views Tree shows all views as a tree. • Properties shows all properties of the selected view. • Abstract Designer shows the views on a screen • Script - General allows to ‘fine tune’ the layouts. The Designer is explained in detail in the B4X Visual Designer booklet.
- 23. 2.5 My first B4A program 23 B4X Getting started In this first project we will only look at the three first windows. • Liste of views • Properties • Abstract Designer So we hide the Script- General window to increase the size of the two other windows on top. Click on . And on . The Designer will look like this.
- 24. 2.5 My first B4A program 24 B4X Getting started To shows the views on the device you must connect the device to the Designer. Wait until the Designer and the device are connected. This can take some time, so be patient. You will see the state of the Designer in the bottom left corner of the Designer with the details of the connected device: The project template already contains a layout called Layout. You see that there is already an object, Button1, in the layout. We do not use it yet so we remove it. Right click on the Button1 object and click on to remove it.
- 25. 2.5 My first B4A program 25 B4X Getting started Now we will add the 2 Labels for the numbers. In the Designer, add a Label. We see the Label with the default name Label1 in following windows: Properties Abstract Designer with its default at its default position and Views Tree properties. default dimensions.
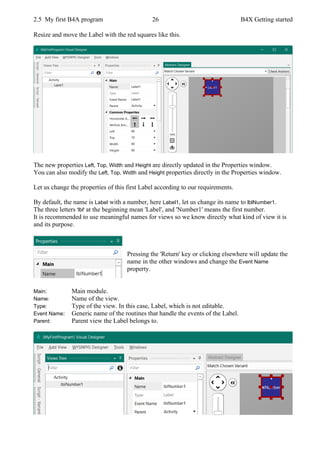
- 26. 2.5 My first B4A program 26 B4X Getting started Resize and move the Label with the red squares like this. The new properties Left, Top, Width and Height are directly updated in the Properties window. You can also modify the Left, Top, Width and Height properties directly in the Properties window. Let us change the properties of this first Label according to our requirements. By default, the name is Label with a number, here Label1, let us change its name to lblNumber1. The three letters 'lbl' at the beginning mean 'Label', and 'Number1' means the first number. It is recommended to use meaningful names for views so we know directly what kind of view it is and its purpose. Pressing the 'Return' key or clicking elsewhere will update the name in the other windows and change the Event Name property. Main: Main module. Name: Name of the view. Type: Type of the view. In this case, Label, which is not editable. Event Name: Generic name of the routines that handle the events of the Label. Parent: Parent view the Label belongs to.
- 27. 2.5 My first B4A program 27 B4X Getting started To better see the other properties we enlarge the Properties window. Let us check and change the other properties: Left, Top, Width and Height are OK. Or if the values are not the same you should change them. Enabled, Visible are OK Tag, we leave empty. Text, we set a default number, say 5 Typeface, Style are OK Horizontal Alignment, we set to CENTER_HORIZONTAL Vertical Alignment, we leave CENTER_VERTICAL. Size, we set to 36 We leave all the other properties as they are.
- 28. 2.5 My first B4A program 28 B4X Getting started We need a second Label similar to the first one. Instead of adding a new one, we duplicate the first one with the same properties. Only the Name and Left properties will change. Right click in the Abstract Designer on lblNumber1 and click on . The new label covers the previous one. We see the new label added in the Views Tree.
- 29. 2.5 My first B4A program 29 B4X Getting started Change its name to lblNumber2. Change the Left property to 180. The new label with its new name and at its new position Now we add a 3rd Label for the math sign. We copy once again lblNumber1. In the Abstract Designer right click on lblNumber1, click on . The new label covers lblNumber1. Position it between the first two Labels and change its name to lblMathSign and its Text property to '+'.
- 30. 2.5 My first B4A program 30 B4X Getting started Now let us add an EditText view. In the Designer menu click on . Position it below the three Labels and change its name to edtResult. 'edt' means EditText and 'Result' for its purpose. Let us change these properties. Name to edtResult Horizontal Alignment to CENTER_HORIZONTAL Size to 30 Input Type to NUMBERS Hint Text to Enter result Setting Input Type to NUMBERS lets the user enter only numbers. Hint Text represents the text shown in the EditText view if no text is entered.
- 31. 2.5 My first B4A program 31 B4X Getting started Now, let's add the Button which, when pressed, will either check the result the user supplied as an answer, or will generate a new math problem, depending on the user's input. Position it below the EditText view. Resize it and change following properties: Set the properties like below. Name to btnAction Text to O K (with a space between O and K) Size to 24
- 32. 2.5 My first B4A program 32 B4X Getting started Let us add the last Label for the comments. Position it below the Button and resize it. Change the following properties: Name to lblComments Horizontal Alignment CENTER_HORIZONTAL Size to 20 Text Color to #000000 We set the Text Color property to Black (#000000). Color to #FFFFFFFF By default, the Label background color is black, we set it to white.
- 33. 2.5 My first B4A program 33 B4X Getting started The result will look like this in the Designer. And on a device or Emulator. Android 4.2 Emulator Samsung Galaxy S10 Yes, the background is white. Android 10 ! Let us save the layout. In the menu click on to save it.
- 34. 2.5 My first B4A program 34 B4X Getting started To write the routines for the project, we need to reference the Views in the code. This can be done with the Generate Members tool in the Designer. The Generate Members tool automatically generates references and subroutine frames. In the menu click on to open the generator. Here we find all the views added to the current layout. We check all views and check the Click event for the btnAction Button. Checking a view generates its reference in the Globals Sub routine in the code. This is needed to make the view recognized by the system and allow the autocomplete function. Private btnAction As Button Private edtResult As EditText Private lblComments As Label Private lblMathSign As Label Private lblNumber1 As Label Private lblNumber2 As Label Clicking on an event of a view generates the Sub frame for this event. Sub btnAction_Click End Sub Click on to generate the references and Sub frames.
- 35. 2.5 My first B4A program 35 B4X Getting started Now we go back to the IDE to enter the code. First, we need our Activity to load our layout file. This is already prepared in the “Activity_Create” sub we have the line which does it. We want to generate a new problem as soon as the program starts. Therefore, we add a call to the NewProblem subroutine. Sub Activity_Create(FirstTime As Boolean) Activity.LoadLayout("Main") NewProblem End Sub Note the NewProblem is in red meaning an error, ‘Undeclared variable …’ in this case, meaning that the system doesn’t recognize this name. Generating a new problem means generating two new random values between 1 and 9 (inclusive) for Number1 and Number2, then showing the values using the lblNumber1 and lblNumber2 ‘Text’ properties. To do this we enter following code: In Sub Globals we add two variables for the two numbers. Public Number1, Number2 As Int End Sub And the 'NewProblem' Subroutine: Sub NewProblem Number1 = Rnd(1, 10) ' Generates a random number between 1 and 9 Number2 = Rnd(1, 10) ' Generates a random number between 1 and 9 lblNumber1.Text = Number1 ' Displays Number1 in label lblNumber1 lblNumber2.Text = Number2 ' Displays Number2 in label lblNumber2 lblComments.Text = "Enter the result" & CRLF & "and click on OK" edtResult.Text = "" ' Sets edtResult.Text to empty End Sub This function Rnd(1, 10) generates a random number from '1' (inclusive) to '10' (exclusive), therefore beween ‘1’ and ‘9’. The following line displays the comment in the lblComments view: lblComments.Text = "Enter the result" & CRLF & "and click on OK" CRLF is the LineFeed character.
- 36. 2.5 My first B4A program 36 B4X Getting started Now we add the code for the Button click event. We have two cases: - When the Button text is equal to "O K" (with a space between O and K), it means that a new problem is displayed, and the program is waiting for the user to enter a result and press the Button. - When the Button text is equal to "NEW", it means that the user has entered a correct answer and when the user clicks on the Button a new problem will be generated. There is already a Button click event routine in the code. You remember that there was the Button1 object in the default layout. Rename Button1_Click to btnAction_Click and add the code below. Sub btnAction_Click If btnAction.Text = "O K" Then If edtResult.Text = "" Then Msgbox("No result entered","E R R O R") Else CheckResult End If Else NewProblem btnAction.Text = "O K" End If End Sub If btnAction.Text = "O K" Then checks if the Button text equals "O K". If yes then we check if the EditText is empty. If yes, we display a MessageBox telling the user that there is no result in the EditText view. If no, we check if the result is correct or if it is false. If no then we generate a new problem, set the Button text to "O K" and clear the EditText view. The last routine checks the result. Sub CheckResult If edtResult.Text = Number1 + Number2 Then lblComments.Text = "G O O D result" & CRLF & "Click on NEW" btnAction.Text = "N E W" Else lblComments.Text = "W R O N G result" & CRLF & "Enter a new result" & CRLF & "and click OK" End If End Sub With If edtResult.Text = Number1 + Number2 Then we check if the entered result is correct. If yes, we display in the lblComments label the text below: 'G O O D result' 'Click on NEW' and we change the Button text to "N E W ". If no, we display in the lblComments label the text below: 'W R O N G result' 'Enter a new result' and click OK.
- 37. 2.5 My first B4A program 37 B4X Getting started On the left side of the editor you see a yellow line. This means that the code was modified. If we click on to save the project the yellow line becomes green showing a modified code but already saved. You can also press Ctrl + S to save the project. If we leave the IDE and load it again the green line disappears.
- 38. 2.5 My first B4A program 38 B4X Getting started Let us now compile the program and transfer it to the Device. In the IDE on top click on : The program is going to be compiled. When the Close button becomes enabled as in message box, above, the compiling and transfer is finished. Looking at the device, you should see something similar to the image, with different numbers. The screenshot may look different depending on the device and the Android version. Of course, we could make aesthetic improvements in the layout, but this was not the main goal for the first program.
- 39. 2.5 My first B4A program 39 B4X Getting started On a real device, you need to use the virtual keyboard. Click on the EditText view to show the keyboard. On some devices the current layout has the disadvantage that the comment label is covered by the virtual keyboard. This will be improved in the next chapter, 'Second program', where we create our own keyboard.
- 40. 2.6 Second B4A program 40 B4X Getting started 2.6 Second B4A program (SecondProgram.b4a) The project is available in the SourceCode folder: SourceCodeSecondProgramB4ASecondProgram.b4a Improvements to “ My first program”. We will add a numeric keyboard to the layout to avoid the use of the virtual keyboard. Create a new folder called “SecondProgram”. Copy all the files and folders from MyFirstProgram to the new SecondProgram folder and rename the program files MyFirstProgram.b4a to SecondProgram.b4a and MyFirstProgram.b4a.meta to SecondProgram.b4a.meta. Open this new program in the IDE. We need to change the Package Name. In the IDE menu. Click on Change the Package name to b4a.SecondProgram. Click on .
- 41. 2.6 Second B4A program 41 B4X Getting started Then we must change the ApplicationLabel on the very top of the code. #Region Project Attributes #ApplicationLabel: SecondProgram We want to replace the edtResult EditText view by a new Label. Run the Visual Designer. If you want you can already connect the device or an Emulator. In the Abstract Designer, click on the edtResult view. Right click on edtResult and click on . Right click on lblNumber1 to select it. Click on . The new label covers lblNumber1.
- 42. 2.6 Second B4A program 42 B4X Getting started Move it between the upper labels and the button and resize it. Modify the following properties: Name to lblResult Change the Left, Top, Width and Height properties if they are not the same as in the image. Text to " " blank character Text Color to Black #000000 Color to White #FFFFFFFF Corner Radius to 5 Border Width to 1
- 43. 2.6 Second B4A program 43 B4X Getting started Now we add a Panel for the keyboard buttons. Position and resize it as in the image. Change its Name to pnlKeyboard "pnl" for Panel, the view type. Change Color to #FF000000 Corner radius to 0
- 44. 2.6 Second B4A program 44 B4X Getting started We will move the btnAction button from the Activity to the pnlKeyboard Panel. Click on btnAction. and in the Parent list click on . The button now belongs to the Panel. Now we rearrange the views to get some more space for the keyboard. Set the Height property of the 4 Labels to 50 instead of 60. Set the Top property of label lblResult to 60. Set the Top property of label lblComments to 120. Set the Top property of panel pnlKeyboard to 210. Set the Height property of panel pnlKeyboard to 180.
- 45. 2.6 Second B4A program 45 B4X Getting started Right click on the pnlKeyboard and click on And click on . to add a new button. The new button is added. Change the following properties: Name to btn0 Event name to btnEvent Left to 0 Top to 120 Width to 55 Height to 55 Tag to 0 Text to 0 Size to 24 TextColor to Black #000000
- 46. 2.6 Second B4A program 46 B4X Getting started Now we want to change the button colors. Click on . In Enabled Drawable click on . Change the following properties: Orientation to TOP_BOTTOM First Color Second Color Pressed Drawable to GradientDrawable Orientation to TOP_BOTTOM First Color Second Color If you have connected a device the button looks now like this.
- 47. 2.6 Second B4A program 47 B4X Getting started Now we duplicate btn0 and position the new one beside button btn0 with a small space. Right click on btn0 and click on . Move the new Button next to the previous one. Change the following properties: Name to btn1 Tag to 1 Text to 1 And the result. In the Abstract Designer and on the device. Let us add 8 more Buttons and position them like in the image. Change following properties: Name btn2 , btn3 , btn4 etc. Tag 2 , 3 , 4 etc. Text 2 , 3 , 4 etc.
- 48. 2.6 Second B4A program 48 B4X Getting started To create the BackSpace button, duplicate one of the number buttons, and position it like in the image. Resize and position btnAction. Change the pnlKeyboard Color to Black #000000. Change their Name, Tag, Text and Color properties as below. btnAction O K btnBS <
- 49. 2.6 Second B4A program 49 B4X Getting started Another improvement is to center the objects on the screen. For this, we add some code in the Designer Scripts in the Script-General window. First, we ‘dock’ the Script – General window. Click on Script – General. And click on . 'All variants script AutoScaleAll lblMathSign.HorizontalCenter = 50%x ' centers the view on the middle of the screen lblNumber1.Right = lblMathSign.Left ' aligns the right edge ont the left edge lblNumber2.Left = lblMathSign.Right ' aligns the left edge ont the right edge lblResult.HorizontalCenter = 50%x ' centers the view on the middle of the screen lblComments.HorizontalCenter = 50%x ' centers the view on the middle of the screen pnlKeyboard.HorizontalCenter = 50%x ' centers the view on the middle of the screen The first two lines are added by default, we leave them. 'All variants script AutoScaleAll lblSigneMath.HorizontalCenter = 50%x HorizontalCenter centers a view horizontally on the screen at the given value, 50%x in our case, which means in the middle of the screen. lblNombre1.Right = lblSigneMath.Left Aligns the right edge of lblNombre1 on the left edge of lblSigneMath, positons lblNombre1 just besides lblSigneMath on the left. lblNombre2.Left = lblSigneMath.Right Aligns the left edge of lblNombre2 on the right edge of lblSigneMath, positons lblNombre2 just besides lblSigneMath on the right.
- 50. 2.6 Second B4A program 50 B4X Getting started The finished new layout. In the Abstract Designer and on the device. Now we will update the code. First, we must replace the edtResult by lblResult because we replaced the EditText view by a Label. Double click on edtResult to select it. In the menu click on or press F3.
- 51. 2.6 Second B4A program 51 B4X Getting started Enter ‘lblResult’ in the Replace with field. Click on We also need to change its view type form EditText to Label. Private lblResult As Label Now we write the routine that handles the Click events of the Buttons. The Event Name for all buttons, except btnAction, is "btnEvent". The routine name for the associated click event will be btnEvent_Click. Enter the following code: Sub btnEvent_Click End Sub We need to know what button raised the event. For this, we use the Sender object which is a special object that holds the object reference of the view that generated the event in the event routine. Sub btnEvent_Click To have access to the properties of the view that raised the Private btnSender As Button event we declare a local variable Private btnSender As Button. btnSender = Sender And set btnSender = Sender. Select btnSender.Tag Then, to differentiate between the backspace button and Case "BS" the numeric buttons we use a Select / Case / End Select Case Else structure and use the Tag property of the buttons. End Select Remember, when we added the different buttons we End Sub set their Tag property to BS, 0, 1, 2 etc. Select btnSender.Tag sets the variable to test. Case "BS" checks if it is the button with the "BS" tag value. Case Else handles all the other buttons.
- 52. 2.6 Second B4A program 52 B4X Getting started Now we add the code for the numeric buttons. We want to add the value of the button to the text in the lblResult Label. Select btnSender.Tag Case "BS" Case Else lblResult.Text = lblResult.Text & btnSender.Text End Select End Sub This is done in this line lblResult.Text = lblResult.Text & btnSender.Text The "&" character means concatenation, so we just append to the already existing text the value of the Text property of the button that raised the event. Now we add the code for the BackSpace button. Select btnSender.Tag Case "BS" If lblResult.Text.Length >0 Then lblResult.Text = lblResult.Text.SubString2(0, lblResult.Text.Length - 1) End If Case Else lblResult.Text = lblResult.Text & btnSender.Text End Select End Sub When clicking on the BS button we must remove the last character from the existing text in lblResult. However, this is only valid if the length of the text is bigger than 0. This is checked with: If lblResult.Text.Length >0 Then To remove the last character we use the SubString2 function. lblResult.Text = lblResult.Text.SubString2(0,lblResult.Text.Length - 1) SubString2(BeginIndex, EndIndex) extracts a new string beginning at BeginIndex (inclusive) until EndIndex (exclusive). Now the whole routine is finished. Sub btnEvent_Click Private btnSender As Button btnSender = Sender Select btnSender.Tag Case "BS" If lblResult.Text.Length >0 Then lblResult.Text = lblResult.Text.SubString2(0,lblResult.Text.Length - 1) End If Case Else lblResult.Text = lblResult.Text & btnSender.Text End Select End Sub
- 53. 2.6 Second B4A program 53 B4X Getting started We can try to improve the user interface of the program by adding some colors to the lblComments Label. Let us set: - Yellow for a new problem - Light Green for a GOOD answer - Light Red for a WRONG answer. Let us first modify the NewProblem routine, where we add the line lblComments.Color = Colors.RGB(255,235,128). Sub NewProblem Number1 = Rnd(1, 10) ' Generates a random number between 1 and 9 Number2 = Rnd(1, 10) ' Generates a random number between 1 and 9 lblNumber1.Text = Number1 ' Displays Number1 in label lblNumber1 lblNumber2.Text = Number2 ' Displays Number2 in label lblNumber2 lblComments.Text = "Enter the result" & CRLF & "and click on OK" lblComments.Color = Colors.RGB(255,235,128) ' yellow color lblResult.Text = "" ' Sets lblResult.Text to empty End Sub And in the CheckResult routine we add lines 76 and 80. Sub CheckResult If lblResult.Text = Number1 + Number2 Then lblComments.Text = "G O O D result" & CRLF & "Click on NEW" lblComments.Color = Colors.RGB(128,255,128) ' light green color btnAction.Text = "N E W" Else lblComments.Text = "W R O N G result" & CRLF & "Enter a new result" & CRLF & "and click OK" lblComments.Color = Colors.RGB(255,128,128) ' light red color End If End Sub Another improvement would be to hide the '0' button to avoid entering a leading '0'. For this, we hide the button in the NewProblem subroutine in line btn0.Visible = False. Sub NewProblem Number1 = Rnd(1, 10) ' Generates a random number between 1 and 9 Number2 = Rnd(1, 10) ' Generates a random number between 1 and 9 lblNumber1.Text = Number1 ' Displays Number1 in label lblNumber1 lblNumber2.Text = Number2 ' Displays Number2 in label lblNumber2 lblComments.Text = "Enter the result" & CRLF & "and click on OK" lblComments.Color = Colors.RGB(255,235,128) ' yellow color lblResult.Text = "" ' Sets lblResult.Text to empty btn0.Visible = False End Sub
- 54. 2.6 Second B4A program 54 B4X Getting started In addition, in the btnEvent_Click subroutine, we hide the button if the length of the text in lblResult is equal to zero and show it if the length is greater than zero, lines 98 to 102. Sub btnEvent_Click Private btnSender As Button btnSender = Sender Select btnSender.Tag Case "BS" If lblResult.Text.Length >0 Then lblResult.Text = lblResult.Text.SubString2(0,lblResult.Text.Length - 1) End If Case Else lblResult.Text = lblResult.Text & btnSender.Tag End Select If lblResult.Text.Length = 0 Then btn0.Visible = False Else btn0.Visible = True End If End Sub As we are accessing btn0 in the code we need to declare it in the Globals routine. Modify line 25 like below: Private btnAction, btn0 As Button Run the program to check the result. In the B4XPagesProjects booklet you find the project as B4XPages project!
- 55. 3 Getting Started B4i 55 B4X Getting started 3 Getting started B4i B4i is a simple yet powerful development environment that targets Apple devices (iPhone, iPad etc.). The B4i language is similar to Visual Basic and B4A language. B4i compiled applications are native iOS applications; there are no extra runtimes or dependencies. Unlike other IDE’s, B4i is 100% focused on iOS. B4i includes a powerful GUI designer, built-in support for multiple screens and orientations. You can develop and debug with a real device. iOS 7 and above are supported. What you need: • The B4i program, this is a Windows program running on a PC. • The Java SDK on the PC, free. • An Apple developer license, cost 99$ per year. • A device for testing. • The Basi4i-Bridge program on the device, free. • A Mac builder to compile the program, this be either. o A Mac computer with the Mac Builder program, on local wifi. o The hosted Mac Builder service over Internet, cost 26$ per year. • A Mac computer or a MacInCloud service to distribute the program. Links to tutorials in the forum: Local Mac Builder Installation Creating a certificate and provisioning profile Installing B4i-Bridge and debugging first app
- 56. 3.1 Installing B4i 56 B4X Getting started 3.1 Installing B4i The most up to date installation instructions are in the forum at this link: www.b4x.com/b4i.html. Please, follow the instructions there! If you have not yet installed Java, look at the B4A installation instructions: www.b4x.com/b4a.html. 3.1.1 Installing B4i Download and install the B4i file on your computer. Copy the license file b4i-license.txt to the B4i folder and to a safe place on the computer for backup. Note that this is not a text file, do not open it with a text editor. When you first run B4i you will be asked to enter your e-mail address, the one you used when you purchased it B4i. You find it also in the mail you received with the B4i file. Enter the e-mail address. You get a confirmation window that B4i is registered. Contact support@basic4ppc.com if you require any assistance.
- 57. 3.1 Installing B4i 57 B4X Getting started 3.1.2 Mac Builder installation iOS compilation requires an Apple Mac computer. Developers have two options with B4i: • Use a local Mac machine connected over the local network. For this you should also download the Mac builder and install it. • Use our hosted builder rental service. Hosted Mac Builder installation. The builder service allows you to develop iOS applications without a Mac computer. All of the development steps can be done with the builder service except of the final step which is uploading the application to Apple App Store. This step requires a Mac or a service such as MacInCloud. Note that the builder is currently limited to projects of up to 15mb. Link to the tutorial in the forum: Local Mac Builder Installation. These instructions explain how to install the builder on a local Mac machine. 1. Install Java JDK 8: http://www.oracle.com/technetwork/java/javase/downloads/jdk8-downloads- 2133151.html 2. Install Xcode 6. 3. Download and unzip the B4i-Builder. 4. Open a terminal and navigate to B4i-Builder folder. 5. Run it with: java -jar B4iBuildServer.jar 6. Set the builder IP address in the IDE under Tools - Build Server - Server Settings Notes & Tips - By default ports numbers 51041 (http) and 51042 (https) are used. - The firewall should be either disabled or allow incoming connections on these two ports. - You can test that the server is running by going to the following link: http://<server ip>:51041/test - You can kill the server with: http://<server ip>:51041/kill - It is recommended to set your Mac server ip address to a static address. This can be done in your router settings or in the Mac under Network settings. - A single Mac builder can serve multiple developers as long as they are all connected to the same local network. Note that you are not allowed to host builders for developers outside of your organization. Multiple IPs. When the server is started it takes the first IP address reported by the OS and uses it as its own IP address. You can see this address in the server messages. In most cases this is the correct address. However if it is not the correct IP address then the server will not be usable. In that case you need to explicitly set the correct address: - Open the key folder and delete all files. - Edit key.txt and change it to: manuel:<correct ip address> For example: manual:192.168.0.199
- 58. 3.1 Installing B4i 58 B4X Getting started 3.1.3 Hosted Mac builder service (optional) If you have bought the hosted Mac builder service you got a mail with your user ID. You must enter it in the IDE. Enter the ID. Don’t forget to check if you use the Hosted Builder Service!
- 59. 3.2 Configure Paths in the IDE 59 B4X Getting started 3.2 Configure Paths in the IDE Then you need to configure the different paths in the IDE. Run the IDE. In the Tools menu click on Configure Paths. javac.exe: Enter the folder of the javac.exe file. Keys folder: Create a special folder for the Keys, for example C:B4iKeys.
- 60. 3.2 Configure Paths in the IDE 60 B4X Getting started 3.2.1 Configure Additional libraries folder It is recommended to create a specific folder for Additional libraries. B4A utilizes two types of libraries: • Standard libraries, which come with B4A and are located in the Libraries folder of B4A. These libraries are automatically updated when you install a new version of B4A. • Additional libraries, which are not part of B4A, and are mostly written by members. These libraries should be saved in a specific folder different from the standard libraries folder. For the additional libraries it is necessary to setup a special folder to save them somewhere else. This folder must have following structure: Folder for B4A additional libraries. Folder for B4i additional libraries. Folder for B4J additional libraries. Folder for B4R additional libraries. Folder for B4X libraries. Folder for B4X libraries XML files. One subfolder for each product: B4A, B4i, B4J, B4R and another B4X for B4X libraries. When you install a new version of a B4X product, all standard libraries are automatically updated, but the additional libraries are not included. The advantage of the special folder is that you don't need to care about them because this folder is not affected when you install the new version of B4X. The additional libraries are not systematically updated with new version of B4X. When the IDE starts, it looks first for the available libraries in the Libraries folder of B4X and then in the additional libraries folders. In my system, I added a B4XlibXMLFiles folder for XML help files. The standard and additional libraries have an XML file. B4X Libraies not. But, if you use the B4X Help Viewer you would be interested in having these help files if they are available. Shared modules: Create a specific folder for shared modules, for example C:B4JSharedModules. Module files can be shared between different projects and must therefore be saved in a specific folder. Libraries and modules are explained in the B4X Basic Language booklet.
- 61. 3.3 Certificate and provisioning profile 61 B4X Getting started 3.3 Creating a certificate and provisioning profile Don't panic! While this process can be a bit annoying it is not too complicated and you can always delete the keys and start from scratch (which is not always the case in Android). Note that you must first register with Apple as an iOS developer (costs $99 per year). The whole process is done on a Windows computer. In order to install an app on an iOS device you need to create a certificate and a provisioning profile. The certificate is used to sign the application. The provisioning profile, which is tied to a specific certificate, includes a list of devices that this app can be installed on. The video shows the steps required for creating and downloading a certificate and provisioning profile. There are two steps which are not shown in the video and are also required before you can create a provisioning profile: - Create an App ID. This step is quite simple. Just make sure that you create a wildcard id. - Add one or more devices. You will need to find the devices UDID for that. Link to the tutorial in the forum: Creating a certificate and provisioning profile. 3.3.1 UDID Devices are recognized by their UDIDs. There are two ways to get the device UDID: 1. If iTunes is installed then you can find it in iTunes. The first time, connect your device with the USB cable to the computer. Run iTunes, you should see on top this icon . It can take a while before you see it.
- 62. 3.3 Certificate and provisioning profile 62 B4X Getting started Click on and you get this screen: Now click on to get the UDID. Right click on to copy the UDID. 2. Use an online service such as this one: http://get.udid.io/ 3.3.2 Certificate and Provisioning Profile Main steps: 1. Set a new keys folder in the IDE. 2. Create a key by choosing Tools - Private Sign Key 3. Create and download the certificate as demonstrated in the video. You will need to upload the CSR file that was created in step 2. Note that you can choose either iOS App Development or App Store and Ad Hoc in the certificate page. 4. Create and download a provisioning profile.
- 63. 3.4 Installing B4i-Bridge 63 B4X Getting started 3.4 Installing B4i-Bridge and debugging first app B4i-Bridge is an application that you install on the device. It has three purposes: 1. Launch the installation process when needed. 2. Run the installed app (when installation is not needed). 3. The bridge is also the WYSIWYG visual designer. You need to install B4i-Bridge once. It is done from the device browser. Link to the tutorial in the forum: Installing B4i-Bridge and debugging first app. 3.5 Install the B4I certificate Open Safari (device browser) and navigate to: www.b4x.com/ca.pem Follow the instructions. You can see at any time the profile in Settings / General / Profile. 3.6 Set the package name based on the provision app id Run B4i, load a project or use the default project and set the package name based on the provision app ID. In the menu click on . The window below is shown: Change the Package name according to the provision app ID. Example in my case:
- 64. 3.4 Installing B4i-Bridge 64 B4X Getting started 3.6.1 Install Build B4i-Bridge In the menu click on and click on : You get the compilation window with a code for Safari (see next chapter). The code you see in the red rectangle will be different!
- 65. 3.4 Installing B4i-Bridge 65 B4X Getting started 3.6.2 Load B4i-Bridge Open Safari on the device . Enter the code in the search box on top. This screen will appear. Click on Click on to install it. Close Safari. 3.6.3 Install B4i-Bridge and run it Click on this B4i-Bridge icon on the device, you will see the installing animation and finally the B4i-Bridge icon . Tips: - You don't need to wait for the installation animation to complete. Once the animation starts you can click on the app icon. - If the installation is stuck in the "waiting" step for more than 10 or 15 seconds then uninstall it and install it again. - B4i-Bridge must be in the foreground for it to be able to start an installation or to run the application. In most cases it will be in the foreground automatically. If it is not in the foreground then you need to click on it to bring it to the foreground.
- 66. 3.7 My first B4i program 66 B4X Getting started 3.7 My first B4i program (MyFirstProgram.b4i) Let us write our first B4i program. The suggested program is a math trainer for kids. The project is available in the SourceCode folder shipped with this booklet: SourceCodeMyFirstProgramB4iMyFirstProgram.b4i On the screen, we will have: - 2 Labels displaying randomly generated numbers (between 1 and 9) - 1 Label with the math sign (+) - 1 TextField where the user must enter the result - 1 Button, used to either confirm when the user has finished entering the result or generate a new calculation. - 1 Label with a comment about the result. In iOS: - Label is an object to show text. - TextField is an object allowing the user to enter text. - Button is an object allowing user actions. We will design the layout of the user interface with the Designer, the Abstract Designer and on a Device and go step by step through the whole process. The Designer manages the different objects of the interface. The AbstractDesigner shows the positions and sizes of the objects and allows moving or resizing them on the screen. On the Device we see the real result.
- 67. 3.7 My first B4i program 67 B4X Getting started Run the IDE When you open the IDE everything is empty. Click on the New button or click on New in the Files menu. You are shown four possibilities. • B4XPages B4X cross-platform project. These are explained in detail in the B4XPages Cross-platfor Booklet. • B4XTurtle B4X Turtle project, a specific library. These are explained in the forum B4XTurtle - Library for teachers and parents. • Default B4A ‘standard’ project • X2 Game X2 Game project. X2 Games are explained in the forum. [B4X] X2 / XUI2D (Box2D) - Game engine. For our project we could select either B4XPages or Default. B4XPages projects are explained in the B4XPages Cross-platform projects booklet. We want to develop a B4i standard project therefore we select Default.
- 68. 3.7 My first B4i program 68 B4X Getting started You are asket to save the project. Enter MyFirstProgram in the Project Name field. Enter the Project Folder name. You can enter any folder for that. I use D:B4A as the generic folder for B4A projects. Check to create a new folder. Click on . Now you see the template for a new B4i project. You may also have a look in the Files Explorer. And you will see that the project, is saved in the D:B4iMyFirstProgram folder.
- 69. 3.7 My first B4i program 69 B4X Getting started Set the Package Name. Each program needs a package name. This window appears: The default name is b4i.example. We will change it to anywheresoftware.b4i.MyFirstProgram.
- 70. 3.7 My first B4i program 70 B4X Getting started Set the Application Label. The Application label is the name of the program that will be shown on the device blow the icon. On top of the code screen you see the ‘region’ Project Attributes. Regions are code parts which can be collapsed or extended. Clicking on will expand the Region. Clicking on will collapse the Region. Regions are explained in the chapter #Regions in the the B4X IDE booklet. #Region Project Attributes #ApplicationLabel: B4i Example #Version: 1.0.0 'Orientation possible values: Portrait, LandscapeLeft, LandscapeRight and PortraitUpsideDown #iPhoneOrientations: Portrait, LandscapeLeft, LandscapeRight #iPadOrientations: Portrait, LandscapeLeft, LandscapeRight, PortraitUpsideDown #Target: iPhone, iPad #ATSEnabled: True #MinVersion: 7 #End Region The default name is B4i Example, but we will change it to MyFirstProgram for naming consistency. Change this line: #ApplicationLabel: B4i Example to #ApplicationLabel: MyFirstProgram The other attributes are explained in chapter Code header Project Attributes / Activity Attributes in the B4X IDE booklet. Then remove this code, it is only an example. Sub Button1_Click xui.MsgboxAsync("Hello world!", "B4X") End Sub
- 71. 3.7 My first B4i program 71 B4X Getting started In the IDE run Build B4i-Bridge App. IDE menu / / You get this screen. On the device run B4i-Bridge . On the screen you see the IP address of the device, yours is probably not the same. In the IDE click on / /
- 72. 3.7 My first B4i program 72 B4X Getting started Enter the IP address: Click on . You will see this screen on the device (only the upper part is shown). In the IDE open the Designer. Wait until the Designer is ready.
- 73. 3.7 My first B4i program 73 B4X Getting started The Designer looks like this. Note that in the bottom left corner of the Designer window you see the connection status: You may see if the device is not connected. With the Designer we have also the Abstract Designer which shows the layout not exactly WYSIWYG but the positions and size of the different objects. Only the top of the image is shown. The dark gray area represents the screen area of the connected device.
- 74. 3.7 My first B4i program 74 B4X Getting started There are different windows: • Views Tree shows all views as a tree. • Properties shows all properties of the selected view. • Abstract Designer shows the views on a screen • Script - General allows to ‘fine tune’ the layouts. The Designer is explained in detail in the B4X Visual Designer booklet. The project template already contains a layout called Page1. You see that there is already an object, Button1, in the layout. We do not use it so we remove it. Right click on the Button1 object and click on to remove it.
- 75. 3.7 My first B4i program 75 B4X Getting started Now we will add the 2 Labels for the numbers. In the Designer, add a Label. The label appears in the Abstract Designer, in the Views Tree window and its default properties are listed in the Properties window. Resize and move the Label with the red squares like this. You can follow the layout on the device. At the moment we see Label1. The background color is by default transparent. Label1 is the default name of the Label.
- 76. 3.7 My first B4i program 76 B4X Getting started The new properties Left, Top, Width and Height are directly updated in the Properties window. You can also modify the Left, Top, Width and Height properties directly in the Properties window. Let us change the properties of this first Label according to our requirements. By default, the name is Label with a number, here Label1, let us change its name to lblNumber1. The three letters 'lbl' at the beginning mean 'Label', and 'Number1' means the first number. It is recommended to use significant names for views so we know directly what kind of view it is and its purpose. Pressing the 'Return' key or clicking elsewhere will also change the Event Name property. We have now: Main : Main module. Name : Name of the view. Type : Type of the view. In this case, Label, which is not editable. Event Name : Generic name of the routines that handle the events of the Label. Parent : Parent view the Label belongs to. Main in this case
- 77. 3.7 My first B4i program 77 B4X Getting started Let us check and change the other properties: Set Left, Top, Width and Height to the values in the picture. Visible is checked. We leave the default colors. Text set to 5 We leave the default Font. Text Size, we set it to 36. Set Text Alignment to Center. And the result in the Abstract Designer and on the device.
- 78. 3.7 My first B4i program 78 B4X Getting started We need a second Label similar to the first one. Instead of adding a new one, we copy the first one with the same properties. Only the Name and Left properties will change. Right click on lblNumber1 and click on in the popup menu. The new label covers the duplicated one. In the left part, in the Views Tree, you see the different views. The new label Label1 is added. Let us position the new Label and change its name to lblNumber2. Change the name to lblNumber2. The Left property to 180. And the result in the Abstract Designer and on the device.
- 79. 3.7 My first B4i program 79 B4X Getting started Let us now add a 3rd Label for the math sign. We copy once again lblNumber1. Right click on lblNumber1 in the Abstract Designer and click on in the popup menu. The new label covers lblNumber1. Position it between the first two Labels and change its name to lblMathSign, its Text property to '+'. And the result in the Abstract Designer and on the device. Now let us add a TextField view. In the Designer menu click on . Position it below the three Labels and change its name to txfResult. 'txf' means TextField and 'Result' for its purpose.
- 80. 3.7 My first B4i program 80 B4X Getting started Change these properties. Name to txfResult Left, Top, Width and Height. Border Width to 1 Text Size to 30 Text Alignment to Center Hint Text to Enter result Hint Text represents the text shown in the TextField view if no text is entered. Keyboard Type to NUMBER_PAD Setting Input Type to NUMBER_PAD lets the user enter only numbers. After making these changes, you should see something like this.
- 81. 3.7 My first B4i program 81 B4X Getting started Now, let's add the Button which, when pressed, will either check the result the user supplied as an answer, or will generate a new math problem, depending on the user's input. Position it below the TextField view. Resize it and change following properties: Name to btnAction Left, Top, Width and Height. Background Color to #FFBDBBBB Border Width to 1 Corner Radius to 5 Text to O K (with a space between O and K) Text Size to 24
- 82. 3.7 My first B4i program 82 B4X Getting started Let us add the last Label for the comments. Position it below the Button and resize it. Change the following properties: Name to lblComments Left, Top, Width and Height. Border Width to 1 Text Size to 20 Multiline to True (checked) Text Alignment to Center And the result.
- 83. 3.7 My first B4i program 83 B4X Getting started Now we save the layout file. Click on .
- 84. 3.7 My first B4i program 84 B4X Getting started To write the routines for the project, we need to reference the Views in the code. This can be done with the Generate Members tool in the Designer. The Generate Members tool automatically generates references and subroutine frames. Click on to open the generator. Here we find all the views added to the current layout. We check all views and check the Click event for the btnAction Button. Checking a view generates its reference in the Process_Globals Sub routine in the code. This is needed to make the view recognized by the system and allow the autocomplete function. Private btnAction As Button Private lblComments As Label Private lblMathSign As Label Private lblNumber1 As Label Private lblNumber2 As Label Private txfResult As TextField Clicking on shows all events for the selected view . Clicking on an event of a view generates the Sub frame for this event. Sub btnAction_Click End Sub Click on to generate the references and Sub frames, then close the window .
- 85. 3.7 My first B4i program 85 B4X Getting started Now we go back to the IDE to enter the code. On the top of the program code we have: Sub Process_Globals 'These global variables will be declared once when the application starts. 'Public variables can be accessed from all modules. Public App As Application Public NavControl As NavigationController Private Page1 As Page Private btnAction As Button Private lblComments As Label Private lblMathSign As Label Private lblNumber1 As Label Private lblNumber2 As Label Private txfResult As TextField End Sub These lines are automatically in the project code. Public App As Application Public NavControl As NavigationController Private Page1 As Page iOS needs an Application, a NavigationControl and at least one Page, the details are explained in the chapter Program flow B4i in the B4X Basic Language Booklet. Below the code above we have the Application_Start routine which is the first routine called when the program starts. The content below is also added automatically in each new project. Private Sub Application_Start (Nav As NavigationController) NavControl = Nav Page1.Initialize("Page1") Page1.RootPanel.LoadLayout("Page1") NavControl.ShowPage(Page1) End Sub NavControl = Nav > Sets NavControl as the NavigationController Page1.Initialize("Page1") > Initializes Page1, "Page1" is the generic EventName of Page1. Page1. RootPanel.LoadLayout("Page1") > Loads the layout. NavControl.ShowPage(Page1) > Shows Page1 on the device.
- 86. 3.7 My first B4i program 86 B4X Getting started We want to generate a new problem as soon as the program starts. Therefore, we add a call to the NewProblem subroutine in Application_Start. Private Sub Application_Start (Nav As NavigationController) NavControl = Nav Page1.Initialize("Page1") Page1.RootPanel.LoadLayout("Page1") NavControl.ShowPage(Page1) NewProblem End Sub NewProblem is displayed in red because the ‘NewProblem’ routine has not yet been defined. Generating a new problem means generating two new random values between 1 and 9 (inclusive) for Number1 and Number2, then showing the values using the lblNumber1 and lblNumber2 ‘Text’ properties. To do this we enter following code: In Sub Process_Globals we add two variables for the two numbers. Private Number1, Number2 As Int End Sub And the 'NewProblem' Subroutine: Private Sub NewProblem Number1 = Rnd(1, 10) ' Generates a random number between 1 and 9 Number2 = Rnd(1, 10) ' Generates a random number between 1 and 9 lblNumber1.Text = Number1 ' Displays Number1 in label lblNumber1 lblNumber2.Text = Number2 ' Displays Number2 in label lblNumber2 lblComments.Text = "Enter the result" & CRLF & "and click on OK" txfResult.Text = "" ' Sets edtResult.Text to empty End Sub The following line of code generates a random number from '1' (inclusive) to '10' (exclusive) : Rnd(1, 10) In this line Number1 = Rnd(1, 10) ' Generates a random number between 1 and 9 The text after the quote, ' Generates..., is considered as a comment. It is good practice to add comments explaining the purpose of the code. The following line displays the comment in the lblComment view: lblComments.Text = "Enter the result" & CRLF & "and click on OK" CRLF is the LineFeed character.
- 87. 3.7 My first B4i program 87 B4X Getting started Now we add the code for the Button click event. We have two cases: - When the Button text is equal to "O K", it means that a new problem is displayed, and the program is waiting for the user to enter a result and press the Button. - When the Button text is equal to "NEW", it means that the user has entered a correct answer and when the user clicks on the Button a new problem will be generated. Private Sub btnAction_Click If btnAction.Text = "O K" Then If txfResult.Text="" Then Msgbox("No result entered","E R R O R") Else CheckResult End If Else NewProblem btnAction.Text = "O K" End If End Sub If btnAction.Text = "O K" Then checks if the Button text equals "O K" If yes then we check if the TextField is empty. If yes, we display a MessageBox telling the user that there is no result in the TextField view. If no, we check if the result is correct or if it is wrong. If no then we generate a new problem, set the Button text to "O K" and clear the TextField view. The last routine checks the result. Private Sub CheckResult If txfResult.Text = Number1 + Number2 Then lblComments.Text = "G O O D result" & CRLF & "Click on NEW" btnAction.Text = "N E W" Else lblComments.Text = "W R O N G result" & CRLF & "Enter a new result" & CRLF & "and click OK" End If End Sub With If txfResult.Text = Number1 + Number2 Then we check if the entered result is correct. If yes, we display in the lblComments label the text below: 'G O O D result' 'Click on NEW' and we change the Button text to "N E W ". If no, we display in the lblComments label the text below: W R O N G result Enter a new result and click OK
- 88. 3.7 My first B4i program 88 B4X Getting started Let us now compile the program and transfer it to the Device. In the IDE on top click on or press F5: The program is going to be compiled. When you see 'Completed successfully.' as in the message box, the compiling and transfer is finished. Looking at the device, you should see something similar to the image below when you first run the program. Touch on . Then you will see somewhere on the device the icon of the program , touch it to run the program. Then you should see something similar to the image on the left, with different numbers. Of course, we could make aesthetic improvements in the layout, but this was not the main issue for the first program.
- 89. 3.7 My first B4i program 89 B4X Getting started Touch on to activate the keyboard Enter 14 You will see this screen. Click on to confirm the result entry. If the result is correct you will see the screen on the left. If the result is wrong the message is:
- 90. 3.8 Second B4i program 90 B4X Getting started 3.8 Second B4i program (SecondProgram.b4i) The project is available in the SourceCode folder: SourceCodeSecondProgramB4iSecondProgram.b4i. Improvements to “My first program”. - Independent numeric keyboard to avoid the use of the virtual keyboard. - Colors in the comment label. Create a new folder called “SecondProgram”. Copy all the files and folders from MyFirstProgram to the new SecondProgram folder and rename the program file MyFirstProgram.b4i to SecondProgram.b4i and MyFirstProgram.meta to SecondProgram.meta. Load this new program in the IDE. We need to change the Package Name. In the IDE menu. Click on . Change the Package name to anywheresoftware.b4i.SecondProgram and click on .
- 91. 3.8 Second B4i program 91 B4X Getting started Then we must change the ApplicationLabel on the very top of the code. #Region Project Attributes #ApplicationLabel: SecondProgram Run the Designer. We want to replace the txfResult TextField view by a new Label. In the Abstract Designer, click on the txfResult view. Right click on txfResult Right click on lblNumber1 and click on . and click on . Right click somewhere else The new label covers lblNumber1. and click on .
- 92. 3.8 Second B4i program 92 B4X Getting started Modify the following properties: Name to lblResult Left, Top, Width, Height Boarder Width to 1 Text to "" no character
- 93. 3.8 Second B4i program 93 B4X Getting started Let us add a Panel for the keyboard buttons. Position and resize it as in the image. Change its Name to pnlKeyboard "pnl" for Panel, the view type. Change Border Width to 0 Corner radius to 0
- 94. 3.8 Second B4i program 94 B4X Getting started We will move btnAction from Main to the pnlKeyboard Panel. Click on btnAction. In the Parent list click on . The button now belongs to the Panel. Set these properties: Now we rearrange the views to get some more space for the keyboard. Set the properties below: lblNumber1 Top = 10 lblMathSign Top = 10 lblNumber2 Top = 10 lblResult Top = 70 lblComments Top = 140 pnlKeyboard Left = 15 pnlKeyboard Top = 240 pnlKeyboard Width = 290 pnlKeyboard Height = 170 pnlKeyboard BorderWidth = 0 Move btnAction to the upper right corner of pnlKeyboard.
- 95. 3.8 Second B4i program 95 B4X Getting started Click on the pnlKeyboard panel to select it. Click on to add a new button. The new button is added. Change following properties: Name to btn0 Event name to btnEvent Left to 0 Top to 120 Width to 50 Heightto 50 Tag to 0 Background Color to #B7FA7EA9 Boarder Width to 1 Corner Radius to 5
- 96. 3.8 Second B4i program 96 B4X Getting started Text to 0 Size to 28 The button looks now like this. Let us duplicate btn0 and position the new one beside button btn0. Select the Button btn0. Right click on btn0 and click on . Move the new Button next to the previous one with a space. Change the following properties: Name to btn1 Tag to 1 Text to 1 And the result.
- 97. 3.8 Second B4i program 97 B4X Getting started Add 8 more Buttons and position them like in the image. Change following properties: Name btn2, btn3, btn4 etc. Tag 2 , 3 , 4 etc. Text 2 , 3 , 4 etc. To create the BackSpace button, duplicate one of the number buttons, and position it in the top left corner. Resize and position btnAction.
- 98. 3.8 Second B4i program 98 B4X Getting started Change their Name, Tag, Text and Color properties as below. btnBS < btnAction O K
- 99. 3.8 Second B4i program 99 B4X Getting started Another improvement is to center the objects on the screen. For this, we add some code in the Designer Scripts in the Script-General window. 'All variants script AutoScaleAll lblMathSign.HorizontalCenter = 50%x ' centers the view on the middle of the screen lblNumber1.Right = lblMathSign.Left ' aligns the right edge ont the left edge lblNumber2.Left = lblMathSign.Right ' aligns the left edge ont the right edge lblResult.HorizontalCenter = 50%x ' centers the view on the middle of the screen lblComments.HorizontalCenter = 50%x ' centers the view on the middle of the screen pnlKeyboard.HorizontalCenter = 50%x ' centers the view on the middle of the screen The first two lines are added by default, we leave them. 'All variants script AutoScaleAll lblSigneMath.HorizontalCenter = 50%x HorizontalCenter centers a view horizontally on the screen at the given value, 50%x in our case, which means in the middle of the screen. lblNombre1.Right = lblSigneMath.Left Aligns the right edge of lblNombre1 on the left edge of lblSigneMath, positons lblNombre1 just besides lblSigneMath on the left. lblNombre2.Left = lblSigneMath.Right Aligns the left edge of lblNombre2 on the right edge of lblSigneMath, positons lblNombre2 just besides lblSigneMath on the right. To see the result, click on in the Script – General window. This executes the code.
- 100. 3.8 Second B4i program 100 B4X Getting started The finished new layout on the device. If you had connect the device since the beginning you could have followed all the evolutions of the layout on the device. Now we will update the code. First, we must replace the txfResult by lblResult because we replaced the TextField view by a Label. Double click on txfResult to select it. Click on
- 101. 3.8 Second B4i program 101 B4X Getting started The Find / Replace window is displayed. Click on and close the window. We also need to change its view type form TextField to Label. Private lblResult As Label Now we write the routine that handles the Click events of the Buttons. The Event Name for all buttons, except btnAction, is "btnEvent". The routine name for the associated click event will be btnEvent_Click. Enter the following code: Private Sub btnEvent_Click End Sub We need to know what button raised the event. For this, we use the Sender object which is a special object that holds the object reference of the view that generated the event in the event routine. Private Sub btnEvent_Click To have access to the properties of the view that raised the Dim btnSender As Button event we declare a local variable Dim btnSender As Button. btnSender = Sender And set btnSender = Sender. Select btnSender.Tag Then, to differentiate between the backspace button and Case "BS" the numeric buttons we use a Select / Case / End Select Case Else structure and use the Tag property of the buttons. End Select Remember, when we added the different buttons we End Sub set their Tag property to BS, 0, 1, 2 etc. Select btnSender.Tag Select sets the variable to test. Case "BS" Checks if it is the button with the "BS" tag value. Case Else Handles all the other buttons.
- 102. 3.8 Second B4i program 102 B4X Getting started Now we add the code for the numeric buttons. We want to add the value of the button to the text in the lblResult Label. Select btnSender.Tag Case "BS" Case Else lblResult.Text = lblResult.Text & btnSender.Text End Select End Sub This is done in this line lblResult.Text = lblResult.Text & btnSender.Text The "&" character means concatenation, so we just append to the already existing text the value of the Text property of the button that raised the event. Now we add the code for the BackSpace button. Select btnSender.Tag Case "BS" If lblResult.Text.Length > 0 Then lblResult.Text = lblResult.Text.SubString2(0, lblResult.Text.Length - 1) End If Case Else lblResult.Text = lblResult.Text & btnSender.Text End Select End Sub When clicking on the BS button we must remove the last character from the existing text in lblResult. However, this is only valid if the length of the text is bigger than 0. This is checked with: If lblResult.Text.Length > 0 Then To remove the last character we use the SubString2 function. lblResult.Text = lblResult.Text.SubString2(0,lblResult.Text.Length - 1) SubString2(BeginIndex, EndIndex) extracts a new string beginning at BeginIndex (inclusive) until EndIndex (exclusive). Now the whole routine is finished. Private Sub btnEvent_Click Private btnSender As Button btnSender = Sender Select btnSender.Tag Case "BS" If lblResult.Text.Length >0 Then lblResult.Text = lblResult.Text.SubString2(0,lblResult.Text.Length - 1) End If Case Else lblResult.Text = lblResult.Text & btnSender.Text End Select End Sub In Sub btnAction_Click we add, at the end, lblResult.Text = "" to clear the text. Else NewProblem btnAction.Text = "O K" lblResult.Text = "" End If End Sub
- 103. 3.8 Second B4i program 103 B4X Getting started We can try to improve the user interface of the program by adding some colors to the lblComments Label. Let us set: - Yellow for a new problem - Light Green for a GOOD answer - Light Red for a WRONG answer. We first modify the NewProblem routine, where we add this line lblComments.Color = Colors.RGB(255,235,128) Private Sub NewProblem Number1 = Rnd(1, 10) ' Generates a random number between 1 and 9 Number2 = Rnd(1, 10) ' Generates a random number between 1 and 9 lblNumber1.Text = Number1 ' Displays Number1 in label lblNumber1 lblNumber2.Text = Number2 ' Displays Number2 in label lblNumber2 lblComments.Text = "Enter the result" & CRLF & "and click on OK" lblComments.Color = Colors.RGB(255,235,128) ' yellow color lblResult.Text = "" ' Sets lblResult.Text to empty End Sub And in the CheckResult routine we add the two lines with lblComments.Color =... Private Sub CheckResult If lblResult.Text = Number1 + Number2 Then lblComments.Text = "G O O D result" & CRLF & "Click on NEW" lblComments.Color = Colors.RGB(128,255,128) ' light green color btnAction.Text = "N E W" Else lblComments.Color = Colors.RGB(255,128,128) ' light red color lblComments.Text = "W R O N G result" & CRLF & "Enter a new result" & CRLF & "and click OK" End If End Sub And we give the program a more meaningful title by adding Page1.Title = "Calc Trainer" in Application_Start just before NavControl.ShowPage(Page1).
- 104. 3.8 Second B4i program 104 B4X Getting started Another improvement would be to hide the '0' button to avoid entering a leading '0'. For this, we hide the button in the NewProblem subroutine with line btn0.Visible = False. Private Sub NewProblem Number1 = Rnd(1, 10) ' Generates a random number between 1 and 9 Number2 = Rnd(1, 10) ' Generates a random number between 1 and 9 lblNumber1.Text = Number1 ' Displays Number1 in label lblNumber1 lblNumber2.Text = Number2 ' Displays Number2 in label lblNumber2 lblComments.Text = "Enter the result" & CRLF & "and click on OK" lblComments.Color = Colors.RGB(255,235,128) ' yellow color lblResult.Text = "" ' Sets lblResult.Text to empty btn0.Visible = False End Sub We see that btn0 is in red, this means that this object is not recognized by the IDE. btn0.Visible = False So we must declare it, by adding btn0 into line 17: Private btnAction, btn0 As Button Now btn0 is no more in red. btn0.Visible = False In addition, in the btnEvent_Click subroutine, we hide the button if the length of the text in lblResult is equal to zero and show it if the length is greater than zero. Private Sub btnEvent_Click Dim btnSender As Button btnSender = Sender Select btnSender.Tag Case "BS" If lblResult.Text.Length >0 Then lblResult.Text = lblResult.Text.SubString2(0,lblResult.Text.Length - 1) End If Case Else lblResult.Text = lblResult.Text & Send.Tag End Select If lblResult.Text.Length = 0 Then btn0.Visible = False Else btn0.Visible = True End If End Sub
- 105. 4.1 Installing B4J 105 B4X Getting started 4 Getting started B4J B4J is a 100% free development tool for desktop, server and IoT solutions. With B4J you can easily create desktop applications (UI), console programs (non-UI) and server solutions. The compiled apps can run on Windows, Mac, Linux and ARM boards (such as Raspberry Pi). The B4J language is like Visual Basic and B4A language. B4J includes a powerful GUI designer, built-in support for multiple screens and orientations. What you need: • The B4J program, this is a Windows program running on a PC. • The Java SDK on the PC, free.
- 106. 4.1 Installing B4J 106 B4X Getting started 4.1 Installing B4J The most up to date installation instructions are in the forum at this link: www.b4x.com/b4j.html. Please, follow the instructions there! 4.1.1 Installing B4J Download and install the B4J file on your computer. As B4J is for free, there is no license file needed like for B4A and B4i. 4.1.2 B4JPackager11 B4JPackager11 is a non-ui project. For now you should run it from B4J after you set the value of InputJar (and NetFrameworkCSC). The output of B4JPackager11 looks like this: Clicking on run.exe will run the program. run_debug.bat will run the program with a console window. An Inno Setup script template is created in the parent folder. You can use it to build a single file installer. Notes - B4JPackager11 supports Windows 64 bit. Support for Mac and Linux will be added in the future. Windows 32 bit is not supported by Java 11. - B4JPackager11 creates a folder named temp in the Objects folder. If such folder already exists it deletes it. - A new version of B4J-Bridge was released (v1.40). It is required for Java 11. If you are running Java 11 on the PC then you should also run Java 11 on the remote computer. - Runnable jars are not supported in Java 11+.
- 107. 4.2 Configure Paths in the IDE 107 B4X Getting started 4.2 Configure Paths in the IDE Then you need to configure the different paths in the IDE. Run the IDE. In the menu click on . javac.exe: Enter the folder of the javac.exe file. It will be similar to C:javajdk-11.0.1binjavac.exe or C:Program FilesJavajdk1.8.0_202binjavac.exe
- 108. 4.2 Configure Paths in the IDE 108 B4X Getting started 4.2.1 Configure Additional libraries folder It is recommended to create a specific folder for Additional libraries. B4A utilizes two types of libraries: • Standard libraries, which come with B4A and are located in the Libraries folder of B4A. These libraries are automatically updated when you install a new version of B4A. • Additional libraries, which are not part of B4A, and are mostly written by members. These libraries should be saved in a specific folder different from the standard libraries folder. For the additional libraries it is necessary to setup a special folder to save them somewhere else. This folder must have following structure: Folder for B4A additional libraries. Folder for B4i additional libraries. Folder for B4J additional libraries. Folder for B4R additional libraries. Folder for B4X libraries. Folder for B4X libraries XML files. One subfolder for each product: B4A, B4i, B4J, B4R and another B4X for B4X libraries. When you install a new version of a B4X product, all standard libraries are automatically updated, but the additional libraries are not included. The advantage of the special folder is that you don't need to care about them because this folder is not affected when you install the new version of B4X. The additional libraries are not systematically updated with new version of B4X. When the IDE starts, it looks first for the available libraries in the Libraries folder of B4X and then in the additional libraries folders. In my system, I added a B4XlibXMLFiles folder for XML help files. The standard and additional libraries have an XML file. B4X Libraies not. But, if you use the B4X Help Viewer you would be interested in having these help files if they are available. Shared Modules: Create a specific folder for shared modules, for example C:B4JSharedModules. Module files can be shared between different projects and must therefore be saved in a specific folder. Libraries and modules are explained in the B4X Basic Language booklet.
- 109. 4.3 My first B4J program 109 B4X Getting started 4.3 My first program (MyFirstProgram.b4j) Let us write our first program. The suggested program is a math trainer for kids. The project is available in the SourceCode folder shipped with this booklet: SourceCodeMyFirstProgramB4JMyFirstProgram.b4j On the screen, we will have: - 2 Labels displaying randomly generated numbers (between 1 and 9) - 1 Label with the math sign (+) - 1 TextField where the user must enter the result - 1 Button, used to either confirm when the user has finished entering the result or generate a new calculation. - 1 Label with a comment about the result. In B4J: - Label is an object to show text. - TextField is an object allowing the user to enter text, like EditText in B4A. - Button is an object allowing user actions. We will design the layout of the user interface with the Designer, the Abstract Designer and a Form on the screen. We will go step by step through the whole process. The Designer manages the different objects of the interface. The Abstract Designer shows the positions and sizes of the objects and allows moving or resizing them on the screen. On the Form, we see the real result.
- 110. 4.3 My first B4J program 110 B4X Getting started Run the IDE When you open the IDE everything is empty. Click on the New button or click on New in the Files menu. You are shown six possibilities. • B4XPages B4X cross-platform project. These are explained in detail in the B4XPages Cross-platfor Booklet. • B4XTurtle B4X Turtle project, a specific library. These are explained in the forum B4XTurtle - Library for teachers and parents. • Console (Non-UI) Non user interface project. • Server Server project • UI B4J ‘standard’ user interface project. • X2 Game X2 Game project. X2 Games are explained in the forum. [B4X] X2 / XUI2D (Box2D) - Game engine.
- 111. 4.3 My first B4J program 111 B4X Getting started For our project we could select either B4XPages or UI. B4XPages projects are explained in the B4XPages Cross-platform projects booklet. We want to develop a B4J standard project therefore we select UI. You are asket to save the project. Enter MyFirstProgram in the Project Name field. Enter the Project Folder name. You can enter any folder for that. I use D:B4J as the generic folder for B4J projects. Check to create a new folder. Click on .
- 112. 4.3 My first B4J program 112 B4X Getting started Now you see the template for a new B4J project. You may also have a look in the Files Explorer. And you will see that the project is saved in the D:B4JMyFirstProgram folder.
- 113. 4.3 My first B4J program 113 B4X Getting started Set the Package Name. In the menu, click on The default name is b4j.example. This window appears: The default name is b4a.example. We will change it to b4j.MyFirstProgram. And click on .
- 114. 4.3 My first B4J program 114 B4X Getting started Set the Form size. The Form size is the size of the main window, called Form, shown on the PC screen. On top of the code you see Region Project Attributes. Regions are code parts which can be collapsed or extended. Clicking on will expand the Region. Clicking on will collapse the Region. Regions are explained in chapther #Regions in the B4X IDE Booklet. Here we can define the size of the project main window called Form. The default values are Width = 600 and Height = 400. We change these to Width = 400 and Height = 600. #Region Project Attributes #MainFormWidth: 400 #MainFormHeight: 600 #End Region Then remove this code, it is only an example. Sub Button1_Click xui.MsgboxAsync("Hello world!", "B4X") End Sub In the IDE open the Designer. Wait until the Designer is ready.
- 115. 4.3 My first B4J program 115 B4X Getting started We get a WYSIWYG Form. And the Designer looks like this. The template contains already a layout file Layout1, we keep it.
- 116. 4.3 My first B4J program 116 B4X Getting started Note that in the bottom left of the Designer window you see the connection status to the WYSIWYG Form: If you close the WYSIWYG Form you will see this status: With the Designer, we have also the Abstract Designer which shows the layout not exactly WYSIWYG but the positions and size of the different objects. Only the top of the image is shown. The dark gray area represents the screen area of the connected ‘device’ which is the WYSIWYG Form. The default screen size variant is 600 * 600, we define a new variant with the same values, 400 * 600, as in the Project Attributes. Click on . In this window click on and enter the two values.
- 117. 4.3 My first B4J program 117 B4X Getting started On top of the Variants window we see the new variant. Click on to select the 600 * 600 variant. Click on to remove the 600 * 600 variant. Click on to show the Views Tree window. We already have a button, Button1, we remove it. Right click onto Button1 and click on .
- 118. 4.3 My first B4J program 118 B4X Getting started Now we will add the 2 Labels for the numbers. In the Designer, add a Label. In the Designer menu click on . The Label appears in the Abstract Designer, in the Views Tree window and its default properties are listed in the Properties window. And in the WYSIWYG Form.
- 119. 4.3 My first B4J program 119 B4X Getting started Resize and move the Label with the red squares like this. The new properties Left, Top, Width and Height are directly updated in the Properties window. You can also modify the Left, Top, Width and Height properties directly in the Properties window. Let us change the properties of this first Label, per our requirements. By default, the name is Label with a number, here Label1. Let us change its name to lblNumber1. The three letters 'lbl' at the beginning mean 'Label', and 'Number1' means the first number. It is recommended to use significant names for nodes so we know directly what kind of node it is and its purpose. Pressing the 'Return' key or clicking elsewhere will also change the Event Name property. Main : Main module. Name : name of the node. Type : type of the node. In this case, Label, which is not editable. Event Name : generic name of the routines that handle the events of the Label. Parent : parent node the Label belongs to.
- 120. 4.3 My first B4J program 120 B4X Getting started Let us check and change the other properties: Set Left, Top, Width and Height to the values in the picture. Visible is checked. We leave the default colors. Text set to 5 Set Text Alignment to Center. We leave the default Font. Size, we set it to 36. And the result in the Abstract Designer and on the WYSIWYG Form
- 121. 4.3 My first B4J program 121 B4X Getting started We need a second Label, like the first one. Instead of adding a new one, we copy the first one with the same properties. Only the Name and Left properties will change. Right click on lblNumber1 and click on in the popup menu. The new label covers the previous one. In the left part, in the Views Tree, you see the different nodes. The new label Label1 is added. Let us position the new Label and change its name to lblNumber2. Change the name to lblNumber2. The Left property to 230. And the result in the Abstract Designer and on the WYSIWYG Form.
- 122. 4.3 My first B4J program 122 B4X Getting started Let us now add a 3rd Label for the math sign. We copy once again lblNumber1. Right click on lblNumber1 in the Abstract Designer and click on in the popup menu. The new label covers lblNumber1. Position it between the first two Labels and change its name to lblMathSign and its Text property to '+'. And the result in the Abstract Designer and on the WYSIWYG Form. Now let us add a TextField node. In the Designer menu click on . Position it below the three Labels and change its name to txfResult. 'txf' means TextField and 'Result' for its purpose.
- 123. 4.3 My first B4J program 123 B4X Getting started Change these properties. Name to txfResult Left, Top, Width and Height. Border Width to 1 Prompt to Enter result Prompt represents the text shown in the TextField node if no text is entered. Size to 30 After making these changes, you should see something like this.
- 124. 4.3 My first B4J program 124 B4X Getting started Now, let's add the Button which, when pressed, will either check the result the user supplied as an answer, or generate a new math problem, depending on the user's input. Position it below the TextField node. Resize it and change following properties: Name to btnAction Left, Top, Width and Height. Background Color to #FFBDBBBB Text to O K (with a space between O and K) Result (pictures reduced size) Size to 24
- 125. 4.3 My first B4J program 125 B4X Getting started Let us add the last Label for the comments. Position it below the Button and resize it. Change the following properties: Name to lblComments Left, Top, Width and Height. Border Width to 1 Text empty Font Size to 20
- 126. 4.3 My first B4J program 126 B4X Getting started And the result. Now we save the layout file. Click on and save it.
- 127. 4.3 My first B4J program 127 B4X Getting started To write the routines for the project, we need to reference the Views in the code. This can be done with the Generate Members tool in the Designer. The Generate Members tool automatically generates references and subroutine frames. Click on to open the generator. Here we find all the nodes added to the current layout. We check all nodes and check the MouseClicked event for the btnAction Button. Checking a node generates its reference in the Process_Globals routine in the code. This is needed to make the node recognized by the system and allow the autocomplete function. Private btnAction As Button Private lblComments As Label Private lblMathSign As Label Private lblNumber1 As Label Private lblNumber2 As Label Private txfResult As TextField Clicking on shows all events for the selected node . Clicking on an event of a node generates the Sub frame for this event. Sub btnAction_Click (EventData As MouseEvent) End Sub Click on to generate the references and Sub frames, then close the window .
- 128. 4.3 My first B4J program 128 B4X Getting started Now we go back to the IDE to enter the code. On the top of the program code we have: Click on to open the Region. We have the code below #Region Project Attributes #MainFormWidth: 400 #MainFormHeight: 600 #End Region Change MainFormWidth from 600 to 400 to adjust the default dimensions of the from. Just below, we have: Sub Process_Globals Private fx As JFX Private MainForm As Form Private btnAction As Button Private lblComments As Label Private lblMathSign As Label Private lblNumber1 As Label Private lblNumber2 As Label Private txfResult As TextField End Sub These lines are automatically in the project code. Private fx As JFX Private MainForm As Form B4J needs a MainForm, and the JFX library for the nodes, details in chapter Program flow / Process life cycle in the B4X Basic Language booklet. Below the code above we have the AppStart routine which is the first routine executed when the program starts. The content below is also added automatically in each new project. Sub AppStart (Form1 As Form, Args() As String) MainForm = Form1 'MainForm.RootPane.LoadLayout("Layout1") 'Load the layout file. MainForm.Show End Sub MainForm = Form1 > Sets Form1 to the variable MainForm. 'MainForm.RootPane.LoadLayout("Layout1") > Loads a layout file if needed. MainForm.Show > Shows the MainForm First, we need our program to load the layout file we defined in the previous pages. The file must be loaded onto the MainForm.RootPane, we uncomment the line 'MainForm.RootPane.LoadLayout("Layout1") and change the layout file name. Sub AppStart (Form1 As Form, Args() As String) MainForm = Form1 MainForm.RootPane.LoadLayout("Main") 'Load the layout file. MainForm.Show End Sub
- 129. 4.3 My first B4J program 129 B4X Getting started We want to generate a new problem as soon as the program starts. Therefore, we add a call to the NewProblem subroutine in AppStart. Sub AppStart (Form1 As Form, Args() As String) MainForm = Form1 MainForm.RootPane.LoadLayout("Main") 'Load the layout file. MainForm.Show NewProblem End Sub NewProblem is displayed in red because the ‘NewProblem’ routine has not yet been defined. Generating a new problem means generating two new random values between 1 and 9 (inclusive) for Number1 and Number2, then showing the values using the lblNumber1 and lblNumber2 ‘Text’ properties. To do this we enter following code: In Sub Process_Globals we add two variables for the two numbers. Private Number1, Number2 As Int End Sub And the 'NewProblem' Subroutine: Private Sub NewProblem Number1 = Rnd(1, 10) ' Generates a random number between 1 and 9 Number2 = Rnd(1, 10) ' Generates a random number between 1 and 9 lblNumber1.Text = Number1 ' Displays Number1 in label lblNumber1 lblNumber2.Text = Number2 ' Displays Number2 in label lblNumber2 lblComments.Text = "Enter the result" & CRLF & "and click on OK" txfResult.Text = "" ' Sets edtResult.Text to empty End Sub The following line of code generates a random number from '1' (inclusive) to '10' (exclusive) : Rnd(1, 10) In this line Number1 = Rnd(1, 10) ' Generates a random number between 1 and 9 The text after the quote, ' Generates..., is considered as a comment. It is good practice to add comments explaining the purpose of the code. The following line displays the comment in the lblComment node: lblComments.Text = "Enter the result" & CRLF & "and click on OK" CRLF is the LineFeed character.
- 130. 4.3 My first B4J program 130 B4X Getting started Now we add the code for the Button click event. We have two cases: - When the Button text is equal to "O K", it means that a new problem is displayed, and the program is waiting for the user to enter a result and press the Button. - When the Button text is equal to "NEW", it means that the user has entered a correct answer and when the user clicks on the Button a new problem will be generated. Private Sub btnAction_Click If btnAction.Text = "O K" Then If txfResult.Text="" Then lblComments.Text = "No result entered" & CRLF & "Enter a result" & CRLF & "and click on OK" Else CheckResult End If Else NewProblem btnAction.Text = "O K" End If End Sub If btnAction.Text = "O K" Then checks if the Button text equals "O K". If yes, we check if the TextField is empty. If yes, we display a message in the comment field telling the user that there is no result in the TextField node. If no, we check if the result is correct or if it is wrong. If no, we generate a new problem, set the Button text to "O K" and clear the TextField node. The last routine checks the result. Private Sub CheckResult If txfResult.Text = Number1 + Number2 Then lblComments.Text = "G O O D result" & CRLF & "Click on NEW" btnAction.Text = "N E W" Else lblComments.Text = "W R O N G result" & CRLF & "Enter a new result" & CRLF & "and click OK" End If End Sub With If txfResult.Text = Number1 + Number2 Then we check if the entered result is correct. If yes, we display in the lblComments label the text below: 'G O O D result' 'Click on NEW' and we change the Button text to "N E W ". If no, we display in the lblComments label the text below: W R O N G result Enter a new result and click OK
- 131. 4.3 My first B4J program 131 B4X Getting started Let us now compile and run the program. In the IDE on top click on : The program is going to be compiled. When you see 'Completed successfully.' as in the message box, the compiling and transfer is finished. Then you should see something like the image on the left, with different numbers. Of course, we could make aesthetic improvements in the layout, but this was not the main issue for the first program.
- 132. 4.3 My first B4J program 132 B4X Getting started Enter 7 Click on to confirm the result entry. If the result is correct you will see the screen on the left. If the result is wrong the message is displayed : Click on to define a new problem.
- 133. 4.4 Second B4J program 133 B4X Getting started 4.4 Second B4J program (SecondProgram.b4j) The project is available in the SourceCode folder: SourceCodeSecondProgramSecondProgram.b4j. Improvements to “My first program”. - Independent numeric keyboard to avoid the use of the PC keyboard. - Colors in the comment label. Create a new folder called “SecondProgram”. Copy all the files and folders from MyFirstProgram to the new SecondProgram folder and rename the program file MyFirstProgram.b4j to SecondProgram.b4j and MyFirstProgram.b4j.meta to SecondProgram.b4j.meta.
- 134. 4.4 Second B4J program 134 B4X Getting started Load this new program in the IDE. Run the Designer. We need to change the Package Name. In the IDE menu. Click on . Change the Package name to b4j.SecondProgram and click on .
- 135. 4.4 Second B4J program 135 B4X Getting started We want to replace the txfResult TextField node by a new Label. In the Abstract Designer, click on the txfResult node. Right click on txfResult and click on . Right click on lblNumber1 and click on . The new label covers lblNumber1.
- 136. 4.4 Second B4J program 136 B4X Getting started Modify the following properties: Name to lblResult Left, Top, Width, Height Border Width to 1 Text to "" no character And the result.
- 137. 4.4 Second B4J program 137 B4X Getting started Let us add a Pane for the keyboard buttons. Position and resize it as in the image. Change its Name to pnlKeyboard "pnl" for Pane (B4A habit pnl for Panel), the node type. Change Corner radius to 0
- 138. 4.4 Second B4J program 138 B4X Getting started We will move btnAction from Main to the pnlKeyboard Panel. Click on btnAction. In the Parent list click on . The button now belongs to the Pane. Now we rearrange the nodes to get some more space for the keyboard. Set the properties below: lblComments Top = 220 pnlKeyboard Left = 50 pnlKeyboard Top = 350 pnlKeyboard Width = 290 pnlKeyboard Height = 170 pnlKeyboard BorderWidth = 0 Move btnAction to the upper right corner of pnlKeyboard.
- 139. 4.4 Second B4J program 139 B4X Getting started Click on the pnlKeyboard pane to select it. Click on to add a new button. The new button is added. Change following properties: Name to btn0 Event name to btnEvent Left to 0 Top to 120 Width to 50 Height to 50 Tag to 0 Color to #B7FA7EA9
- 140. 4.4 Second B4J program 140 B4X Getting started Border Width to 1 Corner Radius to 5 Text to 0 Size to 22 The button looks now like this.
- 141. 4.4 Second B4J program 141 B4X Getting started Let us duplicate btn0 and position the new one beside button btn0. Select the Button btn0. Right click on btn0 and click on . Move the new Button next to the previous one with a space. Change the following properties: Name to btn1 Tag to 1 Text to 1 And the result. Add 8 more Buttons and position them like in the image. Change following properties: Name btn2, btn3, btn4 etc. Tag 2 , 3 , 4 etc. Text 2 , 3 , 4 etc. To create the BackSpace button, duplicate one of the number buttons, and position it in the top left corner. Resize and position btnAction.
- 142. 4.4 Second B4J program 142 B4X Getting started Change their Name, Tag, Text and Color properties as below. btnBS < btnAction O K
- 143. 4.4 Second B4J program 143 B4X Getting started The finished new layout in the WYSIWYG form. You could have followed all the evolutions of the layout in the WYSIWYG form. Now we will update the code. First, we must replace the txfResult by lblResult because we replaced the TextField node by a Label. Double click on txfResult to select it. Click on .
- 144. 4.4 Second B4J program 144 B4X Getting started The Find / Replace window is displayed. Click on and close the window. We also need to change its node type form TextField to Label. Private lblResult As Label Now we write the routine that handles the Click events of the Buttons. The Event Name for all buttons, except btnAction, is "btnEvent". The routine name for the associated click event will be btnEvent_Click. Enter the following code: Private Sub btnEvent_MouseClicked End Sub We need to know what button raised the event. For this, we use the Sender object which is a special object that holds the object reference of the node that generated the event in the event routine. Private Sub btnEvent_MouseClicked To have access to the properties of the node that raised the Private btnSender As Button event we declare a local variable Private btnSender As Button. btnSender = Sender and set btnSender = Sender. Select btnSender.Tag Then, to differentiate between the backspace button and Case "BS" the numeric buttons we use a Select / Case / End Select Case Else structure and use the Tag property of the buttons. End Select Remember, when we added the different buttons we End Sub set their Tag property to BS, 0, 1, 2 etc. Select btnSender.Tag Select sets the variable to test. Case "BS" Checks if it is the button with the "BS" tag value. Case Else Handles all the other buttons.
- 145. 4.4 Second B4J program 145 B4X Getting started Now we add the code for the numeric buttons. We want to add the value of the button to the text in the lblResult Label. Select btnSender.Tag Case "BS" Case Else lblResult.Text = lblResult.Text & btnSender.Text End Select End Sub This is done in this line lblResult.Text = lblResult.Text & btnSender.Text The "&" character means concatenation, so we just append to the already existing text the value of the Text property of the button that raised the event. Now we add the code for the BackSpace button. Select btnSender.Tag Case "BS" If lblResult.Text.Length > 0 Then lblResult.Text = lblResult.Text.SubString2(0, lblResult.Text.Length - 1) End If Case Else lblResult.Text = lblResult.Text & btnSender.Text End Select End Sub When clicking on the BS button we must remove the last character from the existing text in lblResult. However, this is only valid if the length of the text is bigger than 0. This is checked with: If lblResult.Text.Length > 0 Then To remove the last character, we use the SubString2 function. lblResult.Text = lblResult.Text.SubString2(0, lblResult.Text.Length - 1) SubString2(BeginIndex, EndIndex) extracts a new string beginning at BeginIndex (inclusive) until EndIndex (exclusive). Now the whole routine is finished. Private Sub btnEvent_MouseClicked (EventData As MouseEvent) Private btnSender As Button btnSender = Sender Select btnSender.Tag Case "BS" If lblResult.Text.Length >0 Then lblResult.Text = lblResult.Text.SubString2(0,lblResult.Text.Length - 1) End If Case Else lblResult.Text = lblResult.Text & btnSender.Text End Select End Sub In Sub btnAction_MouseClicked we add, at the end, lblResult.Text = "" to clear the text. Else NewProblem btnAction.Text = "O K" lblResult.Text = "" End If End Sub
- 146. 4.4 Second B4J program 146 B4X Getting started We can try to improve the user interface of the program by adding some colors to the lblComments Label. Let us set: - Yellow for a new problem - Light Green for a GOOD answer - Light Red for a WRONG answer. We first modify the NewProblem routine, where we add this line CSSUtils.SetBackgroundColor(lblComments, fx.Colors.RGB(255,235,128)) We need to use the CSSUtils library for that! See next page how to add a library. Private Sub NewProblem Number1 = Rnd(1, 10) ' Generates a random number between 1 and 9 Number2 = Rnd(1, 10) ' Generates a random number between 1 and 9 lblNumber1.Text = Number1 ' Displays Number1 in label lblNumber1 lblNumber2.Text = Number2 ' Displays Number2 in label lblNumber2 lblComments.Text = "Enter the result" & CRLF & "and click on OK" CSSUtils.SetBackgroundColor(lblComments, fx.Colors.RGB(255,235,128))' yellow color lblResult.Text = "" ' Sets lblResult.Text to empty End Sub And in the CheckResult routine we add the two lines with CSSUtils.SetBackgroundColor... Private Sub CheckResult If lblResult.Text = Number1 + Number2 Then CSSUtils.SetBackgroundColor(lblComments, fx.Colors.RGB(128,255,128)) ' light green color lblComments.Text = "G O O D result" & CRLF & "Click on NEW" lblComments.Style = "-fx-background-color: palgreen;" ' palegreen color btnAction.Text = "N E W" Else CSSUtils.SetBackgroundColor(lblComments, fx.Colors.RGB(255,128,128)) ' light red color lblComments.Text = "W R O N G result" & CRLF & "Enter a new result" & CRLF & "and click OK" End If End Sub And we give the program a more meaningful title by adding MainForm.Title = "Calc Trainer" in AppStart just after MainForm.Show.
- 147. 4.4 Second B4J program 147 B4X Getting started Add the CSSUtils library to the project. In the lower right corner click on the Libraries Manager Tab. In the libraries list check CSSUtils. And the result. The CSSUtils library is added to the project. The libraries are ordered by alphabetic order. The use of libraries is detailed in chapter 3.8 Libraries in the B4X Basic Language booklet.
- 148. 4.4 Second B4J program 148 B4X Getting started Another improvement would be to hide the '0' button to avoid entering a leading '0'. For this, we hide the button in the NewProblem subroutine with line btn0.Visible = False. Private Sub NewProblem Number1 = Rnd(1, 10) ' Generates a random number between 1 and 9 Number2 = Rnd(1, 10) ' Generates a random number between 1 and 9 lblNumber1.Text = Number1 ' Displays Number1 in label lblNumber1 lblNumber2.Text = Number2 ' Displays Number2 in label lblNumber2 lblComments.Text = "Enter the result" & CRLF & "and click on OK" lblComments.Color = Colors.RGB(255,235,128) ' yellow color lblResult.Text = "" ' Sets lblResult.Text to empty btn0.Visible = False End Sub We see that btn0 is in red, this means that this object is not recognized by the IDE. btn0.Visible = False So we must declare it, by adding btn0 into line 9: Private btnAction, btn0 As Button Now btn0 is no more in red. btn0.Visible = False In addition, in the btnEvent_MouseClicked subroutine, we hide the button if the length of the text in lblResult is equal to zero and show it if the length is greater than zero. Private Sub btnEvent_MouseClicked (EventData As MouseEvent) Dim btnSender As Button btnSender = Sender Select btnSender.Tag Case "BS" If lblResult.Text.Length > 0 Then lblResult.Text = lblResult.Text.SubString2(0,lblResult.Text.Length - 1) End If Case Else lblResult.Text = lblResult.Text & Send.Tag End Select If lblResult.Text.Length = 0 Then btn0.Visible = False Else btn0.Visible = True End If End Sub
- 149. 5 Getting started B4R 149 B4X Getting started 5 Getting started B4R B4R - The simplest way to develop native, powerful Arduino programs. B4R follows the same concepts of the other B4X tools (B4A, B4i, B4J), providing a simple and powerful development tool. Compiled apps run on Arduino compatible boards. 5.1 Installing Arduino IDE B4R needs the installation of Arduino IDE version 1.8+. Download Arduino IDE from this link: https://www.arduino.cc/en/Main/Donate and install it. You should not install Arduino from this site: http://www.arduino.org/downloads It wont work. 5.2 Install Microsoft .Net Framework On most computers Microsoft .Net Framework is already preinstalled. If it is not the case, you must install either: • .Net Framework 4.5.2 for Windows Vista + • .Net Framework 4.0 for Windows XP
- 150. 5.3 Install and configure B4R 150 B4X Getting started 5.3 Install and configure B4R - Download and install B4R. - Open B4R. - Choose Tools menu - Configure Paths. Use the button to locate "arduino.exe". The path will depend on where you installed the Arduino IDE.
- 151. 5.3 Install and configure B4R 151 B4X Getting started Additional Libraries: It is recommended to create a specific folder for Additional libraries. B4A utilizes two types of libraries: • Standard libraries, which come with B4A and are located in the Libraries folder of B4A. These libraries are automatically updated when you install a new version of B4A. • Additional libraries, which are not part of B4A, and are mostly written by members. These libraries should be saved in a specific folder different from the standard libraries folder. For the additional libraries it is necessary to setup a special folder to save them somewhere else. This folder must have following structure: Folder for B4A additional libraries. Folder for B4i additional libraries. Folder for B4J additional libraries. Folder for B4R additional libraries. Folder for B4X libraries. Folder for B4X libraries XML files. One subfolder for each product: B4A, B4i, B4J, B4R and another B4X for B4X libraries. When you install a new version of a B4X product, all standard libraries are automatically updated, but the additional libraries are not included. The advantage of the special folder is that you don't need to care about them because this folder is not affected when you install the new version of B4X. The additional libraries are not systematically updated with new version of B4X. When the IDE starts, it looks first for the available libraries in the Libraries folder of B4X and then in the additional libraries folders. In my system, I added a B4XlibXMLFiles folder for XML help files. The standard and additional libraries have an XML file. B4X Libraies not. But, if you use the B4X Help Viewer you would be interested in having these help files if they are available. Shared modules: Create a specific folder for shared modules, for example C:B4JSharedModules. Module files can be shared between different projects and must therefore be saved in a specific folder. Libraries and modules are explained in the B4X Basic Language booklet.
- 152. 5.4 Connecting a board 152 B4X Getting started 5.4 Connecting a board When you connect a board to the PC with the USB cable Windows will load the driver and display the Serial port used. 5.5 Select a Board Run B4R. Click on Board Selector. The window below will be displayed. Select the Board Type in the drop down list. Select the Serial Port and select the Baud Rate. If only one board is connected it will automatically be recognized. You will see only boards which are connected.
- 153. 5.4 Connecting a board 153 B4X Getting started Depending on the board type several other properties can be set.
- 154. 5.6 Arduino UNO board 154 B4X Getting started 5.6 Arduino UNO board In this chapter I will explain some basic functions of the Arduino UNO board which may be useful for beginners. The Arduino UNO board is the basic board of the Arduino family. There exist other more advanced boards. • Arduino DUE • Arduino MEGA • Arduino MICRO • etc. see Compare board specs. Additional boards called ‘Shields’ can be clipped onto the Arduino boards. • Arduino Wi-Fi Shield 101 • Arduino Ethernet Shield • etc. The Arduino UNO: The source of the information in this chapter is a summary from the Arduino site. Digital Input / Output pins On board LED 13 LED Serial TX / RX USB plug LED Power ON DC Power plug Power pins Analog Input pins
- 155. 5.6 Arduino UNO board 155 B4X Getting started 5.6.1 Power supply The board can be supplied with power either from the DC power jack (7 - 12V), the USB connector (5V), or the VIN pin of the board (7-12V). Supplying voltage via the 5V or 3.3V pins bypasses the regulator, and can damage your board (see the pins below). We don't advise it. 5.6.2 Pins The Arduino UNO has 3 pin sockets: • Power pins. • Digital Input / Output pins. • Analog Input pins. 5.6.3 Power pins The Power pins are: • GND Power ground, 2 pins. • VIN Power supply input. The input voltage to the Uno board when it's using an external power source (as opposed to 5 volts from the USB connection or other regulated power source). You can supply voltage through this pin, or, if supplying voltage via the power jack, access it through this pin. Voltage 7 – 12 V. • 5V 5 Volt reference voltage. Don’t provide the power to this pin! This pin outputs a regulated 5V from the regulator on the board. • 3.3V 3.3 Volt reference voltage. Don’t provide the power to this pin! A 3.3 volt supply generated by the on-board regulator. Maximum current draw is 50 mA. • RESET Bring this line LOW to reset the microcontroller. Typically used to add a reset button to shields which block the one on the board. • IOREF This pin on the Uno board provides the voltage reference with which the microcontroller operates. A properly configured shield can read the IOREF pin voltage and select the appropriate power source or enable voltage translators on the outputs to work with the 5V or 3.3V.
- 156. 5.6 Arduino UNO board 156 B4X Getting started 5.6.3.1 Digital Input / Output pins Each of the 14 digital pins on the Uno can be used as an input or output, using the pinMode method, DigitalRead and DigitalWrite functions. They operate at 5 volts. Each pin can provide or receive 20 mA as recommended operating condition and has an internal pull-up resistor (disconnected by default) of 20-50 kohm. A maximum of 40mA is the value that must not be exceeded on any I/O pin to avoid permanent damage to the microcontroller. In addition, some pins have specialized functions: • Serial: 0 (RX) and 1 (TX). Used to receive (RX) and transmit (TX) TTL serial data. These pins are connected to the corresponding pins of the ATmega8U2 USB-to-TTL Serial chip. • PWM: ~3, ~5, ~6, ~9, ~10, and ~11. These numbers have this “~” prefix. They can provide 8-bit PWM (Pulse Width Modulation) outputs with the AnalogWrite function allowing to modulate the brightness of a LED (Light Emitting Diode) or run DC motors at different speeds. A value of 0 means always OFF and 255 means always ON. Usage: pinTest3.AnalogWrite(Value As UInt) pinTest3.AnalogWrite(196) After AnalogWrite the pin will generate a steady square wave of the specified duty cycle until the next call to AnalogWrite (or a call to DigitalRead or DigitalWrite on the same pin). The frequency of the PWM signal on most pins is approximately 490 Hz. On the Uno and similar boards, pins 5 and 6 have a frequency of approximately 980 Hz. Pins 3 and 11 on the Leonardo also run at 980 Hz. • LED 13: There is a built-in LED driven by digital pin 13. When the pin is HIGH value, the LED is on, when the pin is LOW, it's off. 5.6.3.2 Analog input pins The Arduino UNO has 6 Analog input pins A0 to A5 with 10 bit analog to digital converters (0 to 1023 resolution). The reference voltage is 5 Volt allowing a resolution of 4.9 mV per unit. While the main function of the analog pins for most Arduino users is to read analog sensors, the analog pins also have all the functionality of general purpose input/output (GPIO) pins (the same as digital pins 0 - 13). 5.6.4 Input modes INPUT / INPUT_PULLUP If you have your pin configured as an INPUT, and are reading a switch, when the switch is in the open state the input pin will be "floating", resulting in unpredictable results. In order to assure a proper reading when the switch is open, a pull-up or pull-down resistor must be used. The purpose of this resistor is to pull the pin to a known state when the switch is open. A 10 K ohm resistor is usually chosen, as it is a low enough value to reliably prevent a floating input, and at the same time a high enough value to not draw too much current when the switch is closed. The INPUT_PULLUP mode adds an internal pull up resistor no need to add one externally. With a pull up resistor the pin returns False when the switch is closed because it sets the input to 0 Volt.
- 157. 5.6 Arduino UNO board 157 B4X Getting started 5.6.5 Basic Pin functions 5.6.5.1 Initialize Initializes a pin. Pin.Initialize(Pin As Byte, Mode As Byte) Pin is the pin number. • 0, 1, 2, 3 etc. for digital pins • Pin.A0, Pin.A1 , Pin.A2 etc. for analog pins. Mode is one of the three connection modes: • MODE_INPUT • MODE_INPUT_PULLUP adds an internal pull up resistor. • MODE_OUTPUT Example1: Initialize digital pin 3 as input. Private pinTest1 As Pin pinTest1.Initialize(3, pinTest1.MODE_INPUT) Example2: Initialize digital pin 3 as input with pull up resistor. Private pinTest2 As Pin pinTest2.Initialize(3, pinTest2.MODE_INPUT_PULLUP) Example3: Initialize digital pin 3 as output. Private pinTest3 As Pin pinTest3.Initialize(3, pinTest3.MODE_OUTPUT) Example4: Initialize analog pin 4 as input. Private pinTest4 As Pin pinTest4.Initialize(pinTest4.A4, pinTest4.MODE_INPUT) The analog pins, on the Arduino UNO, can also be accessed with numbers, like: pinTest4.Initialize(18, pinTest4.MODE_INPUT) Pin.A0 = 14 Pin.A1 = 15 Pin.A2 = 16 Pin.A3 = 17 Pin.A4 = 18 Pin.A5 = 19 Initializing an analog pin as output works like a digital output pin.
- 158. 5.6 Arduino UNO board 158 B4X Getting started 5.6.5.2 DigitalRead Reads the current digital value of a pin. The return value is True or False. Pin.DigitalRead returns a Boolean. There are two input modes depending on the input signal. • Pin.MODE_INPUT • Pin. MODE_INPUT_PULLUP adds an internal pullup resistor for use with a switch. Example: Private pinTest1 As Pin pinTest1.Initialize(3, pinTest.MODE_INPUT) Private Value As Boolean Value = pinTest1.DigitalRead The Arduino uses internally 0 and 1 for a boolean variable. Log("State: ", Value) Will write either 0 for False or 1 for True in the Logs. In the code you can use False and True. 5.6.5.3 DigitalWrite Writes a Boolean value to the given pin. It can be used for all digital pins and also all analog pins. Pin.DigitalWrite (Value As Boolean) Example: Private pinTest3 As Pin pinTest3.Initialize(3, pinTest3.MODE_OUTPUT) pinTest3.DigitalWrite(True) directly with the value. pinTest3.DigitalWrite(Value) with a variable. 5.6.5.4 AnalogRead AnalogRead reads the current value of an analog pin. The return value is an UInt with values between 0 and 1023 (10 bits). The reference voltage is 5V. Example: Private pinPot As Pin pinPot.Initialize(pinPot.A4, pinPot.MODE_INPUT) Private Value As UInt Value = pinPot.AnalogRead
- 159. 5.6 Arduino UNO board 159 B4X Getting started 5.6.5.5 AnalogWrite AnalogWrite writes a Byte value to the given pin. AnalogWrite has nothing to do with the analog pins nor with AnalogRead. AnalogWrite can only be used on the digital pins ~3, ~5, ~6, ~9, ~10, and ~11 on the Arduino UNO, the pins with the ~ prefix. Pin.AnalogWrite (Value As UInt) Example: we use digital pin ~3 which allows PWM. Private pinTest3 As Pin pinTest3.Initialize(3, pinTest3.MODE_OUTPUT) pinTest3.AnalogWrite(145) directly with the value. pinTest3.AnalogWrite(Value) with a variable, Value must be a UInt variable.
- 160. 5.7 First B4R example programs 160 B4X Getting started 5.7 First example programs All the projects were realized with the Arduino Starter Kit. The diagrams for the projects were realized with the Fritzing software. When we run the IDE we get the default code like below. The #Region Project Attributes is normally collapsed; these attributes are explained below. #Region Project Attributes #AutoFlushLogs: True #CheckArrayBounds: True #StackBufferSize: 300 #End Region Sub Process_Globals 'These global variables will be declared once when the application starts. 'Public variables can be accessed from all modules. Public Serial1 As Serial End Sub Private Sub AppStart Serial1.Initialize(115200) Log("AppStart") End Sub #AutoFlushLogs: AutoFlushLogs: True assures that the Logs are sent without problems. AutoFlushLogs: False can lead to program crashes. #CheckArrayBounds: Checks the array bounds or not. #StackBufferSize: Sets the default Stack buffer size. Public Serial1 As Serial Defines the serial interface with the computer. Serial1.Initialize(115200) Initializes the serial port with a Baud rate of 115200 Hertz. Log("AppStart") Shows AppStart in the Logs Tab when the program starts. The Logs are explained in chapter Logs in the B4X IDE Booklet.
- 161. 5.7.1 Button.b4r 161 B4X Getting started 5.7.1 Button.b4r Let us write our first program. It’s similar to Erels Button example from the forum. It uses a pushbutton switch and the Led 13 on the Arduino UNO board. The project Button.b4r is available in the SourceCode folder. • Open B4R. • Save the project as Button in a folder with the name Button. • Build the board with the pushbutton and the wires. • Connect the Arduino to the PC. • Write the code. • Run the program. 5.7.1.1 Sketch Material: • 1 pushbutton switch Connect one Arduino GND (ground) pin to the ground GND line of the breadboard. Then connect one pin of the pushbutton switch to the ground line. And connect the other pin of the pushbutton to pin A5 of the Arduino analog pins. We could have connected the first pin of the pushbutton directly to the GDN pin of the Arduino, but the connection in the image is ready for the next examples. We could also have used one of the digital pins instead of the analog pin.
- 162. 5.7.1 Button.b4r 162 B4X Getting started 5.7.1.2 Code Sub Process_Globals Public Serial1 As Serial Private pinButton As Pin 'pin for the button Private pinLED13 As Pin 'pin for LED 13 on the Arduino End Sub We declare the pins for the pushbutton and the on board Led 13. Private Sub AppStart Serial1.Initialize(115200) Log("AppStart") pinButton.Initialize(pinButton.A5, pinButton.MODE_INPUT_PULLUP) 'Using the internal pull up resistor to prevent the pin from floating. pinButton.AddListener("pinButton_StateChanged") pinLED13.Initialize(13, pinLED13.MODE_OUTPUT) End Sub We initialize pinButton, as the analog pin A5, with pinButton.A5 and set the input mode to pinButton.MODE_INPUT_PULLUP. We need a pullup resistor to prevent the pin from floating, MODE_INPUT_PULLUP connects an internal pull up resistor. We add pinButton.AddListener("pinButton_StateChanged"), to generate a StateChanged event when the state of pin pinButton changes which means that the pushbutton is pressed or released. We initialize pinLED13, as the onboard Led as digital pin 13 and set the output mode to pinLED13.MODE_OUTPUT. Sub pinButton_StateChanged (State As Boolean) Log("State: ", State) 'state will be False when the button is clicked because of the PULLUP mode. pinLED13.DigitalWrite(Not(State)) End Sub We add a Log, Log("State: ", State), to display the state in the Logs. We write the State to the digital output of the on board led, pinLED13.DigitalWrite(Not(State)). We write Not(State) because State will be False when the pushbutton is pressed because of the PULLUP mode. Click on or press F5 to run the code. When you press the pushbutton, led 13 on the Arduino UNO will be ON and when you release the pushbutton led 13 will be OFF.
- 163. 5.7.2 LedGreen.b4r 163 B4X Getting started 5.7.2 LedGreen.b4r For this project we use a copy of the Button project. Create a new LedGreen folder, copy the files of the Button project and rename the Button.xxx files to LedGreen.xxx. We add a green Led which can be switched on and off with the button from the first example. The project LedGreen.b4r is available in the SourceCode folder. 5.7.2.1 Sketch Material: • 1 pushbutton switch • 1 green LED • 1 220 Ω resistor We keep the mounting of the pushbutton switch from the first example. One pin on the GND line of the breadboard. The other pin to A5 of the Arduino analog pins. And we - Add a green Led on the breadboard. - Connect the cathode (-) via a 220 Ω resistor to the ground GND line of the breadboard. - Connect the anode (+) to digital pin 7.
- 164. 5.7.2 LedGreen.b4r 164 B4X Getting started 5.7.2.2 Code Sub Process_Globals Public Serial1 As Serial Private pinButton As Pin 'pin for the button Private pinLEDGreen As Pin 'pin for the green Led Private LightOn = False As Boolean End Sub We keep the definition of pinButton. We change the definition Private pinLED13 As Pin to Private pinLEDGreen As Pin for the green Led We add a global boolean variable LightOn which is True when the light is ON. Private Sub AppStart Serial1.Initialize(115200) pinButton.Initialize(pinButton.A5, pinButton.MODE_INPUT_PULLUP) 'Using the internal pull up resistor to prevent the pin from floating. pinButton.AddListener("pinButton_StateChanged") pinLEDGreen.Initialize(7, pinLEDGreen.MODE_OUTPUT) End Sub We leave the code for pinButton. We initialize pinLEDGreen as digital pin 7 and set the output mode to pinLEDGreen.MODE_OUTPUT. Private Sub pinButton_StateChanged (State As Boolean) If State = False Then 'remember, False means button pressed. LightOn = Not(LightOn) pinLEDGreen.DigitalWrite(LightOn) End If End Sub Every time State is False, pushbutton pressed, we change the variable LightOn and write it to pinLEDGreen.
- 165. 5.7.3 LedGreenNoSwitchBounce.b4r 165 B4X Getting started 5.7.3 LedGreenNoSwitchBounce.b4r For this proejct we use exactly the same circuit as LedGreen.b4r. The only difference is in the code. The project LedGreenNoSwitchBounce.b4r is available in the SourceCode folder. The pushbutton switch we use in our projects has a problem called bouncing. The signal of a mecanical switch is not clean, the switch has several bounces which are interpreted by the the digital inputs as several state changes. If we have an even number of state changes it is similar to having done nothing. But we want only one state change per button press. Image of switch bouncing (source Wikipedia): The switch bounces between on and off several times before settling. To solve this problem we don’t react in the pinButton_StateChanged routine on state changes within a given time.
- 166. 5.7.3 LedGreenNoSwitchBounce.b4r 166 B4X Getting started 5.7.3.1 Sketch Material: • 1 pushbutton switch • 1 green LED • 1 220 Ω resistor We keep the mounting of the pushbutton switch from the first example. One pin on the GND line of the breadboard. The other pin to digital pin 7 on the Arduino. And we - Add a green Led on the breadboard. - Connect the cathode (-) via a 220 Ω resistor to the ground GND line of the breadboard. - Connect the anode (+) to digital pin 7.
- 167. 5.7.3 LedGreenNoSwitchBounce.b4r 167 B4X Getting started 5.7.3.2 Code The code is almost the same as LedGreen.b4r. Sub Process_Globals Public Serial1 As Serial Private pinButton As Pin 'pin for the button Private pinLEDGreen As Pin 'pin for the green Led Private LightOn = False As Boolean Private BounceTime As ULong Private BounceDelay = 10 As ULong End Sub We add two new variables: BounceTime and BounceDelay. Private Sub AppStart Serial1.Initialize(115200) 'Using the internal pull up resistor to prevent the pin from floating. pinButton.Initialize(pinButton.A5, pinButton.MODE_INPUT_PULLUP) pinButton.AddListener("pinButton_StateChanged") pinLEDGreen.Initialize(7, pinLEDGreen.MODE_OUTPUT) End Sub Same as LedGreen.b4r New pinButton_StateChanged routine: Private Sub pinButton_StateChanged (State As Boolean) If State = False Then 'remember, False means button pressed. If Millis - BounceTime < BounceDelay Then Return 'Return, bouncing Else LightOn = Not(LightOn) pinLEDGreen.DigitalWrite(LightOn) BounceTime = Millis 'reset BounceTime to current time End If End If End Sub Every time State is False, pushbutton pressed: • We check if the time between the current state change and the first state change. If the time is shorter than BounceDelay, which means a bounce, we do nothing. If the time is longer than BounceDelay, which means a real state change, we execute the code. • We change the variable LightOn and write it to pinLEDGreen. • Set the new BounceTime.
- 168. 5.7.4 TraficLight.b4r 168 B4X Getting started 5.7.4 TraficLight.b4r This project is an evolution of the LedGreen project and simulates traffic lights. We use a copy of the LedGreen project. Create a new TrafficLight folder, copy the files of the LedGreen project and rename the LedGreen.xxx files to TrafficLight.xxx. The lights can be switched on and off with the pushbutton switch from the previous examples. The timing for the change from red to green and green to red is managed with a Timer TimerGreenRed and the duration of the yellow light is managed with a second Timer TimerYellow. The project TrafficLight.b4r is available in the SourceCode folder. 5.7.4.1 Sketch Material: • 1 pushbutton switch • 1 green Led • 1 yellow Led • 1 red led • 3 220 Ω resistors We - add a yellow and a red Led similar to the green one. - connect the yellow led (+) to digital pin 8. - connect the red led (+) to digital pin 9.
- 169. 5.7.4 TraficLight.b4r 169 B4X Getting started 5.7.4.2 Code Sub Process_Globals Public Serial1 As Serial Private pinButton As Pin 'pin for the button Private pinLEDGreen, pinLEDYellow, pinLEDRed As Pin 'pins for the Leds Private TimerGreenRed, TimerYellow As Timer Private LightOn = False As Boolean Private LightGreen = False As Boolean Private BounceTime As ULong Private BounceDelay = 10 As ULong End Sub We declare the button and the three led Pins, the two Timers and two global variables LightOn and LightGreen. LightOn = False > light OFF LightGreen = True > green light ON Private Sub AppStart Serial1.Initialize(115200) TimerGreenRed.Initialize("TimerGreenRed_Tick", 2000) 'Using the internal pull up resistor to prevent the pin from floating. pinButton.Initialize(pinButton.A5, pinButton.MODE_INPUT_PULLUP) pinButton.AddListener("pinButton_StateChanged") pinLEDGreen.Initialize(7, pinLEDGreen.MODE_OUTPUT) pinLEDYellow.Initialize(8, pinLEDYellow.MODE_OUTPUT) pinLEDRed.Initialize(9, pinLEDRed.MODE_OUTPUT) End Sub We initialize TimerGreenRed with the Tick event ("TimerGreenRed_Tick" and an interval of 2000 which means that the Tick event is raised every 2 seconds (2000 milli seconds). We initialize TimerYellow with the Tick event ("TimerYellow_Tick" and an interval of 500 which means that the Tick event is raised every 0.5 second (500 milli seconds). We keep the code for the button and the green Led, initialize pinLEDYellow as digital pin 8 as output and initialize pinLEDRed as digital pin 9 as output.
- 170. 5.7.4 TraficLight.b4r 170 B4X Getting started The code is hopefully self-explanatory. Private Sub pinButton_StateChanged (State As Boolean) ' Log("State: ", State) 'Log the State value If State = False Then 'if State = False If Millis - BounceTime < BounceDelay Then Return Else pinLEDRed.DigitalWrite(True) 'switch ON the red LED LightOn = Not(LightOn) 'change the value of LightOn BounceTime = Millis ' Log("Light: ", LightOn) 'Log the LightOn value TimerGreenRed.Enabled = LightOn 'enable TimerGreenRed Timer If LightOn = False Then 'if LightOn = False pinLEDGreen.DigitalWrite(False) 'switch OFF LED Green pinLEDYellow.DigitalWrite(False) 'switch OFF LED Yellow pinLEDRed.DigitalWrite(False) 'switch OFF LED Red End If End If End If End Sub Private Sub TimerGreenRed_Tick If LightGreen = True Then 'if LightGreen = True ' Log("TimerGreenRed_Tick LightYellow") 'write the Log CallSubPlus("EndYellow", 500, 0) pinLEDGreen.DigitalWrite(False) 'switch OFF LED Green pinLEDYellow.DigitalWrite(True) 'switch ON LED Yellow LightGreen = False 'set LightGreen to False Else Log("TimerGreenRed_Tick LightGreen") 'write the Log pinLEDRed.DigitalWrite(False) 'switch OFF LED Red pinLEDGreen.DigitalWrite(True) 'switch ON LED Green LightGreen = True 'set LightGreen to True End If End Sub Private Sub EndYellow(Tag As Byte) ' Log("TimerYellow_Tick LightRed") 'write the Log ' Log(" ") pinLEDYellow.DigitalWrite(False) 'switch OFF LED Yellow pinLEDRed.DigitalWrite(True) 'switch ON LED Red End Sub We use the EndYellowNous routine to switch from the yellow light to the red light. This routine is called with the CallSubPlus keyword which allows to call a routine with a given delay. CallSubPlus("EndYellow", 500, 0) EndYellow = Name of the routine 500 = Delay, 0.5 seconde (500 milliseconds) 0 = Tag, not used in our case. We can switch ON or OFF the traffic lights with the pushbutton switch.