SlideShare a Scribd company logo
11
Most read
15
Most read
18
Most read
ETABS BASIC DESIGN
R. UDHAYASANKAR., M.E
sankarme7@gmail.com
7639444321,9597771821
Analysis and design of multistory building
SPACE FRAMED STRUCTURE
Rectangular section
G+4
Beam = 230*300 mm
Main beam = 230*450 mm
Column = 230*450 mm
Slab thickness = 200 mm
Wall thickness = 230 mm
Load = 3 kN/m
STEP 1
Open →The ETABS → Click → New Model
Model initialization
Click → Use built in setting with
Display Metric SI
Steel section data base Indian
Steel design code IS 800-2007
Concrete design code IS 456-2000
Click → Ok
STEP 2
Grid Dimension Plan
New model → quick templates
Number of Grid Lines X Direction = 5
Number of Grid Lines Y Direction = 5
Spacing of Grid X Direction = Uneven spacing
Spacing of Grid Y Direction = Uneven spacing
Click → Custom Gird Spacing
Edit Grid Data
Click → Display Grid Data
Grid IdX Spacing Grid IdY Spacing
A 3 1 4
B 4 2 3
C 4 3 3
D 4 4 3
E 0 5 0
→ OK
Story Dimension
Number of Stories = 5
Typical Story Height = 3
Bottom Story Height = 2
→ OK
STEP 3
• Material
• Property
• Support
• Load
• Analyses
Material
Add concrete material
Click→ Define → Material Property → Define Material→ Click → Add New Material Property
Region Indian
Material concrete
Standard Indian
Grade M 20
Ok→ Ok → Ok
Add Rebar Material (Reinforcement)
Click → Define → Material Property → Define Material → Click→ Add New Material → Add New
Material Property
Region Indian
Material Rebar
Standard Indian
Grade Fe 415
OK → OK → OK
Add Masonry (wall)
Click → Define → Material Property → Define Material → Click → Add New Material → Add New
Material Property
Region Indian
Material Masonry
Standard Indian
Grade -
OK → OK→ OK
Plinth Beam 230 X300
Property
Define → Section Properties → Frame Section → Frame Properties → Add New Material →
Concrete → Click → Rectangle Frame Section
Property data
Property name = Beam 230 *300
Material = M20
Section dimension
Depth D= 300 mm
Width B= 230 mm
Click → Reinforcement → Click
Modify show rebar
Design type
Click→ m3 design only (beam)
Rebar material
Longitudinal bar = Fe 415
Conferment tiles = Fe 415
Cover to longitudinal rebar cover
Top bar = 41 mm
Bottom bar = 41 mm
Ok→ Ok → Ok
Main Beam 230 X 450
Property
Define → Section Properties → Frame Section → Frame Properties → Add New Material →
Concrete → Click → Rectangle Frame Section
Property data
Property name = Beam 230 *450
Material = M20
Section dimension
Depth D= 450 mm
Width B= 230 mm
Click → Reinforcement → Click
Modify show rebar
Design type
Click→ m3 design only (beam)
Rebar material
Longitudinal bar = Fe 415
Conferment tiles = Fe 415
Cover to longitudinal rebar cover
Top bar = 41 mm
Bottom bar = 41 mm
Ok→ Ok → Ok
COLUMN 230 X 450
Property
Define → Section Properties → Frame Section → Frame Properties → Add New Material →
Concrete → Click → Rectangle Frame Section
Property data
Property name = Column 230 *450
Material = M20
Section dimension
Depth D= 450 mm
Width B= 230 mm
Click → Reinforcement → Click
Modify show rebar
Design type
Click→ m3 design only (Column)
Rebar material
Longitudinal bar = Fe 415
Conferment tiles = Fe 415
Ok→ Ok → Ok
SLAB 200
SLAB PROPERTY
SLAB
Define → Section Property → Slab Section → Add New Property
Property Name Slab 200
Slab Material M20
Modeling Type Shell Thick
Thickness 200 mm
Ok→ Ok
WALL 230
WALL PROPERTY
WALL
Define → Section Property → Wall Section → Add New Property
Property Name Wall 230
Wall Material Masonry
Modeling Type Shell Thick
Thickness 230 Mm
Ok → Ok
STEP 5
• Draw Beam
• Draw Column
• Draw Slab
• Draw Wall
Draw the Beam B1 PLINTH BEAM
Change the Plan View
Click → View → Click→ Set Plan View → Story 1→ Ok (Z = 2m)
Click → Draw→ Draw Beam → Click Quick Draw Beam
Properties of Object
Property Select Beam → 230 *300 → Ok
Draw the Beam B2 MAIN BEAM
Click →View→ Click Set Plan View → Story 1→ Ok (Z = M)
Click → All Story
Click → Draw→ Draw Beam → Click Quick Draw Beam
Properties of Object
Property select beam → 230 *450 →ok
Draw the column
Click →All Stories
Click→ Draw Column → Quick Draw Column
Property →230 X 450 → Ok
Draw Slab
Click→ All Story
Click → Draw → Draw Floor → Click → Quick Draw Floor
Properties of Object
Property → Select → Slab → 200
Draw Wall
Click→ All Story
Click →Draw→ Draw Wall→ Click → Quick Draw Wall
Properties of Object
Property →select → wall 230
How Cut the Wall
Click→ Draw Wall→ Draw Wall Opening
Click → Wall Double→ Click Draw
STEP 6
Support
Select the node a point
Select→ Assign→ Joint→ Restraint → Select→ Fixed→ Ok
STEP 7
CRETE THE C.G OF THE BUILDING
Select → Whole Building
Click→ Assign → Shell → Diaphragms → D1 → OK
CLICK
• LOADS
• DEAD LOAD
• LIVE LOAD
• WIND LOAD
• EARTHQUCK LOAD
LIVE LOAD
Select All Floor Slab
Click→ Select → Select→ Properties Slab → Section → Select → Slab 200 Select → Close
Apply→ Live Load on Slab
Assign → Shell→ Loads → Uniform
Load Pattern →
Name Live Load
Load 3 kN/mm2
→ Ok
Apply Wind and Earthquake Load
Wind Force
Define Load Pattern
Define Wind Load
Load Wind Load
Self- 0
Auto Lateral Load Is 875 Add New Load
Click → The Load →Click Modify → Lateral Load
→ Ok
Earthquake load
Define EQ
Load Seismic
Self 0
Auto Lateral Load Is 1983 2002 Add New Load
Click The Load → Click → Modify Lateral Load
→ Ok
→ Ok
Load combination
Define load combination ADD new load
Combo 1
Dead Load 1.5→ Add
Live Load 1.5 →Add
Wind Load 1.2→ Add
Seismic Load 1.2 → Add
→ Ok
→ Ok → ok
STEP 8
Analyze
Select→ Analyze → Run analyze
STEP 9
Click →Display →Force Stress→ Diagram Fram /Pier
Select → LIVE LOAD
Shear force shear 2-2
Bending moment 3-3
Display option
Click → show value at controlling stations on diagrams
→ OK
Joint Reaction
Click → Display → Force /Stress Diagram →Supporting Spring Reaction → Select Load → Dead
or Live
→ Ok ‘
→ Ok ‘
→ Numerical Value
Select →Display→ Show Table→ Click→ Analysis →Ok

More Related Content

PPTX
PDF
How to model and analyse structures using etabs
PPTX
Etabs BY Subash Pathak
PDF
Etabs presentation
PDF
Book for Beginners, RCC Design by ETABS
PPTX
Design and Analysis of Building using Etabs
PDF
Etabs tutorial
PDF
Etabs steel-design
How to model and analyse structures using etabs
Etabs BY Subash Pathak
Etabs presentation
Book for Beginners, RCC Design by ETABS
Design and Analysis of Building using Etabs
Etabs tutorial
Etabs steel-design

What's hot (20)

PDF
Analysis and design of multi-storey building using staad.Pro
PPT
Design and analasys of a g+3 residential building using staad
PPT
Design of footing as per IS 456-2000
PPTX
residential buliding by stadd pro
PPSX
PPTX
Loads and forces
PDF
Etabs notes-pdf
PPTX
Design of R.C.C Beam
PPT
Limit state method
PPTX
staad pro
PPTX
Isolated column footing
PDF
EFFECT OF SHAPE OF TALL BUILDINGS SUBJECTED TO WIND LOADING
PPTX
ANALYSIS AND DESIGN OF HIGH RISE BUILDING BY USING ETABS
PPTX
Analysis of g+3 rcc storied building
PPTX
Design Of Continuous Beams 30_8.pptx
PPTX
Design of multistorey building
PDF
Etabs example-rc building seismic load response-
PPTX
post tensioning slabs
PPTX
Internship review (Civil Engineering)
Analysis and design of multi-storey building using staad.Pro
Design and analasys of a g+3 residential building using staad
Design of footing as per IS 456-2000
residential buliding by stadd pro
Loads and forces
Etabs notes-pdf
Design of R.C.C Beam
Limit state method
staad pro
Isolated column footing
EFFECT OF SHAPE OF TALL BUILDINGS SUBJECTED TO WIND LOADING
ANALYSIS AND DESIGN OF HIGH RISE BUILDING BY USING ETABS
Analysis of g+3 rcc storied building
Design Of Continuous Beams 30_8.pptx
Design of multistorey building
Etabs example-rc building seismic load response-
post tensioning slabs
Internship review (Civil Engineering)
Ad

Similar to ETABS BASIC DESIGN (20)

PPTX
Modelling for etab and design on etabs for concrete
PPTX
etab modelling and design of concrete elemnts
PDF
IRJET- Analysis and Design of Multistorey Building (G+3) by using ETABS Software
PPTX
Modeling the Building.pptx
PDF
Analysis, Design and Estimation of Basement +G+2 Residential Building
PDF
Analysis of earthquake resisting building with Shear wall using ETABS Software
PDF
Modeling seismic analysis_and_design_of_rc_building_10_story
PPTX
etabsresidential-191005160917-converted.pptx
DOC
Structurala Analysis Report
PDF
IRJET- Planning, Design and Analysis of G+3 Hospital Building Provided with G...
PPTX
gradution_presentation-gradution_presentation.pptx
PDF
FYP Structure.pdf
DOC
Building model-sap2000-tutorial-guide
PPT
36405231_seismic_design_steps_153.ppt
PPT
SEISMIC DESIGN STEPS.ppt
PPT
Seismic design steps
PDF
579040435-Mini-Project-Analysis-of-Residential-Building-Using-ETABS.pdf
PPTX
188.pptx
PPTX
planning and designing of three storied residential building
PPTX
Analysis and design of residential building
Modelling for etab and design on etabs for concrete
etab modelling and design of concrete elemnts
IRJET- Analysis and Design of Multistorey Building (G+3) by using ETABS Software
Modeling the Building.pptx
Analysis, Design and Estimation of Basement +G+2 Residential Building
Analysis of earthquake resisting building with Shear wall using ETABS Software
Modeling seismic analysis_and_design_of_rc_building_10_story
etabsresidential-191005160917-converted.pptx
Structurala Analysis Report
IRJET- Planning, Design and Analysis of G+3 Hospital Building Provided with G...
gradution_presentation-gradution_presentation.pptx
FYP Structure.pdf
Building model-sap2000-tutorial-guide
36405231_seismic_design_steps_153.ppt
SEISMIC DESIGN STEPS.ppt
Seismic design steps
579040435-Mini-Project-Analysis-of-Residential-Building-Using-ETABS.pdf
188.pptx
planning and designing of three storied residential building
Analysis and design of residential building
Ad

Recently uploaded (20)

PDF
PPT on Performance Review to get promotions
PDF
Arduino robotics embedded978-1-4302-3184-4.pdf
PPTX
UNIT 4 Total Quality Management .pptx
PDF
Well-logging-methods_new................
PPTX
Lesson 3_Tessellation.pptx finite Mathematics
PPTX
Construction Project Organization Group 2.pptx
PDF
BMEC211 - INTRODUCTION TO MECHATRONICS-1.pdf
PDF
Mitigating Risks through Effective Management for Enhancing Organizational Pe...
DOCX
573137875-Attendance-Management-System-original
PPTX
CYBER-CRIMES AND SECURITY A guide to understanding
PPTX
OOP with Java - Java Introduction (Basics)
PPTX
additive manufacturing of ss316l using mig welding
PPTX
IOT PPTs Week 10 Lecture Material.pptx of NPTEL Smart Cities contd
PPTX
MCN 401 KTU-2019-PPE KITS-MODULE 2.pptx
PPTX
MET 305 2019 SCHEME MODULE 2 COMPLETE.pptx
PDF
Structs to JSON How Go Powers REST APIs.pdf
PPT
Mechanical Engineering MATERIALS Selection
PPTX
Sustainable Sites - Green Building Construction
PPTX
Foundation to blockchain - A guide to Blockchain Tech
PDF
composite construction of structures.pdf
PPT on Performance Review to get promotions
Arduino robotics embedded978-1-4302-3184-4.pdf
UNIT 4 Total Quality Management .pptx
Well-logging-methods_new................
Lesson 3_Tessellation.pptx finite Mathematics
Construction Project Organization Group 2.pptx
BMEC211 - INTRODUCTION TO MECHATRONICS-1.pdf
Mitigating Risks through Effective Management for Enhancing Organizational Pe...
573137875-Attendance-Management-System-original
CYBER-CRIMES AND SECURITY A guide to understanding
OOP with Java - Java Introduction (Basics)
additive manufacturing of ss316l using mig welding
IOT PPTs Week 10 Lecture Material.pptx of NPTEL Smart Cities contd
MCN 401 KTU-2019-PPE KITS-MODULE 2.pptx
MET 305 2019 SCHEME MODULE 2 COMPLETE.pptx
Structs to JSON How Go Powers REST APIs.pdf
Mechanical Engineering MATERIALS Selection
Sustainable Sites - Green Building Construction
Foundation to blockchain - A guide to Blockchain Tech
composite construction of structures.pdf

ETABS BASIC DESIGN

  • 1. ETABS BASIC DESIGN R. UDHAYASANKAR., M.E sankarme7@gmail.com 7639444321,9597771821 Analysis and design of multistory building
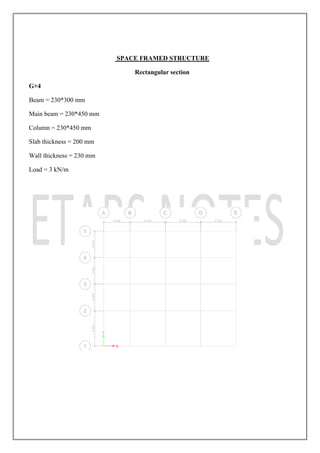
  • 2. SPACE FRAMED STRUCTURE Rectangular section G+4 Beam = 230*300 mm Main beam = 230*450 mm Column = 230*450 mm Slab thickness = 200 mm Wall thickness = 230 mm Load = 3 kN/m
  • 3. STEP 1 Open →The ETABS → Click → New Model Model initialization Click → Use built in setting with Display Metric SI Steel section data base Indian Steel design code IS 800-2007 Concrete design code IS 456-2000 Click → Ok STEP 2 Grid Dimension Plan New model → quick templates Number of Grid Lines X Direction = 5 Number of Grid Lines Y Direction = 5 Spacing of Grid X Direction = Uneven spacing Spacing of Grid Y Direction = Uneven spacing Click → Custom Gird Spacing
  • 4. Edit Grid Data Click → Display Grid Data Grid IdX Spacing Grid IdY Spacing A 3 1 4 B 4 2 3 C 4 3 3 D 4 4 3 E 0 5 0 → OK Story Dimension Number of Stories = 5 Typical Story Height = 3 Bottom Story Height = 2 → OK
  • 5. STEP 3 • Material • Property • Support • Load • Analyses Material Add concrete material Click→ Define → Material Property → Define Material→ Click → Add New Material Property Region Indian Material concrete Standard Indian Grade M 20 Ok→ Ok → Ok Add Rebar Material (Reinforcement) Click → Define → Material Property → Define Material → Click→ Add New Material → Add New Material Property Region Indian Material Rebar Standard Indian Grade Fe 415
  • 6. OK → OK → OK Add Masonry (wall) Click → Define → Material Property → Define Material → Click → Add New Material → Add New Material Property Region Indian Material Masonry Standard Indian Grade - OK → OK→ OK Plinth Beam 230 X300 Property Define → Section Properties → Frame Section → Frame Properties → Add New Material → Concrete → Click → Rectangle Frame Section Property data Property name = Beam 230 *300 Material = M20 Section dimension Depth D= 300 mm Width B= 230 mm Click → Reinforcement → Click Modify show rebar Design type Click→ m3 design only (beam) Rebar material Longitudinal bar = Fe 415 Conferment tiles = Fe 415 Cover to longitudinal rebar cover Top bar = 41 mm
  • 7. Bottom bar = 41 mm Ok→ Ok → Ok Main Beam 230 X 450 Property Define → Section Properties → Frame Section → Frame Properties → Add New Material → Concrete → Click → Rectangle Frame Section Property data Property name = Beam 230 *450 Material = M20 Section dimension Depth D= 450 mm Width B= 230 mm Click → Reinforcement → Click Modify show rebar Design type Click→ m3 design only (beam) Rebar material Longitudinal bar = Fe 415 Conferment tiles = Fe 415 Cover to longitudinal rebar cover Top bar = 41 mm Bottom bar = 41 mm Ok→ Ok → Ok COLUMN 230 X 450 Property Define → Section Properties → Frame Section → Frame Properties → Add New Material → Concrete → Click → Rectangle Frame Section Property data
  • 8. Property name = Column 230 *450 Material = M20 Section dimension Depth D= 450 mm Width B= 230 mm Click → Reinforcement → Click Modify show rebar Design type Click→ m3 design only (Column) Rebar material Longitudinal bar = Fe 415 Conferment tiles = Fe 415 Ok→ Ok → Ok
  • 9. SLAB 200 SLAB PROPERTY SLAB Define → Section Property → Slab Section → Add New Property Property Name Slab 200 Slab Material M20 Modeling Type Shell Thick Thickness 200 mm Ok→ Ok
  • 10. WALL 230 WALL PROPERTY WALL Define → Section Property → Wall Section → Add New Property Property Name Wall 230 Wall Material Masonry Modeling Type Shell Thick Thickness 230 Mm Ok → Ok
  • 11. STEP 5 • Draw Beam • Draw Column • Draw Slab • Draw Wall Draw the Beam B1 PLINTH BEAM Change the Plan View Click → View → Click→ Set Plan View → Story 1→ Ok (Z = 2m) Click → Draw→ Draw Beam → Click Quick Draw Beam Properties of Object Property Select Beam → 230 *300 → Ok Draw the Beam B2 MAIN BEAM Click →View→ Click Set Plan View → Story 1→ Ok (Z = M) Click → All Story Click → Draw→ Draw Beam → Click Quick Draw Beam Properties of Object
  • 12. Property select beam → 230 *450 →ok Draw the column Click →All Stories Click→ Draw Column → Quick Draw Column Property →230 X 450 → Ok Draw Slab Click→ All Story Click → Draw → Draw Floor → Click → Quick Draw Floor Properties of Object Property → Select → Slab → 200 Draw Wall Click→ All Story
  • 13. Click →Draw→ Draw Wall→ Click → Quick Draw Wall Properties of Object Property →select → wall 230 How Cut the Wall Click→ Draw Wall→ Draw Wall Opening Click → Wall Double→ Click Draw STEP 6 Support Select the node a point
  • 14. Select→ Assign→ Joint→ Restraint → Select→ Fixed→ Ok STEP 7 CRETE THE C.G OF THE BUILDING Select → Whole Building Click→ Assign → Shell → Diaphragms → D1 → OK CLICK • LOADS • DEAD LOAD • LIVE LOAD • WIND LOAD
  • 15. • EARTHQUCK LOAD LIVE LOAD Select All Floor Slab Click→ Select → Select→ Properties Slab → Section → Select → Slab 200 Select → Close Apply→ Live Load on Slab Assign → Shell→ Loads → Uniform Load Pattern → Name Live Load Load 3 kN/mm2 → Ok Apply Wind and Earthquake Load Wind Force Define Load Pattern Define Wind Load Load Wind Load Self- 0 Auto Lateral Load Is 875 Add New Load Click → The Load →Click Modify → Lateral Load
  • 16. → Ok Earthquake load Define EQ Load Seismic Self 0 Auto Lateral Load Is 1983 2002 Add New Load Click The Load → Click → Modify Lateral Load → Ok
  • 17. → Ok Load combination Define load combination ADD new load Combo 1 Dead Load 1.5→ Add Live Load 1.5 →Add Wind Load 1.2→ Add Seismic Load 1.2 → Add → Ok → Ok → ok STEP 8 Analyze
  • 18. Select→ Analyze → Run analyze STEP 9 Click →Display →Force Stress→ Diagram Fram /Pier Select → LIVE LOAD Shear force shear 2-2 Bending moment 3-3 Display option Click → show value at controlling stations on diagrams → OK Joint Reaction Click → Display → Force /Stress Diagram →Supporting Spring Reaction → Select Load → Dead or Live → Ok ‘ → Ok ‘ → Numerical Value Select →Display→ Show Table→ Click→ Analysis →Ok