To Create a component.
Enter Tcode bsp_wd_cmpwb
In the component screen enter a name and click on create.


Click on OK
And then press enter until we get this screen
Right click on view and select create following screen appear
Click on continue
Enter a name for the view and click continue
Enter continue
Now this screen appears
Enter a value node name and click continue
This screen appears click continue
This screen appears
Click on add button this screen appears
Select the table u want to use for this context node
Select the field u want to use and click ok then this screen appears
Click on continue this screen appears
This screen appears
Select empty view and click continue this screen appears
Click on complete this screen appears
Click on enter
Now click on view this screen appears
Click on the HTML part

And paste this code

<%@page language="abap" %>
<%@extension name="chtmlb" prefix="chtmlb" %>
<%@extension name="thtmlb" prefix="thtmlb" %>

<%
     data: lv_xml type string.
     lv_xml = controller->CONFIGURATION_DESCR->GET_CONFIG_DATA( ).
     %>

<chtmlb:config xml = "<%= lv_xml %>"
                      mode = "RUNTIME" />


Save it check it activate it.
Now double click on the view this screen appears
Note the page preview tab is changed to configuration

Now again go on view and right click and select create overview page this page appears
Enter a name and then click ok this page appears (below)
Click on enter until this page appears
Goto runtime repository editor
Right Click on viewsets and choose add view set.
Select the overview page and click ok this screen appears
Now right click the view set and add View area this screen appears
Now enter this hardcoded value OverviewPage this screen appears
Now right click on view area overview page and select add view like this
This screen appears select the view and click ox
Now right click on window and select add view like this
Now add the overview page and click ok like this
Save and Check
Now click on the view and configuration tab, this screen appears
Select show available fields this screen appears
Now select the field u want to add and click on add button the screen will appear like this
Now save it
Now go to overview page inside the window and configuration tab, this screen appears
Click on continue this screen appears
Add to displayed assignment blocks it will appear like this and click on save
Now select the load option as you wish and save it.
Now component is created with a view and overview page and a window is assigned.
How to make LOV
       Now if u want to make any field as drop down then go to browser component structure
       Select any attribute like I m selecting zgender this screen appears


Double Click on get_v_zgender and create the object like this
Now paste this code

   DATA : lt_ddlb TYPE bsp_wd_dropdown_table,
       wa_ddlb like line of lt_ddlb.
wa_ddlb-key = 'M'.
wa_ddlb-value = 'MALE'.
append wa_ddlb to lt_ddlb.

wa_ddlb-key = 'F'.
wa_ddlb-value = 'FEMALE'.
append wa_ddlb to lt_ddlb.


 IF gr_ddlb is not bound.

  CREATE OBJECT gr_ddlb EXPORTING iv_source_type = 'T'.

endif.
IF gr_ddlb is       bound.


gr_ddlb->set_selection_table( it_selection_table = lt_ddlb ).

ENDIF.

  rv_valuehelp_descriptor = gr_ddlb.
Save it.
Goto the node class and in the attribute tab enter

GR_DDLB         Instance Attribute      Public Type Ref To   CL_CRM_UIU_DDLB


And the activateget_v_zgender
Double Click on get_p_zgender and create similarly as get_v_zgender
Now paste this code and save and activate it.
CASE iv_property.
   WHEN if_bsp_wd_model_setter_getter~fp_fieldtype.
         rv_value = cl_bsp_dlc_view_descriptor=>field_type_picklist.
                 WHEN if_bsp_wd_model_setter_getter=>fp_server_event.
       rv_value = 'DUMMY'.

   ENDCASE.

    How to disable & enable a field

    To disable a field go to get_i_field comment the whole code and paste
     rv_disabled = 'TRUE'.
    Save it and activate it.


    To change any property of the attributes go to run time repository and select field and click on
    show field properties change and click apply as shown below and then save.


To run first click on test .

More Related Content

DOCX
6.develop a synchronous service for caliculation of factorial of a given number
ODP
Wellrailed - Cucumber tips
PPTX
Javascript
PPSX
Techcamp aavn-chanh pham
PDF
NSSF - Alcon case: Justice Katureebe - Judgement
PPTX
Windows 8 overview PPT
PDF
PRESS STATEMENT: NSSF's Response To Press Reports on IGG Investigation
PPTX
Motivation quotes
6.develop a synchronous service for caliculation of factorial of a given number
Wellrailed - Cucumber tips
Javascript
Techcamp aavn-chanh pham
NSSF - Alcon case: Justice Katureebe - Judgement
Windows 8 overview PPT
PRESS STATEMENT: NSSF's Response To Press Reports on IGG Investigation
Motivation quotes

Viewers also liked (10)

PPTX
NSSF Pays January 2013 - March 2013 Report
PPTX
Actividad 3 Jose Monge
PDF
NSSF - Aclon case: Chief Justice Odoki - Judgement
DOC
SARAVANAN_RESUME
PPTX
NSSF Pays: Q2 October - December 2012 Report
DOCX
NSSF Wins Supreme Court Appeal Against Alcon International
PPTX
NSSF Pays: Q1 July - September 2012 Report
PDF
Guide For Members: All About NSSF
PPTX
El atletismo power point
PPTX
Why NSSF Declared interest rate of 11.23% for Financial Year 2012/13: Facts &...
NSSF Pays January 2013 - March 2013 Report
Actividad 3 Jose Monge
NSSF - Aclon case: Chief Justice Odoki - Judgement
SARAVANAN_RESUME
NSSF Pays: Q2 October - December 2012 Report
NSSF Wins Supreme Court Appeal Against Alcon International
NSSF Pays: Q1 July - September 2012 Report
Guide For Members: All About NSSF
El atletismo power point
Why NSSF Declared interest rate of 11.23% for Financial Year 2012/13: Facts &...
Ad

Similar to How to create a component and view (20)

DOC
Open microsoft visual studio/tutorialoutlet
DOC
Cis407 a ilab 3 web application development devry university
PPTX
KP Salesforce PPT Part I.pptx
PDF
Sap ps training material
PDF
SAP Training ( PS , Material PR , Service PR ,Cost Planning , Budgeting , PO...
DOCX
Previous weeks work has been uploaded as well as any other pieces ne.docx
DOCX
CIS407AWk2iLabDefault.aspx Greetings and Salutations.docx
PDF
Sales force class-3
PDF
Web-First Design Patterns
DOC
Creating a dot netnuke
DOCX
PPTX
Introduction to HTML+CSS+Javascript.pptx
PDF
WEBDYPRO ABAP WITH DETAILED NOTES
PDF
Gokul bok
DOCX
Cis 407 i lab 4 of 7
PPTX
Bootstrap 4 ppt
PDF
Rc085 010d-vaadin7
PDF
Oracle ADF 11g Tutorial
PDF
Tutorial on how to load images in crystal reports dynamically using visual ba...
Open microsoft visual studio/tutorialoutlet
Cis407 a ilab 3 web application development devry university
KP Salesforce PPT Part I.pptx
Sap ps training material
SAP Training ( PS , Material PR , Service PR ,Cost Planning , Budgeting , PO...
Previous weeks work has been uploaded as well as any other pieces ne.docx
CIS407AWk2iLabDefault.aspx Greetings and Salutations.docx
Sales force class-3
Web-First Design Patterns
Creating a dot netnuke
Introduction to HTML+CSS+Javascript.pptx
WEBDYPRO ABAP WITH DETAILED NOTES
Gokul bok
Cis 407 i lab 4 of 7
Bootstrap 4 ppt
Rc085 010d-vaadin7
Oracle ADF 11g Tutorial
Tutorial on how to load images in crystal reports dynamically using visual ba...
Ad

How to create a component and view

  • 1. To Create a component. Enter Tcode bsp_wd_cmpwb In the component screen enter a name and click on create. Click on OK And then press enter until we get this screen
  • 2. Right click on view and select create following screen appear
  • 4. Enter a name for the view and click continue
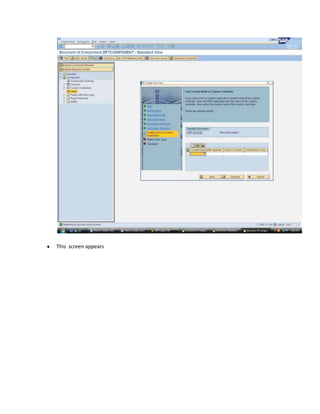
  • 5. Enter continue Now this screen appears
  • 6. Enter a value node name and click continue This screen appears click continue
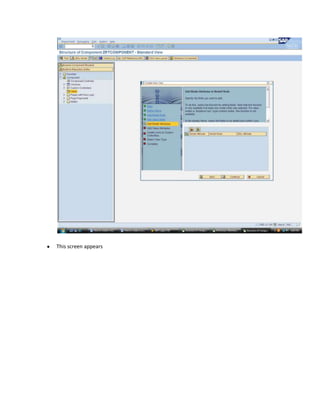
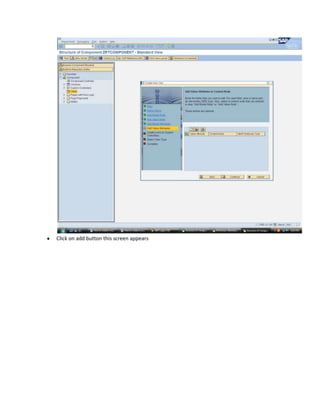
  • 8. Click on add button this screen appears
  • 9. Select the table u want to use for this context node Select the field u want to use and click ok then this screen appears
  • 10. Click on continue this screen appears
  • 12. Select empty view and click continue this screen appears
  • 13. Click on complete this screen appears
  • 14. Click on enter Now click on view this screen appears
  • 15. Click on the HTML part And paste this code <%@page language="abap" %> <%@extension name="chtmlb" prefix="chtmlb" %> <%@extension name="thtmlb" prefix="thtmlb" %> <% data: lv_xml type string. lv_xml = controller->CONFIGURATION_DESCR->GET_CONFIG_DATA( ). %> <chtmlb:config xml = "<%= lv_xml %>" mode = "RUNTIME" /> Save it check it activate it. Now double click on the view this screen appears
  • 16. Note the page preview tab is changed to configuration Now again go on view and right click and select create overview page this page appears
  • 17. Enter a name and then click ok this page appears (below)
  • 18. Click on enter until this page appears
  • 19. Goto runtime repository editor Right Click on viewsets and choose add view set.
  • 20. Select the overview page and click ok this screen appears
  • 21. Now right click the view set and add View area this screen appears
  • 22. Now enter this hardcoded value OverviewPage this screen appears
  • 23. Now right click on view area overview page and select add view like this
  • 24. This screen appears select the view and click ox
  • 25. Now right click on window and select add view like this
  • 26. Now add the overview page and click ok like this
  • 27. Save and Check Now click on the view and configuration tab, this screen appears
  • 28. Select show available fields this screen appears
  • 29. Now select the field u want to add and click on add button the screen will appear like this
  • 30. Now save it Now go to overview page inside the window and configuration tab, this screen appears
  • 31. Click on continue this screen appears
  • 32. Add to displayed assignment blocks it will appear like this and click on save
  • 33. Now select the load option as you wish and save it. Now component is created with a view and overview page and a window is assigned.
  • 34. How to make LOV Now if u want to make any field as drop down then go to browser component structure Select any attribute like I m selecting zgender this screen appears Double Click on get_v_zgender and create the object like this
  • 35. Now paste this code DATA : lt_ddlb TYPE bsp_wd_dropdown_table, wa_ddlb like line of lt_ddlb. wa_ddlb-key = 'M'. wa_ddlb-value = 'MALE'. append wa_ddlb to lt_ddlb. wa_ddlb-key = 'F'. wa_ddlb-value = 'FEMALE'. append wa_ddlb to lt_ddlb. IF gr_ddlb is not bound. CREATE OBJECT gr_ddlb EXPORTING iv_source_type = 'T'. endif.
  • 36. IF gr_ddlb is bound. gr_ddlb->set_selection_table( it_selection_table = lt_ddlb ). ENDIF. rv_valuehelp_descriptor = gr_ddlb. Save it. Goto the node class and in the attribute tab enter GR_DDLB Instance Attribute Public Type Ref To CL_CRM_UIU_DDLB And the activateget_v_zgender Double Click on get_p_zgender and create similarly as get_v_zgender Now paste this code and save and activate it.
  • 37. CASE iv_property. WHEN if_bsp_wd_model_setter_getter~fp_fieldtype. rv_value = cl_bsp_dlc_view_descriptor=>field_type_picklist. WHEN if_bsp_wd_model_setter_getter=>fp_server_event. rv_value = 'DUMMY'. ENDCASE. How to disable & enable a field To disable a field go to get_i_field comment the whole code and paste rv_disabled = 'TRUE'. Save it and activate it. To change any property of the attributes go to run time repository and select field and click on show field properties change and click apply as shown below and then save. To run first click on test .