SlideShare a Scribd company logo
Solaris Common Desktop Environment Working Effectively and Smartly © Mustafa Golam,2007
We Assume: you can !!! Mouse Skills : Click Double-Click Drag Duplicate Desktop Workspaces © Mustafa Golam,2007
Layout Of the Course © Mustafa Golam,2007
CDE Desktop © Mustafa Golam,2007
Location of File Subpanel © Mustafa Golam,2007
File Manager © Mustafa Golam,2007
Common File Manager Tasks find a file carry out an action on a file print a file access a floppy diskette or CD-ROM Deleting Files © Mustafa Golam,2007
Running Applications From Front Panel and the Workspace menu From Application Manager. By dropping files or data on their drop zones From Terminal emulator windows  From File Manager application © Mustafa Golam,2007
Front Panel and Application Manager © Mustafa Golam,2007
Running Applications from Drop Zones  on the Front Panel Certain controls on the Front Panel—such as the Printer, Mailer and Web Browser controls—act as drop zones that activate the relevant application when you drag and drop appropriate text or files on them. For example, if you drop a file on the Mailer control, Mailer displays a New Message window with the file attached to the new message. © Mustafa Golam,2007
Running Applications from File Manager You can run an application by clicking its application icon in a File Manager window. For example, you can run Image Viewer by clicking the file SDTimage in the folder /var/dt/appconfig/appmanager/ user-hostname-0 /Desktop_Apps/ where  user-hostname-0  is a folder specific to your user ID. If an application uses data files, it may be configured so that the application can be started from File Manager by clicking one of its data files. For example, double-clicking a bitmap file (a file whose name ends with .bm) runs Icon Editor. © Mustafa Golam,2007
Running Applications from a Terminal Emulator Window A terminal emulator is an application whose window provides a command-line interface to your system—for example, operating system commands, script names, or commands that run applications. All applications have a command that you can type to start them. The application’s documentation usually describes how to use the command. The desktop provides a terminal emulator called  dtterm . Your system may include other terminal emulators.  To open a terminal emulator window, click the This Host control in the Hosts subpanel. © Mustafa Golam,2007
Working with Windows © Mustafa Golam,2007
To Open an Application Window (Mouse) Click the application’s control in the Front Panel. Or,  from within Application Manager, double-click the application’s icon. Or,  from within Application Manager, double-click the application’s icon. Or,  from the Workspace Programs submenu, choose the item with the application name. You can also select an icon in a File Manager or Application Manager window by clicking it and then choose an action for the selected icon from the Selected menu. © Mustafa Golam,2007
To Open an Application Window (Keyboard) From the Front Panel: 1. Press Alt+Tab to move the keyboard focus to the Front Panel. 2. Press the arrow keys to move the highlight within the Front Panel and select a control. 3. Press Spacebar or Return to choose the control and open the application’s window. © Mustafa Golam,2007
To Turn a Window into an Icon (Keyboard) 1. Press Alt+Spacebar to display the Window menu. 2. Choose Minimize: Press Down Arrow until you select Minimize, then press Return. Or , press N, the menu’s mnemonic for Minimize. © Mustafa Golam,2007
Stretch and Shrinking  Windows © Mustafa Golam,2007
To Move a Window or Icon to the Foreground or Background (Keyboard) To bring the bottom window or icon in a workspace forward, press Alt+Up Arrow. To place the top window in the background, press Alt+Down Arrow. To cycle through and select the windows and icons in a workspace, press Alt+Tab or Alt+Esc. To cycle through and select the windows and icons in reverse order, press Shift+Alt+Tab or Shift+Alt+Esc. © Mustafa Golam,2007
Copying and Pasting Text into Windows To Select the Text To Be Copied 1. Move the pointer to the start of the text to be pasted. 2. Drag to the end of the text to be pasted, then release the mouse button, leaving the text highlighted. To Paste Text 1. Place the text insertion cursor in the target location. 2. Click mouse button 2 to paste the text. Note –  To deselect text, click in an empty area of the window that has the text selected, or press Esc. © Mustafa Golam,2007
Using Workspaces Workspaces are like separate screens or windows. To help organize your desktop, you can have separate workspaces for different groups of related tasks.  For example, a workspace you’ve named Reports could contain the tools you use to prepare reports, such as a spreadsheet, desktop publisher, and graphics applications.  You might set up other workspaces according to your projects. © Mustafa Golam,2007
Workspaces To Display Another Workspace (Mouse) To Display Another Workspace (Keyboard) To Place a Window in Other Workspaces (Mouse) To Place a Window in Other Workspaces (Keyboard) To Rename a Workspace (Mouse) To Rename a Workspace (Keyboard) © Mustafa Golam,2007
Using Menus © Mustafa Golam,2007
Window Menu © Mustafa Golam,2007
Workspace menu © Mustafa Golam,2007
Using Tear-Off Menus In some applications such as Mailer and Calendar, you can “tear off” a menu, which keeps it open on your desktop for repeated use. You can recognize the availability of a tear-off menu by the appearance of a dotted line at the top of the menu. © Mustafa Golam,2007
Basic Keyboard Skills You can perform desktop tasks using your keyboard instead of your mouse. When you use your keyboard for desktop navigation, note the following: The Alt key is the same as the Extend char key on some keyboards Return is the same as Enter on some keyboards Pressing Esc halts most interactive operations In Style Manager, the Window Behavior setting must be Click In Window To Make Active (this is the default value) Keyboard focus uses the highlight to show you which element of a window, menu, or control will respond to your input. To activate a selected menu item or control (such as a button), press the Spacebar. © Mustafa Golam,2007
Basic Keyboard Skills  (continued) To move the highlight to the next window: Press Alt+Tab. To move the keyboard highlight within a window: Press Tab and the arrow keys (up, down, left, and right). To close a window and remove it from the workspace: Press Alt+F4. To minimize a window (turn it into an icon): Press Alt+Spacebar, then N to choose Minimize from the Window menu. To move a window: Press Alt+Spacebar, then M to choose Move from the Window menu. Press the arrow keys to move the window up, down, left, or right, then press Return. Hold down Control while you press an arrow key to move the window faster. © Mustafa Golam,2007
Leaving the Desktop © Mustafa Golam,2007
On Log Out As you log out of the desktop, your current session is saved. When you log back in, the desktop will appear as it did before you logged out. Applications that do not get saved as part of the current session include: Applications that you run in terminal emulator windows Non-desktop applications that do not preserve their state during logout .You’ll need to restart these applications when you log in. © Mustafa Golam,2007
To Lock Your Display To prevent unauthorized use of your system when you are away from it and have not logged out: © Mustafa Golam,2007
Getting Help You can request help by: Pressing F1 or the Help key Choosing an item from an application’s Help menu Clicking the Help button in a dialog box Opening the Help Manager to browse all the available help The quickest and easiest way to get help is to press the F1 key. When you press F1,the application you are using displays the help topic most closely related to your current activity. Some keyboards have a dedicated Help key that may take the place of the F1 key. Help Menu Help Manager © Mustafa Golam,2007
Starting a Desktop Session A desktop session occurs between the time you log in and the time you log out. The login screen, displayed by the Login Manager, is your gateway to the desktop. It provides a place for you to type your login name and password. The Options menu on the login screen lists your login options. In addition to running a desktop session, you can run a failsafe session. You can also select the language for your session. © Mustafa Golam,2007
Starting and Ending a Desktop  Session A desktop session starts when you log in. Session Manager is started after Login Manager authenticates your login and password. Session Manager provides the ability to  manage  sessions—to remember the state of your most recent session and return you there the next time you log in. Session Manager saves and restores: The appearance and behavior settings – for example, fonts, colors, and mouse settings. The window applications that were running – for example, your File Manager and Text Editor windows. Certain types of applications can’t be saved and restored by Session Manager. For example, if you start the vi editor from a command line in a Terminal window, Session Manager cannot restore your editing session. © Mustafa Golam,2007
Starting a Command-Line Session Command Line Login mode enables you to temporarily leave the desktop to work in your operating system environment. Command Line Login mode is not a desktop session. When your system is in Command Line Login mode, the desktop is suspended. You log in using your operating system mechanism rather than Login Manager. There are no windows because the X server is not running. © Mustafa Golam,2007
Using a Home Session Ordinarily, the desktop saves session information when you log out and uses that information to start your next session. If you start or stop applications during your session, or use Style Manager to change the appearance and behavior of your system, changes you make are reflected in your next session. This type of session is called a  current session . The desktop also provides a  home session . A home session is a session that you explicitly save. It’s like taking a snapshot of your current session at some point in time. Once you’ve saved a home session, you can specify that logging in always restores that session instead of the current session. © Mustafa Golam,2007
To Automatically Start the Home Session at Login 1. Click the Style Manager control in the Front Panel. 2. Click the Startup control in Style Manager. The Startup dialog box is displayed. 3. Select Return to Home session. 4. Click OK. When you choose Return to Home session, Session Manager will not save your session at logout. © Mustafa Golam,2007
Getting Help Requesting Help (F1) Choose a command from an application’s Help menu Open Help Manager from the Front Panel to browse help on your system Open the Help subpanel to choose help about the desktop or to choose On Item Help © Mustafa Golam,2007
Pattern Searches In a pattern search certain characters (known as “wildcards”) have special meaning. You can combine these characters in a variety of ways. Two frequently used wildcards are asterisk (*) and question mark (?). The * matches any string of characters (including no characters), and ? matches any single character. Other wildcards include: . (period)—matches any character | (vertical bar)—specifies two search patterns and matches either pattern (logical OR) ( ) (parentheses)—encloses a pattern expression To search for a character that has special meaning in a regular expression, precede the character with a \ (backslash). © Mustafa Golam,2007
Getting ALEX Help at OSS Right Mouse Click Documentation ALEX If it does not work then Set the Proxy to 10.10.4.59 and port 3828 © Mustafa Golam,2007
To Display a Man Page © Mustafa Golam,2007
To Change Help Window Colors  for an Application 1. Edit your HomeDirectory/.Xdefaults file by adding these resources: application_name *DtHelpDialog*DisplayArea.foreground:  color application_name *DtHelpDialog*DisplayArea.background:  color application_name *DtHelpDialog*TocArea.foreground:  color application_name *DtHelpDialog*TocArea.background:  color application_name *DtHelpQuickDialog*DisplayArea.foreground:  color application_name *DtHelpQuickDialog*DisplayArea.background:  color Substitute the name of the application whose help windows you want to change for application_name. You can ask your system administrator for a list of colors that you can use or refer to your system documentation. 2. Save and close the file. © Mustafa Golam,2007
Using the Front Panel The Front Panel is your “dashboard” or control area for the CDE desktop. It gives you point-and-click and drag-and-drop access to the majority of applications on your system; it allows you to switch workspaces; and it displays information such as time and date, printer status, and so on.  You can customize your Front Panel to include your favorite applications, and you can move or minimize the Front Panel. © Mustafa Golam,2007
Front Panel Elements and  Customization © Mustafa Golam,2007
Main Panel and Subpanels Main Panel Links Subpanel Cards Subpanel Files Subpanel Applications Subpanel Mail Subpanel Personal Printers Subpanel Tools Subpanel Hosts Subpanel Help Subpanel Trash Subpanel © Mustafa Golam,2007
Changing the Default Web  Browser Your PATH environment is searched for the Netscape command (for the Netscape browser) or hotjava command (for the HotJava™ browser). Change  MAP_ACTION SDtNetscape  or MAP_ACTION SDtHotJava at user-prefs.dt The user-prefs.dt file belongs in your $HOME/.dt/types directory.  To create a user-prefs.dt file, copy the /usr/dt/appconfig/types/C/user-prefs.dt file and save it in your $HOME/.dt/types directory as user-prefs.dt. © Mustafa Golam,2007
Miscellaneous Tasks Working With Bookmarks To Display a Different Clock Working With Bookmarks Using Encryption with  crypt Using Compression with  compress   which use adaptive Lempel-Ziv coding. Using Archiving with  tar © Mustafa Golam,2007
To Put a Subpanel Control in the  Main Panel © Mustafa Golam,2007
File Manager Window © Mustafa Golam,2007
Basic File System Concepts Files Folders Objects Since files and folders are both represented in File Manager as icons, the term  object  isused to describe them both. Paths Paths and Path Names Absolute Paths Absolute Paths © Mustafa Golam,2007
Object Properties © Mustafa Golam,2007
Links A link icon is a copy of an icon that points to the same file or folder as the original icon. Any changes you make after opening the link icon will also appear when you access the file or folder using the original icon. © Mustafa Golam,2007
File and Folder Ownership  and Security The traditional UNIX file and folder protection scheme provides  read ,  write , and  execute  permissions for three user types:  owner ,  group , and  other . These are called  basic permissions . Access Control Lists (ACLs) provide greater control over file and folder permissions than do basic permissions. ACLs enable you to define file or folder permissions for the owner, owner’s group, others, and specific users and groups, and default permissions for each of these categories. © Mustafa Golam,2007
Basic Permissions Read Permission  – Allows access to retrieve, copy, or view the contents of the object. Write Permission  – For a file, allows access to change the contents of the file. For a folder, allows access to create or delete objects from the folder. Execute Permission  – For a file, allows access to run the file (for executable files,scripts, and actions). For a folder, allows access to search and list the folder’s contents. © Mustafa Golam,2007
Basic User Types Owner  – The user who owns the file or folder. Only a system administrator (root user) can change the owner of a file or folder. Group  – Users who have been grouped together by the system administrator. For example, the members of a department might belong to the same group. This group is the owning group and usually includes the file or folder’s owner. Other  – All other users on the system besides the owner and owning group. © Mustafa Golam,2007
On File Permission To View a File or Folder’s Permissions (sdtfprop) To Modify Basic Permissions To Change File or Folder Ownership To Browse and Edit Properties of Multiple Files and Folders © Mustafa Golam,2007
On ACL ACLs enable you to define file or folder permissions for the owner, owner’s group, others, and specific users and groups, and default permissions for each of these categories.  You can set up only one ACL per file or folder. An ACL consists of ACL  entries . Each entry has a user type associated with it, much as basic permissions have Owner, Group, or Other associated with them. © Mustafa Golam,2007
Properties Graphical User  Interface (GUI) © Mustafa Golam,2007
ACL Access List Entry © Mustafa Golam,2007
Changing ACL © Mustafa Golam,2007
Setting Default Permissions  Through an Access Control List When you create a file or folder within a folder, it inherits the basic permissions set by the system administrator. (To determine the current defaults, create a new file or folder and then choose Properties from the Selected menu to view the permissions.) You can use an Access Control List to set default basic permissions yourself for any file or folder that is created within a folder. The ACL for that folder must contain entries for all four of the following  required  Default entry types: Default Owning User, Default Owning Group, Default Other, and Default Mask. An ACL can contain only one entry of each required type. The file or folder inherits the values for Owner, Group, and Other from the person who creates it and inherits the basic permissions from the required ACL Default entry types on the containing folder. ACL entries of these types do not have names associated with them. You can also set  optional  Default entry types—Default User and Default Group— for any file or folder that is created within a folder. You can create as many Default User or Default Group ACL entries as you want. You must specify the name of the user or group when you create the ACL entry. Any ACL in which you want to put a Default User or Default Group entry must also contain one of each required entry type. © Mustafa Golam,2007
Permissions Mask ACL-enabled files and folders have a  mask  defined whose default permissions are the group permissions for the file or folder. The mask is the maximum allowable permissions granted to any user on all ACL entries and for Group basic permissions. It does not restrict Owner or Other basic permissions. For example, if a file’s mask is read-only, then you cannot create an ACL with write or execute permission for a user without changing the mask value. © Mustafa Golam,2007
Using File Finder © Mustafa Golam,2007
Customizing File Manager Views Using the Tree View To Display the Folder View To Change How Objects Are Represented To Change the Order in Which Icons Are Sorted To Re-Sort (Clean Up) Objects © Mustafa Golam,2007
Hiding Files and Folders Hidden files and folders are those whose file types are selected in the  filter list . The criterion for hiding or showing a file or folder is based on its data type. Use the Set Filter Options command to change which data types are shown and hidden. The default hidden data types are DOT_FILE, DOT_FOLDER, and CURRENT_FOLDER. © Mustafa Golam,2007
Icon Browsing Files with names that end in .pm or .bm contain icons. These are the files that File Manager uses to build icons. By default, you must open these files to see the icons they contain. If you enable icon browsing, File Manager displays the contents of .pm or .bm files so you don’t have to open them to see what they look like. Copy the file  /usr/dt/examples/types/ language /IconBrowse.dt into your / $HOME /.dt/types  folder. © Mustafa Golam,2007
To Change the Icon Display  Area Size Open a Terminal window and type  dtpad ~/.Xdefaults . Dtfile*smallIconWidth:24 Dtfile*smallIconHeight:24 Dtfile*largeIconWidth:38 Dtfile*largeIconHeight:38 © Mustafa Golam,2007
GWM Graphical Workspace Manager enables you to operate a workspace "control panel". This panel displays a window containing a miniaturized picture of each workspace on the desktop. Workspaces may be created, deleted, renamed, tiled, or cascaded. Application windows may be moved (within or between workspaces), terminated,minimized, or maximized. © Mustafa Golam,2007
GWM options © Mustafa Golam,2007
Window List The Window List displays information about all windows across the CDE workspaces. Once launched, the window list will be updated in a dynamic fashion. © Mustafa Golam,2007
Window List – Option Dialog © Mustafa Golam,2007
Application Manager Windows © Mustafa Golam,2007
Application Manager:  Calculator © Mustafa Golam,2007
Adding Application to  Front Panel © Mustafa Golam,2007
Advanced Application  Manager Concepts File Names in Application Manager Folder Location of Application Manager /var/dt/appconfig/appmanager/ special_folder_name Creating Personal Actions and Data Types The desktop provides a tool that helps you create icons for running scripts, applications, and other commands. You may want to use this tool if you have a personal application your system administrator has not configured for you. © Mustafa Golam,2007
Create Action Window © Mustafa Golam,2007
Registering Applications When an application is registered in Application Manager, it has its own application group. This application group is available to all users on the system. Registering applications is an advanced task, since it requires you to be the root user. © Mustafa Golam,2007
Customizing the Desktop  Environment Introducing Style Manager Customizing Screen Appearance Color Palettes and Color Flashing Color Buttons Customizing System Behavior To Change Keyboard Behavior To Change Mouse Behavior To Change Beep Settings Power Management % xset s noblank © Mustafa Golam,2007
Customizing Startup and Logout To Change How Your Next Session Starts To Set Your Logout Confirmation Preference © Mustafa Golam,2007
Advanced Topic : Mailer Starting Mailer Logging In to Your IMAP Inbox Using the Mailer Main Window Viewing Your Mail Messages Acting on Your Mail Messages Searching for Mail Messages Within a Mailbox To Create Advanced Search Scripts Sending Mail Messages Using a Signature To Create an Automatic Reply (Vacation Message) Customizing Mailer Configuring the Appearance of the Toolbar © Mustafa Golam,2007
Advanced Topic : Printer Your Default Printer To Determine the Default Printer To Change the Default Printer .dtprofile . LPDEST= printer_device;  export LPDEST At csh : setenv LPDEST  printer_device Printing Files Using Print Manager Printer Applications Displaying Print Job Information Print Job Properties © Mustafa Golam,2007
Using Text Editor Opening and Closing Text Editor /usr/dt/bin/dtpad /usr/bin/gedit Text Editor Window Using Wrap To Fit © Mustafa Golam,2007
Cursor Key Movement Key  Cursor Movement Up Arrow  Up one line Down Arrow  Down one line Left Arrow  Left one character Right Arrow  Right one character Control+Left Arrow  Move left to previous word Control+Right Arrow  Move right to next word Home  Beginning of the current line End  End of the current line Control+Up Arrow  Beginning of the previous paragraph Control+Down Arrow  Beginning of the next paragraph Control+Home  Beginning of the document Control+End  End of the document Control+G  To the Line field in the status line © Mustafa Golam,2007
To Select Text with the  Keyboard Text to Select  Action Text block  Move the cursor to the beginning of the text block. Hold down the Shift key and an arrow key to move the cursor to the end of the text block. Cursor to beginning of line  Shift+Home Cursor to end of line  Shift+End Cursor to beginning of paragraph  Shift+Control+Up Arrow Cursor to end of paragraph  Shift+Control+Down Arrow Cursor to beginning of document  Shift+Control+Home Cursor to end of document  Shift+Control+End All text  Control+/ Deselect all text  Control+\ © Mustafa Golam,2007
Editing Keys Key  Action Backspace  Deletes the character before the cursor Delete  Deletes the character following the insertion cursor Control+Backspace  Deletes the previous word Shift+Backspace  Deletes characters from the cursor to the beginning  of the line Control+Delete  Deletes all the characters from the cursor to the end  of the current line Insert  Toggles Overstrike and Insert mode © Mustafa Golam,2007
UNIX Key Bindings UNIX® key bindings enable you to use a set of extended Emacs keys, such as Alt+B (back word) or Control+N (next line), in Text Editor. To enable UNIX key bindings (which are set off by default) you edit a file in your home directory. Add the following line to the .Xdefaults file in your home directory: #include "/usr/dt/appdefaults/language/UNIXbindings" Replace language with the name of your language environment. © Mustafa Golam,2007
Unix Key Binding Enabled Command  Alternate Menu Accelerator Find/Change  (Control+F) Control+S Paste (Control+V)  Shift+Insert Print (Control+P)  No alternate accelerator Undo (Control+Z)  Control+_ If you want to modify these menu accelerators, copy the contents of the /usr/dt/app-defaults/language/UNIXbindings  file into your .Xdefaults file and then make your changes. © Mustafa Golam,2007
Correcting Misspelled  Words and etc. Customizing Spelling Checker Dictionaries To Import Another User’s Personal Dictionary To Set Your Default Dictionary Locale Formatting and Printing Documents © Mustafa Golam,2007
Using Calendar Calendar Startup Calendar Main Window Calendar Views Day View Week View Month View Year View Appointments To Do Items Printing Calendars, Appointment, or To Do Lists Browsing Calendars on a Network To Create an Appointment Message Using a Mail Program © Mustafa Golam,2007
Other Calendar Tools sdtcm_admin  - Use to create and administer calendars sdtcm_convert  - Use to convert data format or prune a calendar dtcm_editor  - Use to edit appointments dtcm_lookup  - Use to view calendar appointments dtcm_insert  - Use to insert calendar appointments dtcm_delete  - Use to delete calendar appointments © Mustafa Golam,2007
Using Terminal Default Desktop Terminal Emulator – dtterm The default terminal emulator on the desktop is dtterm. The dtterm terminal emulator emulates that portion of the VT220 terminal that is consistent with ANSI and ISO standards. © Mustafa Golam,2007
Starting a Terminal Window From the Front Panel From Application Manager From File Manager From the Window Menu of Another Terminal From Address Manager with a host selected © Mustafa Golam,2007
Using a Terminal Window application  [ options ] & xclock -digital & Ls To Resize the Window Contents eval ‘resize‘ © Mustafa Golam,2007
Running dtterm on  Another System The -display options dtterm -display hpcvxdm:0 & The rlogin command rlogin there xload -display here:0 The remsh command remsh  remote  -n  client  -display system : display [. screen ] The Terminal menu item in Address Manager (when the remote host is displayed) © Mustafa Golam,2007
Dtterm Global Options © Mustafa Golam,2007
Terminal Control Characters Control Name  Character  Definition Erase Control+H  Backspace erases characters intr  Control+C  Interrupt: Cancel the current  operation and redisplay the  command-line prompt. kill  Control+U  Stop an operation or application. start  Control+Q  Accept keyboard input: Used to  continue an application that has  been paused. stop  Control+S  Do not accept keyboard input:  Used to pause an application. swtch  Control+@  Switch between layers in a shell. ttyModes: erase ^H intr ^C kill ^U start ^Q stop ^S swtch ^@ © Mustafa Golam,2007
Using Icon Editor, Image Viewer, Snapshot Introducing Icon Editor  dticon X pixmap (XPM) X bitmap (XBM) Starting and Quitting Image Viewer  sdtimage Andrew Toolkit  Kodak Photo CD (Base/4) Atari Compressed Spectrum*  Lisp Machine Bit-Array Atari Degas 1* MGR Atari Degas 3*  MTV/PRT Ray-Tracer Atari Uncompressed Spectrum*  MacPaint Viewing PostScript Files Using Snapshot  (sdtimage –snapshot) © Mustafa Golam,2007
Using Video and Audio Java Media Player Audio From the Command Line sdtaudio  filename Playing with Audio Window and Waveform window Audio Control © Mustafa Golam,2007
Using Address Manager Cards Address Cards $HOME/.dt/Addresses Host Cards Alias Cards © Mustafa Golam,2007
Working with Cards Cards   Stored System Cards  A site-specific database searched by  sdtnamer (1) Personal Cards  The file $HOME/.dt/Addresses  (Editable in AddressManager) System Aliases  The file /etc/aliases and the  Mail.Aliases NIS map Personal Aliases  The file $HOME/.mailrc Users  The file /etc/passwd and the  Passwd.Byname NIS map Hosts  The file /etc/hosts and the  Hosts.Byname NIS map © Mustafa Golam,2007
Using Process Manager Use Process Manager to display the processes that are running on your workstation, and to perform actions on them. You can do this without knowing the syntax for ps(1), truss(1), kill(1), and other character-based commands. Where relevant, the equivalent UNIX commands are given for each Process Manager action. © Mustafa Golam,2007
About Processes UNIX works with processes. Your login shell, application programs, the edit session you run, and even the ls program that lists your files are all processes under control of the operating environment. In UNIX you can perform operations on these processes. For example, you can look at all the programs you’re running at any time, stop and restart programs as you choose, and investigate and debug errant processes. © Mustafa Golam,2007
Tips for Finding Errant Processes An errant process is a process that is not doing the job you expect it to do.  For example, a process might be consuming a large percentage of your available resources due to a bug, or it might be interfering with another process. Use Process Manager to detect errant processes when you experience the following: Workstation performance or response seems to have slowed. A program will not respond to user input. A standard service such as printing, file transfer or remote login does not respond. When displaying all processes, Process Manager typically displays thirty to fifty processes, so finding the errant processes can be daunting to the untrained eye. Use Process Manager to identify: Processes using a large percentage of the available CPU or RAM when they shouldn’t Orphaned processes whose parent process has reverted to 1, that is init (but not processes such as  sched, dtlogin , or  cron  whose parent process ID should be 1) Processes that were started a long time ago and weren’t terminated when they should have been Large processes owned by another user that are degrading performance © Mustafa Golam,2007
Process Information Column  Heading Meaning ID  Process ID Name  Process Name Owner  Name of Owner CPU%  Ratio of CPU time used recently to time available in the same period, expressed as a percentage RAM  Amount of RAM currently occupied  by this process Swap  Total size in virtual memory Started  Actual start time (or date if other than  current) Parent  Process ID of parent process, or PPID Command  Actual UNIX command (truncated) being  executed © Mustafa Golam,2007
Process Manager Window © Mustafa Golam,2007
Sending Kill Signals to a Process The kill command in UNIX enables the user to send a signal to a process. A  signal  is a message sent to a process to interrupt it and cause a response. If the process has been designed to respond to signals of the type sent it does so; otherwise, it terminates.  © Mustafa Golam,2007
Meaning of Common Signals The following table lists some commonly used signal numbers/names and their meanings. Signal No.  Signal Name  Meaning 1  HUP  Hangup (often used before  logging out) 2  INT  Interrupt (same as pressing  Control+C in a terminal session) 9  KILL  Kill (terminates without cleanup) Only works if issued by process  owner or super user (root) The program cannot respond to  this signal; it must terminate 15  TERM  Kill (terminates gracefully after  cleanup) Only works if issued by  process owner or super user  (root) © Mustafa Golam,2007
To Kill A Process (Quick Kill) The equivalent UNIX command is: kill -9  PID  where  PID  is the process ID of the selected process. You can redefine the command performed by the Kill menu item to a different command by redefining the action labelled ’Kill’ in the file: /usr/dt/appconfig/types/C/sdtprocess.dt © Mustafa Golam,2007
To Send a Signal to a Process Process Manager issues the signal command and closes the dialog box. No success message is issued. Killing a process typically kills its children. The equivalent UNIX command is: kill  -signum_name PID  where  -signum_name  is the signal number or name, and  PID  is the process ID of the selected process. © Mustafa Golam,2007
To Show the Ancestry for  a Process The equivalent UNIX command is: /usr/proc/bin/ptree  PID  where  PID  is the process ID of the selected process. © Mustafa Golam,2007
To Trace Child Processes When a UNIX process initiates one or more dependent processes, we call these  child processes , or children. Child and parent processes have the same user ID. Process Manager displays a record of the creation of any new children (and their children, recursively) for the selected process. Error returns are reported using the error code names described in the Intro(2) man page. The equivalent UNIX command is: truss -fa -texec,fork -s¦CLD,ALRM -p  PID where  PID  is the process ID of the selected process. © Mustafa Golam,2007
To Trace System Calls During its execution, a process makes calls to the UNIX kernel, or system calls. You might want to trace these system calls to see the affect they are having on other processes. Each line of the trace output reports either the fault or signal name or the system call name with its arguments and return values. For further information, see the truss(1)man page. The equivalent UNIX command is: truss -p  PID where  PID  is the process ID of the selected process. © Mustafa Golam,2007
To Show the Stack for a Process Process Manager displays a window containing hexadecimal and symbolic stack trace for the selected process. The equivalent UNIX command is: /usr/proc/bin/pstack  PID where  PID  is the process ID of the selected process. © Mustafa Golam,2007
To Debug a Process Application developers and system administrators sometimes use a debugging application such as Sun Workshop to investigate an errant process. The Debug item on the Process menu invokes your preferred debugger on the selected process. The equivalent UNIX command is: workshop  -d  command where  workshop  is the name of the debugger program and  command  is the command needed to pass the process ID to the debugger. © Mustafa Golam,2007
Using Performance Meter Use the Performance Meter to monitor activity and performance on a workstation. Several performance parameters such as CPU utilization, disk activity, network packets, and the like, can be displayed graphically in this customizable window. To make Performance Meter’s Front Panel icon inactive, use Process Manager to kill the  sdtperfmeter  process. © Mustafa Golam,2007
Using Hotkey Editor Use the Hotkey Editor to create, modify, or delete CDE hotkeys. Hotkey is a general term used to show the association between a specific key and a specified event (target event). For example, choosing Alt+Left will move the workspace to the left. The target event could be a CDE action, an application, a document, a workspace management function, or a multiple monitor management function. To Start Hotkey Editor Creating a Hotkey Editing a Hotkey Deleting and Recovering Hotkeys © Mustafa Golam,2007
Misc Topics Using Personal Digital Assistant (PDA) Synchronization Power Management © Mustafa Golam,2007
Keyboard Shortcuts for the  Desktop Menu Shortcuts Keyboard Focus and the Highlight Moving the Keyboard Focus Opening and Closing Windows Online Help Keyboard Navigation © Mustafa Golam,2007
Moving the Keyboard Focus Press  To Move To Tab  The next tab group Shift+Tab  The previous tab group Down Arrow  The next control in the  tab group Up Arrow  The previous control in a  tab group F10  The window’s menu bar—use the arrow  keys to display menus and move among  their items Shift+F10  The selected object’s pop-up menu—use the  arrow keys to move among the menu’s items Alt+Spacebar  The Window menu © Mustafa Golam,2007
Shortcut Key Continued Within a workspace Press  To Move To Alt+Tab or Alt+Esc  The next window or icon Shift+Alt+Tab  The previous window or icon Alt+Up Arrow  The bottom window in a stack of  windows (bringing it forward) Alt+Down Arrow   The bottom of the window stack Alt+F6  The next window belonging to an  application, or between the Front Panel and a subpanel Shift+Alt+F6  The previous window belonging to  an application, or between the Front Panel and a subpanel Within a menu Press  To Move To Down Arrow  The next menu item Up Arrow  The previous menu item Press the Spacebar to choose a selected item from within a menu. Press Esc to dismiss a menu. © Mustafa Golam,2007
Further Resources \\10.10.3.40\Documentation\OSS_DOCS http://docs.sun.com http://www.google.com http://www.unixq.com © Mustafa Golam,2007

More Related Content

DOCX
IDS FortuneNext 6i Property Management: Hot keys and keyboard short cuts
PPTX
S02.W04. - Working with Windows and Applications - 1
PDF
Readme toefl
PDF
File17770
DOCX
Windows 7 part 1
PPT
Windows xp unit a
PPT
Windows lyceum
IDS FortuneNext 6i Property Management: Hot keys and keyboard short cuts
S02.W04. - Working with Windows and Applications - 1
Readme toefl
File17770
Windows 7 part 1
Windows xp unit a
Windows lyceum

What's hot (20)

PDF
Programming Without Coding Technology (PWCT) - Create Menus in our console ap...
PPTX
Chapter01 (1)
PDF
Programming Without Coding Technology (PWCT) - HarbourPWCT - Colors - Console...
DOC
Cutviewer mill user guide v3
PPT
Desktop 03
PDF
Programming Without Coding Technology (PWCT) - HarbourPWCT - Rectangles - Con...
PPTX
Introduction to Windows - Windows Interface
PPTX
What’s new with windows 7
PPTX
KEYBOARD
PDF
D1467503
PDF
VB.Net-Controls and events
PPS
Power Point Lesson 07 P2
DOCX
How to take a screenshot
PPTX
U Pointer Detailed Training Manual
PPT
Windows7tipstrickspptversion 12599513345858-phpapp01
PDF
Programming Without Coding Technology (PWCT) - Telephone Database
PPTX
desktop startmenu task bar
DOCX
Trabajo en ingles[1]
PDF
Programming Without Coding Technology (PWCT) - Get Input From User
Programming Without Coding Technology (PWCT) - Create Menus in our console ap...
Chapter01 (1)
Programming Without Coding Technology (PWCT) - HarbourPWCT - Colors - Console...
Cutviewer mill user guide v3
Desktop 03
Programming Without Coding Technology (PWCT) - HarbourPWCT - Rectangles - Con...
Introduction to Windows - Windows Interface
What’s new with windows 7
KEYBOARD
D1467503
VB.Net-Controls and events
Power Point Lesson 07 P2
How to take a screenshot
U Pointer Detailed Training Manual
Windows7tipstrickspptversion 12599513345858-phpapp01
Programming Without Coding Technology (PWCT) - Telephone Database
desktop startmenu task bar
Trabajo en ingles[1]
Programming Without Coding Technology (PWCT) - Get Input From User
Ad

Viewers also liked (20)

PPT
[Challenge:Future] 'DreamCache' : Mickey Mouse explains Quantum Physics in yo...
PDF
EVOMOUSE --- Future Mouse
PPTX
surface computing seminar Jecrc,jaipur
PPTX
E ball pc technology & space mouse
PPTX
Surface Computing
PPTX
Presentation on mouse, keyboard and scanners
PPTX
PPT
Surface computing
PPSX
Slide for space mouse by manish myst, ssgbcoet
PDF
41 projects using ic 741 op amp
PPT
Eye mouse ppt
PPTX
PPTX
Presentacion mouse power point
PDF
Past present future tense page 2 If you give a mouse a cookie
PPT
Current Perspectives on Stem Cell Biology
PPTX
Optical mouse working principle
PPTX
Final ppt
PDF
Computer mouse.pptx
PPT
Walt Disney Company
PPTX
Evo mouse seminar
[Challenge:Future] 'DreamCache' : Mickey Mouse explains Quantum Physics in yo...
EVOMOUSE --- Future Mouse
surface computing seminar Jecrc,jaipur
E ball pc technology & space mouse
Surface Computing
Presentation on mouse, keyboard and scanners
Surface computing
Slide for space mouse by manish myst, ssgbcoet
41 projects using ic 741 op amp
Eye mouse ppt
Presentacion mouse power point
Past present future tense page 2 If you give a mouse a cookie
Current Perspectives on Stem Cell Biology
Optical mouse working principle
Final ppt
Computer mouse.pptx
Walt Disney Company
Evo mouse seminar
Ad

Similar to Introduction To C D E (20)

PDF
Keyboard Shortcuts
PDF
Green hectares rural tech factsheet computer basics
PPT
Basic Skills for Bigginners
PDF
জেনে নিন ১০০+ কিবোর্ড শর্টকাট
DOCX
basic shortcut keys in computer
PPTX
Living in the IT Era L3.pptx
PDF
Keyboard short cuts for windows xp
DOCX
Windows keyboard shortcuts overview
PPTX
1.0 QuickBooks Fundementals : Day 02 Windows :2.1 windows
PPTX
Reviewer-CCS-L3.pptx
PPT
Windows Basic Computer Skills
PPS
Power Point Lesson 05
DOCX
New microsoft office word document
PDF
Computer basicsclassnpl
PPT
Windows
DOCX
05 LAB - Operating Systems.docx
PDF
osx keyboard shortcut easy usage
DOC
Windows XP Home / Pro Run Commands an...
PDF
Introduction to windows xp
RTF
Windows xp run commands and shortcuts
Keyboard Shortcuts
Green hectares rural tech factsheet computer basics
Basic Skills for Bigginners
জেনে নিন ১০০+ কিবোর্ড শর্টকাট
basic shortcut keys in computer
Living in the IT Era L3.pptx
Keyboard short cuts for windows xp
Windows keyboard shortcuts overview
1.0 QuickBooks Fundementals : Day 02 Windows :2.1 windows
Reviewer-CCS-L3.pptx
Windows Basic Computer Skills
Power Point Lesson 05
New microsoft office word document
Computer basicsclassnpl
Windows
05 LAB - Operating Systems.docx
osx keyboard shortcut easy usage
Windows XP Home / Pro Run Commands an...
Introduction to windows xp
Windows xp run commands and shortcuts

Recently uploaded (20)

PDF
Machine learning based COVID-19 study performance prediction
PDF
Optimiser vos workloads AI/ML sur Amazon EC2 et AWS Graviton
PDF
Approach and Philosophy of On baking technology
PDF
Reach Out and Touch Someone: Haptics and Empathic Computing
PPT
“AI and Expert System Decision Support & Business Intelligence Systems”
PDF
Mobile App Security Testing_ A Comprehensive Guide.pdf
PDF
Electronic commerce courselecture one. Pdf
DOCX
The AUB Centre for AI in Media Proposal.docx
PDF
Review of recent advances in non-invasive hemoglobin estimation
PDF
Empathic Computing: Creating Shared Understanding
PDF
Agricultural_Statistics_at_a_Glance_2022_0.pdf
PPTX
ACSFv1EN-58255 AWS Academy Cloud Security Foundations.pptx
PPTX
Big Data Technologies - Introduction.pptx
PDF
How UI/UX Design Impacts User Retention in Mobile Apps.pdf
PDF
Encapsulation_ Review paper, used for researhc scholars
PDF
7 ChatGPT Prompts to Help You Define Your Ideal Customer Profile.pdf
PPT
Teaching material agriculture food technology
PPTX
Cloud computing and distributed systems.
PDF
KodekX | Application Modernization Development
PPTX
VMware vSphere Foundation How to Sell Presentation-Ver1.4-2-14-2024.pptx
Machine learning based COVID-19 study performance prediction
Optimiser vos workloads AI/ML sur Amazon EC2 et AWS Graviton
Approach and Philosophy of On baking technology
Reach Out and Touch Someone: Haptics and Empathic Computing
“AI and Expert System Decision Support & Business Intelligence Systems”
Mobile App Security Testing_ A Comprehensive Guide.pdf
Electronic commerce courselecture one. Pdf
The AUB Centre for AI in Media Proposal.docx
Review of recent advances in non-invasive hemoglobin estimation
Empathic Computing: Creating Shared Understanding
Agricultural_Statistics_at_a_Glance_2022_0.pdf
ACSFv1EN-58255 AWS Academy Cloud Security Foundations.pptx
Big Data Technologies - Introduction.pptx
How UI/UX Design Impacts User Retention in Mobile Apps.pdf
Encapsulation_ Review paper, used for researhc scholars
7 ChatGPT Prompts to Help You Define Your Ideal Customer Profile.pdf
Teaching material agriculture food technology
Cloud computing and distributed systems.
KodekX | Application Modernization Development
VMware vSphere Foundation How to Sell Presentation-Ver1.4-2-14-2024.pptx

Introduction To C D E

  • 1. Solaris Common Desktop Environment Working Effectively and Smartly © Mustafa Golam,2007
  • 2. We Assume: you can !!! Mouse Skills : Click Double-Click Drag Duplicate Desktop Workspaces © Mustafa Golam,2007
  • 3. Layout Of the Course © Mustafa Golam,2007
  • 4. CDE Desktop © Mustafa Golam,2007
  • 5. Location of File Subpanel © Mustafa Golam,2007
  • 6. File Manager © Mustafa Golam,2007
  • 7. Common File Manager Tasks find a file carry out an action on a file print a file access a floppy diskette or CD-ROM Deleting Files © Mustafa Golam,2007
  • 8. Running Applications From Front Panel and the Workspace menu From Application Manager. By dropping files or data on their drop zones From Terminal emulator windows From File Manager application © Mustafa Golam,2007
  • 9. Front Panel and Application Manager © Mustafa Golam,2007
  • 10. Running Applications from Drop Zones on the Front Panel Certain controls on the Front Panel—such as the Printer, Mailer and Web Browser controls—act as drop zones that activate the relevant application when you drag and drop appropriate text or files on them. For example, if you drop a file on the Mailer control, Mailer displays a New Message window with the file attached to the new message. © Mustafa Golam,2007
  • 11. Running Applications from File Manager You can run an application by clicking its application icon in a File Manager window. For example, you can run Image Viewer by clicking the file SDTimage in the folder /var/dt/appconfig/appmanager/ user-hostname-0 /Desktop_Apps/ where user-hostname-0 is a folder specific to your user ID. If an application uses data files, it may be configured so that the application can be started from File Manager by clicking one of its data files. For example, double-clicking a bitmap file (a file whose name ends with .bm) runs Icon Editor. © Mustafa Golam,2007
  • 12. Running Applications from a Terminal Emulator Window A terminal emulator is an application whose window provides a command-line interface to your system—for example, operating system commands, script names, or commands that run applications. All applications have a command that you can type to start them. The application’s documentation usually describes how to use the command. The desktop provides a terminal emulator called dtterm . Your system may include other terminal emulators. To open a terminal emulator window, click the This Host control in the Hosts subpanel. © Mustafa Golam,2007
  • 13. Working with Windows © Mustafa Golam,2007
  • 14. To Open an Application Window (Mouse) Click the application’s control in the Front Panel. Or, from within Application Manager, double-click the application’s icon. Or, from within Application Manager, double-click the application’s icon. Or, from the Workspace Programs submenu, choose the item with the application name. You can also select an icon in a File Manager or Application Manager window by clicking it and then choose an action for the selected icon from the Selected menu. © Mustafa Golam,2007
  • 15. To Open an Application Window (Keyboard) From the Front Panel: 1. Press Alt+Tab to move the keyboard focus to the Front Panel. 2. Press the arrow keys to move the highlight within the Front Panel and select a control. 3. Press Spacebar or Return to choose the control and open the application’s window. © Mustafa Golam,2007
  • 16. To Turn a Window into an Icon (Keyboard) 1. Press Alt+Spacebar to display the Window menu. 2. Choose Minimize: Press Down Arrow until you select Minimize, then press Return. Or , press N, the menu’s mnemonic for Minimize. © Mustafa Golam,2007
  • 17. Stretch and Shrinking Windows © Mustafa Golam,2007
  • 18. To Move a Window or Icon to the Foreground or Background (Keyboard) To bring the bottom window or icon in a workspace forward, press Alt+Up Arrow. To place the top window in the background, press Alt+Down Arrow. To cycle through and select the windows and icons in a workspace, press Alt+Tab or Alt+Esc. To cycle through and select the windows and icons in reverse order, press Shift+Alt+Tab or Shift+Alt+Esc. © Mustafa Golam,2007
  • 19. Copying and Pasting Text into Windows To Select the Text To Be Copied 1. Move the pointer to the start of the text to be pasted. 2. Drag to the end of the text to be pasted, then release the mouse button, leaving the text highlighted. To Paste Text 1. Place the text insertion cursor in the target location. 2. Click mouse button 2 to paste the text. Note – To deselect text, click in an empty area of the window that has the text selected, or press Esc. © Mustafa Golam,2007
  • 20. Using Workspaces Workspaces are like separate screens or windows. To help organize your desktop, you can have separate workspaces for different groups of related tasks. For example, a workspace you’ve named Reports could contain the tools you use to prepare reports, such as a spreadsheet, desktop publisher, and graphics applications. You might set up other workspaces according to your projects. © Mustafa Golam,2007
  • 21. Workspaces To Display Another Workspace (Mouse) To Display Another Workspace (Keyboard) To Place a Window in Other Workspaces (Mouse) To Place a Window in Other Workspaces (Keyboard) To Rename a Workspace (Mouse) To Rename a Workspace (Keyboard) © Mustafa Golam,2007
  • 22. Using Menus © Mustafa Golam,2007
  • 23. Window Menu © Mustafa Golam,2007
  • 24. Workspace menu © Mustafa Golam,2007
  • 25. Using Tear-Off Menus In some applications such as Mailer and Calendar, you can “tear off” a menu, which keeps it open on your desktop for repeated use. You can recognize the availability of a tear-off menu by the appearance of a dotted line at the top of the menu. © Mustafa Golam,2007
  • 26. Basic Keyboard Skills You can perform desktop tasks using your keyboard instead of your mouse. When you use your keyboard for desktop navigation, note the following: The Alt key is the same as the Extend char key on some keyboards Return is the same as Enter on some keyboards Pressing Esc halts most interactive operations In Style Manager, the Window Behavior setting must be Click In Window To Make Active (this is the default value) Keyboard focus uses the highlight to show you which element of a window, menu, or control will respond to your input. To activate a selected menu item or control (such as a button), press the Spacebar. © Mustafa Golam,2007
  • 27. Basic Keyboard Skills (continued) To move the highlight to the next window: Press Alt+Tab. To move the keyboard highlight within a window: Press Tab and the arrow keys (up, down, left, and right). To close a window and remove it from the workspace: Press Alt+F4. To minimize a window (turn it into an icon): Press Alt+Spacebar, then N to choose Minimize from the Window menu. To move a window: Press Alt+Spacebar, then M to choose Move from the Window menu. Press the arrow keys to move the window up, down, left, or right, then press Return. Hold down Control while you press an arrow key to move the window faster. © Mustafa Golam,2007
  • 28. Leaving the Desktop © Mustafa Golam,2007
  • 29. On Log Out As you log out of the desktop, your current session is saved. When you log back in, the desktop will appear as it did before you logged out. Applications that do not get saved as part of the current session include: Applications that you run in terminal emulator windows Non-desktop applications that do not preserve their state during logout .You’ll need to restart these applications when you log in. © Mustafa Golam,2007
  • 30. To Lock Your Display To prevent unauthorized use of your system when you are away from it and have not logged out: © Mustafa Golam,2007
  • 31. Getting Help You can request help by: Pressing F1 or the Help key Choosing an item from an application’s Help menu Clicking the Help button in a dialog box Opening the Help Manager to browse all the available help The quickest and easiest way to get help is to press the F1 key. When you press F1,the application you are using displays the help topic most closely related to your current activity. Some keyboards have a dedicated Help key that may take the place of the F1 key. Help Menu Help Manager © Mustafa Golam,2007
  • 32. Starting a Desktop Session A desktop session occurs between the time you log in and the time you log out. The login screen, displayed by the Login Manager, is your gateway to the desktop. It provides a place for you to type your login name and password. The Options menu on the login screen lists your login options. In addition to running a desktop session, you can run a failsafe session. You can also select the language for your session. © Mustafa Golam,2007
  • 33. Starting and Ending a Desktop Session A desktop session starts when you log in. Session Manager is started after Login Manager authenticates your login and password. Session Manager provides the ability to manage sessions—to remember the state of your most recent session and return you there the next time you log in. Session Manager saves and restores: The appearance and behavior settings – for example, fonts, colors, and mouse settings. The window applications that were running – for example, your File Manager and Text Editor windows. Certain types of applications can’t be saved and restored by Session Manager. For example, if you start the vi editor from a command line in a Terminal window, Session Manager cannot restore your editing session. © Mustafa Golam,2007
  • 34. Starting a Command-Line Session Command Line Login mode enables you to temporarily leave the desktop to work in your operating system environment. Command Line Login mode is not a desktop session. When your system is in Command Line Login mode, the desktop is suspended. You log in using your operating system mechanism rather than Login Manager. There are no windows because the X server is not running. © Mustafa Golam,2007
  • 35. Using a Home Session Ordinarily, the desktop saves session information when you log out and uses that information to start your next session. If you start or stop applications during your session, or use Style Manager to change the appearance and behavior of your system, changes you make are reflected in your next session. This type of session is called a current session . The desktop also provides a home session . A home session is a session that you explicitly save. It’s like taking a snapshot of your current session at some point in time. Once you’ve saved a home session, you can specify that logging in always restores that session instead of the current session. © Mustafa Golam,2007
  • 36. To Automatically Start the Home Session at Login 1. Click the Style Manager control in the Front Panel. 2. Click the Startup control in Style Manager. The Startup dialog box is displayed. 3. Select Return to Home session. 4. Click OK. When you choose Return to Home session, Session Manager will not save your session at logout. © Mustafa Golam,2007
  • 37. Getting Help Requesting Help (F1) Choose a command from an application’s Help menu Open Help Manager from the Front Panel to browse help on your system Open the Help subpanel to choose help about the desktop or to choose On Item Help © Mustafa Golam,2007
  • 38. Pattern Searches In a pattern search certain characters (known as “wildcards”) have special meaning. You can combine these characters in a variety of ways. Two frequently used wildcards are asterisk (*) and question mark (?). The * matches any string of characters (including no characters), and ? matches any single character. Other wildcards include: . (period)—matches any character | (vertical bar)—specifies two search patterns and matches either pattern (logical OR) ( ) (parentheses)—encloses a pattern expression To search for a character that has special meaning in a regular expression, precede the character with a \ (backslash). © Mustafa Golam,2007
  • 39. Getting ALEX Help at OSS Right Mouse Click Documentation ALEX If it does not work then Set the Proxy to 10.10.4.59 and port 3828 © Mustafa Golam,2007
  • 40. To Display a Man Page © Mustafa Golam,2007
  • 41. To Change Help Window Colors for an Application 1. Edit your HomeDirectory/.Xdefaults file by adding these resources: application_name *DtHelpDialog*DisplayArea.foreground: color application_name *DtHelpDialog*DisplayArea.background: color application_name *DtHelpDialog*TocArea.foreground: color application_name *DtHelpDialog*TocArea.background: color application_name *DtHelpQuickDialog*DisplayArea.foreground: color application_name *DtHelpQuickDialog*DisplayArea.background: color Substitute the name of the application whose help windows you want to change for application_name. You can ask your system administrator for a list of colors that you can use or refer to your system documentation. 2. Save and close the file. © Mustafa Golam,2007
  • 42. Using the Front Panel The Front Panel is your “dashboard” or control area for the CDE desktop. It gives you point-and-click and drag-and-drop access to the majority of applications on your system; it allows you to switch workspaces; and it displays information such as time and date, printer status, and so on. You can customize your Front Panel to include your favorite applications, and you can move or minimize the Front Panel. © Mustafa Golam,2007
  • 43. Front Panel Elements and Customization © Mustafa Golam,2007
  • 44. Main Panel and Subpanels Main Panel Links Subpanel Cards Subpanel Files Subpanel Applications Subpanel Mail Subpanel Personal Printers Subpanel Tools Subpanel Hosts Subpanel Help Subpanel Trash Subpanel © Mustafa Golam,2007
  • 45. Changing the Default Web Browser Your PATH environment is searched for the Netscape command (for the Netscape browser) or hotjava command (for the HotJava™ browser). Change MAP_ACTION SDtNetscape or MAP_ACTION SDtHotJava at user-prefs.dt The user-prefs.dt file belongs in your $HOME/.dt/types directory. To create a user-prefs.dt file, copy the /usr/dt/appconfig/types/C/user-prefs.dt file and save it in your $HOME/.dt/types directory as user-prefs.dt. © Mustafa Golam,2007
  • 46. Miscellaneous Tasks Working With Bookmarks To Display a Different Clock Working With Bookmarks Using Encryption with crypt Using Compression with compress which use adaptive Lempel-Ziv coding. Using Archiving with tar © Mustafa Golam,2007
  • 47. To Put a Subpanel Control in the Main Panel © Mustafa Golam,2007
  • 48. File Manager Window © Mustafa Golam,2007
  • 49. Basic File System Concepts Files Folders Objects Since files and folders are both represented in File Manager as icons, the term object isused to describe them both. Paths Paths and Path Names Absolute Paths Absolute Paths © Mustafa Golam,2007
  • 50. Object Properties © Mustafa Golam,2007
  • 51. Links A link icon is a copy of an icon that points to the same file or folder as the original icon. Any changes you make after opening the link icon will also appear when you access the file or folder using the original icon. © Mustafa Golam,2007
  • 52. File and Folder Ownership and Security The traditional UNIX file and folder protection scheme provides read , write , and execute permissions for three user types: owner , group , and other . These are called basic permissions . Access Control Lists (ACLs) provide greater control over file and folder permissions than do basic permissions. ACLs enable you to define file or folder permissions for the owner, owner’s group, others, and specific users and groups, and default permissions for each of these categories. © Mustafa Golam,2007
  • 53. Basic Permissions Read Permission – Allows access to retrieve, copy, or view the contents of the object. Write Permission – For a file, allows access to change the contents of the file. For a folder, allows access to create or delete objects from the folder. Execute Permission – For a file, allows access to run the file (for executable files,scripts, and actions). For a folder, allows access to search and list the folder’s contents. © Mustafa Golam,2007
  • 54. Basic User Types Owner – The user who owns the file or folder. Only a system administrator (root user) can change the owner of a file or folder. Group – Users who have been grouped together by the system administrator. For example, the members of a department might belong to the same group. This group is the owning group and usually includes the file or folder’s owner. Other – All other users on the system besides the owner and owning group. © Mustafa Golam,2007
  • 55. On File Permission To View a File or Folder’s Permissions (sdtfprop) To Modify Basic Permissions To Change File or Folder Ownership To Browse and Edit Properties of Multiple Files and Folders © Mustafa Golam,2007
  • 56. On ACL ACLs enable you to define file or folder permissions for the owner, owner’s group, others, and specific users and groups, and default permissions for each of these categories. You can set up only one ACL per file or folder. An ACL consists of ACL entries . Each entry has a user type associated with it, much as basic permissions have Owner, Group, or Other associated with them. © Mustafa Golam,2007
  • 57. Properties Graphical User Interface (GUI) © Mustafa Golam,2007
  • 58. ACL Access List Entry © Mustafa Golam,2007
  • 59. Changing ACL © Mustafa Golam,2007
  • 60. Setting Default Permissions Through an Access Control List When you create a file or folder within a folder, it inherits the basic permissions set by the system administrator. (To determine the current defaults, create a new file or folder and then choose Properties from the Selected menu to view the permissions.) You can use an Access Control List to set default basic permissions yourself for any file or folder that is created within a folder. The ACL for that folder must contain entries for all four of the following required Default entry types: Default Owning User, Default Owning Group, Default Other, and Default Mask. An ACL can contain only one entry of each required type. The file or folder inherits the values for Owner, Group, and Other from the person who creates it and inherits the basic permissions from the required ACL Default entry types on the containing folder. ACL entries of these types do not have names associated with them. You can also set optional Default entry types—Default User and Default Group— for any file or folder that is created within a folder. You can create as many Default User or Default Group ACL entries as you want. You must specify the name of the user or group when you create the ACL entry. Any ACL in which you want to put a Default User or Default Group entry must also contain one of each required entry type. © Mustafa Golam,2007
  • 61. Permissions Mask ACL-enabled files and folders have a mask defined whose default permissions are the group permissions for the file or folder. The mask is the maximum allowable permissions granted to any user on all ACL entries and for Group basic permissions. It does not restrict Owner or Other basic permissions. For example, if a file’s mask is read-only, then you cannot create an ACL with write or execute permission for a user without changing the mask value. © Mustafa Golam,2007
  • 62. Using File Finder © Mustafa Golam,2007
  • 63. Customizing File Manager Views Using the Tree View To Display the Folder View To Change How Objects Are Represented To Change the Order in Which Icons Are Sorted To Re-Sort (Clean Up) Objects © Mustafa Golam,2007
  • 64. Hiding Files and Folders Hidden files and folders are those whose file types are selected in the filter list . The criterion for hiding or showing a file or folder is based on its data type. Use the Set Filter Options command to change which data types are shown and hidden. The default hidden data types are DOT_FILE, DOT_FOLDER, and CURRENT_FOLDER. © Mustafa Golam,2007
  • 65. Icon Browsing Files with names that end in .pm or .bm contain icons. These are the files that File Manager uses to build icons. By default, you must open these files to see the icons they contain. If you enable icon browsing, File Manager displays the contents of .pm or .bm files so you don’t have to open them to see what they look like. Copy the file /usr/dt/examples/types/ language /IconBrowse.dt into your / $HOME /.dt/types folder. © Mustafa Golam,2007
  • 66. To Change the Icon Display Area Size Open a Terminal window and type dtpad ~/.Xdefaults . Dtfile*smallIconWidth:24 Dtfile*smallIconHeight:24 Dtfile*largeIconWidth:38 Dtfile*largeIconHeight:38 © Mustafa Golam,2007
  • 67. GWM Graphical Workspace Manager enables you to operate a workspace "control panel". This panel displays a window containing a miniaturized picture of each workspace on the desktop. Workspaces may be created, deleted, renamed, tiled, or cascaded. Application windows may be moved (within or between workspaces), terminated,minimized, or maximized. © Mustafa Golam,2007
  • 68. GWM options © Mustafa Golam,2007
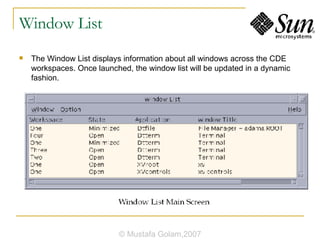
  • 69. Window List The Window List displays information about all windows across the CDE workspaces. Once launched, the window list will be updated in a dynamic fashion. © Mustafa Golam,2007
  • 70. Window List – Option Dialog © Mustafa Golam,2007
  • 71. Application Manager Windows © Mustafa Golam,2007
  • 72. Application Manager: Calculator © Mustafa Golam,2007
  • 73. Adding Application to Front Panel © Mustafa Golam,2007
  • 74. Advanced Application Manager Concepts File Names in Application Manager Folder Location of Application Manager /var/dt/appconfig/appmanager/ special_folder_name Creating Personal Actions and Data Types The desktop provides a tool that helps you create icons for running scripts, applications, and other commands. You may want to use this tool if you have a personal application your system administrator has not configured for you. © Mustafa Golam,2007
  • 75. Create Action Window © Mustafa Golam,2007
  • 76. Registering Applications When an application is registered in Application Manager, it has its own application group. This application group is available to all users on the system. Registering applications is an advanced task, since it requires you to be the root user. © Mustafa Golam,2007
  • 77. Customizing the Desktop Environment Introducing Style Manager Customizing Screen Appearance Color Palettes and Color Flashing Color Buttons Customizing System Behavior To Change Keyboard Behavior To Change Mouse Behavior To Change Beep Settings Power Management % xset s noblank © Mustafa Golam,2007
  • 78. Customizing Startup and Logout To Change How Your Next Session Starts To Set Your Logout Confirmation Preference © Mustafa Golam,2007
  • 79. Advanced Topic : Mailer Starting Mailer Logging In to Your IMAP Inbox Using the Mailer Main Window Viewing Your Mail Messages Acting on Your Mail Messages Searching for Mail Messages Within a Mailbox To Create Advanced Search Scripts Sending Mail Messages Using a Signature To Create an Automatic Reply (Vacation Message) Customizing Mailer Configuring the Appearance of the Toolbar © Mustafa Golam,2007
  • 80. Advanced Topic : Printer Your Default Printer To Determine the Default Printer To Change the Default Printer .dtprofile . LPDEST= printer_device; export LPDEST At csh : setenv LPDEST printer_device Printing Files Using Print Manager Printer Applications Displaying Print Job Information Print Job Properties © Mustafa Golam,2007
  • 81. Using Text Editor Opening and Closing Text Editor /usr/dt/bin/dtpad /usr/bin/gedit Text Editor Window Using Wrap To Fit © Mustafa Golam,2007
  • 82. Cursor Key Movement Key Cursor Movement Up Arrow Up one line Down Arrow Down one line Left Arrow Left one character Right Arrow Right one character Control+Left Arrow Move left to previous word Control+Right Arrow Move right to next word Home Beginning of the current line End End of the current line Control+Up Arrow Beginning of the previous paragraph Control+Down Arrow Beginning of the next paragraph Control+Home Beginning of the document Control+End End of the document Control+G To the Line field in the status line © Mustafa Golam,2007
  • 83. To Select Text with the Keyboard Text to Select Action Text block Move the cursor to the beginning of the text block. Hold down the Shift key and an arrow key to move the cursor to the end of the text block. Cursor to beginning of line Shift+Home Cursor to end of line Shift+End Cursor to beginning of paragraph Shift+Control+Up Arrow Cursor to end of paragraph Shift+Control+Down Arrow Cursor to beginning of document Shift+Control+Home Cursor to end of document Shift+Control+End All text Control+/ Deselect all text Control+\ © Mustafa Golam,2007
  • 84. Editing Keys Key Action Backspace Deletes the character before the cursor Delete Deletes the character following the insertion cursor Control+Backspace Deletes the previous word Shift+Backspace Deletes characters from the cursor to the beginning of the line Control+Delete Deletes all the characters from the cursor to the end of the current line Insert Toggles Overstrike and Insert mode © Mustafa Golam,2007
  • 85. UNIX Key Bindings UNIX® key bindings enable you to use a set of extended Emacs keys, such as Alt+B (back word) or Control+N (next line), in Text Editor. To enable UNIX key bindings (which are set off by default) you edit a file in your home directory. Add the following line to the .Xdefaults file in your home directory: #include "/usr/dt/appdefaults/language/UNIXbindings" Replace language with the name of your language environment. © Mustafa Golam,2007
  • 86. Unix Key Binding Enabled Command Alternate Menu Accelerator Find/Change (Control+F) Control+S Paste (Control+V) Shift+Insert Print (Control+P) No alternate accelerator Undo (Control+Z) Control+_ If you want to modify these menu accelerators, copy the contents of the /usr/dt/app-defaults/language/UNIXbindings file into your .Xdefaults file and then make your changes. © Mustafa Golam,2007
  • 87. Correcting Misspelled Words and etc. Customizing Spelling Checker Dictionaries To Import Another User’s Personal Dictionary To Set Your Default Dictionary Locale Formatting and Printing Documents © Mustafa Golam,2007
  • 88. Using Calendar Calendar Startup Calendar Main Window Calendar Views Day View Week View Month View Year View Appointments To Do Items Printing Calendars, Appointment, or To Do Lists Browsing Calendars on a Network To Create an Appointment Message Using a Mail Program © Mustafa Golam,2007
  • 89. Other Calendar Tools sdtcm_admin - Use to create and administer calendars sdtcm_convert - Use to convert data format or prune a calendar dtcm_editor - Use to edit appointments dtcm_lookup - Use to view calendar appointments dtcm_insert - Use to insert calendar appointments dtcm_delete - Use to delete calendar appointments © Mustafa Golam,2007
  • 90. Using Terminal Default Desktop Terminal Emulator – dtterm The default terminal emulator on the desktop is dtterm. The dtterm terminal emulator emulates that portion of the VT220 terminal that is consistent with ANSI and ISO standards. © Mustafa Golam,2007
  • 91. Starting a Terminal Window From the Front Panel From Application Manager From File Manager From the Window Menu of Another Terminal From Address Manager with a host selected © Mustafa Golam,2007
  • 92. Using a Terminal Window application [ options ] & xclock -digital & Ls To Resize the Window Contents eval ‘resize‘ © Mustafa Golam,2007
  • 93. Running dtterm on Another System The -display options dtterm -display hpcvxdm:0 & The rlogin command rlogin there xload -display here:0 The remsh command remsh remote -n client -display system : display [. screen ] The Terminal menu item in Address Manager (when the remote host is displayed) © Mustafa Golam,2007
  • 94. Dtterm Global Options © Mustafa Golam,2007
  • 95. Terminal Control Characters Control Name Character Definition Erase Control+H Backspace erases characters intr Control+C Interrupt: Cancel the current operation and redisplay the command-line prompt. kill Control+U Stop an operation or application. start Control+Q Accept keyboard input: Used to continue an application that has been paused. stop Control+S Do not accept keyboard input: Used to pause an application. swtch Control+@ Switch between layers in a shell. ttyModes: erase ^H intr ^C kill ^U start ^Q stop ^S swtch ^@ © Mustafa Golam,2007
  • 96. Using Icon Editor, Image Viewer, Snapshot Introducing Icon Editor dticon X pixmap (XPM) X bitmap (XBM) Starting and Quitting Image Viewer sdtimage Andrew Toolkit Kodak Photo CD (Base/4) Atari Compressed Spectrum* Lisp Machine Bit-Array Atari Degas 1* MGR Atari Degas 3* MTV/PRT Ray-Tracer Atari Uncompressed Spectrum* MacPaint Viewing PostScript Files Using Snapshot (sdtimage –snapshot) © Mustafa Golam,2007
  • 97. Using Video and Audio Java Media Player Audio From the Command Line sdtaudio filename Playing with Audio Window and Waveform window Audio Control © Mustafa Golam,2007
  • 98. Using Address Manager Cards Address Cards $HOME/.dt/Addresses Host Cards Alias Cards © Mustafa Golam,2007
  • 99. Working with Cards Cards Stored System Cards A site-specific database searched by sdtnamer (1) Personal Cards The file $HOME/.dt/Addresses (Editable in AddressManager) System Aliases The file /etc/aliases and the Mail.Aliases NIS map Personal Aliases The file $HOME/.mailrc Users The file /etc/passwd and the Passwd.Byname NIS map Hosts The file /etc/hosts and the Hosts.Byname NIS map © Mustafa Golam,2007
  • 100. Using Process Manager Use Process Manager to display the processes that are running on your workstation, and to perform actions on them. You can do this without knowing the syntax for ps(1), truss(1), kill(1), and other character-based commands. Where relevant, the equivalent UNIX commands are given for each Process Manager action. © Mustafa Golam,2007
  • 101. About Processes UNIX works with processes. Your login shell, application programs, the edit session you run, and even the ls program that lists your files are all processes under control of the operating environment. In UNIX you can perform operations on these processes. For example, you can look at all the programs you’re running at any time, stop and restart programs as you choose, and investigate and debug errant processes. © Mustafa Golam,2007
  • 102. Tips for Finding Errant Processes An errant process is a process that is not doing the job you expect it to do. For example, a process might be consuming a large percentage of your available resources due to a bug, or it might be interfering with another process. Use Process Manager to detect errant processes when you experience the following: Workstation performance or response seems to have slowed. A program will not respond to user input. A standard service such as printing, file transfer or remote login does not respond. When displaying all processes, Process Manager typically displays thirty to fifty processes, so finding the errant processes can be daunting to the untrained eye. Use Process Manager to identify: Processes using a large percentage of the available CPU or RAM when they shouldn’t Orphaned processes whose parent process has reverted to 1, that is init (but not processes such as sched, dtlogin , or cron whose parent process ID should be 1) Processes that were started a long time ago and weren’t terminated when they should have been Large processes owned by another user that are degrading performance © Mustafa Golam,2007
  • 103. Process Information Column Heading Meaning ID Process ID Name Process Name Owner Name of Owner CPU% Ratio of CPU time used recently to time available in the same period, expressed as a percentage RAM Amount of RAM currently occupied by this process Swap Total size in virtual memory Started Actual start time (or date if other than current) Parent Process ID of parent process, or PPID Command Actual UNIX command (truncated) being executed © Mustafa Golam,2007
  • 104. Process Manager Window © Mustafa Golam,2007
  • 105. Sending Kill Signals to a Process The kill command in UNIX enables the user to send a signal to a process. A signal is a message sent to a process to interrupt it and cause a response. If the process has been designed to respond to signals of the type sent it does so; otherwise, it terminates. © Mustafa Golam,2007
  • 106. Meaning of Common Signals The following table lists some commonly used signal numbers/names and their meanings. Signal No. Signal Name Meaning 1 HUP Hangup (often used before logging out) 2 INT Interrupt (same as pressing Control+C in a terminal session) 9 KILL Kill (terminates without cleanup) Only works if issued by process owner or super user (root) The program cannot respond to this signal; it must terminate 15 TERM Kill (terminates gracefully after cleanup) Only works if issued by process owner or super user (root) © Mustafa Golam,2007
  • 107. To Kill A Process (Quick Kill) The equivalent UNIX command is: kill -9 PID where PID is the process ID of the selected process. You can redefine the command performed by the Kill menu item to a different command by redefining the action labelled ’Kill’ in the file: /usr/dt/appconfig/types/C/sdtprocess.dt © Mustafa Golam,2007
  • 108. To Send a Signal to a Process Process Manager issues the signal command and closes the dialog box. No success message is issued. Killing a process typically kills its children. The equivalent UNIX command is: kill -signum_name PID where -signum_name is the signal number or name, and PID is the process ID of the selected process. © Mustafa Golam,2007
  • 109. To Show the Ancestry for a Process The equivalent UNIX command is: /usr/proc/bin/ptree PID where PID is the process ID of the selected process. © Mustafa Golam,2007
  • 110. To Trace Child Processes When a UNIX process initiates one or more dependent processes, we call these child processes , or children. Child and parent processes have the same user ID. Process Manager displays a record of the creation of any new children (and their children, recursively) for the selected process. Error returns are reported using the error code names described in the Intro(2) man page. The equivalent UNIX command is: truss -fa -texec,fork -s¦CLD,ALRM -p PID where PID is the process ID of the selected process. © Mustafa Golam,2007
  • 111. To Trace System Calls During its execution, a process makes calls to the UNIX kernel, or system calls. You might want to trace these system calls to see the affect they are having on other processes. Each line of the trace output reports either the fault or signal name or the system call name with its arguments and return values. For further information, see the truss(1)man page. The equivalent UNIX command is: truss -p PID where PID is the process ID of the selected process. © Mustafa Golam,2007
  • 112. To Show the Stack for a Process Process Manager displays a window containing hexadecimal and symbolic stack trace for the selected process. The equivalent UNIX command is: /usr/proc/bin/pstack PID where PID is the process ID of the selected process. © Mustafa Golam,2007
  • 113. To Debug a Process Application developers and system administrators sometimes use a debugging application such as Sun Workshop to investigate an errant process. The Debug item on the Process menu invokes your preferred debugger on the selected process. The equivalent UNIX command is: workshop -d command where workshop is the name of the debugger program and command is the command needed to pass the process ID to the debugger. © Mustafa Golam,2007
  • 114. Using Performance Meter Use the Performance Meter to monitor activity and performance on a workstation. Several performance parameters such as CPU utilization, disk activity, network packets, and the like, can be displayed graphically in this customizable window. To make Performance Meter’s Front Panel icon inactive, use Process Manager to kill the sdtperfmeter process. © Mustafa Golam,2007
  • 115. Using Hotkey Editor Use the Hotkey Editor to create, modify, or delete CDE hotkeys. Hotkey is a general term used to show the association between a specific key and a specified event (target event). For example, choosing Alt+Left will move the workspace to the left. The target event could be a CDE action, an application, a document, a workspace management function, or a multiple monitor management function. To Start Hotkey Editor Creating a Hotkey Editing a Hotkey Deleting and Recovering Hotkeys © Mustafa Golam,2007
  • 116. Misc Topics Using Personal Digital Assistant (PDA) Synchronization Power Management © Mustafa Golam,2007
  • 117. Keyboard Shortcuts for the Desktop Menu Shortcuts Keyboard Focus and the Highlight Moving the Keyboard Focus Opening and Closing Windows Online Help Keyboard Navigation © Mustafa Golam,2007
  • 118. Moving the Keyboard Focus Press To Move To Tab The next tab group Shift+Tab The previous tab group Down Arrow The next control in the tab group Up Arrow The previous control in a tab group F10 The window’s menu bar—use the arrow keys to display menus and move among their items Shift+F10 The selected object’s pop-up menu—use the arrow keys to move among the menu’s items Alt+Spacebar The Window menu © Mustafa Golam,2007
  • 119. Shortcut Key Continued Within a workspace Press To Move To Alt+Tab or Alt+Esc The next window or icon Shift+Alt+Tab The previous window or icon Alt+Up Arrow The bottom window in a stack of windows (bringing it forward) Alt+Down Arrow The bottom of the window stack Alt+F6 The next window belonging to an application, or between the Front Panel and a subpanel Shift+Alt+F6 The previous window belonging to an application, or between the Front Panel and a subpanel Within a menu Press To Move To Down Arrow The next menu item Up Arrow The previous menu item Press the Spacebar to choose a selected item from within a menu. Press Esc to dismiss a menu. © Mustafa Golam,2007
  • 120. Further Resources \\10.10.3.40\Documentation\OSS_DOCS http://docs.sun.com http://www.google.com http://www.unixq.com © Mustafa Golam,2007