SlideShare a Scribd company logo
Prepared by: Mohamed AbdAllah
Raspberry pi interfacing
Lecture 6: Working on raspberry pi
1
Lecture Agenda
 Installing Linux on the Pi.
 Setting a static IP address.
 Setting a local host name.
 Configuring the Wi-Fi dongle.
 Working with Pi GPIO.
 Working with Pi UART.
 Working with Pi PWM.
2
Lecture Agenda
3
Installing Linux on the Pi
4
 Downloading Linux image
• Download Linux image for raspberry pi, for example download the
Raspbian image from the following website:
http://raspberrypi.org/
 Image extracting
• Decompress the downloaded file, rename the decompressed file to any
name for easier access using command line, for example let the file
name be (assuming in home directory):
~/RaspberryImage.img
 Installing the image
• Put the SD Card in the computer and format it first (using disks utility
for example, you can type “disks” in the already installed applications).
Installing Linux on the Pi
5
• Then type the following command in the terminal to know the SD Card
name (Note the $ is just indication that this is a command, don’t write it
in your commands):
$ dmesg
• Then search in the last few lines for SD Card name, for example sdb
(Note we will ignore sdb0 and sdb1 and so on as those are just the SD
Card internal partitions if you didn’t format the card).
• Type on the terminal and wait about 5 minutes to finish:
$ sudo dd bs=4M if=~/RaspberryImage.img of=/dev/sdb
• Now the Pi is ready to boot, connect your SD Card, keyboard, mouse,
HDMI cable, LAN cable and WiFi dongle to the Pi and start working.
• Note that normally the HDMI cable will work automatically, but on
some cases if it didn’t work, we need to edit some configurations as we
will illustrate next.
Installing Linux on the Pi
6
 Configuring the HDMI
• In case that the HDMI didn’t work automatically, connect the SD Card to
the computer and open the file called config.txt inside the SD Card boot
partition.
• Note that you need to open it as root, in the command line type:
$ sudo gedit
And before hitting Enter key, drag the config.txt file from its place and drop
it beside your command to automatically paste its path, then hit Enter.
• The file after editing should look the same like this:
Installing Linux on the Pi
7
 Configuring the HDMI
Installing Linux on the Pi
8
 Configuring the HDMI
Installing Linux on the Pi
9
 Configuring the HDMI
• Now remove the SD Card from your computer and connect it to the Pi
and start it and it the HDMI now should work.
 First steps on the Pi
• At the first time the Pi boots it shows a configuration screen, you can
edit the configurations now or later after login by opening the same
screen by typing the command
$ sudo raspi-config
 Choose Expand File System option.
 Choose on advanced options to enable SSH, I2C, SPI.
 Choose update.
• After update, login by using “pi” as user name, and “raspberry” as
password
• Type the following commands
$ sudo apt-get update
$ sudo apt-get upgrade
Installing Linux on the Pi
10
 First steps on the Pi
• Now reboot the Pi
$ sudo reboot
• To connect remotely to the Pi using your PC inside the same network,
we need first to know the Pi IP address, so on the Pi type the command
$ ifconfig
• You will find the Pi IP address beside the interface “eth0” as now we are
connected to the network through LAN cable.
• Assuming that you found that the Pi IP is 192.168.1.2, now on your PC
while you are connected on the same network, type the following
$ sudo ssh pi@192.168.1.2
• Then if prompted, type yes and hit enter to confirm the connection
• Then type “pi” as user name, and “raspberry” as password, and now
you are one the Pi command line so any command you type is actually
executed on the Pi not on your PC.
Installing Linux on the Pi
11
Setting a static IP address
12
• The IP address we used to connect to the Pi may be changed by the
network router, so to make it static edit the following file on the Pi :
/etc/network/interfaces
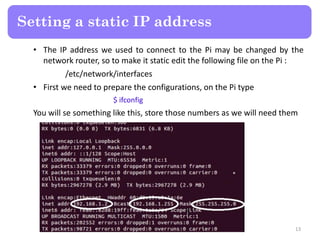
• First we need to prepare the configurations, on the Pi type
$ ifconfig
You will se something like this, store those numbers as we will need them
Setting a static IP address
13
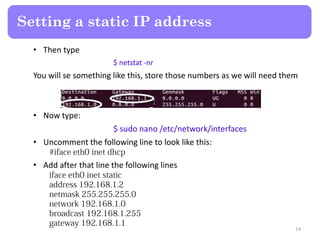
• Then type
$ netstat -nr
You will se something like this, store those numbers as we will need them
• Now type:
$ sudo nano /etc/network/interfaces
• Uncomment the following line to look like this:
• Add after that line the following lines
Setting a static IP address
14
• The file after editing should look like this, now close the file by hitting
CTRL+X and hit Enter:
• Now whenever the Pi boots, it will automatically take the IP 192.168.1.2
Setting a static IP address
15
Setting a local host name
16
• The problem of the static IP address is the when we move to another
network with other configurations it will not work, so we will give the Pi
a local host name that we can deal with the Pi using that name
whatever its IP.
• First type the following command to set password for root user as we
will need it
$ sudo passwd
• Then we need to undo the configurations of the static IP, open the same
file again /etc/network/interfaces and undo all changes again
Setting a local host name
17
• Then type
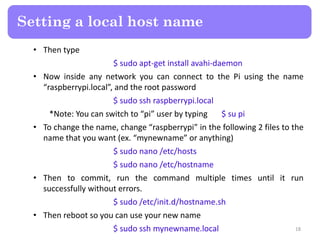
$ sudo apt-get install avahi-daemon
• Now inside any network you can connect to the Pi using the name
“raspberrypi.local”, and the root password
$ sudo ssh raspberrypi.local
*Note: You can switch to “pi” user by typing $ su pi
• To change the name, change “raspberrypi” in the following 2 files to the
name that you want (ex. “mynewname” or anything)
$ sudo nano /etc/hosts
$ sudo nano /etc/hostname
• Then to commit, run the command multiple times until it run
successfully without errors.
$ sudo /etc/init.d/hostname.sh
• Then reboot so you can use your new name
$ sudo ssh mynewname.local
Setting a local host name
18
Configuring the Wi-Fi dongle
19
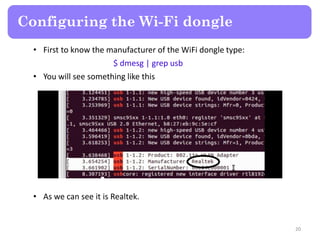
• First to know the manufacturer of the WiFi dongle type:
$ dmesg | grep usb
• You will see something like this
• As we can see it is Realtek.
Configuring the Wi-Fi dongle
20
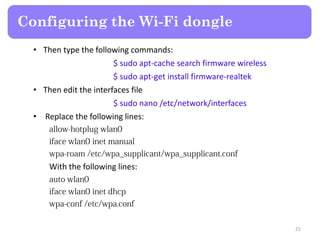
• Then type the following commands:
$ sudo apt-cache search firmware wireless
$ sudo apt-get install firmware-realtek
• Then edit the interfaces file
$ sudo nano /etc/network/interfaces
• Replace the following lines:
With the following lines:
Configuring the Wi-Fi dongle
21
• Then type the following command:
$ sudo nano /etc/wpa.conf
• Type the following lines, replace “networkname” with your WiFi
network name, and “network passkey” with your WiFi network pass
key:
*Note that there is no space after the = sign
• Now shutdown and remove the LAN cable then start the Pi with the
WiFi dongle only and it will automatically access the network, you can
access it remotely using the same name “raspberrypi.local” or the
name you gave to it.
Configuring the Wi-Fi dongle
22
Working with Pi GPIO
23
Working with Pi GPIO
24
• To interact with Pi GPIO (Make pi input or output, read pin value or
write to pin logic high or logic low value), first create empty file:
$ nano GPIO_python.py
• Write the following lines in the file, here we are making LED ON for 5
seconds then OFF on GPIO17:
Working with Pi GPIO
25
• Now close the file, then add execute permission to it:
$ sudo chmod u+x GPIO_python.py
• Now execute the script by typing:
$ sudo ./GPIO_python.py
Working with Pi GPIO
26
• To make LED Flasher each 1 second on GPIO17, create new script as
previous example:
Working with Pi GPIO
27
• To take input from GPIO4, if logic high the make the LED connected to
GPIO17 to be ON, else make LED OFF, create new script:
Working with Pi GPIO
28
Working with Pi UART
29
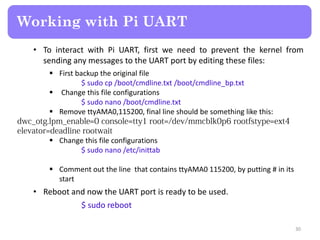
• To interact with Pi UART, first we need to prevent the kernel from
sending any messages to the UART port by editing these files:
 First backup the original file
$ sudo cp /boot/cmdline.txt /boot/cmdline_bp.txt
 Change this file configurations
$ sudo nano /boot/cmdline.txt
 Remove ttyAMA0,115200, final line should be something like this:
 Change this file configurations
$ sudo nano /etc/inittab
 Comment out the line that contains ttyAMA0 115200, by putting # in its
start
• Reboot and now the UART port is ready to be used.
$ sudo reboot
Working with Pi UART
30
• To send and receive bytes on UART port, create new script:
Working with Pi UART
31
• To observe what you receive on the serial port you can use a program
like minicom, to install it:
$ sudo apt-get install minicom
• To edit program configurations:
$ sudo minicom -s
• To edit port name press Shift+A, and change it to be /dev/ttyAMA0.
• To edit baud rate press Shift+E, then Shift+C for 9600.
• Now choose save as dfl to save this configurations as default, then Exit.
• To use the program at any time, type the following and observe what
you receive on the UART port:
$ sudo minicom
Working with Pi UART
32
Working with Pi PWM
33
• To output a soft PWM signal on any GPIO for example GPIO27, create
new script:
Working with Pi PWM
34
• Useful methods:
Working with Pi PWM
35
Mohamed AbdAllah
Embedded Systems Engineer
mohabdallah8@gmail.com
36

More Related Content

PPTX
Raspberry pi
PDF
Introduction to Raspberry PI
PDF
Linux Porting
PPTX
MPMC presentation.pptx
PPTX
PPTX
Raspberry Pi Session - 22_11_2014
PDF
Understanding The Boot Process
PPT
Introduction motherboard
Raspberry pi
Introduction to Raspberry PI
Linux Porting
MPMC presentation.pptx
Raspberry Pi Session - 22_11_2014
Understanding The Boot Process
Introduction motherboard

What's hot (20)

ODP
Basics of boot-loader
PPT
PPTX
Raspberry pi
PPT
Raspberry Pi Presentation
PPTX
Computer hardware presentation
PPTX
Raspberry Pi (Introduction)
PDF
I2c drivers
PPTX
BIOS basic input output system
PPTX
Routers and Routing Configuration
PPTX
Bios, cmos and post
PDF
Real Time Operating System Concepts
PPT
PPTX
Raspberry pi
PDF
Boot process: BIOS vs UEFI
PPTX
Ardui no
PPTX
Motherboard and its components
PDF
USB Drivers
PPTX
U-Boot presentation 2013
PPTX
RISC (reduced instruction set computer)
PPTX
2nd lesson installing operating system
Basics of boot-loader
Raspberry pi
Raspberry Pi Presentation
Computer hardware presentation
Raspberry Pi (Introduction)
I2c drivers
BIOS basic input output system
Routers and Routing Configuration
Bios, cmos and post
Real Time Operating System Concepts
Raspberry pi
Boot process: BIOS vs UEFI
Ardui no
Motherboard and its components
USB Drivers
U-Boot presentation 2013
RISC (reduced instruction set computer)
2nd lesson installing operating system
Ad

Viewers also liked (20)

PDF
Raspberry Pi - Lecture 1 Introduction
PDF
Raspberry Pi - Lecture 2 Linux OS
PDF
Raspberry Pi - Lecture 5 Python for Raspberry Pi
PDF
Raspberry Pi - Lecture 4 Hardware Interfacing Special Cases
PDF
Raspberry Pi - Lecture 3 Embedded Communication Protocols
PDF
Embedded C - Lecture 4
PDF
Hardware interfacing basics using AVR
PDF
Embedded C - Lecture 1
PDF
Embedded C - Lecture 3
PDF
Embedded C - Lecture 2
PPT
Raspberry pi
DOCX
Plc dasar
PPT
Linuxdd[1]
PPTX
Device drivers Introduction
PDF
Linux kernel code
PDF
Gnubs-pres-foss-cdac-sem
PPTX
Device Drivers in Linux
PDF
Breaking into Open Source and Linux: A USB 3.0 Success Story
PDF
brief intro to Linux device drivers
PPTX
Linux Device Driver’s
Raspberry Pi - Lecture 1 Introduction
Raspberry Pi - Lecture 2 Linux OS
Raspberry Pi - Lecture 5 Python for Raspberry Pi
Raspberry Pi - Lecture 4 Hardware Interfacing Special Cases
Raspberry Pi - Lecture 3 Embedded Communication Protocols
Embedded C - Lecture 4
Hardware interfacing basics using AVR
Embedded C - Lecture 1
Embedded C - Lecture 3
Embedded C - Lecture 2
Raspberry pi
Plc dasar
Linuxdd[1]
Device drivers Introduction
Linux kernel code
Gnubs-pres-foss-cdac-sem
Device Drivers in Linux
Breaking into Open Source and Linux: A USB 3.0 Success Story
brief intro to Linux device drivers
Linux Device Driver’s
Ad

Similar to Raspberry Pi - Lecture 6 Working on Raspberry Pi (20)

PPTX
Up and running with Raspberry Pi
PPTX
Raspberry Pi ppt.pptx
PPTX
Raspberry Pi ppt.pptx
PDF
Raspi_TOR_Access_Point_BenMoore
DOCX
Lab manual
PPT
Raspberry zero usb in linux
PPTX
introduction to Raspberry pi
PDF
Raspberry pi overview
PPTX
Raspberry Pi Introductory Lecture
PPTX
IOT notes ....,.........
PPTX
Configuring Raspberry Pi as a Dev Environment
PPTX
IoT for data science Module 5 - Raspberry Pi.pptx
DOCX
Ex.no1
PPTX
Raspberry pi : how to get started
PPTX
Raspberry pi
PDF
Exploring Raspberry Pi
DOCX
Raspberry with laptop
PPTX
Starting Raspberry Pi
PPTX
Getting Started with Raspberry Pi
PPTX
Capstone_Project.ppt
Up and running with Raspberry Pi
Raspberry Pi ppt.pptx
Raspi_TOR_Access_Point_BenMoore
Lab manual
Raspberry zero usb in linux
introduction to Raspberry pi
Raspberry pi overview
Raspberry Pi Introductory Lecture
IOT notes ....,.........
Configuring Raspberry Pi as a Dev Environment
IoT for data science Module 5 - Raspberry Pi.pptx
Ex.no1
Raspberry pi : how to get started
Raspberry pi
Exploring Raspberry Pi
Raspberry with laptop
Starting Raspberry Pi
Getting Started with Raspberry Pi
Capstone_Project.ppt

Recently uploaded (20)

PPTX
Lesson 3_Tessellation.pptx finite Mathematics
PPTX
Construction Project Organization Group 2.pptx
PPT
Mechanical Engineering MATERIALS Selection
PDF
Evaluating the Democratization of the Turkish Armed Forces from a Normative P...
PDF
Structs to JSON How Go Powers REST APIs.pdf
PPTX
UNIT 4 Total Quality Management .pptx
PPTX
OOP with Java - Java Introduction (Basics)
PPTX
additive manufacturing of ss316l using mig welding
PPTX
Lecture Notes Electrical Wiring System Components
PDF
The CXO Playbook 2025 – Future-Ready Strategies for C-Suite Leaders Cerebrai...
PPTX
Internet of Things (IOT) - A guide to understanding
PPTX
Strings in CPP - Strings in C++ are sequences of characters used to store and...
PPTX
FINAL REVIEW FOR COPD DIANOSIS FOR PULMONARY DISEASE.pptx
PPTX
Infosys Presentation by1.Riyan Bagwan 2.Samadhan Naiknavare 3.Gaurav Shinde 4...
PDF
Embodied AI: Ushering in the Next Era of Intelligent Systems
DOCX
ASol_English-Language-Literature-Set-1-27-02-2023-converted.docx
PDF
July 2025 - Top 10 Read Articles in International Journal of Software Enginee...
PPTX
CYBER-CRIMES AND SECURITY A guide to understanding
PPTX
CARTOGRAPHY AND GEOINFORMATION VISUALIZATION chapter1 NPTE (2).pptx
PPTX
bas. eng. economics group 4 presentation 1.pptx
Lesson 3_Tessellation.pptx finite Mathematics
Construction Project Organization Group 2.pptx
Mechanical Engineering MATERIALS Selection
Evaluating the Democratization of the Turkish Armed Forces from a Normative P...
Structs to JSON How Go Powers REST APIs.pdf
UNIT 4 Total Quality Management .pptx
OOP with Java - Java Introduction (Basics)
additive manufacturing of ss316l using mig welding
Lecture Notes Electrical Wiring System Components
The CXO Playbook 2025 – Future-Ready Strategies for C-Suite Leaders Cerebrai...
Internet of Things (IOT) - A guide to understanding
Strings in CPP - Strings in C++ are sequences of characters used to store and...
FINAL REVIEW FOR COPD DIANOSIS FOR PULMONARY DISEASE.pptx
Infosys Presentation by1.Riyan Bagwan 2.Samadhan Naiknavare 3.Gaurav Shinde 4...
Embodied AI: Ushering in the Next Era of Intelligent Systems
ASol_English-Language-Literature-Set-1-27-02-2023-converted.docx
July 2025 - Top 10 Read Articles in International Journal of Software Enginee...
CYBER-CRIMES AND SECURITY A guide to understanding
CARTOGRAPHY AND GEOINFORMATION VISUALIZATION chapter1 NPTE (2).pptx
bas. eng. economics group 4 presentation 1.pptx

Raspberry Pi - Lecture 6 Working on Raspberry Pi

  • 1. Prepared by: Mohamed AbdAllah Raspberry pi interfacing Lecture 6: Working on raspberry pi 1
  • 2. Lecture Agenda  Installing Linux on the Pi.  Setting a static IP address.  Setting a local host name.  Configuring the Wi-Fi dongle.  Working with Pi GPIO.  Working with Pi UART.  Working with Pi PWM. 2
  • 5.  Downloading Linux image • Download Linux image for raspberry pi, for example download the Raspbian image from the following website: http://raspberrypi.org/  Image extracting • Decompress the downloaded file, rename the decompressed file to any name for easier access using command line, for example let the file name be (assuming in home directory): ~/RaspberryImage.img  Installing the image • Put the SD Card in the computer and format it first (using disks utility for example, you can type “disks” in the already installed applications). Installing Linux on the Pi 5
  • 6. • Then type the following command in the terminal to know the SD Card name (Note the $ is just indication that this is a command, don’t write it in your commands): $ dmesg • Then search in the last few lines for SD Card name, for example sdb (Note we will ignore sdb0 and sdb1 and so on as those are just the SD Card internal partitions if you didn’t format the card). • Type on the terminal and wait about 5 minutes to finish: $ sudo dd bs=4M if=~/RaspberryImage.img of=/dev/sdb • Now the Pi is ready to boot, connect your SD Card, keyboard, mouse, HDMI cable, LAN cable and WiFi dongle to the Pi and start working. • Note that normally the HDMI cable will work automatically, but on some cases if it didn’t work, we need to edit some configurations as we will illustrate next. Installing Linux on the Pi 6
  • 7.  Configuring the HDMI • In case that the HDMI didn’t work automatically, connect the SD Card to the computer and open the file called config.txt inside the SD Card boot partition. • Note that you need to open it as root, in the command line type: $ sudo gedit And before hitting Enter key, drag the config.txt file from its place and drop it beside your command to automatically paste its path, then hit Enter. • The file after editing should look the same like this: Installing Linux on the Pi 7
  • 8.  Configuring the HDMI Installing Linux on the Pi 8
  • 9.  Configuring the HDMI Installing Linux on the Pi 9
  • 10.  Configuring the HDMI • Now remove the SD Card from your computer and connect it to the Pi and start it and it the HDMI now should work.  First steps on the Pi • At the first time the Pi boots it shows a configuration screen, you can edit the configurations now or later after login by opening the same screen by typing the command $ sudo raspi-config  Choose Expand File System option.  Choose on advanced options to enable SSH, I2C, SPI.  Choose update. • After update, login by using “pi” as user name, and “raspberry” as password • Type the following commands $ sudo apt-get update $ sudo apt-get upgrade Installing Linux on the Pi 10
  • 11.  First steps on the Pi • Now reboot the Pi $ sudo reboot • To connect remotely to the Pi using your PC inside the same network, we need first to know the Pi IP address, so on the Pi type the command $ ifconfig • You will find the Pi IP address beside the interface “eth0” as now we are connected to the network through LAN cable. • Assuming that you found that the Pi IP is 192.168.1.2, now on your PC while you are connected on the same network, type the following $ sudo ssh pi@192.168.1.2 • Then if prompted, type yes and hit enter to confirm the connection • Then type “pi” as user name, and “raspberry” as password, and now you are one the Pi command line so any command you type is actually executed on the Pi not on your PC. Installing Linux on the Pi 11
  • 12. Setting a static IP address 12
  • 13. • The IP address we used to connect to the Pi may be changed by the network router, so to make it static edit the following file on the Pi : /etc/network/interfaces • First we need to prepare the configurations, on the Pi type $ ifconfig You will se something like this, store those numbers as we will need them Setting a static IP address 13
  • 14. • Then type $ netstat -nr You will se something like this, store those numbers as we will need them • Now type: $ sudo nano /etc/network/interfaces • Uncomment the following line to look like this: • Add after that line the following lines Setting a static IP address 14
  • 15. • The file after editing should look like this, now close the file by hitting CTRL+X and hit Enter: • Now whenever the Pi boots, it will automatically take the IP 192.168.1.2 Setting a static IP address 15
  • 16. Setting a local host name 16
  • 17. • The problem of the static IP address is the when we move to another network with other configurations it will not work, so we will give the Pi a local host name that we can deal with the Pi using that name whatever its IP. • First type the following command to set password for root user as we will need it $ sudo passwd • Then we need to undo the configurations of the static IP, open the same file again /etc/network/interfaces and undo all changes again Setting a local host name 17
  • 18. • Then type $ sudo apt-get install avahi-daemon • Now inside any network you can connect to the Pi using the name “raspberrypi.local”, and the root password $ sudo ssh raspberrypi.local *Note: You can switch to “pi” user by typing $ su pi • To change the name, change “raspberrypi” in the following 2 files to the name that you want (ex. “mynewname” or anything) $ sudo nano /etc/hosts $ sudo nano /etc/hostname • Then to commit, run the command multiple times until it run successfully without errors. $ sudo /etc/init.d/hostname.sh • Then reboot so you can use your new name $ sudo ssh mynewname.local Setting a local host name 18
  • 20. • First to know the manufacturer of the WiFi dongle type: $ dmesg | grep usb • You will see something like this • As we can see it is Realtek. Configuring the Wi-Fi dongle 20
  • 21. • Then type the following commands: $ sudo apt-cache search firmware wireless $ sudo apt-get install firmware-realtek • Then edit the interfaces file $ sudo nano /etc/network/interfaces • Replace the following lines: With the following lines: Configuring the Wi-Fi dongle 21
  • 22. • Then type the following command: $ sudo nano /etc/wpa.conf • Type the following lines, replace “networkname” with your WiFi network name, and “network passkey” with your WiFi network pass key: *Note that there is no space after the = sign • Now shutdown and remove the LAN cable then start the Pi with the WiFi dongle only and it will automatically access the network, you can access it remotely using the same name “raspberrypi.local” or the name you gave to it. Configuring the Wi-Fi dongle 22
  • 23. Working with Pi GPIO 23
  • 24. Working with Pi GPIO 24
  • 25. • To interact with Pi GPIO (Make pi input or output, read pin value or write to pin logic high or logic low value), first create empty file: $ nano GPIO_python.py • Write the following lines in the file, here we are making LED ON for 5 seconds then OFF on GPIO17: Working with Pi GPIO 25
  • 26. • Now close the file, then add execute permission to it: $ sudo chmod u+x GPIO_python.py • Now execute the script by typing: $ sudo ./GPIO_python.py Working with Pi GPIO 26
  • 27. • To make LED Flasher each 1 second on GPIO17, create new script as previous example: Working with Pi GPIO 27
  • 28. • To take input from GPIO4, if logic high the make the LED connected to GPIO17 to be ON, else make LED OFF, create new script: Working with Pi GPIO 28
  • 29. Working with Pi UART 29
  • 30. • To interact with Pi UART, first we need to prevent the kernel from sending any messages to the UART port by editing these files:  First backup the original file $ sudo cp /boot/cmdline.txt /boot/cmdline_bp.txt  Change this file configurations $ sudo nano /boot/cmdline.txt  Remove ttyAMA0,115200, final line should be something like this:  Change this file configurations $ sudo nano /etc/inittab  Comment out the line that contains ttyAMA0 115200, by putting # in its start • Reboot and now the UART port is ready to be used. $ sudo reboot Working with Pi UART 30
  • 31. • To send and receive bytes on UART port, create new script: Working with Pi UART 31
  • 32. • To observe what you receive on the serial port you can use a program like minicom, to install it: $ sudo apt-get install minicom • To edit program configurations: $ sudo minicom -s • To edit port name press Shift+A, and change it to be /dev/ttyAMA0. • To edit baud rate press Shift+E, then Shift+C for 9600. • Now choose save as dfl to save this configurations as default, then Exit. • To use the program at any time, type the following and observe what you receive on the UART port: $ sudo minicom Working with Pi UART 32
  • 33. Working with Pi PWM 33
  • 34. • To output a soft PWM signal on any GPIO for example GPIO27, create new script: Working with Pi PWM 34
  • 35. • Useful methods: Working with Pi PWM 35
  • 36. Mohamed AbdAllah Embedded Systems Engineer mohabdallah8@gmail.com 36