SlideShare a Scribd company logo
2
Most read
4
Most read
7
Most read
CHAPTER 1
Creating HTML forms using
KompoZer
Use of IDE to create a form
• Full form of IDE is Integrated Development
Environment
• Creating a form using HTML tags is tedious process.
• An IDE is a software application that provides
complete facilities to programmer to develop software.
• IDE provides
1)GUI – Graphical User Interface
2)Text/code Editor
3) compiler and/or interpreter and
4) a debugger.
• 1) Kompozer, 2) Eclipse, 3) JBuilder and 4) Netbeans
are all examples of some open source IDEs.
Introduction to KompoZer
• KompoZer is a free open source web development
IDE.
• KompoZer can be downloaded from
http://www.KompoZer.net.
• It provides a webpage editor which has a simple
graphical interface known as WYSIWYG
• WYSIWYG means “What You See is What You Get”
• It is a complete web authoring system which
integrates 1) webpage development and 2) web
file management.
Interface to KompoZer
• Open KompoZer::::
– ApplicationsProgrammingKompoZer
– Double click KompoZer icon on desktop
• To view the different toolbars and status bar , click on
View -> Show/Hide
• Different Toolbar: Composite Toolbar, Format Toolbar1,
Format Toolbar2, Edit Mode Toolbar and Status bar.
• Site Manager and Rulers option also be listed.
• KompoZer has eight menus:- File, Edit, View, Insert, Format,
Table, Tools and Help.
• 3 Toolbars below Menu bar:- Composite Toolbar, Format
Toolbar-1 and Format Toolbar-2
– The composite toolbar is used to create new file, open a file, save a
file or publish a web page.
– The format toolbar1 and format toolbar2 are used to format the
text, add bullets, numbering and perform similar formatting
operations.
2 Panes in the center of the Kompozer Window:
In the centre of the window, you can see two panes:
Site Manager and blank web page
• Site Manager:
– Site Manager is a powerful tool used to navigate within the site or
between the sites.
– KompoZer incorporates a Site Manager which gives rapid access
to the files on both local machines and remote servers
– We can close the site manager pane by clicking on close button or
press F9.
• Blank webpage (Page Pane):
– The page pane shows a blank untitled webpage.
Edit Mode toolbar
The bottom right side of the window shows Edit mode toolbar
with three viewing modes: Normal, HTML tags and Preview
– The Normal View mode
– Webpage along with the table outlines are visible.
– Normal view is very similar to preview mode.
– HTML tags View:
– A Yellow marker is used to indicate the start tag for all
elements.
– Preview Mode:
– The Preview mode offers the page view as seen in a
browser.
– In the Preview mode the script do not run and
therefore their effects will not be seen.
– The links also does not operate in preview mode
3 tabs on the Left side of the page pane:
– The Design tab is used to design the web page.
– The Split tab display the HTML source of the
current element.
– Source tab shows all details of the HTML code. It
helps in editing the source code.
Status Bar
– On the bottom of the window.
– When any item in page is clicked, its structure
appears in the status bar.
Introduction to Form
• With the increase in the use of Internet many activities have
become online.
• Web page is used to fill various information about ourselves or
product.
• HTML forms are used to help the visitors of the website to input
data.
• A form in HTML is a container used to collect different kinds of
inputs from the user.
• It allows for more interactivity and control in data entry.
• Well organized structure designed to input the required the data
and information of website is called form.
• HTML contains elements like label, checkbox, text input field, radio
button, submit button, reset button and many more.
• The form elements are used to enter the data as well as validate
the data within the forms.
Four elements are used in a form:
1) Form
2) Input
3) Textarea
4) Select and option
Form Elements
• Form element acts as a container for all the elements used in the form.
• The tag <form>….</form> is used to implement this element.
• SYNTAX::::: <form action=”file1.html” method=”post”>
• The form element uses two attributes namely action and method
• Action Attribute
– The action attribute is used to specify where to send the form data when the form is
submitted.
– The action attribute takes a filename as value.
• Method Attribute
– The method attribute specifies the HTTP(Hyper Text Transfer Protocol) method to be
used when sending the data.
– The method attribute take two values: GET and POST
• GET Method
»The GET method retrieves the data from the form and sends it to the server by
attaching it at the end of the URL.
»The GET method allows only a limited amount of information to be sent at a
time.
»The default value for method attribute is GET.
• POST Method
»In the POST method, the data is sent as a block through the HTTP transaction.
»POST method does not have any restriction on data length.
»POST method attribute send the data in the body of the request
Input Elements
• The input elements are used to insert various fields in
the form.
• Fields likes 1) Textbox 2) Password 3) Radio button
4) Checkbox 5)Submit button & 6)Reset button
• The tag <input>…….</input> or <input> is used to
implement input element.
• The input tag has different attributes like type, name
and value.
– The type attribute of the input element specifies the field
that is to be created in the form.
– The name attribute specifies the name to be used for the
field in the form.
– The value attribute specifies the default value of the field
in the form.
Various Input Elements created using
type attribute of <input> tag:
• Text or Textbox
– A user can enter any text or data of his choice in the text field.
– Textbox is used to enter data like username, email id etc
– Syntax:::: <input type=”text” name=”fname” value=”priya”>
• Password
– Password filed is used to enter password and it is similar to text
field.
– In password field the characters are not displayed to the user.
Instead the character typed is converted into non readable format.
– Syntax:::: <input type=”password” name=”pwd”>
• Radio button
– Any one radio button can be selected at a time from a group of
radio buttons.
– Generally radio button used to select a single item from a given
group of items.
– Syntax:::: <input type=”radio” name=”gender” value=”female”>
• Checkbox
– Multiple check boxes can be selected at a time.
– Generally used to select a multiple items from a given
group of items
– Syntax:::: <input type=”checkbox” name=”hobby”
value=”reading”>
• Submit button
– On clicking the submit button, the values of data entered
in the form is submitted to the file specified in the action
attribute of the form element.
– Syntax:::: <input type=”submit” value=”Login”>
• Reset button
– On clicking the reset button, the values of data entered in
the form are cleared and set back to default values.
– Syntax:::: <input type=”reset” value=”Clear”>
Textarea Element
• The textarea element allows multi line text input
• The tag <textarea>….</textarea> is used to implement
textarea element.
• Textarea allows entering unlimited number of characters.
• Textarea can be used to enter comment, report or a long
description of product.
• The size of a textarea element can be specifies using rows
and cols attributes.
• The row attribute is used to set the number of rows of text
that will be visible without scrolling up and down.
• The cols attribute is used to set the number of columns of
text that will be visible without scrolling right or left.
• Syntax:::: <textarea name=”address” rows=”5” cols=”20”>
Some content goes here </textarea>
Select and option Element (Drop
down menu)
• The select element is used to create a drop down list
or menu in a form.
• The tag <select>….</select> is used to create a drop
down menu.
• The tag <option>…</option> is used to create the
elements within the menu.
• Selected attribute is optional.
• Syntax::::
<select>
<option> Bhuj</option>
<option>Gandhidham</option>
</select>
Changing background color to the form
• To give a background color to the form from
white color to any other color, go to
FormatPage Colors and Background
• Select “Use custom colors” option. Click the
background option and this display “Block
Background Color” dialog box. Select the
color and click on OK button.
Thank You

More Related Content

PPTX
WWW and web browser
PPT
PPT
Evolution of www ppt
PPTX
HTML Lesson 1
DOCX
WEB DESIGNING MODULE
PDF
Prep 2-booklet-2nd-term-2016-2017
PPT
world wide web
PPTX
Grade 10 COMPUTER
WWW and web browser
Evolution of www ppt
HTML Lesson 1
WEB DESIGNING MODULE
Prep 2-booklet-2nd-term-2016-2017
world wide web
Grade 10 COMPUTER

What's hot (20)

PPTX
Std 12 Computer Chapter 2 Cascading Style Sheet and Javascript (Part-2)
PPTX
Std 12 Computer Chapter 2 Cascading Style Sheets and Javascript(Part 1 CSS)
PPTX
Std 12 Computer Chapter 3 Designing Simple Website using KompoZer
PPTX
Std 12 Computer Chapter 5 Introduction to Mcommerce (Part 1)
PPTX
Microsoft FrontPage PPT
PPTX
Std 12 Computer Chapter 5 Introduction to Mcommerce (Part 2)
PPTX
html-table
PPTX
An Overview of HTML, CSS & Java Script
PPTX
Html ppt
PPTX
Html forms
PDF
Html frames
PPTX
HTML (Web) basics for a beginner
PDF
Introduction to html
PPT
Introduction to visual basic programming
PPTX
Std 12 Computer Chapter 4 Introduction to Ecommerce (Part 2)
DOCX
Html example
PPT
Intro Html
PPTX
Html5 tutorial for beginners
PPTX
Std 12 Computer Chapter 2 Cascading Style Sheet and Javascript (Part-2)
Std 12 Computer Chapter 2 Cascading Style Sheets and Javascript(Part 1 CSS)
Std 12 Computer Chapter 3 Designing Simple Website using KompoZer
Std 12 Computer Chapter 5 Introduction to Mcommerce (Part 1)
Microsoft FrontPage PPT
Std 12 Computer Chapter 5 Introduction to Mcommerce (Part 2)
html-table
An Overview of HTML, CSS & Java Script
Html ppt
Html forms
Html frames
HTML (Web) basics for a beginner
Introduction to html
Introduction to visual basic programming
Std 12 Computer Chapter 4 Introduction to Ecommerce (Part 2)
Html example
Intro Html
Html5 tutorial for beginners
Ad

Similar to Std 12 Computer Chapter 1 Creating Html Forms Using KompoZer (20)

PPT
Web forms and html (lect 4)
PDF
CSS_Forms.pdf
PPTX
Web design - Working with forms in HTML
PPTX
HTML FORMS.pptx
PPSX
Computer language - Html forms
PPT
Forms,Frames.ppt
PPT
Forms,Frames.ppt
PPTX
Html form tag
PPT
Web forms and html lecture Number 4
PPTX
1. Lecture 1 WT- Forms.pptxl;kjhgfdsfghj
DOCX
PPTX
Web topic 20 1 html forms
PPTX
Web topic 20 2 html forms
PPTX
PPTX
Html form
PPTX
PPT
331592291-HTML-and-Cascading style sheet
PDF
Tm 1st quarter - 2nd meeting
PPTX
Html forms
PDF
HTML Foundations, pt 3: Forms
Web forms and html (lect 4)
CSS_Forms.pdf
Web design - Working with forms in HTML
HTML FORMS.pptx
Computer language - Html forms
Forms,Frames.ppt
Forms,Frames.ppt
Html form tag
Web forms and html lecture Number 4
1. Lecture 1 WT- Forms.pptxl;kjhgfdsfghj
Web topic 20 1 html forms
Web topic 20 2 html forms
Html form
331592291-HTML-and-Cascading style sheet
Tm 1st quarter - 2nd meeting
Html forms
HTML Foundations, pt 3: Forms
Ad

More from Nuzhat Memon (20)

PPTX
Std 10 chapter 11 data type, expression and operators important MCQs
PPTX
Std 10 Chapter 10 Introduction to C Language Important MCQs
PPTX
Std 12 chapter 7 Java Basics Important MCQs
PPTX
Std 12 computer chapter 8 classes and objects in java important MCQs
PPTX
Std 12 Computer Chapter 6 object oriented concept important mcqs
PPTX
Std 12 computer chapter 6 object oriented concepts (part 1)
PPTX
Std 12 computer chapter 6 object oriented concepts (part 2)
PPTX
Std 12 computer java basics part 3 control structure
PPTX
Std 12 Computer Chapter 7 Java Basics (Part 2)
PPTX
Std 12 Computer Chapter 7 Java Basics (Part 1)
PPTX
Std 12 Computer Chapter 13 other useful free tools and services important MCQs
PPTX
Std 12 Computer Chapter 9 Working with Array and String in Java important MCQs
PPTX
Std 12 computer chapter 8 classes and object in java (part 2)
PPTX
Std 10 computer chapter 10 introduction to c language (part2)
PPTX
Std 10 computer chapter 10 introduction to c language (part1)
PPTX
Std 10 computer chapter 9 Problems and Problem Solving
PPTX
Std 11 Computer Chapter 5 Using Pictures in Synfig (Practical 3: Masking to R...
PPTX
Chapter 5 Using Pictures in Synfig (Practical 2: Masking to hide area in synfig)
PPTX
Std 11 Computer Chapter 5 Using Pictures in Synfig (Practical 1 Basics Opera...
PPTX
Std 11 Computer Chapter 4 Introduction to Layers (Part 3 Solving Textual Exe...
Std 10 chapter 11 data type, expression and operators important MCQs
Std 10 Chapter 10 Introduction to C Language Important MCQs
Std 12 chapter 7 Java Basics Important MCQs
Std 12 computer chapter 8 classes and objects in java important MCQs
Std 12 Computer Chapter 6 object oriented concept important mcqs
Std 12 computer chapter 6 object oriented concepts (part 1)
Std 12 computer chapter 6 object oriented concepts (part 2)
Std 12 computer java basics part 3 control structure
Std 12 Computer Chapter 7 Java Basics (Part 2)
Std 12 Computer Chapter 7 Java Basics (Part 1)
Std 12 Computer Chapter 13 other useful free tools and services important MCQs
Std 12 Computer Chapter 9 Working with Array and String in Java important MCQs
Std 12 computer chapter 8 classes and object in java (part 2)
Std 10 computer chapter 10 introduction to c language (part2)
Std 10 computer chapter 10 introduction to c language (part1)
Std 10 computer chapter 9 Problems and Problem Solving
Std 11 Computer Chapter 5 Using Pictures in Synfig (Practical 3: Masking to R...
Chapter 5 Using Pictures in Synfig (Practical 2: Masking to hide area in synfig)
Std 11 Computer Chapter 5 Using Pictures in Synfig (Practical 1 Basics Opera...
Std 11 Computer Chapter 4 Introduction to Layers (Part 3 Solving Textual Exe...

Recently uploaded (20)

PDF
Pre independence Education in Inndia.pdf
PDF
TR - Agricultural Crops Production NC III.pdf
PDF
O5-L3 Freight Transport Ops (International) V1.pdf
PDF
RMMM.pdf make it easy to upload and study
PPTX
human mycosis Human fungal infections are called human mycosis..pptx
PDF
Complications of Minimal Access Surgery at WLH
PDF
Supply Chain Operations Speaking Notes -ICLT Program
PPTX
Cell Types and Its function , kingdom of life
PDF
Basic Mud Logging Guide for educational purpose
PDF
VCE English Exam - Section C Student Revision Booklet
PPTX
Pharmacology of Heart Failure /Pharmacotherapy of CHF
PPTX
PPH.pptx obstetrics and gynecology in nursing
PDF
The Lost Whites of Pakistan by Jahanzaib Mughal.pdf
PPTX
master seminar digital applications in india
PDF
Anesthesia in Laparoscopic Surgery in India
PDF
Classroom Observation Tools for Teachers
PPTX
GDM (1) (1).pptx small presentation for students
PDF
O7-L3 Supply Chain Operations - ICLT Program
PDF
3rd Neelam Sanjeevareddy Memorial Lecture.pdf
PPTX
Final Presentation General Medicine 03-08-2024.pptx
Pre independence Education in Inndia.pdf
TR - Agricultural Crops Production NC III.pdf
O5-L3 Freight Transport Ops (International) V1.pdf
RMMM.pdf make it easy to upload and study
human mycosis Human fungal infections are called human mycosis..pptx
Complications of Minimal Access Surgery at WLH
Supply Chain Operations Speaking Notes -ICLT Program
Cell Types and Its function , kingdom of life
Basic Mud Logging Guide for educational purpose
VCE English Exam - Section C Student Revision Booklet
Pharmacology of Heart Failure /Pharmacotherapy of CHF
PPH.pptx obstetrics and gynecology in nursing
The Lost Whites of Pakistan by Jahanzaib Mughal.pdf
master seminar digital applications in india
Anesthesia in Laparoscopic Surgery in India
Classroom Observation Tools for Teachers
GDM (1) (1).pptx small presentation for students
O7-L3 Supply Chain Operations - ICLT Program
3rd Neelam Sanjeevareddy Memorial Lecture.pdf
Final Presentation General Medicine 03-08-2024.pptx

Std 12 Computer Chapter 1 Creating Html Forms Using KompoZer

  • 1. CHAPTER 1 Creating HTML forms using KompoZer
  • 2. Use of IDE to create a form • Full form of IDE is Integrated Development Environment • Creating a form using HTML tags is tedious process. • An IDE is a software application that provides complete facilities to programmer to develop software. • IDE provides 1)GUI – Graphical User Interface 2)Text/code Editor 3) compiler and/or interpreter and 4) a debugger. • 1) Kompozer, 2) Eclipse, 3) JBuilder and 4) Netbeans are all examples of some open source IDEs.
  • 3. Introduction to KompoZer • KompoZer is a free open source web development IDE. • KompoZer can be downloaded from http://www.KompoZer.net. • It provides a webpage editor which has a simple graphical interface known as WYSIWYG • WYSIWYG means “What You See is What You Get” • It is a complete web authoring system which integrates 1) webpage development and 2) web file management.
  • 4. Interface to KompoZer • Open KompoZer:::: – ApplicationsProgrammingKompoZer – Double click KompoZer icon on desktop • To view the different toolbars and status bar , click on View -> Show/Hide • Different Toolbar: Composite Toolbar, Format Toolbar1, Format Toolbar2, Edit Mode Toolbar and Status bar. • Site Manager and Rulers option also be listed. • KompoZer has eight menus:- File, Edit, View, Insert, Format, Table, Tools and Help. • 3 Toolbars below Menu bar:- Composite Toolbar, Format Toolbar-1 and Format Toolbar-2 – The composite toolbar is used to create new file, open a file, save a file or publish a web page. – The format toolbar1 and format toolbar2 are used to format the text, add bullets, numbering and perform similar formatting operations.
  • 5. 2 Panes in the center of the Kompozer Window: In the centre of the window, you can see two panes: Site Manager and blank web page • Site Manager: – Site Manager is a powerful tool used to navigate within the site or between the sites. – KompoZer incorporates a Site Manager which gives rapid access to the files on both local machines and remote servers – We can close the site manager pane by clicking on close button or press F9. • Blank webpage (Page Pane): – The page pane shows a blank untitled webpage.
  • 6. Edit Mode toolbar The bottom right side of the window shows Edit mode toolbar with three viewing modes: Normal, HTML tags and Preview – The Normal View mode – Webpage along with the table outlines are visible. – Normal view is very similar to preview mode. – HTML tags View: – A Yellow marker is used to indicate the start tag for all elements. – Preview Mode: – The Preview mode offers the page view as seen in a browser. – In the Preview mode the script do not run and therefore their effects will not be seen. – The links also does not operate in preview mode
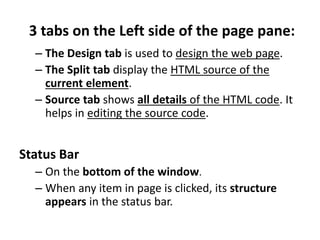
  • 7. 3 tabs on the Left side of the page pane: – The Design tab is used to design the web page. – The Split tab display the HTML source of the current element. – Source tab shows all details of the HTML code. It helps in editing the source code. Status Bar – On the bottom of the window. – When any item in page is clicked, its structure appears in the status bar.
  • 8. Introduction to Form • With the increase in the use of Internet many activities have become online. • Web page is used to fill various information about ourselves or product. • HTML forms are used to help the visitors of the website to input data. • A form in HTML is a container used to collect different kinds of inputs from the user. • It allows for more interactivity and control in data entry. • Well organized structure designed to input the required the data and information of website is called form. • HTML contains elements like label, checkbox, text input field, radio button, submit button, reset button and many more. • The form elements are used to enter the data as well as validate the data within the forms.
  • 9. Four elements are used in a form: 1) Form 2) Input 3) Textarea 4) Select and option
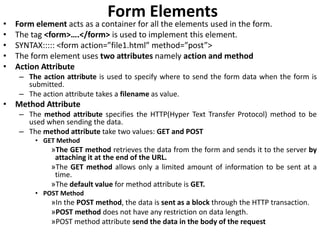
  • 10. Form Elements • Form element acts as a container for all the elements used in the form. • The tag <form>….</form> is used to implement this element. • SYNTAX::::: <form action=”file1.html” method=”post”> • The form element uses two attributes namely action and method • Action Attribute – The action attribute is used to specify where to send the form data when the form is submitted. – The action attribute takes a filename as value. • Method Attribute – The method attribute specifies the HTTP(Hyper Text Transfer Protocol) method to be used when sending the data. – The method attribute take two values: GET and POST • GET Method »The GET method retrieves the data from the form and sends it to the server by attaching it at the end of the URL. »The GET method allows only a limited amount of information to be sent at a time. »The default value for method attribute is GET. • POST Method »In the POST method, the data is sent as a block through the HTTP transaction. »POST method does not have any restriction on data length. »POST method attribute send the data in the body of the request
  • 11. Input Elements • The input elements are used to insert various fields in the form. • Fields likes 1) Textbox 2) Password 3) Radio button 4) Checkbox 5)Submit button & 6)Reset button • The tag <input>…….</input> or <input> is used to implement input element. • The input tag has different attributes like type, name and value. – The type attribute of the input element specifies the field that is to be created in the form. – The name attribute specifies the name to be used for the field in the form. – The value attribute specifies the default value of the field in the form.
  • 12. Various Input Elements created using type attribute of <input> tag: • Text or Textbox – A user can enter any text or data of his choice in the text field. – Textbox is used to enter data like username, email id etc – Syntax:::: <input type=”text” name=”fname” value=”priya”> • Password – Password filed is used to enter password and it is similar to text field. – In password field the characters are not displayed to the user. Instead the character typed is converted into non readable format. – Syntax:::: <input type=”password” name=”pwd”> • Radio button – Any one radio button can be selected at a time from a group of radio buttons. – Generally radio button used to select a single item from a given group of items. – Syntax:::: <input type=”radio” name=”gender” value=”female”>
  • 13. • Checkbox – Multiple check boxes can be selected at a time. – Generally used to select a multiple items from a given group of items – Syntax:::: <input type=”checkbox” name=”hobby” value=”reading”> • Submit button – On clicking the submit button, the values of data entered in the form is submitted to the file specified in the action attribute of the form element. – Syntax:::: <input type=”submit” value=”Login”> • Reset button – On clicking the reset button, the values of data entered in the form are cleared and set back to default values. – Syntax:::: <input type=”reset” value=”Clear”>
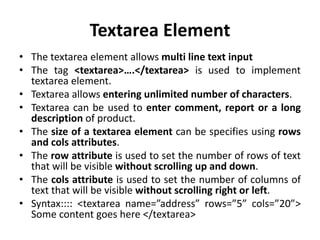
  • 14. Textarea Element • The textarea element allows multi line text input • The tag <textarea>….</textarea> is used to implement textarea element. • Textarea allows entering unlimited number of characters. • Textarea can be used to enter comment, report or a long description of product. • The size of a textarea element can be specifies using rows and cols attributes. • The row attribute is used to set the number of rows of text that will be visible without scrolling up and down. • The cols attribute is used to set the number of columns of text that will be visible without scrolling right or left. • Syntax:::: <textarea name=”address” rows=”5” cols=”20”> Some content goes here </textarea>
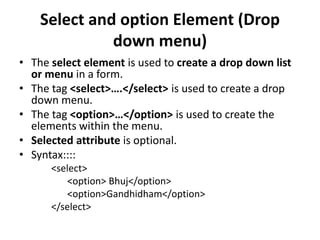
  • 15. Select and option Element (Drop down menu) • The select element is used to create a drop down list or menu in a form. • The tag <select>….</select> is used to create a drop down menu. • The tag <option>…</option> is used to create the elements within the menu. • Selected attribute is optional. • Syntax:::: <select> <option> Bhuj</option> <option>Gandhidham</option> </select>
  • 16. Changing background color to the form • To give a background color to the form from white color to any other color, go to FormatPage Colors and Background • Select “Use custom colors” option. Click the background option and this display “Block Background Color” dialog box. Select the color and click on OK button.