SlideShare a Scribd company logo
[Vertical Vessel Foundation Analysis and Design Guide]
PURPOSE
This practice establishes guidelines and recommended procedures for the design of vertical vessel
foundations using AFES(=Automatic Foundation Engineering System). AFES can design vertical vessel
foundations as either soil- or pile-supported footings.
CONTENTS
This practice comprises the following:
 Create or Open New Project
 Setting Soil and Pile Parameters.
 Creating New Structure.
 Exporting Load Combination.
 Assign Foundation Grouping.
 Editing footing sizes and other parameters.
 Pier and Footing Reinforcement
 Set Pile Layout for Pile Foundations.
 Import Load Combination for various foundation groups.
 Performing Design and Analysis functions.
 Quantity BOM(Bill of Material) function
 Construction Drawing
 Export 3D Modeling Data (PDMS, PDS Frame Work Plus)
There is a need to gather all necessary data from responsible disciplines such as load data of
machine or equipment from Mechanical group, etc. before proceeding to modeling. You can input
loads directly to AFES through the “Load Case/Combination” feature or import superstructure
analysis result files for foundation analysis and design.
Below figures are foundation types commonly used for vertical vessel equipment supports.
Use : OCT Block Foundation
Use : OCT Foundation
Design data sample for equipment is shown below based from actual projects. This equipment is a vertical
vessel supported by octagonal shape foundation.
DESIGN DATA
Equipment Design Data
Footing Sketch Sheet
Sample spreadsheet calculation for wind and seismic load is presented below which was applied for actual
project. This kind of calculation can be done by manual, excel, visual basic or in any form provided to satisfy
code and standard requirements.
Afes foundation design
1. Create or Open New Project
The first step is to enter project specific items. These items include general data, client data and Job data
about a project. General data includes project No. Project Name, Client Name, Site Name, any more. The
client data includes your client manager name, e-mail, number of telephone and fax, address. Job data
includes assigned engineer, supervisor, duration of project, project rate that values the program needs to use
for the specific project.
The Project Number and Structure Name entered in Project Information will display as a menu header
Note: General Data should be input. This data needs to use for the specific project.
To open the existing project, or create a new project, Click on the “New/Open Project” from Top toolbar
menu
1.1 Create New Project
a) From “File” menu, select “New/Open Project”.
A window dialogue will display as shown.
b) Select “New Project” option then click “OK” button.
A window dialogue will display as shown.
c) Enter information then click “OK” button.
Or
1.2 Open Existing Project
a) From “File” menu, select “New/Open Project”.
A window will display as shown.
b) Select “Open Existing Project”.
c) Select a project then click “OK” button.
2. Setting Soil and Pile Parameters.
Setting of constants options include design information that AFES needs in order to design a foundation.
This includes a number of parameters such as design code, safety factor, bearing capacity of soil, capacity of
pile, material and unit weight, clear cover, allowable increase of soil, allowable increase of pile, strength
reduction factors, supports and anchor bolt options.
In case of New project, set all design parameters from the “Setting of Constant” form.
2.1 Set “Bearing Capacity of Soil” from the “Setting of Constant” command.
a) Click “Setting of Constant” button.
b) Select “Bearing Capacity of Soil” tab.
c) Enter name in the “Soil Bearing Capacity Name” text box.
d) Enter “Soil Bearing Capacity (Qa)” value.
e) Click “Save” button.
2.2 Set “Capacity of Pile” from the “Setting of Constant” button.
a) Select “Capacity of Pile” tab.
b) Enter name in the “Pile Name” text box.
c) Select “Pile Type”.
d) Select “Pile Shape”.
e) Enter values for “Pile dimensions”
f) Enter values for “Allowable Capacities”.
g) Enter values for “Elastic Modulus (Ep)” and “ Pile Area”.
h) Click “Save” button.
3. Creating New Structure.
Every input and output data can be saved in AFES Data Base according to projects, which provide work
efficiency in control over project information. An engineer is able to create a file for a new project, reuse
data from projects conducted previously, or eliminate old and useless data for the user’s own sake.
3.1 Choose “Create New Structure” button.
“Add : New Structure Name” dialog window will appear. Input structure name, and then click on the “New”
button.
4. Exporting Load Combination.
This function enables us to export load combination data that was saved in text file in AFES program. After
exporting the file, it will be available for import in this program.
4.1. Export Load Combination before assigning group otherwise they will be deleted.
a) Click “Load Case/Combination” button.
b) Click “Load Combination” button.
A warning message will appear as shown.
c) Click “OK” button.
The Load Combination form will appear as shown.
d) Click “Export” button.
e) Choose directory to save file, assign file name then click “Save” button.
5. Assign Foundation Grouping.
The Assign Foundation Grouping command is used for assigning group for models with multi-foundations.
This is very important because it eliminates repetitions of commands. Foundations with the same load
combinations are recommended to join in one group.
The available foundation types are as follows;
The foundation modules in red box shown in above figure are normally used for vertical vessel equipment.
At the end of this step, we will create the structure as shown below.
5.1 Click “Assign Foundation Grouping” button.
5.2 Assign group for nodes 1 and 5.
a) Click “New” button.
b) Assign name from the “Group name” text box.
c) Select “Octagonal” from the “Group type”.
d) Select “Non Pile fdn.” option.
e) Check “Block foundation”.
f) Select “Non Pile fdn.”
g) Select “Different size (Each foundation)”
h) Select nodes 1 and 5 from the “Using node list” form.
i) Click “Save” button.
5.3 Assign group for nodes 2 and 6.
a) Click “New” button.
b) Assign name from the “Group name” text box.
c) Select “Octagonal” from the “Group type”.
d) Select “Non Pile fdn.” option.
e) Select “Different size (Each foundation)”
f) Select nodes 2 and 6 from the “Using node list” form.
g) Click “Save” button.
5.4 Assign group for nodes 3 and 4.
a) Click “New” button.
b) Assign name from the “Group name” text box.
c) Select “Octagonal” from the “Group type”.
d) Select “Pile fdn.” option.
e) Select “Different size (Each foundation)”.
e) Select nodes 3 and 4 from the “Using node list” form.
f) Click “Save” button.
5.5 Assign group for nodes 7 and 8.
a) Click “New” button.
b) Assign name from the “Group name” text box.
c) Select “Octagonal” from the “Group type”.
d) Select “Block foundation”.
e) Select “Pile fdn.” option.
f) Select “Different size (Each foundation)”.
g) Select nodes 7 and 8 from the “Using node list” form.
h) Click “Save” button.
The structure outcome is shown below.
6. Editing footing sizes and other parameters.
The Feature Data (Dimension) command is used to define the dimensions and other parameters necessary for
the foundation and piers.
6.1 Edit footing size of group “G1”.
a) Select “G1” from the “Group” selection in top menu.
b) Click “Feature Data/Dimension” button.
c) Choose “SUPT-01” in the “Soil Name” selection.
<Footing tab>
<Pier tab>
d) Enter values as shown in the “Feature” form for “Footing”.
e) Click “Save” button.
6.2 Edit footing size of group “G2”.
a) Select “G2” from the “Group” selection in top menu.
b) Click “Feature Data/Dimension” button.
c) Choose “SUPT-01” in the “Soil Name” selection.
<Footing tab>
<Pier tab>
d) Enter values as shown in the “Feature” form for “Footing” and “Pier”.
e) Click “Save” button.
6.3 Edit footing size of group “G3”.
a) Select “G3” from the “Group” selection in top menu.
b) Click “Feature Data/Dimension” button.
c) Choose “SUPT-02” in the “Soil Name” selection.
<Footing tab>
<Pier tab>
d) Enter values as shown in the “Feature” form for “Footing” and “Pier”.
e) Click “Save” button.
6.4 Edit footing size of group “G4”.
a) Select “G4” from the “Group” selection in top menu.
b) Click “Feature Data/Dimension” button.
c) Choose “SUPT-02” in the “Soil Name” selection.
<Footing tab>
<Pier tab>
c) Enter values as shown in the “Feature” form for “Footing” and “Pier”.
d) Click “Save” button.
7. Pier and Footing Reinforcement
The Reinforcement Data command is used to assign bar sizes and spacing for piers and footings.
Reinforcement bar sizes depend on the design code designated in the Setting of Constant command. Set of
bar array options are available in the Footing option. The arrangement of footing bars are parallel to the X
and Y axis except for Tank1 and Tank2 Ring type modules which are in radial and longitudinal directions.
Below are our based from our company standards.
Minimum Pier Reinforcement
Octagons 4'- 0" to 5'- 10": 8 - #4 vertical with #4 ties at 15 inches maximum.
Octagons 6'- 0" to 8'- 10": 16 - #4 vertical with #4 ties at 15 inches maximum.
Octagons 9'- 0" to 12'- 0": 24 - #5 vertical with #5 ties at 15 inches maximum.
Octagons larger than 12- 0": 32 - #5 vertical with #5 ties at 15 inches maximum.
Pedestals larger than 8'- 0" in diameter will have a mat of reinforcing steel at the top.
The requirement for additional vertical reinforcing for anchor bolt development will be checked in
accordance with Company Structural Engineering Guide.
From the main tool bar, click the “Reinforcement data” button. Reinforcement data form will appear as
shown in below figure.
7.1 Block Foundation
a) Set Array Type
Select from the array types of footing reinforcement layout. Different forms for single and double layer
arrangement are presented.
b) Set “Footing” reinforcement arrangement.
c) Select “Save” then “Close” button.
7.2 Octagonal Foundation
a) Set Array Type
Select from the array types of footing reinforcement layout. Different forms for single and double
layer arrangement are presented.
b) Set “Footing” reinforcement arrangement.
c) Select ‘Pier’ or footing tab.
Enter the values of footing re-bar as shown.
d) Select “Save” then “Close” button.
Fore further discussions, refer to Help documents.
8. Set Pile Layout for Pile Foundations.
The Pile Data command is used to layout and assign piles in the foundation. Regular pile arrangements are
available for circular or rectangular arrays.
This function is activated only when the selected type is Pile fdn. in the Assign Foundation Grouping
command. Define pile features first before proceeding to this function in the Setting of Constant command.
8.1 Set Pile Arrangement for foundation group “G3 – F5”. (Circular Array)
a) Select “G3” from the “Group” selection and “3(F5)” from the “Pier” in top menu.
b) Click “Pile Data” command.
c) Select “Array Wizard” tab.
d) Select “Origin Point”.
e) Select “PHC-12” from the “Pile Name” selection.
f) Set “Circular” option.
g) Enter “Star Angle”, “No.” and “Pile Circle Dia. (PCD)”.
h) Click “Regenerate” button.
i) Click “OK” button.
Repeat above steps in creating new circular pile array arrangement then click “Add Draw” to include to
defined pile arrangement.
8.2 Set Pile Arrangement for foundation group “G3-F6”. (Rectangular by Coordinates)
a) Select “G3 from the “Group” selection and “4(F6)” from the “Pier” in top menu.
b) Click “Pile Data” command.
c) Select “Coordinates”.
d) Select “Origin Point”.
c) Select “PHC-12” from the “Pile Name” selection.
d) Click “Add” button 18 times to define 18 piles.
e) Enter coordinate values from the corresponding text boxes as shown.
f) Click “OK” button.
9. Import Load Combination for various foundation groups.
The Load Case/Combination command is used to define, add, edit or delete load cases and combinations.
Assigned load cases can be combined with factors in accordance with a few design methods and
specifications. Mainly applied load combinations are Allowable Strength Load Combination and Ultimate
Load Combination. Combinations by Allowable Strength Design are normally applied with 1.0 factored
value.
The purpose of the combinations is to take into account soil bearing capacity, sliding, overturning, uplift
check, and pile capacity check for a pile supported foundation.
Combinations referring to Ultimate Strength Design are used for footing reinforcement, pier design, one way
shear check, and taking different factors for various cases.
Below are load cases and load combinations usually used for vertical vessel footing based from ACI code.
Load cases definitions are also discussed for further information. These are also based from our actual
projects.
DESIGN LOAD CASE
A vertical vessel or tower is subjected to the loading conditions mentioned under general loads.
The default load cases for a vertical vessel foundation that AFES generates are as follows:
- Operating Load
- Erection or Empty Load
- Test Load
- Wind Load X Direction
- Wind Load Y Direction
- Earthquake Load Empty X Direction
- Earthquake Load Empty Y Direction
- Earthquake Load Operation X Direction
- Earthquake Load Operation Y Direction
Vertical Loads
Erection Weight: Fabricated weight of vessel, generally taken from vessel drawing, plus internals, platforms,
manways, and piping that are actually erected with the vessel.
Empty Weight: Fabricated weight of vessel plus weight of internals, piping, insulation, fireproofing, and
platforms; generally taken from vessel drawing.
Operating Weight: Empty weight plus weight of operating liquid or catalyst; generally taken from vessel
drawing.
Test Weight: Empty weight plus weight of water required for hydrostatic test; generally taken from vessel
drawing.
It should be determined whether a hydrostatic test will actually be done in the field. It is generally desirable
to design for test weight since unforeseen circumstances may occur.
The above loads should be considered as dead loads when applying load factors used in ultimate strength
design.
Wind Loads
Wind loads should be calculated in accordance with the job specifications and Company Structural
Engineering Guidel: Wind Load Calculation.
Wind loads are normally calculated by the Mechanical group, however, verification by the Structural group
may be required. Wind loads calculated by hand should be compared to the computer printout. If the two
results compare favorably, the mechanical results should be used for foundation design. If the results do not
compare favorably, the differences shall be jointly discussed and resolved.
When calculating or checking wind loads, due consideration should be given to factors which may
significantly affect total wind loads such as the application of dynamic gust factors or the presence of
spoilers on the vessel.
Seismic Loads
In earthquake zones, seismic forces determined in accordance with job specifications, usually conforming
with the UBC (Uniform Building Code), will replace wind forces when greater. Refer to Structural Company
Engineering Guide: Earthquake Engineering, for seismic design considerations and procedures.
Seismic loads calculated by the Mechanical group shall be independently verified as appropriate by the
Structural group.
Thermal Loads
Thrusts due to thermal expansion of piping will be included in the operating load combinations, when
deemed advisable. Dead load factors will be applied to the resultants of piping thermal loadings. Consult
with the Pipe Stress Engineer for any thermal loads that are to be considered.
DESIGN LOAD COMBINATION
The default allowable or unfactored load combinations for a vertical vessel foundation generated by AFES
depend on the concrete design code selected. For eg if ACI code is selected, the combinations are as follows:
- Self Weight + Oper
- Self Weight + Oper + Wind X Direction
- Self Weight + Oper + Wind Y Direction
- Self Weight + Oper + EQ X Direction
- Self Weight + Oper + EQ Y Direction
- Self Weight + Erec or Empty
- Self Weight + Erec + Wind X Direction
- Self Weight + Erec + Wind Y Direction
- Self Weight + Erec + EQ X Direction
- Self Weight + Erec + EQ Y Direction
- Self Weight + Test + 0.33Wind X Direction
- Self Weight + Test + 0.33Wind Y Direction
- 1.4Self Weight + 1.4Oper
- 1.05Self Weight + 1.05Oper + 1.275Wind X Direction
- 0.9Self Weight + 0.9Oper + 1.3Wind X Direction
- 1.05Self Weight + 1.05Oper + 1.275 Wind Y Direction
- 0.9Self Weight + 0.9Oper + 1.3 Wind Y Direction
- 1.05Self Weight + 1.05Oper + 1.4025EQ X Direction
- 0.9Self Weight + 0.9Oper + 1.43EQ X Direction
- 1.05Self Weight + 1.05Oper + 1.4025 EQ Y Direction
- 0.9Self Weight + 0.9Oper + 1.43EQ Y Direction
- 1.4Self Weight + 1.4Erec or 1.4Empty
- 1.05Self Weight + 1.05 Erec + 1.275 Wind X Direction
- 0.9Self Weight + 0.9 Erec + 1.3Wind X Direction
- 1.05Self Weight + 1.05 Erec + 1.275 Wind Y Direction
- 0.9Self Weight + 0.9 Erec + 1.3Wind Y Direction
- 1.05Self Weight + 1.05 Erec + 1.4025 EQ X Direction
- 0.9Self Weight + 0.9 Erec + 1.43 EQ X Direction
- 1.05Self Weight + 1.05 Erec + 1.4025EQ Y Direction
- 0.9Self Weight + 0.9 Erec + 1.43EQ Y Direction
- 1.05Self Weight + 1.05Test + 0.42Wind X Direction
- 1.05Self Weight + 1.05Test + 0.42Wind Y Direction
For eg if BS81100 code is selected, the combinations are as follows
- 1.6Self Weight + 1.6Oper
- 1.4Self Weight + 1.4Empty + 1.2Wind X Direction
- 1.4Self Weight + 1.4Empty + 1.2Wind Y Direction
- 1.2Self Weight + 1.2Oper + 1.2Wind X Direction
- 1.2Self Weight + 1.2Oper + 1.2Wind Y Direction
- 1.6Self Weight + 1.4Test + 0.6Wind X Direction
- 1.6Self Weight + 1.4Test + 0.6Wind Y Direction
- 0.9Self Weight + 0.9Empty + 1.2Wind X Direction
- 0.9Self Weight + 0.9Empty + 1.2Wind Y Direction
- 1.2Self Weight + 1.2 Oper + 1.0 EQ X Direction + 0.5Platform
- 1.2Self Weight + 1.2 Oper + 1.0 EQ Y Direction + 0.5Platform
You can actually create new load combinations through the Load Combination button but in this example,
we will use Import command.
a) Click Load Combination button.
The Load Combination form will display as shown.
b) Click “Import” button.
c) Access the load combination file then click “Open” button.
A warning message will appear as shown.
d) Select appropriate button as explained in the warning message form.
e) Click “Save” button.
Repeat same procedure for the other foundation groups.
10. Performing Design and Analysis functions.
AFES executes Foundation Analysis and Design according to design standards widely accepted. It is
assumed that all external forces are loaded at the center of the piers and the connection between the pier and
the footing is considered to be rigid enough to carry those forces. Strength, stability and sectional design of
components of footing, pier, corbels and tie girders are properly examined.
The design codes of AFES support ACI318-99, 02, BS 8110, Korean, AIJ-WSD99, CP-65 and IS456(2000).
10.1 Click on the “Foundation Analysis/Design” button to be able to start analysis and design.
10.2 Select “Foundation Design New Version”.
10.3 Click “OK” button.
For through discussion on setting other functions such as General, Temperature and Shrinkage/Stability, Tank
Design, Detail Report Option and Contents, you may refer to help menu.
10.4 Using “Conventional Rigid Method”.
a) Select “Rigid Method Foundation Design” option.
b) Click “Analysis” button.
c) Click “Report” button.
The calculation report will display as shown below.
11. Quantity BOM(=Bill of Materials) function
BOM functions are used for estimate of earthworks including other related items such as excavation, backfill,
disposal, concrete, lean concrete, crushed stone, grout, formworks, protection materials, anchor bolts and
steel reinforcements.
Options for BOM take off for active structure and all structures in a project is supported.
11.1 For Active Foundation structure.
a) From “Design” menu, select “Quantity (BOM) then “Take off BOM 3D”.
b) Set parameters from the “Afes – Bill of Material” form.
c) Click “OK” button.
The “Bill of Material” form will display as shown below.
11.2 For All Foundation structures.
a) From “Design” menu, select “Quantity (BOM) then “Take off BOM 3D (All Structure)”.
b) Set parameters from the “Afes – Bill of Material” form.
c) Click “OK” button.
d) Check structures to include BOM Take off calculation from the form below.
e) Click “OK” button.
The “Bill of Material” form will display as shown below.
12. Construction Drawing
AFES is a completely integrated software package for automatically producing drawings of reinforcing
details for foundations that have been analyzed and designed using AFES. AFES interfaces with AutoCAD
and MicroStation to create a construction drawing with bar-schedule.
The Export DXF File command is used to export the drawing files made from AFES to other programs such
as AutoCAD and MicroStation. Standard drawings are already set up for various design codes.
The program will create the DWG or DXF file format and display a construction drawing through a viewer.
The drawing report consists of the Standards, Layout and Drawing detail including plan and sections of
foundation with reinforcement schedules. You can set from this command the drawing preferences to be
utilized before exporting to AutoCAD.
a) Click “Export DXF File” button.
A form will display as shown below.
b) Set options from this form.
c) Click “OK” button.
Drawing details will display as below.
Afes foundation design
13. Export 3D Modeling Data (PDMS, PDS Frame Work Plus)
Today, plant design works involve many design parts, modeling objects from each part allows other parts to
assess those object on their work process helping streamlining the work process through project completion.
A 3D foundation model of the objects designed by various design parts effectively communicates the
geometric design data. Therefore automating the work process from design to 3D modeling forms an integral
component of reducing overall project cost. With our design to modeling interface from AFES to
Frameworks Plus, you will experience significant productivity.
13.1 Export to PDS
a) Click “Export PDS Data” button.
A dialogue form will display as shown.
b) Set Output unit and coordinate mapping options.
c) Check “Send Model Data to PDS” option then click “OK” button.
13.2 Export to PDMS
a) Click “Export PDMS Data” button.
A dialogue form will display as shown.
b) Set various parameters accordingly and click “OK” button.
For further discussions, you may refer to Help PDF manuals.

More Related Content

PDF
Afes english manual
PDF
Unit-2 [Dynamic Equipment Foundation].pdf
PDF
ACI 350_ESPAÑOL.pdf
PDF
Sni 03 2828-1992-sand-cone-libre
DOCX
Tugas Besar Pondasi II
PPT
SNI Tata Cara Perencanaan Struktur Baja.ppt
PDF
Dynamics of Structures 4th Edition Chopra Solutions Manual
DOCX
Perhitungan ting bor
Afes english manual
Unit-2 [Dynamic Equipment Foundation].pdf
ACI 350_ESPAÑOL.pdf
Sni 03 2828-1992-sand-cone-libre
Tugas Besar Pondasi II
SNI Tata Cara Perencanaan Struktur Baja.ppt
Dynamics of Structures 4th Edition Chopra Solutions Manual
Perhitungan ting bor

What's hot (20)

PPS
Membrane - Plate - Shell
PDF
Tower design using etabs- Nada Zarrak
PDF
Direct analysis method - Sap2000
PDF
Etabs tutorial
PDF
Etabs notes-pdf
PDF
Matching base shear in Etabs 2016
PPT
Wind load calculation
PDF
Analysis and design of shear wall transfer beam structure
PDF
Tower design-Chapter 2-pile caps design
PDF
Tutorial for design of foundations using safe
PDF
Rc corbel example
PDF
Staad pro-getting started &tutorial
PDF
Etabs installation and cracking procedure
PDF
Training sap2000 linearanalysis
PDF
Rcc structure design by etabs (acecoms)
PDF
Manual Sap
PDF
CSI ETABS & SAFE MANUAL: Slab Analysis and Design to EC2
PDF
Book for Beginners, RCC Design by ETABS
PDF
Etabs modeling - Design of slab according to EC2
PDF
Etabs multistory-steel
Membrane - Plate - Shell
Tower design using etabs- Nada Zarrak
Direct analysis method - Sap2000
Etabs tutorial
Etabs notes-pdf
Matching base shear in Etabs 2016
Wind load calculation
Analysis and design of shear wall transfer beam structure
Tower design-Chapter 2-pile caps design
Tutorial for design of foundations using safe
Rc corbel example
Staad pro-getting started &tutorial
Etabs installation and cracking procedure
Training sap2000 linearanalysis
Rcc structure design by etabs (acecoms)
Manual Sap
CSI ETABS & SAFE MANUAL: Slab Analysis and Design to EC2
Book for Beginners, RCC Design by ETABS
Etabs modeling - Design of slab according to EC2
Etabs multistory-steel
Ad

Similar to Afes foundation design (20)

PDF
Workshop5 pump-mat
PDF
Mixsim帮助
PDF
07 release notes 2005
DOCX
Open Office Writer : Level2
PDF
Normal Modal Analysis in Hypermesh
PDF
Rc bldg. modeling & analysis
PDF
Saving File As Plot File
PDF
08 - Annotating Designs_2022R3-01-01.pdf
PPT
SolidWorks Advanced Customization Techniques
PDF
Etabs acecoms rcc structure design
PDF
4. safe tutorial v. 12 ingles
PDF
4. safe tutorial v. 12 ingles
DOC
Ecad final
PDF
Innovyze Infonet Manual
PDF
Safe tutorial
PDF
LabReport-Autodesk Inventor 2008-MasterCam X4
PDF
Geo prompt dashboard
PDF
Introductory tutorial etab2016
PDF
building-a-fdm-application-for-a-hfm-target
PDF
Tài liệu kiểm chứng Robot Structural theo Tiêu chuẩn Nga code sp 16.13330.201...
Workshop5 pump-mat
Mixsim帮助
07 release notes 2005
Open Office Writer : Level2
Normal Modal Analysis in Hypermesh
Rc bldg. modeling & analysis
Saving File As Plot File
08 - Annotating Designs_2022R3-01-01.pdf
SolidWorks Advanced Customization Techniques
Etabs acecoms rcc structure design
4. safe tutorial v. 12 ingles
Ecad final
Innovyze Infonet Manual
Safe tutorial
LabReport-Autodesk Inventor 2008-MasterCam X4
Geo prompt dashboard
Introductory tutorial etab2016
building-a-fdm-application-for-a-hfm-target
Tài liệu kiểm chứng Robot Structural theo Tiêu chuẩn Nga code sp 16.13330.201...
Ad

Recently uploaded (20)

PPTX
bas. eng. economics group 4 presentation 1.pptx
PDF
Arduino robotics embedded978-1-4302-3184-4.pdf
PPTX
Engineering Ethics, Safety and Environment [Autosaved] (1).pptx
PDF
Mohammad Mahdi Farshadian CV - Prospective PhD Student 2026
PDF
composite construction of structures.pdf
PDF
Mitigating Risks through Effective Management for Enhancing Organizational Pe...
PDF
Embodied AI: Ushering in the Next Era of Intelligent Systems
PDF
keyrequirementskkkkkkkkkkkkkkkkkkkkkkkkkkkkkkkkkkkkk
PPTX
OOP with Java - Java Introduction (Basics)
PPTX
KTU 2019 -S7-MCN 401 MODULE 2-VINAY.pptx
PPTX
UNIT-1 - COAL BASED THERMAL POWER PLANTS
PDF
Digital Logic Computer Design lecture notes
PDF
Structs to JSON How Go Powers REST APIs.pdf
PDF
BMEC211 - INTRODUCTION TO MECHATRONICS-1.pdf
PDF
July 2025 - Top 10 Read Articles in International Journal of Software Enginee...
PPTX
web development for engineering and engineering
PPTX
Strings in CPP - Strings in C++ are sequences of characters used to store and...
PPTX
Lesson 3_Tessellation.pptx finite Mathematics
PPTX
M Tech Sem 1 Civil Engineering Environmental Sciences.pptx
PDF
Operating System & Kernel Study Guide-1 - converted.pdf
bas. eng. economics group 4 presentation 1.pptx
Arduino robotics embedded978-1-4302-3184-4.pdf
Engineering Ethics, Safety and Environment [Autosaved] (1).pptx
Mohammad Mahdi Farshadian CV - Prospective PhD Student 2026
composite construction of structures.pdf
Mitigating Risks through Effective Management for Enhancing Organizational Pe...
Embodied AI: Ushering in the Next Era of Intelligent Systems
keyrequirementskkkkkkkkkkkkkkkkkkkkkkkkkkkkkkkkkkkkk
OOP with Java - Java Introduction (Basics)
KTU 2019 -S7-MCN 401 MODULE 2-VINAY.pptx
UNIT-1 - COAL BASED THERMAL POWER PLANTS
Digital Logic Computer Design lecture notes
Structs to JSON How Go Powers REST APIs.pdf
BMEC211 - INTRODUCTION TO MECHATRONICS-1.pdf
July 2025 - Top 10 Read Articles in International Journal of Software Enginee...
web development for engineering and engineering
Strings in CPP - Strings in C++ are sequences of characters used to store and...
Lesson 3_Tessellation.pptx finite Mathematics
M Tech Sem 1 Civil Engineering Environmental Sciences.pptx
Operating System & Kernel Study Guide-1 - converted.pdf

Afes foundation design

  • 1. [Vertical Vessel Foundation Analysis and Design Guide] PURPOSE This practice establishes guidelines and recommended procedures for the design of vertical vessel foundations using AFES(=Automatic Foundation Engineering System). AFES can design vertical vessel foundations as either soil- or pile-supported footings. CONTENTS This practice comprises the following:  Create or Open New Project  Setting Soil and Pile Parameters.  Creating New Structure.  Exporting Load Combination.  Assign Foundation Grouping.  Editing footing sizes and other parameters.  Pier and Footing Reinforcement  Set Pile Layout for Pile Foundations.  Import Load Combination for various foundation groups.  Performing Design and Analysis functions.  Quantity BOM(Bill of Material) function  Construction Drawing  Export 3D Modeling Data (PDMS, PDS Frame Work Plus) There is a need to gather all necessary data from responsible disciplines such as load data of machine or equipment from Mechanical group, etc. before proceeding to modeling. You can input loads directly to AFES through the “Load Case/Combination” feature or import superstructure analysis result files for foundation analysis and design.
  • 2. Below figures are foundation types commonly used for vertical vessel equipment supports. Use : OCT Block Foundation Use : OCT Block Foundation
  • 3. Use : OCT Foundation Design data sample for equipment is shown below based from actual projects. This equipment is a vertical vessel supported by octagonal shape foundation. DESIGN DATA Equipment Design Data
  • 5. Sample spreadsheet calculation for wind and seismic load is presented below which was applied for actual project. This kind of calculation can be done by manual, excel, visual basic or in any form provided to satisfy code and standard requirements.
  • 8. 1. Create or Open New Project The first step is to enter project specific items. These items include general data, client data and Job data about a project. General data includes project No. Project Name, Client Name, Site Name, any more. The client data includes your client manager name, e-mail, number of telephone and fax, address. Job data includes assigned engineer, supervisor, duration of project, project rate that values the program needs to use for the specific project. The Project Number and Structure Name entered in Project Information will display as a menu header Note: General Data should be input. This data needs to use for the specific project. To open the existing project, or create a new project, Click on the “New/Open Project” from Top toolbar menu 1.1 Create New Project a) From “File” menu, select “New/Open Project”. A window dialogue will display as shown.
  • 9. b) Select “New Project” option then click “OK” button. A window dialogue will display as shown. c) Enter information then click “OK” button. Or
  • 10. 1.2 Open Existing Project a) From “File” menu, select “New/Open Project”. A window will display as shown. b) Select “Open Existing Project”. c) Select a project then click “OK” button.
  • 11. 2. Setting Soil and Pile Parameters. Setting of constants options include design information that AFES needs in order to design a foundation. This includes a number of parameters such as design code, safety factor, bearing capacity of soil, capacity of pile, material and unit weight, clear cover, allowable increase of soil, allowable increase of pile, strength reduction factors, supports and anchor bolt options. In case of New project, set all design parameters from the “Setting of Constant” form. 2.1 Set “Bearing Capacity of Soil” from the “Setting of Constant” command. a) Click “Setting of Constant” button. b) Select “Bearing Capacity of Soil” tab. c) Enter name in the “Soil Bearing Capacity Name” text box. d) Enter “Soil Bearing Capacity (Qa)” value. e) Click “Save” button.
  • 12. 2.2 Set “Capacity of Pile” from the “Setting of Constant” button. a) Select “Capacity of Pile” tab. b) Enter name in the “Pile Name” text box. c) Select “Pile Type”. d) Select “Pile Shape”. e) Enter values for “Pile dimensions” f) Enter values for “Allowable Capacities”. g) Enter values for “Elastic Modulus (Ep)” and “ Pile Area”. h) Click “Save” button.
  • 13. 3. Creating New Structure. Every input and output data can be saved in AFES Data Base according to projects, which provide work efficiency in control over project information. An engineer is able to create a file for a new project, reuse data from projects conducted previously, or eliminate old and useless data for the user’s own sake. 3.1 Choose “Create New Structure” button. “Add : New Structure Name” dialog window will appear. Input structure name, and then click on the “New” button.
  • 14. 4. Exporting Load Combination. This function enables us to export load combination data that was saved in text file in AFES program. After exporting the file, it will be available for import in this program. 4.1. Export Load Combination before assigning group otherwise they will be deleted. a) Click “Load Case/Combination” button. b) Click “Load Combination” button. A warning message will appear as shown. c) Click “OK” button. The Load Combination form will appear as shown. d) Click “Export” button. e) Choose directory to save file, assign file name then click “Save” button.
  • 15. 5. Assign Foundation Grouping. The Assign Foundation Grouping command is used for assigning group for models with multi-foundations. This is very important because it eliminates repetitions of commands. Foundations with the same load combinations are recommended to join in one group. The available foundation types are as follows; The foundation modules in red box shown in above figure are normally used for vertical vessel equipment. At the end of this step, we will create the structure as shown below. 5.1 Click “Assign Foundation Grouping” button.
  • 16. 5.2 Assign group for nodes 1 and 5. a) Click “New” button. b) Assign name from the “Group name” text box. c) Select “Octagonal” from the “Group type”. d) Select “Non Pile fdn.” option. e) Check “Block foundation”. f) Select “Non Pile fdn.” g) Select “Different size (Each foundation)” h) Select nodes 1 and 5 from the “Using node list” form. i) Click “Save” button.
  • 17. 5.3 Assign group for nodes 2 and 6. a) Click “New” button. b) Assign name from the “Group name” text box. c) Select “Octagonal” from the “Group type”. d) Select “Non Pile fdn.” option. e) Select “Different size (Each foundation)” f) Select nodes 2 and 6 from the “Using node list” form. g) Click “Save” button.
  • 18. 5.4 Assign group for nodes 3 and 4. a) Click “New” button. b) Assign name from the “Group name” text box. c) Select “Octagonal” from the “Group type”. d) Select “Pile fdn.” option. e) Select “Different size (Each foundation)”. e) Select nodes 3 and 4 from the “Using node list” form. f) Click “Save” button. 5.5 Assign group for nodes 7 and 8. a) Click “New” button. b) Assign name from the “Group name” text box. c) Select “Octagonal” from the “Group type”. d) Select “Block foundation”. e) Select “Pile fdn.” option. f) Select “Different size (Each foundation)”. g) Select nodes 7 and 8 from the “Using node list” form. h) Click “Save” button.
  • 19. The structure outcome is shown below.
  • 20. 6. Editing footing sizes and other parameters. The Feature Data (Dimension) command is used to define the dimensions and other parameters necessary for the foundation and piers. 6.1 Edit footing size of group “G1”. a) Select “G1” from the “Group” selection in top menu. b) Click “Feature Data/Dimension” button. c) Choose “SUPT-01” in the “Soil Name” selection. <Footing tab>
  • 21. <Pier tab> d) Enter values as shown in the “Feature” form for “Footing”. e) Click “Save” button. 6.2 Edit footing size of group “G2”. a) Select “G2” from the “Group” selection in top menu. b) Click “Feature Data/Dimension” button. c) Choose “SUPT-01” in the “Soil Name” selection.
  • 23. d) Enter values as shown in the “Feature” form for “Footing” and “Pier”. e) Click “Save” button. 6.3 Edit footing size of group “G3”. a) Select “G3” from the “Group” selection in top menu. b) Click “Feature Data/Dimension” button. c) Choose “SUPT-02” in the “Soil Name” selection. <Footing tab>
  • 24. <Pier tab> d) Enter values as shown in the “Feature” form for “Footing” and “Pier”. e) Click “Save” button. 6.4 Edit footing size of group “G4”. a) Select “G4” from the “Group” selection in top menu. b) Click “Feature Data/Dimension” button. c) Choose “SUPT-02” in the “Soil Name” selection.
  • 26. c) Enter values as shown in the “Feature” form for “Footing” and “Pier”. d) Click “Save” button.
  • 27. 7. Pier and Footing Reinforcement The Reinforcement Data command is used to assign bar sizes and spacing for piers and footings. Reinforcement bar sizes depend on the design code designated in the Setting of Constant command. Set of bar array options are available in the Footing option. The arrangement of footing bars are parallel to the X and Y axis except for Tank1 and Tank2 Ring type modules which are in radial and longitudinal directions. Below are our based from our company standards. Minimum Pier Reinforcement Octagons 4'- 0" to 5'- 10": 8 - #4 vertical with #4 ties at 15 inches maximum. Octagons 6'- 0" to 8'- 10": 16 - #4 vertical with #4 ties at 15 inches maximum. Octagons 9'- 0" to 12'- 0": 24 - #5 vertical with #5 ties at 15 inches maximum. Octagons larger than 12- 0": 32 - #5 vertical with #5 ties at 15 inches maximum. Pedestals larger than 8'- 0" in diameter will have a mat of reinforcing steel at the top. The requirement for additional vertical reinforcing for anchor bolt development will be checked in accordance with Company Structural Engineering Guide. From the main tool bar, click the “Reinforcement data” button. Reinforcement data form will appear as shown in below figure. 7.1 Block Foundation
  • 28. a) Set Array Type Select from the array types of footing reinforcement layout. Different forms for single and double layer arrangement are presented. b) Set “Footing” reinforcement arrangement. c) Select “Save” then “Close” button.
  • 29. 7.2 Octagonal Foundation a) Set Array Type Select from the array types of footing reinforcement layout. Different forms for single and double layer arrangement are presented. b) Set “Footing” reinforcement arrangement.
  • 30. c) Select ‘Pier’ or footing tab. Enter the values of footing re-bar as shown.
  • 31. d) Select “Save” then “Close” button. Fore further discussions, refer to Help documents.
  • 32. 8. Set Pile Layout for Pile Foundations. The Pile Data command is used to layout and assign piles in the foundation. Regular pile arrangements are available for circular or rectangular arrays. This function is activated only when the selected type is Pile fdn. in the Assign Foundation Grouping command. Define pile features first before proceeding to this function in the Setting of Constant command. 8.1 Set Pile Arrangement for foundation group “G3 – F5”. (Circular Array) a) Select “G3” from the “Group” selection and “3(F5)” from the “Pier” in top menu. b) Click “Pile Data” command. c) Select “Array Wizard” tab. d) Select “Origin Point”. e) Select “PHC-12” from the “Pile Name” selection. f) Set “Circular” option. g) Enter “Star Angle”, “No.” and “Pile Circle Dia. (PCD)”. h) Click “Regenerate” button. i) Click “OK” button. Repeat above steps in creating new circular pile array arrangement then click “Add Draw” to include to defined pile arrangement.
  • 33. 8.2 Set Pile Arrangement for foundation group “G3-F6”. (Rectangular by Coordinates) a) Select “G3 from the “Group” selection and “4(F6)” from the “Pier” in top menu. b) Click “Pile Data” command. c) Select “Coordinates”. d) Select “Origin Point”. c) Select “PHC-12” from the “Pile Name” selection. d) Click “Add” button 18 times to define 18 piles. e) Enter coordinate values from the corresponding text boxes as shown. f) Click “OK” button.
  • 34. 9. Import Load Combination for various foundation groups. The Load Case/Combination command is used to define, add, edit or delete load cases and combinations. Assigned load cases can be combined with factors in accordance with a few design methods and specifications. Mainly applied load combinations are Allowable Strength Load Combination and Ultimate Load Combination. Combinations by Allowable Strength Design are normally applied with 1.0 factored value. The purpose of the combinations is to take into account soil bearing capacity, sliding, overturning, uplift check, and pile capacity check for a pile supported foundation. Combinations referring to Ultimate Strength Design are used for footing reinforcement, pier design, one way shear check, and taking different factors for various cases. Below are load cases and load combinations usually used for vertical vessel footing based from ACI code. Load cases definitions are also discussed for further information. These are also based from our actual projects. DESIGN LOAD CASE A vertical vessel or tower is subjected to the loading conditions mentioned under general loads. The default load cases for a vertical vessel foundation that AFES generates are as follows: - Operating Load - Erection or Empty Load - Test Load - Wind Load X Direction - Wind Load Y Direction - Earthquake Load Empty X Direction - Earthquake Load Empty Y Direction - Earthquake Load Operation X Direction - Earthquake Load Operation Y Direction Vertical Loads Erection Weight: Fabricated weight of vessel, generally taken from vessel drawing, plus internals, platforms, manways, and piping that are actually erected with the vessel. Empty Weight: Fabricated weight of vessel plus weight of internals, piping, insulation, fireproofing, and platforms; generally taken from vessel drawing. Operating Weight: Empty weight plus weight of operating liquid or catalyst; generally taken from vessel
  • 35. drawing. Test Weight: Empty weight plus weight of water required for hydrostatic test; generally taken from vessel drawing. It should be determined whether a hydrostatic test will actually be done in the field. It is generally desirable to design for test weight since unforeseen circumstances may occur. The above loads should be considered as dead loads when applying load factors used in ultimate strength design. Wind Loads Wind loads should be calculated in accordance with the job specifications and Company Structural Engineering Guidel: Wind Load Calculation. Wind loads are normally calculated by the Mechanical group, however, verification by the Structural group may be required. Wind loads calculated by hand should be compared to the computer printout. If the two results compare favorably, the mechanical results should be used for foundation design. If the results do not compare favorably, the differences shall be jointly discussed and resolved. When calculating or checking wind loads, due consideration should be given to factors which may significantly affect total wind loads such as the application of dynamic gust factors or the presence of spoilers on the vessel. Seismic Loads In earthquake zones, seismic forces determined in accordance with job specifications, usually conforming with the UBC (Uniform Building Code), will replace wind forces when greater. Refer to Structural Company Engineering Guide: Earthquake Engineering, for seismic design considerations and procedures. Seismic loads calculated by the Mechanical group shall be independently verified as appropriate by the Structural group. Thermal Loads Thrusts due to thermal expansion of piping will be included in the operating load combinations, when deemed advisable. Dead load factors will be applied to the resultants of piping thermal loadings. Consult with the Pipe Stress Engineer for any thermal loads that are to be considered. DESIGN LOAD COMBINATION The default allowable or unfactored load combinations for a vertical vessel foundation generated by AFES depend on the concrete design code selected. For eg if ACI code is selected, the combinations are as follows: - Self Weight + Oper - Self Weight + Oper + Wind X Direction
  • 36. - Self Weight + Oper + Wind Y Direction - Self Weight + Oper + EQ X Direction - Self Weight + Oper + EQ Y Direction - Self Weight + Erec or Empty - Self Weight + Erec + Wind X Direction - Self Weight + Erec + Wind Y Direction - Self Weight + Erec + EQ X Direction - Self Weight + Erec + EQ Y Direction - Self Weight + Test + 0.33Wind X Direction - Self Weight + Test + 0.33Wind Y Direction - 1.4Self Weight + 1.4Oper - 1.05Self Weight + 1.05Oper + 1.275Wind X Direction - 0.9Self Weight + 0.9Oper + 1.3Wind X Direction - 1.05Self Weight + 1.05Oper + 1.275 Wind Y Direction - 0.9Self Weight + 0.9Oper + 1.3 Wind Y Direction - 1.05Self Weight + 1.05Oper + 1.4025EQ X Direction - 0.9Self Weight + 0.9Oper + 1.43EQ X Direction - 1.05Self Weight + 1.05Oper + 1.4025 EQ Y Direction - 0.9Self Weight + 0.9Oper + 1.43EQ Y Direction - 1.4Self Weight + 1.4Erec or 1.4Empty - 1.05Self Weight + 1.05 Erec + 1.275 Wind X Direction - 0.9Self Weight + 0.9 Erec + 1.3Wind X Direction - 1.05Self Weight + 1.05 Erec + 1.275 Wind Y Direction - 0.9Self Weight + 0.9 Erec + 1.3Wind Y Direction - 1.05Self Weight + 1.05 Erec + 1.4025 EQ X Direction - 0.9Self Weight + 0.9 Erec + 1.43 EQ X Direction - 1.05Self Weight + 1.05 Erec + 1.4025EQ Y Direction - 0.9Self Weight + 0.9 Erec + 1.43EQ Y Direction - 1.05Self Weight + 1.05Test + 0.42Wind X Direction - 1.05Self Weight + 1.05Test + 0.42Wind Y Direction For eg if BS81100 code is selected, the combinations are as follows - 1.6Self Weight + 1.6Oper - 1.4Self Weight + 1.4Empty + 1.2Wind X Direction - 1.4Self Weight + 1.4Empty + 1.2Wind Y Direction - 1.2Self Weight + 1.2Oper + 1.2Wind X Direction - 1.2Self Weight + 1.2Oper + 1.2Wind Y Direction
  • 37. - 1.6Self Weight + 1.4Test + 0.6Wind X Direction - 1.6Self Weight + 1.4Test + 0.6Wind Y Direction - 0.9Self Weight + 0.9Empty + 1.2Wind X Direction - 0.9Self Weight + 0.9Empty + 1.2Wind Y Direction - 1.2Self Weight + 1.2 Oper + 1.0 EQ X Direction + 0.5Platform - 1.2Self Weight + 1.2 Oper + 1.0 EQ Y Direction + 0.5Platform You can actually create new load combinations through the Load Combination button but in this example, we will use Import command. a) Click Load Combination button. The Load Combination form will display as shown. b) Click “Import” button. c) Access the load combination file then click “Open” button. A warning message will appear as shown.
  • 38. d) Select appropriate button as explained in the warning message form. e) Click “Save” button. Repeat same procedure for the other foundation groups.
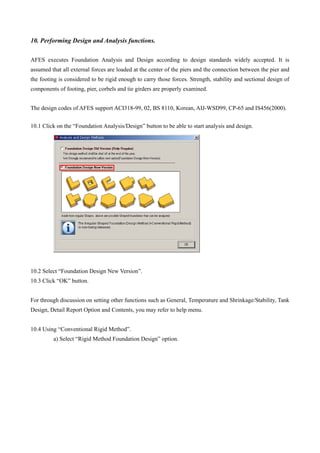
  • 39. 10. Performing Design and Analysis functions. AFES executes Foundation Analysis and Design according to design standards widely accepted. It is assumed that all external forces are loaded at the center of the piers and the connection between the pier and the footing is considered to be rigid enough to carry those forces. Strength, stability and sectional design of components of footing, pier, corbels and tie girders are properly examined. The design codes of AFES support ACI318-99, 02, BS 8110, Korean, AIJ-WSD99, CP-65 and IS456(2000). 10.1 Click on the “Foundation Analysis/Design” button to be able to start analysis and design. 10.2 Select “Foundation Design New Version”. 10.3 Click “OK” button. For through discussion on setting other functions such as General, Temperature and Shrinkage/Stability, Tank Design, Detail Report Option and Contents, you may refer to help menu. 10.4 Using “Conventional Rigid Method”. a) Select “Rigid Method Foundation Design” option.
  • 40. b) Click “Analysis” button. c) Click “Report” button.
  • 41. The calculation report will display as shown below.
  • 42. 11. Quantity BOM(=Bill of Materials) function BOM functions are used for estimate of earthworks including other related items such as excavation, backfill, disposal, concrete, lean concrete, crushed stone, grout, formworks, protection materials, anchor bolts and steel reinforcements. Options for BOM take off for active structure and all structures in a project is supported. 11.1 For Active Foundation structure. a) From “Design” menu, select “Quantity (BOM) then “Take off BOM 3D”. b) Set parameters from the “Afes – Bill of Material” form. c) Click “OK” button.
  • 43. The “Bill of Material” form will display as shown below. 11.2 For All Foundation structures. a) From “Design” menu, select “Quantity (BOM) then “Take off BOM 3D (All Structure)”.
  • 44. b) Set parameters from the “Afes – Bill of Material” form. c) Click “OK” button. d) Check structures to include BOM Take off calculation from the form below. e) Click “OK” button.
  • 45. The “Bill of Material” form will display as shown below.
  • 46. 12. Construction Drawing AFES is a completely integrated software package for automatically producing drawings of reinforcing details for foundations that have been analyzed and designed using AFES. AFES interfaces with AutoCAD and MicroStation to create a construction drawing with bar-schedule. The Export DXF File command is used to export the drawing files made from AFES to other programs such as AutoCAD and MicroStation. Standard drawings are already set up for various design codes. The program will create the DWG or DXF file format and display a construction drawing through a viewer. The drawing report consists of the Standards, Layout and Drawing detail including plan and sections of foundation with reinforcement schedules. You can set from this command the drawing preferences to be utilized before exporting to AutoCAD. a) Click “Export DXF File” button. A form will display as shown below. b) Set options from this form. c) Click “OK” button.
  • 47. Drawing details will display as below.
  • 49. 13. Export 3D Modeling Data (PDMS, PDS Frame Work Plus) Today, plant design works involve many design parts, modeling objects from each part allows other parts to assess those object on their work process helping streamlining the work process through project completion. A 3D foundation model of the objects designed by various design parts effectively communicates the geometric design data. Therefore automating the work process from design to 3D modeling forms an integral component of reducing overall project cost. With our design to modeling interface from AFES to Frameworks Plus, you will experience significant productivity. 13.1 Export to PDS a) Click “Export PDS Data” button. A dialogue form will display as shown. b) Set Output unit and coordinate mapping options. c) Check “Send Model Data to PDS” option then click “OK” button. 13.2 Export to PDMS a) Click “Export PDMS Data” button. A dialogue form will display as shown. b) Set various parameters accordingly and click “OK” button. For further discussions, you may refer to Help PDF manuals.