SlideShare a Scribd company logo
How To Build a Robot With an
Arduino and 8051
Microcontroller
http://www.elprocus.com/
How To Build a Robot With an Arduino
and 8051 Microcontroller
Introduction:
The main purpose of robot is to decrease the man power. The robots are
used in electronics in many applications. In this presentation we are
discussing about how to build the obstacle-avoiding robot with the Arduino
module & 8051 microcontroller.
http://www.elprocus.com/
How To Build a Robot With an Arduino
and 8051 Microcontroller
 The required components to build the robot includes the following
How To Build a Robot
• Robot Body
• DC Motor
• Arduino Module
• Motor Driver IC
• Ultrasonic Sensor
http://www.elprocus.com/
How To Build a Robot With an Arduino
and 8051 Microcontroller
How to Build a Robot
1. Robot Body
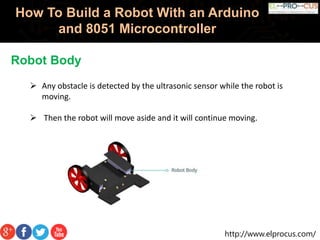
 The basic robot body of the robot of obstacle avoidance vehicle.
 The robot body is a plastic body and it contains wheels on both sides.
 Ultrasonic sensor is arranged in front of the robot body.
 By using the ultrasonic sensor the obstacle can be detected.
http://www.elprocus.com/
How To Build a Robot With an Arduino
and 8051 Microcontroller
Robot Body
 Any obstacle is detected by the ultrasonic sensor while the robot is
moving.
 Then the robot will move aside and it will continue moving.
http://www.elprocus.com/
How To Build a Robot With an Arduino
and 8051 Microcontroller
2. DC Motor
 The DC motor is an electric motor and it runs with direct current.
 The operation of any motor is based on the electromagnetism.
 The magnetic field is produced by the current carrying conductors
 When it is placed in an external magnetic field, it will experience a force
proportional to the current in the conductor.
http://www.elprocus.com/
How To Build a Robot With an Arduino
and 8051 Microcontroller
DC Motor
 Generally, we know that the magnets are opposite polarity attraction
from north to south.
 If the polarities are same like north to north & south to south then the
magnets will repel.
DC Motor
http://www.elprocus.com/
How To Build a Robot With an Arduino
and 8051 Microcontroller
DC Motor
 The internal configuration of DC motor is designed to attach the magnetic
interaction between the current carrying conductor and the external
magnetic field to produce the motion.
 Here we are using two DC motors, each motor contains 6v and the total
two DC motors contain 12v.
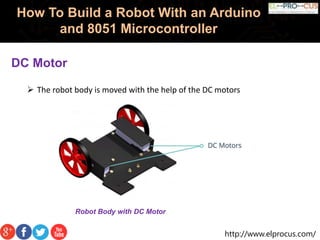
 The two DC motors are placed in the robot body
http://www.elprocus.com/
How To Build a Robot With an Arduino
and 8051 Microcontroller
DC Motor
 The robot body is moved with the help of the DC motors
Robot Body with DC Motor
http://www.elprocus.com/
How To Build a Robot With an Arduino
and 8051 Microcontroller
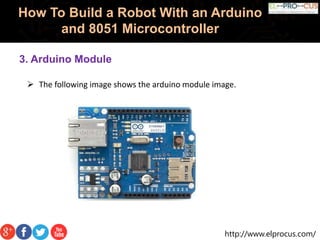
3. Arduino Module
 The following image shows the arduino module image.
http://www.elprocus.com/
How To Build a Robot With an Arduino
and 8051 Microcontroller
3. Arduino Module
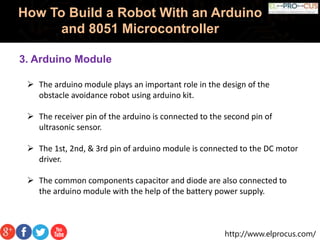
 The arduino module plays an important role in the design of the
obstacle avoidance robot using arduino kit.
 The receiver pin of the arduino is connected to the second pin of
ultrasonic sensor.
 The 1st, 2nd, & 3rd pin of arduino module is connected to the DC motor
driver.
 The common components capacitor and diode are also connected to
the arduino module with the help of the battery power supply.
http://www.elprocus.com/
How To Build a Robot With an Arduino
and 8051 Microcontroller
4. Motor Driver IC
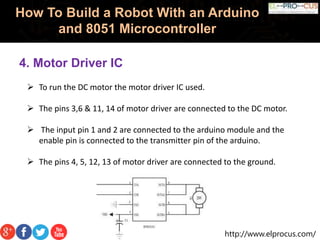
 To run the DC motor the motor driver IC used.
 The pins 3,6 & 11, 14 of motor driver are connected to the DC motor.
 The input pin 1 and 2 are connected to the arduino module and the
enable pin is connected to the transmitter pin of the arduino.
 The pins 4, 5, 12, 13 of motor driver are connected to the ground.
http://www.elprocus.com/
How To Build a Robot With an Arduino
and 8051 Microcontroller
Ultrasonic Sensor
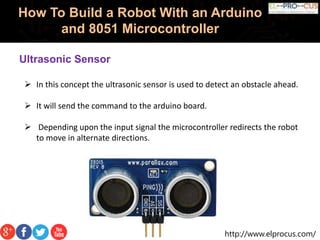
 In this concept the ultrasonic sensor is used to detect an obstacle ahead.
 It will send the command to the arduino board.
 Depending upon the input signal the microcontroller redirects the robot
to move in alternate directions.
http://www.elprocus.com/
How To Build a Robot With an Arduino
and 8051 Microcontroller
 The applications of the arduino robot obstacle avoidance
Ultrasonic Sensor
• The arduino robot can move on any surface
• It can move on metallic surface like refrigerator body.
http://www.elprocus.com/
How To Build a Robot With an Arduino
and 8051 Microcontroller
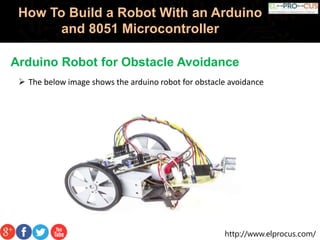
 The below image shows the arduino robot for obstacle avoidance
Arduino Robot for Obstacle Avoidance
http://www.elprocus.com/
How To Build a Robot With an Arduino
and 8051 Microcontroller
Building Robot With 8051 Microcontroller
 The components required to build the robot with the 8051 microcontroller
are
• 8051 microcontroller
• DC motors
• Motor drivers
• Metal detector
 To build a robot with the 8051 microcontroller, We took the metal detector
robot vehicle for the explanation.
http://www.elprocus.com/
How To Build a Robot With an Arduino
and 8051 Microcontroller
• Decoder
• Encoder
• Push buttons
• Crystal
• RF transmitter and receiver
Building Robot With 8051 Microcontroller
http://www.elprocus.com/
How To Build a Robot With an Arduino
and 8051 Microcontroller
Metal Detector
 The metal detector is a coil it has one or more metal coils used to detect
the metals on the ground.
 The metal detector works on the principle of the electromagnetic
induction.
 The metal detector is connected to the robot body through the PCB.
http://www.elprocus.com/
How To Build a Robot With an Arduino
and 8051 Microcontroller
Metal Detector
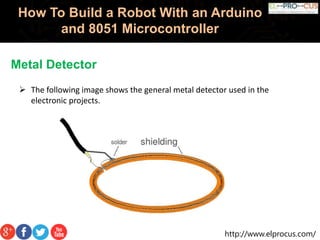
 The following image shows the general metal detector used in the
electronic projects.
http://www.elprocus.com/
How To Build a Robot With an Arduino
and 8051 Microcontroller
Push Buttons
 The push buttons are buttons which are made up of hard metals like
plastic and metal.
 Generally the push buttons are used to reset the program in the
microcontroller.
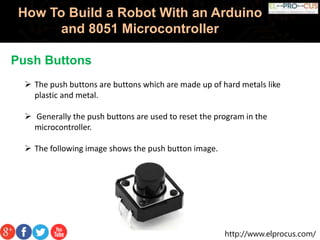
 The following image shows the push button image.
http://www.elprocus.com/
How To Build a Robot With an Arduino
and 8051 Microcontroller
8051 Microcontroller
 The 8051 microcontroller consists of 40 pins.
 The 4th & 5th pin of the microcontroller is connected to the crystal
oscillator.
 The Vcc pin is given to the power supply of 5V and the ground pin is
connected to the ground.
 The pins 15, 16, 18, 19 of the microcontroller are connected to the
encoder IC of HT12E.
 The microcontroller pins 2, 7, 8, 9, are connected to the push buttons.
http://www.elprocus.com/
How To Build a Robot With an Arduino
and 8051 Microcontroller
8051 Microcontroller
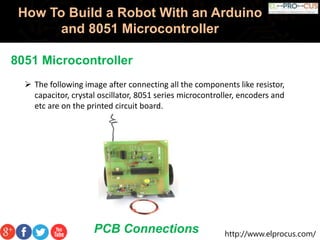
 The following image after connecting all the components like resistor,
capacitor, crystal oscillator, 8051 series microcontroller, encoders and
etc are on the printed circuit board.
PCB Connections
http://www.elprocus.com/
How To Build a Robot With an Arduino
and 8051 Microcontroller
8051 Microcontroller
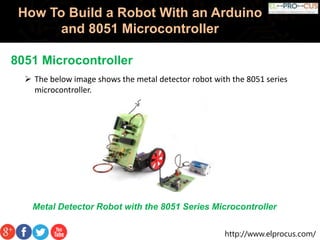
 The below image shows the metal detector robot with the 8051 series
microcontroller.
Metal Detector Robot with the 8051 Series Microcontroller
http://www.elprocus.com/
How To Build a Robot With an Arduino
and 8051 Microcontroller
 Here in this project we showed how to build a simple robotic obstacle
avoidance using arduino and 8051 Microcontroller. With the help of
sensors and other components robot can detect the obstacle and turn
around and avoid crashing.
Conclusion
http://www.elprocus.com/

More Related Content

DOCX
IoT Smart keychain finder project
PPT
Control chap9
DOCX
Gas sensor Alarm
DOCX
Development of anti theft security system
PDF
Home automation using bluetooth - Aurdino BASED
PDF
Lesson 9- NodeMCU with Arduino UNO (UART)
PPTX
Automatic street lighting system
PPTX
SMART CAR-PARKING SYSTEM USING IOT
IoT Smart keychain finder project
Control chap9
Gas sensor Alarm
Development of anti theft security system
Home automation using bluetooth - Aurdino BASED
Lesson 9- NodeMCU with Arduino UNO (UART)
Automatic street lighting system
SMART CAR-PARKING SYSTEM USING IOT

What's hot (20)

DOCX
Home automation with arduino
PPTX
CHILD SAFETY WEARABLE DEVICE
PDF
Speed checker on highway using 8051
PDF
Intelligent Control and Fuzzy Logic
PPTX
Automatic door using arduino
PDF
Mosquito Repellent Circuit
DOCX
Temperature Controlled Fan Report
PPTX
AVR ATmega32
PDF
Automatic water level monitoring and control system using IoT
PDF
VLSI Static Timing Analysis Timing Checks Part 4 - Timing Constraints
PPTX
Ultrasonic sensor
PPTX
Temperature Based Fan Controller
PDF
My Final Year Project - Individual Control Home Automation System
DOCX
AUTOMATIC FAN CONTROLLER USING THERMISTOR
PPT
automatic room light controller
PPTX
Smart home automation using microcontroller
PDF
Biomedical Equipments
PPT
Home Automation
PDF
Hydro-Thermal Scheduling: Using Soft Computing Technique Approch
PPSX
Engineer in society
Home automation with arduino
CHILD SAFETY WEARABLE DEVICE
Speed checker on highway using 8051
Intelligent Control and Fuzzy Logic
Automatic door using arduino
Mosquito Repellent Circuit
Temperature Controlled Fan Report
AVR ATmega32
Automatic water level monitoring and control system using IoT
VLSI Static Timing Analysis Timing Checks Part 4 - Timing Constraints
Ultrasonic sensor
Temperature Based Fan Controller
My Final Year Project - Individual Control Home Automation System
AUTOMATIC FAN CONTROLLER USING THERMISTOR
automatic room light controller
Smart home automation using microcontroller
Biomedical Equipments
Home Automation
Hydro-Thermal Scheduling: Using Soft Computing Technique Approch
Engineer in society
Ad

Viewers also liked (20)

PPTX
Presentation introducing 'How to make a plant watering robot' activity
PPTX
Embedded systems introduction
PDF
Multiple File Upload Control
PPTX
Autonomous metal search,collect and collision avoidance robot
DOCX
Wireless industrial robot
PDF
Arduino mega-schematic
PDF
Projet ROBOT MOBILE SUIVEUR DE LIGNE BASE SUR LE TRAITEMENT D'IMAGE
DOCX
Wireless industrial robot
PDF
Wireless AI based industrial security robot
PPTX
Mobille phone detector
PPTX
Fire Fighting Robotic Vehicle
PPTX
AUTOMATED METAL DETECTOR ROBOTIC VEHICLE WITH MANUAL CONTROL USING BLUETOOTH
PPTX
Robotics workshop PPT
PPTX
Android Controlled Arduino Spy Robot
PPTX
Metal Detector Robotic Vehicle
PPTX
MINI PROJECT ON CELLPHONE DETECTOR
PPT
Seminar report on robotics (line follower) ppt
PPTX
Wireless robot ppt
PPTX
Introduction to arduino
PPT
Introduction To Robotics
Presentation introducing 'How to make a plant watering robot' activity
Embedded systems introduction
Multiple File Upload Control
Autonomous metal search,collect and collision avoidance robot
Wireless industrial robot
Arduino mega-schematic
Projet ROBOT MOBILE SUIVEUR DE LIGNE BASE SUR LE TRAITEMENT D'IMAGE
Wireless industrial robot
Wireless AI based industrial security robot
Mobille phone detector
Fire Fighting Robotic Vehicle
AUTOMATED METAL DETECTOR ROBOTIC VEHICLE WITH MANUAL CONTROL USING BLUETOOTH
Robotics workshop PPT
Android Controlled Arduino Spy Robot
Metal Detector Robotic Vehicle
MINI PROJECT ON CELLPHONE DETECTOR
Seminar report on robotics (line follower) ppt
Wireless robot ppt
Introduction to arduino
Introduction To Robotics
Ad

Similar to How to build a robot with an arduino and 8051 microcontroller (20)

PPTX
Arduino bt mobile robot r2.0
PDF
Android Control robot using 8051 microcontroler
PPTX
Obstacle Detctor Robot
PPTX
Fire Fighter Robot with Night Vision Camera (1).pptx
DOCX
Arduino bluetooth controlled robot
PPTX
Obstacle detection Robot using Ultrasonic Sensor and Arduino UNO
PDF
IRJET - Red Herring Reconnaissance Robot
PDF
Animatronic hand controller
PPTX
Robotic car ppt (1)1.pptx project presentation
PPTX
Robotics and microcontroller (Introduction to Arduino)
PDF
MOBILE CONTROLLED ROBOTIC ARM USING ARDUINO AND HC-06
PPTX
BATCH 4 ppt presentation.pptx industrial
DOCX
MIDTERM.docxgggggggggggggggggggggggggggg
PDF
obstacle detection
PPTX
magnetic wall climbing robot presentation.pptx
PDF
Ball following Robot using ESP32-cam & Arduino UNO
PPTX
Robo wireless controll
PPTX
Bluetooth controlled robot using arduino uno and HC-05
PPTX
BLUETOOTH CONTROLLED ROBOT
PPTX
Remote Control Robot
Arduino bt mobile robot r2.0
Android Control robot using 8051 microcontroler
Obstacle Detctor Robot
Fire Fighter Robot with Night Vision Camera (1).pptx
Arduino bluetooth controlled robot
Obstacle detection Robot using Ultrasonic Sensor and Arduino UNO
IRJET - Red Herring Reconnaissance Robot
Animatronic hand controller
Robotic car ppt (1)1.pptx project presentation
Robotics and microcontroller (Introduction to Arduino)
MOBILE CONTROLLED ROBOTIC ARM USING ARDUINO AND HC-06
BATCH 4 ppt presentation.pptx industrial
MIDTERM.docxgggggggggggggggggggggggggggg
obstacle detection
magnetic wall climbing robot presentation.pptx
Ball following Robot using ESP32-cam & Arduino UNO
Robo wireless controll
Bluetooth controlled robot using arduino uno and HC-05
BLUETOOTH CONTROLLED ROBOT
Remote Control Robot

More from Edgefxkits & Solutions (20)

PPTX
Mains operated under voltage over voltage trip switch
PPTX
Scada for remote industrial plant
PPTX
TV Remote Jammer | 555 Timer Projects | Final Year Engineering Projects
PPTX
Predefined speed control of bldc motor
PPTX
Microcontroller based Electronic Eye Controlled security System
PPTX
How to select the diy electrical projects kit by engineering students
PPTX
Smooth start of a single phase induction motor
PPTX
Opto-Electronic Oscillator Circuit Working and Applications
PPTX
Importance of Doing Mini Projects By Engineering Students
PPTX
Common mode rejection ratio (cmrr) and the operational amplifier
PPTX
Vehicle tracking by gps gsm
PPTX
Tutorial on avr atmega8 microcontroller, architecture and its applications
PPTX
Photodiode working principle characteristics and applications
PPTX
Cro cathode ray oscilloscope working and applications
PPTX
Rfid security access control system
PPTX
Density based traffic signal system
PPTX
Electronic Speed Control (ESC) Circuits, Working And Applications
PPTX
Difference between soc and single board computer ppt1
PPTX
Prepaid energy meter with gsm interface
PPTX
Pc mouse operated electrical load control using vb application
Mains operated under voltage over voltage trip switch
Scada for remote industrial plant
TV Remote Jammer | 555 Timer Projects | Final Year Engineering Projects
Predefined speed control of bldc motor
Microcontroller based Electronic Eye Controlled security System
How to select the diy electrical projects kit by engineering students
Smooth start of a single phase induction motor
Opto-Electronic Oscillator Circuit Working and Applications
Importance of Doing Mini Projects By Engineering Students
Common mode rejection ratio (cmrr) and the operational amplifier
Vehicle tracking by gps gsm
Tutorial on avr atmega8 microcontroller, architecture and its applications
Photodiode working principle characteristics and applications
Cro cathode ray oscilloscope working and applications
Rfid security access control system
Density based traffic signal system
Electronic Speed Control (ESC) Circuits, Working And Applications
Difference between soc and single board computer ppt1
Prepaid energy meter with gsm interface
Pc mouse operated electrical load control using vb application

Recently uploaded (20)

PDF
FourierSeries-QuestionsWithAnswers(Part-A).pdf
PPTX
Introduction to Child Health Nursing – Unit I | Child Health Nursing I | B.Sc...
PDF
Classroom Observation Tools for Teachers
PDF
Basic Mud Logging Guide for educational purpose
PPTX
Institutional Correction lecture only . . .
PDF
Pre independence Education in Inndia.pdf
PPTX
PPT- ENG7_QUARTER1_LESSON1_WEEK1. IMAGERY -DESCRIPTIONS pptx.pptx
PDF
3rd Neelam Sanjeevareddy Memorial Lecture.pdf
PDF
Physiotherapy_for_Respiratory_and_Cardiac_Problems WEBBER.pdf
PPTX
Week 4 Term 3 Study Techniques revisited.pptx
PPTX
Cell Types and Its function , kingdom of life
PDF
Business Ethics Teaching Materials for college
PDF
TR - Agricultural Crops Production NC III.pdf
PPTX
Microbial diseases, their pathogenesis and prophylaxis
PDF
Complications of Minimal Access Surgery at WLH
PPTX
IMMUNITY IMMUNITY refers to protection against infection, and the immune syst...
PPTX
human mycosis Human fungal infections are called human mycosis..pptx
PDF
2.FourierTransform-ShortQuestionswithAnswers.pdf
PPTX
school management -TNTEU- B.Ed., Semester II Unit 1.pptx
PDF
ANTIBIOTICS.pptx.pdf………………… xxxxxxxxxxxxx
FourierSeries-QuestionsWithAnswers(Part-A).pdf
Introduction to Child Health Nursing – Unit I | Child Health Nursing I | B.Sc...
Classroom Observation Tools for Teachers
Basic Mud Logging Guide for educational purpose
Institutional Correction lecture only . . .
Pre independence Education in Inndia.pdf
PPT- ENG7_QUARTER1_LESSON1_WEEK1. IMAGERY -DESCRIPTIONS pptx.pptx
3rd Neelam Sanjeevareddy Memorial Lecture.pdf
Physiotherapy_for_Respiratory_and_Cardiac_Problems WEBBER.pdf
Week 4 Term 3 Study Techniques revisited.pptx
Cell Types and Its function , kingdom of life
Business Ethics Teaching Materials for college
TR - Agricultural Crops Production NC III.pdf
Microbial diseases, their pathogenesis and prophylaxis
Complications of Minimal Access Surgery at WLH
IMMUNITY IMMUNITY refers to protection against infection, and the immune syst...
human mycosis Human fungal infections are called human mycosis..pptx
2.FourierTransform-ShortQuestionswithAnswers.pdf
school management -TNTEU- B.Ed., Semester II Unit 1.pptx
ANTIBIOTICS.pptx.pdf………………… xxxxxxxxxxxxx

How to build a robot with an arduino and 8051 microcontroller

  • 1. How To Build a Robot With an Arduino and 8051 Microcontroller
  • 2. http://www.elprocus.com/ How To Build a Robot With an Arduino and 8051 Microcontroller Introduction: The main purpose of robot is to decrease the man power. The robots are used in electronics in many applications. In this presentation we are discussing about how to build the obstacle-avoiding robot with the Arduino module & 8051 microcontroller.
  • 3. http://www.elprocus.com/ How To Build a Robot With an Arduino and 8051 Microcontroller  The required components to build the robot includes the following How To Build a Robot • Robot Body • DC Motor • Arduino Module • Motor Driver IC • Ultrasonic Sensor
  • 4. http://www.elprocus.com/ How To Build a Robot With an Arduino and 8051 Microcontroller How to Build a Robot 1. Robot Body  The basic robot body of the robot of obstacle avoidance vehicle.  The robot body is a plastic body and it contains wheels on both sides.  Ultrasonic sensor is arranged in front of the robot body.  By using the ultrasonic sensor the obstacle can be detected.
  • 5. http://www.elprocus.com/ How To Build a Robot With an Arduino and 8051 Microcontroller Robot Body  Any obstacle is detected by the ultrasonic sensor while the robot is moving.  Then the robot will move aside and it will continue moving.
  • 6. http://www.elprocus.com/ How To Build a Robot With an Arduino and 8051 Microcontroller 2. DC Motor  The DC motor is an electric motor and it runs with direct current.  The operation of any motor is based on the electromagnetism.  The magnetic field is produced by the current carrying conductors  When it is placed in an external magnetic field, it will experience a force proportional to the current in the conductor.
  • 7. http://www.elprocus.com/ How To Build a Robot With an Arduino and 8051 Microcontroller DC Motor  Generally, we know that the magnets are opposite polarity attraction from north to south.  If the polarities are same like north to north & south to south then the magnets will repel. DC Motor
  • 8. http://www.elprocus.com/ How To Build a Robot With an Arduino and 8051 Microcontroller DC Motor  The internal configuration of DC motor is designed to attach the magnetic interaction between the current carrying conductor and the external magnetic field to produce the motion.  Here we are using two DC motors, each motor contains 6v and the total two DC motors contain 12v.  The two DC motors are placed in the robot body
  • 9. http://www.elprocus.com/ How To Build a Robot With an Arduino and 8051 Microcontroller DC Motor  The robot body is moved with the help of the DC motors Robot Body with DC Motor
  • 10. http://www.elprocus.com/ How To Build a Robot With an Arduino and 8051 Microcontroller 3. Arduino Module  The following image shows the arduino module image.
  • 11. http://www.elprocus.com/ How To Build a Robot With an Arduino and 8051 Microcontroller 3. Arduino Module  The arduino module plays an important role in the design of the obstacle avoidance robot using arduino kit.  The receiver pin of the arduino is connected to the second pin of ultrasonic sensor.  The 1st, 2nd, & 3rd pin of arduino module is connected to the DC motor driver.  The common components capacitor and diode are also connected to the arduino module with the help of the battery power supply.
  • 12. http://www.elprocus.com/ How To Build a Robot With an Arduino and 8051 Microcontroller 4. Motor Driver IC  To run the DC motor the motor driver IC used.  The pins 3,6 & 11, 14 of motor driver are connected to the DC motor.  The input pin 1 and 2 are connected to the arduino module and the enable pin is connected to the transmitter pin of the arduino.  The pins 4, 5, 12, 13 of motor driver are connected to the ground.
  • 13. http://www.elprocus.com/ How To Build a Robot With an Arduino and 8051 Microcontroller Ultrasonic Sensor  In this concept the ultrasonic sensor is used to detect an obstacle ahead.  It will send the command to the arduino board.  Depending upon the input signal the microcontroller redirects the robot to move in alternate directions.
  • 14. http://www.elprocus.com/ How To Build a Robot With an Arduino and 8051 Microcontroller  The applications of the arduino robot obstacle avoidance Ultrasonic Sensor • The arduino robot can move on any surface • It can move on metallic surface like refrigerator body.
  • 15. http://www.elprocus.com/ How To Build a Robot With an Arduino and 8051 Microcontroller  The below image shows the arduino robot for obstacle avoidance Arduino Robot for Obstacle Avoidance
  • 16. http://www.elprocus.com/ How To Build a Robot With an Arduino and 8051 Microcontroller Building Robot With 8051 Microcontroller  The components required to build the robot with the 8051 microcontroller are • 8051 microcontroller • DC motors • Motor drivers • Metal detector  To build a robot with the 8051 microcontroller, We took the metal detector robot vehicle for the explanation.
  • 17. http://www.elprocus.com/ How To Build a Robot With an Arduino and 8051 Microcontroller • Decoder • Encoder • Push buttons • Crystal • RF transmitter and receiver Building Robot With 8051 Microcontroller
  • 18. http://www.elprocus.com/ How To Build a Robot With an Arduino and 8051 Microcontroller Metal Detector  The metal detector is a coil it has one or more metal coils used to detect the metals on the ground.  The metal detector works on the principle of the electromagnetic induction.  The metal detector is connected to the robot body through the PCB.
  • 19. http://www.elprocus.com/ How To Build a Robot With an Arduino and 8051 Microcontroller Metal Detector  The following image shows the general metal detector used in the electronic projects.
  • 20. http://www.elprocus.com/ How To Build a Robot With an Arduino and 8051 Microcontroller Push Buttons  The push buttons are buttons which are made up of hard metals like plastic and metal.  Generally the push buttons are used to reset the program in the microcontroller.  The following image shows the push button image.
  • 21. http://www.elprocus.com/ How To Build a Robot With an Arduino and 8051 Microcontroller 8051 Microcontroller  The 8051 microcontroller consists of 40 pins.  The 4th & 5th pin of the microcontroller is connected to the crystal oscillator.  The Vcc pin is given to the power supply of 5V and the ground pin is connected to the ground.  The pins 15, 16, 18, 19 of the microcontroller are connected to the encoder IC of HT12E.  The microcontroller pins 2, 7, 8, 9, are connected to the push buttons.
  • 22. http://www.elprocus.com/ How To Build a Robot With an Arduino and 8051 Microcontroller 8051 Microcontroller  The following image after connecting all the components like resistor, capacitor, crystal oscillator, 8051 series microcontroller, encoders and etc are on the printed circuit board. PCB Connections
  • 23. http://www.elprocus.com/ How To Build a Robot With an Arduino and 8051 Microcontroller 8051 Microcontroller  The below image shows the metal detector robot with the 8051 series microcontroller. Metal Detector Robot with the 8051 Series Microcontroller
  • 24. http://www.elprocus.com/ How To Build a Robot With an Arduino and 8051 Microcontroller  Here in this project we showed how to build a simple robotic obstacle avoidance using arduino and 8051 Microcontroller. With the help of sensors and other components robot can detect the obstacle and turn around and avoid crashing. Conclusion