SlideShare a Scribd company logo
JDBC example


               http://www.java2all.com
Chapter 3


JDBC example


               http://www.java2all.com
JDBC example with access:


                     http://www.java2all.com
To connect java application to access database we
       must have at least one database created in
  access.
  Steps to create a database in MS-Access:
(1) Open Microsoft Office Access.
(2) Click on Blank Database.
(3) Type an appropriate name of database in File
  Name: box for example, HOD_DATA and click on
  Create Button.
(4) Create appropriate field name in table and value
  as per the field.
  EX.:
                                            http://www.java2all.com
http://www.java2all.com
(5) Right click on Table1 and select Save. Type the
name of Table for example, DATA and click on OK
button.
(6) Close the Table by right clicking on DATA and
select Close. and Exit from Database
(7) Move this database to the appropriate drive where
you want.

    Now lets create TYPE 1 driver program for
JDBC with access.


                                            http://www.java2all.com
import java.sql.Connection;
import java.sql.DriverManager;
import java.sql.ResultSet;
import java.sql.Statement;

public class Type_One
{
  public static void main(String[] args)
  {
    try
         {
       Class.forName("sun.jdbc.odbc.JdbcOdbcDriver"); //Load Driver
       Connection con = DriverManager.getConnection("jdbc:odbc:HOD_DATA"); //Create
Connection with Data Source Name : HOD_DATA
       Statement s = con.createStatement(); // Create Statement
       String query = "select * from Data"; // Create Query
       s.execute(query); // Execute Query
       ResultSet rs = s.getResultSet(); //return the data from Statement into ResultSet
       while(rs.next()) // Retrieve data from ResultSet
       {
          System.out.print("Serial number : "+rs.getString(1)); //1st column of Table from database
          System.out.print(" , Name : "+rs.getString(2)); //2nd column of Table
          System.out.print(" , City : "+rs.getString(3)); //3rd column of Table
          System.out.println(" and Age : "+rs.getString(4)); //4th column of Table
       }


                                                                                    http://www.java2all.com
s.close();
          con.close();
        }
        catch (Exception e)
            {
          System.out.println("Exception : "+e);
        }
    }
}


        Output :

        Serial number : 1 , Name : Ashutosh Abhangi ,
        City : Dhoraji and Age : 27
        Serial number : 2 , Name : Kamal Kotecha ,
        City : Junagadh and Age : 24


                                                    http://www.java2all.com
Key point:

      String which we are writing in
Class.forName("sun.jdbc.odbc.JdbcOdbcDriver") to
load the driver.

     String which we are writing in Connection con =
DriverManager.getConnection("jdbc:odbc:HOD_DA
TA") to create connection with particular database.

Here HOD_DATA is our DSN (Data Source Name).


                                          http://www.java2all.com
Steps for creating DSN for access.

(1) Go to Control Panel.
(2) Click on Administrative Tools(Window XP) for
(Window 7) System and Security then Administrative
Tools.
(3) Click on Data Sources (ODBC).
(4) Select MS Access Database and Click on Add
button.
      Here in Windows XP you can easily add new
DSN but if you are getting an error or not able to add
new DSN in Window 7 go
to C:WindowsSysWOW64 and then open
odbcad32.exe and repeate step 4.             http://www.java2all.com
http://www.java2all.com
(5) Select Microsoft Access Driver
(*.mdb,*.accdb) and Click on Finish button.
If you cant find the below driver then you should
download JDBC ODBC Driver for ms access.


                                            http://www.java2all.com
(6) Type Data Source Name, for example
HOD_DATA then click on Select button in the
Database frame.

(7) Select particular database which we saved on
particular drive and created at beginning of this page
(HOd_DATA). and click on OK button.


                                              http://www.java2all.com
http://www.java2all.com
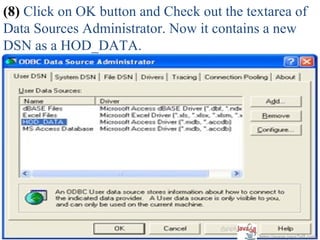
(8) Click on OK button and Check out the textarea of
Data Sources Administrator. Now it contains a new
DSN as a HOD_DATA.


                                           http://www.java2all.com
(9) Click on OK button and close the Administrative
Tools (Control Panel).

NOTE:
         Do not confuse your self due to Database
Name and Data Source Name, Here Both are same
HOD_DATA but we can take different name too.

      One more thing there may be a 32 bit or 64 bit
issue like architecture mismatch so java2all
recommend you that please make them all same.

     Your java IDE tool, Microsoft Aceess and JVM
or JDK all must be the same bit (32/64) version.
                                             http://www.java2all.com
Now run the above program and check out the
output.


                                         http://www.java2all.com
PreparedStatement in access:


                        http://www.java2all.com
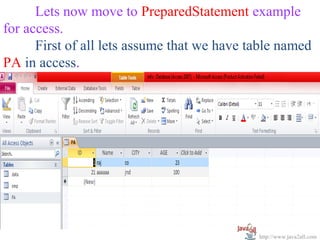
Lets now move to PreparedStatement example
for access.
      First of all lets assume that we have table named
PA in access.


                                             http://www.java2all.com
And our DSN is DATA.
import java.sql.Connection;
import java.sql.DriverManager;
import java.sql.PreparedStatement;

public class Prepare_Demo
{
  public static void main(String[] args)
  {
    try
    {
      Class.forName("sun.jdbc.odbc.JdbcOdbcDriver");
      Connection con=DriverManager.getConnection("jdbc:odbc:DATA");

     PreparedStatement ps = con.prepareStatement("insert into PA
(ID,Name,CITY,AGE)values(?,?,?,?)");

       ps.setInt(1,200);
       ps.setString(2, "hello");
       ps.setInt(4,101);
       ps.setString(3, "brd");


                                                                   http://www.java2all.com
ps.executeUpdate();
           System.out.println("inserted");
           con.close();
        }
        catch (Exception e)
        {
          System.out.println(e);
        }
    }
}          Output :

            inserted


     First run the above program with suitable table
and after running it refresh your access database and
you cDSN an see one record inserted as per our
program.
                                             http://www.java2all.com
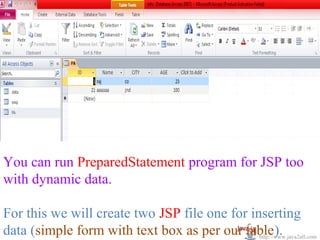
You can run PreparedStatement program for JSP too
with dynamic data.

For this we will create two JSP file one for inserting
data (simple form with text box as per our table).
                                               http://www.java2all.com
Second JSP file contains logic for connecting
data base as well as PreparedStatement logic for
inserting data.

Insert_data.jsp
<html>
<head>
<meta http-equiv="Content-Type" content="text/html; charset=ISO-8859-1">
<title>Insert DATA</title>
</head>
<body>
<form action="datams.jsp">
ID: <input type="text" name="ID"/>
NAME : <input type="text" name="NAME"/>
AGE : <input type="text" name="AGE"/>
CITY : <input type="text" name="CITY"/>
<input type="submit" value ="INSERT">
</form>
</body>
</html>


                                                                  http://www.java2all.com
Now insert value in text box as you want to
insert in database as shown below.

Remember here too our DSN and Table are same as
above program.


                                             http://www.java2all.com
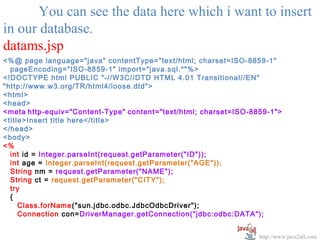
You can see the data here which i want to insert
in our database.
datams.jsp
<%@ page language="java" contentType="text/html; charset=ISO-8859-1"
  pageEncoding="ISO-8859-1" import="java.sql.*"%>
<!DOCTYPE html PUBLIC "-//W3C//DTD HTML 4.01 Transitional//EN"
"http://www.w3.org/TR/html4/loose.dtd">
<html>
<head>
<meta http-equiv="Content-Type" content="text/html; charset=ISO-8859-1">
<title>Insert title here</title>
</head>
<body>
<%
  int id = Integer.parseInt(request.getParameter("ID"));
  int age = Integer.parseInt(request.getParameter("AGE"));
  String nm = request.getParameter("NAME");
  String ct = request.getParameter("CITY");
  try
  {
     Class.forName("sun.jdbc.odbc.JdbcOdbcDriver");
     Connection con=DriverManager.getConnection("jdbc:odbc:DATA");


                                                                  http://www.java2all.com
PreparedStatement ps = con.prepareStatement("insert into PA
(ID,Name,CITY,AGE)values(?,?,?,?)");

   ps.setInt(1,id);
   ps.setString(2,nm);
   ps.setInt(4,age);                  Output :
   ps.setString(3,ct);

   ps.executeUpdate();                 inserted
   System.out.println("inserted");
   con.close();
  }
  catch (Exception e)
  {
    System.out.println(e);
  }
%>
</body>
</html>


     Now again refresh your table data and you can
see one more new record which we inserted
dynamically.
                                                               http://www.java2all.com
With access we can not do CallableStatement because
access does not support stored procedure.
We will do it in mysql and oracle in next chapters.
                                          http://www.java2all.com
JDBC connection for MySQL:


                     http://www.java2all.com
To connect java application to MySQL database
we must have at least one database created in MySQL.
And to create database in MySQL,it should be
installed on your system.

     So first of all install MySQL database in your
system.

     After installing it open MySQL console.


                                            http://www.java2all.com
http://www.java2all.com
Create database with syntax create database
databasename; and press enter.

      You can see message like Query OK, 1 row
affected (0.03 sec)

      Now our database is created in MySQL. Second
step is to create table in our database.

       For creating table in particular database
type Use databasename; and press enter and you can
see message like database changed. Now for creating
table type create table tablename (field1 type of field1,
field2 type of field2, field3 type of field3); http://www.java2all.com
Now for creating table type create table
tablename (field1 type of field1, field2 type of field2,
field3 type of field3);

      Now press enter again you can see the message
like Query OK, 0 row affected (0.01 sec).

EX:

Create database java2all;

Use java2all;

                                               http://www.java2all.com
Create table data (id int,name char(20),city
char(20),age int);

      Now the next step is to insert data into our table.

     For inserting data simply type insert into table
name (field1,field2,field3) values
(value1,value2,value3);

EX:
      insert into data (id,name,city,age) values
(1,"java","abc",300);

                                               http://www.java2all.com
So by that’s way you can insert as many data as
you want in your table. Now for viewing our data
from table just type select * from tablename;

 EX:

select * from data;


                                           http://www.java2all.com


    http://www.java2all.com
 
     Now we have data in our table, table in our 
database, database in our MySQL and MySQL in our 
system.

So let`s now move to JDBC program with MySQL.
Simple Statement in JDBC with MySQL:
import java.sql.*;
public class MysqlDemo
{
  public static void main(String[] args)
  {
    try
    {
      Class.forName("com.mysql.jdbc.Driver");
      System.out.println("Driver is loaded");
      Connection c =
DriverManager.getConnection("jdbc:mysql://localhost:3306/java2all","root","root");
      System.out.println("Connection created");
      Statement s = c.createStatement();
                                                                     http://www.java2all.com
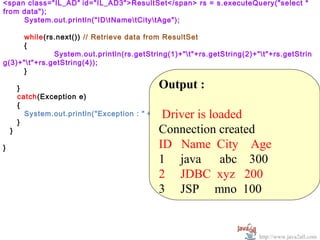
<span class="IL_AD" id="IL_AD3">ResultSet</span> rs = s.executeQuery("select *
 
from data");
     System.out.println("IDtNametCitytAge");

     while(rs.next()) // Retrieve data from ResultSet
     {
              System.out.println(rs.getString(1)+"t"+rs.getString(2)+"t"+rs.getStrin
g(3)+"t"+rs.getString(4));
     }

        }                                      Output :
        catch(Exception e)
        {
                                                
          System.out.println("Exception : " +e);Driver is loaded
        }
    }                                          Connection created
}                                              ID   Name  City    Age
                                               1     java      abc    300
                                               2     JDBC  xyz   200
                                               3     JSP     mno  100


                                                                       http://www.java2all.com
  
Key point:
      String which we are writing in 
Class.forName("com.mysql.jdbc.Driver"); to load 
the driver.
      String which we are writing in Connection con = 
DriverManager.getConnection("jdbc:mysql://localho
st:3306/java2all","root","root") to create 
connection with particular database.
      Here the string jdbc:mysql://localhost:3306 is for 
connecting MySQL to JDBC in our local system and 
the name /java2all is our database name and 1st "root" 
is username of MySQL and 2nd "root" is password of 
MySQL.
                                              http://www.java2all.com


      Here no need of Data Source Name as in access 
but one jar file named mysql-connector-java-5.1.6-
bin.jar must be loaded in your java IDE. 

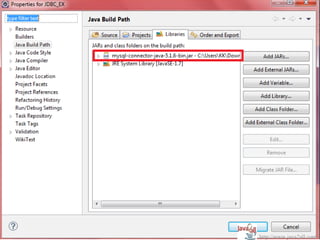
      In eclipse for adding jar file simply right click on 
your project and select build path ? configure build 
path and you can see window like this.


                                               http://www.java2all.com


     http://www.java2all.com
  
      Click on libraries tab then click on Add External 
JARs..
 
      And select proper path where your jar file is 
located on your system.
 
      If you don’t have jar file you can easily 
download it from the web for free
 
      After selecting your jar file you can see its now 
added to our library for that particular project.


                                             http://www.java2all.com


     http://www.java2all.com
  
    After adding jar file in our library we can now easily 
    run our program.
    Statement in JDBC with MySQL for inserting
    data:
    java.sql.*;
    class Mysql_insertDemo

ic static void main(String[] args)

y

Class.forName("com.mysql.jdbc.Driver");
System.out.println("Driver is loaded");
Connection c = DriverManager.getConnection("jdbc:mysql://localhost:3306/java2all","ro
System.out.println("Connection created");
String s = "insert into data (id,name,city,age) values (4,'Servlet','JND',120)";
Statement sm = c.createStatement();
sm.execute(s);


                                                                    http://www.java2all.com
catch(Exception e)
  
     {
       System.out.println("Exception : "
+e);
     }
   }
}


       Output :
        
        Driver is loaded
       Connection created
       Inserted

                                           http://www.java2all.com
  
PreparedStatement in JDBC with MySQL:
import java.sql.*;
public class Mysql_insertDemo
{
  public static void main(String[] args)
  {
    try
    {
        Class.forName("com.mysql.jdbc.Driver");
        System.out.println("Driver is loaded");
        Connection c =
DriverManager.getConnection("jdbc:mysql://localhost:3306/java2all","root","kamal");
        System.out.println("Connection created");
        String s = "insert into data (id,name,city,age) values (?,?,?,?)";
        PreparedStatement ps = c.prepareStatement(s);
        ps.setInt(1, 6);
        ps.setString(2, "J2EE");
        ps.setString(3, "AAA");
        ps.setInt(4, 55);
        ps.execute();
        c.close();
        System.out.println("Inserted");


                                                                    http://www.java2all.com
        catch(Exception e)
  
        {
                System.out.println("Exception : " +e);
                 
        }  
    }
}
           Output :
            
            Driver is loaded
           Connection created
           Inserted

      You can run PreparedStatement program for 
JSP too with dynamic data.
 
      For this we will create two JSP file one for 
inserting data (simple form with text box as per our 
table).                                       http://www.java2all.com
  
      You can run PreparedStatement program for 
JSP too with dynamic data.
 
      For this we will create two JSP file one for 
inserting data (simple form with text box as per our 
table).
 
      Second JSP file contains logic for connecting 
data base as well as PreparedStatement logic for 
inserting data.

Insert_data.jsp

                                             http://www.java2all.com
<html>
  
<head>
<meta http-equiv="Content-Type" content="text/html; charset=ISO-8859-1">
<title>Insert DATA</title>
</head>
<body>
<<span class="IL_AD" id="IL_AD4">form action</span>="datamysql.jsp">
ID: <input type="text" name="ID"/>
NAME : <input type="text" name="NAME"/>
AGE : <input type="text" name="AGE"/>
CITY : <input type="text" name="CITY"/>
<input type="submit" value ="INSERT">
</form>
</body>
</html>


      Now insert value in text box as you want to 
insert in database as shown below.


                                                                           http://www.java2all.com


You can see the data here which i want to insert in our 
database.
datamysql.jsp
<%@ page language="java" contentType="text/html; charset=ISO-8859-1"
pageEncoding="ISO-8859-1" import="java.sql.*"%>
<!DOCTYPE html PUBLIC "-//W3C//DTD HTML 4.01 Transitional//EN"
"http://www.w3.org/TR/html4/loose.dtd">
<html>
<head>
<meta http-equiv="Content-Type" content="text/html; charset=ISO-8859-1">
<title>Insert title here</title>
</head>                                                           http://www.java2all.com
<%
  
   int id = Integer.parseInt(request.getParameter("ID"));
   int age = Integer.parseInt(request.getParameter("AGE"));
   String nm = request.getParameter("NAME");
   String ct = request.getParameter("CITY");
   try
   {
         Class.forName("com.mysql.jdbc.Driver");
         System.out.println("Driver is loaded");
         Connection c =
DriverManager.getConnection("jdbc:mysql://localhost:3306/java2all","root","kamal");
         System.out.println("Connection created");
         String s = "insert into data (id,name,city,age) values (?,?,?,?)";
         PreparedStatement ps = c.prepareStatement(s);
         ps.setInt(1, id);
         ps.setString(2, nm);
         ps.setString(3, ct);
         ps.setInt(4, age);
         ps.execute();
         c.close();
         System.out.println("Inserted");
   }
   catch(Exception e)
   {
         System.out.println("Exception : " +e);

  }
                                                                               http://www.java2all.com
%>
  
</body>
</html>
            Output :
             
            Driver is loaded
            Connection created
            Inserted


You can see your data as we inserted through 
program.


                                           http://www.java2all.com


     http://www.java2all.com
  
CallableStatement in MySQL:

       Now we all know that for CallableStatement first 
of all we must have stored procedure in our database.
 
       Now how can we create stored procedure in 
MySQL.
 
       For that follow the steps given below.


                                             http://www.java2all.com
  
       We already create a database in MySQL now 
for creating stored procedure for that particular 
database
 
Use java2all; (use databasename;)
 
Example stored procedure for addition of two 
numbers.
      Copy and paste it in your MySQL console after 
selecting your database.
DELIMITER $$
CREATE PROCEDURE `addproc`( IN a INT, IN b INT, OUT c INT) 
BEGIN 
SET c = a + b;
END$$                                            http://www.java2all.com
  
       You can get message like Query OK, 0 rows 
affected (0.04 sec)
 
      It means your stored procedure is created 
successfully.
 
      Here we create stored procedure for add two int 
number.
 
      The stored procedure has 2 IN parameter and 1 
OUT parameter so total 3 parameters
 
      Now let us move to JDBC program for 
CallableStatement in MySQL                   http://www.java2all.com
import java.sql.*;
  
public class Mysql_callableDemo
{
   public static void main(String[] args)
   {
     try
     {
       Class.forName("com.mysql.jdbc.Driver");
       System.out.println("Driver is loaded");
       Connection c =
DriverManager.getConnection("jdbc:mysql://localhost:3306/java2all","root","kamal");
       System.out.println("Connection created");
       String q = "call addproc(?,?,?)";
       CallableStatement cs = c.prepareCall(q);     Output :
       cs.setInt(1, 10);
       cs.setInt(2, 20);                             
       cs.registerOutParameter(3, Types.INTEGER);
       cs.execute();                                Driver is loaded
       int add = cs.getInt(3);
       System.out.println("addition = "+add);
                                                    Connection created
     }                                              addition = 30
     catch(Exception e)
     {
       System.out.println("Exception : " +e);
     }
   }
}
                                                                               http://www.java2all.com
  
      To call a storedprocedure you can see the syntax 
in our program.
 
      Call storedprocedurename(parameter);
 
      Here two more methods are introduced 1st is 
registerOutParameter(3, Types);
 
      We have to register our out parameter with the 
method given above.
 
      This method has two arguments 1st is sequence 
of question mark we passed in calling of stored 
procedure.                                   http://www.java2all.com
  
      2nd is out parameter type here it is integer type 
and question mark sequence is 3 so we write
 
cs.registerOutParameter(3, Types.INTEGER);
 
2nd method is getXXX(int sequence_number);
 
The working of this method is same as setXXX(), 
which we used in PreparedStatement and 
CallableStatement.

      But setXXX() is for set a value and getXXX() is 
for getting a particular value as you can see in our 
program.                                       http://www.java2all.com
  
      Now let’s take one more example of 
CallableStatement.
 
Here we are going to create stroredprocedure that 
returns the data as per the id.
 
Our data in table is something like that.


                                            http://www.java2all.com


     http://www.java2all.com
  
Stored Procedure:
 
DELIMITER $$
CREATE PROCEDURE `datainfo`( IN sid INT,OUT 
sname VARCHAR(20), OUT scity 
VARCHAR(20),OUT sage INT)
BEGIN 
select name,city,age INTO sname,scity,sage from data 
where id=sid; 
END$$


                                           http://www.java2all.com
  
We will pass the id when we call the stored procedure 
and it will return name,city and age as per the id we 
passed.

EX:
import java.sql.*;
import java.util.Scanner;

public class Mysql_callableDemo
{
  public static void main(String[] args)
  {
    int i;
    try
    {
       Scanner s = new Scanner(System.in);
       System.out.println("Enter ID");
       i=s.nextInt();
       Class.forName("com.mysql.jdbc.Driver");
       System.out.println("Driver is loaded");
       Connection c =
DriverManager.getConnection("jdbc:mysql://localhost:3306/java2all","root","kamal");
                                                                               http://www.java2all.com
      
           System.out.println("Connection created");
           String q = "call datainfo(?,?,?,?)";
           CallableStatement cs = c.prepareCall(q);
                                                        Output :
           cs.setInt(1,i);                               
           cs.registerOutParameter(2, Types.VARCHAR);
           cs.registerOutParameter(3, Types.VARCHAR);    Enter ID
           cs.registerOutParameter(4, Types.INTEGER);
           cs.execute();                                1
           String nm = cs.getString(2);
           String ct = cs.getString(3);
                                                        Driver is loaded
           int age = cs.getInt(4);                      Connection created
           System.out.println("Name = "+nm);
           System.out.println("City = "+ct);            Name = java
           System.out.println("Age = "+age);
         }                                              City = abc
         catch(Exception e)
         {
                                                        Age  = 300
           System.out.println("Exception : " +e);
         }
    }
}


For closing the connection in each and every program 
of JDBC we should call the method close() through 
Connection object c.close();                http://www.java2all.com
  
      As my friend suggest me we should call close() 
method to close our connection with database from 
finally block so close() method will execute in all 
circumstances.

     Even if a try block has an exception our 
connection will be closed safely.

     EXample with finally block:


                                            http://www.java2all.com
  
 import java.sql.*;
public class MysqlDemo
{
   public static void main(String[] args) throws SQLException
   {
          Connection c = null;
     try
     {
       Class.forName("com.mysql.jdbc.Driver");
       System.out.println("Driver is loaded");
       c = DriverManager.getConnection("jdbc:mysql://localhost:3306/java2all","root","root");
       System.out.println("Connection created");
       Statement s = c.createStatement();
       ResultSet rs = s.executeQuery("select * from data");
       System.out.println("IDtNametCitytAge");

       while(rs.next()) // Retrieve data from ResultSet
       {
                 System.out.println(rs.getString(1)+"t"+rs.getString(2)+"t"+rs.getString(3)+"t"+rs.g
etString(4));
       }

    }


                                                                                    http://www.java2all.com
         catch(Exception e)
         {
           System.out.println("Exception : " +e);
         }
             finally
             {
                 c.close();
             }
     }

}


                                                    http://www.java2all.com

More Related Content

PPT
Sq lite database
PPTX
Sqlite
PPTX
What is java?
PPTX
JDBC ppt
DOC
Java Class Loading
PPT
Layered Architecture
PPTX
Adbms 17 object query language
Sq lite database
Sqlite
What is java?
JDBC ppt
Java Class Loading
Layered Architecture
Adbms 17 object query language

What's hot (20)

PPT
Sqlite
ODP
Garbage collection
PPT
Ajax Ppt 1
PPT
Java database connectivity
PPT
JDBC – Java Database Connectivity
PPSX
Spring - Part 1 - IoC, Di and Beans
PPTX
SQLite - Overview
PPTX
Servlets
PPTX
Database system environment ppt.
PPTX
Spring Boot
PPTX
Java database connectivity with MySql
PPTX
Constructor ppt
ODP
Partitioning
PPT
Jsp ppt
PPTX
Introduction to Java -unit-1
PPT
Java IO Package and Streams
PPT
Introduction to ADO.NET
PPTX
Client server architecture
PPTX
object oriented Programming ppt
PPTX
Introduction to java
Sqlite
Garbage collection
Ajax Ppt 1
Java database connectivity
JDBC – Java Database Connectivity
Spring - Part 1 - IoC, Di and Beans
SQLite - Overview
Servlets
Database system environment ppt.
Spring Boot
Java database connectivity with MySql
Constructor ppt
Partitioning
Jsp ppt
Introduction to Java -unit-1
Java IO Package and Streams
Introduction to ADO.NET
Client server architecture
object oriented Programming ppt
Introduction to java
Ad

Viewers also liked (20)

PPSX
JDBC: java DataBase connectivity
PPTX
Database Access With JDBC
PPTX
Jdbc in servlets
PPT
JDBC Java Database Connectivity
PPS
Jdbc architecture and driver types ppt
PPTX
Java Database Connectivity (JDBC)
KEY
JDBC Basics (In 20 Minutes Flat)
ODP
VHDL Packages, Coding Styles for Arithmetic Operations and VHDL-200x Additions
PPSX
Java rmi
PPT
Jdbc ppt
PPTX
Database Connectivity with JDBC
PPT
AES Cryptosystem
DOC
Ad java prac sol set
PPTX
Advance Java Topics (J2EE)
PDF
Jdbc Complete Notes by Java Training Center (Som Sir)
PPS
Advance Java
JDBC: java DataBase connectivity
Database Access With JDBC
Jdbc in servlets
JDBC Java Database Connectivity
Jdbc architecture and driver types ppt
Java Database Connectivity (JDBC)
JDBC Basics (In 20 Minutes Flat)
VHDL Packages, Coding Styles for Arithmetic Operations and VHDL-200x Additions
Java rmi
Jdbc ppt
Database Connectivity with JDBC
AES Cryptosystem
Ad java prac sol set
Advance Java Topics (J2EE)
Jdbc Complete Notes by Java Training Center (Som Sir)
Advance Java
Ad

Similar to Jdbc example program with access and MySql (20)

PPT
3 database-jdbc(1)
PPTX
Jdbc
PPT
PPT
30 5 Database Jdbc
PPT
Executing Sql Commands
PPT
Executing Sql Commands
DOC
Java database connectivity notes for undergraduate
PDF
PDF
Lecture17
PPTX
PPT
Data Access with JDBC
PDF
PDF
java4th.pdf bilgisayar mühendisliği bölümü
PPT
Jdbc day-1
PPTX
Jdbc presentation
PPT
41slideAdvancedDatabaseProgramming.ppt
PPTX
Jdbc Java Programming
PDF
Jdbc 1
PPT
Jdbc sasidhar
PPT
3 database-jdbc(1)
Jdbc
30 5 Database Jdbc
Executing Sql Commands
Java database connectivity notes for undergraduate
Lecture17
Data Access with JDBC
java4th.pdf bilgisayar mühendisliği bölümü
Jdbc day-1
Jdbc presentation
41slideAdvancedDatabaseProgramming.ppt
Jdbc Java Programming
Jdbc 1
Jdbc sasidhar

More from kamal kotecha (20)

PPS
Java Hibernate Programming with Architecture Diagram and Example
PPTX
Network programming in java - PPT
PPT
Java servlet life cycle - methods ppt
PPS
Java rmi example program with code
PPS
Java rmi
PPS
Jdbc api
PPS
Java Exception handling
PPS
JSP Error handling
PPS
Jsp element
PPS
Jsp chapter 1
PPS
String and string buffer
PPS
Wrapper class
PPS
Packages and inbuilt classes of java
PPS
Interface
PPS
Inheritance chepter 7
PPS
Class method
PPS
Introduction to class in java
PPS
Control statements
PPTX
Jsp myeclipse
PPTX
basic core java up to operator
Java Hibernate Programming with Architecture Diagram and Example
Network programming in java - PPT
Java servlet life cycle - methods ppt
Java rmi example program with code
Java rmi
Jdbc api
Java Exception handling
JSP Error handling
Jsp element
Jsp chapter 1
String and string buffer
Wrapper class
Packages and inbuilt classes of java
Interface
Inheritance chepter 7
Class method
Introduction to class in java
Control statements
Jsp myeclipse
basic core java up to operator

Recently uploaded (20)

PPTX
Pharma ospi slides which help in ospi learning
PDF
VCE English Exam - Section C Student Revision Booklet
PPTX
Cell Types and Its function , kingdom of life
PDF
RMMM.pdf make it easy to upload and study
PPTX
Renaissance Architecture: A Journey from Faith to Humanism
PDF
Mark Klimek Lecture Notes_240423 revision books _173037.pdf
PPTX
human mycosis Human fungal infections are called human mycosis..pptx
PDF
Insiders guide to clinical Medicine.pdf
PPTX
Week 4 Term 3 Study Techniques revisited.pptx
PDF
102 student loan defaulters named and shamed – Is someone you know on the list?
PDF
STATICS OF THE RIGID BODIES Hibbelers.pdf
PDF
Basic Mud Logging Guide for educational purpose
PDF
Origin of periodic table-Mendeleev’s Periodic-Modern Periodic table
PDF
Complications of Minimal Access Surgery at WLH
PPTX
IMMUNITY IMMUNITY refers to protection against infection, and the immune syst...
PDF
Pre independence Education in Inndia.pdf
PPTX
Microbial diseases, their pathogenesis and prophylaxis
PDF
Physiotherapy_for_Respiratory_and_Cardiac_Problems WEBBER.pdf
PDF
Saundersa Comprehensive Review for the NCLEX-RN Examination.pdf
PDF
grade 11-chemistry_fetena_net_5883.pdf teacher guide for all student
Pharma ospi slides which help in ospi learning
VCE English Exam - Section C Student Revision Booklet
Cell Types and Its function , kingdom of life
RMMM.pdf make it easy to upload and study
Renaissance Architecture: A Journey from Faith to Humanism
Mark Klimek Lecture Notes_240423 revision books _173037.pdf
human mycosis Human fungal infections are called human mycosis..pptx
Insiders guide to clinical Medicine.pdf
Week 4 Term 3 Study Techniques revisited.pptx
102 student loan defaulters named and shamed – Is someone you know on the list?
STATICS OF THE RIGID BODIES Hibbelers.pdf
Basic Mud Logging Guide for educational purpose
Origin of periodic table-Mendeleev’s Periodic-Modern Periodic table
Complications of Minimal Access Surgery at WLH
IMMUNITY IMMUNITY refers to protection against infection, and the immune syst...
Pre independence Education in Inndia.pdf
Microbial diseases, their pathogenesis and prophylaxis
Physiotherapy_for_Respiratory_and_Cardiac_Problems WEBBER.pdf
Saundersa Comprehensive Review for the NCLEX-RN Examination.pdf
grade 11-chemistry_fetena_net_5883.pdf teacher guide for all student

Jdbc example program with access and MySql

  • 1. JDBC example http://www.java2all.com
  • 2. Chapter 3 JDBC example http://www.java2all.com
  • 3. JDBC example with access: http://www.java2all.com
  • 4. To connect java application to access database we must have at least one database created in access. Steps to create a database in MS-Access: (1) Open Microsoft Office Access. (2) Click on Blank Database. (3) Type an appropriate name of database in File Name: box for example, HOD_DATA and click on Create Button. (4) Create appropriate field name in table and value as per the field. EX.: http://www.java2all.com
  • 6. (5) Right click on Table1 and select Save. Type the name of Table for example, DATA and click on OK button. (6) Close the Table by right clicking on DATA and select Close. and Exit from Database (7) Move this database to the appropriate drive where you want. Now lets create TYPE 1 driver program for JDBC with access. http://www.java2all.com
  • 7. import java.sql.Connection; import java.sql.DriverManager; import java.sql.ResultSet; import java.sql.Statement; public class Type_One { public static void main(String[] args) { try { Class.forName("sun.jdbc.odbc.JdbcOdbcDriver"); //Load Driver Connection con = DriverManager.getConnection("jdbc:odbc:HOD_DATA"); //Create Connection with Data Source Name : HOD_DATA Statement s = con.createStatement(); // Create Statement String query = "select * from Data"; // Create Query s.execute(query); // Execute Query ResultSet rs = s.getResultSet(); //return the data from Statement into ResultSet while(rs.next()) // Retrieve data from ResultSet { System.out.print("Serial number : "+rs.getString(1)); //1st column of Table from database System.out.print(" , Name : "+rs.getString(2)); //2nd column of Table System.out.print(" , City : "+rs.getString(3)); //3rd column of Table System.out.println(" and Age : "+rs.getString(4)); //4th column of Table } http://www.java2all.com
  • 8. s.close(); con.close(); } catch (Exception e) { System.out.println("Exception : "+e); } } } Output : Serial number : 1 , Name : Ashutosh Abhangi , City : Dhoraji and Age : 27 Serial number : 2 , Name : Kamal Kotecha , City : Junagadh and Age : 24 http://www.java2all.com
  • 9. Key point: String which we are writing in Class.forName("sun.jdbc.odbc.JdbcOdbcDriver") to load the driver. String which we are writing in Connection con = DriverManager.getConnection("jdbc:odbc:HOD_DA TA") to create connection with particular database. Here HOD_DATA is our DSN (Data Source Name). http://www.java2all.com
  • 10. Steps for creating DSN for access. (1) Go to Control Panel. (2) Click on Administrative Tools(Window XP) for (Window 7) System and Security then Administrative Tools. (3) Click on Data Sources (ODBC). (4) Select MS Access Database and Click on Add button. Here in Windows XP you can easily add new DSN but if you are getting an error or not able to add new DSN in Window 7 go to C:WindowsSysWOW64 and then open odbcad32.exe and repeate step 4. http://www.java2all.com
  • 12. (5) Select Microsoft Access Driver (*.mdb,*.accdb) and Click on Finish button. If you cant find the below driver then you should download JDBC ODBC Driver for ms access. http://www.java2all.com
  • 13. (6) Type Data Source Name, for example HOD_DATA then click on Select button in the Database frame. (7) Select particular database which we saved on particular drive and created at beginning of this page (HOd_DATA). and click on OK button. http://www.java2all.com
  • 15. (8) Click on OK button and Check out the textarea of Data Sources Administrator. Now it contains a new DSN as a HOD_DATA. http://www.java2all.com
  • 16. (9) Click on OK button and close the Administrative Tools (Control Panel). NOTE: Do not confuse your self due to Database Name and Data Source Name, Here Both are same HOD_DATA but we can take different name too. One more thing there may be a 32 bit or 64 bit issue like architecture mismatch so java2all recommend you that please make them all same. Your java IDE tool, Microsoft Aceess and JVM or JDK all must be the same bit (32/64) version. http://www.java2all.com
  • 17. Now run the above program and check out the output. http://www.java2all.com
  • 18. PreparedStatement in access: http://www.java2all.com
  • 19. Lets now move to PreparedStatement example for access. First of all lets assume that we have table named PA in access. http://www.java2all.com
  • 20. And our DSN is DATA. import java.sql.Connection; import java.sql.DriverManager; import java.sql.PreparedStatement; public class Prepare_Demo { public static void main(String[] args) { try { Class.forName("sun.jdbc.odbc.JdbcOdbcDriver"); Connection con=DriverManager.getConnection("jdbc:odbc:DATA"); PreparedStatement ps = con.prepareStatement("insert into PA (ID,Name,CITY,AGE)values(?,?,?,?)"); ps.setInt(1,200); ps.setString(2, "hello"); ps.setInt(4,101); ps.setString(3, "brd"); http://www.java2all.com
  • 21. ps.executeUpdate(); System.out.println("inserted"); con.close(); } catch (Exception e) { System.out.println(e); } } } Output : inserted First run the above program with suitable table and after running it refresh your access database and you cDSN an see one record inserted as per our program. http://www.java2all.com
  • 22. You can run PreparedStatement program for JSP too with dynamic data. For this we will create two JSP file one for inserting data (simple form with text box as per our table). http://www.java2all.com
  • 23. Second JSP file contains logic for connecting data base as well as PreparedStatement logic for inserting data. Insert_data.jsp <html> <head> <meta http-equiv="Content-Type" content="text/html; charset=ISO-8859-1"> <title>Insert DATA</title> </head> <body> <form action="datams.jsp"> ID: <input type="text" name="ID"/> NAME : <input type="text" name="NAME"/> AGE : <input type="text" name="AGE"/> CITY : <input type="text" name="CITY"/> <input type="submit" value ="INSERT"> </form> </body> </html> http://www.java2all.com
  • 24. Now insert value in text box as you want to insert in database as shown below. Remember here too our DSN and Table are same as above program. http://www.java2all.com
  • 25. You can see the data here which i want to insert in our database. datams.jsp <%@ page language="java" contentType="text/html; charset=ISO-8859-1" pageEncoding="ISO-8859-1" import="java.sql.*"%> <!DOCTYPE html PUBLIC "-//W3C//DTD HTML 4.01 Transitional//EN" "http://www.w3.org/TR/html4/loose.dtd"> <html> <head> <meta http-equiv="Content-Type" content="text/html; charset=ISO-8859-1"> <title>Insert title here</title> </head> <body> <% int id = Integer.parseInt(request.getParameter("ID")); int age = Integer.parseInt(request.getParameter("AGE")); String nm = request.getParameter("NAME"); String ct = request.getParameter("CITY"); try { Class.forName("sun.jdbc.odbc.JdbcOdbcDriver"); Connection con=DriverManager.getConnection("jdbc:odbc:DATA"); http://www.java2all.com
  • 26. PreparedStatement ps = con.prepareStatement("insert into PA (ID,Name,CITY,AGE)values(?,?,?,?)"); ps.setInt(1,id); ps.setString(2,nm); ps.setInt(4,age); Output : ps.setString(3,ct); ps.executeUpdate(); inserted System.out.println("inserted"); con.close(); } catch (Exception e) { System.out.println(e); } %> </body> </html> Now again refresh your table data and you can see one more new record which we inserted dynamically. http://www.java2all.com
  • 27. With access we can not do CallableStatement because access does not support stored procedure. We will do it in mysql and oracle in next chapters. http://www.java2all.com
  • 28. JDBC connection for MySQL: http://www.java2all.com
  • 29. To connect java application to MySQL database we must have at least one database created in MySQL. And to create database in MySQL,it should be installed on your system. So first of all install MySQL database in your system. After installing it open MySQL console. http://www.java2all.com
  • 31. Create database with syntax create database databasename; and press enter. You can see message like Query OK, 1 row affected (0.03 sec) Now our database is created in MySQL. Second step is to create table in our database. For creating table in particular database type Use databasename; and press enter and you can see message like database changed. Now for creating table type create table tablename (field1 type of field1, field2 type of field2, field3 type of field3); http://www.java2all.com
  • 32. Now for creating table type create table tablename (field1 type of field1, field2 type of field2, field3 type of field3); Now press enter again you can see the message like Query OK, 0 row affected (0.01 sec). EX: Create database java2all; Use java2all; http://www.java2all.com
  • 33. Create table data (id int,name char(20),city char(20),age int); Now the next step is to insert data into our table. For inserting data simply type insert into table name (field1,field2,field3) values (value1,value2,value3); EX: insert into data (id,name,city,age) values (1,"java","abc",300); http://www.java2all.com
  • 34. So by that’s way you can insert as many data as you want in your table. Now for viewing our data from table just type select * from tablename; EX: select * from data; http://www.java2all.com
  • 35.   http://www.java2all.com
  • 36.   Now we have data in our table, table in our  database, database in our MySQL and MySQL in our  system. So let`s now move to JDBC program with MySQL. Simple Statement in JDBC with MySQL: import java.sql.*; public class MysqlDemo { public static void main(String[] args) { try { Class.forName("com.mysql.jdbc.Driver"); System.out.println("Driver is loaded"); Connection c = DriverManager.getConnection("jdbc:mysql://localhost:3306/java2all","root","root"); System.out.println("Connection created"); Statement s = c.createStatement(); http://www.java2all.com
  • 37. <span class="IL_AD" id="IL_AD3">ResultSet</span> rs = s.executeQuery("select *   from data"); System.out.println("IDtNametCitytAge"); while(rs.next()) // Retrieve data from ResultSet { System.out.println(rs.getString(1)+"t"+rs.getString(2)+"t"+rs.getStrin g(3)+"t"+rs.getString(4)); } } Output : catch(Exception e) {   System.out.println("Exception : " +e);Driver is loaded } } Connection created } ID   Name  City    Age 1     java      abc    300 2     JDBC  xyz   200 3     JSP     mno  100 http://www.java2all.com
  • 38.    Key point: String which we are writing in  Class.forName("com.mysql.jdbc.Driver"); to load  the driver. String which we are writing in Connection con =  DriverManager.getConnection("jdbc:mysql://localho st:3306/java2all","root","root") to create  connection with particular database. Here the string jdbc:mysql://localhost:3306 is for  connecting MySQL to JDBC in our local system and  the name /java2all is our database name and 1st "root"  is username of MySQL and 2nd "root" is password of  MySQL. http://www.java2all.com
  • 39.    Here no need of Data Source Name as in access  but one jar file named mysql-connector-java-5.1.6- bin.jar must be loaded in your java IDE.  In eclipse for adding jar file simply right click on  your project and select build path ? configure build  path and you can see window like this. http://www.java2all.com
  • 40.    http://www.java2all.com
  • 41.    Click on libraries tab then click on Add External  JARs..   And select proper path where your jar file is  located on your system.   If you don’t have jar file you can easily  download it from the web for free   After selecting your jar file you can see its now  added to our library for that particular project. http://www.java2all.com
  • 42.    http://www.java2all.com
  • 43.    After adding jar file in our library we can now easily  run our program. Statement in JDBC with MySQL for inserting data: java.sql.*; class Mysql_insertDemo ic static void main(String[] args) y Class.forName("com.mysql.jdbc.Driver"); System.out.println("Driver is loaded"); Connection c = DriverManager.getConnection("jdbc:mysql://localhost:3306/java2all","ro System.out.println("Connection created"); String s = "insert into data (id,name,city,age) values (4,'Servlet','JND',120)"; Statement sm = c.createStatement(); sm.execute(s); http://www.java2all.com
  • 44. catch(Exception e)    { System.out.println("Exception : " +e); } } } Output :    Driver is loaded Connection created Inserted http://www.java2all.com
  • 45.    PreparedStatement in JDBC with MySQL: import java.sql.*; public class Mysql_insertDemo { public static void main(String[] args) { try { Class.forName("com.mysql.jdbc.Driver"); System.out.println("Driver is loaded"); Connection c = DriverManager.getConnection("jdbc:mysql://localhost:3306/java2all","root","kamal"); System.out.println("Connection created"); String s = "insert into data (id,name,city,age) values (?,?,?,?)"; PreparedStatement ps = c.prepareStatement(s); ps.setInt(1, 6); ps.setString(2, "J2EE"); ps.setString(3, "AAA"); ps.setInt(4, 55); ps.execute(); c.close(); System.out.println("Inserted"); http://www.java2all.com
  • 46.         catch(Exception e)            {                 System.out.println("Exception : " +e);                           }       } } Output :    Driver is loaded Connection created Inserted You can run PreparedStatement program for  JSP too with dynamic data.   For this we will create two JSP file one for  inserting data (simple form with text box as per our  table). http://www.java2all.com
  • 47.    You can run PreparedStatement program for  JSP too with dynamic data.   For this we will create two JSP file one for  inserting data (simple form with text box as per our  table).   Second JSP file contains logic for connecting  data base as well as PreparedStatement logic for  inserting data. Insert_data.jsp http://www.java2all.com
  • 48. <html>    <head> <meta http-equiv="Content-Type" content="text/html; charset=ISO-8859-1"> <title>Insert DATA</title> </head> <body> <<span class="IL_AD" id="IL_AD4">form action</span>="datamysql.jsp"> ID: <input type="text" name="ID"/> NAME : <input type="text" name="NAME"/> AGE : <input type="text" name="AGE"/> CITY : <input type="text" name="CITY"/> <input type="submit" value ="INSERT"> </form> </body> </html> Now insert value in text box as you want to  insert in database as shown below. http://www.java2all.com
  • 49.    You can see the data here which i want to insert in our  database. datamysql.jsp <%@ page language="java" contentType="text/html; charset=ISO-8859-1" pageEncoding="ISO-8859-1" import="java.sql.*"%> <!DOCTYPE html PUBLIC "-//W3C//DTD HTML 4.01 Transitional//EN" "http://www.w3.org/TR/html4/loose.dtd"> <html> <head> <meta http-equiv="Content-Type" content="text/html; charset=ISO-8859-1"> <title>Insert title here</title> </head> http://www.java2all.com
  • 50. <%    int id = Integer.parseInt(request.getParameter("ID")); int age = Integer.parseInt(request.getParameter("AGE")); String nm = request.getParameter("NAME"); String ct = request.getParameter("CITY"); try { Class.forName("com.mysql.jdbc.Driver"); System.out.println("Driver is loaded"); Connection c = DriverManager.getConnection("jdbc:mysql://localhost:3306/java2all","root","kamal"); System.out.println("Connection created"); String s = "insert into data (id,name,city,age) values (?,?,?,?)"; PreparedStatement ps = c.prepareStatement(s); ps.setInt(1, id); ps.setString(2, nm); ps.setString(3, ct); ps.setInt(4, age); ps.execute(); c.close(); System.out.println("Inserted"); } catch(Exception e) { System.out.println("Exception : " +e); } http://www.java2all.com
  • 51. %>    </body> </html> Output :   Driver is loaded Connection created Inserted You can see your data as we inserted through  program. http://www.java2all.com
  • 52.    http://www.java2all.com
  • 53.    CallableStatement in MySQL: Now we all know that for CallableStatement first  of all we must have stored procedure in our database.   Now how can we create stored procedure in  MySQL.   For that follow the steps given below. http://www.java2all.com
  • 54.     We already create a database in MySQL now  for creating stored procedure for that particular  database   Use java2all; (use databasename;)   Example stored procedure for addition of two  numbers. Copy and paste it in your MySQL console after  selecting your database. DELIMITER $$ CREATE PROCEDURE `addproc`( IN a INT, IN b INT, OUT c INT)  BEGIN  SET c = a + b; END$$ http://www.java2all.com
  • 55.     You can get message like Query OK, 0 rows  affected (0.04 sec)   It means your stored procedure is created  successfully.   Here we create stored procedure for add two int  number.   The stored procedure has 2 IN parameter and 1  OUT parameter so total 3 parameters   Now let us move to JDBC program for  CallableStatement in MySQL http://www.java2all.com
  • 56. import java.sql.*;    public class Mysql_callableDemo { public static void main(String[] args) { try { Class.forName("com.mysql.jdbc.Driver"); System.out.println("Driver is loaded"); Connection c = DriverManager.getConnection("jdbc:mysql://localhost:3306/java2all","root","kamal"); System.out.println("Connection created"); String q = "call addproc(?,?,?)"; CallableStatement cs = c.prepareCall(q); Output : cs.setInt(1, 10); cs.setInt(2, 20);   cs.registerOutParameter(3, Types.INTEGER); cs.execute(); Driver is loaded int add = cs.getInt(3); System.out.println("addition = "+add); Connection created } addition = 30 catch(Exception e) { System.out.println("Exception : " +e); } } } http://www.java2all.com
  • 57.    To call a storedprocedure you can see the syntax  in our program.   Call storedprocedurename(parameter);   Here two more methods are introduced 1st is  registerOutParameter(3, Types);   We have to register our out parameter with the  method given above.   This method has two arguments 1st is sequence  of question mark we passed in calling of stored  procedure. http://www.java2all.com
  • 58.    2nd is out parameter type here it is integer type  and question mark sequence is 3 so we write   cs.registerOutParameter(3, Types.INTEGER);   2nd method is getXXX(int sequence_number);   The working of this method is same as setXXX(),  which we used in PreparedStatement and  CallableStatement. But setXXX() is for set a value and getXXX() is  for getting a particular value as you can see in our  program. http://www.java2all.com
  • 59.    Now let’s take one more example of  CallableStatement.   Here we are going to create stroredprocedure that  returns the data as per the id.   Our data in table is something like that. http://www.java2all.com
  • 60.    http://www.java2all.com
  • 62.    We will pass the id when we call the stored procedure  and it will return name,city and age as per the id we  passed. EX: import java.sql.*; import java.util.Scanner; public class Mysql_callableDemo { public static void main(String[] args) { int i; try { Scanner s = new Scanner(System.in); System.out.println("Enter ID"); i=s.nextInt(); Class.forName("com.mysql.jdbc.Driver"); System.out.println("Driver is loaded"); Connection c = DriverManager.getConnection("jdbc:mysql://localhost:3306/java2all","root","kamal"); http://www.java2all.com
  • 63.           System.out.println("Connection created"); String q = "call datainfo(?,?,?,?)"; CallableStatement cs = c.prepareCall(q); Output : cs.setInt(1,i);   cs.registerOutParameter(2, Types.VARCHAR); cs.registerOutParameter(3, Types.VARCHAR);  Enter ID cs.registerOutParameter(4, Types.INTEGER); cs.execute(); 1 String nm = cs.getString(2); String ct = cs.getString(3); Driver is loaded int age = cs.getInt(4); Connection created System.out.println("Name = "+nm); System.out.println("City = "+ct); Name = java System.out.println("Age = "+age); } City = abc catch(Exception e) { Age  = 300 System.out.println("Exception : " +e); } } } For closing the connection in each and every program  of JDBC we should call the method close() through  Connection object c.close(); http://www.java2all.com
  • 64.    As my friend suggest me we should call close()  method to close our connection with database from  finally block so close() method will execute in all  circumstances. Even if a try block has an exception our  connection will be closed safely. EXample with finally block: http://www.java2all.com
  • 65.    import java.sql.*; public class MysqlDemo { public static void main(String[] args) throws SQLException { Connection c = null; try { Class.forName("com.mysql.jdbc.Driver"); System.out.println("Driver is loaded"); c = DriverManager.getConnection("jdbc:mysql://localhost:3306/java2all","root","root"); System.out.println("Connection created"); Statement s = c.createStatement(); ResultSet rs = s.executeQuery("select * from data"); System.out.println("IDtNametCitytAge"); while(rs.next()) // Retrieve data from ResultSet { System.out.println(rs.getString(1)+"t"+rs.getString(2)+"t"+rs.getString(3)+"t"+rs.g etString(4)); } } http://www.java2all.com
  • 66.    catch(Exception e) { System.out.println("Exception : " +e); } finally { c.close(); } } } http://www.java2all.com