SlideShare a Scribd company logo
13
Most read
16
Most read
17
Most read
How to use I2C with AVR
Sunday, April 28, 13
I2C abstract(1)
AVR1 AVR2
SCL
SDA
Vdd
I2C is one of communication systems for Microcomputer.
I2C uses 2 lines, SCL(clock), SDA(data).
Sunday, April 28, 13
I2C abstract(2)
AVR1 AVR2
SCL
SDA
SCL(clock) is used to send clock for synchronization.
SDA(data) is used for sending data.
1 bit data is transferred every clock.
1 0 1 0
Sunday, April 28, 13
I2C abstract(3)
Master
You can connect more than 2 boards.
One board must be Master and the others are Slave.
Each slave has own address.
Master can send data to each slave using the address.
Slave1 Slave2 Slave3 Slave4
SDA
address1 address2 address3 address4
SCL
Sunday, April 28, 13
I2C abstract(4)
Master
For example, if Master wants to send data to Slave2, Master
sends address2 to SDA line.All Slaves receives the address.
Only Slave2 replies.
Slave1 Slave2 Slave3 Slave4
SDA
address1 address2 address3 address4
SCL
address2
reply
The data is mine!
I must send replay.
The data is not mine.
I will ignore it.
The data is not mine.
I will ignore it.
The data is not mine.
I will ignore it.
Sunday, April 28, 13
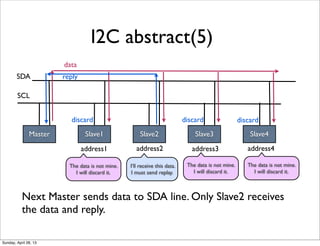
I2C abstract(5)
Master
Next Master sends data to SDA line. Only Slave2 receives
the data and reply.
Slave1 Slave2 Slave3 Slave4
SDA
address1 address2 address3 address4
SCL
data
reply
I’ll receive this data.
I must send replay.
The data is not mine.
I will discard it.
The data is not mine.
I will discard it.
The data is not mine.
I will discard it.
discard discard discard
Sunday, April 28, 13
Program I2C with AVR
In this instance, you use arduino uno.
Arduino uno has Atmega168.
I am going to explain how to program
Atmega168 with C, without
Arduino library.
Sunday, April 28, 13
Connection
SDA pin and SCL pin are fixed. On Arduino Uno, analog4 = SDA, analog 5 = SCL.
Connect A4 and A5 of each Arduino.
Vcc
Sunday, April 28, 13
C programming on Arduino IDE
Arduino language is based on C. You can use all construction of C.
When you write C on Arduino IDE, you have to replace “main and while” with “setup() and
loop()”. Initialize process must be inside setup() and loop process must be inside loop().
#include<avr.io.h>
void main(int){
//initialize process
while(1){
//loop process
}
}
#include<avr.io.h>
void setup(){
//initialize process
}
void loop(){
//loop process
}
Normal C C on Arduino IDE
Sunday, April 28, 13
I2C registers(Atmega168 version)
If you want to use I2C function on Microcomputer, you have to use registers for I2C.
(Sometimes different microcomputers have different registers, you have to see data sheet.)
These are I2C resisters(NOT all).
TWAR is TWI(Slave) Address Register. Slave address is set in this register.
TWBR is TWI Bit Rate Register. This is to decide SCL clock.
TWCR is TWI Control Register.You can control I2C with this register.
TWDR is TWI Data Register.The data to be transferred or received is set in this register.
TWSR is TWI Status Register. The status of I2C communication is set in this register.
TWA6 TWA5 TWA4 TWA3 TWA2 TWA1 TWA0 TWGCETWAR
TWBR7 TWBR6 TWBR5 TWBR4 TWBR3 TWBR2 TWBR1 TWBR0
TWINT TWEA TWSTA TWSTO TWWC TWEN - TWIE
TWD7 TWD6 TWD5 TWD4 TWD3 TWD2 TWD1 TWD0
TWS7 TWS6 TWS5 TWS4 TWS3 - TWPS1 TWPS0
TWBR
TWCR
TWDR
TWSR
Sunday, April 28, 13
The simplest I2C sequence
This is the simplest sequence of I2C.
If you want to send data more than 1 byte.You have to repeat (4)(5).
Master Slave
(1)Start
(2)Slave Adress
(3)Ack
(4)Data
(5)Ack
(6)Stop
Sunday, April 28, 13
How to use TWBR and TWSR
First, you have to decide the communication speed(SCL) with TWBR and TWSR.
SCL = CPU clock/(16+2(TWBR)xPrescaler)
TWBR7 TWBR6 TWBR5 TWBR4 TWBR3 TWBR2 TWBR1 TWBR0
TWS7 TWS6 TWS5 TWS4 TWS3 - TWPS1 TWPS0
TWBR
TWSR
Prescaler parameter
(ex)
TWBR =0b00000001=1
TWBR =0b00000011=3
TWBR =0b11111111 = 255
(ex)
CPU clock = 1Mhz
TWBR=255
Prescaler=1
SCL = 1000000/(16+2(255)x1)=2kHz
(ex)
TWBR =(0<<TWPS1)|(0<<TWPS0) : prescaler is 1
TWBR =(0<<TWPS1)|(1<<TWPS0) : prescaler is 4
TWBR =(1<<TWPS1)|(1<<TWPS0) : prescaler is 64
Sunday, April 28, 13
How to use TWCR
You can control I2C message with TWCR.
TWINT TWEA TWSTA TWSTO TWWC TWEN - TWIETWCR
Send start condition
TWINT TWEA TWSTA TWSTO TWWC TWEN - TWIETWCR
Clear TWINT flag after sending message
TWINT TWEA TWSTA TWSTO TWWC TWEN - TWIETWCR
Send stop condition
TWCR = (1<<TWINT)|(1<<TWSTA)|(1<<TWEN); //Start condition
while(!(TWCR & 1<<TWINT)) {} //After TWCR, always you have to check whether TWINT is updated
TWCR = 0b10000100; //flag clear
while(!(TWCR & 1<<TWINT)) {}
TWCR = 0b10010100; //finish translation
while(!(TWCR & 1<<TWINT)) {}
Source code sample
Sunday, April 28, 13
How to use TWSR
You can check status of I2C sequence from TWSR.
TWS7 TWS6 TWS5 TWS4 TWS3 - TWPS1 TWPS0
TWSR
Source code sample
//check condition
if((TWSR & 0xF8) == 0x08){
TWDR = 0b00000010; //set slave address
TWCR = 0b10000100; //flag clear
while(!(TWCR & 1<<TWINT)) {}
_delay_ms(1);
if((TWSR & 0xF8) == 0x18){
TWDR = 0b10101010; //write data(1byte)
TWCR = 0b10000100; //send data
while(!(TWCR & (1<<TWINT)));
_delay_ms(1);
}
}
Sunday, April 28, 13
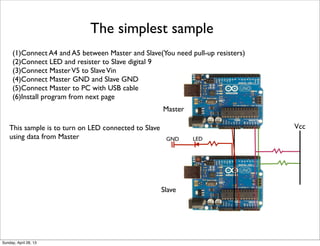
The simplest sample
(1)Connect A4 and A5 between Master and Slave(You need pull-up resisters)
(2)Connect LED and resister to Slave digital 9
(3)Connect MasterV5 to SlaveVin
(4)Connect Master GND and Slave GND
(5)Connect Master to PC with USB cable
(6)Install program from next page
Vcc
Master
Slave
LEDGND
This sample is to turn on LED connected to Slave
using data from Master
Sunday, April 28, 13
Sample code(master)
#include <avr/io.h>
#include <util/delay.h>
void setup(){
TWSR = (0<<TWPS1)|(0<<TWPS0); //Prescaler
TWBR = 0xFF; //TWBR=255
}
void loop(){
TWCR = (1<<TWINT)|(1<<TWSTA)|(1<<TWEN); //Start condition
while(!(TWCR & 1<<TWINT)) {} //wait for flag update
_delay_ms(1);
if((TWSR & 0xF8) == 0x08){ //check condition
TWDR = 0b00000010; //send slave address
TWCR = 0b10000100; //flag clear
while(!(TWCR & 1<<TWINT)) {}
_delay_ms(1);
if((TWSR & 0xF8) == 0x18){ //check condition
TWDR = 0b10101010; //write data(1byte)
TWCR = 0b10000100; //send data
while(!(TWCR & (1<<TWINT)));
_delay_ms(1);
}
}
TWCR = 0b10010100; //finish translation
_delay_ms(2);
}
Sunday, April 28, 13
Sample code(slave)
#include <avr/io.h>
#include <util/delay.h>
void setup(){
DDRB = 0xFF; //all PINB is output mode
PORTB = 0x00; //all PINB is Low
TWAR = 0b00000010; //salve address setting
}
void loop(){
TWCR = 0b11000100; //start as slave(wait for address)
if((TWSR & 0xF8) == 0x60){ //check status
while(1){
TWCR = 0b11000100; //wait for data
while(!(TWCR & (1<<TWINT)));
if((TWSR & 0xF8) == 0x80){ //check status
char data = TWDR; //receive data
PORTB = data; //insert data to PORTB
}
if((TWSR & 0xF8) == 0xA0){ //check stop status
_delay_ms(10);
break;
}
}
}
}
Sunday, April 28, 13

More Related Content

PDF
ARM CORTEX M3 PPT
PPT
Uart
PDF
Introduction to 8085 Microprocessors
DOCX
301378156 design-of-sram-in-verilog
DOCX
Arduino bluetooth controlled robot
PPT
Serial Communication In Atmega 16
PPTX
PDF
Arduino based Home Automation System with Android
ARM CORTEX M3 PPT
Uart
Introduction to 8085 Microprocessors
301378156 design-of-sram-in-verilog
Arduino bluetooth controlled robot
Serial Communication In Atmega 16
Arduino based Home Automation System with Android

What's hot (20)

PPTX
I/O system in intel 80386 microcomputer architecture
PDF
Digital 4-bit Comprator
PPTX
DHT11 with Arduino
PDF
L13 interrupts-in-atmega328 p
PPTX
I2C Protocol
PPTX
embedded system and iot.pptx
PDF
Safety Helmet for Coal Miners
PDF
Typical Embedded System
PDF
Introduction of Arduino Uno
PPTX
Bluetooth controlled robot using arduino uno and HC-05
PPTX
Ardui no
PPT
PPTX
Bus Structure, Memory and I/O Interfacing
PPTX
Interfacing of ADC 0808
PDF
I2C-SPI-UART Basics || Embedded System || Hariharan K
PPTX
ATmega32-AVR microcontrollers-Part I
DOCX
Microprocessor Interfacing and 8155 Features
PPTX
INTEL 8086 MICROPROCESSOR
I/O system in intel 80386 microcomputer architecture
Digital 4-bit Comprator
DHT11 with Arduino
L13 interrupts-in-atmega328 p
I2C Protocol
embedded system and iot.pptx
Safety Helmet for Coal Miners
Typical Embedded System
Introduction of Arduino Uno
Bluetooth controlled robot using arduino uno and HC-05
Ardui no
Bus Structure, Memory and I/O Interfacing
Interfacing of ADC 0808
I2C-SPI-UART Basics || Embedded System || Hariharan K
ATmega32-AVR microcontrollers-Part I
Microprocessor Interfacing and 8155 Features
INTEL 8086 MICROPROCESSOR
Ad

Viewers also liked (19)

PDF
SPI Protocol
PPT
Protols used in bluetooth
PDF
Multiple Inheritance
PPT
Arm processor
PPTX
Inheritance in OOPS
PDF
Embedded C - Optimization techniques
PPTX
Compiler in System Programming/Code Optimization techniques in System Program...
PDF
Introduction to Embedded System
PPTX
I2C Protocol
PDF
Object-Oriented Design: Multiple inheritance (C++ and C#)
ODP
Arm developement
PPTX
Serial Peripheral Interface
PDF
I2C Bus (Inter-Integrated Circuit)
PDF
Embedded C - Lecture 1
PPTX
Serial peripheral interface
PPT
Serial Peripheral Interface(SPI)
PPT
Code Optimization
PPTX
SPI Protocol
Protols used in bluetooth
Multiple Inheritance
Arm processor
Inheritance in OOPS
Embedded C - Optimization techniques
Compiler in System Programming/Code Optimization techniques in System Program...
Introduction to Embedded System
I2C Protocol
Object-Oriented Design: Multiple inheritance (C++ and C#)
Arm developement
Serial Peripheral Interface
I2C Bus (Inter-Integrated Circuit)
Embedded C - Lecture 1
Serial peripheral interface
Serial Peripheral Interface(SPI)
Code Optimization
Ad

Similar to I2C programming with C and Arduino (20)

PDF
Arduino spooky projects_class3
PPTX
Sensors and Actuators in Arduino, Introduction
PDF
ELC 2016 - I2C hacking demystified
PPTX
How to use an Arduino
PPTX
Arduino Programming - Brief Introduction
PDF
arduinocourse-180308074529 (1).pdf
PPTX
Arduino course
PDF
Arduino reference
PPT
ARDUINO AND ITS PIN CONFIGURATION
PDF
Microcontroller part 4
PDF
Arduino - Learning.pdf
PPTX
Introduction to Arduino Microcontroller
PDF
Assembler4
PDF
introductiontoarduino-111120102058-phpapp02.pdf
PPTX
02 General Purpose Input - Output on the Arduino
PPTX
Arduino intro.pptx
PPTX
Electronz_Chapter_2.pptx
PPTX
Introduction to the Arduino
PPTX
arduino and its introduction deep dive ppt.pptx
PDF
Itsp documentation quadcopter flight controller based on kalman filters
Arduino spooky projects_class3
Sensors and Actuators in Arduino, Introduction
ELC 2016 - I2C hacking demystified
How to use an Arduino
Arduino Programming - Brief Introduction
arduinocourse-180308074529 (1).pdf
Arduino course
Arduino reference
ARDUINO AND ITS PIN CONFIGURATION
Microcontroller part 4
Arduino - Learning.pdf
Introduction to Arduino Microcontroller
Assembler4
introductiontoarduino-111120102058-phpapp02.pdf
02 General Purpose Input - Output on the Arduino
Arduino intro.pptx
Electronz_Chapter_2.pptx
Introduction to the Arduino
arduino and its introduction deep dive ppt.pptx
Itsp documentation quadcopter flight controller based on kalman filters

Recently uploaded (20)

PPTX
sap open course for s4hana steps from ECC to s4
PDF
cuic standard and advanced reporting.pdf
PPTX
KOM of Painting work and Equipment Insulation REV00 update 25-dec.pptx
PDF
Reach Out and Touch Someone: Haptics and Empathic Computing
PDF
Unlocking AI with Model Context Protocol (MCP)
PDF
Spectral efficient network and resource selection model in 5G networks
PPTX
Cloud computing and distributed systems.
PDF
Per capita expenditure prediction using model stacking based on satellite ima...
PDF
Chapter 3 Spatial Domain Image Processing.pdf
PDF
Approach and Philosophy of On baking technology
PDF
KodekX | Application Modernization Development
PPTX
ACSFv1EN-58255 AWS Academy Cloud Security Foundations.pptx
PDF
Diabetes mellitus diagnosis method based random forest with bat algorithm
PPT
“AI and Expert System Decision Support & Business Intelligence Systems”
PDF
Network Security Unit 5.pdf for BCA BBA.
PDF
Machine learning based COVID-19 study performance prediction
PDF
Optimiser vos workloads AI/ML sur Amazon EC2 et AWS Graviton
PPTX
Programs and apps: productivity, graphics, security and other tools
PDF
Advanced methodologies resolving dimensionality complications for autism neur...
PDF
Empathic Computing: Creating Shared Understanding
sap open course for s4hana steps from ECC to s4
cuic standard and advanced reporting.pdf
KOM of Painting work and Equipment Insulation REV00 update 25-dec.pptx
Reach Out and Touch Someone: Haptics and Empathic Computing
Unlocking AI with Model Context Protocol (MCP)
Spectral efficient network and resource selection model in 5G networks
Cloud computing and distributed systems.
Per capita expenditure prediction using model stacking based on satellite ima...
Chapter 3 Spatial Domain Image Processing.pdf
Approach and Philosophy of On baking technology
KodekX | Application Modernization Development
ACSFv1EN-58255 AWS Academy Cloud Security Foundations.pptx
Diabetes mellitus diagnosis method based random forest with bat algorithm
“AI and Expert System Decision Support & Business Intelligence Systems”
Network Security Unit 5.pdf for BCA BBA.
Machine learning based COVID-19 study performance prediction
Optimiser vos workloads AI/ML sur Amazon EC2 et AWS Graviton
Programs and apps: productivity, graphics, security and other tools
Advanced methodologies resolving dimensionality complications for autism neur...
Empathic Computing: Creating Shared Understanding

I2C programming with C and Arduino

  • 1. How to use I2C with AVR Sunday, April 28, 13
  • 2. I2C abstract(1) AVR1 AVR2 SCL SDA Vdd I2C is one of communication systems for Microcomputer. I2C uses 2 lines, SCL(clock), SDA(data). Sunday, April 28, 13
  • 3. I2C abstract(2) AVR1 AVR2 SCL SDA SCL(clock) is used to send clock for synchronization. SDA(data) is used for sending data. 1 bit data is transferred every clock. 1 0 1 0 Sunday, April 28, 13
  • 4. I2C abstract(3) Master You can connect more than 2 boards. One board must be Master and the others are Slave. Each slave has own address. Master can send data to each slave using the address. Slave1 Slave2 Slave3 Slave4 SDA address1 address2 address3 address4 SCL Sunday, April 28, 13
  • 5. I2C abstract(4) Master For example, if Master wants to send data to Slave2, Master sends address2 to SDA line.All Slaves receives the address. Only Slave2 replies. Slave1 Slave2 Slave3 Slave4 SDA address1 address2 address3 address4 SCL address2 reply The data is mine! I must send replay. The data is not mine. I will ignore it. The data is not mine. I will ignore it. The data is not mine. I will ignore it. Sunday, April 28, 13
  • 6. I2C abstract(5) Master Next Master sends data to SDA line. Only Slave2 receives the data and reply. Slave1 Slave2 Slave3 Slave4 SDA address1 address2 address3 address4 SCL data reply I’ll receive this data. I must send replay. The data is not mine. I will discard it. The data is not mine. I will discard it. The data is not mine. I will discard it. discard discard discard Sunday, April 28, 13
  • 7. Program I2C with AVR In this instance, you use arduino uno. Arduino uno has Atmega168. I am going to explain how to program Atmega168 with C, without Arduino library. Sunday, April 28, 13
  • 8. Connection SDA pin and SCL pin are fixed. On Arduino Uno, analog4 = SDA, analog 5 = SCL. Connect A4 and A5 of each Arduino. Vcc Sunday, April 28, 13
  • 9. C programming on Arduino IDE Arduino language is based on C. You can use all construction of C. When you write C on Arduino IDE, you have to replace “main and while” with “setup() and loop()”. Initialize process must be inside setup() and loop process must be inside loop(). #include<avr.io.h> void main(int){ //initialize process while(1){ //loop process } } #include<avr.io.h> void setup(){ //initialize process } void loop(){ //loop process } Normal C C on Arduino IDE Sunday, April 28, 13
  • 10. I2C registers(Atmega168 version) If you want to use I2C function on Microcomputer, you have to use registers for I2C. (Sometimes different microcomputers have different registers, you have to see data sheet.) These are I2C resisters(NOT all). TWAR is TWI(Slave) Address Register. Slave address is set in this register. TWBR is TWI Bit Rate Register. This is to decide SCL clock. TWCR is TWI Control Register.You can control I2C with this register. TWDR is TWI Data Register.The data to be transferred or received is set in this register. TWSR is TWI Status Register. The status of I2C communication is set in this register. TWA6 TWA5 TWA4 TWA3 TWA2 TWA1 TWA0 TWGCETWAR TWBR7 TWBR6 TWBR5 TWBR4 TWBR3 TWBR2 TWBR1 TWBR0 TWINT TWEA TWSTA TWSTO TWWC TWEN - TWIE TWD7 TWD6 TWD5 TWD4 TWD3 TWD2 TWD1 TWD0 TWS7 TWS6 TWS5 TWS4 TWS3 - TWPS1 TWPS0 TWBR TWCR TWDR TWSR Sunday, April 28, 13
  • 11. The simplest I2C sequence This is the simplest sequence of I2C. If you want to send data more than 1 byte.You have to repeat (4)(5). Master Slave (1)Start (2)Slave Adress (3)Ack (4)Data (5)Ack (6)Stop Sunday, April 28, 13
  • 12. How to use TWBR and TWSR First, you have to decide the communication speed(SCL) with TWBR and TWSR. SCL = CPU clock/(16+2(TWBR)xPrescaler) TWBR7 TWBR6 TWBR5 TWBR4 TWBR3 TWBR2 TWBR1 TWBR0 TWS7 TWS6 TWS5 TWS4 TWS3 - TWPS1 TWPS0 TWBR TWSR Prescaler parameter (ex) TWBR =0b00000001=1 TWBR =0b00000011=3 TWBR =0b11111111 = 255 (ex) CPU clock = 1Mhz TWBR=255 Prescaler=1 SCL = 1000000/(16+2(255)x1)=2kHz (ex) TWBR =(0<<TWPS1)|(0<<TWPS0) : prescaler is 1 TWBR =(0<<TWPS1)|(1<<TWPS0) : prescaler is 4 TWBR =(1<<TWPS1)|(1<<TWPS0) : prescaler is 64 Sunday, April 28, 13
  • 13. How to use TWCR You can control I2C message with TWCR. TWINT TWEA TWSTA TWSTO TWWC TWEN - TWIETWCR Send start condition TWINT TWEA TWSTA TWSTO TWWC TWEN - TWIETWCR Clear TWINT flag after sending message TWINT TWEA TWSTA TWSTO TWWC TWEN - TWIETWCR Send stop condition TWCR = (1<<TWINT)|(1<<TWSTA)|(1<<TWEN); //Start condition while(!(TWCR & 1<<TWINT)) {} //After TWCR, always you have to check whether TWINT is updated TWCR = 0b10000100; //flag clear while(!(TWCR & 1<<TWINT)) {} TWCR = 0b10010100; //finish translation while(!(TWCR & 1<<TWINT)) {} Source code sample Sunday, April 28, 13
  • 14. How to use TWSR You can check status of I2C sequence from TWSR. TWS7 TWS6 TWS5 TWS4 TWS3 - TWPS1 TWPS0 TWSR Source code sample //check condition if((TWSR & 0xF8) == 0x08){ TWDR = 0b00000010; //set slave address TWCR = 0b10000100; //flag clear while(!(TWCR & 1<<TWINT)) {} _delay_ms(1); if((TWSR & 0xF8) == 0x18){ TWDR = 0b10101010; //write data(1byte) TWCR = 0b10000100; //send data while(!(TWCR & (1<<TWINT))); _delay_ms(1); } } Sunday, April 28, 13
  • 15. The simplest sample (1)Connect A4 and A5 between Master and Slave(You need pull-up resisters) (2)Connect LED and resister to Slave digital 9 (3)Connect MasterV5 to SlaveVin (4)Connect Master GND and Slave GND (5)Connect Master to PC with USB cable (6)Install program from next page Vcc Master Slave LEDGND This sample is to turn on LED connected to Slave using data from Master Sunday, April 28, 13
  • 16. Sample code(master) #include <avr/io.h> #include <util/delay.h> void setup(){ TWSR = (0<<TWPS1)|(0<<TWPS0); //Prescaler TWBR = 0xFF; //TWBR=255 } void loop(){ TWCR = (1<<TWINT)|(1<<TWSTA)|(1<<TWEN); //Start condition while(!(TWCR & 1<<TWINT)) {} //wait for flag update _delay_ms(1); if((TWSR & 0xF8) == 0x08){ //check condition TWDR = 0b00000010; //send slave address TWCR = 0b10000100; //flag clear while(!(TWCR & 1<<TWINT)) {} _delay_ms(1); if((TWSR & 0xF8) == 0x18){ //check condition TWDR = 0b10101010; //write data(1byte) TWCR = 0b10000100; //send data while(!(TWCR & (1<<TWINT))); _delay_ms(1); } } TWCR = 0b10010100; //finish translation _delay_ms(2); } Sunday, April 28, 13
  • 17. Sample code(slave) #include <avr/io.h> #include <util/delay.h> void setup(){ DDRB = 0xFF; //all PINB is output mode PORTB = 0x00; //all PINB is Low TWAR = 0b00000010; //salve address setting } void loop(){ TWCR = 0b11000100; //start as slave(wait for address) if((TWSR & 0xF8) == 0x60){ //check status while(1){ TWCR = 0b11000100; //wait for data while(!(TWCR & (1<<TWINT))); if((TWSR & 0xF8) == 0x80){ //check status char data = TWDR; //receive data PORTB = data; //insert data to PORTB } if((TWSR & 0xF8) == 0xA0){ //check stop status _delay_ms(10); break; } } } } Sunday, April 28, 13