SlideShare a Scribd company logo
SAP FI Configuration step by step
Prepared by- Snehashis Paul
SAP FI configuration consists of Enterprise structure, Accounts Payable, Accounts
Receivable, Bank Accounting, Asset Accounting & Financial Statement Version.
Enterprise Structure:
Define Company:
In this step you can create companies. A company is an organizational unit in Accounting
which represents a business organization according to the requirements of commercial
law in a particular country. You store basic data for each company in company definition.
You only specify particular functions when you customize in Financial Accounting.
Company G0000 is preset in all foreign key tables. In the SAP system, consolidation
functions in financial accounting are based on companies. A company can comprise one
or more company codes.
SPRO––IMG––Enterprise structure—Definition—Financial accounting—Define
company
T. Code—OX15
SAP FI Configuration step by step
Prepared by- Snehashis Paul
Click on “New entries”
“Ctrl+S” save it.
Edit, Copy, Delete, Check Company Code:
In this activity you create your company codes. The company code is an organizational
unit used in accounting. It is used to structure the business organization from a financial
accounting perspective.
We recommend that you copy a company code from an existing company code. This has
the advantage that you also copy the existing company code-specific parameters. If
necessary, you can then change certain data in the relevant application. This is much less
time-consuming than creating a new company code. See "Recommendations" for more
details about copying a company code.
SPRO—IMG––Enterprise structure—Definition—Financial accounting—Edit, Copy,
Delete, Check company code
T. Code—OX02
SAP FI Configuration step by step
Prepared by- Snehashis Paul
Copy org object.
SAP FI Configuration step by step
Prepared by- Snehashis Paul
Click on edit company code data.
SAP FI Configuration step by step
Prepared by- Snehashis Paul
“Ctrl+S” save it.
Define Business Area:
In this section you create business areas. A business area is an organizational unit within
accounting that represents a separate area of operations or responsibilities in a business
organization.
When defining a business area, you enter a four-character alphanumeric key and the
name of the business area.
In a client, you can set up several business areas to which the system can assign the
postings made in all company codes defined in this client. To ensure consistency in
document entry, you should give business areas the same name in all company codes.
SPRO—IMG––Enterprise structure—Definition—Financial accounting—Define
Business Area.
T. Code—OX03
SAP FI Configuration step by step
Prepared by- Snehashis Paul
Click “New Entries”
“Ctrl+S” save it.
Define Functional Area:
In this activity you create your functional areas.
Example
Typical functional areas are Sales, Production, Marketing, Administration and Research
& Development.
SPRO—IMG––Enterprise structure—Definition—Financial accounting—Define
Functional Area
T. Code—OKBD
Click on “New Entries”
SAP FI Configuration step by step
Prepared by- Snehashis Paul
“Ctrl+S” save it.
Define Credit Control Area:
In this step, you define your credit control areas. The credit control area is an
organizational unit that specifies and checks a credit limit for customers.
SPRO—IMG––Enterprise structure—Definition—Financial accounting—Define Credit
control Area
T. Code—OB45
Click on “New Entries”
SAP FI Configuration step by step
Prepared by- Snehashis Paul
SAP FI Configuration step by step
Prepared by- Snehashis Paul
“Ctrl+S” save it
Assign company code to company:
In this step you assign the company codes which you want to include in the group
accounting to a company.
SPRO—IMG––Enterprise structure—Assignment—Financial accounting—Assign
company to company code.
T. Code- OX16
SAP FI Configuration step by step
Prepared by- Snehashis Paul
“Ctrl+S” save it
Assign company code to credit control area:
In this step, you assign company codes to a credit control area.
SPRO—IMG––Enterprise structure—Assignment—Financial accounting—Assign
company to Credit control area.
T. Code—OB38
SAP FI Configuration step by step
Prepared by- Snehashis Paul
“Ctrl+S” save it
Financial Accounting:
Maintain Fiscal Year Variant (Maintain Shortened Fisc. Year):
You can define the following characteristics for a fiscal year variant:
 how many posting periods a fiscal year has
 how many special periods you need
 how the system is to determine the posting periods when posting
When defining your fiscal year, you have the following options:
o Your fiscal year is the calendar year
In this case, you must only select the Calendar year field.
o Your fiscal year is not the same as the calendar year and is not year-
dependent
SAP FI Configuration step by step
Prepared by- Snehashis Paul
In this case, you first enter the number of your posting periods in the
Number posting per. field. To define your posting periods, select your
fiscal year variant and select Periods on the navigation screen. On this
screen, enter the month and the day of the period end and the period in
each case.
o Your fiscal year is not the same as the calendar year and is year-dependent
Enter the number of your posting periods in the field Number posting
periods and select the field Year-dependent. To define your posting
periods, select your fiscal year variant and select Periods on the navigation
screen. The system asks for which calendar year your year-dependent
fiscal year variant is valid. You then enter the month and day of the period
end for each of your periods, and the periods themselves.
It is also possible to determine names for the periods of a non-year-specific fiscal year
variant. To do so, select your fiscal year variant and choose Period texts on the
navigation screen. You can specify a three-character abbreviation (Jan, Feb, Mar...) and a
20-character long text (January, February, March).
Standard settings
The following fiscal year variants have been created in the standard system:
 Variants in which the fiscal year is the same as the calendar and has up to four
special periods
 Variants for shortened fiscal years. For more information on shortened fiscal
years, see Defining shortened fiscal years.
 Variants for non-calendar fiscal years:
o April to March with four special periods
o July to June with four special periods
o October to September with four special periods
 Variants that are set up on a weekly basis. These variants can only be used in the
Special Purpose Ledger (FI-SL) application.
Activities
1. Check the standard fiscal year variants.
2. Change the existing variants, if necessary, or create your own variants.
SAP FI Configuration step by step
Prepared by- Snehashis Paul
Defining shortened fiscal year
A shortened fiscal year is a fiscal year having less than twelve months, but for which
year-end closing must be carried out. The definition of a shortened fiscal year is always
year-dependent, since it represents a year-related exception. You must always define an
entire calendar year when defining a fiscal year variant. The year-related fiscal year
variant therefore contains not only the periods from the shortened fiscal year, but also
other periods from the previous or subsequent fiscal year.
There are two ways to define a shortened fiscal year:
 If you only use Financial Accounting (FI) without Asset Accounting (FI-AA), you
can begin a fiscal year with any period.
Example
If your shortened year goes from January to September, you can assign periods
004 to 012. Assign periods 001 to 003 of the new fiscal year to the months
October-December.
Specify the number of periods for the fiscal year variant (12 in the example
above).
Note
Keep in mind that the last period of a fiscal year must correspond to the number
of periods in that year. This means that if you want to define 12 periods, the last
period in that year must be number 12.
 If you also implement the Asset Accounting (FI-AA) component or another
component such as Materials Management (MM) or Controlling (CO), each fiscal
year must begin with period number 001, to allow asset depreciation calculations
to be carried out accurately.
For a fiscal year variant, specify the periods and the number of periods the
shortened fiscal year has. This way, each fiscal year of the variant can begin with
period 001.
Example
If you define a fiscal year with twelve periods, it can contain a shortened year
with nine periods (from 001 to 009). The remaining calendar year contains the
first three periods of the new fiscal year (periods 001 to 003).
For more information about implementing the Asset Accounting component, see
the Asset Accounting documentation.
Note
You define your shortened year and the following normal fiscal years under the same
fiscal year variant. Bear in mind that you generally need to ensure that it is possible to
post to previous fiscal years.
SAP FI Configuration step by step
Prepared by- Snehashis Paul
You need to keep the year-dependent fiscal year variant for as long as you are posting in
or prior to a shortened fiscal year, or if you are transferring old data from this period.
Year-dependent definitions will be deleted as soon as you convert the fiscal year variants
from year-dependent to year-independent.
Caution
The fiscal year variant is used in several application components of the SAP system, for
example, FI, FI-AA, CO, SD, MM, HR. In some application components, the calendar
year-dependent definition of fiscal periods and years is still required if the shortened
fiscal year is already in the past. If such a shortened fiscal year exists in your system, it
must always be indicated as year-specific. You must not change this setting under any
circumstances, even if the shortened fiscal year is already in the past.
Standard settings
Two shortened fiscal year variants are provided with the standard system: variant R1 for
a Financial Accounting shortened year, and variant AM for shortened years when Asset
Accounting is in use.
Activities
1. If you need to define a shortened fiscal year, first determine which of the two
options above will be used.
2. Define the shortened fiscal year.
To define the shortened year for Asset Accounting, select Navigation ->
Shortened fisc.yr.
SPRO—IMG––Financial accounting—Financial accounting global settings––Fiscal
year––Maintain fiscal year variant.
T. Code–– OB29
“Copy as”
SAP FI Configuration step by step
Prepared by- Snehashis Paul
Click on “Periods”
SAP FI Configuration step by step
Prepared by- Snehashis Paul
“Ctrl+S” Save it.
Year shift: One company start for fiscal year 2015-2016 from April 2015 to March 2016
in this case 3 months of the current fiscal year is added to the following year hence we
need to show as -1 in year shift as more than 6month is falling under 2015.
One company start for fiscal year 2015-2016 from October 2015 to November 2016 in
this case 3 months need to show as +1 in year shift as more than 6month is falling under
2016.
Assign Company Code to a Fiscal Year Variant:
Assign a fiscal year variant to each company code.
SPRO—IMG––Financial accounting—Financial accounting global settings––Fiscal
year––Assign company code to fiscal year variant.
T. Code–– OB37
SAP FI Configuration step by step
Prepared by- Snehashis Paul
“Ctrl+S” save it
Define Variants for Open Posting Periods:
In this activity, you can define variants for open posting periods.
Standard settings
In the standard setting, a separate variant for posting periods is defined for every
company code. The name of this variant is identical to the company code name. Every
company code is allocated to this variant with the same name. Thus nothing has changed
in the system yet: Every company code has its own variant. If you want to and can
continue working on this basis (for example, if you manage with only a few company
codes), you do not have to make any changes in the configuration.
SPRO—IMG––Financial accounting—Financial accounting global settings––Document–
–Posting periods––Define variant for open posting periods.
T. Code–– OBBO
SAP FI Configuration step by step
Prepared by- Snehashis Paul
“Ctrl+S” save it
Open and Close Posting Periods:
In this activity you specify for each variant which posting periods are open for posting.
Two intervals are available for doing this (period 1 and period 2). For every interval,
enter a lower period limit, an upper period limit and the fiscal year.
You close periods by selecting the period specifications so that the periods to be closed
are no longer contained.
You can also assign authorization groups for permitted posting periods. This means that,
for example, some posting periods can only be opened for particular users within monthly
or annual closing. You can only assign the authorization group at document header level
and it only affects period 1. The authorization object is called F_BKPF_BUP
(Accounting document: Authorizations for posting periods). Read the corresponding
chapter on "User maintenance" in the "Assigning authorizations" topic.
SPRO—IMG––Financial accounting—Financial accounting global settings––Document–
–Posting periods––Open and close posting periods.
T. Code–– OB52
SAP FI Configuration step by step
Prepared by- Snehashis Paul
“Ctrl+S” save it
Assign Variants to Company Code:
Assign the same variant to the corresponding company codes.
SPRO—IMG––Financial accounting—Financial accounting global settings––Document–
–Posting periods––Assign variants to company code
T. Code–– OBBP
SAP FI Configuration step by step
Prepared by- Snehashis Paul
“Ctrl+S” save it
Define Document Types:
In this activity you create document types for customer, vendor and general ledger
business transactions in Financial Accounting. Document types differentiate business
transactions and control document filing.
SPRO—IMG––Financial accounting—Financial accounting global settings––Document–
–Document header––Define document types
T. Code–– OBA7
SAP FI Configuration step by step
Prepared by- Snehashis Paul
Click on “New entries”
SAP FI Configuration step by step
Prepared by- Snehashis Paul
“Ctrl+S” save it
Define Field Status Variants:
In this activity you can define and edit field status variants and groups. You group several
field status groups together in one field status variant. You assign the field status variants
to a company code in the activity Assign Company Code to Field Status Variants. This
allows you to work with the same field status groups in any number of company codes.
SPRO—IMG––Financial accounting—Financial accounting global settings––Document–
–Line item––Controls––Define field status variant
T. Code–– OBC4
SAP FI Configuration step by step
Prepared by- Snehashis Paul
Select the company code and click on “Field status group”
SAP FI Configuration step by step
Prepared by- Snehashis Paul
Double click on each field status group and make the necessary changes which fields
needs to be Suppressed, Display, Required, Optional.
SAP FI Configuration step by step
Prepared by- Snehashis Paul
“Ctrl+S” save it
Assign Company Code to Field Status Variants:
Assign the company codes concerned to the same field status variant.
SPRO—IMG––Financial accounting—Financial accounting global settings––Document–
–Line item––Controls––Assign company code to field status variant.
T. Code–– OBC4
SAP FI Configuration step by step
Prepared by- Snehashis Paul
“Ctrl+S” save it
Define Tolerance Groups for Employees:
In this activity, you predefine various amount limits for your employees with which you
determine:
 the maximum document amount the employee is authorized to post
 the maximum amount the employee can enter as a line item in a customer or
vendor account
 the maximum cash discount percentage the employee can grant in a line item
 the maximum acceptable tolerance for payment differences for the employee.
Payment differences are posted automatically within certain tolerance groups. This way
the system can post the difference by correcting the cash discount or by posting to a
separate expense or revenue account.
In this respect you define:
SAP FI Configuration step by step
Prepared by- Snehashis Paul
 the amounts or percentage rates up to which the system is to automatically post to
a separate expense or revenue account if it is not possible to correct the cash
discount or
 Up to which difference amounts the system is to correct the cash discount. In this
case the cash discount is automatically increased or decreased by the difference.
Using tolerance groups.
You can also additionally differentiate these settings by company code. Since the same
rules usually apply to a group of employees, enter the values for employee groups. You
can then enter amount limits and tolerances per employee group and company code.
SPRO—IMG––Financial accounting—Financial accounting global settings––Document–
–Line item––Define Tolerance Groups for Employees.
T. Code–– OBA4
Click on “New entries”
SAP FI Configuration step by step
Prepared by- Snehashis Paul
“Ctrl+S” save it
Define Document Number Ranges:
In this IMG activity you create number ranges for documents. For each number range
you specify (among other things):
 a number interval from which document numbers are selected
 the type of number assignment (internal or external)
You assign one or more document types to each number range. The number range
becomes effective via the document type specified in document entry and posting.
You can use one number range for several document types. This means you can
differentiate documents by document type but combine them again for filing the original
documents, provided you store your original documents under the EDP document
number.
SPRO—IMG––Financial accounting—Financial accounting global settings––Document–
–Document number ranges––Define document number ranges.
SAP FI Configuration step by step
Prepared by- Snehashis Paul
T. Code–– FBN1
Click on “Intervals”
SAP FI Configuration step by step
Prepared by- Snehashis Paul
Click on “Interval”
SAP FI Configuration step by step
Prepared by- Snehashis Paul
Save it.
SAP FI Configuration step by step
Prepared by- Snehashis Paul
G/L Accounting:
Edit Chart of Accounts List:
In the chart of accounts list you enter the charts of accounts that you want to use in your
organization (at client level).
SPRO—IMG––Financial accounting—General ledger accounting––G/L accounts––
Master Data––Preparations––Edit chart of account list.
T. Code–– OB13
Click on “New entries”
SAP FI Configuration step by step
Prepared by- Snehashis Paul
“Ctrl+S” save it
Assign Company Code to Chart of Accounts:
For each company code, you need to specify which chart of accounts is to be used.
Several company codes can use the same chart of accounts.
SPRO—IMG––Financial accounting—General ledger accounting––G/L accounts––
Master Data––Preparations––Assign company code to chart of accounts.
T. Code–– OB62
SAP FI Configuration step by step
Prepared by- Snehashis Paul
“Ctrl+S” save it
Define Account Group
When creating a G/L account, you must specify an account group.
The account group determines:
 the interval in which the account number must be
 which fields are required and optional entries when creating and changing master
records
 which fields are suppressed when creating and changing master data.
It enables you to control the layout of screens.
You use account groups to combine accounts according to the above criteria (for
example, a P&L account group, asset account group and material account group).
SPRO—IMG––Financial accounting—General ledger accounting––G/L accounts––
Master Data––Preparations––Define account Group.
SAP FI Configuration step by step
Prepared by- Snehashis Paul
T. Code–– OBD4
Click on “New entries” and put Account group, Account name, From account-To
account.
“Ctrl+S” save it
Define Retained Earnings Account:
You assign a retained earnings account to each P&L account by specifying a P&L
statement account type in the chart of accounts area of each P&L account.
At the end of a fiscal year, the system carries forward the balance of the P&L account to
the retained earnings account. You can define one or more P&L statement account types
per chart of accounts and assign them to retained earnings accounts.
SPRO—IMG––Financial accounting—General ledger accounting––G/L accounts––
Master Data––Preparations––Define retained earning accounts.
T. Code–– OB53
SAP FI Configuration step by step
Prepared by- Snehashis Paul
“Ctrl+S” save it
GL Master Data:
GL master data can be created in 3 ways.
T. Code–– FS00–– Centrally
FSP0–– In chart of accounts
FSS0–– In company code
SAP FI Configuration step by step
Prepared by- Snehashis Paul
Click on “Create” and put the company code along with account number.
Type description tab–– Select account group, P/L or B/S, type short text.
SAP FI Configuration step by step
Prepared by- Snehashis Paul
Control Data tab–– Select account currency, Select reconciliation account (Vendor,
Customer, Asset), Click open item management/ line item display, Put sort key.
SAP FI Configuration step by step
Prepared by- Snehashis Paul
Create bank/interest tab–– Put field status group and select other fields accordingly Ex-
Post automatically only, Interest indicator if there is interest.
“Ctrl+S” save it
Necessary T. Codes––
FB03–– Display document
FB02–– Edit document
FBL3N–– GL a/c line item
FB08–– Single document reversal
F.80–– Mass document reversal
FBV0–– Post/Delete park document
F-01–– Create sample document
FB50–– Single screen document posting
SAP FI Configuration step by step
Prepared by- Snehashis Paul
F-02–– Multiple screen document posting
F-03–– GL account clear
Accounts Payable:
Vendor account group:
In this step you determine the account groups for vendors.
You can also define reference account groups for one-time accounts. These enable you to
control the fields in the one-time account screen. You can, for example, make certain
fields required fields and suppress others.
When creating a vendor account, an account group must be specified. You can enter a
reference account group in the "General data" section of the one-time account master
record under "Control data". If you do not specify a reference account group, all fields in
the one-time account screen for document entry are ready for input (as before).
Via the account group you determine
 The interval for the account numbers
 Whether the number is assigned internally by the system or externally by the user
(type of number assignment)
 Whether it is a one-time account
 Which fields are ready for input or must be filled when creating and changing
master records (field status)
Example:
In the one-time accounts you want to suppress the address, communication and
bank detail fields. These fields are part of the general data and so you set the field
status in the general data section. Define the reconciliation account as a required
field since this is a required entry for one-time accounts as well. The field is
company code-dependent so you define the status for this field in the company
data section.
With the account groups, you group accounts together according to the criteria mentioned
above, for example, one-time accounts. You determine the account number interval and
the type of number assignment by using number ranges.
SPRO—IMG––Financial accounting—Accounts Receivable/Payable––Vendor accounts–
–Master Data––Preparations for creating vendor master data––Define account groups
with screen layout(Vendor)
SAP FI Configuration step by step
Prepared by- Snehashis Paul
T. code–– OBD3
Click “New entries”
SAP FI Configuration step by step
Prepared by- Snehashis Paul
Fill up necessary fields and “Ctrl+S” save it
“Ctrl+S” save it.
Create vendor number range:
SAP FI Configuration step by step
Prepared by- Snehashis Paul
In this activity you create the number ranges for vendor accounts. To do this, specify the
following under a two-character key:
 A number interval from which the account number for the vendor accounts is to
be selected
 The type of number assignment (internal or external number assignment)
SPRO—IMG––Financial accounting—Accounts Receivable/Payable––Vendor accounts–
–Master Data––Preparations for creating vendor master data––Create number ranges for
vendor account
T. code–– XKN1
Click on “Interval”
SAP FI Configuration step by step
Prepared by- Snehashis Paul
Put number range and press enter
SAP FI Configuration step by step
Prepared by- Snehashis Paul
“Ctrl+S” save it.
Assign number range to vendor account group:
Allocate the required number ranges to the account groups.
SPRO—IMG––Financial accounting—Accounts Receivable/Payable––Vendor accounts–
–Master Data––Preparations for creating vendor master data––Assign number ranges to
vendor account group
T. code–– OBAS
SAP FI Configuration step by step
Prepared by- Snehashis Paul
“Ctrl+S” save it.
Define Tolerances for Customers/Vendors:
In this activity you define the tolerances for customers/vendors. The tolerances are used
for dealing with payment differences and residual items that may arise when payment
clearing is carried out. You specify the tolerances in one or more tolerance groups and
assign a tolerance group to each customer/vendor using the master record. For each
tolerance group specify the following:
 Tolerances, up to which payment differences arising from open item clearing can
be automatically posted to expense or revenue accounts
 The treatment of terms of payment for residual items if they are to be posted
during clearing.
SPRO—IMG––Financial accounting—Accounts Receivable/Payable––Business
Transaction––Incoming payments––Manual incoming payments––Clearing differences––
Define tolerances for customer/vendor
T. code––OBA3
SAP FI Configuration step by step
Prepared by- Snehashis Paul
Click “New entries”
SAP FI Configuration step by step
Prepared by- Snehashis Paul
Put necessary field and “Ctrl+S” save it.
“Ctrl+S” save it.
Automatic Payment Programme and House Bank set up:
List of invoices can be paid through automatic payment programme. Automatic payment
programme consist list of invoices from list of vendors. House Bank is company’s bank
account from where daily activities E.g. Vendor payment, Customer payment receipt
carries out.
SPRO––IMG––Financial Accounting––Accounts receivable and Accounts payable––
Business Transaction––Outgoing payments––Automatic outgoing payments––Payment
method/Bank selection for payment programme.
T- Code–– FBZP
SAP FI Configuration step by step
Prepared by- Snehashis Paul
Click on “All company code”
SAP FI Configuration step by step
Prepared by- Snehashis Paul
Click “New entries”
SAP FI Configuration step by step
Prepared by- Snehashis Paul
Put the necessary fields and “Ctrl+S” save it.
Click “Paying company codes”
SAP FI Configuration step by step
Prepared by- Snehashis Paul
Click on “New entries”
SAP FI Configuration step by step
Prepared by- Snehashis Paul
Put necessary fields and “Ctrl+S” save it.
Click “Payment methods in country”
SAP FI Configuration step by step
Prepared by- Snehashis Paul
Click on “New entries”
SAP FI Configuration step by step
Prepared by- Snehashis Paul
Put necessary data and “Ctrl+S” save it.
Click “Payment methods in company code”
SAP FI Configuration step by step
Prepared by- Snehashis Paul
Click on “New entries”
SAP FI Configuration step by step
Prepared by- Snehashis Paul
Put the necessary fields and “Ctrl+S” save it.
Click on “Bank Determination”
SAP FI Configuration step by step
Prepared by- Snehashis Paul
Select company code and click on “Ranking order”
SAP FI Configuration step by step
Prepared by- Snehashis Paul
Click on “New entries”
SAP FI Configuration step by step
Prepared by- Snehashis Paul
Put necessary fields and “Ctrl+S” save it.
SAP FI Configuration step by step
Prepared by- Snehashis Paul
Click on “Bank accounts”
SAP FI Configuration step by step
Prepared by- Snehashis Paul
Click on “New entries”
SAP FI Configuration step by step
Prepared by- Snehashis Paul
Put necessary fields and “Ctrl+S” save it.
SAP FI Configuration step by step
Prepared by- Snehashis Paul
Click on “Available amounts”
SAP FI Configuration step by step
Prepared by- Snehashis Paul
Click on “New entries”
SAP FI Configuration step by step
Prepared by- Snehashis Paul
Put necessary data and “Ctrl+S” save it.
SAP FI Configuration step by step
Prepared by- Snehashis Paul
Click on “Value Date”
SAP FI Configuration step by step
Prepared by- Snehashis Paul
Click on “New entries”
SAP FI Configuration step by step
Prepared by- Snehashis Paul
Put the necessary data and “Ctrl+S” it
Click on “House Bank”
SAP FI Configuration step by step
Prepared by- Snehashis Paul
Click on “New entries”
SAP FI Configuration step by step
Prepared by- Snehashis Paul
Put necessary fields and “Ctrl+S” save it.
Select the house bank and click on “Bank accounts”
SAP FI Configuration step by step
Prepared by- Snehashis Paul
Click on “New entries”
SAP FI Configuration step by step
Prepared by- Snehashis Paul
Put necessary fields and “Ctrl+S” save it.
Note: Vendor Creation (with purchase organization) and Payment term setup will be done
by MM Team
Necessary T. Codes:––
FK01–– Vendor creation (without purchase organization)
FK02–– Edit vendor (Without purchase organization)
FK03–– Display vendor (Without purchase organization)
FK05–– Block/Unblock vendor (Without purchase organization)
FK09–– Confirmation of vendor for creation or any changes (Without purchase
organization)
FB60–– Vendor Invoice Posting (Without PO)
FBL1N–– Vendor line item
SAP FI Configuration step by step
Prepared by- Snehashis Paul
FK10N–– Vendor balance
F-53–– Manual payment of vendor invoice
F–43–– Vendor invoice posting with posting key
FB65–– Vendor credit memo posting (Without PO)
F–41–– Vendor credit memo posting with posting key
F-44–– Vendor line item clear
F-47–– Vendor down payment request
F-48–– Vendor down payment
F–54–– Down payment clearing
F110–– Automatic payment programme
Accounts Payable:
Customer account group
In this step, you determine the account groups for customers.
You can also define reference account groups for one-time accounts. You can use these
to control the fields of the one-time account screen so that, for example, certain fields are
displayed as required fields or are hidden.
When creating a customer account, you must specify an account group. You can specify a
reference account group under "Control" in the "General data" part of a one-time
account's master data. If you do not specify a reference account group, then, as
previously, all fields of the one-time account screen are ready for input during document
entry.
SPRO––IMG––Financial Accounting––Account Receivable and Accounts Payable––
Customer Accounts––Master Data––Preparations for creating customer master data––
Define account group with screen layout
T. Code–– OBD2
SAP FI Configuration step by step
Prepared by- Snehashis Paul
Click on “New entries”
SAP FI Configuration step by step
Prepared by- Snehashis Paul
“Ctrl+S” Save it.
Create Number Ranges for Customer Accounts
In this activity you create the number ranges for the customer accounts. To do this,
specify the following under a two-character key:
 A number interval from which the account number for the customer accounts is to
be selected
 The type of number assignment (internal or external number assignment)
Allocate the number ranges to the account groups for customers.
SPRO––IMG––Financial Accounting––Account Receivable and Accounts Payable––
Customer Accounts––Master Data––Preparations for creating customer master data––
Creating number ranges for customer account
T. Code–– XDN1
SAP FI Configuration step by step
Prepared by- Snehashis Paul
Click on “Change Interval”
SAP FI Configuration step by step
Prepared by- Snehashis Paul
Click on “Insert Interval”
SAP FI Configuration step by step
Prepared by- Snehashis Paul
Put number range and press enter.
“Ctrl+S” Save it.
Assign Number Ranges to Customer Account Groups
In this step you assign the number ranges you created in the preceding step to the account
groups for customers. You can use one number range for several account groups.
SPRO––IMG––Financial Accounting––Account Receivable and Accounts Payable––
Customer Accounts––Master Data––Preparations for creating customer master data––
Assign number ranges to customer account group
T. Code–– OBAR
SAP FI Configuration step by step
Prepared by- Snehashis Paul
“Ctrl+S” Save it.
Define Dunning Procedure
In this activity you enter the settings that control the dunning program by:
 Specifying the company codes to include in dunning.
You specify these company codes when configuring the dunning program.
 Setting up the dunning procedure you want to use.
Dunning procedures are company code independent. They determine the dunning
interval, the grace periods for the due date determination, and the number of
dunning levels. You can also set the dunning level at which you want to list all
due items from an account in the dunning notice.
 Setting the dunning charges.
You can either specify a fixed charge or have the system calculate the charge on
the basis of a percentage rate you specify.
SAP FI Configuration step by step
Prepared by- Snehashis Paul
 Specifying the net payment due date at which a particular dunning level is
reached.
 Specifying the dunning notice you want to send to your customers.
You have to define one or more forms for the notice.
SPRO––IMG––Financial Accounting––Account Receivable and Accounts Payable––
Business Transactions––Dunning––Dunning Procedure––Define Dunning Procedures
T. Code–– FBMP
Click on “New Procedure”
SAP FI Configuration step by step
Prepared by- Snehashis Paul
Put necessary data and click on “Dunning Levels”
SAP FI Configuration step by step
Prepared by- Snehashis Paul
Put necessary data and click on “Charges”
SAP FI Configuration step by step
Prepared by- Snehashis Paul
Put necessary data and click on “Minimum Amounts”
SAP FI Configuration step by step
Prepared by- Snehashis Paul
Put necessary data and click on “Dunning Texts”
SAP FI Configuration step by step
Prepared by- Snehashis Paul
“Ctrl+S” Save it and go back to the main screen
SAP FI Configuration step by step
Prepared by- Snehashis Paul
“Ctrl+S” Save it
Note: Customer Creation (with Sales organization) will be done by SD Team
Necessary T. Codes:––
FD01–– Customer creation (Without sales organization)
FD02–– Edit Customer (Without sales organization)
FD03–– View Customer (Without sales organization)
FD05–– Block/Unblock Customer (Without sales organization)
FD09–– Confirmation of Customer for creation or any changes (Without sales
organization)
FD10N–– Display customer balance
FB70–– Customer invoice posting
F-22–– Customer invoice posting with posting key
SAP FI Configuration step by step
Prepared by- Snehashis Paul
F-28–– Incoming Payment
FBL5N–– Customer line item display
F-37–– Customer down payment request
F-29–– Customer down payment
F-39–– Clear customer down payment
F-32–– Clear customer line item
F150–– Dunning
Asset Accounting
Copy Reference Chart of Depreciation/Depreciation Areas:
In this step, you define your charts of depreciation. The chart of depreciation is a list of
depreciation areas arranged according to business and legal requirements. The chart of
depreciation enables you to manage all rules for the valuation of assets in a particular
country or economic region.
You must assign a chart of depreciation to each company code that is defined in Asset
Accounting. SAP provides country-specific charts of depreciation with predefined
depreciation areas. These charts of depreciation serve only as a reference for creating
your own charts of depreciation, and are therefore not directly accessible in the SAP
system. When creating a chart of depreciation, you have to copy the reference chart of
depreciation.
SPRO––IMG––Financial Accounting––Asset Accounting––Organizational Structure––
Copy reference chart of Depreciation/Depreciation areas
SAP FI Configuration step by step
Prepared by- Snehashis Paul
Click on “Copy reference chart of Depreciation”
SAP FI Configuration step by step
Prepared by- Snehashis Paul
Click on “Copy org object” and put necessary data then “Ctrl+S” Save it.
SAP FI Configuration step by step
Prepared by- Snehashis Paul
Click on “Specify description of chart of depreciation”
SAP FI Configuration step by step
Prepared by- Snehashis Paul
“Ctrl+S” Save it.
SAP FI Configuration step by step
Prepared by- Snehashis Paul
Click on “Copy/Delete depreciation area”
SAP FI Configuration step by step
Prepared by- Snehashis Paul
Select necessary depreciation are and delete other depreciation areas.
“Ctrl+S” Save it.
Assign Chart of Depreciation to Company Code:
In this step, you assign a chart of depreciation to each company code.
SPRO––IMG––Financial Accounting––Asset Accounting––Organizational Structure––
Assign chart of depreciation to company code
SAP FI Configuration step by step
Prepared by- Snehashis Paul
Select correct company code and assign chart of depreciation with it. “Ctrl+S” Save it.
Specify Account Determination:
In this step, you define the account determinations for Asset Accounting (key and
description). The key of an account determination must be stored in the asset class asset
class. In this way, the account determination links an asset master record to the general
ledger accounts to be posted for an accounting transaction using the asset class.
SPRO––IMG––Financial Accounting––Asset Accounting––Organizational Structure––
Asset Classes––Specify Account Determination.
SAP FI Configuration step by step
Prepared by- Snehashis Paul
Click on “New entries”
SAP FI Configuration step by step
Prepared by- Snehashis Paul
Put necessary data and “Ctrl+S” save it.
Create Screen Layout Rules:
In this step, you create your screen layout rules. The screen layout specifies the status of
the fields in the asset master record. You use the screen layout to determine if fields are
required entry or optional entry fields, or if they are suppressed completely, for example.
SPRO––IMG––Financial Accounting––Asset Accounting––Organizational Structure––
Asset Classes––Specify screen layout.
SAP FI Configuration step by step
Prepared by- Snehashis Paul
Select any screen layout amongst the list and click on “Copy as” to copy it.
SAP FI Configuration step by step
Prepared by- Snehashis Paul
Make necessary changes and “Ctrl+S” Save it.
Define Number Range Interval:
In this step, you define the number ranges for this company code for assigning the main
asset number. You can roughly classify your asset portfolio using the number ranges.
SPRO––IMG––Financial Accounting––Asset Accounting––Organizational Structure––
Asset Classes––Define number range interval.
T. Code–– AS08
SAP FI Configuration step by step
Prepared by- Snehashis Paul
Click on “Change Interval”
SAP FI Configuration step by step
Prepared by- Snehashis Paul
Click on “Insert Interval”
SAP FI Configuration step by step
Prepared by- Snehashis Paul
Put necessary number range and press enter and “Ctrl+S” Save it.
Define Asset Classes:
In this step you define the asset classes. The asset class is the most important criteria for
structuring fixed assets from an accounting point of view. Every asset has to be assigned
to exactly one asset class. The asset class is used to assign the assets (and their business
transactions) to the correct general ledger accounts. Several asset classes can use the
same account assignment. You can see that it is possible to make finer distinctions at the
level of the asset class than at the level of the general ledger accounts. The most
important tasks of the asset classes are:
 the assignment of default values when creating assets (particularly depreciation
terms)
 the grouping of assets for reporting purposes
You define the asset classes in the system in a series of steps. The asset class is structured
in three parts:
 control parameters
SAP FI Configuration step by step
Prepared by- Snehashis Paul
 default values for general master data
 default values for depreciation terms in the chart of depreciation
You can assign depreciation terms to an asset class for any number of charts of
depreciation. This makes it possible to manage an asset class catalog that is valid
for an entire corporate group, independent of the country-specific charts of
depreciation.
In this step, you define the asset classes and their control parameters. In further steps, you
add further to the asset classes by supplying default values for certain logical field groups
in the asset master record.
SPRO––IMG––Financial Accounting––Asset Accounting––Organizational Structure––
Asset Classes––Define Asset classes.
Click on “New entries”
SAP FI Configuration step by step
Prepared by- Snehashis Paul
Put necessary fields and “Ctrl+S” save it.
Specify Chart-of-Dep.-Dependent Screen Layout/Acct Assignment:
Generally, the control specifications (the screen layout and the account determination) for
the asset class applies throughout the client, that is, for all charts of depreciation. It is
therefore sufficient to make control specifications once per asset class.
You only need to carry out this step, if, contrary to the usual case, you want these control
specifications to be country-specific (that is, different depending on the chart of
depreciation). The system then uses the entries you make here depending on the chart of
depreciation in the given company code. The system then ignores the control
specifications in the asset class that are independent of the chart of depreciation.
SPRO––IMG––Financial Accounting––Asset Accounting––Organizational Structure––
Asset Classes––Specify chart of depreciation dependent screen layout/Acct assignment.
SAP FI Configuration step by step
Prepared by- Snehashis Paul
Select correct asset class and click on “Chart of depreciation dependent data”.
SAP FI Configuration step by step
Prepared by- Snehashis Paul
Put necessary data and “Ctrl+S” Save it.
Assign G/L Accounts:
In this step, you specify the balance sheet accounts, special reserve accounts, and the
depreciation accounts for Asset Accounting.
SPRO––IMG––Financial Accounting––Asset Accounting––Integration with General
ledger––Assign G/L accounts.
SAP FI Configuration step by step
Prepared by- Snehashis Paul
Select chart of accounts and click on “Account determination”
SAP FI Configuration step by step
Prepared by- Snehashis Paul
Select Account determination and click on “Balance sheet account”
SAP FI Configuration step by step
Prepared by- Snehashis Paul
Put necessary G/L accounts and click on “Depreciation”
SAP FI Configuration step by step
Prepared by- Snehashis Paul
Put necessary G/L and “Ctrl+S” Save it.
Specify Intervals and Posting Rules:
In this step, you define the posting rules for the depreciation areas that post depreciation
values to Financial Accounting. You define the posting cycle (how often depreciation is
posted) and the account assignment rules for the depreciation posting run.
SPRO––IMG––Financial Accounting––Asset Accounting––Integration with General
ledger––Post depreciation to the General ledger––Specify intervals and Posting rules
SAP FI Configuration step by step
Prepared by- Snehashis Paul
Select company code and click on “posting rules”
SAP FI Configuration step by step
Prepared by- Snehashis Paul
Put the necessary fields and “Ctrl+S” Save it.
Determine Depreciation Areas in the Asset Class:
Generally, the assets in an asset class use the same depreciation terms (depreciation key,
useful life). Therefore, you do not have to maintain the depreciation terms in the asset
master record. Instead, they can be default values from the asset class.
SPRO––IMG––Financial Accounting––Asset Accounting––Valuation––Determine
depreciation area in the asset class
SAP FI Configuration step by step
Prepared by- Snehashis Paul
Select the Asset class and click on “Depreciation Area”
SAP FI Configuration step by step
Prepared by- Snehashis Paul
Select the correct depreciation area and assign the Depreciation key and Layout.
“Ctrl+S” Save it.
Define Base Methods:
In this step, you maintain base methods. Base methods are valid in all charts of
depreciation. You assign base methods to depreciation keys.
SPRO––IMG––Financial Accounting––Asset Accounting––Depreciation––Valuation
methods––Depreciation key––Calculation methods–– Define Base methods.
SAP FI Configuration step by step
Prepared by- Snehashis Paul
Click on “New entries”
SAP FI Configuration step by step
Prepared by- Snehashis Paul
Put the necessary fields and “Ctrl+S” Save it.
Define Multi-Level Methods:
In this step, you define multi-level methods. You then assign them to depreciation keys.
Each level represents a validity period for a given percentage rate.
SPRO––IMG––Financial Accounting––Asset Accounting––Depreciation––Valuation
methods––Depreciation key––Calculation methods–– Define multilevel methods.
SAP FI Configuration step by step
Prepared by- Snehashis Paul
Click on “New entries”
SAP FI Configuration step by step
Prepared by- Snehashis Paul
Put necessary fields and click on “Levels”
SAP FI Configuration step by step
Prepared by- Snehashis Paul
Define multilevel with percentage and “Ctrl+S” save it.
Maintain Period Control Methods:
In this step, you maintain period control methods. You then assign them to depreciation
keys. Using period control methods, you can specify that the depreciation start date for all
acquisitions in the year is set to the first day of the period.
SPRO––IMG––Financial Accounting––Asset Accounting––Depreciation––Valuation
methods––Depreciation key––Calculation methods–– Maintain Period control methods.
SAP FI Configuration step by step
Prepared by- Snehashis Paul
Click on “New entries” then field the necessary fields and “Ctrl+S” Save it.
Define the Cutoff Value Key:
For certain types of valuation, it makes sense, or is legally required, that you end
depreciation when a certain value is reached. You can enter an absolute scrap value in the
asset master record. Or you can enter a percentage scrap value (cut-off value) in the
calculation key.
In this step, you define the calculation key for automatically determining scrap values.
For each calculation key, you can specify
 the percentage of the depreciation base that should be used as the cut-off value
percentage
 whether the cut-off value percentage should be deducted at the start or the end of
the calculation of depreciation
 at what point in time the system should start calculating the validity period
SAP FI Configuration step by step
Prepared by- Snehashis Paul
You can enter several cut-off percentages for each scrap value key. You can define the
cut-off percentages/levels per acquisition year, and the validity period can be of any
length.
SPRO––IMG––Financial Accounting––Asset Accounting––Depreciation––Valuation
methods––Depreciation key––Further settings–– Define the cut off value key.
Click on “New entries”
SAP FI Configuration step by step
Prepared by- Snehashis Paul
Make the selection and click on “Levels”
SAP FI Configuration step by step
Prepared by- Snehashis Paul
Click on “New entries” and put the necessary fields the “Ctrl+S” Save it.
Maintain Depreciation Key:
In this step, you maintain depreciation keys by assigning calculation methods to them.
You can divide the duration of depreciation into several phases. When you enter a
changeover method for one of these phases, the system changes over to the next phase as
soon as the event specified in the changeover method has occurred. The system then uses
the depreciation calculation that is specified in the calculation method for this phase.
SPRO––IMG––Financial Accounting––Asset Accounting––Depreciation––Valuation
methods––Depreciation key––Calculation method––Maintain Depreciation Key.
SAP FI Configuration step by step
Prepared by- Snehashis Paul
Click on “New entries”
SAP FI Configuration step by step
Prepared by- Snehashis Paul
Put necessary data and Click on “Assignment of Calculation”
SAP FI Configuration step by step
Prepared by- Snehashis Paul
Put necessary data then save the document and click on “Back key”
SAP FI Configuration step by step
Prepared by- Snehashis Paul
Now click on “Activate” key to activate the document and “Ctrl+S” Save it.
Necessary T. Codes––
AS01–– Create Asset Master
AS11–– Create Sub asset master
F-90–– Purchase/Acquire of Asset (Posting key 31 for vendor and 70 for asset)
AW01N–– Asset explorer
S_ALR_87011965–– Display asset balance
AFAB–– Depreciation Run
F-92–– Sale/Retirement of Asset with customer (Posting key 01 for customer and 75 for
asset)
ABAVN–– Asset Scrapping
ABUMN–– Asset transfer (Within Company code)
SAP FI Configuration step by step
Prepared by- Snehashis Paul
S_ALR_87011990–– Asset history sheet
AJRW–– Year change
ABAON–– Asset retirement without customer
ABTIN–– Transfer assets intrercompany
AUVA–– Incomplete asset list
Bank Accounting
Note: House Bank creation already shown at the time of automatic payment programme
creation.
Check Deposit:
In the following steps you will make all the settings necessary for check deposit.
Create and Assign Business Transactions:
In this step you store transaction indicators for check deposit and allocate these indicators
to a posting rule.
You specify this indicator in the "Transaction" field on the initial screen of check deposit.
SPRO––IMG––Financial Accounting––Bank Accounting––Business Transactions––
Check Deposit–– Create and Assign Business Transaction
T. Code–– OT53
SAP FI Configuration step by step
Prepared by- Snehashis Paul
Click on “New entries”
SAP FI Configuration step by step
Prepared by- Snehashis Paul
Put necessary data and “Ctrl+S” Save it.
Define Posting Keys and Posting Rules for Check Deposit:
In this activity you store the posting keys and posting rules for check deposit.
Creating Keys for Posting Rules
Under this node, you define a posting rule for check deposits. The key determines the
posting rules for general ledger and subledger accounting. The posting rule represents
the business transactions typical of the check deposit, such as:
 Incoming check to check clearing
 Check clearing to customer
 Bank to incoming check
SPRO––IMG––Financial Accounting––Bank Accounting––Business Transactions––
Check Deposit–– Define posting key and posting rules for check deposit.
SAP FI Configuration step by step
Prepared by- Snehashis Paul
Click on “New entries”
SAP FI Configuration step by step
Prepared by- Snehashis Paul
Put necessary data and “Ctrl+S” Save it.
SAP FI Configuration step by step
Prepared by- Snehashis Paul
Click on “Assign accounts to account symbol”
SAP FI Configuration step by step
Prepared by- Snehashis Paul
Click on “New entries”
SAP FI Configuration step by step
Prepared by- Snehashis Paul
Put necessary data and “Ctrl+S” Save it.
SAP FI Configuration step by step
Prepared by- Snehashis Paul
Click on “Create keys for Posting rules”
SAP FI Configuration step by step
Prepared by- Snehashis Paul
Click on “New entries”
SAP FI Configuration step by step
Prepared by- Snehashis Paul
Put necessary data and “Ctrl+S” Save it.
SAP FI Configuration step by step
Prepared by- Snehashis Paul
Click on “define posting rules”
SAP FI Configuration step by step
Prepared by- Snehashis Paul
Click on “New entries”
SAP FI Configuration step by step
Prepared by- Snehashis Paul
Put necessary data and “Ctrl+S” Save it.
Define Variants for Check Deposit:
In this step you can create your own account assignment variants for check deposit in
order to modify the arrangement and/or selection of account assignment fields according
to your company-specific requirements.
One variant is delivered as a default. It cannot be changed.
If you do not want to work with the standard variant, you can deactivate it. New variants
must be activated after you create them.
SPRO––IMG––Financial Accounting––Bank Accounting––Business Transaction––
Check Deposit–– Define Variant for Check Deposit.
T. Code–– OT45
SAP FI Configuration step by step
Prepared by- Snehashis Paul
Company can maintain standard variant for check deposit else create separate variant
clicking on “Create” button.
SAP FI Configuration step by step
Prepared by- Snehashis Paul
Select the fields which are require for this variant and “Ctrl+S” Save it.
Necessary T. Codes––
FCHI–– Check Lot
FCHN–– Display Check Register
FCH5–– Manual Check information creation
FCH6–– Change Check Information (Use for BRS to put check encashment date)
FCH7–– Reprint Check
FCH8–– Reversal of Cancelled Check Payment
FCH9–– Void Issued Checks
FCHU–– Update Check Information in an entry which cut outside the system manually.
SAP FI Configuration step by step
Prepared by- Snehashis Paul
Manual Bank Statement:
In the following steps you make all the settings necessary for the manual bank statement.
Create and Assign Business Transactions:
In this step you store an indicator for each business transaction and allocate a posting rule
to each business transaction. Several business transactions usually refer to the same
posting rule.
SPRO––IMG––Financial Accounting––Bank Accounting––Business Transaction––
Payment Transaction––Manual Bank Statement–– Create and Assign Business
Transaction.
T. Code–– OT52
Click on “New entries”
SAP FI Configuration step by step
Prepared by- Snehashis Paul
Put necessary data and “Ctrl+S” Save it.
Define Posting Keys and Posting Rules for Manual Bank Statement:
Note: This step is same as “Define posting keys and Posting rules for Check Deposit”
Please refer to page 130-141.
Only difference is for Manual bank statement we need to add Bank Transfer account also.
Define Variants for Manual Bank Statement:
Note: This step is same as “Define Variant for Check Deposit” Please refer to page 141-
143.
Necessary T. Code––
FF67–– Process Manual Bank Statement
SM35–– Batch Posting.
Cash Journal
SAP FI Configuration step by step
Prepared by- Snehashis Paul
Create G/L Account for Cash Journal:
In this activity, you create a G/L account, for example 100000, for the cash journal in the
required company code.
SPRO––IMG––Financial Accounting––Bank Accounting––Business Transaction––Cash
Journal––Create GL account for Cash Journal.
T. Code–– FS01
SAP FI Configuration step by step
Prepared by- Snehashis Paul
SAP FI Configuration step by step
Prepared by- Snehashis Paul
“Ctrl+S” Save it.
Define Document Types for Cash Journal Documents:
You can select existing document types for cash journal documents, or define new
document types in this activity.
You must have document types for the following postings:
 G/L account postings
 Outgoing payments to vendors
 Incoming payments from vendors
 Incoming payments from customers
 Outgoing payments to customers
SPRO––IMG––Financial Accounting––Bank Accounting––Business Transaction––Cash
Journal––Define Document type for Cash Journal Documents
SAP FI Configuration step by step
Prepared by- Snehashis Paul
T. Code–– OBA7
Maintain the Standard Document type.
Define Number Range Intervals for Cash Journal Documents:
You have to define a number range interval for cash journal documents. Each document
then receives a unique number that does not clash with the G/L document number.
SPRO––IMG––Financial Accounting––Bank Accounting––Business Transaction––Cash
Journal––Define Document type for Cash Journal Documents
SAP FI Configuration step by step
Prepared by- Snehashis Paul
Click on “Change Interval”
SAP FI Configuration step by step
Prepared by- Snehashis Paul
Click on “Insert Interval”
SAP FI Configuration step by step
Prepared by- Snehashis Paul
Put number range and press “Enter” “Ctrl+S” Save it.
Set Up Cash Journal:
To set up a new cash journal for a company code, enter the appropriate data for the
following fields:
 Company code
Company code in which you want to run the cash journal
 Number
Random number for cash journal identification;
You can run several cash journals in each company code
 G/L account
G/L account to which you want to post the cash journal business transactions,
usually the petty cash account.
 Currency
SAP FI Configuration step by step
Prepared by- Snehashis Paul
Currency in which you want to run the cash journal. You are free to choose the
cash journal currency.
If you want to run a cash journal whose currency does not correspond to that of
the company code, you have to consider the following details in the
corresponding cash journal G/L account master data:
o The indicator Balances in local currency only should not be set
o The account currency must correspond to the company code currency
You can run several cash journals with different currencies in one cash journal
G/L account. Several cash journals with the same currency in one G/L account is
however not possible.
If you want to run several cash journals in the same currency in one company
code, you have to select different cash journal G/L accounts.
 Cash Journal Closed?
Indicator that a cash journal is closed
 Document types for
o G/L account postings
o Outgoing payments to vendors
o Incoming payments from vendors
o Incoming payments from customers
o Outgoing payments to customers
 Name
Automatic language-dependent cash journal identification name,
for example, Cash journal 1 SAP AG
 Authorization group
Enables access protection for specific objects
 Person 1, Person 2
Contains the names of important people for the cash journal, for example, the
name of the cashier
SAP FI Configuration step by step
Prepared by- Snehashis Paul
 Text
Contains additional information for the cash journal
SPRO––IMG––Financial Accounting––Bank Accounting––Business Transaction––Cash
Journal––Set up Cash Journal
Click on “New entries”
SAP FI Configuration step by step
Prepared by- Snehashis Paul
Put necessary Data and “Ctrl+S” Save it.
Create, Change, Delete Business Transactions:
In this activity, you can create, change, and delete business transactions for the cash
journal.
SPRO––IMG––Financial Accounting––Bank Accounting––Business Transaction––Cash
Journal––Create, Change, Delete business transaction.
SAP FI Configuration step by step
Prepared by- Snehashis Paul
Click on “New entries”
SAP FI Configuration step by step
Prepared by- Snehashis Paul
Maintain business transaction as per bank provided by Company and “Ctrl+S” Save it.
Set Up Print Parameters for Cash Journal:
In order to print the cash journal and the cash journal receipts, you have to set up the
corresponding print program parameters per company code.
SPRO––IMG––Financial Accounting––Bank Accounting––Business Transaction––Cash
Journal––Set up print parameters for cash journal.
SAP FI Configuration step by step
Prepared by- Snehashis Paul
Maintain standard print programme hence click any standard parameter and copy it then
change the company code and “Ctrl+S” save it.
Necessary T. Code––
FBCJ–– Cash Journal
Foreign Currency
Foreign currency configuration requires to those companies who are dealing with foreign
countries.
Exchange rate is two types 1. Direct Quote 2. Indirect Quote
Ex. Local currency is INR and foreign currency is USD
Direct Quote–– 1 USD=66 INR
Indirect Quote–– 1 INR= 0.66(1/66) USD
Foreign Currency Valuation:
SAP FI Configuration step by step
Prepared by- Snehashis Paul
In the following steps, you make specifications required for the valuation of foreign
currency balances and open items in foreign currency.
SPRO––IMG––Financial Accounting––General Ledger Accounting––Business
Transactions––Closing––Valuate––Foreign Currency Valuation–– Define Valuation
Methods
T. Code–– OB59
Click on “New entries”
SAP FI Configuration step by step
Prepared by- Snehashis Paul
“Ctrl+S” Save it.
Prepare Automatic Postings for Foreign Currency Valuation:
In this activity you define the numbers of the accounts to which you want the system to
automatically post exchange rate differences when valuating open items and foreign
currency balances.
You can also define the accounts for realized exchange rate differences during open item
clearing. For more information on this, see the Define Accounts for Exchange Rate
Differences activity.
You can use the currency type to control account determination during open item
valuation and exchange rate difference posting. You could, for example, post gains in
local currency and gains in group currency to separate accounts.
When valuating open items the system posts to a balance sheet adjustment account and to
an account for exchange rate differences that occur during the valuation. Exchange rate
differences could be either a gain or a loss. You store the account numbers accordingly.
The valuation of foreign currency balances requires a special key that is assigned the gain
and loss accounts for posting any exchange rate differences that occur during valuation.
SAP FI Configuration step by step
Prepared by- Snehashis Paul
You can freely define this key. You then enter it in the master records of the accounts that
you want to valuate. To post the differences that are determined from a group of G/L
accounts to the same gain or loss accounts, enter the same key for all these G/L accounts.
SPRO––IMG––Financial Accounting––General Ledger Accounting––Business
Transactions––Closing––Valuate––Foreign Currency Valuation–– Prepare Automatic
posting for Foreign currency valuation.
T. Code–– OBA1
Click on “KDB”
SAP FI Configuration step by step
Prepared by- Snehashis Paul
Put Exchange Loss/Gain account and “Ctrl+S” Save it.
SAP FI Configuration step by step
Prepared by- Snehashis Paul
Click on “KDF”
SAP FI Configuration step by step
Prepared by- Snehashis Paul
Put Exchange Loss/Gain account also Valuation Loss/Gain account
Create GL in T. Code FS00.
Exchange Loss/Gain- Profit and Loss Account
Valuation Loss/Gain- Balance Sheet Account
Enter Exchange Rates:
Exchange rates are required to:
 Translate foreign currency amounts when posting or clearing or to check an
exchange rate entered manually
 Determine the gain and loss from exchange rate differences
 Evaluate open items in foreign currency and the foreign currency balance sheet
accounts
The exchange rates are defined by period ("valid from").
SAP FI Configuration step by step
Prepared by- Snehashis Paul
SPRO––IMG––SAP Netweaver––General Settings––Currencies––Enter Exchange Rates
T. Code–– OB08
Click on “New entries”
SAP FI Configuration step by step
Prepared by- Snehashis Paul
Maintain Exchange Rate and “Ctrl+S” Save it.
Note: M- Average Rate, B- Bank Selling Rate, G- Bank Buying Rate
Define Valuation Areas:
In this IMG activity, you define your valuation areas for your closing operations. With
the valuation areas, you can report different valuation approaches and post to different
accounts. You can save the valuation result separately for each document item and use it
for other closing operations (such as sorted lists).
SPRO––IMG––Financial Accounting (New)––General Ledger Accounting (New)––
Periodic Processing––Valuate––Define Valuation Areas
SAP FI Configuration step by step
Prepared by- Snehashis Paul
Click on “New entries”
SAP FI Configuration step by step
Prepared by- Snehashis Paul
Put necessary data and “Ctrl+S” Save it.
Assign Valuation Areas and Accounting Principles:
In this IMG activity, you assign the desired accounting principles to your valuation areas.
You can use the valuation area for the reclassification or sorted list of payables and
receivables and for foreign currency valuation. You can use the valuation area to apply in
these reports the different valuation requirements of the accounting principles.
SPRO––IMG––Financial Accounting (New)––General Ledger Accounting (New)––
Periodic Processing––Valuate–– Assign valuation area and accounting principle
SAP FI Configuration step by step
Prepared by- Snehashis Paul
Click on “New entries”
SAP FI Configuration step by step
Prepared by- Snehashis Paul
Put Valuation area and select Accounting Principle which company is following.
“Ctrl+S” Save it.
Necessary T. Code––
FAGL_FC_VAL–– Foreign Currency Valuation
F.05–– Foreign Currency Valuation
SAP FI Configuration step by step
Prepared by- Snehashis Paul
Tax on Sales/Purchases
Check Calculation Procedure:
In this activity, you can check and, if necessary, change existing procedures for tax
calculation.
Standard settings
Calculation procedures containing the necessary specifications for the calculation and
posting of taxes on sales/purchases have already been defined in the standard SAP system
for certain countries. Every calculation procedure groups several tax types together into a
condition type (for example, output tax or input tax) in the calculation procedure, and
determines calculation rules for it.
The calculation procedure determines for which amount the individual condition types
are to be calculated. This can be the base amount (total of the expense items and the
revenue items) or a subtotal. The entry in column From Level, determines for which
amount tax is calculated.
SPRO––IMG––Financial Accounting––Financial Accounting Global Settings––Tax on
Sales/Purchases–– Basic Settings–– Check Calculation Procedure.
T. Code–– OBYZ
SAP FI Configuration step by step
Prepared by- Snehashis Paul
Click on “Define Procedure”
SAP FI Configuration step by step
Prepared by- Snehashis Paul
Click on “New entries”
SAP FI Configuration step by step
Prepared by- Snehashis Paul
Put tax procedure and “Ctrl+S” Save it.
SAP FI Configuration step by step
Prepared by- Snehashis Paul
Maintain Standard Condition type and Access sequence hence no require to change.
Assign Country to Calculation Procedure:
In this activity, you enter the key for the calculation procedure which determines the
conditions which are allowed per document and which defines the sequence of the
conditions in the document for each country.
SPRO––IMG––Financial Accounting––Financial Accounting Global Settings––Tax on
Sales/Purchases–– Basic Settings–– Assign Country to Calculation Procedure.
T. Code–– OBBG
SAP FI Configuration step by step
Prepared by- Snehashis Paul
Assign Tax Procedure with Country and “Ctrl+S” Save it.
Define Tax Codes for Sales and Purchases:
You have to define a separate tax on sales/purchases code for each country in which one
of your company codes is located.
Each code contains one or more tax rates for the different tax types.
If you have to report tax-exempt or non-taxable sales to the tax authorities, you need to
define a tax rate with the value 0.
SPRO––IMG––Financial Accounting––Financial Accounting Global Settings––Tax on
Sales/Purchases–– Calculation––Define Tax code for Sales and Purchases
T. Code–– FTXP
SAP FI Configuration step by step
Prepared by- Snehashis Paul
Put Tax code and Press Enter.
SAP FI Configuration step by step
Prepared by- Snehashis Paul
Maintain Tax percentage.
Output Tax–– Sales Tax
Input Tax–– Purchase Tax
“Ctrl+S” Save it.
Define Tax Accounts:
In this activity, you specify the accounts to which the different tax types are to be posted.
The system determines these accounts for automatic postings.
SPRO––IMG––Financial Accounting––Financial Accounting Global Settings––Tax on
Sales/Purchases–– Posting––Define Tax Accounts
T. Code–– OB40
SAP FI Configuration step by step
Prepared by- Snehashis Paul
Click “MWS” for Output Tax and “VST” for Input Tax
SAP FI Configuration step by step
Prepared by- Snehashis Paul
Put Tax code and GL account number then “Ctrl+S” Save it.
Note: Create GL in FS00. Create a Liability account for Output Tax and Asset account
for Input Tax.
SAP FI Configuration step by step
Prepared by- Snehashis Paul
Put tax category “*” in GL account of Sales Tax/ Purchase Tax in T. code FS00
SAP FI Configuration step by step
Prepared by- Snehashis Paul
Put tax code in “Tax Category” in GL account of Sales/Purchase in T. Code FS00
Financial Statement Versions
Define Financial Statement Versions:
In this activity:
 You define the versions you need to create a balance sheet and profit and loss
statement.
You can define versions for a specific chart of accounts, for a group chart of
accounts, or without any specific assignment.
 You then determine the financial statement items for your version.
You assign groups of accounts to the items at the lowest levels of the hierarchy.
You can select the criteria that determine which items the accounts are displayed
in. For example, accounts or groups of accounts can be assigned to particular
items based on their balance.
Alternatively, you can also assign functional area intervals at the lowest level of
the structure, instead of account intervals. Either account intervals or functional
SAP FI Configuration step by step
Prepared by- Snehashis Paul
area intervals can be assigned to a financial statement item. You must explicitly
define financial statement versions to which functional areas are assigned as such.
You do this by setting the "Fun.area allowed" indicator. This financial statement
version can then also be used by the notes to financial statement in the G/L
account information system.
SPRO––IMG––Financial Accounting––General Ledger Accounting––Business
Transaction––Closing––Document––Define Financial Statement Version
T. Code–– OB58
Click on “New entries”
SAP FI Configuration step by step
Prepared by- Snehashis Paul
Put necessary data and Click on “Financial Statement items”
SAP FI Configuration step by step
Prepared by- Snehashis Paul
Select the line of Profit & Loss/Balance Sheet and click on “Create Items”
SAP FI Configuration step by step
Prepared by- Snehashis Paul
SAP FI Configuration step by step
Prepared by- Snehashis Paul
Put the header name under which GL accounts would be assigned
SAP FI Configuration step by step
Prepared by- Snehashis Paul
Example of Balance Sheet
SAP FI Configuration step by step
Prepared by- Snehashis Paul
Select the header item and click on “Assign accounts”
SAP FI Configuration step by step
Prepared by- Snehashis Paul
Press enter and “Ctrl+S” Save it.
Run T. Code–– F.01 and put the necessary fields then execute (F8), Financial statement
will get generate.
SAP FI Configuration step by step
Prepared by- Snehashis Paul
SAP FI Configuration step by step
Prepared by- Snehashis Paul
Note: This document contains overall FI configuration also tried to capture end user T.
Codes.
Fell free to put your comment and let me know if I missed any point that I can add those
in this file.
Email–– snehashispaul007@gmail.com
*****END*****
SAP FI Configuration step by step
Prepared by- Snehashis Paul
SAP FI Configuration step by step
Prepared by- Snehashis Paul
SAP FI Configuration step by step
Prepared by- Snehashis Paul
SAP FI Configuration step by step
Prepared by- Snehashis Paul
SAP FI Configuration step by step
Prepared by- Snehashis Paul
SAP FI Configuration step by step
Prepared by- Snehashis Paul

More Related Content

DOC
SAP CO step by step config guide & user manual part 1
DOC
manual-de-config-fm
PDF
Automatic vendor payment advice notes by mail
PPTX
SAP FICO Config step-by-step-sap-fi-basic-configuration-settings.pptx
PPTX
Presentation sap
PDF
SAP Asset Accounting
PDF
Quick sap fi configuration
PPT
SAP FI - Accounts Receivable
SAP CO step by step config guide & user manual part 1
manual-de-config-fm
Automatic vendor payment advice notes by mail
SAP FICO Config step-by-step-sap-fi-basic-configuration-settings.pptx
Presentation sap
SAP Asset Accounting
Quick sap fi configuration
SAP FI - Accounts Receivable

What's hot (20)

PDF
Quick sap co configuration Internal Order
DOC
SAP CO Configuration Guide - Exclusive Document
PDF
PDF
Fi sd integration with copa
PDF
Business partner-2
 
PDF
Sap fico tutorial
PDF
Availability Check in SAP SD
PDF
Business Area in SAP FI
PDF
Cutover activities
DOCX
FI & MM integration
DOC
Functional specification doc Gst purcahse register
DOCX
Configuration of TCS
PPTX
SAP Account determination SD-FI by odaiah pelley
PDF
GST_Configuration Document_GANESH_SAPSD
DOCX
New GL parallel ledgers in asset accounting
PDF
Sap sd-pricing-in-depth-configuration-guide
PDF
S4 HANA Business Partner Configuration@Ganesh Tarlana
DOCX
SAP MM Standard Business Processes
PDF
Sap fico configuration
PDF
Sap fi integration with other modules in sap fico
Quick sap co configuration Internal Order
SAP CO Configuration Guide - Exclusive Document
Fi sd integration with copa
Business partner-2
 
Sap fico tutorial
Availability Check in SAP SD
Business Area in SAP FI
Cutover activities
FI & MM integration
Functional specification doc Gst purcahse register
Configuration of TCS
SAP Account determination SD-FI by odaiah pelley
GST_Configuration Document_GANESH_SAPSD
New GL parallel ledgers in asset accounting
Sap sd-pricing-in-depth-configuration-guide
S4 HANA Business Partner Configuration@Ganesh Tarlana
SAP MM Standard Business Processes
Sap fico configuration
Sap fi integration with other modules in sap fico
Ad

Viewers also liked (7)

PDF
Sap fi configuration
PPT
05 b 01workflowcustomizing
PPT
SAP workflow classics
PDF
MAHESH SAP FI NOTES
PDF
Sap workflow training
PDF
Workflow Part1 1
PPT
Business workflow
Sap fi configuration
05 b 01workflowcustomizing
SAP workflow classics
MAHESH SAP FI NOTES
Sap workflow training
Workflow Part1 1
Business workflow
Ad

Similar to Sap fi configuration (20)

PDF
Enterprise structure in sap fico
DOCX
Sap fico interview questions
PPTX
SAP FICO Enterprise Structure Notes for Beginners
PDF
SAP APO - Fiscal Year Variant and Posting Periods.pdf
DOC
Basic settings notes of SAP FICO
PDF
Fico interview questions and answers
PDF
Ficointerviewquestionsandanswers
PDF
Fico interview quetions
PDF
Ficointerviewquestionsandanswers
PDF
Interview questions
PDF
Ficointerviewquestionsandanswers
PDF
Sap interview questions Anilkumar chowdary
PDF
Ficointerviewquestionsandanswers
PDF
Sap fico interview question
PDF
Sap fico interview questions
PPTX
ERP Financial Management Enterprise Structure
PPTX
SAP TREASURY_Money Market.pptx
PDF
SAP FINANCE GENERAL LEDGER ACCOUNTING
Enterprise structure in sap fico
Sap fico interview questions
SAP FICO Enterprise Structure Notes for Beginners
SAP APO - Fiscal Year Variant and Posting Periods.pdf
Basic settings notes of SAP FICO
Fico interview questions and answers
Ficointerviewquestionsandanswers
Fico interview quetions
Ficointerviewquestionsandanswers
Interview questions
Ficointerviewquestionsandanswers
Sap interview questions Anilkumar chowdary
Ficointerviewquestionsandanswers
Sap fico interview question
Sap fico interview questions
ERP Financial Management Enterprise Structure
SAP TREASURY_Money Market.pptx
SAP FINANCE GENERAL LEDGER ACCOUNTING

Recently uploaded (20)

PPTX
Detection-First SIEM: Rule Types, Dashboards, and Threat-Informed Strategy
PPTX
ACSFv1EN-58255 AWS Academy Cloud Security Foundations.pptx
PPTX
Cloud computing and distributed systems.
PPT
Teaching material agriculture food technology
PDF
Machine learning based COVID-19 study performance prediction
PDF
Encapsulation_ Review paper, used for researhc scholars
PDF
TokAI - TikTok AI Agent : The First AI Application That Analyzes 10,000+ Vira...
PDF
Mobile App Security Testing_ A Comprehensive Guide.pdf
PPTX
Digital-Transformation-Roadmap-for-Companies.pptx
PPTX
KOM of Painting work and Equipment Insulation REV00 update 25-dec.pptx
PDF
MIND Revenue Release Quarter 2 2025 Press Release
PPTX
Programs and apps: productivity, graphics, security and other tools
PDF
Chapter 3 Spatial Domain Image Processing.pdf
PDF
Review of recent advances in non-invasive hemoglobin estimation
PDF
NewMind AI Weekly Chronicles - August'25 Week I
PDF
Approach and Philosophy of On baking technology
PDF
Electronic commerce courselecture one. Pdf
PPTX
VMware vSphere Foundation How to Sell Presentation-Ver1.4-2-14-2024.pptx
PDF
7 ChatGPT Prompts to Help You Define Your Ideal Customer Profile.pdf
PPTX
Understanding_Digital_Forensics_Presentation.pptx
Detection-First SIEM: Rule Types, Dashboards, and Threat-Informed Strategy
ACSFv1EN-58255 AWS Academy Cloud Security Foundations.pptx
Cloud computing and distributed systems.
Teaching material agriculture food technology
Machine learning based COVID-19 study performance prediction
Encapsulation_ Review paper, used for researhc scholars
TokAI - TikTok AI Agent : The First AI Application That Analyzes 10,000+ Vira...
Mobile App Security Testing_ A Comprehensive Guide.pdf
Digital-Transformation-Roadmap-for-Companies.pptx
KOM of Painting work and Equipment Insulation REV00 update 25-dec.pptx
MIND Revenue Release Quarter 2 2025 Press Release
Programs and apps: productivity, graphics, security and other tools
Chapter 3 Spatial Domain Image Processing.pdf
Review of recent advances in non-invasive hemoglobin estimation
NewMind AI Weekly Chronicles - August'25 Week I
Approach and Philosophy of On baking technology
Electronic commerce courselecture one. Pdf
VMware vSphere Foundation How to Sell Presentation-Ver1.4-2-14-2024.pptx
7 ChatGPT Prompts to Help You Define Your Ideal Customer Profile.pdf
Understanding_Digital_Forensics_Presentation.pptx

Sap fi configuration

  • 1. SAP FI Configuration step by step Prepared by- Snehashis Paul SAP FI configuration consists of Enterprise structure, Accounts Payable, Accounts Receivable, Bank Accounting, Asset Accounting & Financial Statement Version. Enterprise Structure: Define Company: In this step you can create companies. A company is an organizational unit in Accounting which represents a business organization according to the requirements of commercial law in a particular country. You store basic data for each company in company definition. You only specify particular functions when you customize in Financial Accounting. Company G0000 is preset in all foreign key tables. In the SAP system, consolidation functions in financial accounting are based on companies. A company can comprise one or more company codes. SPRO––IMG––Enterprise structure—Definition—Financial accounting—Define company T. Code—OX15
  • 2. SAP FI Configuration step by step Prepared by- Snehashis Paul Click on “New entries” “Ctrl+S” save it. Edit, Copy, Delete, Check Company Code: In this activity you create your company codes. The company code is an organizational unit used in accounting. It is used to structure the business organization from a financial accounting perspective. We recommend that you copy a company code from an existing company code. This has the advantage that you also copy the existing company code-specific parameters. If necessary, you can then change certain data in the relevant application. This is much less time-consuming than creating a new company code. See "Recommendations" for more details about copying a company code. SPRO—IMG––Enterprise structure—Definition—Financial accounting—Edit, Copy, Delete, Check company code T. Code—OX02
  • 3. SAP FI Configuration step by step Prepared by- Snehashis Paul Copy org object.
  • 4. SAP FI Configuration step by step Prepared by- Snehashis Paul Click on edit company code data.
  • 5. SAP FI Configuration step by step Prepared by- Snehashis Paul “Ctrl+S” save it. Define Business Area: In this section you create business areas. A business area is an organizational unit within accounting that represents a separate area of operations or responsibilities in a business organization. When defining a business area, you enter a four-character alphanumeric key and the name of the business area. In a client, you can set up several business areas to which the system can assign the postings made in all company codes defined in this client. To ensure consistency in document entry, you should give business areas the same name in all company codes. SPRO—IMG––Enterprise structure—Definition—Financial accounting—Define Business Area. T. Code—OX03
  • 6. SAP FI Configuration step by step Prepared by- Snehashis Paul Click “New Entries” “Ctrl+S” save it. Define Functional Area: In this activity you create your functional areas. Example Typical functional areas are Sales, Production, Marketing, Administration and Research & Development. SPRO—IMG––Enterprise structure—Definition—Financial accounting—Define Functional Area T. Code—OKBD Click on “New Entries”
  • 7. SAP FI Configuration step by step Prepared by- Snehashis Paul “Ctrl+S” save it. Define Credit Control Area: In this step, you define your credit control areas. The credit control area is an organizational unit that specifies and checks a credit limit for customers. SPRO—IMG––Enterprise structure—Definition—Financial accounting—Define Credit control Area T. Code—OB45 Click on “New Entries”
  • 8. SAP FI Configuration step by step Prepared by- Snehashis Paul
  • 9. SAP FI Configuration step by step Prepared by- Snehashis Paul “Ctrl+S” save it Assign company code to company: In this step you assign the company codes which you want to include in the group accounting to a company. SPRO—IMG––Enterprise structure—Assignment—Financial accounting—Assign company to company code. T. Code- OX16
  • 10. SAP FI Configuration step by step Prepared by- Snehashis Paul “Ctrl+S” save it Assign company code to credit control area: In this step, you assign company codes to a credit control area. SPRO—IMG––Enterprise structure—Assignment—Financial accounting—Assign company to Credit control area. T. Code—OB38
  • 11. SAP FI Configuration step by step Prepared by- Snehashis Paul “Ctrl+S” save it Financial Accounting: Maintain Fiscal Year Variant (Maintain Shortened Fisc. Year): You can define the following characteristics for a fiscal year variant:  how many posting periods a fiscal year has  how many special periods you need  how the system is to determine the posting periods when posting When defining your fiscal year, you have the following options: o Your fiscal year is the calendar year In this case, you must only select the Calendar year field. o Your fiscal year is not the same as the calendar year and is not year- dependent
  • 12. SAP FI Configuration step by step Prepared by- Snehashis Paul In this case, you first enter the number of your posting periods in the Number posting per. field. To define your posting periods, select your fiscal year variant and select Periods on the navigation screen. On this screen, enter the month and the day of the period end and the period in each case. o Your fiscal year is not the same as the calendar year and is year-dependent Enter the number of your posting periods in the field Number posting periods and select the field Year-dependent. To define your posting periods, select your fiscal year variant and select Periods on the navigation screen. The system asks for which calendar year your year-dependent fiscal year variant is valid. You then enter the month and day of the period end for each of your periods, and the periods themselves. It is also possible to determine names for the periods of a non-year-specific fiscal year variant. To do so, select your fiscal year variant and choose Period texts on the navigation screen. You can specify a three-character abbreviation (Jan, Feb, Mar...) and a 20-character long text (January, February, March). Standard settings The following fiscal year variants have been created in the standard system:  Variants in which the fiscal year is the same as the calendar and has up to four special periods  Variants for shortened fiscal years. For more information on shortened fiscal years, see Defining shortened fiscal years.  Variants for non-calendar fiscal years: o April to March with four special periods o July to June with four special periods o October to September with four special periods  Variants that are set up on a weekly basis. These variants can only be used in the Special Purpose Ledger (FI-SL) application. Activities 1. Check the standard fiscal year variants. 2. Change the existing variants, if necessary, or create your own variants.
  • 13. SAP FI Configuration step by step Prepared by- Snehashis Paul Defining shortened fiscal year A shortened fiscal year is a fiscal year having less than twelve months, but for which year-end closing must be carried out. The definition of a shortened fiscal year is always year-dependent, since it represents a year-related exception. You must always define an entire calendar year when defining a fiscal year variant. The year-related fiscal year variant therefore contains not only the periods from the shortened fiscal year, but also other periods from the previous or subsequent fiscal year. There are two ways to define a shortened fiscal year:  If you only use Financial Accounting (FI) without Asset Accounting (FI-AA), you can begin a fiscal year with any period. Example If your shortened year goes from January to September, you can assign periods 004 to 012. Assign periods 001 to 003 of the new fiscal year to the months October-December. Specify the number of periods for the fiscal year variant (12 in the example above). Note Keep in mind that the last period of a fiscal year must correspond to the number of periods in that year. This means that if you want to define 12 periods, the last period in that year must be number 12.  If you also implement the Asset Accounting (FI-AA) component or another component such as Materials Management (MM) or Controlling (CO), each fiscal year must begin with period number 001, to allow asset depreciation calculations to be carried out accurately. For a fiscal year variant, specify the periods and the number of periods the shortened fiscal year has. This way, each fiscal year of the variant can begin with period 001. Example If you define a fiscal year with twelve periods, it can contain a shortened year with nine periods (from 001 to 009). The remaining calendar year contains the first three periods of the new fiscal year (periods 001 to 003). For more information about implementing the Asset Accounting component, see the Asset Accounting documentation. Note You define your shortened year and the following normal fiscal years under the same fiscal year variant. Bear in mind that you generally need to ensure that it is possible to post to previous fiscal years.
  • 14. SAP FI Configuration step by step Prepared by- Snehashis Paul You need to keep the year-dependent fiscal year variant for as long as you are posting in or prior to a shortened fiscal year, or if you are transferring old data from this period. Year-dependent definitions will be deleted as soon as you convert the fiscal year variants from year-dependent to year-independent. Caution The fiscal year variant is used in several application components of the SAP system, for example, FI, FI-AA, CO, SD, MM, HR. In some application components, the calendar year-dependent definition of fiscal periods and years is still required if the shortened fiscal year is already in the past. If such a shortened fiscal year exists in your system, it must always be indicated as year-specific. You must not change this setting under any circumstances, even if the shortened fiscal year is already in the past. Standard settings Two shortened fiscal year variants are provided with the standard system: variant R1 for a Financial Accounting shortened year, and variant AM for shortened years when Asset Accounting is in use. Activities 1. If you need to define a shortened fiscal year, first determine which of the two options above will be used. 2. Define the shortened fiscal year. To define the shortened year for Asset Accounting, select Navigation -> Shortened fisc.yr. SPRO—IMG––Financial accounting—Financial accounting global settings––Fiscal year––Maintain fiscal year variant. T. Code–– OB29 “Copy as”
  • 15. SAP FI Configuration step by step Prepared by- Snehashis Paul Click on “Periods”
  • 16. SAP FI Configuration step by step Prepared by- Snehashis Paul “Ctrl+S” Save it. Year shift: One company start for fiscal year 2015-2016 from April 2015 to March 2016 in this case 3 months of the current fiscal year is added to the following year hence we need to show as -1 in year shift as more than 6month is falling under 2015. One company start for fiscal year 2015-2016 from October 2015 to November 2016 in this case 3 months need to show as +1 in year shift as more than 6month is falling under 2016. Assign Company Code to a Fiscal Year Variant: Assign a fiscal year variant to each company code. SPRO—IMG––Financial accounting—Financial accounting global settings––Fiscal year––Assign company code to fiscal year variant. T. Code–– OB37
  • 17. SAP FI Configuration step by step Prepared by- Snehashis Paul “Ctrl+S” save it Define Variants for Open Posting Periods: In this activity, you can define variants for open posting periods. Standard settings In the standard setting, a separate variant for posting periods is defined for every company code. The name of this variant is identical to the company code name. Every company code is allocated to this variant with the same name. Thus nothing has changed in the system yet: Every company code has its own variant. If you want to and can continue working on this basis (for example, if you manage with only a few company codes), you do not have to make any changes in the configuration. SPRO—IMG––Financial accounting—Financial accounting global settings––Document– –Posting periods––Define variant for open posting periods. T. Code–– OBBO
  • 18. SAP FI Configuration step by step Prepared by- Snehashis Paul “Ctrl+S” save it Open and Close Posting Periods: In this activity you specify for each variant which posting periods are open for posting. Two intervals are available for doing this (period 1 and period 2). For every interval, enter a lower period limit, an upper period limit and the fiscal year. You close periods by selecting the period specifications so that the periods to be closed are no longer contained. You can also assign authorization groups for permitted posting periods. This means that, for example, some posting periods can only be opened for particular users within monthly or annual closing. You can only assign the authorization group at document header level and it only affects period 1. The authorization object is called F_BKPF_BUP (Accounting document: Authorizations for posting periods). Read the corresponding chapter on "User maintenance" in the "Assigning authorizations" topic. SPRO—IMG––Financial accounting—Financial accounting global settings––Document– –Posting periods––Open and close posting periods. T. Code–– OB52
  • 19. SAP FI Configuration step by step Prepared by- Snehashis Paul “Ctrl+S” save it Assign Variants to Company Code: Assign the same variant to the corresponding company codes. SPRO—IMG––Financial accounting—Financial accounting global settings––Document– –Posting periods––Assign variants to company code T. Code–– OBBP
  • 20. SAP FI Configuration step by step Prepared by- Snehashis Paul “Ctrl+S” save it Define Document Types: In this activity you create document types for customer, vendor and general ledger business transactions in Financial Accounting. Document types differentiate business transactions and control document filing. SPRO—IMG––Financial accounting—Financial accounting global settings––Document– –Document header––Define document types T. Code–– OBA7
  • 21. SAP FI Configuration step by step Prepared by- Snehashis Paul Click on “New entries”
  • 22. SAP FI Configuration step by step Prepared by- Snehashis Paul “Ctrl+S” save it Define Field Status Variants: In this activity you can define and edit field status variants and groups. You group several field status groups together in one field status variant. You assign the field status variants to a company code in the activity Assign Company Code to Field Status Variants. This allows you to work with the same field status groups in any number of company codes. SPRO—IMG––Financial accounting—Financial accounting global settings––Document– –Line item––Controls––Define field status variant T. Code–– OBC4
  • 23. SAP FI Configuration step by step Prepared by- Snehashis Paul Select the company code and click on “Field status group”
  • 24. SAP FI Configuration step by step Prepared by- Snehashis Paul Double click on each field status group and make the necessary changes which fields needs to be Suppressed, Display, Required, Optional.
  • 25. SAP FI Configuration step by step Prepared by- Snehashis Paul “Ctrl+S” save it Assign Company Code to Field Status Variants: Assign the company codes concerned to the same field status variant. SPRO—IMG––Financial accounting—Financial accounting global settings––Document– –Line item––Controls––Assign company code to field status variant. T. Code–– OBC4
  • 26. SAP FI Configuration step by step Prepared by- Snehashis Paul “Ctrl+S” save it Define Tolerance Groups for Employees: In this activity, you predefine various amount limits for your employees with which you determine:  the maximum document amount the employee is authorized to post  the maximum amount the employee can enter as a line item in a customer or vendor account  the maximum cash discount percentage the employee can grant in a line item  the maximum acceptable tolerance for payment differences for the employee. Payment differences are posted automatically within certain tolerance groups. This way the system can post the difference by correcting the cash discount or by posting to a separate expense or revenue account. In this respect you define:
  • 27. SAP FI Configuration step by step Prepared by- Snehashis Paul  the amounts or percentage rates up to which the system is to automatically post to a separate expense or revenue account if it is not possible to correct the cash discount or  Up to which difference amounts the system is to correct the cash discount. In this case the cash discount is automatically increased or decreased by the difference. Using tolerance groups. You can also additionally differentiate these settings by company code. Since the same rules usually apply to a group of employees, enter the values for employee groups. You can then enter amount limits and tolerances per employee group and company code. SPRO—IMG––Financial accounting—Financial accounting global settings––Document– –Line item––Define Tolerance Groups for Employees. T. Code–– OBA4 Click on “New entries”
  • 28. SAP FI Configuration step by step Prepared by- Snehashis Paul “Ctrl+S” save it Define Document Number Ranges: In this IMG activity you create number ranges for documents. For each number range you specify (among other things):  a number interval from which document numbers are selected  the type of number assignment (internal or external) You assign one or more document types to each number range. The number range becomes effective via the document type specified in document entry and posting. You can use one number range for several document types. This means you can differentiate documents by document type but combine them again for filing the original documents, provided you store your original documents under the EDP document number. SPRO—IMG––Financial accounting—Financial accounting global settings––Document– –Document number ranges––Define document number ranges.
  • 29. SAP FI Configuration step by step Prepared by- Snehashis Paul T. Code–– FBN1 Click on “Intervals”
  • 30. SAP FI Configuration step by step Prepared by- Snehashis Paul Click on “Interval”
  • 31. SAP FI Configuration step by step Prepared by- Snehashis Paul Save it.
  • 32. SAP FI Configuration step by step Prepared by- Snehashis Paul G/L Accounting: Edit Chart of Accounts List: In the chart of accounts list you enter the charts of accounts that you want to use in your organization (at client level). SPRO—IMG––Financial accounting—General ledger accounting––G/L accounts–– Master Data––Preparations––Edit chart of account list. T. Code–– OB13 Click on “New entries”
  • 33. SAP FI Configuration step by step Prepared by- Snehashis Paul “Ctrl+S” save it Assign Company Code to Chart of Accounts: For each company code, you need to specify which chart of accounts is to be used. Several company codes can use the same chart of accounts. SPRO—IMG––Financial accounting—General ledger accounting––G/L accounts–– Master Data––Preparations––Assign company code to chart of accounts. T. Code–– OB62
  • 34. SAP FI Configuration step by step Prepared by- Snehashis Paul “Ctrl+S” save it Define Account Group When creating a G/L account, you must specify an account group. The account group determines:  the interval in which the account number must be  which fields are required and optional entries when creating and changing master records  which fields are suppressed when creating and changing master data. It enables you to control the layout of screens. You use account groups to combine accounts according to the above criteria (for example, a P&L account group, asset account group and material account group). SPRO—IMG––Financial accounting—General ledger accounting––G/L accounts–– Master Data––Preparations––Define account Group.
  • 35. SAP FI Configuration step by step Prepared by- Snehashis Paul T. Code–– OBD4 Click on “New entries” and put Account group, Account name, From account-To account. “Ctrl+S” save it Define Retained Earnings Account: You assign a retained earnings account to each P&L account by specifying a P&L statement account type in the chart of accounts area of each P&L account. At the end of a fiscal year, the system carries forward the balance of the P&L account to the retained earnings account. You can define one or more P&L statement account types per chart of accounts and assign them to retained earnings accounts. SPRO—IMG––Financial accounting—General ledger accounting––G/L accounts–– Master Data––Preparations––Define retained earning accounts. T. Code–– OB53
  • 36. SAP FI Configuration step by step Prepared by- Snehashis Paul “Ctrl+S” save it GL Master Data: GL master data can be created in 3 ways. T. Code–– FS00–– Centrally FSP0–– In chart of accounts FSS0–– In company code
  • 37. SAP FI Configuration step by step Prepared by- Snehashis Paul Click on “Create” and put the company code along with account number. Type description tab–– Select account group, P/L or B/S, type short text.
  • 38. SAP FI Configuration step by step Prepared by- Snehashis Paul Control Data tab–– Select account currency, Select reconciliation account (Vendor, Customer, Asset), Click open item management/ line item display, Put sort key.
  • 39. SAP FI Configuration step by step Prepared by- Snehashis Paul Create bank/interest tab–– Put field status group and select other fields accordingly Ex- Post automatically only, Interest indicator if there is interest. “Ctrl+S” save it Necessary T. Codes–– FB03–– Display document FB02–– Edit document FBL3N–– GL a/c line item FB08–– Single document reversal F.80–– Mass document reversal FBV0–– Post/Delete park document F-01–– Create sample document FB50–– Single screen document posting
  • 40. SAP FI Configuration step by step Prepared by- Snehashis Paul F-02–– Multiple screen document posting F-03–– GL account clear Accounts Payable: Vendor account group: In this step you determine the account groups for vendors. You can also define reference account groups for one-time accounts. These enable you to control the fields in the one-time account screen. You can, for example, make certain fields required fields and suppress others. When creating a vendor account, an account group must be specified. You can enter a reference account group in the "General data" section of the one-time account master record under "Control data". If you do not specify a reference account group, all fields in the one-time account screen for document entry are ready for input (as before). Via the account group you determine  The interval for the account numbers  Whether the number is assigned internally by the system or externally by the user (type of number assignment)  Whether it is a one-time account  Which fields are ready for input or must be filled when creating and changing master records (field status) Example: In the one-time accounts you want to suppress the address, communication and bank detail fields. These fields are part of the general data and so you set the field status in the general data section. Define the reconciliation account as a required field since this is a required entry for one-time accounts as well. The field is company code-dependent so you define the status for this field in the company data section. With the account groups, you group accounts together according to the criteria mentioned above, for example, one-time accounts. You determine the account number interval and the type of number assignment by using number ranges. SPRO—IMG––Financial accounting—Accounts Receivable/Payable––Vendor accounts– –Master Data––Preparations for creating vendor master data––Define account groups with screen layout(Vendor)
  • 41. SAP FI Configuration step by step Prepared by- Snehashis Paul T. code–– OBD3 Click “New entries”
  • 42. SAP FI Configuration step by step Prepared by- Snehashis Paul Fill up necessary fields and “Ctrl+S” save it “Ctrl+S” save it. Create vendor number range:
  • 43. SAP FI Configuration step by step Prepared by- Snehashis Paul In this activity you create the number ranges for vendor accounts. To do this, specify the following under a two-character key:  A number interval from which the account number for the vendor accounts is to be selected  The type of number assignment (internal or external number assignment) SPRO—IMG––Financial accounting—Accounts Receivable/Payable––Vendor accounts– –Master Data––Preparations for creating vendor master data––Create number ranges for vendor account T. code–– XKN1 Click on “Interval”
  • 44. SAP FI Configuration step by step Prepared by- Snehashis Paul Put number range and press enter
  • 45. SAP FI Configuration step by step Prepared by- Snehashis Paul “Ctrl+S” save it. Assign number range to vendor account group: Allocate the required number ranges to the account groups. SPRO—IMG––Financial accounting—Accounts Receivable/Payable––Vendor accounts– –Master Data––Preparations for creating vendor master data––Assign number ranges to vendor account group T. code–– OBAS
  • 46. SAP FI Configuration step by step Prepared by- Snehashis Paul “Ctrl+S” save it. Define Tolerances for Customers/Vendors: In this activity you define the tolerances for customers/vendors. The tolerances are used for dealing with payment differences and residual items that may arise when payment clearing is carried out. You specify the tolerances in one or more tolerance groups and assign a tolerance group to each customer/vendor using the master record. For each tolerance group specify the following:  Tolerances, up to which payment differences arising from open item clearing can be automatically posted to expense or revenue accounts  The treatment of terms of payment for residual items if they are to be posted during clearing. SPRO—IMG––Financial accounting—Accounts Receivable/Payable––Business Transaction––Incoming payments––Manual incoming payments––Clearing differences–– Define tolerances for customer/vendor T. code––OBA3
  • 47. SAP FI Configuration step by step Prepared by- Snehashis Paul Click “New entries”
  • 48. SAP FI Configuration step by step Prepared by- Snehashis Paul Put necessary field and “Ctrl+S” save it. “Ctrl+S” save it. Automatic Payment Programme and House Bank set up: List of invoices can be paid through automatic payment programme. Automatic payment programme consist list of invoices from list of vendors. House Bank is company’s bank account from where daily activities E.g. Vendor payment, Customer payment receipt carries out. SPRO––IMG––Financial Accounting––Accounts receivable and Accounts payable–– Business Transaction––Outgoing payments––Automatic outgoing payments––Payment method/Bank selection for payment programme. T- Code–– FBZP
  • 49. SAP FI Configuration step by step Prepared by- Snehashis Paul Click on “All company code”
  • 50. SAP FI Configuration step by step Prepared by- Snehashis Paul Click “New entries”
  • 51. SAP FI Configuration step by step Prepared by- Snehashis Paul Put the necessary fields and “Ctrl+S” save it. Click “Paying company codes”
  • 52. SAP FI Configuration step by step Prepared by- Snehashis Paul Click on “New entries”
  • 53. SAP FI Configuration step by step Prepared by- Snehashis Paul Put necessary fields and “Ctrl+S” save it. Click “Payment methods in country”
  • 54. SAP FI Configuration step by step Prepared by- Snehashis Paul Click on “New entries”
  • 55. SAP FI Configuration step by step Prepared by- Snehashis Paul Put necessary data and “Ctrl+S” save it. Click “Payment methods in company code”
  • 56. SAP FI Configuration step by step Prepared by- Snehashis Paul Click on “New entries”
  • 57. SAP FI Configuration step by step Prepared by- Snehashis Paul Put the necessary fields and “Ctrl+S” save it. Click on “Bank Determination”
  • 58. SAP FI Configuration step by step Prepared by- Snehashis Paul Select company code and click on “Ranking order”
  • 59. SAP FI Configuration step by step Prepared by- Snehashis Paul Click on “New entries”
  • 60. SAP FI Configuration step by step Prepared by- Snehashis Paul Put necessary fields and “Ctrl+S” save it.
  • 61. SAP FI Configuration step by step Prepared by- Snehashis Paul Click on “Bank accounts”
  • 62. SAP FI Configuration step by step Prepared by- Snehashis Paul Click on “New entries”
  • 63. SAP FI Configuration step by step Prepared by- Snehashis Paul Put necessary fields and “Ctrl+S” save it.
  • 64. SAP FI Configuration step by step Prepared by- Snehashis Paul Click on “Available amounts”
  • 65. SAP FI Configuration step by step Prepared by- Snehashis Paul Click on “New entries”
  • 66. SAP FI Configuration step by step Prepared by- Snehashis Paul Put necessary data and “Ctrl+S” save it.
  • 67. SAP FI Configuration step by step Prepared by- Snehashis Paul Click on “Value Date”
  • 68. SAP FI Configuration step by step Prepared by- Snehashis Paul Click on “New entries”
  • 69. SAP FI Configuration step by step Prepared by- Snehashis Paul Put the necessary data and “Ctrl+S” it Click on “House Bank”
  • 70. SAP FI Configuration step by step Prepared by- Snehashis Paul Click on “New entries”
  • 71. SAP FI Configuration step by step Prepared by- Snehashis Paul Put necessary fields and “Ctrl+S” save it. Select the house bank and click on “Bank accounts”
  • 72. SAP FI Configuration step by step Prepared by- Snehashis Paul Click on “New entries”
  • 73. SAP FI Configuration step by step Prepared by- Snehashis Paul Put necessary fields and “Ctrl+S” save it. Note: Vendor Creation (with purchase organization) and Payment term setup will be done by MM Team Necessary T. Codes:–– FK01–– Vendor creation (without purchase organization) FK02–– Edit vendor (Without purchase organization) FK03–– Display vendor (Without purchase organization) FK05–– Block/Unblock vendor (Without purchase organization) FK09–– Confirmation of vendor for creation or any changes (Without purchase organization) FB60–– Vendor Invoice Posting (Without PO) FBL1N–– Vendor line item
  • 74. SAP FI Configuration step by step Prepared by- Snehashis Paul FK10N–– Vendor balance F-53–– Manual payment of vendor invoice F–43–– Vendor invoice posting with posting key FB65–– Vendor credit memo posting (Without PO) F–41–– Vendor credit memo posting with posting key F-44–– Vendor line item clear F-47–– Vendor down payment request F-48–– Vendor down payment F–54–– Down payment clearing F110–– Automatic payment programme Accounts Payable: Customer account group In this step, you determine the account groups for customers. You can also define reference account groups for one-time accounts. You can use these to control the fields of the one-time account screen so that, for example, certain fields are displayed as required fields or are hidden. When creating a customer account, you must specify an account group. You can specify a reference account group under "Control" in the "General data" part of a one-time account's master data. If you do not specify a reference account group, then, as previously, all fields of the one-time account screen are ready for input during document entry. SPRO––IMG––Financial Accounting––Account Receivable and Accounts Payable–– Customer Accounts––Master Data––Preparations for creating customer master data–– Define account group with screen layout T. Code–– OBD2
  • 75. SAP FI Configuration step by step Prepared by- Snehashis Paul Click on “New entries”
  • 76. SAP FI Configuration step by step Prepared by- Snehashis Paul “Ctrl+S” Save it. Create Number Ranges for Customer Accounts In this activity you create the number ranges for the customer accounts. To do this, specify the following under a two-character key:  A number interval from which the account number for the customer accounts is to be selected  The type of number assignment (internal or external number assignment) Allocate the number ranges to the account groups for customers. SPRO––IMG––Financial Accounting––Account Receivable and Accounts Payable–– Customer Accounts––Master Data––Preparations for creating customer master data–– Creating number ranges for customer account T. Code–– XDN1
  • 77. SAP FI Configuration step by step Prepared by- Snehashis Paul Click on “Change Interval”
  • 78. SAP FI Configuration step by step Prepared by- Snehashis Paul Click on “Insert Interval”
  • 79. SAP FI Configuration step by step Prepared by- Snehashis Paul Put number range and press enter. “Ctrl+S” Save it. Assign Number Ranges to Customer Account Groups In this step you assign the number ranges you created in the preceding step to the account groups for customers. You can use one number range for several account groups. SPRO––IMG––Financial Accounting––Account Receivable and Accounts Payable–– Customer Accounts––Master Data––Preparations for creating customer master data–– Assign number ranges to customer account group T. Code–– OBAR
  • 80. SAP FI Configuration step by step Prepared by- Snehashis Paul “Ctrl+S” Save it. Define Dunning Procedure In this activity you enter the settings that control the dunning program by:  Specifying the company codes to include in dunning. You specify these company codes when configuring the dunning program.  Setting up the dunning procedure you want to use. Dunning procedures are company code independent. They determine the dunning interval, the grace periods for the due date determination, and the number of dunning levels. You can also set the dunning level at which you want to list all due items from an account in the dunning notice.  Setting the dunning charges. You can either specify a fixed charge or have the system calculate the charge on the basis of a percentage rate you specify.
  • 81. SAP FI Configuration step by step Prepared by- Snehashis Paul  Specifying the net payment due date at which a particular dunning level is reached.  Specifying the dunning notice you want to send to your customers. You have to define one or more forms for the notice. SPRO––IMG––Financial Accounting––Account Receivable and Accounts Payable–– Business Transactions––Dunning––Dunning Procedure––Define Dunning Procedures T. Code–– FBMP Click on “New Procedure”
  • 82. SAP FI Configuration step by step Prepared by- Snehashis Paul Put necessary data and click on “Dunning Levels”
  • 83. SAP FI Configuration step by step Prepared by- Snehashis Paul Put necessary data and click on “Charges”
  • 84. SAP FI Configuration step by step Prepared by- Snehashis Paul Put necessary data and click on “Minimum Amounts”
  • 85. SAP FI Configuration step by step Prepared by- Snehashis Paul Put necessary data and click on “Dunning Texts”
  • 86. SAP FI Configuration step by step Prepared by- Snehashis Paul “Ctrl+S” Save it and go back to the main screen
  • 87. SAP FI Configuration step by step Prepared by- Snehashis Paul “Ctrl+S” Save it Note: Customer Creation (with Sales organization) will be done by SD Team Necessary T. Codes:–– FD01–– Customer creation (Without sales organization) FD02–– Edit Customer (Without sales organization) FD03–– View Customer (Without sales organization) FD05–– Block/Unblock Customer (Without sales organization) FD09–– Confirmation of Customer for creation or any changes (Without sales organization) FD10N–– Display customer balance FB70–– Customer invoice posting F-22–– Customer invoice posting with posting key
  • 88. SAP FI Configuration step by step Prepared by- Snehashis Paul F-28–– Incoming Payment FBL5N–– Customer line item display F-37–– Customer down payment request F-29–– Customer down payment F-39–– Clear customer down payment F-32–– Clear customer line item F150–– Dunning Asset Accounting Copy Reference Chart of Depreciation/Depreciation Areas: In this step, you define your charts of depreciation. The chart of depreciation is a list of depreciation areas arranged according to business and legal requirements. The chart of depreciation enables you to manage all rules for the valuation of assets in a particular country or economic region. You must assign a chart of depreciation to each company code that is defined in Asset Accounting. SAP provides country-specific charts of depreciation with predefined depreciation areas. These charts of depreciation serve only as a reference for creating your own charts of depreciation, and are therefore not directly accessible in the SAP system. When creating a chart of depreciation, you have to copy the reference chart of depreciation. SPRO––IMG––Financial Accounting––Asset Accounting––Organizational Structure–– Copy reference chart of Depreciation/Depreciation areas
  • 89. SAP FI Configuration step by step Prepared by- Snehashis Paul Click on “Copy reference chart of Depreciation”
  • 90. SAP FI Configuration step by step Prepared by- Snehashis Paul Click on “Copy org object” and put necessary data then “Ctrl+S” Save it.
  • 91. SAP FI Configuration step by step Prepared by- Snehashis Paul Click on “Specify description of chart of depreciation”
  • 92. SAP FI Configuration step by step Prepared by- Snehashis Paul “Ctrl+S” Save it.
  • 93. SAP FI Configuration step by step Prepared by- Snehashis Paul Click on “Copy/Delete depreciation area”
  • 94. SAP FI Configuration step by step Prepared by- Snehashis Paul Select necessary depreciation are and delete other depreciation areas. “Ctrl+S” Save it. Assign Chart of Depreciation to Company Code: In this step, you assign a chart of depreciation to each company code. SPRO––IMG––Financial Accounting––Asset Accounting––Organizational Structure–– Assign chart of depreciation to company code
  • 95. SAP FI Configuration step by step Prepared by- Snehashis Paul Select correct company code and assign chart of depreciation with it. “Ctrl+S” Save it. Specify Account Determination: In this step, you define the account determinations for Asset Accounting (key and description). The key of an account determination must be stored in the asset class asset class. In this way, the account determination links an asset master record to the general ledger accounts to be posted for an accounting transaction using the asset class. SPRO––IMG––Financial Accounting––Asset Accounting––Organizational Structure–– Asset Classes––Specify Account Determination.
  • 96. SAP FI Configuration step by step Prepared by- Snehashis Paul Click on “New entries”
  • 97. SAP FI Configuration step by step Prepared by- Snehashis Paul Put necessary data and “Ctrl+S” save it. Create Screen Layout Rules: In this step, you create your screen layout rules. The screen layout specifies the status of the fields in the asset master record. You use the screen layout to determine if fields are required entry or optional entry fields, or if they are suppressed completely, for example. SPRO––IMG––Financial Accounting––Asset Accounting––Organizational Structure–– Asset Classes––Specify screen layout.
  • 98. SAP FI Configuration step by step Prepared by- Snehashis Paul Select any screen layout amongst the list and click on “Copy as” to copy it.
  • 99. SAP FI Configuration step by step Prepared by- Snehashis Paul Make necessary changes and “Ctrl+S” Save it. Define Number Range Interval: In this step, you define the number ranges for this company code for assigning the main asset number. You can roughly classify your asset portfolio using the number ranges. SPRO––IMG––Financial Accounting––Asset Accounting––Organizational Structure–– Asset Classes––Define number range interval. T. Code–– AS08
  • 100. SAP FI Configuration step by step Prepared by- Snehashis Paul Click on “Change Interval”
  • 101. SAP FI Configuration step by step Prepared by- Snehashis Paul Click on “Insert Interval”
  • 102. SAP FI Configuration step by step Prepared by- Snehashis Paul Put necessary number range and press enter and “Ctrl+S” Save it. Define Asset Classes: In this step you define the asset classes. The asset class is the most important criteria for structuring fixed assets from an accounting point of view. Every asset has to be assigned to exactly one asset class. The asset class is used to assign the assets (and their business transactions) to the correct general ledger accounts. Several asset classes can use the same account assignment. You can see that it is possible to make finer distinctions at the level of the asset class than at the level of the general ledger accounts. The most important tasks of the asset classes are:  the assignment of default values when creating assets (particularly depreciation terms)  the grouping of assets for reporting purposes You define the asset classes in the system in a series of steps. The asset class is structured in three parts:  control parameters
  • 103. SAP FI Configuration step by step Prepared by- Snehashis Paul  default values for general master data  default values for depreciation terms in the chart of depreciation You can assign depreciation terms to an asset class for any number of charts of depreciation. This makes it possible to manage an asset class catalog that is valid for an entire corporate group, independent of the country-specific charts of depreciation. In this step, you define the asset classes and their control parameters. In further steps, you add further to the asset classes by supplying default values for certain logical field groups in the asset master record. SPRO––IMG––Financial Accounting––Asset Accounting––Organizational Structure–– Asset Classes––Define Asset classes. Click on “New entries”
  • 104. SAP FI Configuration step by step Prepared by- Snehashis Paul Put necessary fields and “Ctrl+S” save it. Specify Chart-of-Dep.-Dependent Screen Layout/Acct Assignment: Generally, the control specifications (the screen layout and the account determination) for the asset class applies throughout the client, that is, for all charts of depreciation. It is therefore sufficient to make control specifications once per asset class. You only need to carry out this step, if, contrary to the usual case, you want these control specifications to be country-specific (that is, different depending on the chart of depreciation). The system then uses the entries you make here depending on the chart of depreciation in the given company code. The system then ignores the control specifications in the asset class that are independent of the chart of depreciation. SPRO––IMG––Financial Accounting––Asset Accounting––Organizational Structure–– Asset Classes––Specify chart of depreciation dependent screen layout/Acct assignment.
  • 105. SAP FI Configuration step by step Prepared by- Snehashis Paul Select correct asset class and click on “Chart of depreciation dependent data”.
  • 106. SAP FI Configuration step by step Prepared by- Snehashis Paul Put necessary data and “Ctrl+S” Save it. Assign G/L Accounts: In this step, you specify the balance sheet accounts, special reserve accounts, and the depreciation accounts for Asset Accounting. SPRO––IMG––Financial Accounting––Asset Accounting––Integration with General ledger––Assign G/L accounts.
  • 107. SAP FI Configuration step by step Prepared by- Snehashis Paul Select chart of accounts and click on “Account determination”
  • 108. SAP FI Configuration step by step Prepared by- Snehashis Paul Select Account determination and click on “Balance sheet account”
  • 109. SAP FI Configuration step by step Prepared by- Snehashis Paul Put necessary G/L accounts and click on “Depreciation”
  • 110. SAP FI Configuration step by step Prepared by- Snehashis Paul Put necessary G/L and “Ctrl+S” Save it. Specify Intervals and Posting Rules: In this step, you define the posting rules for the depreciation areas that post depreciation values to Financial Accounting. You define the posting cycle (how often depreciation is posted) and the account assignment rules for the depreciation posting run. SPRO––IMG––Financial Accounting––Asset Accounting––Integration with General ledger––Post depreciation to the General ledger––Specify intervals and Posting rules
  • 111. SAP FI Configuration step by step Prepared by- Snehashis Paul Select company code and click on “posting rules”
  • 112. SAP FI Configuration step by step Prepared by- Snehashis Paul Put the necessary fields and “Ctrl+S” Save it. Determine Depreciation Areas in the Asset Class: Generally, the assets in an asset class use the same depreciation terms (depreciation key, useful life). Therefore, you do not have to maintain the depreciation terms in the asset master record. Instead, they can be default values from the asset class. SPRO––IMG––Financial Accounting––Asset Accounting––Valuation––Determine depreciation area in the asset class
  • 113. SAP FI Configuration step by step Prepared by- Snehashis Paul Select the Asset class and click on “Depreciation Area”
  • 114. SAP FI Configuration step by step Prepared by- Snehashis Paul Select the correct depreciation area and assign the Depreciation key and Layout. “Ctrl+S” Save it. Define Base Methods: In this step, you maintain base methods. Base methods are valid in all charts of depreciation. You assign base methods to depreciation keys. SPRO––IMG––Financial Accounting––Asset Accounting––Depreciation––Valuation methods––Depreciation key––Calculation methods–– Define Base methods.
  • 115. SAP FI Configuration step by step Prepared by- Snehashis Paul Click on “New entries”
  • 116. SAP FI Configuration step by step Prepared by- Snehashis Paul Put the necessary fields and “Ctrl+S” Save it. Define Multi-Level Methods: In this step, you define multi-level methods. You then assign them to depreciation keys. Each level represents a validity period for a given percentage rate. SPRO––IMG––Financial Accounting––Asset Accounting––Depreciation––Valuation methods––Depreciation key––Calculation methods–– Define multilevel methods.
  • 117. SAP FI Configuration step by step Prepared by- Snehashis Paul Click on “New entries”
  • 118. SAP FI Configuration step by step Prepared by- Snehashis Paul Put necessary fields and click on “Levels”
  • 119. SAP FI Configuration step by step Prepared by- Snehashis Paul Define multilevel with percentage and “Ctrl+S” save it. Maintain Period Control Methods: In this step, you maintain period control methods. You then assign them to depreciation keys. Using period control methods, you can specify that the depreciation start date for all acquisitions in the year is set to the first day of the period. SPRO––IMG––Financial Accounting––Asset Accounting––Depreciation––Valuation methods––Depreciation key––Calculation methods–– Maintain Period control methods.
  • 120. SAP FI Configuration step by step Prepared by- Snehashis Paul Click on “New entries” then field the necessary fields and “Ctrl+S” Save it. Define the Cutoff Value Key: For certain types of valuation, it makes sense, or is legally required, that you end depreciation when a certain value is reached. You can enter an absolute scrap value in the asset master record. Or you can enter a percentage scrap value (cut-off value) in the calculation key. In this step, you define the calculation key for automatically determining scrap values. For each calculation key, you can specify  the percentage of the depreciation base that should be used as the cut-off value percentage  whether the cut-off value percentage should be deducted at the start or the end of the calculation of depreciation  at what point in time the system should start calculating the validity period
  • 121. SAP FI Configuration step by step Prepared by- Snehashis Paul You can enter several cut-off percentages for each scrap value key. You can define the cut-off percentages/levels per acquisition year, and the validity period can be of any length. SPRO––IMG––Financial Accounting––Asset Accounting––Depreciation––Valuation methods––Depreciation key––Further settings–– Define the cut off value key. Click on “New entries”
  • 122. SAP FI Configuration step by step Prepared by- Snehashis Paul Make the selection and click on “Levels”
  • 123. SAP FI Configuration step by step Prepared by- Snehashis Paul Click on “New entries” and put the necessary fields the “Ctrl+S” Save it. Maintain Depreciation Key: In this step, you maintain depreciation keys by assigning calculation methods to them. You can divide the duration of depreciation into several phases. When you enter a changeover method for one of these phases, the system changes over to the next phase as soon as the event specified in the changeover method has occurred. The system then uses the depreciation calculation that is specified in the calculation method for this phase. SPRO––IMG––Financial Accounting––Asset Accounting––Depreciation––Valuation methods––Depreciation key––Calculation method––Maintain Depreciation Key.
  • 124. SAP FI Configuration step by step Prepared by- Snehashis Paul Click on “New entries”
  • 125. SAP FI Configuration step by step Prepared by- Snehashis Paul Put necessary data and Click on “Assignment of Calculation”
  • 126. SAP FI Configuration step by step Prepared by- Snehashis Paul Put necessary data then save the document and click on “Back key”
  • 127. SAP FI Configuration step by step Prepared by- Snehashis Paul Now click on “Activate” key to activate the document and “Ctrl+S” Save it. Necessary T. Codes–– AS01–– Create Asset Master AS11–– Create Sub asset master F-90–– Purchase/Acquire of Asset (Posting key 31 for vendor and 70 for asset) AW01N–– Asset explorer S_ALR_87011965–– Display asset balance AFAB–– Depreciation Run F-92–– Sale/Retirement of Asset with customer (Posting key 01 for customer and 75 for asset) ABAVN–– Asset Scrapping ABUMN–– Asset transfer (Within Company code)
  • 128. SAP FI Configuration step by step Prepared by- Snehashis Paul S_ALR_87011990–– Asset history sheet AJRW–– Year change ABAON–– Asset retirement without customer ABTIN–– Transfer assets intrercompany AUVA–– Incomplete asset list Bank Accounting Note: House Bank creation already shown at the time of automatic payment programme creation. Check Deposit: In the following steps you will make all the settings necessary for check deposit. Create and Assign Business Transactions: In this step you store transaction indicators for check deposit and allocate these indicators to a posting rule. You specify this indicator in the "Transaction" field on the initial screen of check deposit. SPRO––IMG––Financial Accounting––Bank Accounting––Business Transactions–– Check Deposit–– Create and Assign Business Transaction T. Code–– OT53
  • 129. SAP FI Configuration step by step Prepared by- Snehashis Paul Click on “New entries”
  • 130. SAP FI Configuration step by step Prepared by- Snehashis Paul Put necessary data and “Ctrl+S” Save it. Define Posting Keys and Posting Rules for Check Deposit: In this activity you store the posting keys and posting rules for check deposit. Creating Keys for Posting Rules Under this node, you define a posting rule for check deposits. The key determines the posting rules for general ledger and subledger accounting. The posting rule represents the business transactions typical of the check deposit, such as:  Incoming check to check clearing  Check clearing to customer  Bank to incoming check SPRO––IMG––Financial Accounting––Bank Accounting––Business Transactions–– Check Deposit–– Define posting key and posting rules for check deposit.
  • 131. SAP FI Configuration step by step Prepared by- Snehashis Paul Click on “New entries”
  • 132. SAP FI Configuration step by step Prepared by- Snehashis Paul Put necessary data and “Ctrl+S” Save it.
  • 133. SAP FI Configuration step by step Prepared by- Snehashis Paul Click on “Assign accounts to account symbol”
  • 134. SAP FI Configuration step by step Prepared by- Snehashis Paul Click on “New entries”
  • 135. SAP FI Configuration step by step Prepared by- Snehashis Paul Put necessary data and “Ctrl+S” Save it.
  • 136. SAP FI Configuration step by step Prepared by- Snehashis Paul Click on “Create keys for Posting rules”
  • 137. SAP FI Configuration step by step Prepared by- Snehashis Paul Click on “New entries”
  • 138. SAP FI Configuration step by step Prepared by- Snehashis Paul Put necessary data and “Ctrl+S” Save it.
  • 139. SAP FI Configuration step by step Prepared by- Snehashis Paul Click on “define posting rules”
  • 140. SAP FI Configuration step by step Prepared by- Snehashis Paul Click on “New entries”
  • 141. SAP FI Configuration step by step Prepared by- Snehashis Paul Put necessary data and “Ctrl+S” Save it. Define Variants for Check Deposit: In this step you can create your own account assignment variants for check deposit in order to modify the arrangement and/or selection of account assignment fields according to your company-specific requirements. One variant is delivered as a default. It cannot be changed. If you do not want to work with the standard variant, you can deactivate it. New variants must be activated after you create them. SPRO––IMG––Financial Accounting––Bank Accounting––Business Transaction–– Check Deposit–– Define Variant for Check Deposit. T. Code–– OT45
  • 142. SAP FI Configuration step by step Prepared by- Snehashis Paul Company can maintain standard variant for check deposit else create separate variant clicking on “Create” button.
  • 143. SAP FI Configuration step by step Prepared by- Snehashis Paul Select the fields which are require for this variant and “Ctrl+S” Save it. Necessary T. Codes–– FCHI–– Check Lot FCHN–– Display Check Register FCH5–– Manual Check information creation FCH6–– Change Check Information (Use for BRS to put check encashment date) FCH7–– Reprint Check FCH8–– Reversal of Cancelled Check Payment FCH9–– Void Issued Checks FCHU–– Update Check Information in an entry which cut outside the system manually.
  • 144. SAP FI Configuration step by step Prepared by- Snehashis Paul Manual Bank Statement: In the following steps you make all the settings necessary for the manual bank statement. Create and Assign Business Transactions: In this step you store an indicator for each business transaction and allocate a posting rule to each business transaction. Several business transactions usually refer to the same posting rule. SPRO––IMG––Financial Accounting––Bank Accounting––Business Transaction–– Payment Transaction––Manual Bank Statement–– Create and Assign Business Transaction. T. Code–– OT52 Click on “New entries”
  • 145. SAP FI Configuration step by step Prepared by- Snehashis Paul Put necessary data and “Ctrl+S” Save it. Define Posting Keys and Posting Rules for Manual Bank Statement: Note: This step is same as “Define posting keys and Posting rules for Check Deposit” Please refer to page 130-141. Only difference is for Manual bank statement we need to add Bank Transfer account also. Define Variants for Manual Bank Statement: Note: This step is same as “Define Variant for Check Deposit” Please refer to page 141- 143. Necessary T. Code–– FF67–– Process Manual Bank Statement SM35–– Batch Posting. Cash Journal
  • 146. SAP FI Configuration step by step Prepared by- Snehashis Paul Create G/L Account for Cash Journal: In this activity, you create a G/L account, for example 100000, for the cash journal in the required company code. SPRO––IMG––Financial Accounting––Bank Accounting––Business Transaction––Cash Journal––Create GL account for Cash Journal. T. Code–– FS01
  • 147. SAP FI Configuration step by step Prepared by- Snehashis Paul
  • 148. SAP FI Configuration step by step Prepared by- Snehashis Paul “Ctrl+S” Save it. Define Document Types for Cash Journal Documents: You can select existing document types for cash journal documents, or define new document types in this activity. You must have document types for the following postings:  G/L account postings  Outgoing payments to vendors  Incoming payments from vendors  Incoming payments from customers  Outgoing payments to customers SPRO––IMG––Financial Accounting––Bank Accounting––Business Transaction––Cash Journal––Define Document type for Cash Journal Documents
  • 149. SAP FI Configuration step by step Prepared by- Snehashis Paul T. Code–– OBA7 Maintain the Standard Document type. Define Number Range Intervals for Cash Journal Documents: You have to define a number range interval for cash journal documents. Each document then receives a unique number that does not clash with the G/L document number. SPRO––IMG––Financial Accounting––Bank Accounting––Business Transaction––Cash Journal––Define Document type for Cash Journal Documents
  • 150. SAP FI Configuration step by step Prepared by- Snehashis Paul Click on “Change Interval”
  • 151. SAP FI Configuration step by step Prepared by- Snehashis Paul Click on “Insert Interval”
  • 152. SAP FI Configuration step by step Prepared by- Snehashis Paul Put number range and press “Enter” “Ctrl+S” Save it. Set Up Cash Journal: To set up a new cash journal for a company code, enter the appropriate data for the following fields:  Company code Company code in which you want to run the cash journal  Number Random number for cash journal identification; You can run several cash journals in each company code  G/L account G/L account to which you want to post the cash journal business transactions, usually the petty cash account.  Currency
  • 153. SAP FI Configuration step by step Prepared by- Snehashis Paul Currency in which you want to run the cash journal. You are free to choose the cash journal currency. If you want to run a cash journal whose currency does not correspond to that of the company code, you have to consider the following details in the corresponding cash journal G/L account master data: o The indicator Balances in local currency only should not be set o The account currency must correspond to the company code currency You can run several cash journals with different currencies in one cash journal G/L account. Several cash journals with the same currency in one G/L account is however not possible. If you want to run several cash journals in the same currency in one company code, you have to select different cash journal G/L accounts.  Cash Journal Closed? Indicator that a cash journal is closed  Document types for o G/L account postings o Outgoing payments to vendors o Incoming payments from vendors o Incoming payments from customers o Outgoing payments to customers  Name Automatic language-dependent cash journal identification name, for example, Cash journal 1 SAP AG  Authorization group Enables access protection for specific objects  Person 1, Person 2 Contains the names of important people for the cash journal, for example, the name of the cashier
  • 154. SAP FI Configuration step by step Prepared by- Snehashis Paul  Text Contains additional information for the cash journal SPRO––IMG––Financial Accounting––Bank Accounting––Business Transaction––Cash Journal––Set up Cash Journal Click on “New entries”
  • 155. SAP FI Configuration step by step Prepared by- Snehashis Paul Put necessary Data and “Ctrl+S” Save it. Create, Change, Delete Business Transactions: In this activity, you can create, change, and delete business transactions for the cash journal. SPRO––IMG––Financial Accounting––Bank Accounting––Business Transaction––Cash Journal––Create, Change, Delete business transaction.
  • 156. SAP FI Configuration step by step Prepared by- Snehashis Paul Click on “New entries”
  • 157. SAP FI Configuration step by step Prepared by- Snehashis Paul Maintain business transaction as per bank provided by Company and “Ctrl+S” Save it. Set Up Print Parameters for Cash Journal: In order to print the cash journal and the cash journal receipts, you have to set up the corresponding print program parameters per company code. SPRO––IMG––Financial Accounting––Bank Accounting––Business Transaction––Cash Journal––Set up print parameters for cash journal.
  • 158. SAP FI Configuration step by step Prepared by- Snehashis Paul Maintain standard print programme hence click any standard parameter and copy it then change the company code and “Ctrl+S” save it. Necessary T. Code–– FBCJ–– Cash Journal Foreign Currency Foreign currency configuration requires to those companies who are dealing with foreign countries. Exchange rate is two types 1. Direct Quote 2. Indirect Quote Ex. Local currency is INR and foreign currency is USD Direct Quote–– 1 USD=66 INR Indirect Quote–– 1 INR= 0.66(1/66) USD Foreign Currency Valuation:
  • 159. SAP FI Configuration step by step Prepared by- Snehashis Paul In the following steps, you make specifications required for the valuation of foreign currency balances and open items in foreign currency. SPRO––IMG––Financial Accounting––General Ledger Accounting––Business Transactions––Closing––Valuate––Foreign Currency Valuation–– Define Valuation Methods T. Code–– OB59 Click on “New entries”
  • 160. SAP FI Configuration step by step Prepared by- Snehashis Paul “Ctrl+S” Save it. Prepare Automatic Postings for Foreign Currency Valuation: In this activity you define the numbers of the accounts to which you want the system to automatically post exchange rate differences when valuating open items and foreign currency balances. You can also define the accounts for realized exchange rate differences during open item clearing. For more information on this, see the Define Accounts for Exchange Rate Differences activity. You can use the currency type to control account determination during open item valuation and exchange rate difference posting. You could, for example, post gains in local currency and gains in group currency to separate accounts. When valuating open items the system posts to a balance sheet adjustment account and to an account for exchange rate differences that occur during the valuation. Exchange rate differences could be either a gain or a loss. You store the account numbers accordingly. The valuation of foreign currency balances requires a special key that is assigned the gain and loss accounts for posting any exchange rate differences that occur during valuation.
  • 161. SAP FI Configuration step by step Prepared by- Snehashis Paul You can freely define this key. You then enter it in the master records of the accounts that you want to valuate. To post the differences that are determined from a group of G/L accounts to the same gain or loss accounts, enter the same key for all these G/L accounts. SPRO––IMG––Financial Accounting––General Ledger Accounting––Business Transactions––Closing––Valuate––Foreign Currency Valuation–– Prepare Automatic posting for Foreign currency valuation. T. Code–– OBA1 Click on “KDB”
  • 162. SAP FI Configuration step by step Prepared by- Snehashis Paul Put Exchange Loss/Gain account and “Ctrl+S” Save it.
  • 163. SAP FI Configuration step by step Prepared by- Snehashis Paul Click on “KDF”
  • 164. SAP FI Configuration step by step Prepared by- Snehashis Paul Put Exchange Loss/Gain account also Valuation Loss/Gain account Create GL in T. Code FS00. Exchange Loss/Gain- Profit and Loss Account Valuation Loss/Gain- Balance Sheet Account Enter Exchange Rates: Exchange rates are required to:  Translate foreign currency amounts when posting or clearing or to check an exchange rate entered manually  Determine the gain and loss from exchange rate differences  Evaluate open items in foreign currency and the foreign currency balance sheet accounts The exchange rates are defined by period ("valid from").
  • 165. SAP FI Configuration step by step Prepared by- Snehashis Paul SPRO––IMG––SAP Netweaver––General Settings––Currencies––Enter Exchange Rates T. Code–– OB08 Click on “New entries”
  • 166. SAP FI Configuration step by step Prepared by- Snehashis Paul Maintain Exchange Rate and “Ctrl+S” Save it. Note: M- Average Rate, B- Bank Selling Rate, G- Bank Buying Rate Define Valuation Areas: In this IMG activity, you define your valuation areas for your closing operations. With the valuation areas, you can report different valuation approaches and post to different accounts. You can save the valuation result separately for each document item and use it for other closing operations (such as sorted lists). SPRO––IMG––Financial Accounting (New)––General Ledger Accounting (New)–– Periodic Processing––Valuate––Define Valuation Areas
  • 167. SAP FI Configuration step by step Prepared by- Snehashis Paul Click on “New entries”
  • 168. SAP FI Configuration step by step Prepared by- Snehashis Paul Put necessary data and “Ctrl+S” Save it. Assign Valuation Areas and Accounting Principles: In this IMG activity, you assign the desired accounting principles to your valuation areas. You can use the valuation area for the reclassification or sorted list of payables and receivables and for foreign currency valuation. You can use the valuation area to apply in these reports the different valuation requirements of the accounting principles. SPRO––IMG––Financial Accounting (New)––General Ledger Accounting (New)–– Periodic Processing––Valuate–– Assign valuation area and accounting principle
  • 169. SAP FI Configuration step by step Prepared by- Snehashis Paul Click on “New entries”
  • 170. SAP FI Configuration step by step Prepared by- Snehashis Paul Put Valuation area and select Accounting Principle which company is following. “Ctrl+S” Save it. Necessary T. Code–– FAGL_FC_VAL–– Foreign Currency Valuation F.05–– Foreign Currency Valuation
  • 171. SAP FI Configuration step by step Prepared by- Snehashis Paul Tax on Sales/Purchases Check Calculation Procedure: In this activity, you can check and, if necessary, change existing procedures for tax calculation. Standard settings Calculation procedures containing the necessary specifications for the calculation and posting of taxes on sales/purchases have already been defined in the standard SAP system for certain countries. Every calculation procedure groups several tax types together into a condition type (for example, output tax or input tax) in the calculation procedure, and determines calculation rules for it. The calculation procedure determines for which amount the individual condition types are to be calculated. This can be the base amount (total of the expense items and the revenue items) or a subtotal. The entry in column From Level, determines for which amount tax is calculated. SPRO––IMG––Financial Accounting––Financial Accounting Global Settings––Tax on Sales/Purchases–– Basic Settings–– Check Calculation Procedure. T. Code–– OBYZ
  • 172. SAP FI Configuration step by step Prepared by- Snehashis Paul Click on “Define Procedure”
  • 173. SAP FI Configuration step by step Prepared by- Snehashis Paul Click on “New entries”
  • 174. SAP FI Configuration step by step Prepared by- Snehashis Paul Put tax procedure and “Ctrl+S” Save it.
  • 175. SAP FI Configuration step by step Prepared by- Snehashis Paul Maintain Standard Condition type and Access sequence hence no require to change. Assign Country to Calculation Procedure: In this activity, you enter the key for the calculation procedure which determines the conditions which are allowed per document and which defines the sequence of the conditions in the document for each country. SPRO––IMG––Financial Accounting––Financial Accounting Global Settings––Tax on Sales/Purchases–– Basic Settings–– Assign Country to Calculation Procedure. T. Code–– OBBG
  • 176. SAP FI Configuration step by step Prepared by- Snehashis Paul Assign Tax Procedure with Country and “Ctrl+S” Save it. Define Tax Codes for Sales and Purchases: You have to define a separate tax on sales/purchases code for each country in which one of your company codes is located. Each code contains one or more tax rates for the different tax types. If you have to report tax-exempt or non-taxable sales to the tax authorities, you need to define a tax rate with the value 0. SPRO––IMG––Financial Accounting––Financial Accounting Global Settings––Tax on Sales/Purchases–– Calculation––Define Tax code for Sales and Purchases T. Code–– FTXP
  • 177. SAP FI Configuration step by step Prepared by- Snehashis Paul Put Tax code and Press Enter.
  • 178. SAP FI Configuration step by step Prepared by- Snehashis Paul Maintain Tax percentage. Output Tax–– Sales Tax Input Tax–– Purchase Tax “Ctrl+S” Save it. Define Tax Accounts: In this activity, you specify the accounts to which the different tax types are to be posted. The system determines these accounts for automatic postings. SPRO––IMG––Financial Accounting––Financial Accounting Global Settings––Tax on Sales/Purchases–– Posting––Define Tax Accounts T. Code–– OB40
  • 179. SAP FI Configuration step by step Prepared by- Snehashis Paul Click “MWS” for Output Tax and “VST” for Input Tax
  • 180. SAP FI Configuration step by step Prepared by- Snehashis Paul Put Tax code and GL account number then “Ctrl+S” Save it. Note: Create GL in FS00. Create a Liability account for Output Tax and Asset account for Input Tax.
  • 181. SAP FI Configuration step by step Prepared by- Snehashis Paul Put tax category “*” in GL account of Sales Tax/ Purchase Tax in T. code FS00
  • 182. SAP FI Configuration step by step Prepared by- Snehashis Paul Put tax code in “Tax Category” in GL account of Sales/Purchase in T. Code FS00 Financial Statement Versions Define Financial Statement Versions: In this activity:  You define the versions you need to create a balance sheet and profit and loss statement. You can define versions for a specific chart of accounts, for a group chart of accounts, or without any specific assignment.  You then determine the financial statement items for your version. You assign groups of accounts to the items at the lowest levels of the hierarchy. You can select the criteria that determine which items the accounts are displayed in. For example, accounts or groups of accounts can be assigned to particular items based on their balance. Alternatively, you can also assign functional area intervals at the lowest level of the structure, instead of account intervals. Either account intervals or functional
  • 183. SAP FI Configuration step by step Prepared by- Snehashis Paul area intervals can be assigned to a financial statement item. You must explicitly define financial statement versions to which functional areas are assigned as such. You do this by setting the "Fun.area allowed" indicator. This financial statement version can then also be used by the notes to financial statement in the G/L account information system. SPRO––IMG––Financial Accounting––General Ledger Accounting––Business Transaction––Closing––Document––Define Financial Statement Version T. Code–– OB58 Click on “New entries”
  • 184. SAP FI Configuration step by step Prepared by- Snehashis Paul Put necessary data and Click on “Financial Statement items”
  • 185. SAP FI Configuration step by step Prepared by- Snehashis Paul Select the line of Profit & Loss/Balance Sheet and click on “Create Items”
  • 186. SAP FI Configuration step by step Prepared by- Snehashis Paul
  • 187. SAP FI Configuration step by step Prepared by- Snehashis Paul Put the header name under which GL accounts would be assigned
  • 188. SAP FI Configuration step by step Prepared by- Snehashis Paul Example of Balance Sheet
  • 189. SAP FI Configuration step by step Prepared by- Snehashis Paul Select the header item and click on “Assign accounts”
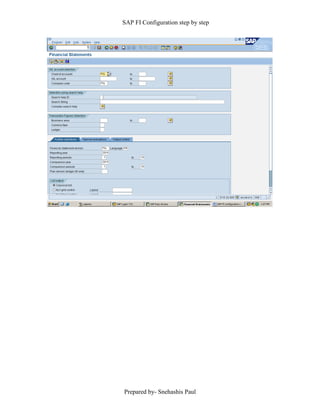
  • 190. SAP FI Configuration step by step Prepared by- Snehashis Paul Press enter and “Ctrl+S” Save it. Run T. Code–– F.01 and put the necessary fields then execute (F8), Financial statement will get generate.
  • 191. SAP FI Configuration step by step Prepared by- Snehashis Paul
  • 192. SAP FI Configuration step by step Prepared by- Snehashis Paul Note: This document contains overall FI configuration also tried to capture end user T. Codes. Fell free to put your comment and let me know if I missed any point that I can add those in this file. Email–– snehashispaul007@gmail.com *****END*****
  • 193. SAP FI Configuration step by step Prepared by- Snehashis Paul
  • 194. SAP FI Configuration step by step Prepared by- Snehashis Paul
  • 195. SAP FI Configuration step by step Prepared by- Snehashis Paul
  • 196. SAP FI Configuration step by step Prepared by- Snehashis Paul
  • 197. SAP FI Configuration step by step Prepared by- Snehashis Paul
  • 198. SAP FI Configuration step by step Prepared by- Snehashis Paul