SlideShare a Scribd company logo
2
Most read
3
Most read
6
Most read
Adjustments


Manipulating Images with Adjustments & Lighting

A. Theinert – Becker College - 2013
You can drastically alter the feeling or mood of an image by making a few
quick adjustments. Most of these are found in Image > Adjustments
All of these adjustments can
produce varying results.
Each one will open a menu,
usually with sliders to change the
strength of the adjustments.
You can check or uncheck the
‘Preview’ box to see your work
with and without the adjustments
before you commit to it (although
you can always track back through the
history menu).

Some of the more useful ones for
manipulating photos are:
Levels
Exposure
Hue/Saturation
Color Balance
HDR Toning
Another (safer) option is using Adjustment
Layers. When using this method (instead of
Image > Adjustments) you can preserve the
original image and make changes later!
Benefits of Adjustment Layers
(instead of reg. adjustments)

•
•
•
•

Can turn on and off
Can re-adjust later
Can affect multiple layers or just 1 layer
Vector Mask! (erase to affect only parts of the layer)
Another useful set of tools for photo editing is the Iris Blur (new with CS6)

Choosing Iris Blur will open the Blur
Gallery.
You can adjust the strength and size of
the blur and move the center point.

‘Tilt Shift’ is another fun blur option that
works well with busy far away shots,
such as a city street or a shot with a lot of
people in it.
You can also use the blur and smudge
tools for smaller areas.
You can use Lighting Effects or Lens Flares to change the lighting of the image

The lighting effects gallery has several
sliders available to change the way
your light affects the image.
You can change the color of your light
and the strength of the color.
On the bottom there is an option for
‘Texture’ and ‘Height’, these options
can add interesting effects to an
image

Some of the galleries that are new to CS6, such as the blur and lighting
galleries, are slightly unstable and sometimes cause Photoshop to crash.
So try to save your work prior to adding these effects.
For lighting effects to affect your entire image you need to flatten the image
first. This should be done on a new copy of the file (hit that button on the
bottom of the history panel to create a new document from the current state)

When working on projects it is normal to have
many iterations of one project file, The most
updated ones being the current working files
and older ones serve as back ups

When your ready to add lighting effects:
Right Click on one of your layers and click
‚Flatten Image‛
You can now add lighting effects that will
affect the entire image. (Make sure to save
your work before opening the lighting
effects window!)
You can also add a blur to your image.
This can be used for purely aesthetic
reasons, or to bring focus to an area, or
to hid imperfections in an outlaying
area.
Neutral

Done with a few
adjustments &
lighting effects
Fall Setting

Summer Setting
Altered Image

Steps Taken:
• Crop
• Exposure Adjustment
• Contrast Adjustment
• Selected Front Splash > Inverse >
turned down Saturation
• Smudged Far Background
• Iris Blur
• Curves Adjustment
• Exposure Adjustment (again)
• Blurred front beam

Original Image
Altered Image
Steps Taken:
• Crop
• Levels Adjustment
• Hue/Saturation Adjustment
• Warm Photo Filter
• Exposure Adjustment
• Lighting Effects (with height on)
• Len Flare at focal point
• Brightness/Contrast Adjustment

Original Image
Altered Image

Steps Taken:
• Crop
• Levels Adjustment
• Select Bird outline, use lasso tool
to remove any branches covering
the bird from the selection
• (with selection active) Increase
Vibrance/Saturation of bird
• (select inverse) Saturation
Adjustment, to remove color
• HDR Toning Adjustment

Original Image
• Remember that you can use the selection tools (lassos
and magic wand)• To adjust only certain parts of an image; by drawing around
the desired area and then applying your adjustments
• You should feather your selections
• You can inverse a selection (Select > Inverse)
• You can add to or subtract from your current selection

• Save Often

• Some of the best work in Photoshop is a compilation
of image manipulation and digital painting. If you are
using images from the web, be sure to set your search
filters to ‘large’ images, this way you are working
with good quality photos.
• Check out the examples on the following slides for
ideas on process.

More Related Content

PPTX
Presentation adobe photoshop (tools)
PPTX
Windowforms controls c#
PPTX
HTML: Tables and Forms
PPTX
Basic Photoshop Tutorial
PPTX
Photoshop Guide
PPTX
html-table
PPTX
TUTORIAL ON PHOTOSHOP
PPT
Active x control
Presentation adobe photoshop (tools)
Windowforms controls c#
HTML: Tables and Forms
Basic Photoshop Tutorial
Photoshop Guide
html-table
TUTORIAL ON PHOTOSHOP
Active x control

What's hot (20)

PPT
JavaScript Control Statements I
PPTX
toolbox and its properties in the visual basic
PPTX
Presentation on adobe photoshop® tools
PPT
Photoshop Introduction
PPTX
Photoshop layers
PPTX
Basics of Photoshop Tutorial
PDF
Visual Basic 6.0
PPTX
PHOTOSHOP BASICS
PPT
Introduction to visual basic programming
PDF
Photoshop_CS_Tutorial
PPTX
Photoshop
PPTX
Templates in C++
PPTX
Modules in Python Programming
PPTX
Javascript event handler
PDF
Photoshop Tools
PPTX
Adobe Photoshop Tools
PPT
Exception handling and templates
PPSX
Javascript variables and datatypes
PPTX
Arrays in java
PPTX
Adobe Photoshop: Retouching Tools
JavaScript Control Statements I
toolbox and its properties in the visual basic
Presentation on adobe photoshop® tools
Photoshop Introduction
Photoshop layers
Basics of Photoshop Tutorial
Visual Basic 6.0
PHOTOSHOP BASICS
Introduction to visual basic programming
Photoshop_CS_Tutorial
Photoshop
Templates in C++
Modules in Python Programming
Javascript event handler
Photoshop Tools
Adobe Photoshop Tools
Exception handling and templates
Javascript variables and datatypes
Arrays in java
Adobe Photoshop: Retouching Tools
Ad

Viewers also liked (18)

PPTX
PPTX
Photoshop Basics - Review of All Tools
PPTX
Gesture drawing
PPTX
Concept Art - Character Design
PDF
Michael hampton figure drawing - design and invention
PPTX
Les 2 game 3d - texturing & materials
PPTX
Les 4 portfolio & product presentation
PPTX
Drawing styles appleproject
PPTX
Les 3 game 3 d - silhouette & composition
PPTX
Eye iris exercise
PDF
2D artist Magazine 001
PDF
2D artist Magazine 002
PDF
Character Development for Video Games
PPT
Game Art Bible - Secret Sauce to Making Great Game Art
PDF
Digital+art+master
PDF
Elements+ +digital+painting+tutorial+series+v02
PDF
Vechicle+digital+painting
PDF
Character Design: Faces
Photoshop Basics - Review of All Tools
Gesture drawing
Concept Art - Character Design
Michael hampton figure drawing - design and invention
Les 2 game 3d - texturing & materials
Les 4 portfolio & product presentation
Drawing styles appleproject
Les 3 game 3 d - silhouette & composition
Eye iris exercise
2D artist Magazine 001
2D artist Magazine 002
Character Development for Video Games
Game Art Bible - Secret Sauce to Making Great Game Art
Digital+art+master
Elements+ +digital+painting+tutorial+series+v02
Vechicle+digital+painting
Character Design: Faces
Ad

Similar to Using Adjustment Layers and Lighting in Photoshop (20)

PPTX
Chap40
PDF
Adobe Photoshop I Primer
PDF
Day_1__Adjusting_images
PDF
Day_1__Adjusting_images
PDF
iPhoto (Photos) Practice #1
PPTX
2 working with layers and adjusting the image quality
PDF
Mobile Photo Editing with Snapseed
PDF
How to Turn a Picture Into a Line Drawing in Photoshop
PPT
Photoshop Workshop 1 - Fall 2012
PPT
Photoshop the whole thing
PPTX
The 8 Basic Steps Elements 6
PPTX
The 8 Basic Steps Elements 6
PPT
Custom Material Boen 04 2009
PPTX
Unit 6 - Masters Tutorials (11)
PDF
How to Edit a RAW Timelapse
PPTX
Manipulating Digital Image
PPT
Photoshop
PPT
Photoshop basics
PDF
quicktip_scanphotoshop
PDF
quicktip_scanphotoshop
Chap40
Adobe Photoshop I Primer
Day_1__Adjusting_images
iPhoto (Photos) Practice #1
2 working with layers and adjusting the image quality
Mobile Photo Editing with Snapseed
How to Turn a Picture Into a Line Drawing in Photoshop
Photoshop Workshop 1 - Fall 2012
Photoshop the whole thing
The 8 Basic Steps Elements 6
Custom Material Boen 04 2009
Unit 6 - Masters Tutorials (11)
How to Edit a RAW Timelapse
Manipulating Digital Image
Photoshop
Photoshop basics
quicktip_scanphotoshop

Recently uploaded (20)

PPTX
LITERATURE CASE STUDY DESIGN SEMESTER 5.pptx
PDF
Integrated-2D-and-3D-Animation-Bridging-Dimensions-for-Impactful-Storytelling...
DOCX
actividad 20% informatica microsoft project
DOCX
The story of the first moon landing.docx
PPTX
BSCS lesson 3.pptxnbbjbb mnbkjbkbbkbbkjb
PDF
Urban Design Final Project-Context
PPTX
CLASS_11_BUSINESS_STUDIES_PPT_CHAPTER_1_Business_Trade_Commerce.pptx
PPTX
12. Community Pharmacy and How to organize it
PPTX
Tenders & Contracts Works _ Services Afzal.pptx
PPTX
Wisp Textiles: Where Comfort Meets Everyday Style
PPTX
mahatma gandhi bus terminal in india Case Study.pptx
PPTX
rapid fire quiz in your house is your india.pptx
PDF
Urban Design Final Project-Site Analysis
PPTX
Media And Information Literacy for Grade 12
PPT
EGWHermeneuticsffgggggggggggggggggggggggggggggggg.ppt
PPTX
AD Bungalow Case studies Sem 2.pptxvwewev
PPTX
HPE Aruba-master-icon-library_052722.pptx
PPT
Machine printing techniques and plangi dyeing
PDF
SEVA- Fashion designing-Presentation.pdf
PPTX
DOC-20250430-WA0014._20250714_235747_0000.pptx
LITERATURE CASE STUDY DESIGN SEMESTER 5.pptx
Integrated-2D-and-3D-Animation-Bridging-Dimensions-for-Impactful-Storytelling...
actividad 20% informatica microsoft project
The story of the first moon landing.docx
BSCS lesson 3.pptxnbbjbb mnbkjbkbbkbbkjb
Urban Design Final Project-Context
CLASS_11_BUSINESS_STUDIES_PPT_CHAPTER_1_Business_Trade_Commerce.pptx
12. Community Pharmacy and How to organize it
Tenders & Contracts Works _ Services Afzal.pptx
Wisp Textiles: Where Comfort Meets Everyday Style
mahatma gandhi bus terminal in india Case Study.pptx
rapid fire quiz in your house is your india.pptx
Urban Design Final Project-Site Analysis
Media And Information Literacy for Grade 12
EGWHermeneuticsffgggggggggggggggggggggggggggggggg.ppt
AD Bungalow Case studies Sem 2.pptxvwewev
HPE Aruba-master-icon-library_052722.pptx
Machine printing techniques and plangi dyeing
SEVA- Fashion designing-Presentation.pdf
DOC-20250430-WA0014._20250714_235747_0000.pptx

Using Adjustment Layers and Lighting in Photoshop

  • 1. Adjustments  Manipulating Images with Adjustments & Lighting A. Theinert – Becker College - 2013
  • 2. You can drastically alter the feeling or mood of an image by making a few quick adjustments. Most of these are found in Image > Adjustments All of these adjustments can produce varying results. Each one will open a menu, usually with sliders to change the strength of the adjustments. You can check or uncheck the ‘Preview’ box to see your work with and without the adjustments before you commit to it (although you can always track back through the history menu). Some of the more useful ones for manipulating photos are: Levels Exposure Hue/Saturation Color Balance HDR Toning
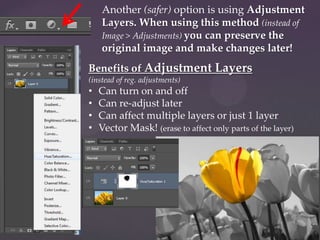
  • 3. Another (safer) option is using Adjustment Layers. When using this method (instead of Image > Adjustments) you can preserve the original image and make changes later! Benefits of Adjustment Layers (instead of reg. adjustments) • • • • Can turn on and off Can re-adjust later Can affect multiple layers or just 1 layer Vector Mask! (erase to affect only parts of the layer)
  • 4. Another useful set of tools for photo editing is the Iris Blur (new with CS6) Choosing Iris Blur will open the Blur Gallery. You can adjust the strength and size of the blur and move the center point. ‘Tilt Shift’ is another fun blur option that works well with busy far away shots, such as a city street or a shot with a lot of people in it. You can also use the blur and smudge tools for smaller areas.
  • 5. You can use Lighting Effects or Lens Flares to change the lighting of the image The lighting effects gallery has several sliders available to change the way your light affects the image. You can change the color of your light and the strength of the color. On the bottom there is an option for ‘Texture’ and ‘Height’, these options can add interesting effects to an image Some of the galleries that are new to CS6, such as the blur and lighting galleries, are slightly unstable and sometimes cause Photoshop to crash. So try to save your work prior to adding these effects.
  • 6. For lighting effects to affect your entire image you need to flatten the image first. This should be done on a new copy of the file (hit that button on the bottom of the history panel to create a new document from the current state) When working on projects it is normal to have many iterations of one project file, The most updated ones being the current working files and older ones serve as back ups When your ready to add lighting effects: Right Click on one of your layers and click ‚Flatten Image‛
  • 7. You can now add lighting effects that will affect the entire image. (Make sure to save your work before opening the lighting effects window!)
  • 8. You can also add a blur to your image. This can be used for purely aesthetic reasons, or to bring focus to an area, or to hid imperfections in an outlaying area.
  • 9. Neutral Done with a few adjustments & lighting effects Fall Setting Summer Setting
  • 10. Altered Image Steps Taken: • Crop • Exposure Adjustment • Contrast Adjustment • Selected Front Splash > Inverse > turned down Saturation • Smudged Far Background • Iris Blur • Curves Adjustment • Exposure Adjustment (again) • Blurred front beam Original Image
  • 11. Altered Image Steps Taken: • Crop • Levels Adjustment • Hue/Saturation Adjustment • Warm Photo Filter • Exposure Adjustment • Lighting Effects (with height on) • Len Flare at focal point • Brightness/Contrast Adjustment Original Image
  • 12. Altered Image Steps Taken: • Crop • Levels Adjustment • Select Bird outline, use lasso tool to remove any branches covering the bird from the selection • (with selection active) Increase Vibrance/Saturation of bird • (select inverse) Saturation Adjustment, to remove color • HDR Toning Adjustment Original Image
  • 13. • Remember that you can use the selection tools (lassos and magic wand)• To adjust only certain parts of an image; by drawing around the desired area and then applying your adjustments • You should feather your selections • You can inverse a selection (Select > Inverse) • You can add to or subtract from your current selection • Save Often • Some of the best work in Photoshop is a compilation of image manipulation and digital painting. If you are using images from the web, be sure to set your search filters to ‘large’ images, this way you are working with good quality photos. • Check out the examples on the following slides for ideas on process.