SlideShare a Scribd company logo
Writing simple Java Web Services using EclipseAuthor:Santosh Kumar Karsantosh.bsil@yahoo.co.in
Create a new Project Wizard to create a project.
You need to select Dynamic Web Project so the deployment module can be deployed in a server. If for you it does not appear, below there is a checkbox [Show All Wizard], check in and then try.
Two important task here before you click the Finish button are:1) Provide a project name for your web service application.2) Put a server configuration under Target Runtime.[NB: You can’t see Apache Tomcat under the list unless Add project to an EAR is disabled.]
A WSDL document defines services as collections of network endpoints, or ports. In WSDL, the abstract definition of endpoints and messages is separated from their concrete network deployment or data format bindings. This allows the reuse of abstract definitions: messages, which are abstract descriptions of the data being exchanged, and port types which are abstract collections of operations. A WSDL document uses the following elements in the definition of network services:Types: a container for data type definitions using some type system (such as XSD).
Message: an abstract, typed definition of the data being communicated.
Operation: an abstract description of an action supported by the service.
Port Type: an abstract set of operations supported by one or more endpoints.
Binding: a concrete protocol and data format specification for a particular port type. The binding is usually SOAP and the encoding and data formatting regulations used (also known as the style) is usually literal (this includes document/literal, and sometimes RPC/literal). Please refer http://www.slideshare.net/krizsan/scdjws-5-study-notes-3085287for document/literal and RPC/literal details.
Port: a single endpoint defined as a combination of a binding and a network address.
Service: a collection of related endpointsWeb services can be created using two methods Top-down development
Bottom-up developmentBottom-up strategyIn Bottom-up strategy, a developer writes java Beans or enterprise beans. Then using the Web services wizard he creates the WSDL file and Web service from those bean classes.Top-downstrategyA developer using a top down method a developer first designs the implementation of the Web service by creating a WSDL file. You can use the WSDL Editor for this. Using the Web services wizard you can create the Web service and skeleton Java™ classes to which you can add the required code.In this example, we are following the bottom-up strategy by selecting Bottom up Java bean Web service  in eclipse..
1write your business implementation methods for the Server which can be invoked by a Client program.
We are creating the class as RequesetHandler.java in santosh.test.server package. Hope you know how to create a class in the source folder (src).
We are writing 2 methods in the RequestHandler.java. Remember they must be public.1) taking a value and return it’s reverse.2) get the current date in text format.After writing the program, build the project to compile the class.
2Generate the WSDL for server.
You need to generate necessary files along with the wsdl. Eclipse takes all the headache of creating the web service related files along with the wsdl. Just you need to select the options provided in Eclipse. Follow the steps.Step 1: Build the application if not yet built. It will generate the .class files.Step 2: Right click on the RequstHandler.java, select web services -> Create Web serviceYou will get a window where it will show you the default server provided in Eclipse. You can use the one and just click on the Finish button. But if you want to use the server as you have defined (we have used this option to select the Apache Tomcat server in this tutorial), You need to choose the radio button Explore Options
You can select the web service runtime either Apache Axis or IBM WebSphere JAX-RPC     (We have selected Apache Axis here)For the Server, you can use the server under Server Types. Make sure you have choose the correct server else you will find the OK button disabled.
Finally click on the OK ButtonRefer the images in the next slides for the above steps.
Right-click on RequestHandler.java, select Web Services->Create Web service
Sometimes Eclipse comes along with embedded Application server, here it is already with WebSphere 6.1. You may use the same server or you can change your server.  To change your server or runtime, click on any of the above link marked by Arrow. Select the radio button for Explore options (shown in next screen). Please refer the next slide for details.
After selecting the radio button to Explore option, we have seletedUnder Web service runtime: Apache Axis
Under Server: Tomcat v5.5 ServerThen click on OK button
Now you can see the configuration changed to Tomcat Server, Apache Axis.
You can see the below files are newly generated. These are required for the server in order to run the web service and deploy the module into the web server container.The most import file created here is the RequestHandler.wsdlTo read the files, you can double click on the below icons, open with Notepad.Now you can deploy the WebServiceForServer.war into Tomcat. However, in Eclipse the module might already have deployed. If you want to deploy in another system/server, just export as war file and deploy in the server.How to ensure the deployment is successful???Answer is, run the below url as:http://localhost:8085/WebServiceForServer/services/RequestHandler?wsdlThe webpage  would appear as : see next page
Writing simple web services in java using eclipse editor
END OF SERVER MODULE
Beginning OF Client Module
Now we are going to write a very simple client application. This is a standalone program, so when we are creating project,  I added only the project type as Java Project. Follow the subsequent slides for the steps.
Adding a name to my project – “WebServiceClient”
This is a very import step to create the Client Stubs for the web service. This will create Remote Interface used to call the business methods.
Proxy class which is the intermediate between the client and the server.

More Related Content

DOCX
Instruction on creating a cluster on jboss eap environment
PPTX
Spring Security 5
PDF
Web Application Development Tools for Creating Perfect User Experience
PDF
Introduction to VueJS & Vuex
PPTX
Cloud Storage System
PPTX
Rest API with Swagger and NodeJS
PPT
Spring ppt
PPTX
Sequelize
Instruction on creating a cluster on jboss eap environment
Spring Security 5
Web Application Development Tools for Creating Perfect User Experience
Introduction to VueJS & Vuex
Cloud Storage System
Rest API with Swagger and NodeJS
Spring ppt
Sequelize

What's hot (20)

DOCX
Sistem operasi : Makalah linux ubuntu
PPTX
Handling I/O in Java
PPTX
Enable Domino Data Access Services (DAS)
PPTX
Presentasi cloud computing
PDF
Rxjava 介紹與 Android 中的 RxJava
PPTX
Model view controller (mvc)
PPTX
Web container and Apache Tomcat
PPT
Materi 4-keamanan-komputer-keamanan-sistem-operasi
PDF
Open mic activity logging
PPT
Understanding REST
PPTX
Azure Hub spoke v1.0
PPTX
jQuery
PPTX
Apache tomcat
PDF
Introduction to Apache Tomcat 7 Presentation
PPTX
scaffold method odoo 16
PPTX
Multi tenancy - a practical approach
PDF
Spring Framework - Spring Security
Sistem operasi : Makalah linux ubuntu
Handling I/O in Java
Enable Domino Data Access Services (DAS)
Presentasi cloud computing
Rxjava 介紹與 Android 中的 RxJava
Model view controller (mvc)
Web container and Apache Tomcat
Materi 4-keamanan-komputer-keamanan-sistem-operasi
Open mic activity logging
Understanding REST
Azure Hub spoke v1.0
jQuery
Apache tomcat
Introduction to Apache Tomcat 7 Presentation
scaffold method odoo 16
Multi tenancy - a practical approach
Spring Framework - Spring Security
Ad

Viewers also liked (20)

PPTX
PPTX
Spring transaction part4
PPTX
Spring & hibernate
PPTX
Spring database - part2
PPT
Web Service Presentation
PDF
Java Web Services [4/5]: Java API for XML Web Services
PPT
WebService-Java
PDF
RESTful Web Services
PPT
Deploy and Publish Web Service
PPTX
Silverlight
ODP
Beginners Guide to Drupal
PPT
12 installing eclipse
PDF
Screenshot of Desktop System Application Complete
PPT
Java Web Service - Summer 2004
PPTX
Maven (EN ESPANOL)
PDF
Jaxp Xmltutorial 11 200108
PPT
Simple API for XML
PDF
Java Web Services [2/5]: Introduction to SOAP
PDF
Java Web Services [5/5]: REST and JAX-RS
Spring transaction part4
Spring & hibernate
Spring database - part2
Web Service Presentation
Java Web Services [4/5]: Java API for XML Web Services
WebService-Java
RESTful Web Services
Deploy and Publish Web Service
Silverlight
Beginners Guide to Drupal
12 installing eclipse
Screenshot of Desktop System Application Complete
Java Web Service - Summer 2004
Maven (EN ESPANOL)
Jaxp Xmltutorial 11 200108
Simple API for XML
Java Web Services [2/5]: Introduction to SOAP
Java Web Services [5/5]: REST and JAX-RS
Ad

Similar to Writing simple web services in java using eclipse editor (20)

PDF
Building A Simple Web Service With CXF
PPTX
1 app 2 developers 3 servers
PDF
Part 1 implementing a simple_web_service
PPT
Java EE 02-First Servlet
PDF
New Flash Builder 4 WSDL and HTTP Connectors
DOCX
58615764 net-and-j2 ee-web-services
PPTX
Jsp and Servlets
PPT
5) running applications
DOC
Unit5 servlets
PDF
Cloud and Ubiquitous Computing manual
PPTX
Mulesoft Soap Service
PDF
Configuring an application_server_in_eclipse
PPTX
Custom connector development using mule DevKit
PDF
Part 2 generating a client_from_wsdl
PPTX
Azure App Service for Windows Container
PDF
AWS CodeDeploy
PPTX
Background Tasks with Worker Service
DOCX
Weblogic 12c Graphical Mode installation steps in Windows
DOCX
12c weblogic installation steps for Windows
Building A Simple Web Service With CXF
1 app 2 developers 3 servers
Part 1 implementing a simple_web_service
Java EE 02-First Servlet
New Flash Builder 4 WSDL and HTTP Connectors
58615764 net-and-j2 ee-web-services
Jsp and Servlets
5) running applications
Unit5 servlets
Cloud and Ubiquitous Computing manual
Mulesoft Soap Service
Configuring an application_server_in_eclipse
Custom connector development using mule DevKit
Part 2 generating a client_from_wsdl
Azure App Service for Windows Container
AWS CodeDeploy
Background Tasks with Worker Service
Weblogic 12c Graphical Mode installation steps in Windows
12c weblogic installation steps for Windows

More from Santosh Kumar Kar (7)

PPTX
Smart home arduino
PPTX
Operating electrical devices with PIR sensor. No coding, No controller
PPTX
Temperature sensor with raspberry pi
PPTX
Pir motion sensor with raspberry pi
PPTX
Angular js for Beginnners
PPTX
Raspberry pi complete setup
PPTX
Introduction to spring boot
Smart home arduino
Operating electrical devices with PIR sensor. No coding, No controller
Temperature sensor with raspberry pi
Pir motion sensor with raspberry pi
Angular js for Beginnners
Raspberry pi complete setup
Introduction to spring boot

Recently uploaded (20)

PDF
Approach and Philosophy of On baking technology
PDF
TokAI - TikTok AI Agent : The First AI Application That Analyzes 10,000+ Vira...
PDF
Blue Purple Modern Animated Computer Science Presentation.pdf.pdf
PDF
Encapsulation_ Review paper, used for researhc scholars
PPTX
MYSQL Presentation for SQL database connectivity
PDF
KodekX | Application Modernization Development
PPTX
Programs and apps: productivity, graphics, security and other tools
PPTX
Detection-First SIEM: Rule Types, Dashboards, and Threat-Informed Strategy
PDF
Dropbox Q2 2025 Financial Results & Investor Presentation
PPTX
Digital-Transformation-Roadmap-for-Companies.pptx
PDF
Empathic Computing: Creating Shared Understanding
PDF
7 ChatGPT Prompts to Help You Define Your Ideal Customer Profile.pdf
PPTX
Big Data Technologies - Introduction.pptx
PDF
Optimiser vos workloads AI/ML sur Amazon EC2 et AWS Graviton
PPTX
Effective Security Operations Center (SOC) A Modern, Strategic, and Threat-In...
PDF
Build a system with the filesystem maintained by OSTree @ COSCUP 2025
PDF
Review of recent advances in non-invasive hemoglobin estimation
PDF
Reach Out and Touch Someone: Haptics and Empathic Computing
PDF
How UI/UX Design Impacts User Retention in Mobile Apps.pdf
PPT
“AI and Expert System Decision Support & Business Intelligence Systems”
Approach and Philosophy of On baking technology
TokAI - TikTok AI Agent : The First AI Application That Analyzes 10,000+ Vira...
Blue Purple Modern Animated Computer Science Presentation.pdf.pdf
Encapsulation_ Review paper, used for researhc scholars
MYSQL Presentation for SQL database connectivity
KodekX | Application Modernization Development
Programs and apps: productivity, graphics, security and other tools
Detection-First SIEM: Rule Types, Dashboards, and Threat-Informed Strategy
Dropbox Q2 2025 Financial Results & Investor Presentation
Digital-Transformation-Roadmap-for-Companies.pptx
Empathic Computing: Creating Shared Understanding
7 ChatGPT Prompts to Help You Define Your Ideal Customer Profile.pdf
Big Data Technologies - Introduction.pptx
Optimiser vos workloads AI/ML sur Amazon EC2 et AWS Graviton
Effective Security Operations Center (SOC) A Modern, Strategic, and Threat-In...
Build a system with the filesystem maintained by OSTree @ COSCUP 2025
Review of recent advances in non-invasive hemoglobin estimation
Reach Out and Touch Someone: Haptics and Empathic Computing
How UI/UX Design Impacts User Retention in Mobile Apps.pdf
“AI and Expert System Decision Support & Business Intelligence Systems”

Writing simple web services in java using eclipse editor

  • 1. Writing simple Java Web Services using EclipseAuthor:Santosh Kumar Karsantosh.bsil@yahoo.co.in
  • 2. Create a new Project Wizard to create a project.
  • 3. You need to select Dynamic Web Project so the deployment module can be deployed in a server. If for you it does not appear, below there is a checkbox [Show All Wizard], check in and then try.
  • 4. Two important task here before you click the Finish button are:1) Provide a project name for your web service application.2) Put a server configuration under Target Runtime.[NB: You can’t see Apache Tomcat under the list unless Add project to an EAR is disabled.]
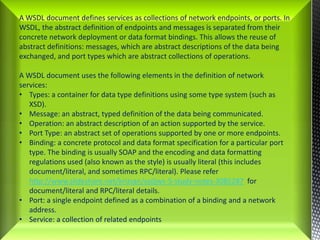
  • 5. A WSDL document defines services as collections of network endpoints, or ports. In WSDL, the abstract definition of endpoints and messages is separated from their concrete network deployment or data format bindings. This allows the reuse of abstract definitions: messages, which are abstract descriptions of the data being exchanged, and port types which are abstract collections of operations. A WSDL document uses the following elements in the definition of network services:Types: a container for data type definitions using some type system (such as XSD).
  • 6. Message: an abstract, typed definition of the data being communicated.
  • 7. Operation: an abstract description of an action supported by the service.
  • 8. Port Type: an abstract set of operations supported by one or more endpoints.
  • 9. Binding: a concrete protocol and data format specification for a particular port type. The binding is usually SOAP and the encoding and data formatting regulations used (also known as the style) is usually literal (this includes document/literal, and sometimes RPC/literal). Please refer http://www.slideshare.net/krizsan/scdjws-5-study-notes-3085287for document/literal and RPC/literal details.
  • 10. Port: a single endpoint defined as a combination of a binding and a network address.
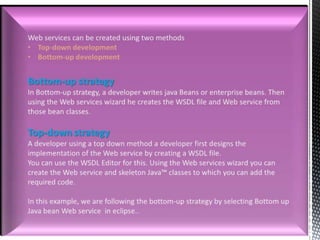
  • 11. Service: a collection of related endpointsWeb services can be created using two methods Top-down development
  • 12. Bottom-up developmentBottom-up strategyIn Bottom-up strategy, a developer writes java Beans or enterprise beans. Then using the Web services wizard he creates the WSDL file and Web service from those bean classes.Top-downstrategyA developer using a top down method a developer first designs the implementation of the Web service by creating a WSDL file. You can use the WSDL Editor for this. Using the Web services wizard you can create the Web service and skeleton Java™ classes to which you can add the required code.In this example, we are following the bottom-up strategy by selecting Bottom up Java bean Web service in eclipse..
  • 13. 1write your business implementation methods for the Server which can be invoked by a Client program.
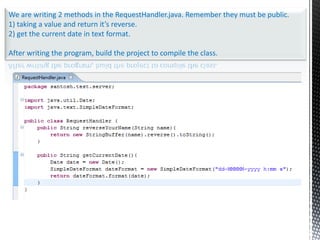
  • 14. We are creating the class as RequesetHandler.java in santosh.test.server package. Hope you know how to create a class in the source folder (src).
  • 15. We are writing 2 methods in the RequestHandler.java. Remember they must be public.1) taking a value and return it’s reverse.2) get the current date in text format.After writing the program, build the project to compile the class.
  • 16. 2Generate the WSDL for server.
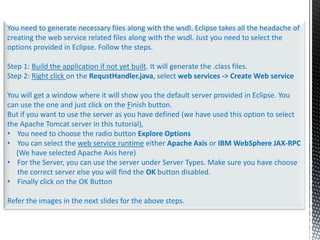
  • 17. You need to generate necessary files along with the wsdl. Eclipse takes all the headache of creating the web service related files along with the wsdl. Just you need to select the options provided in Eclipse. Follow the steps.Step 1: Build the application if not yet built. It will generate the .class files.Step 2: Right click on the RequstHandler.java, select web services -> Create Web serviceYou will get a window where it will show you the default server provided in Eclipse. You can use the one and just click on the Finish button. But if you want to use the server as you have defined (we have used this option to select the Apache Tomcat server in this tutorial), You need to choose the radio button Explore Options
  • 18. You can select the web service runtime either Apache Axis or IBM WebSphere JAX-RPC (We have selected Apache Axis here)For the Server, you can use the server under Server Types. Make sure you have choose the correct server else you will find the OK button disabled.
  • 19. Finally click on the OK ButtonRefer the images in the next slides for the above steps.
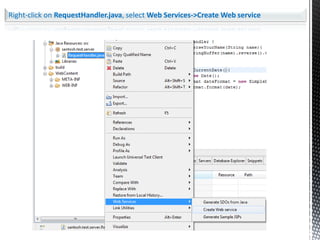
  • 20. Right-click on RequestHandler.java, select Web Services->Create Web service
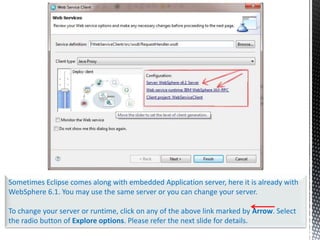
  • 21. Sometimes Eclipse comes along with embedded Application server, here it is already with WebSphere 6.1. You may use the same server or you can change your server. To change your server or runtime, click on any of the above link marked by Arrow. Select the radio button for Explore options (shown in next screen). Please refer the next slide for details.
  • 22. After selecting the radio button to Explore option, we have seletedUnder Web service runtime: Apache Axis
  • 23. Under Server: Tomcat v5.5 ServerThen click on OK button
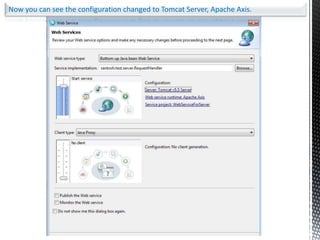
  • 24. Now you can see the configuration changed to Tomcat Server, Apache Axis.
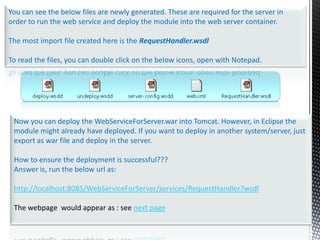
  • 25. You can see the below files are newly generated. These are required for the server in order to run the web service and deploy the module into the web server container.The most import file created here is the RequestHandler.wsdlTo read the files, you can double click on the below icons, open with Notepad.Now you can deploy the WebServiceForServer.war into Tomcat. However, in Eclipse the module might already have deployed. If you want to deploy in another system/server, just export as war file and deploy in the server.How to ensure the deployment is successful???Answer is, run the below url as:http://localhost:8085/WebServiceForServer/services/RequestHandler?wsdlThe webpage would appear as : see next page
  • 27. END OF SERVER MODULE
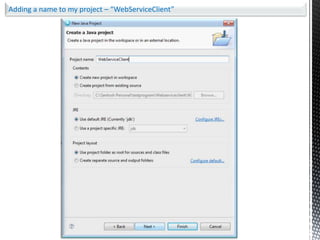
  • 29. Now we are going to write a very simple client application. This is a standalone program, so when we are creating project, I added only the project type as Java Project. Follow the subsequent slides for the steps.
  • 30. Adding a name to my project – “WebServiceClient”
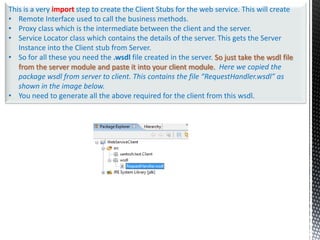
  • 31. This is a very import step to create the Client Stubs for the web service. This will create Remote Interface used to call the business methods.
  • 32. Proxy class which is the intermediate between the client and the server.
  • 33. Service Locator class which contains the details of the server. This gets the Server Instance into the Client stub from Server.
  • 34. So for all these you need the .wsdl file created in the server. So just take the wsdl file from the server module and paste it into your client module.Here we copied the package wsdl from server to client. This contains the file “RequestHandler.wsdl” as shown in the image below.
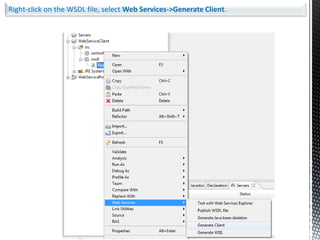
  • 35. You need to generate all the above required for the client from this wsdl.Right-click on the WSDL file, select Web Services->Generate Client.
  • 36. Sometimes Eclipse comes along with embedded Application server, here it is already with WebSphere 6.1. You may use the same server or you can change your server. To change your server or runtime, click on any of the above link marked by Arrow. Select the radio button of Explore options. Please refer the next slide for details.
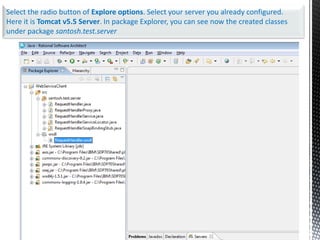
  • 37. Select the radio button of Explore options. Select your server you already configured. Here it is Tomcat v5.5 Server
  • 39. Select the radio button of Explore options. Select your server you already configured. Here it is Tomcat v5.5 Server. In package Explorer, you can see now the created classes under package santosh.test.server
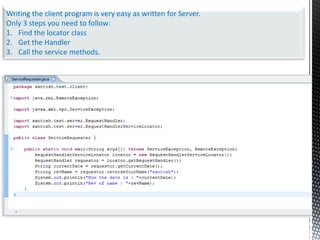
  • 40. Now it is the time to write your client application to call the business methods from Server. We created “ServiceRequester” under santosh.test.client package.
  • 41. Writing the client program is very easy as written for Server.Only 3 steps you need to follow:Find the locator classGet the HandlerCall the service methods.
  • 42. You can simply run the client program, the main() method will execute and call the service methods.
  • 43. You can see this presentation athttp://javacompanionbysantosh.blogspot.com/orhttp://www.slideshare.net/skkar2k2/writing-simple-web-services-using-eclipse-editor
  • 44. Send your queries tosantosh.bsil@gmail.com